#flatchristmastree
Text
DIY Flat Christmas Tree, Save space with an easy tree
Today I will be sharing with you my Easy DIY Flat Christmas Tree. And I'm not joking when I say Easy!!
So it´s that time of year and for the longest time, I have been dreaming of a DIY Flat Christmas Tree.
And why am I dreaming so and yarning for a cool DIY Flat Christmas Tree you may ask.
Many reasons actually, I have three cats, the normal ones take up space and I find the flat ones super cool and more.
So as I was working earlier this week, I was wondering if I would finally make the time to create my dream Christmas tree or at least attend to do so. When I remembered that I have a wood wall mount, for old Tekk shelves ( Tekk is what we call the wood in Iceland, it was thought to be really trendy at the time and was popular in Icelandic homes. ) The shelf wall mounts and have holes in them, giving you endless options in placement of your shelves.
Perfect for making my Christmas tree. My first thought was for this was either to cut some thick net wire. And simple screw in some hooks. But since I had this laying around and it already had holes I suited my needs perfectly, I decided to use that and some thick wire I had one hand.
About this post!
November 11, 2017, And 19 Comments
Yes, Re-posting an old and popular post, after it got delete by mistake in my move to a new server. I can't have my most popular post missing from my site, can we?
I only had that post shared 106430 times. Nobb not a little mad about losing that date. Nob, nob. But Back to the main point of this blog post.
First step
I looped some wire throw the holes in the top end of my sticks so I would have the option of hanging the tree upon my wall, and obviously, the wire helps to keep the stick in the right place. So when I´m satisfied that the basic frame is like I want it. I cut up some wire that is long in of to go throw the whole of my stick and loop around my fake Christmas garland. Having pre-drilled holes makes this a piece of cake.
Second Step
Adding the wire I have cut down to make this go quicker I ad wire every 10 cm. I want my tree to be thick so.
Starting at the top, and leaving a small bush so I can bend some of the ends of the Christmas garland to hold my Christmas topper. I keep going back and forth on til the Christmas garland has gone as long as I wanted to go. I used about four garlands in total, each around 2 meters long.
Third Step
Simply add some Christmas lights and some decorations and you are done.
The best part of this tree is that I can hang it on the wall, making it kitty safe.
And I'm loving how this came out.


I hope you like my small step by step process on how I made my flat Christmas Tree if you like it I hope you share and let me know if you want me to start doing more of personal DIY blogs.


Re-post update:
And let's hope I don't lose this one again. I think I may have had mild chest pain. And to think I just figured out that this pretty was missing from my site. I still use it and it still looks just as good as the first time I put it up. But I think I may do a different twist on it next Christmas. Just to spies things up.
Think the question at the moment is how many versions can you do of a DIY Flat Christmas Tree?
On til next time.
Read the full article
#Christmasdecor#christmasdecorideas#christmasdoordecoratingideas#ChristmasRoomDecor#christmasroomdecoratingideas#Christmastree#Christmastreedecor#Christmastreediy#christmastreeideasforsmallspaces#christmastreethathangsonthewall#christmastreesforsmallspaces#christmaswalldecor#diy#DIY-Crafting#diychristmasdecorations#DIYFlatChristmasTree#Doityourself#easy#engineeryourspace#FlatChristmasTree#how-to#shelfwallmount#smallfakechristmastree#spacesaverchristmastree#spacesavingchristmastree#stepbystep#tutorial#wallchristmastreeideas#wallhungchristmastree#walltree
0 notes
Photo
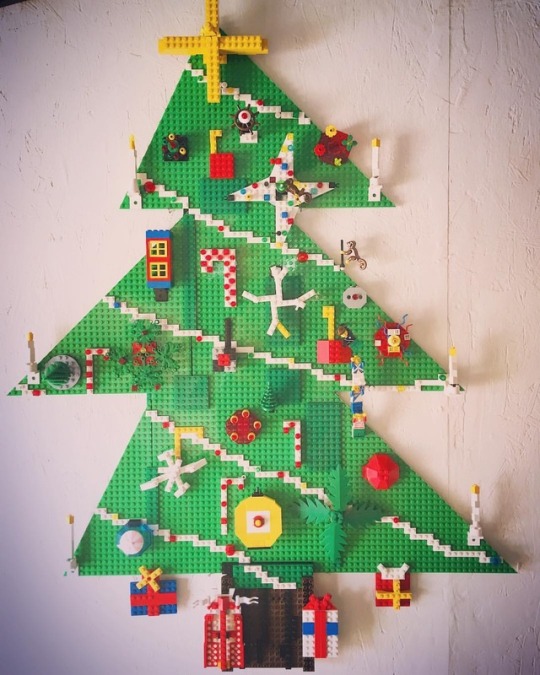
Oh LEGOtree, oh LEGOtree, how bumpy are thy branches! The greenest green I’ve ever seen, on the wall you hang for my holiday scene. Oh LEGOtree, oh LEGOtree, how bumpy are they branches! . . . #lego #legotree #christmaslego #flatchristmastree #tinyhousechristmas #diychristmastree #2dchristmastree #legostagram #legoideas https://www.instagram.com/p/BrO-BrKFEo_/?utm_source=ig_tumblr_share&igshid=1t190u6u8s8mk
#lego#legotree#christmaslego#flatchristmastree#tinyhousechristmas#diychristmastree#2dchristmastree#legostagram#legoideas
0 notes
Last Seen Blogs

kf14wxbw-blog
Insurance


quadrantmodelquotes
Quadrant Model Quotes from 2013 Lectures

nanuhaqiq
Untitled

harryandmeghan0-blog
Harry And Meghan