#filling of the voids and insulation of dry food storages and for a
Text
#Dolphin PU Foam for 15 months from the date of manufacturing.#Where is it used?#Doors and windows assembly is the most effective utilization region of Dolphin PU#Foam. It is used for the insulation of electrical installations#hot and cold water pipes#adhesion of roofing tiles#tightness of terraces#concrete shear wall buildings#industrial roof insulation#cold storage houses#and ice plants#decks of ships and#yachts#filling of the voids between external thermal insulation materials#adhesion of#insulation materials#filling of the voids and insulation of dry food storages and for a#lot more purposes.#The biggest benefit of PU foam: keeps the pests away#PU foam is made up of self-expanding material and hence offers the biggest#advantage of filling up even the hard-to-reach cracks and crevices. These small#holes are the favorite places for the pests to grow and multiply. By covering these#holes with PU foam#you get protection from insects and other pests.#Special features of Dolphin PU foam by Al Muqarram#• Durable airtight seal: prevents air infiltration and energy loss#• High insulating value saves energy and money.#• Environment friendly: contains no CFC’s#no HCFC’s#ozone friendly
1 note
·
View note
Photo
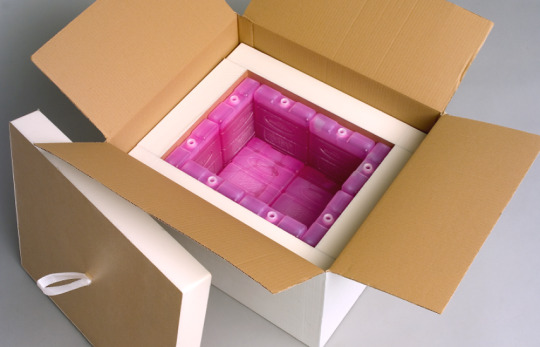
How to Pack Temperature Sensitive Food Products
Covid changed the way that we purchased our food. Many of us turned to supermarkets for home deliveries, ordered food care packages for elderly relatives, foodie treats to comfort ourselves or recipe boxes to break the monotony and inspire culinary adventure.
Food retailers were forced to find new routes to market – independent stores switched to offering local food deliveries or instore collection, with many taking the plunge to open online stores offering nationwide delivery.
If you are considering selling your culinary delights online and sending them through UPS, Fedex or USPS network, you need to consider the length of the journey and the impact it will have on your produce.
If your goods are perishable, maintaining consistent temperatures in transit may be problematic. They will probably encounter more than one distribution warehouse and move between multiple vehicles before reaching their destination. If your product is temperature sensitive, you can stabilize their journey by using thermal insulated packaging.
Temperature controlled packaging will ensure that your required temperatures are maintained for up to 48 hours if goods are packed correctly. Thermal packaging will help you achieve either ambient, warm or cold temperatures.
Preparing your products for their journey. When shipping temperature sensitive product, it is important to have a controlled packing process to make sure your goods reach the customer within the desired temperature range.
Have your packaging primed ready to fill – boxes should be pre-assembled and lined ready to fill, with coolant and tape at hand. This minimizes the amount of time products sit outside of refrigeration waiting to be packed.
Your chilled products should not sit outside of cold storage for longer than 20 – 30 minutes before being packed. If the temperature of your products reduces significantly, there is a risk that it will warm the coolant temperature, which will reduce the viable transit time.
Low temperatures can be better maintained if all gaps between your products are filled with a void fill material. Place your coolant at the top of the pack, this allows the cool air to flow down onto the goods.
As a rule of thumb, the following coolant should be used:
For goods to arrive ambient – ice sheets that have been conditioned to 65° will help prevent the temperature from rising or falling quickly.
For goods to arrive chilled – use ice sheets or gel packs.
For goods to arrive soft frozen – use gel packs or duration ice sheets.
For goods to arrive frozen – dry ice should be used.
In order to extend the length of time your goods are at their desired temperature, packages ready for shipping should be stored in a refrigerated / freezer environment until the delivery vehicle is ready to load.
If you would like to find out more about temperature controlled packaging for your perishable items, call 813 242 6995 our team of experts are on-hand to help.
0 notes
Text
35 Money-Saving Household Habits
Image: Anderson The Fish
Your house gives you so much: security, pride, shelter. With all that on the line, it's easy to assume the costs of keeping it up just are what they are. But wait. There are plenty of expenses that are simply a waste.
Here's how to save money each month without putting a dime of home value at risk.
#1 Clean Your Light Bulbs
What? Who does that? Well, smart people (who want to about shrewd, small ways to save money). A dirty bulb emits 30% less light than a clean one. Dust off both the bulb and fixture, and you might be able to cut back on the number or brightness of lights in each room without noticing any difference.
#2 Keep Your Fridge Full
Solid items snuggled together retain the cold better than air and help keep each other cold — requiring less energy overall. Leaving town for awhile and fridge is empty? Fill voids in the fridge or freezer with water bottles.
#3 Switch Your Bulbs to LED’s
By replacing just five of your most-used incandescent bulbs with uber-efficient light-emitting diode (LED) bulbs, you could save $75 a year on your energy bill.
And LED’s last 15 to 20 times longer than incandescent, so you won't have to replace them nearly as often.
#4 Use Power Strips
Here's how to save money on bills -- a lot of it. Appliances like coffee makers, TVs, and computers continue to suck power even when they're off — which can cost you $100 a year. And did you know the AC adapter for your laptop keeps drawing power even if the laptop isn't plugged in? Stop this slow money burn by connecting them to an easy-to-switch-off power strip.
#5 Use a Toaster Oven When Possible
Toaster ovens use 50% to 70% less energy than a full-size oven.
#6 Set Your Water Heater to 120 Degrees
Hot water heaters often come with a factory setting that's higher than you need. You'll cool your water heating costs by 3% to 5% every time you lower the temperature setting by 10 degrees.
#7 Insulate Your Water Heater
For $30 or less, an insulating jacket or blanket can shave 7% to 16% off your water heating costs for the year. Just make sure to follow the manufacturer's directions to avoid creating a fire hazard.
#8 Wash Clothes in Cold Water
Image: Anna Rodé Designs
Just switching from hot to warm water will cut every load's energy use in half, and you'll reap even more savings taking the temp down to cold. And don't worry: Your clothes will get just as clean from cold water, thanks to the efficiency of today's detergents (except in the case of sickness; you'll want hot water and bleach then).
#9 Use the Right Dryer Cycle
If you're using a high-heat setting for each load, you could be using more energy than you need. Almost all fabrics can be dried with a lower heat setting, such as the permanent press setting. It uses less energy and has the added bonus of extending the life of your fabrics. Save the higher heat for items such as sheets and towels.
#10 Use Homemade Cleaners
Many commercial products rely on baking soda or vinegar for their cleaning power, so why not make your own? Most homemade cleaners cost less than $1.
#11 Cut Back on Laundry Detergent
Never mind the barely visible measurement lines in the cap: You typically only need a tablespoon of detergent. And, clothes actually get cleaner when you use less, because there's no soap residue left behind.
#12 Ditch Disposable Sweeper and Mop Head
Stop throwing money away every time you clean! Refill your Swiffer Sweeper with microfiber cloths. Just cut to size and use them dry for dusting or with a little water and floor cleaner for mopping. Or switch to a microfiber mop with a washable head.
#13 Stop Buying Dryer Sheets
Another easy swap? Give up your dryer-sheet habit (about $7 for 240 loads) in favor of wool dryer balls (about $10 for six, which last more than 500 loads each). Of course, depending on your laundry preferences, you can always just go without either.
#14 Cut Scouring Pads In Half
Most clean-ups don't require a full one.
#15 Don't Rinse Dishes
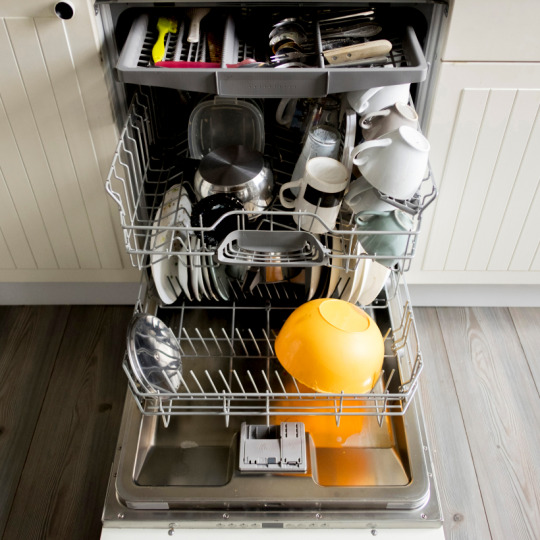
Image: Cavan Images/Offset
Two minutes of rinsing with the faucet on full-power will consume 5 gallons of water — the same amount efficient dishwashers use during an entire cycle. Shocking, right? And it's an unnecessary step, since most newer models are equipped to remove even stubborn food debris. Just be sure to clean the dishwasher trap regularly to keep your dishwasher running efficiently.
#16 Keep a Pitcher of Water in the Fridge
You won't have to waste time and money running the faucet, waiting for it to get cold enough for a refreshing sip.
#17 Set a Timer for the Shower
The average American takes an eight-minute shower and uses about 17 gallons of water. It's easy to linger, so set a timer for five minutes. Or try this more entertaining idea: Time your shower to a song or podcast segment.
#18 Install Low-Flow Fixtures
In addition to water-conserving practices, low-flow showerheads, which cost less than $10, and other fixtures can drop your water use in the shower by 43%.
#19 Hack a Water-Hogging Toilet
If you don't have a water-conserving toilet, there are water-saving retrofitting kits that could yield about $110 in savings every year. Or place a half-gallon milk jug filled with water into the tank — in the corner and away from the flapper and ball-cock assembly. Every time you flush, you'll save.
#20 Close Closet Doors
Each closet and pantry may hold a paltry amount of square footage, but you're still heating and cooling it. Add up all the storage space, and you've got the equivalent of a small room. Shut the doors to keep the conditioned air out.
#21 Program the Thermostat
Program your thermostat to turn the heat down by 3 to 5 degrees when you're not home and at night, and set it to bump the temperature up by the same amount when the A/C is cranking. You'll save $10 to $20 a month and never feel the difference.
#22 Don't Crank the Thermostat Up or Down Too Far
Varying the setting by 10 or more degrees when you're gone for work or over the weekend is overkill. Your HVAC system will have to work overtime to get back to the ideal temperature, erasing your savings.
#23 Use Fans Year-Round

Image: Iaobzjls/Getty
Ceiling fans can reduce your summer cooling costs and even reduce winter heating bills — but only if used correctly. Flip the switch on the base to make the blades rotate counterclockwise for a cooling effect or clockwise to help distribute heat in the winter. And in the warmer months, an attic or whole-house fan can suck hot air out and help distribute cooler air so you can give the A/C a little break.
#24 Caulk or Weatherstrip Around Doors and Windows
Caulk may not have the charisma of something like solar panels, but using it to seal air leaks around doors and windows will deliver immediate savings rather than a 14-year payback. You'll spend $3 to $30 and save 10% to 20% on energy bills.
For gaps between moving parts that can't be caulked, add weatherstripping.
#25 Add Insulation
This is a bigger weatherizing project than caulking or weatherstripping, but it could yield more than $500 in yearly savings. While your home should be properly insulated from the roof down to the foundation, prioritize the attic, under floors above unheated spaces, around walls in a heated basement and in exterior walls.
#26 Plant Shade Trees

Image: Liz Foreman for HouseLogic
Block the summer sun to lower cooling costs. Planting one shade tree on the west side and one on the east side of your home can shield your home from the sun during the summer months (but avoid south-side trees, which block winter sun). By the time they're 15 years old, these two trees can reduce your energy bill by 22% , while adding value to your home.
#27 Use Curtains as Insulation
Another way to practice energy-saving passive heating and cooling? Open curtains on sunny windows in the winter and close them up in the summer.
#28 Cool with a Cross Breeze
On a breezy day, open a window on the side of your house that's receiving the breeze, then open another on the opposite side of the house. Make sure the window on the receiving side is open a little less than the exhaust side to accelerate the breeze. You can also use a fan if there's no breeze outside.
#29 Check Your Mortgage's PMI
If your mortgage was for more than 80% of your home's purchase price, you could be paying more than $50 a month, and as much as $1,000 a year, for private mortgage insurance (PMI). So as soon as you have at least 20% equity in your home, contact your lender to terminate the policy — they aren't necessarily required to notify you when you reach that threshold.
Another option for ditching PMI? If your credit score or debt load has improved since securing your mortgage, look into refinancing with more favorable terms.
#30 Check Your Home Insurance for Savings
Your homeowners insurance should change as your life changes. Buying an automatic generator or installing security alarms could reduce your premium by 5% or more.
Bundling your home and auto coverage could save even more — up to 20% off both policies. But the point is to compare and do a price check to see if you can save.
Surveys have found you could be paying a lot more than what another insurer would charge for the same coverage. So you could save by going with a new company, or by using their quote to bargain with your current provider.
#31 Borrow Tools Instead of Buying
How often are you going to use that $600 demolition hammer once you remove your bathroom tile? Not so much? Rent it from a home-improvement store for a fraction of the cost. Be sure to do the math for each tool and project though; sometimes the rental price is high enough to justify buying it.
Or join a tool lending library or cooperative to borrow tools for free or much less than retail stores.
#32 Cut Back on Paper Towels
Two rolls of paper towels a week add up to about $182 every year! Instead, try machine-washable cotton shop towels. They clean up messes just as fast and cost less than $2 for five. Save paper towels for messes that need to go straight into the trash, like oil and grease.
#33 Stop Buying Plants for Curb Appeal Every Year

Image: Marna McGlinn of Marna McGlinn Ceramics
A pop of color in your landscaping perks up your curb appeal. But instead of wasting household funds on short-lived annuals, invest in perennials that will keep giving for years to come.
#34 Water Grass in the Morning to Save on Your Water Bill
Turning the sprinkler on at midday is kinda like watering the air — especially when the mercury soars. Lose less to evaporation by watering during cooler hours (but avoid overnight watering, when too-slow evaporation can invite fungus growth).
#35 Make Your Yard Drought-Tolerant for Long-Term Savings
Save $100 or more yearly by replacing water-hogging plants and grass with drought-tolerant and native species, and beds of rock or gravel. You'll save time on maintenance, too.
Adopt a few of these home tips to find a bit more cash each month.
View original post here: Read or visit houselogic.com for more articles like this.
© Copyright 2020 NATIONAL ASSOCIATION OF REALTORS®
Used by permission as a REALTOR®
0 notes
Text
Dolphin PU Foam
Dolphin PU foam is a high-quality adhesive foam with excellent bonding strength that is applicable to a wide range of surfaces. It is commonly used in buildings to fill and enclosed spaces between roof tiles, concrete slabs, wall cavities, drilled holes, frame construction, gaps around windows, and another substrate. It’s a single component, moisture-curing, and self-expanding polyurethane foam.
Dolphin PU foam by Al muqarram is worth every penny. It has remarkable weather resistance and comes with the benefit of multi-purpose use. Polyurethane Foam reacts swiftly with moisture in the air and expands after application. It adheres exceedingly well to a wide variety of surfaces including wood, concrete, plaster, plumbing, etc. thanks to its great adhesive power and once you start using Dolphin PU foams, there is no going back.
Application instructions
Shake the PU foam can vigorously for 45 to 60 seconds before and between uses.
Clean the surface from dirt, greases, and dust to facilitate maximum adhesion. For metallic surfaces, get rid of rust.
Protect adjacent surfaces with tape or plastic film.
Remove the seal cap and put clean nozzle spray.
Hold the cylinder upside down and dispense slowly. Spray the product in thin layers while moving your hand in one specific direction.
Fill the opening only 50 % full to allow proper expansion. It usually takes 10 minutes for the hoam to cure properly.
Wait for 1 hour and then use a knife to smooth and trim excess foam. Recommended single layer thickness is 5-8 cm. You can apply several layers with a minimum of a 12 hours gap.
Overfilling and PU foam drops can be cleaned with paint thinner acetone, Toluene, or Nail polish remover.
It is advisable to use the entire quantity of a PU foam can within 2 hours of opening the can to avoid clogging of cured material inside the trigger and straw line or gun lines.
FOR SMALL GAPS: Dispense PU foam slowly and fill the gap with 50 % of volume and allow the foam to expand and fill the rest of the gap.
FOR BIG GAPS: Use multiple coats of PU foam. Sprinkle a small amount of water between layers to speed up the curing process.
Storage and shelf life Dolphin PU foam has quite a long shelf life provided you maintain good storage conditions. Always store the can in an upright position away from exposure to open flame, direct sunlight, and temperature exceeding 50 degrees celsius. Excessive heat can cause premature aging of components resulting in shorter shelf life. Keep away from (Strong) acids and (strong) bases.
Store in a cool, dry, and well-ventilated area and you will maintain the shelf life of Dolphin PU Foam for 15 months from the date of manufacturing.
Where is it used?
Doors and windows assembly is the most effective utilization region of Dolphin PU Foam. It is used for the insulation of electrical installations, hot and cold water pipes, adhesion of roofing tiles, tightness of terraces, concrete shear wall buildings, industrial roof insulation, cold storage houses, and ice plants, decks of ships and yachts, filling of the voids between external thermal insulation materials, adhesion of insulation materials, filling of the voids and insulation of dry food storages and for a lot more purposes.
The biggest benefit of PU foam: keeps the pests away
PU foam is made up of self-expanding material and hence offers the biggest advantage of filling up even the hard-to-reach cracks and crevices. These small holes are the favorite places for the pests to grow and multiply. By covering these holes with PU foam, you get protection from insects and other pests.
Special features of Dolphin PU foam by Al Muqarram
Durable airtight seal: prevents air infiltration and energy loss
High insulating value saves energy and money.
Environment friendly: contains no CFC’s, no HCFC’s, ozone friendly, non-toxic PU foam
Available in two sizes: 500 ml and 750 ml metal cans.
One thing you will never get stuck with after buying this can of Dolphin PU foam by Al Muqarram is REGRET. So, stop waiting and make your first purchase today!
Information
Health and Hygiene
VIEW CATALOG
NEWSLETTER SIGN U
0 notes
Last Seen Blogs