#edit resources
Text

𓈒ིུ ✿˖ 𓈒ིུ ✿˖ 𓈒ིུ ✿˖ 𓈒ིུ ✿˖ 𓈒ིུ ✿˖ 𓈒ིུ ✿˖ 𓈒ིུ ✿˖
1. AquilineTwo ㅤㅤㅤㅤㅤ ㅤㅤㅤㅤㅤㅤㅤ2. Byron
3. Essays 4. RomanAntique-Italic
5. RomanAntique 6. OldNewsPaperTypes
#𝗉𝗎𝖽𝗋𝗂𝖽𝖺 𝗇𝖾𝗐 𝗉𝗈𝗌𝗍 : ✿#𝓐́𝓷𝓰𝓮𝓵 𝓢𝓲𝓷 𝓒𝓲𝓮𝓵𝓸 ㅤ❤︎ㅤ(𝟤𝖮𝖮𝟦)ㅤㅤㅤㅤㅤ#𓈒ིུ ✿˖ 𓈒ིུ ✿˖ 𓈒ིུ ✿˖#⠀⠀⠀⠀⠀⠀⠀⠀⠀⠀⠀⠀⠀⠀⠀⠀⠀⠀⠀⠀⠀⠀⠀⠀⠀⠀⠀⠀⠀⠀⠀⠀⠀⠀⠀⠀⠀⠀⠀⠀⠀⠀#active rp#free fonts#rp resources#carrd resources#edit resources#phonto#ig story#ig edit#ig stan#kpop rp#rp theme#fakeland
784 notes
·
View notes
Text


jagged, crystalized and pixelated tumblr banner masks!
for the 2 anons that asked!
okay to repost, just dont claim as yours. and free to use (its what they were made for, duh!)
keep in mind gifs dont mesh well with translucent colors if youd like to use these with them :0
#🌫️ i know what you dread | creations#anonymous#carrd resources#rentry resources#rentry#web graphics#rentry tutorial#rentry inspo#rentry gif#rentry decor#rentry graphics#rentry template#image masks#edit resources#editing resources
460 notes
·
View notes
Text


✧ 、 🌿 ˚ ✿ ◞

#ㅤㅤㅤㅤ. ׅ ryeins ✿#div cr own#kpop moodboard#fresh moodboard#nature moodboard#cottagecore moodboard#ive moodboard#ive leeseo#coquette moodboard#pink moodboard#kpop icons#gg moodboard#soft bios#messy moodboard#bios#short locs#coquette dividers#green moodboard#lesserafim layouts#edit resources#locs#lesserafim#vintage moodboard#alternative moodboard#y2k moodboard#kpop#kpop headers#layout#moodboard#colorful moodboard
95 notes
·
View notes
Text
Transparent default icons for all ur pfp needs


#default icons#pfp#profile picture#png icons#transparent#transparent png#Art#edit#edit resources#art resources
32 notes
·
View notes
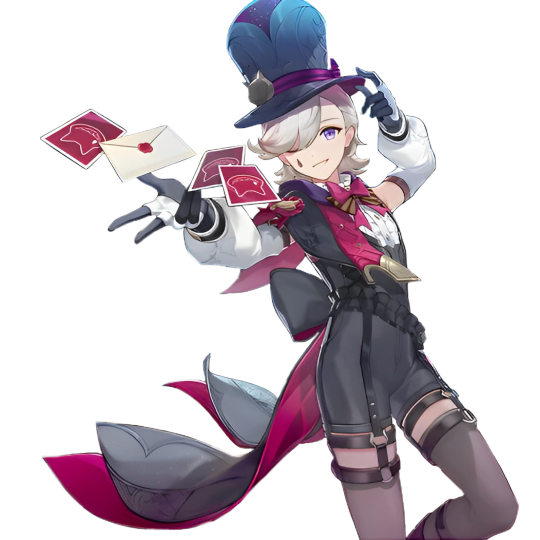
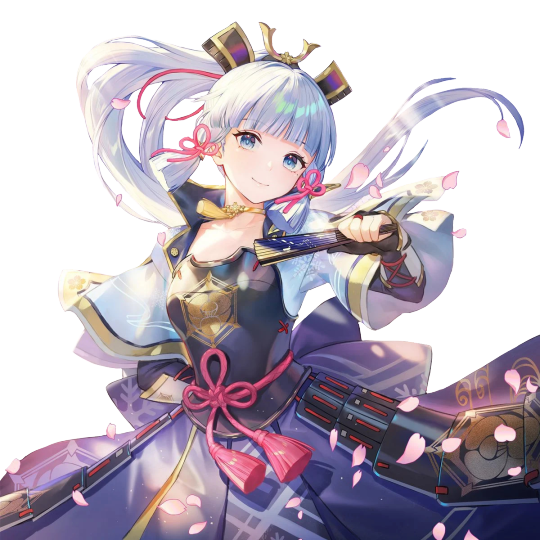
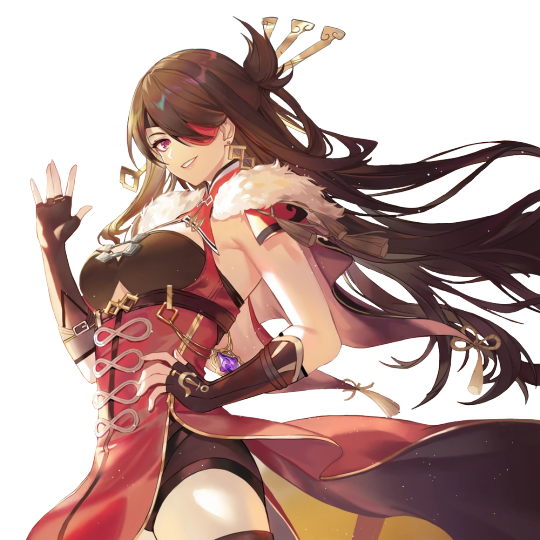
Text

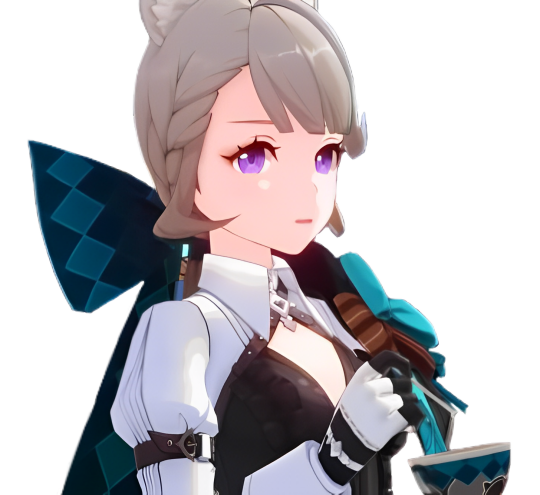


Lynette (+ a bonus lyney) Transparents/Renders
nobody requested, self indulgent! we needed more transparents for her, so thought we'd make and then share them. we hope you can make use of them!
feel free to use with credit as long as you aren't on our dni, but don't claim as your own! like/reblog if you save or enjoy!
#genshin#genshin impact#genshin impact edit#genshin impact transparent#lynette#lynette genshin#genshin render#edit#fandom edit#edit blog#edit resources#[our edits]#[andromeda🌸💫🌈]#[our kins]
87 notes
·
View notes
Text

♡ 〜 PINK CAKE
* Reblog + Credit to use.
* Will need to be adjusted personally for use on darker skinned characters
* Pro.ship + Rad.queer, please do not interact or use.
* Read pinned before interacting.
#— psds#f2u psd#psd#psd coloring#pink psd#pastel psd#psd f2u#psd resources#edit resources#bandori#aya maruyama#himari uehara
19 notes
·
View notes
Text

╰┈➤ sinking adolescence. a psd by ii-nandesu
info && rules in pinned ⌇ download link in source.
#my post ♡#psd#psds#free psd#free psds#psd coloring#free psd coloring#psd download#free psd download#psd filter#free psd filter#ii-nandesu#photoshop#photopea#edit resources#dailypsd#support content creators#soft psd#purple psd#blue psd#pink psd
56 notes
·
View notes
Text

paranoid.psd by sunshinepsds
this is a premium download, so you must buy it to have access to the psd file. you can buy on deviantart (3.25/260 points) or on payhip and ko-fi (2.60)
if you use, put @sunshinepsds or #sunshinepsds in your post, always give credits! don't claim as yours or share/reupload.
(made on photopea)
#coloring#brown psd#beige psd#vintage#vintage psd#vintage moodboard#beige moodboard#resources#edit resources#premium download
48 notes
·
View notes
Text


VARIOUS BOTTOM GRADIENT FOR EDITING !
you can use this without credits !
#editing help#editing#edit resources#resources#aesthetic headers#aesthetic layouts#aesthetic icons#genshin impact layouts#project sekai layouts#arknights layouts#mha layouts#mha icons#genshin impact icons#project sekai icons#my resources#☆ . my edits
77 notes
·
View notes
Text

jelly text tutorial! (works with shapes as well)
what you need: ibis paint x, premium or free version doesnt matter
step 1: color
yes we're starting with color! I highly suggest using multiple colors for a prettier finish. I prefer parallel gradiation but as long as its blurry anything should look nice. pick analogous colors for the best result.

step 2: write the text or draw/import the shape.
as it says! if youre drawing it, make sure its on a new layer above the gradient! I suggest using rounder, bubblier fonts/shapes, one of my favorites to use is starborn on all uppercase. the color you use does not matter as it will be the background color in a short bit
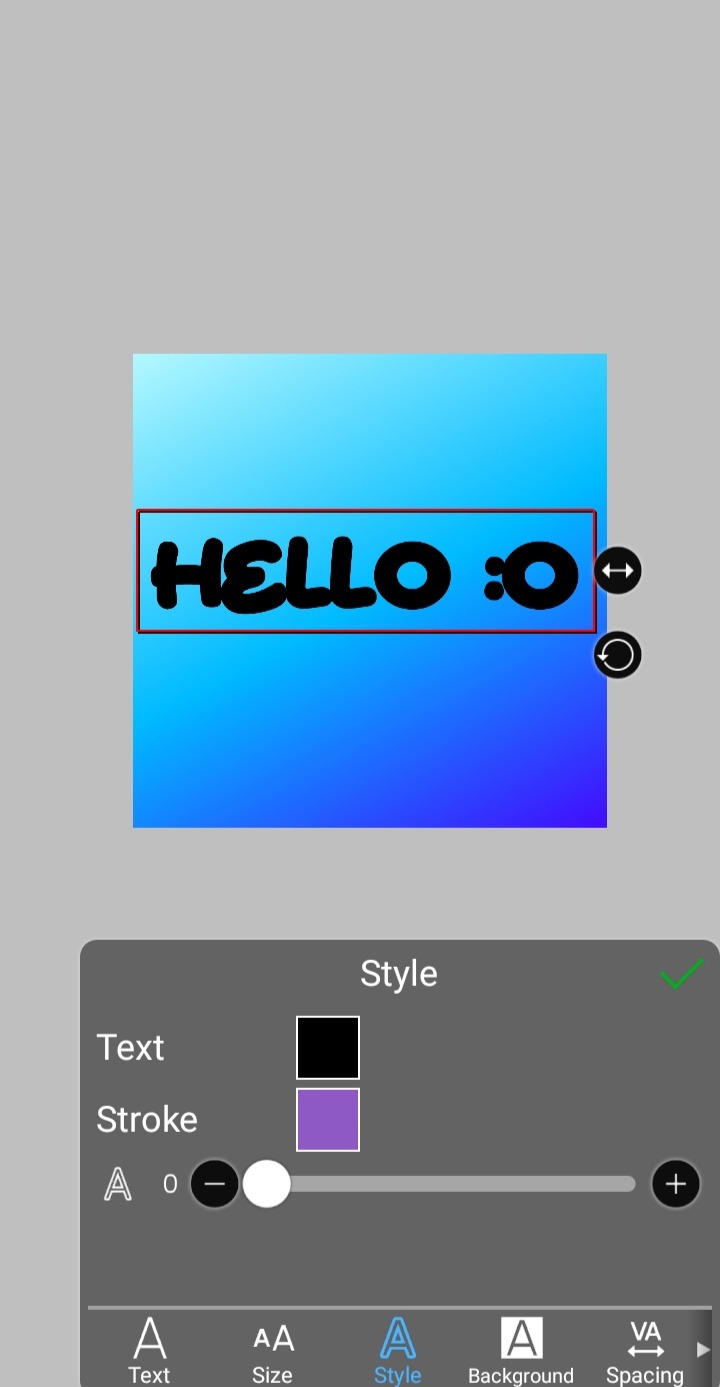
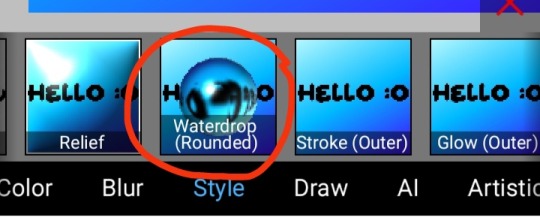
step 3, the jellificationing
this little friend called "water drop (rounded)" in effects under style is your best pal. its here to help you and make the process so much easier.
so just press it and fiddle around with it until you're happy with the result.
step 4 (optional): refracting
to help it make look more 'realistic' I tend to add another layer of the water drop. to do this I simply copy the previous one and go do the same effect on the top layer
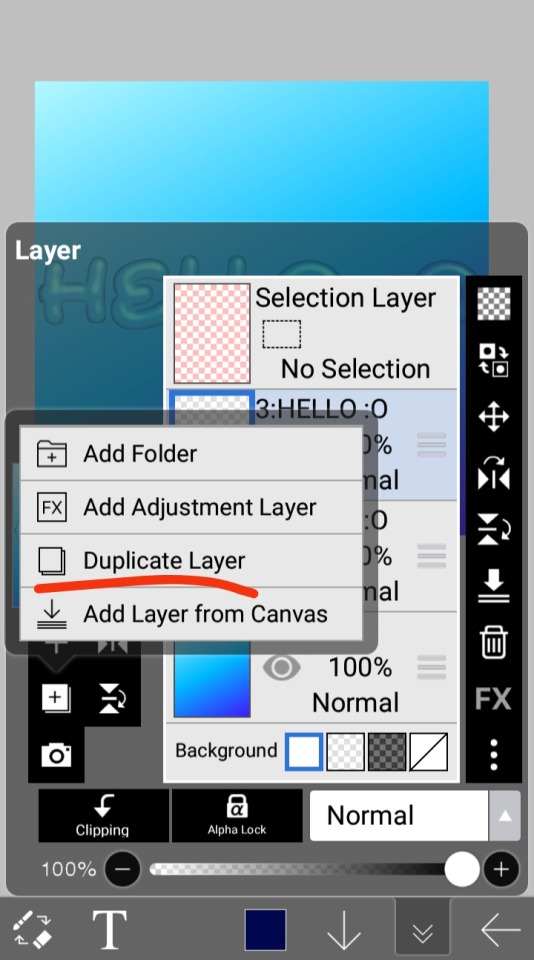
step 4.5: tips
you need to make sure the refractive index for the second one is turned down all the way, or itll look weird, streaky, etc. make sure the highlight and highlight size settings are lower than the previous time you used this effect. and make sure the little sun symbol (the light source) is on the edge of the opposite direction of the previous time you used the effect. so if the first layer of jelliness had the light source coming from the top right, the second layer should br on the very edge of the bottom left.

step 5: begone, background
yeah, we're done with that, this will also be the big reveal of the final image

and then you just crop to fit and then save as a transparent
bam! heres the final thing!

I dont know how good I am at explaining but I hope this helped! if youre confused dont be afraid to ask!
#🌫️ i know what you dread | creations#rentry#rentry inspo#rentry resources#editing resources#editing#editing tutorial#edit tutorial#edit resources#rentry decor#rentry graphics#carrd resources#web graphics
345 notes
·
View notes
Text

⟡ 、 🍽️ ˚ ❥ ◞


⟡ 、 🥣 ˚ ❥ ◞


#ㅤㅤㅤㅤ. ׅ ryeins ✿#div cr own#kpop moodboard#fresh moodboard#food moodboard#chips moodboard#haerin moodboard#newjeans haerin#blue moodboard#brown moodboard#kpop icons#gg moodboard#soft bios#messy moodboard#bios#short locs#coquette dividers#green moodboard#newjeans moodboard#edit resources#locs#lesserafim#vintage moodboard#alternative moodboard#y2k moodboard#kpop#kpop headers#layout#moodboard#colorful moodboard
113 notes
·
View notes
Photo
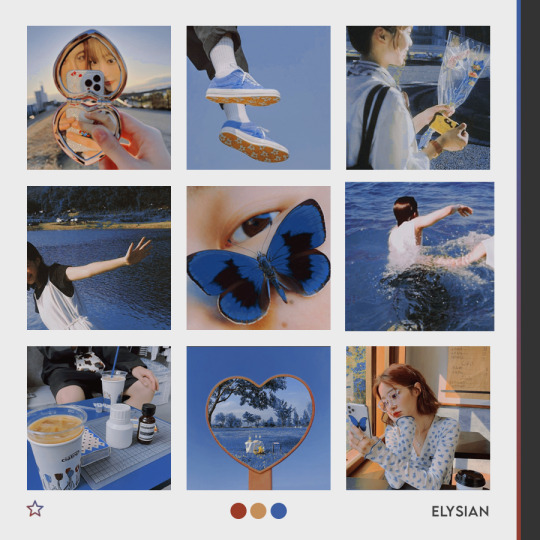
ELYSIAN.PSD — © NOIRPSDS.
download: this is a premium coloring so you must buy it to have access to the file. it's available for purchase on deviantart ($3.50) and payhip ($3.00).
this psd was made using photoshop cc and contains color lookup.
DEVIANTART | KO-FI | PAYHIP
#noirpsds#makerleague#dailypsd#psd coloring#psd coloring download#soft psd#aesthetic#vibrant#blue#orange#moodboard resources#edit resources#psd for icons#psd for sale
83 notes
·
View notes
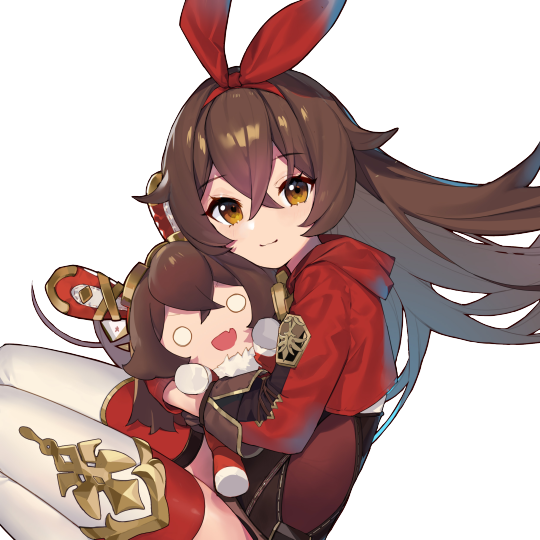
Text

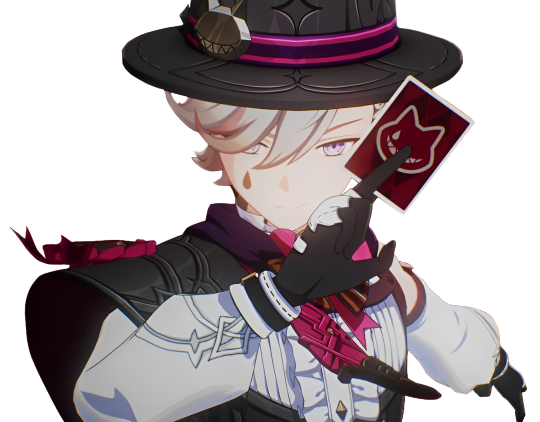


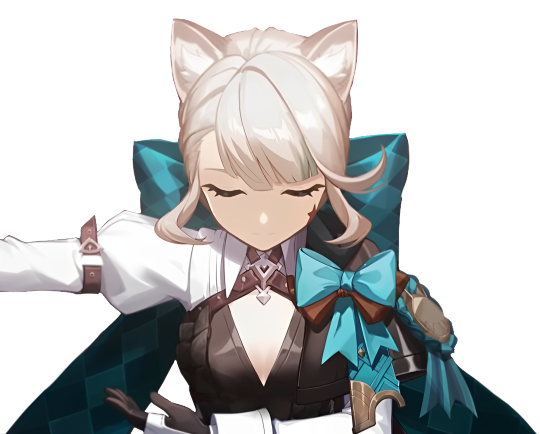
Lyney Transparents/Renders
nobody requested, self indulgent and for our own use! lyney is great and staring at him making these was fun lmao.
also, we made these afterrr the layouts that come out tomorrow so. now i kinda want to remake them, but we probably won't. but we are definetly even more down for lyney requests.
feel free to use with credit, but don't claim as your own! like/reblog if you save or enjoy, and tag us if you use!
#genshin#genshin impact#genshin impact edit#lyney genshin#lyney gi#genshin transparent#transparent edit#genshin render#edit resources#edit#fandom edit#edit blog#[our edits]#[andromeda 🌸💫🌈]#[our favourites]
64 notes
·
View notes
Photo
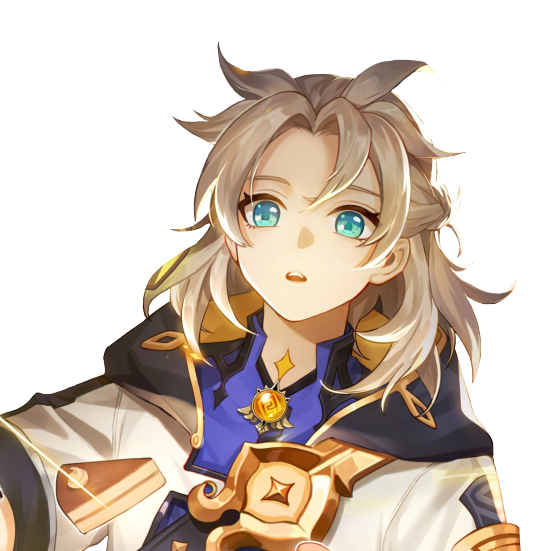


Genshin Birthday Art Transparents/Renders (Part 1)
characters included in part 1: albedo, ayaka, amber, barbara, beidou
i decided recently, to start a little project. i’m going to make transparents of every single genshin birthday art. this is going to kill my wrist, but i’ve been so frustrated looking for these sorts of transparents recently. so, i’m going to do everyone a favour.
credit is appreciated, but not required! like or reblog if you save!
#genshin#genshin impact#genshin impact edit#genshin transparent#genshin render#edit#edit blog#edit resources#fandom edit#transparents - ❁#albedo genshin#kamisato ayaka#amber genshin#barbara genshin#beidou genshin
199 notes
·
View notes
Last Seen Blogs
sunnyinfinite
fantasy!
illarian-rambling
IllarianRambling

erwinelling
Instagram?

tom-harrdy
freddie jackson

cacartoon
Toons