#download rufus for windows
Text
Download Windows 10 All in One 32/64-Bit ISO, Original Gratis Key
Download Windows 10 All in One 32/64-Bit ISO, Original Gratis Key
Download Windows 10 All in One ISO lewat link langsung ada untuk pembaca DatiakTekno. File ISO meliputi semua Windows 10 Editions (DVD ISO versus komplet) untuk mekanisme 32 dan 64-bit. Download Windows 10 All in One ISO di sini bisa lebih cepat dan aman, dibanding unduhan file torrent.
Dalam file download Windows 10 All in One ISO, ada kelompok edisi Windows 10 yang di-launching oleh Microsoft.…

View On WordPress
0 notes
Text
Have YOU got an old Windows PC Microsoft has told you can't run Windows 11? It's time to give it a new life!
How to install Windows 11 on unsupported PC Hardware using Rufus. You can also disable some other Windows 11 bullshit like data harvesting and needing a Microsoft account.
It has been in the news a lot lately that Windows 11 isn't allowed to be installed on PCs without certain requirements, including the TPM 2.0, a chip that was only included in PCs made in 2018 or later. This means that once Windows 10 stops receiving security updates, those PCs will not be able to (officially) run a safe, updated version of Windows anymore. This has led to an estimated 240 million PCs bound for the landfill. Thanks Microsoft! I get you don't want to be seen as the insecure one, but creating this much waste can't be the solution.
(I know nerds, Linux is a thing. I love you but we are not having that conversation. If you want to use Linux on an old PC you are already doing it and you don't need to tell me about it. People need Windows for all sorts of reasons that Linux won't cut.)
So lately I have been helping some under privileged teens get set up with PCs. Their school was giving away their old lab computers, and these kids would usually have no chance to afford even a basic computer. They had their hard drives pulled so I have been setting them up with SSDs, but the question was, what to do about the operating system? So I looked into it and I found out there IS actually a way to bypass Microsoft's system requirement and put Windows 11 on PCs as old as 2010.
You will need:
Rufus: An open source ISO burning tool.
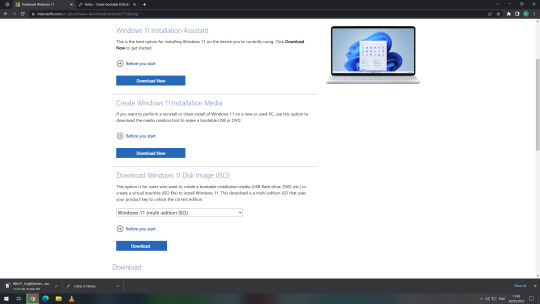
A Windows 11 ISO: Available from Microsoft.
A USB Flash Drive, at least 16GB.
A working PC to make the ISO, and a PC from 2018 or older you want to install Windows 11 on.
Here is the guide I used, but I will put it in my own words as well.
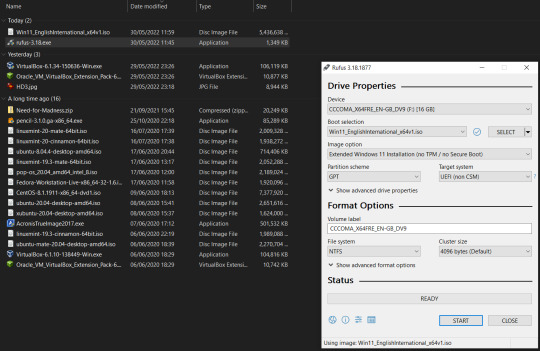
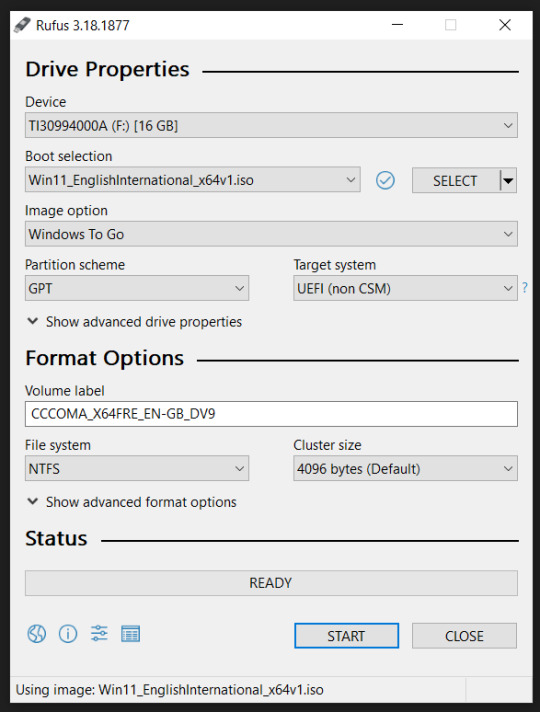
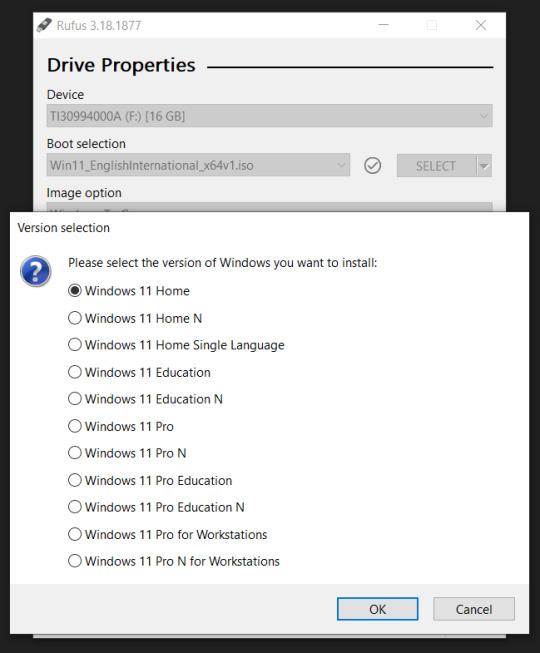
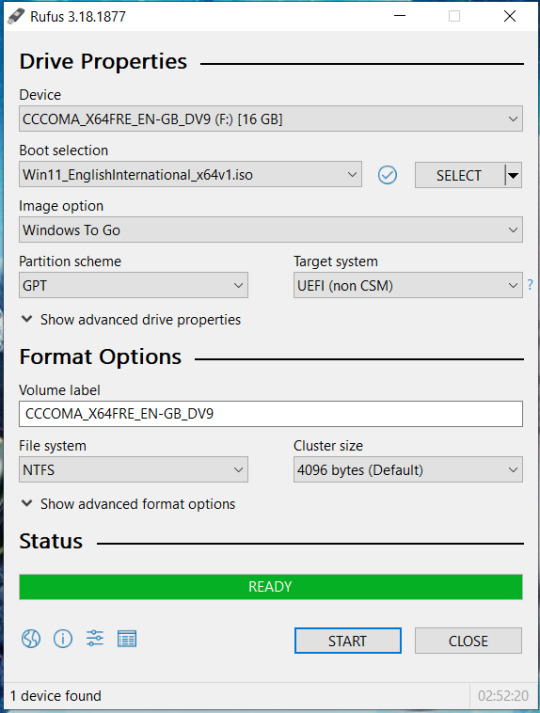
Download your Windows 11 ISO, and plug in your USB drive. It will be erased, so don't have anything valuable on it. Run Rufus, select your USB drive in the Device window, and select your Windows 11 ISO with the Select button. (There is supposed to be a feature in Rufus to download your ISO but I couldn't get it to work.?
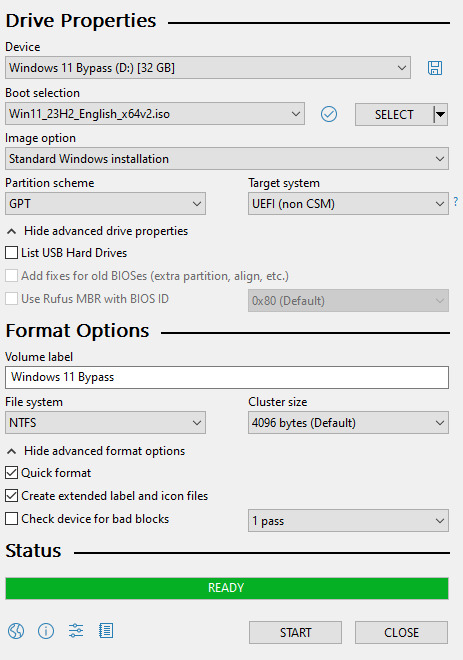
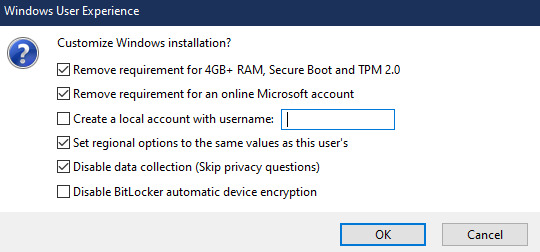
Choose standard windows installation, and follow the screenshot for your settings. Once you are done that, press Start, and then the magic happens. Another window pops up allowing you to remove the system requirements, the need for a microsoft account, and turn off data collecting. Just click the options you want, and press ok to write your iso to a drive.
From there you just need to use the USB drive to install windows. I won't go into details here, but here are some resources if you don't know how to do it.
Boot your PC from a USB Drive
Install Windows 11 from USB Drive
If you had a licensed copy of Windows 10, Windows 11 will already be licensed. If you don't, then perhaps you can use some kind of... Activation Scripts for Microsoft software, that will allow you to activate them. Of course I cannot link such tools here. So there you go, now you can save a PC made from before 2018 from the landfill, and maybe give it to a deserving teen in the process. The more we can extend the lives of technology and keep it out of the trash, the better.
Additional note: This removes the requirement for having 4GB Minimum of RAM, but I think that requirement should honestly be higher. Windows 11 will be unusable slow on any system with below 8GB of RAM. 8GB is the minimum I think you should have before trying this but it still really not enough for modern use outside of light web and office work. I wouldn't recommend trying this on anything with 4GB or less. I am honestly shocked they are still selling brand new Windows 11 PCs with 4GB of ram. If you're not sure how much RAM you have, you can find out in the performance tab of Task Manager in Windows, if you click the More Details icon on the bottom right. If you don't have enough, RAM for old systems is super cheap and widely available so it would definitely be worth upgrading if you have a ram starved machine you'd like to give a new life.

#Windows#Windows 11#tech#tech advice#pc#TPM 2.0#rufus#open source#open source software#technology#tech tips
599 notes
·
View notes
Text
HOW TO SWITCH TO LINUX
So, we're going to go through this step by step.
Before we begin, let's keep a few things clear:
Linux is not Windows, it is its own system, with its own culture, history and way of doing things.
There are many "distributions", "distros" or "flavors" of Linux. What works for you may be different from what people recommend.
You'll want to read up on how to use the terminal; the basics an absolute beginner needs is short, but important. It's not hard to learn, just takes a bit of time and effort.
ADOBE DOES NOT WORK ON LINUX.
WINE is not a Windows Emulator, it should not be treated as such.
Proton is a compatibility tool built on WINE by Valve, which has its own compatibility database, called ProtonDB. It still isn't an emulator and can have quirks.
Not everything will work on Linux. Dead by Daylight actively blocks Linux players from joining a game, as an example. The Windows Edition of Minecraft is another. (But the Java Edition does!)
There are many FOSS alternatives to popular programs, but they may lack maturity and features compared to their commercial counterparts.
You might want to invest in an external drive. It'll keep your files safe and you'll be able to move all your files to a
Step 1: why do you want to switch? Are you concerned about privacy? Are you wanting to boycott Windows? Is 11 not an option for your hardware? Want to try something new? Be honest with yourself on what you want to do. Write down your hardware specs. You'll want to know what kind of processor, RAM, video card and memory you're working on.
Step 2: Make three lists: Programs you need for work, programs you use at home (that aren't games) and games you like to play. Check each of these for if they already have a Linux port. For games, you can check if it's Steamdeck compatible! For those where you can't find one or it's not clear, you can check for the program on WINE HQ and ProtonDB (for games.) Not all of them might be compatible!
There might be Linux-based alternatives for several things, but keep in mind that Adobe does NOT support Linux and does NOT work on WINE! Sea of Thieves and LibreOffice works, Dead by Daylight and Scrivener do not.
Step 3: Get a GOOD QUALITY USB drive stick! I recommend one that's at least 30 GB. That sounds like a lot, but operating systems these days are huge-but there's some fun stuff you can get. It's really important that you get a good quality one, not just a random stick off a reseller like Wish.
Step 4: Remember when I asked you why you were switching? Time to pick a Linux version. There is no "one, true Linux" version-the operating system is open, groups make their own versions and put it out into the world. If you're confused, check out Distrowatch. Read a list here. Download an option-if you have a few sticks around, try multiple ones.
Step 5: Plug in your USB and use either UNetbootin or Rufus to create your boot device. Rufus might be easier if you're not super computer savvy. When looking over the options, make sure there's some storage, set it to most of what's left. Take out your boot stick for now.
Step 6: Find out how to boot to your BIOS. Every computer has a BIOS. Check out your model of laptop/motherboard to figure out what it is. Arrange boot order so that your USB gets checked first.
Step 7: If you have an external drive, move all your personal stuff, game saves, etc to it or purchase cloud drive storage for it. Always back up your files, and with multiple methods.
Step 8: You aren't going to be installing Linux quite yet; instead, boot it up from USB. Note, it'll be a bit slow on USB 2.0, though a USB-3 device and slot should make matters easier. Test each version you're considering for a week. It is super important that you test! Sometimes problems crop up or you turn out to not like it!
Step 9: Once you find a distro you like and have tested, consider if you want to dual boot or completely wipe Windows. Some programs for work might require Windows or you might have a few games that ONLY work on Windows and that's perfectly fine! Just keep in mind, as of Windows 11, this option is not recommended. If you want to use dualboot, you want to keep Windows 10 and NOT update. There's great tutorials on how to make it happen, search engines should be able to point you to one.
Step 10: Fully install Linux and immediately update. Even the latest installers will not have the current security patches. Just let it update and install whatever programs you want to use.
Step 11: Enable compatibility tools in Steam if you're a gamer. File, options, compatibility. Also, check the Software Store in your OS for open source re-implementations for your favorite older games!
You're now a Penguin!
12 notes
·
View notes
Text
Computers
Before everything else: I know this isn't the type of stuff I usually post, but here we go:
I recently switched my computer from Windows to Linux.
And must say, I much prefer Linux. It runs much better on slower computers. If you have a machine that's not running so well on Windows, you might consider trying Linux. For example, my computer kept freezing the whole time I was using it with Windows, but as soon as I switched to Linux that stopped happening.
In case you're curious as to how to do this, I'll try my best to explain.
WARNING: This process will delete EVERYTHING on your computer! Make sure to save any important files on a separate USB stick (not the one you'll use in this process)
So the first thing you will want to do is to download your preferred version of Linux. I took Ubuntu, it's probably one of the best-known ones. I just googled "Ubuntu OS download" and went from there.
Then you need to flash the OS onto a USB stick. There are several programs you can use to do this, Balena Etcher is very user-friendly but I was having some problems with it. Rufus would be another option but it's less user-friendly. You can google around and see what program you want to use. (There's also online guides on how to flash Linux onto a USB stick if you need help.)
Next comes the (sorta?) tricky part. (Make sure all your files are saved to a separate USB stick before you continue!!!) Plug the USB stick with Linux into your computer. Restart your computer, and while it's restarting, spam the function keys on your keyboard (the F1-F12) to get into the BIOS. Unfortunately I don't know exactly which one does the trick, if it doesn't work, try again until you get it.
Now you should see a list of options to boot your computer, and your USB stick should be one of them. Select it in the list. (At lest with Ubuntu) It prompted me to select an operating system or something like that, you don't have to worry about that, just select the first one in the list ("*Ubuntu" in my case).
Now your computer is running on Linux! You can now go ahead and download Linux onto our hard drive, the computer will immediately present this option to you.
Once it's done downloading, you now have a Linux computer!
All you need to do now is grab your USB stick with your files on it, plug it into your computer and you're good to go!
I'm sure there are more detailed guides on the internet, I guess I just wanted to put this out there in case anyone is curious.
11 notes
·
View notes
Note
Just got a new laptop which unfortunately comes with windows 11, so I’m kinda tempted to throw Linux on it out of spite
Would that be a good idea, seeing as I have never to my knowledge used linux?
Ok so this is in my honest opinion, if you want something good for beginners, then Linux Mint is your best option
If you already know how to flash an ISO to a USB drive and boot to it and all that, then you don't have to click the read more button, but if you don't there's some more instructions below the cut
There's a really easy way to get started
First, get a torrent client like qBittorrent, Deluge, Transmission, whatever, they're all pretty good open source torrent clients (although I'm biased towards qBittorrent because that's my personal client of choice)
Then you're gonna wanna go to https://linuxmint.com and you're gonna wanna click that download button
You're gonna come across three different editions of Linux Mint, I recommend going with the first option, Cinnamon edition as Cinnamon is pretty good at helping you feel at home when coming from Windows
Hit the download button and then click the button that says Torrent Download: 64-bit, and you'll get a torrent file that you can open up in your torrent client
Or you could just do a direct download if you're gonna wipe the damn laptop, no point in trying to seed the ISO when Windows 11 is gonna get wiped
Anyway, let that iso download and then you're gonna wanna grab a piece of software called rufus
Go to https://rufus.ie/en/ and download the correct version for your platform
Now get a USB drive you don't mind wiping the data off of, because you need to flash the ISO to it
Then you're gonna wanna plug the USB drive into your computer and open up rufus and select the USB drive you just plugged in, if it didn't already do that
Then you're gonna wanna select the ISO you downloaded in Rufus
Leave all the settings as is, it'll be fine, but given you have a new laptop, I'm gonna assume it's one of the newer models and not something like a Thinkpad, so you should set the partition scheme to GPT
Then you just hit start, click through a couple of prompts, and then you just wait
At this point, just reboot your computer and figure out which key gets you into the boot menu, could be escape, f11, f12, delete, beats me, it's always something different
You may need to disable secureboot because it may prevent you from booting the USB, so there's that
Anyway, boot into the USB, hit enter to start Linux Mint and you'll be dropped into the live desktop
You can poke around and see if you like what you see, or if you don't, then that's alright, you can shutdown and pull the USB and flash a different edition or use a completely different distro
Just poke around in it, see what looks good to you, see what doesn't, you won't affect any of your disks until you decide to install
But yeah, there should be a CD looking icon on the desktop, and you can click it to start the install process
Once you go through it all and wiped Windows 11, there you go, Linux Mint on your computer
And if a video guide works better for you, then maybe this tutorial might help, it's a little old, but the same broad strokes still apply
youtube
Have fun on linux and enjoy the wild west of computing
9 notes
·
View notes
Text
HOW TO BACK UP YOUR SHIT ON A FUBAR PC
So, I have a lil linux know how.
Someone I know's Windows Boot SSD died on em. I helped unfuck it, but it still got me thinkin.
"Do people know how to back up stuff after their PC commits seppuku?"
So What you'll need is:
-A friend's PC to create the usb tool
-A USB drive (preferably USB 3.0) with 16 GB or more of storage
-An external hard drive to store the backup image
-An internet connection.
FIRST
Borrow your friend's pc or laptop.
Download balena-etcher or Rufus
Download a copy of ubuntu linux. Get a coffee, eat a sandwich. This'll take a while.
Once it's done, use Etcher or Rufus to install Ubuntu on the flash drive. Eject the usb, thank your friend, and go back to your malfunctioning compy and plug the usb in.
NOTE: THIS PRESUMES THAT THERE IS A SOFTWARE ERROR PREVENTING YOUR MACHINE FROM BOOTING. IF THE HARDWARE ITSELF IS BROKEN, THIS WONT WORK.
Ok, you're going to boot your PC into BIOS. How? Depends on who made the computer. Google "How to open bios on a [Blank] pc", and you should be able to find the answer pretty quick. Its usually by either spamming the delete key or f10 while your computer turns on.
Once you're in the BIOS, there should be a menu with boot options. Select the usb.
It will boot your computer into ubuntu linux, running off that lil usb stick. Neat, huh? You'll get the option to try or install ubuntu as an operating system. You want to click "try".
Plug in the external drive you're putting the backup image of your drive on.
Hit the windows key and it should pull up a search bar. type "Disks" or "Gparted". it's the same program either way so, open it.
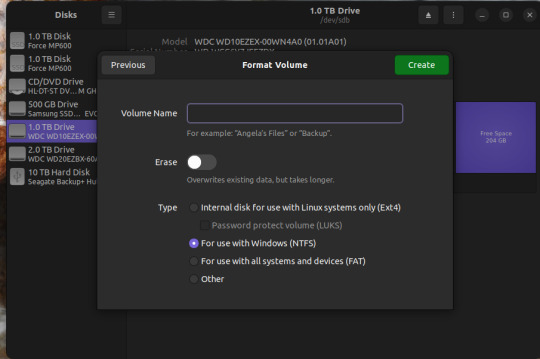
You should see something like this.
Depending on the size of your Boot SSD in windows, you may need to shrink the partition a bit. like If you have a 500gb drive handy, but the drive you need to back up is 1TB.
So click on the bit that says "basic data partition"
click the gear icon
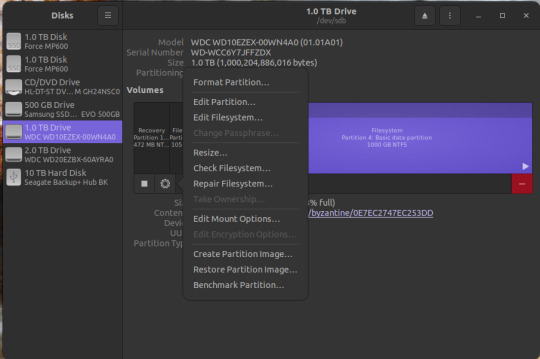
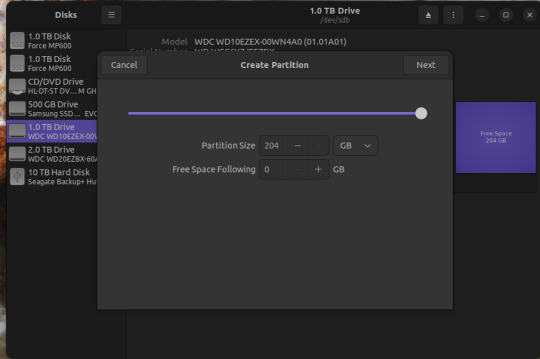
Click "Resize..."
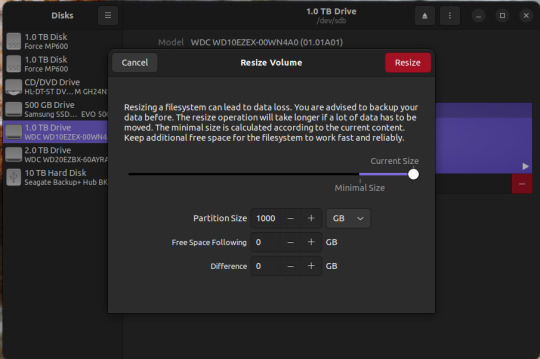
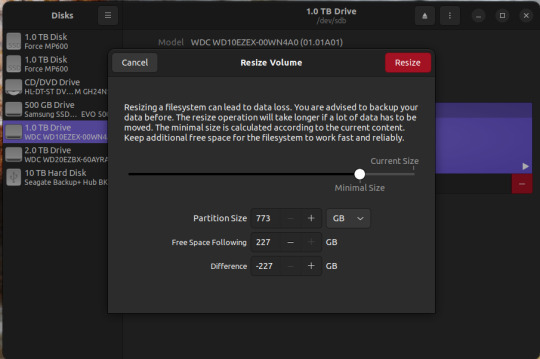
Resize.
if the external drive you're backing up to is BIGGER than the boot drive you're trying to back up, you can skip this.
Now there's two things you can do. The first is to simply create an image of the basic data partition where all your files are. The second is to back up the whole disk.
To back up the partition,
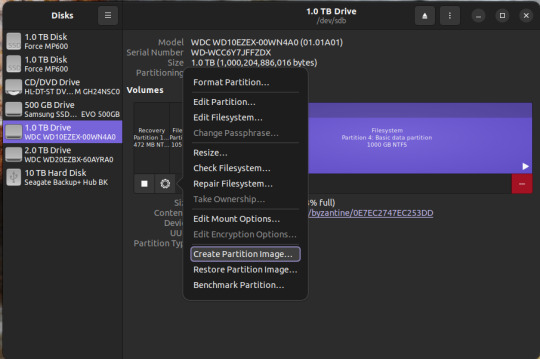
Select the basic data partition, click the gear icon, and select "create partition image"
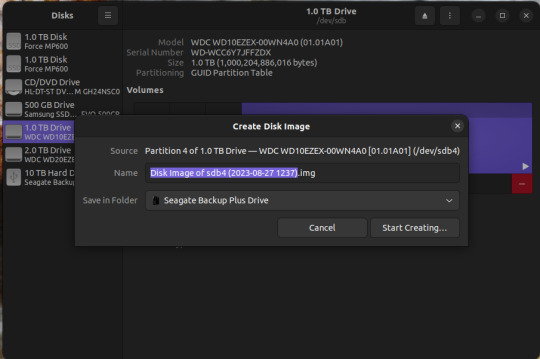
Name it whatever you want, save it on the external drive. Go get another coffee and a sandwich, this may take awhile as well.
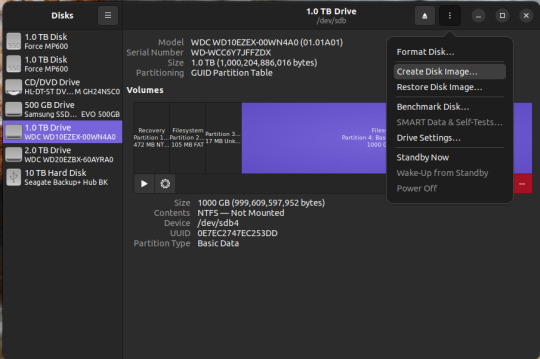
To make a backup of the whole disk, click on the three vertical dots in the upper right corner, and select "create disk image"
Same as before. name it what you want, save it to the external drive.
There you go.
To access the data, you need to restore that image to a new SSD or hard drive. You can do this using the same program. I recommend doing this AFTER you've done whatever was needed to fix windows.
if you're just restoring a partition image, not the whole disk, here's what you do.
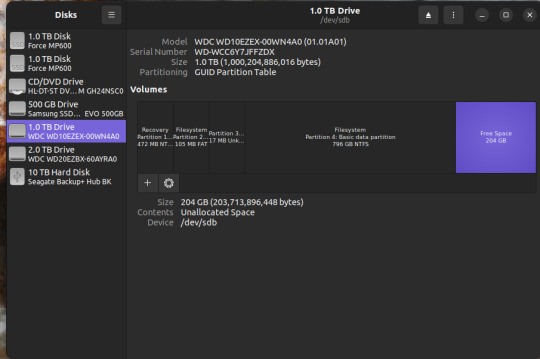
If you have FREE SPACE on a drive, or new drive, you can click on the "+" button, create a new empty partition
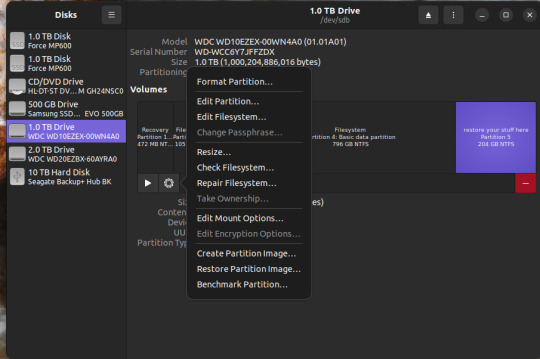
and click "restore partition image" to make it readable. Then you can mount it as a new drive in windows and copy your stuff over.
WARNING: THE PARTITION YOU'RE RESTORING TO MUST BE AS BIG OR BIGGER THAN THE PARTITION IMAGE
For a disk image, similar steps.

Three vertical dots on the upper right, select "restore disk image".
Select the full disk image from wherever you saved it and restore.
WARNING: Restoring a disk image will nuke anything already on the drive you're restoring it TO. So don't restore the disk image to your fixed boot drive, or to the drive you saved the disk image on.
Anywhomst. I hope this helps someone save their stuff or avoid being charged out the nose by a computer repair shop.
5 notes
·
View notes
Video
youtube
BAIXE AGORA a Versão Mais Recente do Windows 10 - PENDRIVE BOOTÁVEL Olá! Nesse vídeo você vai aprender como baixar e instalar windows 10 na última versão pelo pendrive. você vai aprender baixar a iso do Windows, é só seguir o passo a passo. Se você não sabe como baixar e instalar o windows pelo pendrive, você vai aprender de uma forma simples e fácil. Não fique preocupado porque não sabe instalar o windows, irei te mostrar na prática do zero. Se ficar alguma dúvida na hora que você estiver baixando, não se preocupe, é só deixar nos comentários que irei te ajudar a baixar e instalar o windows no pendrive. 👍Acompanhe todo nosso conteúdo em https://ift.tt/P84Y7in 🔴DOWNLOAD LIBERADO PARA INCRITOS🔴 🔐CLIQUE NO LINK PARA LIBERAR O DOWNLOAD: https://bit.ly/3Ct7sL9 Site da Microsoft: https://ift.tt/TnrzhUp Downloads Rufus: https://ift.tt/B6LWwDg 🤦♂️NÃO CLIQUE AQUI: https://bit.ly/3Ct7sL9 🟢NAO ESQUEÇA DE INCREVER-SE NO CANAL🟢 💖 Você também pode gostar desses vídeos aqui: 💖 Ativador do Windows 10 PERMANENTE para todas Versões : https://www.youtube.com/watch?v=yv-zsMhAcV4&t=27s #windows #windows10 #windows11 #pendrivebootavel #instalarwindows by RPM Tutoriais
7 notes
·
View notes
Photo


Project 11. Part 2.
I wanted to try out Windows 11, but both my laptop and my desktop don't meet the requirements for Windows 11.
I found out that it is possible to get around the restrictions by using a Windows registry hack, so I decided to give it a try using the desktop which is my test machine.
First of all we downloaded the Windows 11 ISO file from Microsoft then because I wanted to run Windows 11 from a USB stick, I downloaded a program called Rufus.
I used a 16 Giga-Byte USB stick.
I used Rufus to make a bootable Windows 11 USB installation stick and tried to run Windows from it.
You can download Rufus here:
https://rufus.ie/en/#
Unfortunately I couldn't get this to work, for some reason it kept on looping during the Windows installation process.
I couldn't get round this problem, so I decided to install it in Oracle VM VirtualBox instead.
4 notes
·
View notes
Text
(note to self— info helpful to save, copied text from a post not able to reblog)
“
get yourself a USB stick from any dollar store, install ubuntu with persistent storage on it. There is literally no reason not to, and it means that you now have a little computer of your very own that no one except those who physically get their hands on your USB stick can use (and you can password lock the OS) and that you can run from literally almost any PC with USB ports. Including public machines in libraries and, probably, school laptops.
Ubuntu is an operating system! It's the same kind of thing as Windows, basically-- the software your computer uses to run everything else you do on it, to put it simply. Unlike Windows, though, Ubuntu is totally free, and it's open source, which means anyone is free to look at and play with the code it's made of to write new things for it or even customize their own versions of it!
There's an official website where you can totally legally and safely download the iso you need for free! Then all you have to do is use something like a program called Rufus to install it onto a USB thumb drive!
It does work a little differently from Windows, and needs different file types sometimes, so it isn't an exact replacement, but once you learn a few basic things, it's easy to use, and the tradeoff of having to learn some new things for the improved performance (and the fact that getting a virus on linux is just. Not gonna happen) is worth it imo.
”
https://ubuntu.com/tutorials/create-a-usb-stick-on-windows#1-overview
0 notes
Text
Tutorial Menggunakan Linux Ubuntu Desktop (Bahasa Indonesia) dari Nol!
Tutorial Linux RahmanCyber - Ini udah seminggunan lebih kita icipi linux ubuntu untuk di install di SSD Portabel yang bisa dibawa kemana - mana, tinggal colok dan lebih privat :)
{getToc} $title={Table of Contents}
Sebelumnya kita membagikan pembahasan atau bisa dibilang preview untuk ubuntu 23.10 yang terbaru dengan nama kodenya Mantic Minotaur , tetapi memang aku sendiri mendapati beberapa permasalahan yang murni karna kesalahanku sendiri, jadi bukan ubuntunya yang bermasalah tapi cara aku menginstall library tertentu menyebabkan kerusakan.. ehehe, memang kita perlu aware sih masalah ini.. :) ati ati...
Pembahasan Linux di rahmancyber sudah dikategorikan dalam Link Pembelajaran Linux
Banner Pembelajaran Linux Ubuntu Desktop di RahmanCyber
Kebutuhan Hardware untuk Penggunaan OS Ubuntu Desktop
Sumber resmi Ubuntu Desktop Edition menjelaskan bahwa kebutuhan hardware untuk menjalankan sistem operasi mereka adalah sebagai berikut :
* 2 GHz dual core processor
* 4 GiB RAM (system memory)
* 25 GB (8.6 GB for minimal) of hard-drive space (or USB stick, memory card or external drive but see LiveCD for an alternative approach)
* VGA capable of 1024x768 screen resolution
* Either a CD/DVD drive or a USB port for the installer media
Kalo kita lihat lagi, itu sangat bersahabat untuk komputer komputer generasi lawas dimana kalo dipaksakan memakai Windows 11 tidak mendukung, walau beberapa orang dapat menggunakan versi pemaksaan, tapi tentu kurang optimal juga. Menurutku sendiri windows 11 itu minimal RAM 8GB apalagi dengan adanya Ai yang mungkin nanti akan full di integrasikan, tentu akan membutuhkan perangkat yang mendukung, semisal dari segi processornya generasi terbaru, dan tentu penggunaan RAM dan Grafis juga menjadi konsentrasi utama agar sebuah perangkat READY Ai.
Cara Membuat Bootable Linux Ubuntu 23.10 di MicroSD Card dengan Rufus dan Instalasi OS
Yup! Rufus masih menjadi software pembuat bootable yang cukup lengkap dan gratis andalanku, selain mudah pengoperasiannya, banyak os yang bisa langsung dibuat bootablenya dnegan Rufus.
Kalo bisa sendiri itu murah gan... coba aja... tapi modal download file iso ding.. hehehe
Dulu kita pernah bahas linux kalo gak salah Ubuntu Studio...
kali ini tak terasa ubuntu udah 23.10 aja nih...
Playlist : Linux Experience - https://www.youtube.com/playlist?list=PL1qiMzpnaZtaj0y5Cn_g0bCoNpLs9n13d
Ubuntu 23.10 Wireless Adapter Ready?
Yup! RahmanCyber udah buktikan sendiri di perangkat yang kita miliki, ada TP Link Wifi Adapter yang cukup umum. Ini kita sertakan videonya
bahkan kita juga eksperimen menggunakan Mirascreen. Untuk Cast linux jarak jauh, ya semacam ChromeCast.
Experience! Setup Desktop Ubuntu 23 Mantic Minotaur! OBS Blankscreen Solved, Steam, Davinci Resolve
Disini kita penasaran nih dengan Ubuntu Linux versi terbarunya, dari segi tampilan dan kita coba beragam software, tetapi video explorasi terpotong karena memang ubuntunya crash akibat aku salah install library.
Ini kita record langsung menggunakan OBS Studio di Linuxnya, jadi kita tidak pakai capture card ya...
Sebelumnya kita mendapati permasalahan OBS ketika Record itu hanya Layar Hitam gitu,dan cara mengatasinya sudah kita bagikan ke pembahasan singkat di Quesearch, artikelnya bisa kalian baca disini cara mengatasi OBS BlackScreen Pipeware
Ini Record screen langsung dari linux menggunakan OBS yang berhasil kita selamatkan datanya.
Linux Ubuntu 23.10
Intel I3 3310
Tetapi setidaknya itu dapat memberi gambaran kalian tentang Linux Ubuntu 23.10 tersebut gan..
#linux #ubuntu
Experience! Recorvery Ubuntu 23 Corrupt! Misi Penyelamatan File Rekaman OBS Studio! Partisi Ext4
Kita tau bahwa linux itu memiliki partisi sendiri yang unik, yaitu ext4, dimana jika terjadi apa apa, kita perlu buka dengan os linux juga, jika kita buka di windows, maka kita tidak bisa bro untuk saat artikel ini dibuat.. kecuali jika memakai metode tertentu yang lebih expert, tapi gampangnya drive… http://dlvr.it/T52dT0 F.N.A - RED
0 notes
Text
Creating Bootable-Flashdrive using RUFUS
RUFUS
is a utility that helps format and create bootable USB flash drives, such as USB keys/pendrives, memory sticks, etc. It can be especially useful for cases where: you need to create USB installation media from bootable ISOs (Windows, Linux, UEFI, etc.) you need to work on a system that doesn't have an OS installed.
This Vlog will show you what Rufus is and how to use it to create a working Bootable Flashdrive.
SCRIPT
Vlogger 1:
Background and trivia about rufus
Vlogger 2:
step by step instruction/tutorial to download and operate Rufus in order to create bootable flashdrive.
Vlogger 1:
cessation
Tools needed for the vlog/blog post:
Computer/laptop
Flashdrive ( 8-16GB recommended size)
Camera
Capcut (editor app)
Google Drive
0 notes
Text
Buat USB Bootable dengan Rufus untuk Windows 7, 8, 10 dan 11
Buat USB Bootable dengan Rufus untuk Windows 7, 8, 10 dan 11
Ingin instal 7, 8, 10 ataupun Windows 11? Anda tentu butuh alat booting. Jangan khawatir, Anda bisa buat USB Bootable dengan Rufus. Download file Rufus di sini, dan ikuti setiap petunjuk dari Kami.
Anda baru bisa buat USB Bootable dengan Rufus, apabila Anda sudah mengunduh file Windows ISO. Anggap saja Anda telah download file ISO Windows dan software Rufus. Jadi, Anda sudah memenuhi syarat untuk…

View On WordPress
#Download#Download Software#Microsoft Corporation#Rufus#USB Bootable#Windows#Windows 10#Windows 11#Windows 7
0 notes
Photo
تحميل وندوز 11 Windows 11 23H2 (22631.2361) | Genuine Microsoft Multi Edition ISO مفعل - https://www.animeiatlight.com/%d8%aa%d8%ad%d9%85%d9%8a%d9%84-%d9%88%d9%86%d8%af%d9%88%d8%b2-11-windows-11-23h2-22631-2361-genuine-microsoft-multi-edition-iso-%d9%85%d9%81%d8%b9%d9%84/ - #AnimeiatLight #Windows #Windows11 #Windows1123H2(22631.2361)|GenuineMicrosoftMultiEditionISO #Windows11GenuineMicrosoftMultiEdition #Windows11GenuineMicrosoftMultiEditionISO #انظمةتشغيل #انظمةوندوز #برامج #برامجوندوز #تحميلوندوز11 #تحميلوندوز11Windows1123H2(22631.2361)|GenuineMicrosoftMultiEditionISOمفعل #عالمالتقنية #عالمالتقنيةوالالعاب #مجلةنورالأنيميات #منتدياتنورالأنيميات #نورالأنيميات #نورالأنيمياتAnimeiatLight #وندوز #وندوز11 - #عالمالتقنيةوالالعاب - مجلة نورالأنيميات - تحميل وندوز 11 Windows 11 23H2 (22631.2361) | Genuine Microsoft Multi Edition ISO مفعل Windows 11 23H2 (22631.2361) Genuine Microsoft ISO (Multi Edition) ➡️ 100% Original, Untouched, Genuine Windows 11 23H2 ISO. ➡️ Downloaded Directly from Microsoft’s Servers. ➡️ ISO Notes: There are no changes to this ISO. It is original and genuine, the way Microsoft Intended. Default language is En-US. All additional languages are supported after installation. This Genuine ISO includes 11 editions – Home, Home N, Home Single Language, Education, Education N, Pro, Pro N, Pro Education, Pro Education N, Pro for Workstations, and Pro N for Workstations. ➡️ Installation Instructions: Unzip downloaded files to extract ISO from archive. Use your preferred method to write the ISO to a USB Drive. Boot from the USB Drive, and Install Windows 11 23H2 to your desired partition. Also supports in place upgrade on PC’s that meet Microsoft’s minimum requirements. Requires 2GB RAM and 12 GB Storage Space (if using bypass method given below). Alternately, when using the latest versions of Rufus to write the ISO to a bootable USB, you can select options to bypass Microsoft’s minimum requirements. Spoiler: How to install this Genuine 23H2 ISO on ANY PC! If your PC doesn’t meet the minimum requirements Microsoft has in place for you to install Windows 11, follow the steps below to bypass those requirements, and also learn how to bypass having to be connected to the internet, or having to create an online account to finish Setup. When you get to this screen, before clicking on ‘I don’t have a product key’ to proceed, hit SHIFT+F10 to open cmd prompt. then type ‘regedit’ in cmd prompt, and hit enter. In regedit, go to ‘HKEY_LOCAL_MACHINESYSTEMSetup’ and right click ‘Setup’ followed by ‘New’ then ‘Key’ then input ‘LabConfig’ and hit enter. In the LabConfig Key, right click the right hand pane, and select ‘New’ ‘DWORD (32-bit Value)’ and create the following 6 New DWORD Values: BypassCPUCheck BypassDiskCheck BypassRAMCheck BypassSecureBootCheck BypassStorageCheck BypassTPMCheck Followed by changing the value for each entry to ‘1’ You can now close regedit, and click on ‘I don’t have a product key’ to proceed with installation. When you get to this screen, if you don’t have an internet connection, or just want to bypass being forced to create or sign in to an Microsoft Account to finish setting up Windows, hit SHIFT+F10 to open cmd and then in the cmd window, type ‘oobebypassnro’ and hit enter. Your PC will restart, and go through the setup steps again. But this time allowing you to select ‘I don’t have internet’ and proceeding to finish Setting up by creating an offline local account. Spoiler: Or do it the easy way! (With Rufus) Another method you can use to bypass the minimum requirements required for Windows 11 Installation, and also bypass forced MS account creation during Setup, is by using Rufus to write the ISO to USB, and checking the boxes for whatever bypasses / modifications you would like in place when writing the ISO to USB ➡️RUFUS 4.2p DOWNLOAD LINK Spoiler: MD5 Checksum Hashes PART 1: 6386f27873b2a906bb4a45c9257c2250 PART 2: 08fc91c1c756302f01db767c20bcc136 PART 3: a86264d9086bf72f0f07ba62467aa813 PART 4: 04ef6e85a68ea0c497ce6d552fd18ced ISO: 15452e1dcde9ccf285aa1fe68d13fe39 Spoiler: Screenshots DOWNLOAD LINKS: ➡️PART 1 (USERSDRIVE) ➡️PART 2 (USERSDRIVE) ➡️PART 3 (USERSDRIVE) ➡️PART 4 (USERSDRIVE) ALTERNATE INTERCHANGEABLE DOWNLOAD LINKS: ➡️PART 1 (UPLOADRAR) ➡️PART 2 (UPLOADRAR) ➡️PART 3 (UPLOADRAR) ➡️PART 4 (UPLOADRAR)
0 notes
Text
In this guide, you will learn how to use Ventoy, a programme that makes it incredibly easy to create a multi bootable USB flash drive of Windows 11 (and 10) without the need to reformat the removable storage.
Typically, you use the Media Creation Tool to create a bootable USB media when you need to perform a clean install of Windows 11 (or 10). As an alternative, you can complete the same task with more customization options by using the Rufus tool. The issue is that you have to repeatedly reformat the drive to update the installation files or switch the operating system, even though these tools perform as promised.
A flash drive can be made bootable by installing Ventoy as software. Once the flash drive is able to boot, all you have to do is upload the desired ISO (or WIM, IMG, VHDX, or EFI) files without extracting them first. The system will boot into the Ventoy software when you insert the USB flash drive. You can select the image with which you want the computer to start while you are experiencing this. You can keep both versions of the image on the same bootable flash drive if a new version of the ISO becomes available.
The instructions in this manual will show you how to use Ventoy to make a bootable USB that you can use to install Windows 10, Windows 11, Linux, or another operating system from the same flash drive.
Create multiboot USB flash drive with Ventoy
To create a Windows 11 bootable USB with Ventoy, connect a flash drive with enough space, and use these steps:
Open Ventoy GitHub page.
Under the “Assets” section, click the ventoy-x.x.xx-windows.zip file and download it to your computer.
Quick note: You may need to force and keep the file as the browser may detect it as malicious.
Open the Zip folder location.
Double-click the open the ventoy-x.x.xx-windows.zip file.
Click the Extract all button from the command bar.
Click the Browse button.
Select a location to extract the files.
Click the Select Folder button.
Click the Extract button.
Open the ventoy-x.x.xx folder.
Double-click the Ventoy2Disk.exe file to launch the installer.
Choose the USB flash drive from the “Device” setting.
Click the Install button.
Click the OK button.
Click on This PC from the left pane of File Explorer.
Open the Ventoy drive.
Copy and paste the ISO files to make them bootable. You can include the latest image of Windows 11, 10, Linux, etc.
Once you complete the steps, you can use the USB flash drive to boot a device with the Ventoy software, where you can then choose to start the device with one of the ISOs you uploaded to the drive.
0 notes
Text
How to download Windows 11 22H2 ISO file
To download the Windows 11 ISO file, open the Microsoft download page, choose the ISO download option, click “Download,” choose language, click “Confirm,” and click “Download” again.
You can also use the Media Creation Tool or the Rufus third-party tool.
You can download the Windows 11 22H2 ISO file (current release in 2022) in multiple ways, including from the Microsoft support website. Also,…

View On WordPress
0 notes
Text
برنامج حرق الويندوز على فلاشة "أفضل 3 برامج"
حرق الويندوز علي فلاشة هو عملية تتيح للمستخدمين تشغيل نظام التشغيل على أي جهاز كمبيوتر يدعمتحميل نسخة الويندوز من الفلاشة. يعتبر هذا الإجراء مفيدًا للعديد من الأسباب، من بينها القدرة على تثبيت نظام التشغيل على جهاز كمبيوتر بدون هرد خارجي أو عند عدم توافر اشياء مثل CD أو DVD. بالإضافة إلى ذلك، يمكن حفظ النظام على الفلاشة واستخدامها في أي وقت ومن أي مكان، ويمكن أن يكون حرق الويندوز على فلاشة مفيدًا للأشخاص الذين يحتاجون إلى تثبيت النظام على العديد من الأجهزة.
جدول المحتويات
برنامج حرق ويندوز على فلاشة:
شرح برنامج حرق الويندوز على فلاشة (Rufus 2023)
شرح كيفية حرق الويندوز على الفلاشة (باستخدام أداة WINDOWS 7 USB)
شرح برنامج حرق الويندوز على الفلاشة Universal USB Installe
ومع ذلك، يتطلب حرق الويندوز على فلاشة بعض الخطوات الهامة للتأكد من نجاح العملية. يجب على المستخدمين التحقق من توافر مساحة كافية على الفلاشة، والتأكد من أنهم يستخدمون أداة حرق الويندوز على فلاشة موثوقة ومناسبة لنسخة النظام التي يرغبون في حرقها. علاوة على ذلك، يجب أن يتم تهيئة الفلاشة بطريقة صحيحة وتحديد ترتيب الإقلاع في BIOS للتأكد من أن الجهاز سيبدأ التشغيل من الفلاشة.
في هذه المقالة، سنتناول بشكل مفصل طريقة حرق الويندوز على فلاشة والأدوات المستخدمة لتحقيق ذلك بطريقة صحيحة. سيتم توضيح الأدوات والبرامج المستخدمة لهذا الغرض، وكذلك الإجراءات اللازمة لتحضير الفلاشة وإجراءات الإقلاع منها.
نوصي ايضا بقراءة هذا المقال: ماهو معالج الكمبيوتر سوف تفيدكم جدا.
برنامج حرق ويندوز على فلاشة:
هناك العديد من البرامج المستخدمة لحرق نظام التشغيل ويندوز على فلاشة، وفيما يلي بعض البرامج الشائعة والموصى بها:
- Rufus: يعتبر Rufus أحد أشهر برامج حرق نظام التشغيل على الفلاشة، حيث يتميز بسهولة الاستخدام والسرعة العالية في العملية. كما يدعم البرنامج العديد من صيغ نظام التشغيل المختلفة، ويوفر خيارات تخصيص متقدمة للمستخدم.
- WinToUSB: يوفر WinToUSB واجهة سهلة الاستخدام ويتيح للمستخدمين تثبيت نظام التشغيل على فلاشة والاقلاع منها. كما يتميز البرنامج بالقدرة على تشغيل نظام التشغيل على أجهزة مختلفة وتثبيته على الفلاشة باستخدام الإعدادات المخصصة.
- Universal USB Installer: يوفر Universal USB Installer خيارات واسعة لحرق نظام التشغيل على فلاشة، ويتميز بالقدرة على دعم العديد من صيغ نظام التشغيل والتعرف على مختلف أنواع الفلاشات.
- Etcher: يتميز Etcher بسهولة الاستخدام والدقة في عملية حرق نظام التشغيل على الفلاشة. كما يتيح البرنامج للم��تخدمين إنشاء صورة للنظام على الفلاشة وتثبيتها على أجهزة مختلفة.
شرح برنامج حرق الويندوز على فلاشة (Rufus 2023)
Rufus 2023 هو برنامج حرق الويندوز على فلاشة يتميز بسرعة وسهولة الاستخدام. يعمل البرنامج على تحويل فلاشة USB عادية إلى وسيلة لتثبيت نظام التشغيل Windows على جهاز كمبيوتر.
- فيما يلي شرح لكيفية تحميل برنامج rufus لحرق الويندوز على الفلاشة مع شرح طريقة الحرق:
- قم بعمل تحميل برنامج حرق الويندوز على الفلاشة من الموقع الرسمي للبرنامج.
- قم بتوصيل الفلاشة USB التي تريد استخدامها لتثبيت نظام التشغيل Windows.
- شغل برنامج Rufus، ستظهر واجهة البرنامج التي تحتوي على العديد من الخيارات.
- في الخانة الموجودة تحت "Device"، اختر الفلاشة USB التي تريد استخدامها.
- في الخانة الموجودة تحت "Boot selection"، حدد موقع صورة النظام التي تريد حرقها على الفلاشة USB، عادة ما يكون بورتشن c.
- في القسم الموجود تحت "Partition scheme"، حدد نظام التقسيم الذي تريد استخدامه. يمكن اختيار نظام MBR لأجهزة الكمبيوتر القديمة أو نظام GPT لأجهزة الكمبيوتر الحديثة.
- في القسم الموجود تحت "File system"، حدد نظام الملفات الذي تريد استخدامه. يمكن اختيار نظام FAT32 أو NTFS.
- بعد اختيار جميع الإعدادات، اضغط على زر "Start" لبدء عملية حرق نظام التشغيل على الفلاشة USB.
- بعد اكتمال عملية الحرق، يمكن استخدام الفلاشة USB لتثبيت نظام التشغيل Windows على أي جهاز كمبيوتر يدعم الإقلاع من الفلاشة. يجب التأكد من تعيين الإقلاع من الفلاشة USB في إعدادات الجهاز المطلوب تثبيت النظام عليه.
شرح كيفية حرق الويندوز على الفلاشة (باستخدام أداة WINDOWS 7 USB)
برنامج "Windows 7 USB/DVD Download Tool" هو أحد البرامج الشائعة والموثوقة في حرق نظام التشغيل ويندوز 7 على فلاشة USB.
فيما يلي خطوات حرق ويندوز 7 على فلاشة باستخدام windows usb dvd لحرق الويندوز على الفلاشة.
- برنامج حرق الويندوز على فلاشة usb: لحرق الويندوز على الفلاشة قم بتحميل البرنامج Windows 7 USB/DVD Download Tool من موقع Microsoft الرسمي،
- تثبيت البرنامج: بعد تحميل البرنامج، افتح الملف الذي تم تحميله واتبع التعليمات لتثبيته على جهاز الكمبيوتر الخاص بك.
- توصيل الفلاشة: قم بتوصيل فلاشة USB بالحاسوب الخاص بك، ويجب أن تكون الفلاشة فارغة أو تحتوي على ملفات غير مهمة، لأن البرنامج سيحذف كل الملفات الموجودة عليها.
- اختيار ملف ISO: من شاشة البدء الخاصة بالبرنامج، اضغط على زر "Browse" وحدد ملف ISO الخاص بويندوز 7 الذي تم تنزيله سابقاً من موقع Microsoft الرسمي.
- اختيار الفلاشة: بعد اختيار ملف ISO، حدد الفلاشة التي تم توصيلها بجهاز الكمبيوتر الخاص بك عن طريق النقر على "USB device".
- بدء الحرق: بعد الانتهاء من تحديد الملف ISO والفلاشة، انقر على زر "Begin copying" وانتظر حتى يتم الانتهاء من عملية الحرق.
- الانتهاء: عند انتهاء العملية، يمكنك فصل الفلاشة عن الحاسوب واستخدامها لتثبيت ويندوز 7 على أي حاسوب تريده.
شرح برنامج حرق الويندوز على الفلاشة Universal USB Installe
برنامج Universal USB Installer هو أداة مجانية ومفتوحة المصدر تستخدم لحرق ملفات النظام على الفلاشة USB بطريقة سهلة وسريعة. يمكن استخدامه لحرق أي ملف ISO لنظام التشغيل ويندوز أو لينكس على الفلاشة.
فيما يلي خطوات حرق ويندوز على الفلاشة باستخدام برنامج Universal USB Installer:
- تحميل البرنامج حرق ونسخ الويندوز على فلاشة: قم بتحميل برنامج Universal USB Installer من الموقع الرسمي للبرنامج،:
- توصيل الفلاشة: قم بتوصيل فلاشة USB بالحاسوب الخاص بك وتأكد من أنها تحتوي على مساحة كافية لحجم ملف ISO الذي ترغب في حرقه.
- تشغيل البرنامج: افتح برنامج Universal USB Installer الذي تم تحميله على الحاسوب الخاص بك.
- اختيار ملف ISO: من شاشة البدء الخاصة بالبرنامج، اختر الملف ISO الذي ترغب في حرقه على الفلاشة، ويمكنك تحميله من موقع Microsoft الرسمي.
- اختيار الفلاشة: اختر الفلاشة USB التي ترغب في حرق ملف ISO عليها، وتأكد من تحديدها بشكل صحيح.
- الإعدادات الإضافية: يمكنك تخصيص إعدادات البرنامج بحسب رغبتك، مثل تحديد نظام الملفات للفلاشة (FAT32 أو NTFS) وإضافة ملفات إضافية إلى الفلاشة.
- بدء الحرق: انقر فوق زر "Create" لبدء عملية حرق ملف ISO على الفلاشة.
- الانتهاء: عند الانتهاء من عملية الحرق، يمكنك فصل الفلاشة عن الحاسوب الخاص بك واستخدامها لتثبيت ويندوز على أي حاسوب تريده.
يجب الانتباه إلى أنه يجب عليك التأكد من أن فلاشة USB لا تحتوي على أي بيانات هامة قبل بدء عملية الحرق لحرق الويندوز على فلاشة، لأنه سيتم حذف جميع الملفات الموجودة عليها وهذا مع أي برنامج حرق الويندوز علي الفلاشة. كما يجب عليك التأكد من أن الفلاشة تعمل بشكل صحيح ومتصلة بالحاسوب بشكل جيد قبل بدء عملية الحرق.
بهذه الطريقة تكون قد تعرف على كيفية حرق نسخة الويندوز على فلاشة wintousb على جهازك، وقد وفرنا لك افضل برنامج مجاني يساعدك اتمام المهمة.
Read the full article
0 notes
Last Seen Blogs

whatsmordor
always the goddamn babysitter!

gefdreamsofthesea
I was a mermaid in a past life

deedeedoses
hi! i'm stuffie

adisappointmenttocatch
clear, detailed misinformation

fubukiiisss
all answers you seek are inside you