#createimages
Text
Creating Images should not be a hassale.
Creating images with AI for your business is super helpful! Here's why:
Quick and Easy: AI can make images really fast. It's like having a super speedy artist who doesn't need breaks or sleep!
Save Money: Hiring artists or photographers can be expensive. But with AI, you don't need to pay anyone every time you need a new image. That saves a lot of money!
Lots of Options: AI can create all sorts of images. Whether you need a logo, a poster, or a picture for your website, AI can do it all. You have so many choices!
Customization: You can tell AI what you want your image to look like, and it will make it exactly how you want. It's like having a magical paintbrush that follows your every command.
Consistency: AI makes sure all your images look the same. That's important for your brand. You want people to recognize your business, and having consistent images helps with that.
1 note
·
View note
Text
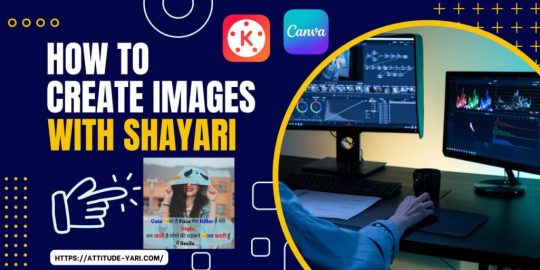
How to Create Images with Shayari?
Well, we know about the images and Shayari, but do you want to write Shayari in any images and don’t know how to create images with Shayari? In that blog, we will tell you how to create images with Shayari easily. You don’t need to download the Shayari images; copy the Shayari like Attitude Shayari, Love Shayari, or any other type of Shayari from Attitude-yari, and it will let you know how to use the software or applications without knowing the design.
Generally, we are addicted to social media, where we post different types of images on our Facebook wall, Twitter, tweets, Instagram Store, WhatsApp status, and many others. We use Google to download the Shayari images from different sources. Even people are trying to do some different things that make their social account profile attractive, so they upload or post not only Shayari but also images with Shayari.
In this blog, we should first discuss why we need to write Shayari in images and where we can find it. We can briefly describe how to create images with Shayari. By the way, there are so many applications or apps like Canva Mod Apk or Kinemaster Mod Apk where you can create pictures with Shayari so easily without any expertise. And can download them as APK files as they are cracked versions of the original application.
Why We Need to Create Images with Shayari?
In this blog, before discussing how to create images with Shayari, first, we should give a short description of why we need to create images with Shayari. Shayari is the only way to express emotions, thoughts, ideas, or feelings passionately to others. Generally, people write Shayari in 2-3 lines, but it does not create a more impact on others.
The reason behind this is getting bored with others writing sentences without looking innovatively or attractively. Here, we need to create images with Shayari because it makes a good impression on others. Anyone loves to see photos or pictures with sentences rather than only simple writing sentences. So, if we write or post only Shayari, then it does not create more impact. But if we create images with Shayari, then it makes a good impression.
Where Can We Copy Shayari?
We need to find a platform or website from where we can copy Shayaris like Attitude Shayari, Love Shayari, and many others. Or you need to find suitable Shayari according to gender, like Boys Attitude Shayari if you are a boy. Also, we need an application which we have described above. At the bottom, we have explained how to create images with Shayari. Usually, any Shayari lover who can write Shayari for themselves can create images of Shayari.
But if they cannot write good Shayari, there are so many websites where we can copy any Shayari. After that, you can create images with Shayari. In the previous blog, you can learn where to copy Shayari. The last blog on our website is a complete description of some of the top 5 websites to copy attitude shayari. Now, you are ready, and it’s time to tell about the main topic of this blog.
How to Create Images with Shayari?
Everyone is thinking about that to create images with Shayari too hard. It requires getting knowledge in designing and also knowing about some graphic design tools. But the fact is that it is the most straightforward process to create images with Shayari. In the internet world, everything is available on Google. It would help if you found whatever you want. It would suggest everything.
Typically, to create images with Shayari, we need only two things: the first one is Shayari, and the second one is an image where we can edit Shayari. We already suggest some websites to copy Shayari so you can follow that blog. And for photos, you pick your favorite photo where you want to edit Shayari.
In this blog, we suggest some software or applications where you can create images with Shayari without any charges. These applications are free of cost to all, and they offer many features or tools that help you to develop attractive or unique images with Shayari. Here is a short description of this application with their functionality discussed below:-
Canva Mod APK:-
Canva Mod APK is the most useable application where users can create images without payment charges. You can create any design in it. It has many features that make it the most popular app among the audience. It is a straightforward app that needs to log in to your account to create images.
In this, you copy your favorite images without any size matter. In it, you can resize your photo to whatever size you want to resize. The most helpful tool, “Magic Expand,” also helps to enlarge your image by generating some new results that look very elegant.
Now, after setting your image, you copy and paste your shayari on that image. According to you, design your image with Shayari and post it wherever you want. It makes a good impression on all. So, Canva is the best application we recommend for creating images with Shayari as it has many templates.
Website
0 notes
Text
Create Images With Canva Mod APK
Don’t have design experience but still want to create images by yourself? In today’s blog, we will discuss the Canva and Canva Pro APK, a useful application to create images without any designing experience, and how to create images with Canva. Most people don’t know how to create images but still want to create images for social media profiles or download them from different sources. You will learn how to create images with Canva.

Canva is not a free application, but when we talk about the Canva Pro APK, it’s a free application where you can create different types of DP images like A name DP or other alphabet images like J name DP, L name DP, etc. We will discuss more about how to create images with Canva and how to use it. But first, we will discuss how important it is to get DP images for our social media profiles.
Social media platform needs a perfect profile picture to increase the weight of your profile. Some faces are photogenic, but not all; that is why the pictures require editing before posting. Now the question arises: the name of the tools or applications that can be used & how to use them?
In the world of technology, every day, a new application is born. Still, we need to identify the correct one that has all the answers to your questions—likewise, the solution to your requirements during any work. While in editing mode, you can choose the best application, Canva Pro APK. And will let you know how to create images with Canva.
What is Canva Pro APK –
Canca is a mobile application that enhances your image with filters & other tools with its simply understandable interface. You can create multiple types of DP beside your pictures, such as if your name starts with A. In that case, you can create Love A name DP images or A-name wallpaper as well. But how to create images with Canva, will discuss more about it.
This application has unlimited tools to edit & create images & all the tools are easily understandable.
How to Download Canva Pro APK –
To download the Canva MOD APK, you should visit third-party websites because it is a cracked premium version. So, it is not available on the Google Play Store or Apple Store. The disadvantage of iPhone users is that they can’t download the pro version for premium features. The pro version of Canva is free of cost with all the premium features like templates, fonts, graphics, and elements.
You can download Canva Mod APK & to install the APK on your Android, follow the guide.
How to Create Images with Canva –
Before starting creation, you should download the mod version on your mobile and make sure not to pay for the premium features as they are accessible in the mod version. There are two methods of creating images: one is uploading your image to Canva & editing it with the tools & and the second is using templates.
Create Images With Canva Through Templets –
In this application, 1000+ templates are available & to use all of them, you should have a premium subscription. These templates help you save time thinking about the designs & these are mainly used to create digital banners or images. Follow the steps to create the images –
The home screen will show you a Plus button in the center& clicking on it will show you the templates to use.
Select the matched templates & you can edit the elements used in the image.
You can also change the size of the image to bigger or smaller, but the quality of the image will remain the same.
You can also change the color of the elements, font style & the font of the premade templates.
If you like any elements, you can copy them & use them in your other image.
You can also add elements from the application.
Create Images With Canva Without Using Templets –
Start the application & sign up with your email ID or Phone number. Once it is done, you will get entered into the application to create images –
Click on the plus button on the home screen & where you can select the size of your design.
There are some preset sizes available, but you can select your custom size.
Then, you can select the templates, but if you don’t like them, you can ignore them.
Besides templates, you will also have the option, elements, text, Gallery, upload, Draw, Apps & many others.
In the element section, you have a search bar to find your desired shapes, graphics, stickers, Photos, videos, charts, frames, & grids.
Selected elements will be added to your project, and you will able to resize & rotate as well.
Some elements, like shapes you will add, can change the color as well.
You can add images from your phone to edit & enhance.
This application has 100+ fonts with seven different effects &colors, and you can create your name DP in different styles. Besides that, the Canava has a fantastic feature to use, which is a color-pick option. If you have the image on your phone or internet & you do like the color of it. You can use the tool to pick the color from the outside images.
These are the simple steps & features to create or edit your photos. The clarity & quality of the pictures made by the Canava will be excellent & and the pixels will remain the same.
Website
1 note
·
View note
Video
youtube
Creating Stunning Images with Midjourney AI Bot: Your Ultimate Guide
Step 1: Sign up for a Discord account
1.1. Go to the Discord website and click on the "Sign Up" button located at the top right corner of the homepage.
1.2. Fill out the required fields such as your email address, username, and password.
1.3. Click on the "Continue" button and follow the instructions to complete the sign-up process.
Step 2: Create your own server
2.1. Once you are logged into your account, click on the "+" icon located on the left-hand side of the Discord window.
2.2. Select the "Create a Server" option from the dropdown menu.
2.3. Choose a name for your server, select a region, and click on the "Create" button.
Step 3: Invite the MidJourney bot to your new server
3.1. Go to the server where you currently have the MidJourney bot.
3.2. Right-click on the MidJourney bot and select "Server Settings" from the dropdown menu.
3.3. Click on the "Authorize" button located at the bottom of the "OAuth2" tab.
3.4. Select the new server you just created from the dropdown menu.
3.5. Choose the appropriate permissions for the bot and click on the "Authorize" button.
3.6. The MidJourney bot will now be added to your new server.
Step 4: Open the MidJourney bot
4.1. Go to your server where you have added the MidJourney bot.
4.2. Type the command "/imagine" in the chat to activate the image generation prompt.
Step 5: Enter the image prompt
5.1. After selecting the image model, the bot will prompt you to enter an image prompt.
5.2. Type in a description of the image you want to generate with ‘Catgut can be anything from a specific object or scene to an abstract concept.
5.3. For example, if you want to generate an image of a cat, you can type " create a beautiful car ,background dark, highway surface, cyberpunk, realistic, neon,—v 4".
Step 6: Wait for the image to generate
6.1. After entering the image prompt, the bot will start generating the image.
6.2. This process can take a few minutes depending on the complexity of the prompt and the image model you are using.
6.3. Once the image is generated, the bot will post it in the chat for you to view and you scale it.
Step 7: Download the image
7.1. To download the image, right-click on the image and select "Save Image As".
7.2. Choose a location on your computer where you want to save the image and click "Save".
Step 7: Upload your image as reference
Find the option to upload a photo by clicking on the"+" sign.
Select the photo you want to upload from your gallery.
Add a caption or description to your photo if desired.
Click the "Post" or "Share" button to upload your photo.
Notice:Make sure you have a stable internet connection to successfully upload your photo during your mid-journey.
#AIimagecreation#midjourneyai#createimages#aitechnology#digital art tutorial#digitalarttutorial#chatgpt#verdantofficialtech
0 notes
Text
youtube
I am an AI generated Image, created using one Free AI Tool, more powerful then Midjourney. If You want to learn how to create such cool images using free Text to Image AI Tool, then watch the video carefully. Artificial intelligence has made it possible for anyone to create unique and compelling images with minimal effort. If you're interested in experimenting with AI-generated images, here's a step-by-step guide on how to generate your first AI-generated image.
Step 1 : Go to Google and type Clipdrop AI and press enter. Step 2: Click on the first link "Clipdrop.co" or you can find the link in the description below. Step 3: Go to Clipdrop.co and click "Try for free" button or just scroll down to checkout more free AI tools. Step 4: Find and click the first tool, "Stable Diffusion XL". Step 5: Enter your prompt and click "Generate". wait few seconds and you will get the grid of four beautiful AI images. Step 6: Go to the image and press right click. Click "open in new tab" to open it to full size or "Save image as" to save image. Step 7: If you want to create some new versions of images then click "Re-Generate all Images". wait few seconds and you will get the new grid of four beautiful AI images.
#AI#ImageCreation#stablediffusion#Clipdrop#Midjourney#AIHowTo#CreateImage#FreeGenerator#CreativeImagery#BeginnersGuide#MachineLearning#ImageDesign#GraphicsDesign#Computervision#VisualArt#artificialintelligence#AIart#imagegeneration#texttoimage#tutorial#beginner#freegenerator#stepbystep#AIartgenerator#Midjourneytutorial#Midjourneyfreegenerator#createwithAI#texttoimageAI#generatewithAI#howto
1 note
·
View note
Text
Plus Minus - untitled - 10/10/2023
Source: Glitch artists collective - Facebook
( processing code from original post)
here is my second processing4 code:PImage inputImage;PImage glizzy;void setup() { size(480, 480); inputImage = loadImage("1212.jpg"); inputImage.resize(width, height); glizzy = createImage(inputImage.width, inputImage.height, RGB); noLoop(); pozzy(); glizzy.save("11.jpg"); image(glizzy, 0, 0);}void draw() {}void pozzy() { inputImage.loadPixels(); glizzy.loadPixels(); float contrastFactor = 2.0; for (int i = 0; i < inputImage.width; i++) { for (int j = 0; j < inputImage.height; j++) { int pixelIndex = j * inputImage.width + i; color pixelColor = inputImage.pixels[pixelIndex]; float r = red(pixelColor); float g = green(pixelColor); float b = blue(pixelColor); r = round(r / 255 * contrastFactor) * 255 / contrastFactor; g = round(g / 255 * contrastFactor) * 255 / contrastFactor; b = round(b / 255 * contrastFactor) * 255 / contrastFactor; glizzy.pixels[pixelIndex] = color(r, g, b); } } glizzy.updatePixels();}
8 notes
·
View notes
Text

#photographers#photos#photo#photography#photographers on tumblr#portrait photography#photogram#selfportrait#greece#thessaloniki#pantelisgeo#createimages#photooftheday#photoofinstagram#instagram#instadaily#instaart#instapic#instafollow#inspire#inspiration#colorful#nikon#nikontop
1 note
·
View note
Link
If you have been looking for an inexpensive way to create amazing graphics for your blog, website, or business, then look no further than Canva.
0 notes
Photo

M: @eduardo_callan . . . . . #modygrams #assasins #darkway #urbanstyle #smoke #isolatedplace #desert #artofvisuals #createimage #darkside #tumblrphoto #igersphoto #pinterest #peruvianboy #vsco #orange #mask #gotic #spy #vscoportrait #canonperu #canont6 #mywaymylife #homersphotographyperu #nochange #myrules
#igersphoto#tumblrphoto#homersphotographyperu#canonperu#artofvisuals#assasins#darkway#smoke#myrules#pinterest#peruvianboy#nochange#modygrams#orange#canont6#vsco#isolatedplace#vscoportrait#mywaymylife#createimage#darkside#desert#urbanstyle#gotic#mask#spy
1 note
·
View note
Photo

# .pyde # Proccesing 3.4 # Python mode 3042 import itertools d = 3 R_min, R_max, I_min, I_max = -2.0, 2.0, -2.0, 2.0 iterations, size_x, size_y = 512, 810, 810 threshold = 4.0 m_img = PImage j_img = PImage def _pow(z,d): if z == 0j: return 0 else: return z**d def multibrot(d, x, y, iterations): c, z, i = complex(x, y), complex(0, 0), 0 while i < iterations and abs(z**2) < threshold: z = _pow(z, d) + c i += 1 return 256 - 256*sqrt(i**3)/sqrt(iterations**3) def julia(x, y, iterations): z, c, i = complex(x, y), complex(-0.7, 0.27015), 0 while i < iterations and abs(z**2) < threshold: z = _pow(z, 2) + c i += 1 return 256 - 256*sqrt(i**3)/sqrt(iterations**3) def setup(): size(size_x, size_y) m_img = createImage(size_x, size_y, RGB) j_img = createImage(size_x, size_y, RGB) m_img.loadPixels() for x, y in itertools.product(range(size_x), range(size_y)): loc = x + (y*width) col = multibrot(d, R_min + (x/float(size_x))*(R_max - R_min), I_min + (y/float(size_y))*(I_max - I_min), iterations) m_img.pixels[loc] = color(col) m_img.updatePixels() j_img.loadPixels() for x, y in itertools.product(range(size_x), range(size_y)): loc = x + (y*width) col = julia(R_min + (x / float(size_x))*(R_max - R_min), I_min + (y / float(size_y))*(I_max - I_min), iterations) j_img.pixels[loc] = color(col) j_img.updatePixels() image(m_img, 0, 0) blend(j_img, 0, 0, m_img.width, m_img.height, 0, 0, j_img.width, j_img.height, DIFFERENCE)
24 notes
·
View notes
Photo

Neon Wave
https://editor.p5js.org/asarmiento/sketches/Ngnos3oN9
let tileSize = 50; // size tiles to make
let tiles; // list of tiles, created in setup()
let font; // font we'll use
function preload() {
font = loadFont("assets/manteka.ttf");
}
function setup() {
createCanvas(windowWidth, windowHeight);
// draw the text to a graphics object
let pg = createGraphics(width, height);
pg.background(255, 84, 238);
pg.textFont(font);
pg.textAlign(CENTER, CENTER);
pg.textSize(200);
pg.fill(148, 255, 162);
pg.stroke(162, 148, 255);
pg.strokeWeight(5);
pg.text("wave", pg.width / 2, pg.height / 2);
// additonal graphics
pg.textSize(20);
fill(0, 8, 255);
for (let i = 0; i < 100; i++) {
pg.text("ocean", random(pg.width), random(pg.height));
}
// creating tiles for our graphics
tiles = [];
for (let y = 0; y < pg.height; y += tileSize) {
for (let x = 0; x < pg.width; x += tileSize) {
let tile = new Tile(x, y, tileSize, pg);
tiles.push(tile);
}
}
print(tiles);
}
function draw() {
// background(50);
//for loop rendering tiles on canvas
for (let i = 0; i < tiles.length; i++) {
tiles[i].display();
}
}
class Tile {
constructor(x, y, w, pg) {
this.x = x;
this.y = y;
this.img = createImage(w, w);
this.img.copy(pg, x, y, w, w, 0, 0, w, w);
}
display() {
push();
translate(this.x, this.y);
rotate(map(mouseX, 1, width, 0, PI));
//scale(mouseX*.01, mouseY *.01);
shearX(mouseY * 0.05, mouseX * 0.05);
image(this.img, 0, 0);
pop();
}
}
1 note
·
View note
Photo

Creating wildlife images and being creative within the wildlife photography genre is a challenge. A combination of artistic view points, a thick skin for opinions and a technical know-how play a big role in one's journey. When time is limited and you don't have the luxury of consistently returning for the perfect "moment" technical knowledge gives you the option to create images rather than to simply photograph them. Just as understanding photographic laws gives you the confidence on how to break them. There isn't much overly creative about this image but understanding how to read an in-camera histogram allowed me to use the light to create something more striking than what initially met my eyes. PS: Did you see what disappeared from the before to the after? • • • • • • #wildlifephotography #wildlifeediting #wildlifeedit #photoediting #photoedit #photoshop #lightroom #createimages #canonaus #fstopgear #thisisafrica #rhino #photography — view on Instagram https://ift.tt/3kwyTwv
0 notes
Text
package KEIKONISSHI;
/*
* To change this license header, choose License Headers in Project Properties.
* To change this template file, choose Tools | Templates
* and open the template in the editor.
*/
import java.awt.*;
import javax.swing.*;
import java.awt.event.*;
import java.io.File;
import java.io.IOException;
import java.net.MalformedURLException;
import java.util.Random;
/**
*
* @author 石橋
*/
public class KEIKONISSHI extends JFrame implements KeyListener{
int Time = 0930;
KEIKONISSHI = new KEIKONISSHI();
//画像設定
KEIKONISSHI(){
super("KEIKONISSHI");
blackpp = getToolkit().getImage("D:\\engawa\\blackpp.png");
addKeyListener(this);
setDefaultCloseOperation(JFrame.EXIT_ON_CLOSE);
setBackground(Color.black);
setSize(1710, 1080);
setVisible(true);
}
public void paint(Graphics g)
{ Dimension frameSize = getSize();
Image frameBack = createImage(frameSize.width,frameSize.height);
Graphics b = frameBack.getGraphics();
Graphics2D g2 = (Graphics2D)g;
Font font = new Font("MSゴシック",Font.BOLD,50);
g2.setFont(font);
g2.setColor(Color.white);
Graphics2D g3 = (Graphics2D)b;
g3.setFont(font);
g3.setColor(Color.white);
b.drawImage(blackpp, 0, 0,1710,1080, this);
g3.drawString("7/10の稽古日誌です", 100, 10);
switch(Time){
case 1000 g3.drawString("上回生はみんな遅刻", 100, 90);
break;
case 1050 g3.drawString("地位エチュード", 100, 90);
//最大8人で大成功
break;
case 1130 g3.drawString("吊り橋エチュードトーナメント", 100, 90);
break;
case 1330 g3.drawString("発声・演劇講習会", 100, 90);
break;
case 1500 g3.drawString("長めの脚本の読み合わせ", 100, 90);
break;
}
g3.drawString("見に来てねー", 100, 210);
}
}
0 notes
Text
How Do You Create Banner Images
How do you create banner images?
Are you working in digital marketing or running your own small business and need to create banner images to promote business or give services to everyone? Yes, you can create banner images without having experience in designing. There are lots of tools that help you to create banner images without having knowledge of graphic design.
Generally, when running a small business, blogging, providing services, influencing, or many other things, you should know how to create banner images without any experience. In that blog, we will talk further about banner images and how to create banner images.
Will we talk about Photoshop? No, we will talk more about better applications where you can change the color and pixels, and you are done with the banner images. Many tools helpMany tools help you to create images, but. You can download Kinemaster Mod APK or Canva Mod APK to create banner images. You can create many other types of images except the banner images like DP images.
You need a mobile device to use these applications, which are free to use. Generally, a mobile phone is a commonly used device which mostly has. You need to register on them; after that, you can take advantage of these applications without a monthly subscription. But you need to download through APK files because they are illegible to upload to the Google Play Store. They can still be installed on your mobile in a different way, called APK installation.
What is a Banner Image:
Well, we all know about banner images, but in short, as a way to describe the services or other information, you can create images. In banner images, you can define your offers, services, coupon codes, cover photos, etc. If you have a small business, blogger, influencer, or any other, you can use it to create banner images.
We know about the image, and we know that we need Photoshop or any other image creator tool to create them. But they are all very expensive tools, and we need to have a piece of knowledge or learn them first to create images on them. It takes a lot of work to learn these tools. It would be best to learn them first via YouTube tutorials, or else you can learn via any other Institute.

There are many ways to create banner images. If you are good at designing, you can use Photoshop, Coral Draw, or other software, Kinemaster, Canva, etc. You can use these applications on your mobile to create them. Also, you can create other images for your social media DP like your name alphabet images, A letter images, R name DP, God Images, post images, or any other kind of images you can create.
How to Create Banner Images:
Many applications and software are offering you the opportunity to create images. Some of this software or applications are free to use, and some are paid. In some, you need to learn the software first to create images; in others, you can create banner images without experience.
Photoshop: The biggest image creator tool you can use to create images. It would be best to learn first from any institute or YouTube tutorial. After that, you need to install Photoshop on your laptop. You need to purchase it, but you can use it for the first seven days for free. So you need to pay for that software to use it to create images.
Kinemaster Mod: That’s a good mobile application to create images. You don’t need to learn that application to use it. It’s quite easy to use it to create banner images. You can use pre-defined templates, which you can get into that application. And use can use it to create banner images.
There are many other ways to create banner images. So, you can use these tools to create banner images.
Why to Create Banner images
Why do we need to create banner images if they are available freely over the internet? There are several reasons behind the creation of banner images. We will describe more.
Copyright issues: When you download banner images for your business purposes, it may cause an issue because you don’t know whether they are copyright-free or need to pay for them. So, instead of using someone’s pictures, if there are free tools, you should create the pictures yourself.
Google Ranking: When we talk about ranking, if you use the same images, Google won’t increase your image visibility over Google. That’s the reason behind creating banner images.
Safe Money: You can stop hiring a designer to create banner images as you can create banner images over Kinemaster without having any designing experience. So you can save your money as you can design yourself.
Types of Banner images:
There are many banners for running a small business, blogging, etc. You need to choose the right type of banner that you want to use for your business or personal purpose. Here are the types of banners that you should use to create images.
Promotional Banners: If you want to promote your business over Google, Facebook, Instagram or other media sites, you can use that promotional banner. You can put coupon code information or % discount.
Event Banners: Are you going to organize an event, or are you promoting your event images, then you can use event banner images. You can put your event information to join that event through social media.
Here
0 notes
Video
GLITCH ART
Glitch art follows an algorithmic style of creation, manipulating the parameters of any image and resizing/resetting them into another position. This example of my glitch sketch shows just a some createImage generated in p5js being manipulated with mouseX and Y.

1 note
·
View note
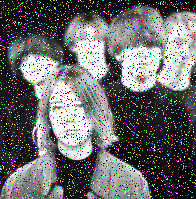
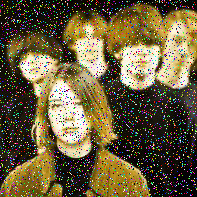
Text
Tarefa 13 - Aula 16 - Filtros
Título da tarefa: criar e explicar uma aplicação que, empregando variáveis para o controle de valores, realiza o processo abaixo numa imagem à sua escolha:

Imagem de exemplo da tarefa
Nessa aula os professores ensinaram, através de vários exercícios, a criar uma função que consegue ler as informações de cada pixel de uma imagem, guardar as mesmas e modificá-las para um reuso.
Para isso, uma configuração inicial a ser declarada é o modo de cor da aplicação, que será HSB onde H = Hue (matiz ou “cor pura”) , S = Saturation (saturação) e B = Brightness (brilho). Com a declaração desse modo de cor, se pode trabalhar e utilizar de várias maneiras esses parâmetros de cor, saturação e brilho.
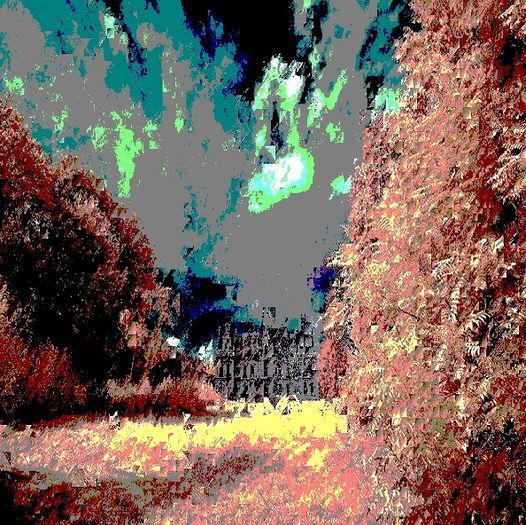
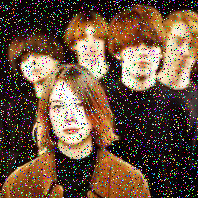
Assim, para esta atividade escolhi a seguinte imagem para ser trabalhada:

Imagem bem antiga da banda Slowdive
Para produzir os efeitos solicitados na imagem de referência da tarefa, carreguei a imagem original e criei variáveis para todas variações da mesma referentes a sua nova cor e variável para guardar a informação da imagem original, utilizadas na função “processaImage()”.
Além disso, criei uma função “Ruido”, que aplica o efeito de ruído em todas as imagens que, de forma básica, adiciona pixels em posições aleatórias em intervalos declarados do eixo x e y da imagem.
Esses foram os resultados:

Original com ruído
Tons de cinza (matiz = 0, saturação = 0 e brilho igual ao da imagem original)
Adição de vermelhos (matiz = 360 com saturação e brilho iguais aos da imagem original)

Adição de amarelos (matiz = 45 com saturação e brilho iguais aos da imagem original)
Este é o código dessa atividade:
PImage imgOriginal;
PImage imgDestino = createImage(200, 200, RGB);
PImage imgDestino2 = createImage(200, 200, RGB);
PImage imgDestino3 = createImage(200, 200, RGB);
PImage imgDestino4 = createImage(200, 200, RGB);
color corOriginal, corDestino1, corDestino2, corDestino3, corDestino4;
float red, green, blue;
void setup() {
size(1000, 200);
colorMode(HSB, 360, 100, 100);
imgOriginal = loadImage("slowdive.jpg");
imgDestino = loadImage("slowdive.jpg");
imgDestino2 = loadImage("slowdive.jpg");
imgDestino3 = loadImage("slowdive.jpg");
imgDestino4 = loadImage("slowdive.jpg");
image(imgOriginal, 0, 0);
processaImage();
Ruido();
image(imgDestino, 200, 0);
image(imgDestino2, 400, 0);
image(imgDestino3, 600, 0);
image(imgDestino4, 800, 0);
}
void draw() {
}
void processaImage() {
for (int i = 0; i<200; i++) {
for (int j = 0; j <200; j++) {
float h, s, b, result;
corOriginal = imgOriginal.get(i, j);
h = hue(corOriginal);
s = saturation(corOriginal);
b = brightness(corOriginal);
corDestino2 = color(0, 0, b);
imgDestino2.set(i, j, corDestino2);
corDestino3= color(360, s, b);
imgDestino3.set(i, j, corDestino3);
corDestino4 = color(45, s, b);
imgDestino4.set(i, j, corDestino4);
}
}
}
void Ruido() {
for (int i = 0; i<7000; i++) {
int x = int(random(200));
int y = int(random(200));
int x2 = int(random(200));
int y2 = int(random(200));
int x3 = int(random(200));
int y3 = int(random(200));
int x4 = int(random(200));
int y4 = int(random(200));
red = int(random(256));
green = int(random(256));
blue = int(random(256));
corDestino1 = color (red, green, blue);
corDestino2 = color (red, green, blue);
corDestino3 = color (red, green, blue);
corDestino4 = color (red, green, blue);
imgDestino.set(x, y, corDestino1);
imgDestino2.set(x2, y2, corDestino2);
imgDestino3.set(x2, y2, corDestino3);
imgDestino4.set(x2, y2, corDestino4);
}
}
0 notes
Last Seen Blogs
skies-of-skaia
Anna's Dumb Homestuck Blog

bugz-iz-here
ONYX-BUGZ

visualexe
Visualexe.

fanfan0279
Sans titre
laurens-german
just be with me.