#complete modular operation theatre setup
Text
If we talk about modular operation theater, then it is a bacteria-free area and it is also known as modular OT.
Modular Operation Theater is a space in hospitals that is designed for the safe treatment of patients. The more advanced it is, the more positive patient outcomes it provides. Today's operation theater includes a small equipment to large machines such as X-ray, anesthesia system, Operating table, Surgical lights, Electro cautery machine, Surgical microscope, Ventilator, Infusion pumps etc.
#modular pendants#modular well & ceiling panels#modular laminar air flow#modular hatch box#modular peripheral light#modular x-ray board#modular surgeon control panel#writing board#modular operation theatre surgical led light#modular ot door#modular pressure relief damper#modular scrub sinks#complete modular operation theatre setup#modular ot#modular ot cost#modular operation theatre#modular operation theater#modular ot design#modular ot door light#modular operation theatre design#nabh guidelines for modular ot#modular ot manufacturer#modular ot setup#modular ot supplier#modular ot manufacturer in india#modular operation theatre layout#modular ot equipment#modular ot hospital#hospital equipment#medical equipment
0 notes
Text
Reviews 367: The Visitor
A couple of years ago, Ai released II, which for me is one of the very best albums of space rock, psychedelia, and kosmische ever conceived…a sort of epic paean to all that is great about the tripped out planetarium sonics of both the early 70s and the early 90s. The album was put out by Hauch Records, an experimentally-minded label operating in the German underground that explores much else besides cosmic rock, including minimal drone, ambient, and dub amongst a range of other moods and styles. The label has a longstanding relationship with Ai, having also released the band’s self-titled LP in 2015. But even before that–back in 2011–Hauch released a record called Imitation of Nature from Ai’s keyboard shaman and synthesizer sorcerer Frank Bauer, who on his own explores imaginative worlds of modular magic as The Visitor. Earlier in 2020 and after an extended period of silence, Bauer and The Visitor returned with Installationen, a new LP+digital release on Hauch featuring music that accompanied an art exhibition in 2019, and that sees Bauer rigging his modular setup to play itself, which to paraphrase the liner notes, creates structures based on dualisms between repetition and evolution, and between composition and spontaneous generation. I’ll also mention here that for those who want more of these mystical modular incantations, Installationen was immediately preceded by a an EP called Instrumentals that contains four further pieces from the same sessions.
The Visitor - Installationen (Hauch, 2020)
“Installation I” opens with twinkling bell tones drifting in a fog, while android idiophones vibrate through a cold cosmic wind. Liquid oscillations evoke UFO landings as they periodically swoosh upon the mix, and also serve to provide the track with the barest semblance of structure. Industrial scrapes transform into fractal shards as they travel radially outwards, and airy pulses of bass signal mysterious pauses. Distorted feedback fades into mist and snaps of synthetic air land amidst cascading layers of growing and overblowing ambiance…all as chemtrails soar through a cloudy winter sky. Machines purr and coo while gong mallets strike massive metal pipes, creating waves of subsonic wonderment. Ghostly vocalizations intermingle with animalistic growls while organic clouds of bass hum emerge then disperse. Computers flicker and pulse as they execute strange algorithms which cause glitching tracers that repeate at hyperspeed, and the music alternately evokes for me the work of Experimental Audio Research, and Natural Snow Buildings at their most cold and abstract. Then, as everything starts fading, the track airs out, with temple tones sitting beneath a hopeful wash of synthesis.
In “Installation II,” a randomized robot orchestra tunes to the dawn, as machine strings and modular horns swirl into a mysterious miasma. Shadowy tones and glowing strands of starlight intermingle as buzzing blankets of interstellar warmth meet glacial walls of shimmer and shine, with sinister bass synthetics evoking the shadowspells of Igor Wakhevitch. Billowing banks of laser light, silent screams of feedbacking static, and fluid flashes of molten crystal flow together before giving way to moments of sickly tonal meditation, as bass buzz and midrange hum move through chromatic slides and disturbing harmonic abstractions. Hovering clouds of reverb and delay shade in the empty spaces with spectral hues and obscuring layers of interstellar dust, pillowy pads drift over one another in a deep lullaby dance, and blinding rainbows are birthed from decaying plumes of smoke while elsewhere, thousands of viols scream and scratch into a wall of drone mesmerism. Sorrowful whale songs distort beyond comprehension as they diffuse through star oceans and slow motion oscillations are born of resonances and misaligned vibrato until the track devolves into a primitive loop, which is chopped even further by a locked groove.

In “Installation III,” percussive sequences and modular electronics evoke tropical jungle hand drum ceremonials and minimalist mallet cascades as a shaman casts spells of fourth world magic overhead. Swaths of static blow in like a psychedelic breeze, satellite broadcasts flow around muted computations, and cracks in the ground spew vapors of all possible color. Bassline shadowforms add a further sense of groove…these barely there thuds and pulses repurposed for a forest fusion jam out…while blips and pings create virtual tapestries of insect chatter and birdsong. Millions of modular marimbas are chopped and looped in real time, creating a mesmeric collage of futurist exotica, while elsewhere, swirling shimmers, mirage sonics, and sonar pings smear into cooling haze. It’s as if a hyperspeed conga line is working its way through an island rainforest paradise, wherein metalloid liquids drip from palm fronds into boiling pools of alien fluid, creating strange reverberations that diffuse in every direction.
The vinyl trip ends with “Installation IV” and a calming bath of buzz accented by twinkles and brass synthesis. Reversing wisps dance in the air, bell tones are stretched into infinitely tall vertical structures, and hypnotizing sparkles pan through wavering whooshes and subdued thumps. It’s a study in using constant motion to achieve sonic stasis, with every single element sparkling, swishing, and vibrating, yet somehow causing time to stand still. Healing tones of feedback grow in intensity before dispersing into glimmering bodies of glass, and the modular synths again evoke idiophones–this time mbiras playing some faintly heard paean to the shining sun. Piercing globules of light move backwards and forwards in temporal displacement and a serene storm of synthesis emerges…like an automaton orchestra activated by a slow and stately sunrise. Ascending phaser streaks and drunken bass synths execute a randomized dream dance while all around, clustered gemstones refract solar light into an infinite web of chiming magnificence. And just as the A-side terminates with a locked groove, so does the B-side, with washed out loops cycling peacefully and eternally.

The trip continues into the digital realm with three further tracks, the first of which is “Installation V.” Smoldering drones and feedbacking flute tones move through atonal harmonizations, while a slowly growing pulse of fevered ambiance enters the scene. Melody is mostly abandoned in favor of texture and resonance, as a malarial fog of silvery synthesis and smoke-shrouded distortion generates flashes of white light and voids of deep darkness. The vibe progressively turns more hopeful as the harmonizing layers ease their oppressive dissonance amidst the calming dances of sci-fi pixie dusk. And from here, the track begins to resemble a mystic sound ceremony, with modulars mimicking gongs, bowed cymbals, and Tibetan bowls while sea crystal pan-pipes are effected into radar bleeps…the whole thing like the Theatre of Eternal Music or Pelt transformed into a machine meditation. As for “Installation VI,” plink plonking and madcap Berlin schools sequences fire, with cut-off manipulations moving the sounds between starlight sparkles, percussive pops, and broken morse code transmissions. The sense of motion and energy is completely arresting in comparison to the preceding track’s sonorous serenity, especially as tick tocking twinkles of multi-colored diamond rotate in maddening patterns. Mysterious vocal tones hover in the background…like chopped and looped mermaid choirs…their gothic ocean arias pulsing at lightspeed and calling to mind Klaus Schulze’s earliest epics, as well as Popol Vuh’s soundtrack work. Indeed, the track almost resembles a Herzog-ian river trek at times, only as if proceeding in hypersonic stop motion, and with minimal melodic development interrupting the interlocking sequential stardance.
The final piece is “Installation VII,” which begins with howling winds and phase-shifting cymbal splashes. Subsuming drones of darkness sit beneath zipping lasers and rushes of white noise, while percussive electronics ping-pong back and forth…their tones evoking hand drums and rainforest mallet instruments. Subsonic slides give a lazed shape to the groove–as well as a feeling of portending doom–and liquid gurgles join hydraulic machines and their vented puffs of compressed air. Sprays of crystalline vapor are as harsh as they are transfixing, and resonant fog banks quiver while obscuring all sight as gaseous blasts of light spread towards some infinitely distant horizon. At times glowing clouds of tonal mesmerism enter…these golden washes of hovering feedback and oceanic vibration that intermingle with sonar synths and wobbling walls of mutating drone mysterium...and again, the modulars evoke the meditative tones of gongs and temple idiophones. Granular blasts of galactic sound arc across the spectrum, ghostly melodies emerge at times while giving off an oscillatory glow, and towards the end, shimmering clouds of sound flow in, churn in place, then mysteriously disappear.
(images from my person copy with download code purposefully erased)
#the visitor#frank bauer#ai#hauch#hauch records#düsseldorf#art installation#art exhibition#installationen#LP+digital#modular#modular synth#kosmische#drone#ambient#spontaneous music#automatic generation#space music#planetarium drone#mystical#futuristic#balearic#tribal#tropical#fourth world#album reviews#music reviews#vinyl reviews#vinyl#2020
1 note
·
View note
Text
One year Diploma Courses in Chandigarh
One-year Diploma Courses in Chandigarh: Technology has become extensive and getting updated day by day. Every student should notice these details and must adapt and learn them as the field of Computers is becoming competitive regularly. But the problem of bright future students starts from their choice of career options after completing 12th. After the completion of 12th is an available many opportunity for students. Modular Courses are for Candidates who already have Knowledge in the field and want to gain the knowledge of the required technologies at an accelerated pace.
One year Diploma Courses in Chandigarh institute provides one of the best institutes for diploma courses. Our institute offers several one-year diploma courses. Many students find themselves in confusion after completing their 12th board exams. They find it difficult to choose from an ocean of streams and courses lying in front of them. We advise the students to do one-year diploma courses according to their skills. One of the primary reasons behind this confusion is that education doesn't come for free - it's a huge investment made with the primary goal of landing in a high paying job.
Diploma courses offer a shortcut to start earning rapidly compared to other degree courses. They are of shorter duration than a bachelor's degree and prepare students to be industry-ready. These Certification Courses Add weight to their existing Degree Certificates and can provide a winning edge to the Candidate during Job Hunting.
What is One Year Diploma Courses?
The diploma is a short-term course generally of 1year which mainly focuses on training students in a particular field. The admission in the One Year Diploma Course can be taken after clearing the high school examination (10th). The diploma is being done through recognized educational institutions or Universities.
One year Diploma Courses in Chandigarh offers several one-year diploma courses like diploma in digital marketing, diploma in web designing, diploma in computer application, etc. A diploma is a certificate or acts issued by an educational institution, such as a college or university, that attests that the recipient has successfully completed a particular course of study. The word diploma also refers to an academic award which is given after the completion of study in several courses such as a diploma in higher education, diploma in graduation or diploma in post-graduation etc. There are various kinds of diplomas available: from graduate to postgraduate and advanced diplomas.
Diplomas serve a mass of purposes for various students: they are sometimes used to bridge the gap between different phases of academic study or to provide additional professional training and qualifications. There are various one-year diplomas in a huge variety, each student is eligible for these diploma courses, if the students are studying in Arts, Humanities, Business, Biological, and Life Sciences, Engineering, Technology, Natural Sciences and even more. The variety of various diplomas can be enormous, don't let it stop you!
What are the types of One Year Diploma Course?
There are lots of one-year Diploma Courses available. Our Institute provides the following important diploma courses after 10th and 12th you can choose the best one of them for your brilliant future.
Diploma in Website Designing (DWN)
Web designing is a great chance for those who want to work independently. Web designing courses deal with several elements of making and maintaining a site. It consists of learning coding languages like HTML, PHP, JavaScript etc. There are many private institutes that offer such courses. Diploma Course in Chandigarh is one of the best institutes. The fees vary from institute to institute. This course is a one-year diploma course. After the completion of the course, the student is granted a diploma certificate in web designing. There are short courses also available (3- 6 months long). But it is better to go for professional web designing (1 year-long course). These days, we just can’t live without the internet! We use the internet to access various websites.
We retrieve websites for entertainment, social networking, online shopping, education and much more! See, websites are here to stay! Businesses – small, medium, and big – are infusing on websites to build a strong online presence. This has resulted in many jobs and projects for web designers and developers. In short, there are suitable job opportunities available out there. You require talent and creativity to make it big in this field. By being a web designer or developer, you may choose to work for an MNC type setup or become a freelancer. Web designing offers excellent self-employment opportunities.
Diploma in Digital Marketing (ADCHN)
Digital marketing is the best & hottest way of marketing nowadays. It is all about reaching customers via several digital channels like search engines, social media, email, and more. Diploma in Digital Marketing is a one year course. Digital Marketing Course Duration may also vary from 3 months to 6 months depending on your chosen online certification course or private institutes. Digital Marketing course content will make sure you master the art of online marketing by reaching your target audiences in a more powerful and accurate way through several digital channels, to impress and captivate them for converting them to customers. It helps you to develop and manage marketing techniques for your company website.
You will be certified by DMCA certification after completing the digital marketing course. The DMCA full form is Digital Marketing Certified Associate.DMCA certified course duration is three months. Digital Marketing is a huge and wide field and also it is one of the unique courses available in the computer field. It covers many subfields in it such as SEO, Content writing, Social Media, Email marketing, Affiliate marketing, Lead Generation, Analytics, A/B testing, SMO, Brand management, etc. This field can be advantageous for you if you want to encourage your brand and run a business or accurately run a business by your own blog etc. After the completion of the course, you can get into any of the following career opportunities:
Digital Marketer (independent)
Digital Marketing professional (work for agencies)
Online Brand Management professional
Social Media Manager
SEO professional (independent/ work for agencies)
SEO consultant
Digital Marketing instructor
Training Institute Chandigarh
Training Institute Chandigarh
Training Institute Chandigarh
Training Institute Chandigarh
Training Institute Chandigarh
Training Institute Chandigarh
Training Institute Chandigarh
Training Institute Chandigarh
Training Institute Chandigarh
Training Institute Chandigarh
Training Institute Chandigarh
Training Institute Chandigarh
Training Institute Chandigarh
Training Institute Chandigarh
Training Institute Chandigarh
Training Institute Chandigarh
Training Institute Chandigarh
Training Institute Chandigarh
Training Institute Chandigarh
Advance Diploma in Graphics & Animation (ADGA)
Advance Diploma in Graphics and Animation and optical Effects is a Diploma level intermatic, Animation, and Gaming course. Animation and Visual Effects are the processes by which imagery is created and operates outside the context of a live-action shot. The course is one and half year duration and career orienting in nature that offers numerous jobs in the multimedia industry. The course offers overall knowledge on 2D Classical & Digital, 3D Animation & Visual effects. Complete your Advance Diploma in Graphics in one year and an Animation course, animation and VFX course in our institute. After completion of this diploma course, You will get job opportunities in Production House, Direction, Animator, Graphic Designer Advertising Agency, VFX, StoryBoarding Artist
Diploma in Interior Design(DID)
Interior Design is a one-year ample diploma course in Interior Design breaks down the multifaceted discipline in smaller volumes for better understanding. With the one-year diploma course in Interior Design, Institute ensures that you will realize what the concept of being an Interior Design is all about. Arranging from the history of interior design and a theoretical understanding of graphic presentation, to ideal construction methods and the roles of an interior designer. This course in Interior Design will ensure that you get hands-on experience about the process required to plan, develop and execute exquisite and picturesque interior spaces.An Interior designer can work in an architectural firm or a construction company, Interior designing company, Exhibition centres, Event management companies, Design consultancies, Retailers, Theatre, tv and film, Photography, Teaching and Design journalism.Maximum, half of the graduates in employment six months after graduation are doing as interior decoration designers. Further, jobs in the top ten involve graphic designer, architect and draftsperson.
Advance Diploma in Animation and VFX
Advance Diploma in Animation and VFX courses deal with topics like visual effects, animation, 3D technology, graphics etc. Earlier, this course had few takers. But with the advancement of demand of VFX and Animation professionals, this course has become popular once again. Again, there are a number of good quality private institutes that offer animation courses. One of the best among them is Arena Multimedia. The fees vary from institute to institute. Animation artists and Experts are in much demand in the film industries all over the world. Nowadays, the number of animation movies has increased.
People love such movies. Also, the significance of using good optical effects in movies has gained. So graduates of this course can find jobs easily in such film production. The salary package is also great. You may also work independently. If you have skills, work will find you spontaneous! This job is not very simple. It requires lots of hard work and the animator has to work for long hours continuously. Choose this course only if you are really interested in animation and arts.
Diploma in Computer Application & Accounting (DCAA)
This is an Accounts aligned course that deals with the know-how of computers in accounts related work. This course will allow students to deal with accounts related problems through effective utilization of computer applications instead of old lengthy manual processes.Development of competent personnel who can excel in the field of accountancy with virtual application of related computer skills and packages. We offer Theoretical as well as practical knowledge of accounts related computer applications. Development of exclusive ideas for financial accounting. Eligibility of this course is minimum educational requirement is 8th passed, preferred knowledge of commerce. Duration of this course is divided into three types 3months, 6months, and 1 year. 1year diploma course is better than 3 or 6months. After this course one can earn good remuneration by working as an Office Assistant, Accounts Executive or Logistic Executive.
Diploma in Computer Application & Designing (DCAD)
Diploma in Computer Application & Designing Course is designed to aim at communicating a basic level IT Literacy program for the common man. This course has essentially been formulated with an idea of giving chance to the common man to achieve computer literacy thereby contributing to gained and speedy PC penetration in various walks of life. After completing the course the obligatory should be able to use the computer for basic purposes of preparing his personal/business letters, viewing information on the internet (the web), receiving & sending emails, preparing his business presentations, making ready small databases, etc. This helps the small business communities, housewives, etc. to keep their small accounts using the computers and like the world of Information Technology. This course is, designed to be more practical aligned. Eligibility for this course is completing the 10th class. The duration of this course is 1 year.
Diploma in Computer Networking (DCN)
Diploma in Computer Networking course provides computer professionals with a sound understanding of basic computer applications in programming languages, database management, systems analysis, computer software development in specific applications such as studies. Diploma in Computer Networking is open to anyone with knowledge of hardware. This hands-on course is our recommended syllabus for those who want to upgrade from hardware to Networking. This is an introductory course recommended for candidates wishing to enter the Network and System administration field. Diploma in Computer Networking is a one year course.
Diploma in Communication Techniques (DCT)
Diploma Computer Technology (DCT) - Computer Technology is a type of computer program. It means the applications and controlling systems used with computers. Diploma in Communication Techniques is a one year course. This course is part of the Computer Technology requirements that are required of all students who graduate. Along with reading, writing and arithmetic, computer technology is a required skill in today's technological world. The skills learned in this course will help you with your future education, employment and home life. Realize that the more you use computers, the more comfortable you will become with these great tools to help you flourish in everyday life.
Diploma in Fashion Technology (DFT)
Diploma Fashion Technology (DFT)- Fashion Technology defines itself as the beacon that signals the infinite opportunities available in the Indian Fashion Industry. We are committed to unearthing the most promising talents and putting them on the right path of academic achievements and professional fulfillment. If the Fashion Industry is where you aspire to be, learning the latest and most effective methodologies in Fashion is your goal and a trusted, Fashion is never a consequence of a single person, nor does it come from a single moment of imagination. It takes a lot of hard work, blood and sweat to make things happen when it comes to striking a perfect balance between class and vogue. Must have candidate should have pass in 10+2 or Graduation or equivalent
Advance Diploma in Information Technology (ADIT)
Develop your career in the field of information technology by doing a one-year advance diploma course in it. ADIT is a course that aims to prepare students in computer and networking fields, database management, web technologies and project management. It is created to meet the demand of specialists in the fields of computers, the internet, networking and software.
What are the benefits of taking a Diploma?
One year Diploma Course in Chandigarh offers the best quality of teaching. There are a number of benefits to obtaining a diploma. Employers seek out diploma-holders for their exhibit knowledge and understanding of their field. Students can conclude during the course of the diploma program if they would offer to start working right away upon graduation, or if they would like to try and transfer the credits they earn in a diploma program to a longer-term degree.
Why Join Us?
Provide high-quality education to our students, inspiring them to develop their abilities to the fullest and creating outstanding professionals and creative citizens.
We generate thorough diligence, new ideas, knowledge and skills, opportunities for personnel and society.
We help the students to develop their personality through several co-curricular and extracurricular, mental and physical campaigns.
At our institute, you get 100% Job after the course completion. Our placements will be in top companies with good starting salaries.
Unlike many others, we do not provide group training. We give you one 2 one personalized training. Our professional trainers standing on your shoulder will train you and help you each step of the way.
It is very essential in the artistic field to have your own portfolio. You are given professional projects from Day 1. When you learn the software you have to complete the projects.
We offer 25 years of extensive experience in training multimedia, animation, graphics, web designing, web development, interior design has proved our growing student demand in the professional industry.
Our institute is probably the only institute that provides you earn while you learn option before you finish your course. While you finish the course we get you a professional job after the 5th month.
We have been awarded by several Magazines, National Papers, News Channels as the most professional and innovative training institutes.
0 notes
Link
Best Car Component Speaker Installation Service and Cost in Austin TX |Mobile Auto Truck Repair Austin
more information is at: https://mobileautotruckrepairaustintx.com/car-component-speaker-installation-service-near-me/
Car Component Speaker Installation Service near Austin TX: Are you looking for the Best Car Component Speaker Installation Service near Austin TX ? Mobile Auto Truck Repair Austin, Depending on your vehicle and where you choose to place your components, they may require drilling or cutting. But don't be intimidated; this installation guide can help even first-time installers find their way through the process. Cost? Free estimates! Send us a message or call us today. Best Car Component Speaker Installation Service around Austin TX. We serve Austin TX and other areas. Get a Free Quote Now!
BEST CAR COMPONENT SPEAKER INSTALLATION SERVICE IN AUSTIN TX
AUSTIN CAR COMPONENT SPEAKER INSTALLATION
Car Component Speaker Installation Service near Austin TX:
At Mobile Auto Truck Repair Austin, we've never settled for ho-hum car sound and speakers firing at your knees leave a lot to be desired. For the best possible sound in your car, we recommend a component speaker system. Separate tweeters and woofers will mean a little more work on installation day, but years of enjoyment thanks to the three big audio advantages of component speakers.
Driving responsibly on the road requires that you avoid distractions as much as possible. For example, it’s a good idea to turn off your mobile phone, or put it in silent mode, so that you don’t get distracted by text messages (in fact, it’s illegal to use a hand-held mobile phone while driving on roads).
Unfortunately, automakers often install low-quality speakers in their cars (in order to save costs) that don’t sound great at low volumes. One solution is to invest in a quality component speaker system that increases the audio quality.
What are component car speakers?
Normal coaxial speakers, whether factory-installed or aftermarket, combine the woofer and tweeter into one speaker. It’s a convenient way to get decent sound from a single speaker opening, but the design of the woofer and tweeter are both compromised in this arrangement.
Component speakers, on the other hand, separate the two drivers and introduce a crossover to define the frequency range that each driver should operate at. Tweeters handle the subtle high range and, since higher frequencies are more directional than lower, they are mounted close to ear level. Woofers are usually mounted in your vehicle’s factory locations, most likely in the doors. Free from any physical interference from the tweeters, the more resonant low frequencies will create a solid foundation for the detailed highs.
Benefits of component speakers
1. Tonal clarity
The tweeters and woofers, in a component speaker system, are free to work at an enhanced level. More specifically, they will perform at a higher level for the frequencies assigned to them. An external crossover ensures that frequencies above a fixed point go to the tweeters, and those below go to the woofers. This prevents the different drivers from stretching to play frequencies that they can’t handle, increasing the definition of individual sounds and boosting the overall clarity.
2. Soundstage
Soundstage is the perceived wideness and depth that the speakers project. Instead of the music sounding like it’s coming from inside or close to your head, a well-set-up component speaker system will sound more spacious. A perfect example to illustrate this is the difference between a standalone speaker and a complete home theatre setup. When you compare the sound quality in a room, excellent Dolby Atmos soundbars will absolutely outshine a lone loudspeaker in terms of soundstage.
3. Sound imaging
Sound imaging refers to the perceived spatial locations of the sound sources in a sound recording, both laterally and in depth. It’s most readily appreciated in classical recordings, where various instruments are seated in different locations. By positioning the various parts of a component speaker system (tweeters, woofers and crossover) strategically, within your car, you can improve the sound imaging and create a three-dimensional reproduction of the music.
4. Customizability
Another advantage of component speaker systems over their coaxial counterparts is their higher level of customizability. For example, component speakers have split drivers, which means that you can configure them differently through an equalizer.
5. Modular system
A complete component speaker system includes tweeters and woofers among other components. The modular nature of this setup means that you can add additional, or upgrade specific, components incrementally and cost-effectively.
Component speakers installation
Car Component Speaker Installation Service near Austin TX: Component speaker systems use separate woofers, tweeters, and crossovers to send out detailed, dynamic sound. The crossovers send the low frequencies to the woofers and the highs to the tweeters, freeing up each driver to play with incredible clarity. Component speakers offer the listener greater imaging possibilities than full-range speakers via increased flexibility in placement, aim, and control. Getting the great sound that components have to offer does come with a price. Component speaker installations generally require more time and effort than coaxial speaker installations. Depending on your vehicle and where you choose to place your components, they may require drilling or cutting. But don't be intimidated; this installation guide can help even first-time installers find their way through the process.
What this guide provides
This installation guide will help you decide on the best location for your new components, as well as help you prepare for and complete the installation.
Woofer placement
The dash, doors, and kick panels serve as the most common homes for woofers. In many cases, you'll be able to mount the woofers in the factory speaker locations with little to no adjustments to the easy fit option. At most, you'll have to drill extra screw holes, cut a small area of metal or pressboard, or file the door panel. Modifying fit speakers requires a greater degree of cutting and drilling. Before you begin, you must be sure that modifications will not interfere with any car mechanisms, and that the speakers will fit securely. Though you can relocate any speaker, whether it be "easy" or "modify" fit, be aware that the process can be complicated and time-consuming, especially for first-time installers.
Tweeter placement
Many people choose to install their tweeters on the doors, the sail or kick panels, or the dash. Tweeter installations require some panel modifications, as very few vehicles come with factory tweeter mounts. The degree of modification depends on the mounting method. Just as it sounds, surface-mounting places the tweeter on top of a surface, with little to no modifications necessary. Of course, this method will leave you with a more noticeable installation. A flush-mount, on the other hand, gives a smooth, customized look. It requires cutting a hole into the door panel for the tweeter so it sits level with the interior panel. Whichever method you choose, most manufacturers recommend that you mount your tweeters within 12 of the woofers. Otherwise, the high and low frequencies may reach your ears at different times, resulting in a sonic wave cancellation or phase interference.
Crossover placement
Though crossovers usually require little in the way of car adaptation, finding the right place to house them can be tricky. The crossovers need to be kept in a place where they won't interfere with any of the car's moving parts, and where they won't get wet or vibrate. While some people choose to permanently mount them under the seats or on display, it's often just as easy to find a convenient spot for them behind the mounting panel near the speakers. The closer the crossover is to the speakers, the better, as the proximity will cut down on noise. The doors and behind the kick panels serve as two good options for housing crossovers.
When to use new wiring
If you're powering your new speakers with a factory or aftermarket stereo, the factory speaker wire already installed in your vehicle should work just fine. However, if you plan to install an external amplifier that's rated at 50 watts RMS or more per channel, then we recommend you run new speaker wire. 14- to 16-gauge wire should do the trick when running new speaker wire.
Add-ons
The following installation instructions will also apply if you are adding a set of speakers (midranges, tweeters) to your current aftermarket system.
Remember, as with any electronic installation, disconnect the negative cable on your battery before doing anything else. Also, make sure you have the necessary tools on hand (see above for details).
Door mounting woofers
Most car manufacturers build the factory woofers into the door and, often, your new woofer will easily fit into that factory speaker hole. You may still have to dismantle part of your door to install it, however. Here's how:
Removing the grille
With a flathead screwdriver, gently pry off the grille of the existing speaker. Car manufacturers usually create a notch in the grille for this very purpose. Grilles secured to the door or attached by friction fittings will require unscrewing or more aggressive prying.
Removing the door panel
You may need to remove the door panel to access the factory speaker, or to custom install your speakers. In this case, start by removing the window crank (if you have one). A screw at the pivot secures some cranks, but most come anchored by a spring clip. You can use a window-crank removal tool (available from Crutchfield) or a flathead screwdriver to remove this clip. To remove, depress the door panel until you can see behind the crank, turn the lever until you see the prongs of the clip, and gently push the crank off with the screwdriver. The clip will pop off, so be careful.
Remove armrest and rest of panel
Next, you'll have to remove the armrest by unscrewing a few phillips-head screws and some trim fittings around the handle. Once the armrest is unattached, you can remove the door panel. For most cars, you'll find the panel fastened by a few screws and friction fittings. With the screws removed, begin prying off the door panel at the bottom corner. Use a panel tool (available from Crutchfield) or, if you don't have one on hand, two putty knives can also do the trick. Once you loosen the bottom and sides, the panel should hang from some trim at the window well. Simply lift up on the trim, and the panel should come free.
Remove the old speaker
Carefully lift out the old speaker and detach it from the wiring harness. Some manufacturers use a sealant foam when mounting the original speakers, so you may need to cut through that with a utility knife. Set the factory wiring harness aside. You'll need to wire the woofer to the crossover before routing it to the head unit. See Page 5 for more wiring instructions.
Make adjustments accordingly
Usually, you'll be able to fit the new speaker into the hole with no difficulty, but sometimes the hole can be too narrow or shallow to accommodate it. In this case, you may have to file or trim part of your door or speaker opening, or anchor your speaker basket to the mounting location.
Surface-mounting
You should surface-mount your tweeters if you want to minimize labor time and modifications, or if you don't have the depth to flush-mount. Surface-mounting may also offer greater angle range than flush-mounting. With a surface-mount, a cup secured to a surface with a screw holds the tweeter in place. You will need to drill a small hole in the panel to secure the mounting cup and run the speaker leads to the tweeter (see previous page for instructions on removing the door panel).
Flush-mounting
The advantage of a flush-mount lies in its sleek, factory-look, since the tweeter does not protrude from the panel. Many manufacturers also include angle-mounts that allow you to aim the tweeters slightly, even when they're mounted within the panel. When flush- or angle-mounting your tweeters, you'll need to drill or cut a hole in the panel to accommodate the entire tweeter.
Installing flush-mount tweeters
First, trace the tweeter cup on the panel or dash. Use a drill with a serrated circular blade to cut the hole, and then trim it with a sharp knife. Mount the tweeter (your tweeter will come with specific instructions for this step).
Protecting the crossover
Make sure you house the crossover in a dry place, such as in a hollow space behind the plastic door panel. If you must mount it on the door metal, wrap the crossover in a plastic bag and tape the openings to keep it safe from moisture.
The crossover should be secure against vibration. Merely placing the crossover in the door or kick panel leaves it likely to be tossed around. Also, as with the speaker installation, you'll want to make sure the crossover does not interfere with any moving parts. Put the crossovers through the same rigorous tests as you did the speakers, specifically with respect to window and door mobility.
Wire networks
Since you'll most likely install the components in new, unwired locations, you'll have to spend some extra time wiring them. Component speakers also come with external crossovers, so the wires running from the receiver must first be routed to the crossover, and then to the individual woofers and tweeters. If connecting an amplifier as well, the amp should be wired between the receiver and the crossover.
Wiring through existing door boot
Once you've found the best location for your component system, you'll need to hook it up. Fortunately, most cars sport a rubber boot that connects between the door and the car body. Using this boot as a conduit, run your speaker wires off the door, underneath the kick panels, and to your receiver or external amplifier. You can easily do this by taping the wire to a straightened coat hanger and fishing everything through the interior panels.
Test-driving your system
At this point, you'll want to test your system before fully reassembling your doors. Loosely attach the door panel to the door, barring the window crank. If you chose to bottom-mount your speakers, mount your speakers in the door before hanging the panel. Holding the speaker in its new hole, mark the screw holes; then remove the speaker, and drill accordingly.
Pull the wires through the door and attach them to the speaker. As long as you're consistent, it does not matter which terminal you use as positive and negative. Next, hang the speaker in the door. You may need to use "speed" clips (often provided) to give the speaker screws extra support. With all speakers in place, you can listen to your stereo to make sure it works to your liking. Once you're satisfied, finish reattaching your door panel.
Cutting a wire hole
If your car doesn't have a rubber boot, you'll have to drill a 5/8" hole to string the wiring through. Before drilling, make sure the hole will have access to the desired speaker location, as structural steel sometimes blocks the edge of the door. Cover any sharp edges of the hole with a rubber grommet, several layers of electrical tape, or some flexible tubing. Make sure the door will stay open all the way, and that the wire will not get pinched by the hinges or door jamb. Once you finish drilling and cutting, vacuum all metal debris before finally installing the speakers to prevent rattling or shorts.
Custom woofer installation
Nothing competes with placing your speakers in the location that you determine emits the best possible sound. You may even end up locating your woofers in locations that don't already have speaker holes. In that case, you need to make some. Here's what you need to know.
For more information on this, check out the Mobile Auto Truck Repair Austin.
TIPS
Car Component Speaker Installation Service near Austin TX: Choosing a professional to install speakers ensures the job is done right.
Some general steps for car speaker’s installation:
● First of all you should disconnect the battery that supplies the power.
● Disassemble the doors you wish to insert the audio system in
● Eliminate the default speakers
● It also requires expulsion of dash, or back shelf interior boards to get to the speaker mounting place
If you're thinking about upgrading your car audio, there are a few things to keep in mind. And it all starts with where the weakest part of the system is. Not enough volume? Lack of solid bass response? Figuring out the weakness helps you formulate a plan of action.
New car? Take the turn-it-up test.
You just bought a new car or truck – and you love it. It smells good, looks good, drives like a dream… and there’s not a single M&M or runaway french-fry under the seat. (Yet.) Awesome, congratulations. Now, get in the driver’s seat and play the stereo. Loud. As in All The Way Up Loud.
Assuming you‘ve already done this, two things: 1) We’re not here to bum you out or tell you anything you don’t already know, like your new car audio is seriously lacking, and 2) You’re not alone. Truth is, every new car and truck comes with less-than-impressive sound systems (even premium sound systems can be improved upon, believe it or not). The good news: upgrading your car's sound system won’t cost a fortune or require ruining your car’s clean original equipment manufacturers (OEM) look. More on that in a moment.
Older car? Skip the turn-it-up test.
You know your car like the back of your hand. And though you can’t turn back the odometer or make it look showroom clean, it’s a good car in spite of its age. (Note: Eddie Van Halen is 62. Aretha Franklin is 75. Both still bring the house down.) Our point is that no matter how old your car is, you can get that new car buzz back again with a killer sound system in one of two ways: 1) By replacing elements of the sound system – speakers, amps, touch screens, etc. – in a way that doesn’t change your car’s OEM look, or 2) Going all in with a balls-to-the-wall car audio system that’s more about blowing your mind vs. keeping a look.
Choose the right speaker size to fit your car.
There are tons of car speaker size options to choose from.
If you’re looking to keep your car’s OEM look, then you want to replace your existing speakers with speakers of the same size. (Have 6.5 speakers in the front doors of your Honda Civic? Get 6.5 speakers as replacements.)
Stick with your current car speaker style.
Before you start looking at new car speakers, you’ll want to know if your current speaker style is component or coaxial. Depending on which one you currently have, you'll want to keep it consistent when you shop for new speakers.
COST
How much does it cost to get a new Component Speaker Installation in your car?
Shop car electronics professional installation
Entertainment Regular Price
Advanced In-Dash Navigation or
In-Dash Video Installation $99.99
Standard Speaker Installation $64.99
Component Speaker Installation $99.99
Rear-Seat Video Installation $119.99–$199.99
Cost for new speakers
In terms of costs, again, the sky’s the limit.
A speaker upgrade can cost as little as $100 up to several thousand dollars depending on the scope of work and type of speaker. Cook says the cost of a subwoofer can run as low as $37.Mobile Auto Truck Repair Austin sells a subwoofer package that includes an amplifier and an enclosure for $299.
For a pair of car speakers, Mobile Auto Truck Repair Austin start prices at $39, with an average cost of about $70 for installation. Adding an anti-vibrator to a pair of speakers costs another $25.
Nevitt, meanwhile, charges as little as $99 for a pair of some decent speakers. The cost of an hour of installation, which is typically how long it takes to install a pair of speakers, is $67.But most customers spend much more.
Paying a total of $800 to $1000 is not out of the realm of possibility.
FREQUENTLY ASKED QUESTIONS
What are component car speakers?
Normal coaxial speakers, whether factory-installed or aftermarket, combine the woofer and tweeter into one speaker. It’s a convenient way to get decent sound from a single speaker opening, but the design of the woofer and tweeter are both compromised in this arrangement.
What advantages do component speakers have over their counterparts coaxial speakers ?
Because component speakers separate all their drivers, they can provide better stereo-imaging as well as much more detailed and rich sound than you could expect from coaxial speakers.
What we like the most about component speakers, is that you can mount the tweeters wherever you assume they can perform at their best. Additionally, the separate crossovers will forward the highs and lows to the proper driver – highs to the tweeters and lows to the woofers. As a rule, if you want your component speakers to really shine out, you’ll want to drive them by an external amplifier.
My new component speakers aren’t what I’ve been expecting. What’s wrong ?
There are a few things you need to do to get your speakers to sound at their best:
● Check your tweeter attenuation switch – Try switching it off to attenuate the highs that overpower the sound output.
● Are your speakers properly powered? If you’ve got some power greedy speakers, don’t expect too much out of them if you’re running them off your receiver. Remember that by under powering your speakers, you risk voiding your warranty.
● You might want to consider installing foam baffles and dynamat in your doors
Which car speakers will fit my car ?
Car speakers are classified by cone size. This size isn’t the only thing you’ll have to take into consideration. Sometimes speakers are too deep for the locations they’re meant to go in. Different speakers can fit different enclosures by using mounting brackets. In addition, sometimes minor modifications are necessary to make your speaker fit their mounting location. Almost all online retailers including Amazon carry a huge database of car’s brands, make, year and models and thus they’re able to tell if a given set of speakers will fit your vehicle or not.
Can I install my new car speakers myself ?
Yes you can, It’s not that complicated at all, especially if your speakers are of coaxial type. If that’s the case, then it’s just a matter of removing the old speakers and dropping the new ones in their mounting locations, connecting a few wires and you’re good to go. However, if you’ve bought component speakers, then be prepared to put in some effort into installing them.
Can I keep my factory speaker’s wires ?
Factory speakers wires are just fine. They can be used with aftermarket speakers if you’re running them off a factory or aftermarket stereo. However, if this is your first step in upgrading your entire sound system, and you intend to add one or multiple sub(s) and amp(s) down the road, then it’s highly recommended to change these wires.
Do speakers with higher sensitivity rating sound better ?
Sensitivity rating doesn’t tell you how good or not so good a speaker sounds. It only indicates how effectively your speakers convert power applied to them into volume. However, the higher the better. Don’t get us wrong, speakers with low sensitivity rating can also sound great, but they require a very powerful external amplifier or a high-powered receiver.
How much power Is enough for my new speakers ?
The amount of power your speakers require is nominated by RMS power handling (Root Mean Square), exceeding this power range by a little bit will boost your overall sound quality. That being said, a speaker with lower RMS power handling is best suited for being powered by a factory or aftermarket stereo, while speakers with higher RMS will work better with an external amp.
It’s important to match up your speakers with the right amp. Make sure the RMS number on your amp matches the RMS rating on your speakers. If there’s a huge gap between the power handling rating of both your speakers and amp, your speakers could be under-powered, or even overpowered, which could put your speakers at risk. However, technically speaking, the risk of under-powering your speakers is much greater than overpowering them.
CALL FOR US:
● Car Component Speaker Installation Service Near Austin TX
● Installing Component Speakers With Amp
● Installing Component Speakers Without Crossover
● How To Wire Component Speakers To 4 Channel Amp
● Best Component Speakers
● Installing Component Speakers Without Amp
● Car Audio Crossover Installation Diagram
● Do Component Speakers Need An Amp Near Austin TX
● 6.5'' Component Speakers
● Best Component Speakers For Car
● Car Speakers 6 Inch
● Car Speakers Price
● Car Component Speakers
● Car Speakers Sony
● 4 Inch Car Speakers With Good Bass
● Best Speakers For Car
● Sony 500 Watt Car Speakers Price Near Austin TX
BEST CAR COMPONENT SPEAKER INSTALLATION SERVICE IN AUSTIN TX
MOBILE AUTO TRUCK REPAIR AUSTIN
REQUEST MORE INFORMATION. CONTACT US NOW!
Contact Details
Mobile Auto Truck Repair Austin
Best Mobile Mechanic & Mobile Auto Truck Repair in Austin Texas
Call US: (512) 649-5322
Location: Texas, Austin
Monday-Sunday 24 Hours
www.mobileautotruckrepairaustintx.com
Zip Codes in Austin, Texas:
76527 (Florence) 76530 (Granger) 76537 (Jarrell) 76573 (Schwertner) 76574 (Taylor) 76578 (Thrall)
78602 (Bastrop) 78610 (Buda) 78612 (Cedar Creek) 78613 (Cedar Park) 78615 (Coupland) 78616 (Dale)
78617 (Del Valle) 78619 (Driftwood) 78620 (Dripping Springs) 78621 (Elgin) 78622 (Fentress) 78626
(Georgetown) 78628 (Georgetown) 78633 (Georgetown) 78634 (Hutto) 78640 (Kyle) 78641 (Leander)
78642 (Liberty Hill) 78644 (Lockhart) 78645 (Lago Vista) 78648 (Luling) 78650 (Mc Dade) 78652
(Manchaca) 78653 (Manor) 78655 (Martindale) 78656 (Maxwell) 78659 (Paige) 78660 (Pflugerville)
78661 (Prairie Lea) 78662 (Red Rock) 78664 (Round Rock) 78665 (Round Rock) 78666 (San Marcos)
78669 (Spicewood) 78676 (Wimberley) 78681 (Round Rock) 78701 | 78702 | 78703 | 78704 | 78705 |
78712 | 78717 | 78719 | 78721 | 78722 | 78723 | 78724 | 78725 (Hornsby Bend) 78726 | 78727 |
78728 (Wells Branch) 78729 (Jollyville) 78730 | 78731 | 78732 | 78733 | 78734 (Lakeway) 78735 |
78736 | 78737 | 78738 (Bee Cave) 78739 | 78741 | 78742 | 78744 | 78745 | 78746 | 78747 | 78748 |
78749 | 78750 | 78751 | 78752 | 78753 | 78754 | 78756 | 78757 | 78758 | 78759 | 78953 (Rosanky)
78957 (Smithville)
#Roadsideassistance. #Emergencyroadsideassistance #CommercialTowing
#Carlockouts #HeavyTransportation #Flatbedtowservice
0 notes
Link
Best Car Component Speaker Installation Service and Cost in Albuquerque NM |Mobile Mechanics of Albuquerque
More information is at:
http://mobilemechanicalbuquerque.org/car-component-speaker-installation-service-near-me/
Are you looking for the Best Car Component Speaker Installation Service near Albuquerque NM ? Mobile Mechanics of Albuquerque,Depending on your vehicle and where you choose to place your components, they may require drilling or cutting. But don't be intimidated; this installation guide can help even first-time installers find their way through the process.Cost? Free estimates! Send us a message or call us today. Best Car Component Speaker Installation Service around Albuquerque NM. We serve Albuquerque NMand other areas. Get a Free Quote Now!
BEST CAR COMPONENT SPEAKER INSTALLATION SERVICE IN ALBUQUERQUE NM
ALBUQUERQUECAR COMPONENT SPEAKER INSTALLATION
Car Component Speaker Installation Service near Albuquerque NM:
At Mobile Mechanics of Albuquerque, we've never settled for ho-hum car sound and speakers firing at your knees leave a lot to be desired. For the best possible sound in your car, we recommend a component speaker system. Separate tweeters and woofers will mean a little more work on installation day, but years of enjoyment thanks to the three big audio advantages of component speakers.
Driving responsibly on the road requires that you avoid distractions as much as possible. For example, it’s a good idea to turn off your mobile phone, or put it in silent mode, so that you don’t get distracted by text messages (in fact, it’s illegal to use a hand-held mobile phone while driving on roads).
Unfortunately, automakers often install low-quality speakers in their cars (in order to save costs) that don’t sound great at low volumes. One solution is to invest in a quality component speaker system that increases the audio quality.
What are component car speakers?
Normal coaxial speakers, whether factory-installed or aftermarket, combine the woofer and tweeter into one speaker. It’s a convenient way to get decent sound from a single speaker opening, but the design of the woofer and tweeter are both compromised in this arrangement.
Component speakers, on the other hand, separate the two drivers and introduce a crossover to define the frequency range that each driver should operate at. Tweeters handle the subtle high range and, since higher frequencies are more directional than lower, they are mounted close to ear level. Woofers are usually mounted in your vehicle’s factory locations, most likely in the doors. Free from any physical interference from the tweeters, the more resonant low frequencies will create a solid foundation for the detailed highs.
Benefits of component speakers
1. Tonal clarity
The tweeters and woofers, in a component speaker system, are free to work at an enhanced level. More specifically, they will perform at a higher level for the frequencies assigned to them. An external crossover ensures that frequencies above a fixed point go to the tweeters, and those below go to the woofers. This prevents the different drivers from stretching to play frequencies that they can’t handle, increasing the definition of individual sounds and boosting the overall clarity.
2. Soundstage
Soundstage is the perceived wideness and depth that the speakers project. Instead of the music sounding like it’s coming from inside or close to your head, a well-set-up component speaker system will sound more spacious. A perfect example to illustrate this is the difference between a standalone speaker and a complete home theatre setup. When you compare the sound quality in a room, excellent Dolby Atmos soundbars will absolutely outshine a lone loudspeaker in terms of soundstage.
3. Sound imaging
Sound imaging refers to the perceived spatial locations of the sound sources in a sound recording, both laterally and in depth. It’s most readily appreciated in classical recordings, where various instruments are seated in different locations. By positioning the various parts of a component speaker system (tweeters, woofers and crossover) strategically, within your car, you can improve the sound imaging and create a three-dimensional reproduction of the music.
4. Customizability
Another advantage of component speaker systems over their coaxial counterparts is their higher level of customizability. For example, component speakers have split drivers, which means that you can configure them differently through an equalizer.
5. Modular system
A complete component speaker system includes tweeters and woofers among other components. The modular nature of this setup means that you can add additional, or upgrade specific, components incrementally and cost-effectively.
Component speakers installation
Car Component Speaker Installation Service near Albuquerque NM: Component speaker systems use separate woofers, tweeters, and crossovers to send out detailed, dynamic sound. The crossovers send the low frequencies to the woofers and the highs to the tweeters, freeing up each driver to play with incredible clarity. Component speakers offer the listener greater imaging possibilities than full-range speakers via increased flexibility in placement, aim, and control. Getting the great sound that components have to offer does come with a price. Component speaker installations generally require more time and effort than coaxial speaker installations. Depending on your vehicle and where you choose to place your components, they may require drilling or cutting. But don't be intimidated; this installation guide can help even first-time installers find their way through the process.
What this guide provides
This installation guide will help you decide on the best location for your new components, as well as help you prepare for and complete the installation.
Woofer placement
The dash, doors, and kick panels serve as the most common homes for woofers. In many cases, you'll be able to mount the woofers in the factory speaker locations with little to no adjustments to the easy fit option. At most, you'll have to drill extra screw holes, cut a small area of metal or pressboard, or file the door panel. Modifying fit speakers requires a greater degree of cutting and drilling. Before you begin, you must be sure that modifications will not interfere with any car mechanisms, and that the speakers will fit securely. Though you can relocate any speaker, whether it be "easy" or "modify" fit, be aware that the process can be complicated and time-consuming, especially for first-time installers.
Tweeter placement
Many people choose to install their tweeters on the doors, the sail or kick panels, or the dash. Tweeter installations require some panel modifications, as very few vehicles come with factory tweeter mounts. The degree of modification depends on the mounting method. Just as it sounds, surface-mounting places the tweeter on top of a surface, with little to no modifications necessary. Of course, this method will leave you with a more noticeable installation. A flush-mount, on the other hand, gives a smooth, customized look. It requires cutting a hole into the door panel for the tweeter so it sits level with the interior panel. Whichever method you choose, most manufacturers recommend that you mount your tweeters within 12 of the woofers. Otherwise, the high and low frequencies may reach your ears at different times, resulting in a sonic wave cancellation or phase interference.
Crossover placement
Though crossovers usually require little in the way of car adaptation, finding the right place to house them can be tricky. The crossovers need to be kept in a place where they won't interfere with any of the car's moving parts, and where they won't get wet or vibrate. While some people choose to permanently mount them under the seats or on display, it's often just as easy to find a convenient spot for them behind the mounting panel near the speakers. The closer the crossover is to the speakers, the better, as the proximity will cut down on noise. The doors and behind the kick panels serve as two good options for housing crossovers.
When to use new wiring
If you're powering your new speakers with a factory or aftermarket stereo, the factory speaker wire already installed in your vehicle should work just fine. However, if you plan to install an external amplifier that's rated at 50 watts RMS or more per channel, then we recommend you run new speaker wire. 14- to 16-gauge wire should do the trick when running new speaker wire.
Add-ons
The following installation instructions will also apply if you are adding a set of speakers (midranges, tweeters) to your current aftermarket system.
Remember, as with any electronic installation, disconnect the negative cable on your battery before doing anything else. Also, make sure you have the necessary tools on hand (see above for details).
Door mounting woofers
Most car manufacturers build the factory woofers into the door and, often, your new woofer will easily fit into that factory speaker hole. You may still have to dismantle part of your door to install it, however. Here's how:
Removing the grille
With a flathead screwdriver, gently pry off the grille of the existing speaker. Car manufacturers usually create a notch in the grille for this very purpose. Grilles secured to the door or attached by friction fittings will require unscrewing or more aggressive prying.
Removing the door panel
You may need to remove the door panel to access the factory speaker, or to custom install your speakers. In this case, start by removing the window crank (if you have one). A screw at the pivot secures some cranks, but most come anchored by a spring clip. You can use a window-crank removal tool (available from Crutchfield) or a flathead screwdriver to remove this clip. To remove, depress the door panel until you can see behind the crank, turn the lever until you see the prongs of the clip, and gently push the crank off with the screwdriver. The clip will pop off, so be careful.
Remove armrest and rest of panel
Next, you'll have to remove the armrest by unscrewing a few phillips-head screws and some trim fittings around the handle. Once the armrest is unattached, you can remove the door panel. For most cars, you'll find the panel fastened by a few screws and friction fittings. With the screws removed, begin prying off the door panel at the bottom corner. Use a panel tool (available from Crutchfield) or, if you don't have one on hand, two putty knives can also do the trick. Once you loosen the bottom and sides, the panel should hang from some trim at the window well. Simply lift up on the trim, and the panel should come free.
Remove the old speaker
Carefully lift out the old speaker and detach it from the wiring harness. Some manufacturers use a sealant foam when mounting the original speakers, so you may need to cut through that with a utility knife. Set the factory wiring harness aside. You'll need to wire the woofer to the crossover before routing it to the head unit. See Page 5 for more wiring instructions.
Make adjustments accordingly
Usually, you'll be able to fit the new speaker into the hole with no difficulty, but sometimes the hole can be too narrow or shallow to accommodate it. In this case, you may have to file or trim part of your door or speaker opening, or anchor your speaker basket to the mounting location.
Surface-mounting
You should surface-mount your tweeters if you want to minimize labor time and modifications, or if you don't have the depth to flush-mount. Surface-mounting may also offer greater angle range than flush-mounting. With a surface-mount, a cup secured to a surface with a screw holds the tweeter in place. You will need to drill a small hole in the panel to secure the mounting cup and run the speaker leads to the tweeter (see previous page for instructions on removing the door panel).
Flush-mounting
The advantage of a flush-mount lies in its sleek, factory-look, since the tweeter does not protrude from the panel. Many manufacturers also include angle-mounts that allow you to aim the tweeters slightly, even when they're mounted within the panel. When flush- or angle-mounting your tweeters, you'll need to drill or cut a hole in the panel to accommodate the entire tweeter.
Installing flush-mount tweeters
First, trace the tweeter cup on the panel or dash. Use a drill with a serrated circular blade to cut the hole, and then trim it with a sharp knife. Mount the tweeter (your tweeter will come with specific instructions for this step).
Protecting the crossover
Make sure you house the crossover in a dry place, such as in a hollow space behind the plastic door panel. If you must mount it on the door metal, wrap the crossover in a plastic bag and tape the openings to keep it safe from moisture.
The crossover should be secure against vibration. Merely placing the crossover in the door or kick panel leaves it likely to be tossed around. Also, as with the speaker installation, you'll want to make sure the crossover does not interfere with any moving parts. Put the crossovers through the same rigorous tests as you did the speakers, specifically with respect to window and door mobility.
Wire networks
Since you'll most likely install the components in new, unwired locations, you'll have to spend some extra time wiring them. Component speakers also come with external crossovers, so the wires running from the receiver must first be routed to the crossover, and then to the individual woofers and tweeters. If connecting an amplifier as well, the amp should be wired between the receiver and the crossover.
Wiring through existing door boot
Once you've found the best location for your component system, you'll need to hook it up. Fortunately, most cars sport a rubber boot that connects between the door and the car body. Using this boot as a conduit, run your speaker wires off the door, underneath the kick panels, and to your receiver or external amplifier. You can easily do this by taping the wire to a straightened coat hanger and fishing everything through the interior panels.
Test-driving your system
At this point, you'll want to test your system before fully reassembling your doors. Loosely attach the door panel to the door, barring the window crank. If you chose to bottom-mount your speakers, mount your speakers in the door before hanging the panel. Holding the speaker in its new hole, mark the screw holes; then remove the speaker, and drill accordingly.
Pull the wires through the door and attach them to the speaker. As long as you're consistent, it does not matter which terminal you use as positive and negative. Next, hang the speaker in the door. You may need to use "speed" clips (often provided) to give the speaker screws extra support. With all speakers in place, you can listen to your stereo to make sure it works to your liking. Once you're satisfied, finish reattaching your door panel.
Cutting a wire hole
If your car doesn't have a rubber boot, you'll have to drill a 5/8" hole to string the wiring through. Before drilling, make sure the hole will have access to the desired speaker location, as structural steel sometimes blocks the edge of the door. Cover any sharp edges of the hole with a rubber grommet, several layers of electrical tape, or some flexible tubing. Make sure the door will stay open all the way, and that the wire will not get pinched by the hinges or door jamb. Once you finish drilling and cutting, vacuum all metal debris before finally installing the speakers to prevent rattling or shorts.
Custom woofer installation
Nothing competes with placing your speakers in the location that you determine emits the best possible sound. You may even end up locating your woofers in locations that don't already have speaker holes. In that case, you need to make some. Here's what you need to know.
For more information on this, check out the Mobile Mechanics of Albuquerque.
TIPS
Car Component Speaker Installation Service near Albuquerque NM: Choosing a professional to install speakers ensures the job is done right.
Some general steps for car speaker’s installation:
● First of all you should disconnect the battery that supplies the power.
● Disassemble the doors you wish to insert the audio system in
● Eliminate the default speakers
● It also requires expulsion of dash, or back shelf interior boards to get to the speaker mounting place
If you're thinking about upgrading your car audio, there are a few things to keep in mind. And it all starts with where the weakest part of the system is. Not enough volume? Lack of solid bass response? Figuring out the weakness helps you formulate a plan of action.
New car? Take the turn-it-up test.
You just bought a new car or truck – and you love it. It smells good, looks good, drives like a dream… and there’s not a single M&M or runaway french-fry under the seat. (Yet.) Awesome, congratulations. Now, get in the driver’s seat and play the stereo. Loud. As in All The Way Up Loud.
Assuming you‘ve already done this, two things: 1) We’re not here to bum you out or tell you anything you don’t already know, like your new car audio is seriously lacking, and 2) You’re not alone. Truth is, every new car and truck comes with less-than-impressive sound systems (even premium sound systems can be improved upon, believe it or not). The good news: upgrading your car's sound system won’t cost a fortune or require ruining your car’s clean original equipment manufacturers (OEM) look. More on that in a moment.
Older car? Skip the turn-it-up test.
You know your car like the back of your hand. And though you can’t turn back the odometer or make it look showroom clean, it’s a good car in spite of its age. (Note: Eddie Van Halen is 62. Aretha Franklin is 75. Both still bring the house down.) Our point is that no matter how old your car is, you can get that new car buzz back again with a killer sound system in one of two ways: 1) By replacing elements of the sound system – speakers, amps, touch screens, etc. – in a way that doesn’t change your car’s OEM look, or 2) Going all in with a balls-to-the-wall car audio system that’s more about blowing your mind vs. keeping a look.
Choose the right speaker size to fit your car.
There are tons of car speaker size options to choose from.
If you’re looking to keep your car’s OEM look, then you want to replace your existing speakers with speakers of the same size. (Have 6.5 speakers in the front doors of your Honda Civic? Get 6.5 speakers as replacements.)
Stick with your current car speaker style.
Before you start looking at new car speakers, you’ll want to know if your current speaker style is component or coaxial. Depending on which one you currently have, you'll want to keep it consistent when you shop for new speakers.
COST
How much does it cost to get a new Component Speaker Installation in your car?
Shop car electronics professional installation
Entertainment Regular Price
Advanced In-Dash Navigation or
In-Dash Video Installation $99.99
Standard Speaker Installation $64.99
Component Speaker Installation $99.99
Rear-Seat Video Installation $119.99–$199.99
Cost for new speakers
In terms of costs, again, the sky’s the limit.
A speaker upgrade can cost as little as $100 up to several thousand dollars depending on the scope of work and type of speaker.Cook says the cost of a subwoofer can run as low as $37.Mobile Mechanics of Albuquerque sells a subwoofer package that includes an amplifier and an enclosure for $299.
For a pair of car speakers,Mobile Mechanics of Albuquerque start prices at $39, with an average cost of about $70 for installation. Adding an anti-vibrator to a pair of speakers costs another $25.
Nevitt, meanwhile, charges as little as $99 for a pair of some decent speakers. The cost of an hour of installation, which is typically how long it takes to install a pair of speakers, is $67.But most customers spend much more.
Paying a total of $800 to $1000 is not out of the realm of possibility.
FREQUENTLY ASKED QUESTIONS
What are component car speakers?
Normal coaxial speakers, whether factory-installed or aftermarket, combine the woofer and tweeter into one speaker. It’s a convenient way to get decent sound from a single speaker opening, but the design of the woofer and tweeter are both compromised in this arrangement.
What advantages do component speakers have over their counterparts coaxial speakers ?
Because component speakers separate all their drivers, they can provide better stereo-imaging as well as much more detailed and rich sound than you could expect from coaxial speakers.
What we like the most about component speakers, is that you can mount the tweeters wherever you assume they can perform at their best. Additionally,the separate crossovers will forward the highs and lows to the proper driver – highs to the tweeters and lows to the woofers. As a rule, if you want your component speakers to really shine out, you’ll want to drive them by an external amplifier.
My new component speakers aren’t what I’ve been expecting.What’s wrong ?
There are a few things you need to do to get your speakers to sound at their best:
● Check your tweeter attenuation switch – Try switching it off to attenuate the highs that overpower the sound output.
● Are your speakers properly powered? If you’ve got some power greedy speakers, don’t expect too much out of them if you’re running them off your receiver. Remember that by underpowering your speakers, you risk voiding your warranty.
● You might want to consider installing foam baffles and dynamat in your doors
Which car speakers will fit my car ?
Car speakers are classified by cone size.This size isn’t the only thing you’ll have to take into consideration. Sometimes speakers are too deep for the locations they’re meant to go in.Different speakers can fit different enclosures by using mounting brackets. In addition, sometimes minor modifications are necessary to make your speaker fit their mounting location. Almost all online retailers including Amazon carry a huge database of car’s brands, make, year and models and thus they’re able to tell if a given set of speakers will fit your vehicle or not.
Can I install my new car speakers myself ?
Yes you can, It’s not that complicated at all, especially if your speakers are of coaxial type. If that’s the case, then it’s just a matter of removing the old speakers and dropping the new ones in their mounting locations, connecting a few wires and you’re good to go. However, if you’ve bought component speakers, then be prepared to put in some effort into installing them.
Can I keep my factory speaker’s wires ?
Factory speakers wires are just fine. They can be used with aftermarket speakers if you’re running them off a factory or aftermarket stereo. However, if this is your first step in upgrading your entire sound system, and you intend to add one or multiple sub(s) and amp(s) down the road, then it’s highly recommended to change these wires.
Do speakers with higher sensitivity rating sound better ?
Sensitivity rating doesn’t tell you how good or not so good a speaker sounds. It only indicates how effectively your speakers convert power applied to them into volume. However, the higher the better. Don’t get us wrong, speakers with low sensitivity rating can also sound great, but they require a very powerful external amplifier or a high-powered receiver.
How much power Is enough for my new speakers ?
The amount of power your speakers require is nominated by RMS power handling (Root Mean Square), exceeding this power range by a little bit will boost your overall sound quality. That being said, a speaker with lower RMS power handling is best suited for being powered by a factory or aftermarket stereo, while speakers with higher RMS will work better with an external amp.
It’s important to match up your speakers with the right amp. Make sure the RMS number on your amp matches the RMS rating on your speakers. If there’s a huge gap between the power handling rating of both your speakers and amp, your speakers could be under-powered, or even overpowered, which could put your speakers at risk. However, technically speaking, the risk of under-powering your speakers is much greater than overpowering them.
CALL FOR US:
● Car Component Speaker Installation Service Near Albuquerque NM
● Installing Component Speakers With Amp
● Installing Component Speakers Without Crossover
● How To Wire Component Speakers To 4 Channel Amp
● Best Component Speakers
● Installing Component Speakers Without Amp
● Car Audio Crossover Installation Diagram
● Do Component Speakers Need An Amp Near Albuquerque NM
● 6.5'' Component Speakers
● Best Component Speakers For Car
● Car Speakers 6 Inch
● Car Speakers Price
● Car Component Speakers
● Car Speakers Sony
● 4 Inch Car Speakers With Good Bass
● Best Speakers For Car
● Sony 500 Watt Car Speakers Price Near Albuquerque NM
BEST CAR COMPONENT SPEAKER INSTALLATION SERVICE IN ALBUQUERQUE NM
MOBILE MECHANICS OF ALBUQUERQUE
REQUEST MORE INFORMATION. CONTACT US NOW!
0 notes
Link
Best Car Component Speaker Installation Service and Cost in Omaha NE |Mobile Mechanics of Omaha
More information is at: http://24hourautotruckrepairOmaha.org/car-component-speaker-installation-near-me/
Car Component Speaker Installation Service near Omaha NE: Are you looking for the Best Car Component Speaker Installation Service near Omaha NE ? Mobile Mechanics of Omaha, Depending on your vehicle and where you choose to place your components, they may require drilling or cutting. But don't be intimidated; this installation guide can help even first-time installers find their way through the process. Cost? Free estimates! Send us a message or call us today. Best Car Component Speaker Installation Service around Omaha NE. We serve Omaha NE and other areas. Get a Free Quote Now!
BEST CAR COMPONENT SPEAKER INSTALLATION SERVICE IN OMAHA NE
OMAHA CAR COMPONENT SPEAKER INSTALLATION
Car Component Speaker Installation Service near Omaha NE:
At Mobile Mechanics of Omaha, we've never settled for ho-hum car sound and speakers firing at your knees leave a lot to be desired. For the best possible sound in your car, we recommend a component speaker system. Separate tweeters and woofers will mean a little more work on installation day, but years of enjoyment thanks to the three big audio advantages of component speakers.
Driving responsibly on the road requires that you avoid distractions as much as possible. For example, it’s a good idea to turn off your mobile phone, or put it in silent mode, so that you don’t get distracted by text messages (in fact, it’s illegal to use a hand-held mobile phone while driving on roads).
Unfortunately, automakers often install low-quality speakers in their cars (in order to save costs) that don’t sound great at low volumes. One solution is to invest in a quality component speaker system that increases the audio quality.
What are component car speakers?
Normal coaxial speakers, whether factory-installed or aftermarket, combine the woofer and tweeter into one speaker. It’s a convenient way to get decent sound from a single speaker opening, but the design of the woofer and tweeter are both compromised in this arrangement.
Component speakers, on the other hand, separate the two drivers and introduce a crossover to define the frequency range that each driver should operate at. Tweeters handle the subtle high range and, since higher frequencies are more directional than lower, they are mounted close to ear level. Woofers are usually mounted in your vehicle’s factory locations, most likely in the doors. Free from any physical interference from the tweeters, the more resonant low frequencies will create a solid foundation for the detailed highs.
Benefits of component speakers
1. Tonal clarity
The tweeters and woofers, in a component speaker system, are free to work at an enhanced level. More specifically, they will perform at a higher level for the frequencies assigned to them. An external crossover ensures that frequencies above a fixed point go to the tweeters, and those below go to the woofers. This prevents the different drivers from stretching to play frequencies that they can’t handle, increasing the definition of individual sounds and boosting the overall clarity.
2. Soundstage
Soundstage is the perceived wideness and depth that the speakers project. Instead of the music sounding like it’s coming from inside or close to your head, a well-set-up component speaker system will sound more spacious. A perfect example to illustrate this is the difference between a standalone speaker and a complete home theatre setup. When you compare the sound quality in a room, excellent Dolby Atmos soundbars will absolutely outshine a lone loudspeaker in terms of soundstage.
3. Sound imaging
Sound imaging refers to the perceived spatial locations of the sound sources in a sound recording, both laterally and in depth. It’s most readily appreciated in classical recordings, where various instruments are seated in different locations. By positioning the various parts of a component speaker system (tweeters, woofers and crossover) strategically, within your car, you can improve the sound imaging and create a three-dimensional reproduction of the music.
4. Customizability
Another advantage of component speaker systems over their coaxial counterparts is their higher level of customizability. For example, component speakers have split drivers, which means that you can configure them differently through an equalizer.
5. Modular system
A complete component speaker system includes tweeters and woofers among other components. The modular nature of this setup means that you can add additional, or upgrade specific, components incrementally and cost-effectively.
Component speakers installation
Car Component Speaker Installation Service near Omaha NE: Component speaker systems use separate woofers, tweeters, and crossovers to send out detailed, dynamic sound. The crossovers send the low frequencies to the woofers and the highs to the tweeters, freeing up each driver to play with incredible clarity. Component speakers offer the listener greater imaging possibilities than full-range speakers via increased flexibility in placement, aim, and control. Getting the great sound that components have to offer does come with a price. Component speaker installations generally require more time and effort than coaxial speaker installations. Depending on your vehicle and where you choose to place your components, they may require drilling or cutting. But don't be intimidated; this installation guide can help even first-time installers find their way through the process.
What this guide provides
This installation guide will help you decide on the best location for your new components, as well as help you prepare for and complete the installation.
Woofer placement
The dash, doors, and kick panels serve as the most common homes for woofers. In many cases, you'll be able to mount the woofers in the factory speaker locations with little to no adjustments to the easy fit option. At most, you'll have to drill extra screw holes, cut a small area of metal or pressboard, or file the door panel. Modifying fit speakers requires a greater degree of cutting and drilling. Before you begin, you must be sure that modifications will not interfere with any car mechanisms, and that the speakers will fit securely. Though you can relocate any speaker, whether it be "easy" or "modify" fit, be aware that the process can be complicated and time-consuming, especially for first-time installers.
Tweeter placement
Many people choose to install their tweeters on the doors, the sail or kick panels, or the dash. Tweeter installations require some panel modifications, as very few vehicles come with factory tweeter mounts. The degree of modification depends on the mounting method. Just as it sounds, surface-mounting places the tweeter on top of a surface, with little to no modifications necessary. Of course, this method will leave you with a more noticeable installation. A flush-mount, on the other hand, gives a smooth, customized look. It requires cutting a hole into the door panel for the tweeter so it sits level with the interior panel. Whichever method you choose, most manufacturers recommend that you mount your tweeters within 12 of the woofers. Otherwise, the high and low frequencies may reach your ears at different times, resulting in a sonic wave cancellation or phase interference.
Crossover placement
Though crossovers usually require little in the way of car adaptation, finding the right place to house them can be tricky. The crossovers need to be kept in a place where they won't interfere with any of the car's moving parts, and where they won't get wet or vibrate. While some people choose to permanently mount them under the seats or on display, it's often just as easy to find a convenient spot for them behind the mounting panel near the speakers. The closer the crossover is to the speakers, the better, as the proximity will cut down on noise. The doors and behind the kick panels serve as two good options for housing crossovers.
When to use new wiring
If you're powering your new speakers with a factory or aftermarket stereo, the factory speaker wire already installed in your vehicle should work just fine. However, if you plan to install an external amplifier that's rated at 50 watts RMS or more per channel, then we recommend you run new speaker wire. 14- to 16-gauge wire should do the trick when running new speaker wire.
Add-ons
The following installation instructions will also apply if you are adding a set of speakers (midranges, tweeters) to your current aftermarket system.
Remember, as with any electronic installation, disconnect the negative cable on your battery before doing anything else. Also, make sure you have the necessary tools on hand (see above for details).
Door mounting woofers
Most car manufacturers build the factory woofers into the door and, often, your new woofer will easily fit into that factory speaker hole. You may still have to dismantle part of your door to install it, however. Here's how:
Removing the grille
With a flathead screwdriver, gently pry off the grille of the existing speaker. Car manufacturers usually create a notch in the grille for this very purpose. Grilles secured to the door or attached by friction fittings will require unscrewing or more aggressive prying.
Removing the door panel
You may need to remove the door panel to access the factory speaker, or to custom install your speakers. In this case, start by removing the window crank (if you have one). A screw at the pivot secures some cranks, but most come anchored by a spring clip. You can use a window-crank removal tool (available from Crutchfield) or a flathead screwdriver to remove this clip. To remove, depress the door panel until you can see behind the crank, turn the lever until you see the prongs of the clip, and gently push the crank off with the screwdriver. The clip will pop off, so be careful.
Remove armrest and rest of panel
Next, you'll have to remove the armrest by unscrewing a few phillips-head screws and some trim fittings around the handle. Once the armrest is unattached, you can remove the door panel. For most cars, you'll find the panel fastened by a few screws and friction fittings. With the screws removed, begin prying off the door panel at the bottom corner. Use a panel tool (available from Crutchfield) or, if you don't have one on hand, two putty knives can also do the trick. Once you loosen the bottom and sides, the panel should hang from some trim at the window well. Simply lift up on the trim, and the panel should come free.
Remove the old speaker
Carefully lift out the old speaker and detach it from the wiring harness. Some manufacturers use a sealant foam when mounting the original speakers, so you may need to cut through that with a utility knife. Set the factory wiring harness aside. You'll need to wire the woofer to the crossover before routing it to the head unit. See Page 5 for more wiring instructions.
Make adjustments accordingly
Usually, you'll be able to fit the new speaker into the hole with no difficulty, but sometimes the hole can be too narrow or shallow to accommodate it. In this case, you may have to file or trim part of your door or speaker opening, or anchor your speaker basket to the mounting location.
Surface-mounting
You should surface-mount your tweeters if you want to minimize labor time and modifications, or if you don't have the depth to flush-mount. Surface-mounting may also offer greater angle range than flush-mounting. With a surface-mount, a cup secured to a surface with a screw holds the tweeter in place. You will need to drill a small hole in the panel to secure the mounting cup and run the speaker leads to the tweeter (see previous page for instructions on removing the door panel).
Flush-mounting
The advantage of a flush-mount lies in its sleek, factory-look, since the tweeter does not protrude from the panel. Many manufacturers also include angle-mounts that allow you to aim the tweeters slightly, even when they're mounted within the panel. When flush- or angle-mounting your tweeters, you'll need to drill or cut a hole in the panel to accommodate the entire tweeter.
Installing flush-mount tweeters
First, trace the tweeter cup on the panel or dash. Use a drill with a serrated circular blade to cut the hole, and then trim it with a sharp knife. Mount the tweeter (your tweeter will come with specific instructions for this step).
Protecting the crossover
Make sure you house the crossover in a dry place, such as in a hollow space behind the plastic door panel. If you must mount it on the door metal, wrap the crossover in a plastic bag and tape the openings to keep it safe from moisture.
The crossover should be secure against vibration. Merely placing the crossover in the door or kick panel leaves it likely to be tossed around. Also, as with the speaker installation, you'll want to make sure the crossover does not interfere with any moving parts. Put the crossovers through the same rigorous tests as you did the speakers, specifically with respect to window and door mobility.
Wire networks
Since you'll most likely install the components in new, unwired locations, you'll have to spend some extra time wiring them. Component speakers also come with external crossovers, so the wires running from the receiver must first be routed to the crossover, and then to the individual woofers and tweeters. If connecting an amplifier as well, the amp should be wired between the receiver and the crossover.
Wiring through existing door boot
Once you've found the best location for your component system, you'll need to hook it up. Fortunately, most cars sport a rubber boot that connects between the door and the car body. Using this boot as a conduit, run your speaker wires off the door, underneath the kick panels, and to your receiver or external amplifier. You can easily do this by taping the wire to a straightened coat hanger and fishing everything through the interior panels.
Test-driving your system
At this point, you'll want to test your system before fully reassembling your doors. Loosely attach the door panel to the door, barring the window crank. If you chose to bottom-mount your speakers, mount your speakers in the door before hanging the panel. Holding the speaker in its new hole, mark the screw holes; then remove the speaker, and drill accordingly.
Pull the wires through the door and attach them to the speaker. As long as you're consistent, it does not matter which terminal you use as positive and negative. Next, hang the speaker in the door. You may need to use "speed" clips (often provided) to give the speaker screws extra support. With all speakers in place, you can listen to your stereo to make sure it works to your liking. Once you're satisfied, finish reattaching your door panel.
Cutting a wire hole
If your car doesn't have a rubber boot, you'll have to drill a 5/8" hole to string the wiring through. Before drilling, make sure the hole will have access to the desired speaker location, as structural steel sometimes blocks the edge of the door. Cover any sharp edges of the hole with a rubber grommet, several layers of electrical tape, or some flexible tubing. Make sure the door will stay open all the way, and that the wire will not get pinched by the hinges or door jamb. Once you finish drilling and cutting, vacuum all metal debris before finally installing the speakers to prevent rattling or shorts.
Custom woofer installation
Nothing competes with placing your speakers in the location that you determine emits the best possible sound. You may even end up locating your woofers in locations that don't already have speaker holes. In that case, you need to make some. Here's what you need to know.
For more information on this, check out the Mobile Mechanics of Omaha.
TIPS
Car Component Speaker Installation Service near Omaha NE: Choosing a professional to install speakers ensures the job is done right.
Some general steps for car speaker’s installation:
● First of all you should disconnect the battery that supplies the power.
● Disassemble the doors you wish to insert the audio system in
● Eliminate the default speakers
● It also requires expulsion of dash, or back shelf interior boards to get to the speaker mounting place
If you're thinking about upgrading your car audio, there are a few things to keep in mind. And it all starts with where the weakest part of the system is. Not enough volume? Lack of solid bass response? Figuring out the weakness helps you formulate a plan of action.
New car? Take the turn-it-up test.
You just bought a new car or truck – and you love it. It smells good, looks good, drives like a dream… and there’s not a single M&M or runaway french-fry under the seat. (Yet.) Awesome, congratulations. Now, get in the driver’s seat and play the stereo. Loud. As in All The Way Up Loud.
Assuming you‘ve already done this, two things: 1) We’re not here to bum you out or tell you anything you don’t already know, like your new car audio is seriously lacking, and 2) You’re not alone. Truth is, every new car and truck comes with less-than-impressive sound systems (even premium sound systems can be improved upon, believe it or not). The good news: upgrading your car's sound system won’t cost a fortune or require ruining your car’s clean original equipment manufacturers (OEM) look. More on that in a moment.
Older car? Skip the turn-it-up test.
You know your car like the back of your hand. And though you can’t turn back the odometer or make it look showroom clean, it’s a good car in spite of its age. (Note: Eddie Van Halen is 62. Aretha Franklin is 75. Both still bring the house down.) Our point is that no matter how old your car is, you can get that new car buzz back again with a killer sound system in one of two ways: 1) By replacing elements of the sound system – speakers, amps, touch screens, etc. – in a way that doesn’t change your car’s OEM look, or 2) Going all in with a balls-to-the-wall car audio system that’s more about blowing your mind vs. keeping a look.
Choose the right speaker size to fit your car.
There are tons of car speaker size options to choose from.
If you’re looking to keep your car’s OEM look, then you want to replace your existing speakers with speakers of the same size. (Have 6.5 speakers in the front doors of your Honda Civic? Get 6.5 speakers as replacements.)
Stick with your current car speaker style.
Before you start looking at new car speakers, you’ll want to know if your current speaker style is component or coaxial. Depending on which one you currently have, you'll want to keep it consistent when you shop for new speakers.
COST
How much does it cost to get a new Component Speaker Installation in your car?
Shop car electronics professional installation
Entertainment Regular Price
Advanced In-Dash Navigation or
In-Dash Video Installation $99.99
Standard Speaker Installation $64.99
Component Speaker Installation $99.99
Rear-Seat Video Installation $119.99–$199.99
Cost for new speakers
In terms of costs, again, the sky’s the limit.
A speaker upgrade can cost as little as $100 up to several thousand dollars depending on the scope of work and type of speaker. Cook says the cost of a subwoofer can run as low as $37.Mobile Mechanics of Omaha sells a subwoofer package that includes an amplifier and an enclosure for $299.
For a pair of car speakers, Mobile Mechanics of Omaha start prices at $39, with an average cost of about $70 for installation. Adding an anti-vibrator to a pair of speakers costs another $25.
Nevitt, meanwhile, charges as little as $99 for a pair of some decent speakers. The cost of an hour of installation, which is typically how long it takes to install a pair of speakers, is $67.But most customers spend much more.
Paying a total of $800 to $1000 is not out of the realm of possibility.
FREQUENTLY ASKED QUESTIONS
What are component car speakers?
Normal coaxial speakers, whether factory-installed or aftermarket, combine the woofer and tweeter into one speaker. It’s a convenient way to get decent sound from a single speaker opening, but the design of the woofer and tweeter are both compromised in this arrangement.
What advantages do component speakers have over their counterparts coaxial speakers ?
Because component speakers separate all their drivers, they can provide better stereo-imaging as well as much more detailed and rich sound than you could expect from coaxial speakers.
What we like the most about component speakers, is that you can mount the tweeters wherever you assume they can perform at their best. Additionally, the separate crossovers will forward the highs and lows to the proper driver – highs to the tweeters and lows to the woofers. As a rule, if you want your component speakers to really shine out, you’ll want to drive them by an external amplifier.
My new component speakers aren’t what I’ve been expecting. What’s wrong ?
There are a few things you need to do to get your speakers to sound at their best:
● Check your tweeter attenuation switch – Try switching it off to attenuate the highs that overpower the sound output.
● Are your speakers properly powered? If you’ve got some power greedy speakers, don’t expect too much out of them if you’re running them off your receiver. Remember that by under powering your speakers, you risk voiding your warranty.
● You might want to consider installing foam baffles and dynamat in your doors
Which car speakers will fit my car ?
Car speakers are classified by cone size. This size isn’t the only thing you’ll have to take into consideration. Sometimes speakers are too deep for the locations they’re meant to go in. Different speakers can fit different enclosures by using mounting brackets. In addition, sometimes minor modifications are necessary to make your speaker fit their mounting location. Almost all online retailers including Amazon carry a huge database of car’s brands, make, year and models and thus they’re able to tell if a given set of speakers will fit your vehicle or not.
Can I install my new car speakers myself ?
Yes you can, It’s not that complicated at all, especially if your speakers are of coaxial type. If that’s the case, then it’s just a matter of removing the old speakers and dropping the new ones in their mounting locations, connecting a few wires and you’re good to go. However, if you’ve bought component speakers, then be prepared to put in some effort into installing them.
Can I keep my factory speaker’s wires ?
Factory speakers wires are just fine. They can be used with aftermarket speakers if you’re running them off a factory or aftermarket stereo. However, if this is your first step in upgrading your entire sound system, and you intend to add one or multiple sub(s) and amp(s) down the road, then it’s highly recommended to change these wires.
Do speakers with higher sensitivity rating sound better ?
Sensitivity rating doesn’t tell you how good or not so good a speaker sounds. It only indicates how effectively your speakers convert power applied to them into volume. However, the higher the better. Don’t get us wrong, speakers with low sensitivity rating can also sound great, but they require a very powerful external amplifier or a high-powered receiver.
How much power Is enough for my new speakers ?
The amount of power your speakers require is nominated by RMS power handling (Root Mean Square), exceeding this power range by a little bit will boost your overall sound quality. That being said, a speaker with lower RMS power handling is best suited for being powered by a factory or aftermarket stereo, while speakers with higher RMS will work better with an external amp.
It’s important to match up your speakers with the right amp. Make sure the RMS number on your amp matches the RMS rating on your speakers. If there’s a huge gap between the power handling rating of both your speakers and amp, your speakers could be under-powered, or even overpowered, which could put your speakers at risk. However, technically speaking, the risk of under-powering your speakers is much greater than overpowering them.
CALL FOR US:
● Car Component Speaker Installation Service Near Omaha NE
● Installing Component Speakers With Amp
● Installing Component Speakers Without Crossover
● How To Wire Component Speakers To 4 Channel Amp
● Best Component Speakers
● Installing Component Speakers Without Amp
● Car Audio Crossover Installation Diagram
● Do Component Speakers Need An Amp Near Omaha NE
● 6.5'' Component Speakers
● Best Component Speakers For Car
● Car Speakers 6 Inch
● Car Speakers Price
● Car Component Speakers
● Car Speakers Sony
● 4 Inch Car Speakers With Good Bass
● Best Speakers For Car
● Sony 500 Watt Car Speakers Price Near Omaha NE
BEST CAR COMPONENT SPEAKER INSTALLATION SERVICE IN OMAHA NE
Mobile Mechanics of Omaha
REQUEST MORE INFORMATION. CONTACT US NOW!
CONTACT US:
Mobile Mechanics of Omaha
24-hour mobile mechanic roadside assistance services in Omaha NE!
CALL (531) 233-6154 MOBILE MECHANIC
CALL (402) 401 7564 TOWING SERVICE OMAHA
CALL (402) 590 8094 ROADSIDE ASSISTANCE
WEBISTE:
www.24hourautotruckrepairOmaha.org
http://www.mobileautorepairOmaha.com/
http://www.mobilemechanicOmaha.com/
SERVICE AREA:
Communities we serve: Omaha, Carter Lake, Council Bluffs, Crescent, Bellevue, Boys Town, La Vista, Papillion, Honey Creek, Offutt A F B, Bennington, Fort Calhoun, Washington, Elkhorn, St Columbans, Underwood, Kennard, Mc Clelland, Mineola, Waterloo, Springfield, Missouri Valley, Treynor, Cedar Creek, Gretna, Blair, Valley, Neola, Pacific Junction, Plattsmouth, Silver City, Glenwood, Louisville, Yutan, Arlington, Minden, Modale, South Bend, Logan, Murray, Ashland, Mead, Persia, Memphis, Manley, Magnolia, Macedonia, Malvern, Fremont, Carson, Oakland, Herman, Murdock, Nickerson, Shelby, Weeping Water, Hastings, Mondamin, Henderson, Ithaca, Hancock, Nehawka, Tabor, Union, Greenwood, Thurman, Portsmouth, Woodbine, Colon, Wahoo, Avoca, Emerson, Winslow, Avoca, Elmwood, Little Sioux, Cedar Bluffs, Pisgah, Tekamah, Alvo, Randolph, Ames, Hooper, Panama, Craig, Waverly, Ceresco, Percival, Otoe, Imogene, Malmo, Sidney, Uehling, Walnut, Harlan, Westphalia, Eagle, Lincoln, Dunlap, Moorhead, Red Oak, Morse Bluff, Weston, Griswold, Blencoe, Earling, Davey, Dunbar, Nebraska City, North Bend, Unadilla, Elliott, Lewis, Prague, Syracuse, Marne, Scribner, Oakland, Palmyra, Pilot Grove, Walton, Riverton, Farragut, Shenandoah, Valparaiso, Lorton, Essex, Soldier, Hamburg, Defiance, Kirkman, Raymond, Dow City, Stanton, Atlantic, Decatur, Bennet, Elk Horn, Snyder, Lyons, Kimballton, Irwin, Arion, Malcolm, West Point, Panama, Roca, Dodge, Manilla, Yorktown, Northboro, Coin, Hickman, Denton, Bancroft, Aspinwall, Sprague, Clarinda, Martell, Blanchard, Manning, Beemer, College Springs, Shambaugh, Braddyville, 50022, 51432, 51446, 51447, 51454, 51455, 51501, 51502, 51503, 51510, 51520, 51521, 51523, 51525, 51526, 51527, 51528, 51529, 51530, 51531, 51532, 51533, 51534, 51535, 51536, 51537, 51540, 51541, 51542, 51543, 51544, 51545, 51546, 51548, 51549, 51550, 51551, 51552, 51553, 51554, 51555, 51556, 51557, 51558, 51559, 51560, 51561, 51562, 51563, 51564, 51565, 51566, 51570, 51571, 51572, 51573, 51575, 51576, 51577, 51578, 51579, 51591, 51593, 51601, 51602, 51603, 51630, 51631, 51632, 51636, 51637, 51638, 51639, 51640, 51645, 51647, 51648, 51649, 51650, 51651, 51652, 51653, 51654, 51656, 52648, 68002, 68003, 68004, 68005, 68007, 68008, 68009, 68010, 68015, 68016, 68017, 68018, 68019, 68020, 68022, 68023, 68025, 68026, 68028, 68029, 68031, 68033, 68034, 68037, 68038, 68040, 68041, 68042, 68044, 68045, 68046, 68048, 68050, 68056, 68057, 68058, 68059, 68061, 68063, 68064, 68065, 68066, 68068, 68069, 68070, 68072, 68073, 68101, 68102, 68103, 68104, 68105, 68106, 68107, 68108, 68109, 68110, 68111, 68112, 68113, 68114, 68116, 68117, 68118, 68119, 68120, 68122, 68123, 68124, 68127, 68128, 68130, 68131, 68132, 68133, 68134, 68135, 68136, 68137, 68138, 68139, 68142, 68144, 68145, 68147, 68152, 68154, 68155, 68157, 68164, 68172, 68175, 68176, 68178, 68179, 68180, 68181, 68182, 68183, 68197, 68198, 68304, 68307, 68317, 68336, 68339, 68346, 68347, 68349, 68366, 68372, 68382, 68402, 68403, 68404, 68407, 68409, 68410, 68413, 68417, 68418, 68419, 68428, 68430, 68438, 68446, 68454, 68455, 68461, 68462, 68463, 68501, 68502, 68503, 68504, 68505, 68506, 68507, 68508, 68509, 68510, 68512, 68514, 68516, 68517, 68520, 68521, 68522, 68523, 68524, 68526, 68527, 68528, 68529, 68531, 68532, 68542, 68583, 68588, 68621, 68633, 68648, 68649, 68664, 68716, 68788
#MobileMechanic
#RoadsideAssistance
#towingService
#Omaha
#NE
#autotruckrepair
#RVRepair
0 notes
Link
looking for Car Component Speaker Installation near McAllen TX? Mobile Mechanics Of McAllen offer Car Component Speaker Installation .Call Us! Best Car Component Speaker Installation Service and Cost in McAllen TX |Mobile Mechanics Of McAllen
More information is at:
http://24hourmobileautorepairmcallen.org/car-component-speaker-installation-service-near-me/
Are you looking for the Best Car Component Speaker Installation Service near McAllen TX ?Mobile Mechanics Of McAllen,Depending on your vehicle and where you choose to place your components, they may require drilling or cutting. But don't be intimidated; this installation guide can help even first-time installers find their way through the process.Cost? Free estimates! Send us a message or call us today. Best Car Component Speaker Installation Service around McAllen TX. We serve McAllen TXand other areas. Get a Free Quote Now!BEST CAR COMPONENT SPEAKER INSTALLATION SERVICE IN MCALLEN TX
MCALLENCAR COMPONENT SPEAKER INSTALLATIONCar Component Speaker Installation Service near McAllen TX:
At Mobile Mechanics Of McAllen, we've never settled for ho-hum car sound and speakers firing at your knees leave a lot to be desired. For the best possible sound in your car, we recommend a component speaker system. Separate tweeters and woofers will mean a little more work on installation day, but years of enjoyment thanks to the three big audio advantages of component speakers.
Driving responsibly on the road requires that you avoid distractions as much as possible. For example, it’s a good idea to turn off your mobile phone, or put it in silent mode, so that you don’t get distracted by text messages (in fact, it’s illegal to use a hand-held mobile phone while driving on roads).
Unfortunately, automakers often install low-quality speakers in their cars (in order to save costs) that don’t sound great at low volumes. One solution is to invest in a quality component speaker system that increases the audio quality.What are component car speakers?
Normal coaxial speakers, whether factory-installed or aftermarket, combine the woofer and tweeter into one speaker. It’s a convenient way to get decent sound from a single speaker opening, but the design of the woofer and tweeter are both compromised in this arrangement.
Component speakers, on the other hand, separate the two drivers and introduce a crossover to define the frequency range that each driver should operate at. Tweeters handle the subtle high range and, since higher frequencies are more directional than lower, they are mounted close to ear level. Woofers are usually mounted in your vehicle’s factory locations, most likely in the doors. Free from any physical interference from the tweeters, the more resonant low frequencies will create a solid foundation for the detailed highs.Benefits of component speakers
1. Tonal clarity
The tweeters and woofers, in a component speaker system, are free to work at an enhanced level. More specifically, they will perform at a higher level for the frequencies assigned to them. An external crossover ensures that frequencies above a fixed point go to the tweeters, and those below go to the woofers. This prevents the different drivers from stretching to play frequencies that they can’t handle, increasing the definition of individual sounds and boosting the overall clarity.
2. Soundstage
Soundstage is the perceived wideness and depth that the speakers project. Instead of the music sounding like it’s coming from inside or close to your head, a well-set-up component speaker system will sound more spacious. A perfect example to illustrate this is the difference between a standalone speaker and a complete home theatre setup. When you compare the sound quality in a room, excellent Dolby Atmos soundbars will absolutely outshine a lone loudspeaker in terms of soundstage.
3. Sound imaging
Sound imaging refers to the perceived spatial locations of the sound sources in a sound recording, both laterally and in depth. It’s most readily appreciated in classical recordings, where various instruments are seated in different locations. By positioning the various parts of a component speaker system (tweeters, woofers and crossover) strategically, within your car, you can improve the sound imaging and create a three-dimensional reproduction of the music.
4. Customizability
Another advantage of component speaker systems over their coaxial counterparts is their higher level of customizability. For example, component speakers have split drivers, which means that you can configure them differently through an equalizer.
5. Modular system
A complete component speaker system includes tweeters and woofers among other components. The modular nature of this setup means that you can add additional, or upgrade specific, components incrementally and cost-effectively.
Component speakers installation
Car Component Speaker Installation Service near McAllen TX: Component speaker systems use separate woofers, tweeters, and crossovers to send out detailed, dynamic sound. The crossovers send the low frequencies to the woofers and the highs to the tweeters, freeing up each driver to play with incredible clarity. Component speakers offer the listener greater imaging possibilities than full-range speakers via increased flexibility in placement, aim, and control. Getting the great sound that components have to offer does come with a price. Component speaker installations generally require more time and effort than coaxial speaker installations. Depending on your vehicle and where you choose to place your components, they may require drilling or cutting. But don't be intimidated; this installation guide can help even first-time installers find their way through the process.What this guide provides
This installation guide will help you decide on the best location for your new components, as well as help you prepare for and complete the installation.
Woofer placement
The dash, doors, and kick panels serve as the most common homes for woofers. In many cases, you'll be able to mount the woofers in the factory speaker locations with little to no adjustments to the easy fit option. At most, you'll have to drill extra screw holes, cut a small area of metal or pressboard, or file the door panel. Modifying fit speakers requires a greater degree of cutting and drilling. Before you begin, you must be sure that modifications will not interfere with any car mechanisms, and that the speakers will fit securely. Though you can relocate any speaker, whether it be "easy" or "modify" fit, be aware that the process can be complicated and time-consuming, especially for first-time installers.
Tweeter placement
Many people choose to install their tweeters on the doors, the sail or kick panels, or the dash. Tweeter installations require some panel modifications, as very few vehicles come with factory tweeter mounts. The degree of modification depends on the mounting method. Just as it sounds, surface-mounting places the tweeter on top of a surface, with little to no modifications necessary. Of course, this method will leave you with a more noticeable installation. A flush-mount, on the other hand, gives a smooth, customized look. It requires cutting a hole into the door panel for the tweeter so it sits level with the interior panel. Whichever method you choose, most manufacturers recommend that you mount your tweeters within 12 of the woofers. Otherwise, the high and low frequencies may reach your ears at different times, resulting in a sonic wave cancellation or phase interference.
Crossover placement
Though crossovers usually require little in the way of car adaptation, finding the right place to house them can be tricky. The crossovers need to be kept in a place where they won't interfere with any of the car's moving parts, and where they won't get wet or vibrate. While some people choose to permanently mount them under the seats or on display, it's often just as easy to find a convenient spot for them behind the mounting panel near the speakers. The closer the crossover is to the speakers, the better, as the proximity will cut down on noise. The doors and behind the kick panels serve as two good options for housing crossovers.
When to use new wiring
If you're powering your new speakers with a factory or aftermarket stereo, the factory speaker wire already installed in your vehicle should work just fine. However, if you plan to install an external amplifier that's rated at 50 watts RMS or more per channel, then we recommend you run new speaker wire. 14- to 16-gauge wire should do the trick when running new speaker wire.
Add-ons
The following installation instructions will also apply if you are adding a set of speakers (midranges, tweeters) to your current aftermarket system.
Remember, as with any electronic installation, disconnect the negative cable on your battery before doing anything else. Also, make sure you have the necessary tools on hand (see above for details).
Door mounting woofers
Most car manufacturers build the factory woofers into the door and, often, your new woofer will easily fit into that factory speaker hole. You may still have to dismantle part of your door to install it, however. Here's how:
Removing the grille
With a flathead screwdriver, gently pry off the grille of the existing speaker. Car manufacturers usually create a notch in the grille for this very purpose. Grilles secured to the door or attached by friction fittings will require unscrewing or more aggressive prying.
Removing the door panel
You may need to remove the door panel to access the factory speaker, or to custom install your speakers. In this case, start by removing the window crank (if you have one). A screw at the pivot secures some cranks, but most come anchored by a spring clip. You can use a window-crank removal tool (available from Crutchfield) or a flathead screwdriver to remove this clip. To remove, depress the door panel until you can see behind the crank, turn the lever until you see the prongs of the clip, and gently push the crank off with the screwdriver. The clip will pop off, so be careful.
Remove armrest and rest of panel
Next, you'll have to remove the armrest by unscrewing a few phillips-head screws and some trim fittings around the handle. Once the armrest is unattached, you can remove the door panel. For most cars, you'll find the panel fastened by a few screws and friction fittings. With the screws removed, begin prying off the door panel at the bottom corner. Use a panel tool (available from Crutchfield) or, if you don't have one on hand, two putty knives can also do the trick. Once you loosen the bottom and sides, the panel should hang from some trim at the window well. Simply lift up on the trim, and the panel should come free.
Remove the old speaker
Carefully lift out the old speaker and detach it from the wiring harness. Some manufacturers use a sealant foam when mounting the original speakers, so you may need to cut through that with a utility knife. Set the factory wiring harness aside. You'll need to wire the woofer to the crossover before routing it to the head unit. See Page 5 for more wiring instructions.
Make adjustments accordingly
Usually, you'll be able to fit the new speaker into the hole with no difficulty, but sometimes the hole can be too narrow or shallow to accommodate it. In this case, you may have to file or trim part of your door or speaker opening, or anchor your speaker basket to the mounting location.
Surface-mounting
You should surface-mount your tweeters if you want to minimize labor time and modifications, or if you don't have the depth to flush-mount. Surface-mounting may also offer greater angle range than flush-mounting. With a surface-mount, a cup secured to a surface with a screw holds the tweeter in place. You will need to drill a small hole in the panel to secure the mounting cup and run the speaker leads to the tweeter (see previous page for instructions on removing the door panel).
Flush-mounting
The advantage of a flush-mount lies in its sleek, factory-look, since the tweeter does not protrude from the panel. Many manufacturers also include angle-mounts that allow you to aim the tweeters slightly, even when they're mounted within the panel. When flush- or angle-mounting your tweeters, you'll need to drill or cut a hole in the panel to accommodate the entire tweeter.
Installing flush-mount tweeters
First, trace the tweeter cup on the panel or dash. Use a drill with a serrated circular blade to cut the hole, and then trim it with a sharp knife. Mount the tweeter (your tweeter will come with specific instructions for this step).
Protecting the crossover
Make sure you house the crossover in a dry place, such as in a hollow space behind the plastic door panel. If you must mount it on the door metal, wrap the crossover in a plastic bag and tape the openings to keep it safe from moisture.
The crossover should be secure against vibration. Merely placing the crossover in the door or kick panel leaves it likely to be tossed around. Also, as with the speaker installation, you'll want to make sure the crossover does not interfere with any moving parts. Put the crossovers through the same rigorous tests as you did the speakers, specifically with respect to window and door mobility.
Wire networks
Since you'll most likely install the components in new, unwired locations, you'll have to spend some extra time wiring them. Component speakers also come with external crossovers, so the wires running from the receiver must first be routed to the crossover, and then to the individual woofers and tweeters. If connecting an amplifier as well, the amp should be wired between the receiver and the crossover.
Wiring through existing door boot
Once you've found the best location for your component system, you'll need to hook it up. Fortunately, most cars sport a rubber boot that connects between the door and the car body. Using this boot as a conduit, run your speaker wires off the door, underneath the kick panels, and to your receiver or external amplifier. You can easily do this by taping the wire to a straightened coat hanger and fishing everything through the interior panels.
Test-driving your system
At this point, you'll want to test your system before fully reassembling your doors. Loosely attach the door panel to the door, barring the window crank. If you chose to bottom-mount your speakers, mount your speakers in the door before hanging the panel. Holding the speaker in its new hole, mark the screw holes; then remove the speaker, and drill accordingly.
Pull the wires through the door and attach them to the speaker. As long as you're consistent, it does not matter which terminal you use as positive and negative. Next, hang the speaker in the door. You may need to use "speed" clips (often provided) to give the speaker screws extra support. With all speakers in place, you can listen to your stereo to make sure it works to your liking. Once you're satisfied, finish reattaching your door panel.
Cutting a wire hole
If your car doesn't have a rubber boot, you'll have to drill a 5/8" hole to string the wiring through. Before drilling, make sure the hole will have access to the desired speaker location, as structural steel sometimes blocks the edge of the door. Cover any sharp edges of the hole with a rubber grommet, several layers of electrical tape, or some flexible tubing. Make sure the door will stay open all the way, and that the wire will not get pinched by the hinges or door jamb. Once you finish drilling and cutting, vacuum all metal debris before finally installing the speakers to prevent rattling or shorts.
Custom woofer installation
Nothing competes with placing your speakers in the location that you determine emits the best possible sound. You may even end up locating your woofers in locations that don't already have speaker holes. In that case, you need to make some. Here's what you need to know.
For more information on this, check out the Mobile Mechanics Of McAllen.
TIPS
Car Component Speaker Installation Service near McAllen TX: Choosing a professional to install speakers ensures the job is done right.
Some general steps for car speaker’s installation:
● First of all you should disconnect the battery that supplies the power.
● Disassemble the doors you wish to insert the audio system in
● Eliminate the default speakers
● It also requires expulsion of dash, or back shelf interior boards to get to the speaker mounting place
If you're thinking about upgrading your car audio, there are a few things to keep in mind. And it all starts with where the weakest part of the system is. Not enough volume? Lack of solid bass response? Figuring out the weakness helps you formulate a plan of action.
New car? Take the turn-it-up test.
You just bought a new car or truck – and you love it. It smells good, looks good, drives like a dream… and there’s not a single M&M or runaway french-fry under the seat. (Yet.) Awesome, congratulations. Now, get in the driver’s seat and play the stereo. Loud. As in All The Way Up Loud.
Assuming you‘ve already done this, two things: 1) We’re not here to bum you out or tell you anything you don’t already know, like your new car audio is seriously lacking, and 2) You’re not alone. Truth is, every new car and truck comes with less-than-impressive sound systems (even premium sound systems can be improved upon, believe it or not). The good news: upgrading your car's sound system won’t cost a fortune or require ruining your car’s clean original equipment manufacturers (OEM) look. More on that in a moment.
Older car? Skip the turn-it-up test.
You know your car like the back of your hand. And though you can’t turn back the odometer or make it look showroom clean, it’s a good car in spite of its age. (Note: Eddie Van Halen is 62. Aretha Franklin is 75. Both still bring the house down.) Our point is that no matter how old your car is, you can get that new car buzz back again with a killer sound system in one of two ways: 1) By replacing elements of the sound system – speakers, amps, touch screens, etc. – in a way that doesn’t change your car’s OEM look, or 2) Going all in with a balls-to-the-wall car audio system that’s more about blowing your mind vs. keeping a look.
Choose the right speaker size to fit your car.
There are tons of car speaker size options to choose from.If you’re looking to keep your car’s OEM look, then you want to replace your existing speakers with speakers of the same size. (Have 6.5 speakers in the front doors of your Honda Civic? Get 6.5 speakers as replacements.)
Stick with your current car speaker style.
Before you start looking at new car speakers, you’ll want to know if your current speaker style is component or coaxial. Depending on which one you currently have, you'll want to keep it consistent when you shop for new speakers.COST
How much does it cost to get a new Component Speaker Installation in your car?
Shop car electronics professional installation
Entertainment Regular Price
Advanced In-Dash Navigation or
In-Dash Video Installation $99.99
Standard Speaker Installation $64.99
Component Speaker Installation $99.99
Rear-Seat Video Installation $119.99–$199.99
Cost for new speakers
In terms of costs, again, the sky’s the limit.
A speaker upgrade can cost as little as $100 up to several thousand dollars depending on the scope of work and type of speaker.Cook says the cost of a subwoofer can run as low as $37.Mobile Mechanics Of McAllen sells a subwoofer package that includes an amplifier and an enclosure for $299.
For a pair of car speakers,Mobile Mechanics Of McAllen start prices at $39, with an average cost of about $70 for installation. Adding an anti-vibrator to a pair of speakers costs another $25.
Nevitt, meanwhile, charges as little as $99 for a pair of some decent speakers. The cost of an hour of installation, which is typically how long it takes to install a pair of speakers, is $67.But most customers spend much more.
Paying a total of $800 to $1000 is not out of the realm of possibility.FREQUENTLY ASKED QUESTIONS
What are component car speakers?
Normal coaxial speakers, whether factory-installed or aftermarket, combine the woofer and tweeter into one speaker. It’s a convenient way to get decent sound from a single speaker opening, but the design of the woofer and tweeter are both compromised in this arrangement.What advantages do component speakers have over their counterparts coaxial speakers ?
Because component speakers separate all their drivers, they can provide better stereo-imaging as well as much more detailed and rich sound than you could expect from coaxial speakers.
What we like the most about component speakers, is that you can mount the tweeters wherever you assume they can perform at their best. Additionally,the separate crossovers will forward the highs and lows to the proper driver – highs to the tweeters and lows to the woofers. As a rule, if you want your component speakers to really shine out, you’ll want to drive them by an external amplifier.My new component speakers aren’t what I’ve been expecting.What’s wrong ?
There are a few things you need to do to get your speakers to sound at their best:
● Check your tweeter attenuation switch – Try switching it off to attenuate the highs that overpower the sound output.
● Are your speakers properly powered? If you’ve got some power greedy speakers, don’t expect too much out of them if you’re running them off your receiver. Remember that by underpowering your speakers, you risk voiding your warranty.
● You might want to consider installing foam baffles and dynamat in your doorsWhich car speakers will fit my car ?
Car speakers are classified by cone size.This size isn’t the only thing you’ll have to take into consideration. Sometimes speakers are too deep for the locations they’re meant to go in.Different speakers can fit different enclosures by using mounting brackets. In addition, sometimes minor modifications are necessary to make your speaker fit their mounting location. Almost all online retailers including Amazon carry a huge database of car’s brands, make, year and models and thus they’re able to tell if a given set of speakers will fit your vehicle or not.Can I install my new car speakers myself ?
Yes you can, It’s not that complicated at all, especially if your speakers are of coaxial type. If that’s the case, then it’s just a matter of removing the old speakers and dropping the new ones in their mounting locations, connecting a few wires and you’re good to go. However, if you’ve bought component speakers, then be prepared to put in some effort into installing them.Can I keep my factory speaker’s wires ?
Factory speakers wires are just fine. They can be used with aftermarket speakers if you’re running them off a factory or aftermarket stereo. However, if this is your first step in upgrading your entire sound system, and you intend to add one or multiple sub(s) and amp(s) down the road, then it’s highly recommended to change these wires.Do speakers with higher sensitivity rating sound better ?
Sensitivity rating doesn’t tell you how good or not so good a speaker sounds. It only indicates how effectively your speakers convert power applied to them into volume. However, the higher the better. Don’t get us wrong, speakers with low sensitivity rating can also sound great, but they require a very powerful external amplifier or a high-powered receiver.How much power Is enough for my new speakers ?
The amount of power your speakers require is nominated by RMS power handling (Root Mean Square), exceeding this power range by a little bit will boost your overall sound quality. That being said, a speaker with lower RMS power handling is best suited for being powered by a factory or aftermarket stereo, while speakers with higher RMS will work better with an external amp.
It’s important to match up your speakers with the right amp. Make sure the RMS number on your amp matches the RMS rating on your speakers. If there’s a huge gap between the power handling rating of both your speakers and amp, your speakers could be under-powered, or even overpowered, which could put your speakers at risk. However, technically speaking, the risk of under-powering your speakers is much greater than overpowering them.CALL FOR US:
● Car Component Speaker Installation Service Near McAllen TX
● Installing Component Speakers With Amp
● Installing Component Speakers Without Crossover
● How To Wire Component Speakers To 4 Channel Amp
● Best Component Speakers
● Installing Component Speakers Without Amp
● Car Audio Crossover Installation Diagram
● Do Component Speakers Need An Amp Near McAllen TX
● 6.5'' Component Speakers
● Best Component Speakers For Car
● Car Speakers 6 Inch
● Car Speakers Price
● Car Component Speakers
● Car Speakers Sony
● 4 Inch Car Speakers With Good Bass
● Best Speakers For Car
● Sony 500 Watt Car Speakers Price Near McAllen TXBEST CAR COMPONENT SPEAKER INSTALLATION SERVICE IN MCALLEN TX
MOBILE MECHANICS OF MCALLEN
REQUEST MORE INFORMATION. CONTACT US NOW!
CONTACT US:
Mobile Mechanics of McAllen
24-hour mobile mechanic roadside assistance services in McAllen, TX!
CALL (956) 278-8017 MOBILE MECHANIC
CALL (956) 278-8258 MOBILE AUTO MECHANIC
CALL (956) 278-8619 MOBILE TRUCK MECHANIC
CALL (956) 587-3435 TOWING & RAODSIDE ASSISTANCE
WEBISTE:
www.24hourmobileautorepairmcallen.org
http://www.mobilemechanicmcallentx.com/
SERVICE AREA:
33 Cities within 30 miles of McAllen, TX
Alamo, TX | Combes, TX | Delmita, TX | Donna, TX | Edcouch, TX | Edinburg, TX | Elsa, TX | Garciasville, TX | Grulla, TX | Hargill, TX | Harlingen, TX | Hidalgo, TX | La Blanca, TX | La Feria, TX | La Joya, TX | La Villa, TX | Lasara, TX | Linn, TX | Los Ebanos, TX | Los Indios, TX | Lyford, TX | Mercedes, TX | Mission, TX | Penitas, TX | Pharr, TX | Progreso, TX | Raymondville, TX | Rio Grande City, TX | San Juan, TX | Santa Maria, TX | Santa Rosa, TX | Sullivan City, TX | Weslaco, TX
Starr County | Hidalgo County | Willacy County | Cameron County | 78504 | 78539 | 78540 | 78541 | 78542 | 78501 | 78503| 78505 | 78557 | 88540 |78502 | 78504 | 78539 | 78572#mobilemechanic #CarDoorHandleReplacement #CarLightAssemblyInstallation
#FuelFilterReplacement #HeadlightReplacement #MirrorReplacement
#BatteryChangeService #BicycleServices #BikeTrainerAssemblyAndSetup
#roadsideassitance
#towing
Mobiletruckmechanic
#mobileautorepair
#McAllen
#texas
0 notes
Text
IVF – In Vitro Fertilization | IVF Centres in Thane | ElaWoman
For many couples that are struggling in their adventure to expand or begin their families, the idea of In Vitro Fertilization higher known as IVF will arise. There are a number of misconceptions approximately it floating around on blogs and in the media, but. Today, we’ll wreck down some of the ones misconceptions, and hopefully answer a number of the questions you can have approximately IVF.
IVF – In Vitro Fertilization
IVF might be the best-recognised shape of ART in Thane. Also referred to as check tube child, it entails collection of sperm from guys and eggs from woman, which can be then positioned collectively in a petri dish in a laboratory. The embryologists and IVF specialists in Thane are highly qualified and skilled to carry out those processes with extreme care and precision. State-of-the-artwork device and era are used inside the process to make sure high achievement fee in each try. These conventional IVF treatment are achieved through maximum IVF clinics in Thane.
Chances of Success in IVF Treatment in Thane
The age of the girl undergoing treatment, and the purpose of the infertility are the 2 elements that affect the achievement fee of IVF centres in Thane. Younger girls are much more likely to have a successful being pregnant but for girls over the age of 42 years, chances of a a hit pregnancy are low. The percentage of IVF treatment in Thane with the likeliness to result in a live start is:
29% for ladies underneath 35 years
23% for girls elderly 35 to 37 years
15% for women elderly 38 to 39 years
9% for ladies elderly 40 to 42 years
3% for ladies aged 43 to 44 years
2% for ladies aged over 44 years
Who is an IVF candidate?
Many couples who warfare with conceiving evidently appearance to IVF. While only a medical doctor or fertility expert can decide if IVF is the quality direction of movement for infertility, a few sufferers may be higher proper than others. IVF is usually applied for individuals or couples who:
Have broken, blocked, or removed fallopian tubes
Have a reduced sperm depend, or sperm with mobility troubles or abnormalities
Have abnormal ovulation
Have endometriosis, uterine fibroids, or different uterine and ovarian situations
Genetic issues that a couple is making an attempt to prevent
Currae Specialty Hospital Thane, Maharashtra
Currae Specialty Hospital Thane, Maharashtra take a look at-up programmes are specially designed to in shape every one’s man or woman desires. Our fitness checkup programs locate your present fitness reputation and displays all the applicable biomedical parameters to discover any risk elements for this reason assisting you to take suitable steps in stopping any main or minor infection. The packages include medical evaluation and specialised consultations to form a complete precis of your clinical fame.The Currae Speciality Hospital for Plastic & Cosmetic surgical procedure is worried with improving the aesthetic look of someone to reshape ordinary systems of the body to decorate once look and build vanity and it is one of the best IVF Centres in Thane.
Currae Specialty Hospital Thane, Maharashtra group of fantastically reputed and skilled plastic and reconstructive professionals are pioneers within the discipline of cosmetic and reconstructive strategies. This team works collectively in a multi-disciplinary collaboration that offers you the satisfactory outcomes. As a part of a multidisciplinary aesthetic centre, our professional specialists can help restore your younger appearance and reawaken your herbal beauty. The noticeably professional and skilled Gastroenterology school at Currae Hospital provides session and treatment of gastrointestinal issues.
Dr. Sachin Wani
Dr. Sachin Wani has been born and taken up in Thane. He completed his MBBS from Rajiv Gandhi Medical College in 2000, MS Surgery from GMC, Miraj in 2006 and Diplomate in National Board (DNB) GI and HPB surgery (Superspeciality) in 2010 in Fortis Mulund Hospital. He has gone through schooling in laparoscopic GI Oncosurgery at Tata Memorial Hospital in 2009. He has also done his training in Laparoscopic Hepatobiliary Surgery and Laparoscopic liver resections at NHS Hospital, Southampton UK in 2012. He is currently running as a consultant GI, HPB specialist and Laparoscopic GI Oncosurgeon at Currae Speciality Hospital, Thane and Joy Multispeciality Hospital, Chembur.
Dr. Sachin Wani has loads of countrywide and worldwide papers and guides to his credit inclusive of an worldwide ebook in the magazine of laparoendoscopic and advanced surgical techniques on one in all the most important wide variety of laparoscopic pancreatic necrosectomy in the global. He also has authored a text bankruptcy on obstructed defecation syndrome in medical GI Surgery textbook which serves as a gaining knowledge of tool for trendy and GI Surgeons throughout India and the world.
Bethany Hospital
To assist serve you better, Bethany Trust, that owns and manages Lok Hospital, unveiled a comprehensive new world elegance healthcare facility that mixes compassion with the finest in diagnostic and therapeutic generation. Bethany Hospital, a one hundred twenty five-bedded multi-forte medical institution, became operational in June 2011. At the heart of the 8-storeyed structure is the equal perception that undergirded the ethos of Lok Hospital - lifestyles is a treasured gift of God and merits our utmost interest and it is one of the best IVF Centres in Thane.
Bethany Hospital has prepare surgical and medical knowledge of very high satisfactory. This one hundred twenty five-mattress, centrally air-conditioned hospital is absolutely equipped for world-class affected person-centred medical and surgical offerings. It homes a modern 24-hour trauma middle with an operation theatre connected. Outpatient rooms and the brand new diagnostic system along with the contemporary Siemens 1.Five Tesla MRI Scanner, Multi-slice spiral CT-Scan, an ICU, NICU , a 5-bed High Dependency Unit (HDU), shipping suite, dialysis room and present day pathology, modular Operation Theatres on par with Mumbai town’s greatest and a bunch of properly-appointed wards
Cocoon Fertility
Cocoon Fertility gives a whole range of Assisted Reproductive Technology (ART) offerings, all beneath one roof. This maximizes comfort and comfort, ensuring that our sufferers do not have to tour to more than one locations for all their required services. Advanced treatment procedures inclusive of In Vitro Fertilization (IVF), Intracytoplasmic Sperm Injection (ICSI), Embryo Freezing (Vitrification) and Frozen Embryo Transfer (FET), PICSI (Physiological Intracytoplasmic Sperm Injection), Intrauterine Insemination (IUI), and male techniques like PESA/ TESA, to name a few.
Cocoon Fertility began at the flagship centre in Thane that's unfold over a sprawling 4000 sq.Ft belongings, we've got separate regions for egg series, embryo switch, and an Intrauterine Insemination room (IUI). We have now accelerated to Santacruz at an similarly comfy location. Cocoon Fertility IVF Operation theatres are equipped with the modern day ultrasound machines for egg retrieval and embryo transfer, Oocyte aspiration unit, heating blocks, air filtration unit systems, and anesthesia machines.
Snehal Hospital
Snehal Hospital is a diagnosed call in affected person care. They are one of the famous Hospitals in Naupada-Thane West. Backed with a vision to offer the best in patient care and prepared with technologically advanced healthcare centers, they're one among the upcoming names within the healthcare industry. Located in , this sanatorium is without difficulty handy with the aid of diverse method of shipping. This health facility is likewise located at Adjacent To Mango Stationery - Naupada-Thane West.
Snehal Hospital is a Multispeciality Centre located in Thane West, Thane. It became setup inside the 12 months 1984. The health center is likewise popular as Karkhanis medical institution. Snehal Hospital affords various offerings which consist of Infertility assessment, In Vitro Fertilisation (IVF), Intrauterine insemination (IUI), Testicular Biopsy, Hysteroscopic Surgery, and Microsurgical Epididymal Sperm Aspiration (MESA) processes. This centre has been supplying services to its patients for the beyond three many years.
For more information, Call Us : +91-8929020600
Visit Website : Elawoman
Elawoman contact
Ela Facebook Ela Twitter Ela Instagram Ela Linkedin Ela Youtube
0 notes
Text
Modular Operation Theatre – Key Benefits & Requirements | Altos

Modular Operation Theatre – Key Benefits & Requirements : Operation theaters are designed to save lives and treat patients in a safe manner. It becomes easier for positive outcomes to be achieved as it develops. Operation theaters today have a wide range of equipment, from small instruments to large dedicated machines such as X-rays, anesthesia systems, etc. The architecture of any hospital requires careful planning, design and analysis.
Establishing a Modular Operating Theater is primarily about efficiency, precision, patient safety, and better outcomes. The main goal is to maximize the use of time and resources. It is important to meet many requirements, including hermetic seal, sound insulation and absolute flatness.
These settings promote consistency and smooth hospital operations. Here are some reasons to give this area of your hospital thorough attention.
Stop the production of bacteria
Standard occupancy of persons and equipment load
Safety standards
Positive air pressure.
Maintenance is required.
Separation of functional spaces.
Traffic flow is regulated.
Hygiene is important for a healthy environment.
Proper air ceiling system.
Innovative medical workspaces
Humidity and ambient temperature are important factors to consider.
There is space for expansion and future devices.
The number of air changes that are appropriate.
Control panel, ceiling-mounted laminar flow system, x-ray display, and surgical scrub platforms are the four main components of a Modular Operating Theater. The control panel is the most important component because it contains important information as well as key features such a stopwatch, real time clock, pressure monitor alarm system, integral sensor, OT controls switches, etc. These components work together to ensure that every operation is smooth and precise.
Partner with a trusted medical supplier in India to create a modular operating theatre that is efficient, safe and well-equipped.
Altos Engineers Pvt. Ltd, a leading medical equipment manufacturing company in India provides its customers with comprehensive equipment support. Call +91-8750050499 to learn more about new and refurbished medical equipment.
Operation Theatre Equipments - OT Manufacturer Company
Modular Operation Theater & Modular OT Equipments
Differences Between Modular And Conventional OT
Best Modular Operation Theater Equipments in Hospital
Best Modular Operation Theatres Manufacturers in India
Best Modular Operation Theatre | Top Modular OT
Major Requirements and Benefits of Modular Operation Theatre
Advanced Modular Operation Theater Modular OT in Hospital
#modular operation theatre#modular operation theater#modular ot#modular ot cost#modular ot design#modular ot door light#modular operation theatre design#nabh guidelines for modular ot#modular ot manufacturer#modular ot setup#modular ot supplier#modular ot manufacturer in india#modular operation theatre layout#modular ot equipment#modular ot hospital#hospital equipment#medical equipment#modular operating theater rooms#india's trusted medical equipment supplier#complete modular operation theatre#medical equipment company in india
0 notes
Text
Modular Operation Theatre – Modular OT Manufacturer Altos Engineers
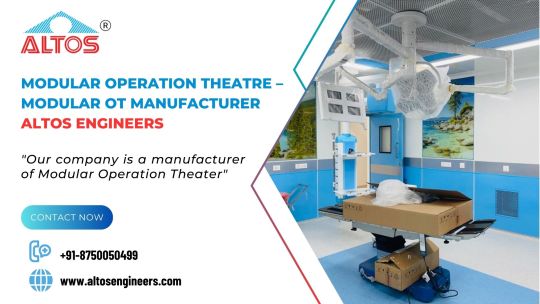
The operating department that has the most integrated functions must maintain cleanliness and safety at all times.
Human engineering must also be taken into consideration when designing the environment in which medical staff, such as doctors and nurse, work. The modular operation theatre that meets these conditions is made up of wall, ceiling, and slanted panel systems. It can incorporate not only electrical equipment but also medical gas system and lighting gears.
The modular theatre also has the ability to be extended in the future. This allows for the creation of new facilities, as well as a working environment that is both functional and high-quality.
The operation theatre is a specialized area of the hospital in which life-saving and life-improving medical procedures are performed on the body using invasive methods, under strict aseptic conditions, by specially trained staff, to promote healing, comfort and economy.
The modular operation theatre must be designed in a scientific manner to ensure sterility and ease of maintenance. It should also maximize the effectiveness of the OT. The planning, opening and maintenance of an operation theatre is based on a civil-mechanical-electrical-electronic-biomedical combination that is driven by the needs, preferences and safety of the medical and surgical team.
What exactly is a modular theatre of operations?
This compact, highly sterile setup contains air filters that control the airflow within. To increase patient safety, specific air handling and cooling units are used. The walls, ceilings and floors are all made from pre-engineered panels. They are also chemical resistant and antistatic. This makes it easier to clean and install the theatre.
Why do we need Modular OT?
Sterility - To be completely free of infection
To achieve a low Bacteria count on the surface of the water.
Surfaces that are non-porous and seamless can be easily cleaned
Reduce the frequency of disinfestation.
Work Flow Management
Medical pipelines and concealed wiring systems
A completely hassle-free flooring area leads to improved equipment and personal movements
It is important to have a lighting system that works well in all conditions.
Aesthetics: Pleasing Work Environment
Maintaining LUX levels is essential for effective lighting
Air quality and ventilation
Use different wall and floor colors to create a pleasing work environment.
What are the features of a modular OT?
Continuous flow of "Bacteria-free" air, highly filtered.
Continuous removal of contaminated air from the operating theatre
Durable antibacterial paint
Clean and maintain easily
Vapour permeability that protects against yeast and microbe growth
Resistance to moisture and Thaw
It is easy to get your hands on and move the instruments.
The room should be large enough to fit a few doctors.
Modular OT System: Major components
The Wall and ceiling
The Modular Operation Theatre structure is a self-standing unit that can be built inside a hospital. Modular OT panels are either made from steel or glass. The inside of the panels facing OT tables are painted with anti-microbial paint of 200 microns.
Air ducts will be installed in all four corners of the room. The operation theatre should have enough space to facilitate the procedure. Any remaining space can be used as storage. To achieve a smooth surface, the joints and cavities should be filled with epoxy.
Laminar Air Flow Unit - Plenum
A Modular OT is made up of a laminar flow unit that supplies air to the Modular OT. Laminar flow can be defined as a fluid flow in which all lines are parallel and the entire flow has a constant velocity.
Modular OTs use a Laminar flow unit
Controlling the temperature and humidity in a space is important.
Assist in the removal and diluting of waste aesthetic gasses
To dilute airborne bacterial contamination
Control the air movement within the department so that airborne bacteria are kept to a minimum.
Light
The ceilings are fitted with lights for a Modular OT. Lighting is essential to any operation. Lighting systems integrated into the system can provide illuminations of up to 1300Lux.
Pendants
Pendants can be used to position Medical Gas Pipelines, Equipment and Other Tools in Modular OTs. They are flexible and can be fixed at different heights and distances.
Pendants are available in a variety of styles.
Medical Gas Supply
Electrical power supply
Data Points
Shelves for some equipment
Drawers for accessories
Mounting medical devices, among others
Hermetically sliding door
Hermetically sliding doors are used to maintain the right air pressure in the modular OT. Hermetically sliding door also use less space than hinges or other types of doors. To reduce abrasion, the door should be fitted with rubber wheels that run on nylon platforms. Doors can be automatic or manually operated. The door should be operated manually in the event of a power outage.
OT Control panel
The modular operation theatre Control Panel is an electric panel that is fixed to the wall. The panel can mount up to 9 different types of controls. The controls can be medical gases, medical equipment or Ventilation systems.
Anti Static Flooring
In industries where static electricity can damage or interfere with employees, anti-static flooring may be used. Anti-static floors are used in industries where static electricity can cause interference or damage to employees and/or equipment.
#modular operation theatre#best modular operation theatre manufacturers in india#modular operation theatre cost#modular ot cost#modular ot in hospital#modular ot manufacturers in india
0 notes
Text
Modular Operation Theatre represents the latest trend in Operation Theatres, where cleanliness and sterility are maintained at all time. Modular prefabricated panel, antibacterial flooring, Laminar flow units, HEPA filters and air handling units are used to achieve sterilization. Altos Engineers is the Modular Operation Theatre Manufacturer of India
Altos Engineers have vast experience in Modular Operation Theater design and installation following NABH guidelines. We provide Modular Operation Theater products of the highest quality at reasonable prices, and we deliver on time. Our group of experienced design engineers are able to understand client requirements and deliver the best designs according to site conditions.
Our state-of-the-art facility is equipped to manufacture the products and accessories for operation theatre construction. Our Laminar Flow Units are made of robust materials and have a high-quality finish. Our products are made with precision using imported machinery. Every corner of our theatre is designed to be easily cleaned.
Altos Engineers provides modular operation theatres for various surgeries such as Liver & Kidney Transplants, Knee Replacement, Cardio Thoracic, General Surgery, Other Super Specialties, and other general surgeries.
Altos Engineers, Modular Operation Theater manufacturer and supplier in India. We offer complete turnkey solutions to modular operation theatres as per the most recent guidelines. In operation theatres, air conditioning systems are vital in maintaining sterility and cleanliness.
The modular operation theatre in a hospital is where the surgical procedures are performed under sterile conditions. Altos Engineers is the modular operation theatre manufacturer in india.
We can also design ICUs, positive pressure and negative pressure rooms to suit different post-operative patients.
We provide the best quality:
Modular Operation Theater
Isolation rooms
IVF Labs
BMT Rooms
Modular Operation Theatre Features
The Good and State of the Art Modular operating room construction.
Low Noise
Easy to clean
Long Life
Highly Durable
Modular Operation Theater Accessories:
Modular Pendants
Modular Well & Ceiling Panels
Modular Laminar Air Flow
Modular Hatch Box
Modular Peripheral light
Modular X-Ray Board
Modular Surgeon Control Panel
Writing Board
Modular Operation Theatre Surgical LED Light
Modular OT Door
Modular Pressure Relief Damper
Modular Scrub Sinks
Complete Modular Operation Theatre Setup
#modular operation theater#prefabricated operation theatre#manufacturers#suppliers#exporters#traders#dealers#manufacturing companies#retailers#producers#surgical & icu equipments india#prefabricated modular operation theatre manufacturers#prefabricated modular operation theatre suppliers#prefabricated modular operation theatre exporters#prefabricated modular operation theatre traders#prefabricated modular operation theatre dealers#prefabricated modular operation theatre manufacturing company#prefabricated modular operation theatre retailers#prefabricated modular operation theatre producers#prefabricated modular operation theatre surgical & icu equipments india#modular ot#modular ot cost#modular operation theatre#modular ot design#modular ot door light#modular operation theatre design#nabh guidelines for modular ot#modular ot manufacturer#modular ot setup#modular ot supplier
0 notes
Link
Best Car Component Speaker Installation Service and Cost in Omaha NE |Mobile Mechanics of Omaha
More information is at: http://24hourautotruckrepairomaha.org/car-component-speaker-installation-near-me/
Car Component Speaker Installation Service near Omaha NE: Are you looking for the Best Car Component Speaker Installation Service near Omaha NE ? Mobile Mechanics of Omaha, Depending on your vehicle and where you choose to place your components, they may require drilling or cutting. But don't be intimidated; this installation guide can help even first-time installers find their way through the process. Cost? Free estimates! Send us a message or call us today. Best Car Component Speaker Installation Service around Omaha NE. We serve Omaha NE and other areas. Get a Free Quote Now!
BEST CAR COMPONENT SPEAKER INSTALLATION SERVICE IN OMAHA NE
OMAHA CAR COMPONENT SPEAKER INSTALLATION
Car Component Speaker Installation Service near Omaha NE:
At Mobile Mechanics of Omaha, we've never settled for ho-hum car sound and speakers firing at your knees leave a lot to be desired. For the best possible sound in your car, we recommend a component speaker system. Separate tweeters and woofers will mean a little more work on installation day, but years of enjoyment thanks to the three big audio advantages of component speakers.
Driving responsibly on the road requires that you avoid distractions as much as possible. For example, it’s a good idea to turn off your mobile phone, or put it in silent mode, so that you don’t get distracted by text messages (in fact, it’s illegal to use a hand-held mobile phone while driving on roads).
Unfortunately, automakers often install low-quality speakers in their cars (in order to save costs) that don’t sound great at low volumes. One solution is to invest in a quality component speaker system that increases the audio quality.
What are component car speakers?
Normal coaxial speakers, whether factory-installed or aftermarket, combine the woofer and tweeter into one speaker. It’s a convenient way to get decent sound from a single speaker opening, but the design of the woofer and tweeter are both compromised in this arrangement.
Component speakers, on the other hand, separate the two drivers and introduce a crossover to define the frequency range that each driver should operate at. Tweeters handle the subtle high range and, since higher frequencies are more directional than lower, they are mounted close to ear level. Woofers are usually mounted in your vehicle’s factory locations, most likely in the doors. Free from any physical interference from the tweeters, the more resonant low frequencies will create a solid foundation for the detailed highs.
Benefits of component speakers
1. Tonal clarity
The tweeters and woofers, in a component speaker system, are free to work at an enhanced level. More specifically, they will perform at a higher level for the frequencies assigned to them. An external crossover ensures that frequencies above a fixed point go to the tweeters, and those below go to the woofers. This prevents the different drivers from stretching to play frequencies that they can’t handle, increasing the definition of individual sounds and boosting the overall clarity.
2. Soundstage
Soundstage is the perceived wideness and depth that the speakers project. Instead of the music sounding like it’s coming from inside or close to your head, a well-set-up component speaker system will sound more spacious. A perfect example to illustrate this is the difference between a standalone speaker and a complete home theatre setup. When you compare the sound quality in a room, excellent Dolby Atmos soundbars will absolutely outshine a lone loudspeaker in terms of soundstage.
3. Sound imaging
Sound imaging refers to the perceived spatial locations of the sound sources in a sound recording, both laterally and in depth. It’s most readily appreciated in classical recordings, where various instruments are seated in different locations. By positioning the various parts of a component speaker system (tweeters, woofers and crossover) strategically, within your car, you can improve the sound imaging and create a three-dimensional reproduction of the music.
4. Customizability
Another advantage of component speaker systems over their coaxial counterparts is their higher level of customizability. For example, component speakers have split drivers, which means that you can configure them differently through an equalizer.
5. Modular system
A complete component speaker system includes tweeters and woofers among other components. The modular nature of this setup means that you can add additional, or upgrade specific, components incrementally and cost-effectively.
Component speakers installation
Car Component Speaker Installation Service near Omaha NE: Component speaker systems use separate woofers, tweeters, and crossovers to send out detailed, dynamic sound. The crossovers send the low frequencies to the woofers and the highs to the tweeters, freeing up each driver to play with incredible clarity. Component speakers offer the listener greater imaging possibilities than full-range speakers via increased flexibility in placement, aim, and control. Getting the great sound that components have to offer does come with a price. Component speaker installations generally require more time and effort than coaxial speaker installations. Depending on your vehicle and where you choose to place your components, they may require drilling or cutting. But don't be intimidated; this installation guide can help even first-time installers find their way through the process.
What this guide provides
This installation guide will help you decide on the best location for your new components, as well as help you prepare for and complete the installation.
Woofer placement
The dash, doors, and kick panels serve as the most common homes for woofers. In many cases, you'll be able to mount the woofers in the factory speaker locations with little to no adjustments to the easy fit option. At most, you'll have to drill extra screw holes, cut a small area of metal or pressboard, or file the door panel. Modifying fit speakers requires a greater degree of cutting and drilling. Before you begin, you must be sure that modifications will not interfere with any car mechanisms, and that the speakers will fit securely. Though you can relocate any speaker, whether it be "easy" or "modify" fit, be aware that the process can be complicated and time-consuming, especially for first-time installers.
Tweeter placement
Many people choose to install their tweeters on the doors, the sail or kick panels, or the dash. Tweeter installations require some panel modifications, as very few vehicles come with factory tweeter mounts. The degree of modification depends on the mounting method. Just as it sounds, surface-mounting places the tweeter on top of a surface, with little to no modifications necessary. Of course, this method will leave you with a more noticeable installation. A flush-mount, on the other hand, gives a smooth, customized look. It requires cutting a hole into the door panel for the tweeter so it sits level with the interior panel. Whichever method you choose, most manufacturers recommend that you mount your tweeters within 12 of the woofers. Otherwise, the high and low frequencies may reach your ears at different times, resulting in a sonic wave cancellation or phase interference.
Crossover placement
Though crossovers usually require little in the way of car adaptation, finding the right place to house them can be tricky. The crossovers need to be kept in a place where they won't interfere with any of the car's moving parts, and where they won't get wet or vibrate. While some people choose to permanently mount them under the seats or on display, it's often just as easy to find a convenient spot for them behind the mounting panel near the speakers. The closer the crossover is to the speakers, the better, as the proximity will cut down on noise. The doors and behind the kick panels serve as two good options for housing crossovers.
When to use new wiring
If you're powering your new speakers with a factory or aftermarket stereo, the factory speaker wire already installed in your vehicle should work just fine. However, if you plan to install an external amplifier that's rated at 50 watts RMS or more per channel, then we recommend you run new speaker wire. 14- to 16-gauge wire should do the trick when running new speaker wire.
Add-ons
The following installation instructions will also apply if you are adding a set of speakers (midranges, tweeters) to your current aftermarket system.
Remember, as with any electronic installation, disconnect the negative cable on your battery before doing anything else. Also, make sure you have the necessary tools on hand (see above for details).
Door mounting woofers
Most car manufacturers build the factory woofers into the door and, often, your new woofer will easily fit into that factory speaker hole. You may still have to dismantle part of your door to install it, however. Here's how:
Removing the grille
With a flathead screwdriver, gently pry off the grille of the existing speaker. Car manufacturers usually create a notch in the grille for this very purpose. Grilles secured to the door or attached by friction fittings will require unscrewing or more aggressive prying.
Removing the door panel
You may need to remove the door panel to access the factory speaker, or to custom install your speakers. In this case, start by removing the window crank (if you have one). A screw at the pivot secures some cranks, but most come anchored by a spring clip. You can use a window-crank removal tool (available from Crutchfield) or a flathead screwdriver to remove this clip. To remove, depress the door panel until you can see behind the crank, turn the lever until you see the prongs of the clip, and gently push the crank off with the screwdriver. The clip will pop off, so be careful.
Remove armrest and rest of panel
Next, you'll have to remove the armrest by unscrewing a few phillips-head screws and some trim fittings around the handle. Once the armrest is unattached, you can remove the door panel. For most cars, you'll find the panel fastened by a few screws and friction fittings. With the screws removed, begin prying off the door panel at the bottom corner. Use a panel tool (available from Crutchfield) or, if you don't have one on hand, two putty knives can also do the trick. Once you loosen the bottom and sides, the panel should hang from some trim at the window well. Simply lift up on the trim, and the panel should come free.
Remove the old speaker
Carefully lift out the old speaker and detach it from the wiring harness. Some manufacturers use a sealant foam when mounting the original speakers, so you may need to cut through that with a utility knife. Set the factory wiring harness aside. You'll need to wire the woofer to the crossover before routing it to the head unit. See Page 5 for more wiring instructions.
Make adjustments accordingly
Usually, you'll be able to fit the new speaker into the hole with no difficulty, but sometimes the hole can be too narrow or shallow to accommodate it. In this case, you may have to file or trim part of your door or speaker opening, or anchor your speaker basket to the mounting location.
Surface-mounting
You should surface-mount your tweeters if you want to minimize labor time and modifications, or if you don't have the depth to flush-mount. Surface-mounting may also offer greater angle range than flush-mounting. With a surface-mount, a cup secured to a surface with a screw holds the tweeter in place. You will need to drill a small hole in the panel to secure the mounting cup and run the speaker leads to the tweeter (see previous page for instructions on removing the door panel).
Flush-mounting
The advantage of a flush-mount lies in its sleek, factory-look, since the tweeter does not protrude from the panel. Many manufacturers also include angle-mounts that allow you to aim the tweeters slightly, even when they're mounted within the panel. When flush- or angle-mounting your tweeters, you'll need to drill or cut a hole in the panel to accommodate the entire tweeter.
Installing flush-mount tweeters
First, trace the tweeter cup on the panel or dash. Use a drill with a serrated circular blade to cut the hole, and then trim it with a sharp knife. Mount the tweeter (your tweeter will come with specific instructions for this step).
Protecting the crossover
Make sure you house the crossover in a dry place, such as in a hollow space behind the plastic door panel. If you must mount it on the door metal, wrap the crossover in a plastic bag and tape the openings to keep it safe from moisture.
The crossover should be secure against vibration. Merely placing the crossover in the door or kick panel leaves it likely to be tossed around. Also, as with the speaker installation, you'll want to make sure the crossover does not interfere with any moving parts. Put the crossovers through the same rigorous tests as you did the speakers, specifically with respect to window and door mobility.
Wire networks
Since you'll most likely install the components in new, unwired locations, you'll have to spend some extra time wiring them. Component speakers also come with external crossovers, so the wires running from the receiver must first be routed to the crossover, and then to the individual woofers and tweeters. If connecting an amplifier as well, the amp should be wired between the receiver and the crossover.
Wiring through existing door boot
Once you've found the best location for your component system, you'll need to hook it up. Fortunately, most cars sport a rubber boot that connects between the door and the car body. Using this boot as a conduit, run your speaker wires off the door, underneath the kick panels, and to your receiver or external amplifier. You can easily do this by taping the wire to a straightened coat hanger and fishing everything through the interior panels.
Test-driving your system
At this point, you'll want to test your system before fully reassembling your doors. Loosely attach the door panel to the door, barring the window crank. If you chose to bottom-mount your speakers, mount your speakers in the door before hanging the panel. Holding the speaker in its new hole, mark the screw holes; then remove the speaker, and drill accordingly.
Pull the wires through the door and attach them to the speaker. As long as you're consistent, it does not matter which terminal you use as positive and negative. Next, hang the speaker in the door. You may need to use "speed" clips (often provided) to give the speaker screws extra support. With all speakers in place, you can listen to your stereo to make sure it works to your liking. Once you're satisfied, finish reattaching your door panel.
Cutting a wire hole
If your car doesn't have a rubber boot, you'll have to drill a 5/8" hole to string the wiring through. Before drilling, make sure the hole will have access to the desired speaker location, as structural steel sometimes blocks the edge of the door. Cover any sharp edges of the hole with a rubber grommet, several layers of electrical tape, or some flexible tubing. Make sure the door will stay open all the way, and that the wire will not get pinched by the hinges or door jamb. Once you finish drilling and cutting, vacuum all metal debris before finally installing the speakers to prevent rattling or shorts.
Custom woofer installation
Nothing competes with placing your speakers in the location that you determine emits the best possible sound. You may even end up locating your woofers in locations that don't already have speaker holes. In that case, you need to make some. Here's what you need to know.
For more information on this, check out the Mobile Mechanics Of Omaha.
TIPS
Car Component Speaker Installation Service near Omaha NE: Choosing a professional to install speakers ensures the job is done right.
Some general steps for car speaker’s installation:
● First of all you should disconnect the battery that supplies the power.
● Disassemble the doors you wish to insert the audio system in
● Eliminate the default speakers
● It also requires expulsion of dash, or back shelf interior boards to get to the speaker mounting place
If you're thinking about upgrading your car audio, there are a few things to keep in mind. And it all starts with where the weakest part of the system is. Not enough volume? Lack of solid bass response? Figuring out the weakness helps you formulate a plan of action.
New car? Take the turn-it-up test.
You just bought a new car or truck – and you love it. It smells good, looks good, drives like a dream… and there’s not a single M&M or runaway french-fry under the seat. (Yet.) Awesome, congratulations. Now, get in the driver’s seat and play the stereo. Loud. As in All The Way Up Loud.
Assuming you‘ve already done this, two things: 1) We’re not here to bum you out or tell you anything you don’t already know, like your new car audio is seriously lacking, and 2) You’re not alone. Truth is, every new car and truck comes with less-than-impressive sound systems (even premium sound systems can be improved upon, believe it or not). The good news: upgrading your car's sound system won’t cost a fortune or require ruining your car’s clean original equipment manufacturers (OEM) look. More on that in a moment.
Older car? Skip the turn-it-up test.
You know your car like the back of your hand. And though you can’t turn back the odometer or make it look showroom clean, it’s a good car in spite of its age. (Note: Eddie Van Halen is 62. Aretha Franklin is 75. Both still bring the house down.) Our point is that no matter how old your car is, you can get that new car buzz back again with a killer sound system in one of two ways: 1) By replacing elements of the sound system – speakers, amps, touch screens, etc. – in a way that doesn’t change your car’s OEM look, or 2) Going all in with a balls-to-the-wall car audio system that’s more about blowing your mind vs. keeping a look.
Choose the right speaker size to fit your car.
There are tons of car speaker size options to choose from.
If you’re looking to keep your car’s OEM look, then you want to replace your existing speakers with speakers of the same size. (Have 6.5 speakers in the front doors of your Honda Civic? Get 6.5 speakers as replacements.)
Stick with your current car speaker style.
Before you start looking at new car speakers, you’ll want to know if your current speaker style is component or coaxial. Depending on which one you currently have, you'll want to keep it consistent when you shop for new speakers.
COST
How much does it cost to get a new Component Speaker Installation in your car?
Shop car electronics professional installation
Entertainment Regular Price
Advanced In-Dash Navigation or
In-Dash Video Installation $99.99
Standard Speaker Installation $64.99
Component Speaker Installation $99.99
Rear-Seat Video Installation $119.99–$199.99
Cost for new speakers
In terms of costs, again, the sky’s the limit.
A speaker upgrade can cost as little as $100 up to several thousand dollars depending on the scope of work and type of speaker. Cook says the cost of a subwoofer can run as low as $37.Mobile Mechanics of Omaha sells a subwoofer package that includes an amplifier and an enclosure for $299.
For a pair of car speakers, Mobile Mechanics of Omaha start prices at $39, with an average cost of about $70 for installation. Adding an anti-vibrator to a pair of speakers costs another $25.
Nevitt, meanwhile, charges as little as $99 for a pair of some decent speakers. The cost of an hour of installation, which is typically how long it takes to install a pair of speakers, is $67.But most customers spend much more.
Paying a total of $800 to $1000 is not out of the realm of possibility.
FREQUENTLY ASKED QUESTIONS
What are component car speakers?
Normal coaxial speakers, whether factory-installed or aftermarket, combine the woofer and tweeter into one speaker. It’s a convenient way to get decent sound from a single speaker opening, but the design of the woofer and tweeter are both compromised in this arrangement.
What advantages do component speakers have over their counterparts coaxial speakers ?
Because component speakers separate all their drivers, they can provide better stereo-imaging as well as much more detailed and rich sound than you could expect from coaxial speakers.
What we like the most about component speakers, is that you can mount the tweeters wherever you assume they can perform at their best. Additionally, the separate crossovers will forward the highs and lows to the proper driver – highs to the tweeters and lows to the woofers. As a rule, if you want your component speakers to really shine out, you’ll want to drive them by an external amplifier.
My new component speakers aren’t what I’ve been expecting. What’s wrong ?
There are a few things you need to do to get your speakers to sound at their best:
● Check your tweeter attenuation switch – Try switching it off to attenuate the highs that overpower the sound output.
● Are your speakers properly powered? If you’ve got some power greedy speakers, don’t expect too much out of them if you’re running them off your receiver. Remember that by under powering your speakers, you risk voiding your warranty.
● You might want to consider installing foam baffles and dynamat in your doors
Which car speakers will fit my car ?
Car speakers are classified by cone size. This size isn’t the only thing you’ll have to take into consideration. Sometimes speakers are too deep for the locations they’re meant to go in. Different speakers can fit different enclosures by using mounting brackets. In addition, sometimes minor modifications are necessary to make your speaker fit their mounting location. Almost all online retailers including Amazon carry a huge database of car’s brands, make, year and models and thus they’re able to tell if a given set of speakers will fit your vehicle or not.
Can I install my new car speakers myself ?
Yes you can, It’s not that complicated at all, especially if your speakers are of coaxial type. If that’s the case, then it’s just a matter of removing the old speakers and dropping the new ones in their mounting locations, connecting a few wires and you’re good to go. However, if you’ve bought component speakers, then be prepared to put in some effort into installing them.
Can I keep my factory speaker’s wires ?
Factory speakers wires are just fine. They can be used with aftermarket speakers if you’re running them off a factory or aftermarket stereo. However, if this is your first step in upgrading your entire sound system, and you intend to add one or multiple sub(s) and amp(s) down the road, then it’s highly recommended to change these wires.
Do speakers with higher sensitivity rating sound better ?
Sensitivity rating doesn’t tell you how good or not so good a speaker sounds. It only indicates how effectively your speakers convert power applied to them into volume. However, the higher the better. Don’t get us wrong, speakers with low sensitivity rating can also sound great, but they require a very powerful external amplifier or a high-powered receiver.
How much power Is enough for my new speakers ?
The amount of power your speakers require is nominated by RMS power handling (Root Mean Square), exceeding this power range by a little bit will boost your overall sound quality. That being said, a speaker with lower RMS power handling is best suited for being powered by a factory or aftermarket stereo, while speakers with higher RMS will work better with an external amp.
It’s important to match up your speakers with the right amp. Make sure the RMS number on your amp matches the RMS rating on your speakers. If there’s a huge gap between the power handling rating of both your speakers and amp, your speakers could be under-powered, or even overpowered, which could put your speakers at risk. However, technically speaking, the risk of under-powering your speakers is much greater than overpowering them.
CALL FOR US:
● Car Component Speaker Installation Service Near Omaha NE
● Installing Component Speakers With Amp
● Installing Component Speakers Without Crossover
● How To Wire Component Speakers To 4 Channel Amp
● Best Component Speakers
● Installing Component Speakers Without Amp
● Car Audio Crossover Installation Diagram
● Do Component Speakers Need An Amp Near Omaha NE
● 6.5'' Component Speakers
● Best Component Speakers For Car
● Car Speakers 6 Inch
● Car Speakers Price
● Car Component Speakers
● Car Speakers Sony
● 4 Inch Car Speakers With Good Bass
● Best Speakers For Car
● Sony 500 Watt Car Speakers Price Near Omaha NE
BEST CAR COMPONENT SPEAKER INSTALLATION SERVICE IN OMAHA NE
MOBILE MECHANICS OF OMAHA
REQUEST MORE INFORMATION. CONTACT US NOW!
CONTACT US:
Mobile Mechanics of Omaha
24-hour mobile mechanic roadside assistance services in Omaha NE!
CALL (531) 233-6154 MOBILE MECHANIC
CALL (402) 401 7564 TOWING SERVICE OMAHA
CALL (402) 590 8094 ROADSIDE ASSISTANCE
WEBISTE:
www.24hourautotruckrepairomaha.org
http://www.mobileautorepairomaha.com/
http://www.mobilemechanicomaha.com/
SERVICE AREA:
Communities we serve: Omaha, Carter Lake, Council Bluffs, Crescent, Bellevue, Boys Town, La Vista, Papillion, Honey Creek, Offutt A F B, Bennington, Fort Calhoun, Washington, Elkhorn, St Columbans, Underwood, Kennard, Mc Clelland, Mineola, Waterloo, Springfield, Missouri Valley, Treynor, Cedar Creek, Gretna, Blair, Valley, Neola, Pacific Junction, Plattsmouth, Silver City, Glenwood, Louisville, Yutan, Arlington, Minden, Modale, South Bend, Logan, Murray, Ashland, Mead, Persia, Memphis, Manley, Magnolia, Macedonia, Malvern, Fremont, Carson, Oakland, Herman, Murdock, Nickerson, Shelby, Weeping Water, Hastings, Mondamin, Henderson, Ithaca, Hancock, Nehawka, Tabor, Union, Greenwood, Thurman, Portsmouth, Woodbine, Colon, Wahoo, Avoca, Emerson, Winslow, Avoca, Elmwood, Little Sioux, Cedar Bluffs, Pisgah, Tekamah, Alvo, Randolph, Ames, Hooper, Panama, Craig, Waverly, Ceresco, Percival, Otoe, Imogene, Malmo, Sidney, Uehling, Walnut, Harlan, Westphalia, Eagle, Lincoln, Dunlap, Moorhead, Red Oak, Morse Bluff, Weston, Griswold, Blencoe, Earling, Davey, Dunbar, Nebraska City, North Bend, Unadilla, Elliott, Lewis, Prague, Syracuse, Marne, Scribner, Oakland, Palmyra, Pilot Grove, Walton, Riverton, Farragut, Shenandoah, Valparaiso, Lorton, Essex, Soldier, Hamburg, Defiance, Kirkman, Raymond, Dow City, Stanton, Atlantic, Decatur, Bennet, Elk Horn, Snyder, Lyons, Kimballton, Irwin, Arion, Malcolm, West Point, Panama, Roca, Dodge, Manilla, Yorktown, Northboro, Coin, Hickman, Denton, Bancroft, Aspinwall, Sprague, Clarinda, Martell, Blanchard, Manning, Beemer, College Springs, Shambaugh, Braddyville, 50022, 51432, 51446, 51447, 51454, 51455, 51501, 51502, 51503, 51510, 51520, 51521, 51523, 51525, 51526, 51527, 51528, 51529, 51530, 51531, 51532, 51533, 51534, 51535, 51536, 51537, 51540, 51541, 51542, 51543, 51544, 51545, 51546, 51548, 51549, 51550, 51551, 51552, 51553, 51554, 51555, 51556, 51557, 51558, 51559, 51560, 51561, 51562, 51563, 51564, 51565, 51566, 51570, 51571, 51572, 51573, 51575, 51576, 51577, 51578, 51579, 51591, 51593, 51601, 51602, 51603, 51630, 51631, 51632, 51636, 51637, 51638, 51639, 51640, 51645, 51647, 51648, 51649, 51650, 51651, 51652, 51653, 51654, 51656, 52648, 68002, 68003, 68004, 68005, 68007, 68008, 68009, 68010, 68015, 68016, 68017, 68018, 68019, 68020, 68022, 68023, 68025, 68026, 68028, 68029, 68031, 68033, 68034, 68037, 68038, 68040, 68041, 68042, 68044, 68045, 68046, 68048, 68050, 68056, 68057, 68058, 68059, 68061, 68063, 68064, 68065, 68066, 68068, 68069, 68070, 68072, 68073, 68101, 68102, 68103, 68104, 68105, 68106, 68107, 68108, 68109, 68110, 68111, 68112, 68113, 68114, 68116, 68117, 68118, 68119, 68120, 68122, 68123, 68124, 68127, 68128, 68130, 68131, 68132, 68133, 68134, 68135, 68136, 68137, 68138, 68139, 68142, 68144, 68145, 68147, 68152, 68154, 68155, 68157, 68164, 68172, 68175, 68176, 68178, 68179, 68180, 68181, 68182, 68183, 68197, 68198, 68304, 68307, 68317, 68336, 68339, 68346, 68347, 68349, 68366, 68372, 68382, 68402, 68403, 68404, 68407, 68409, 68410, 68413, 68417, 68418, 68419, 68428, 68430, 68438, 68446, 68454, 68455, 68461, 68462, 68463, 68501, 68502, 68503, 68504, 68505, 68506, 68507, 68508, 68509, 68510, 68512, 68514, 68516, 68517, 68520, 68521, 68522, 68523, 68524, 68526, 68527, 68528, 68529, 68531, 68532, 68542, 68583, 68588, 68621, 68633, 68648, 68649, 68664, 68716, 68788
#MobileMechanic
#RoadsideAssistance
#towingService
#omaha
#NE
#autotruckrepair
#RVRepair
0 notes
Last Seen Blogs

hunnycarrot
an amalgam of blah

christinesphotodump
Some Are Good ; Some Are Bad

karenfordonte
Caring For Donte


raheelsyed
Untitled