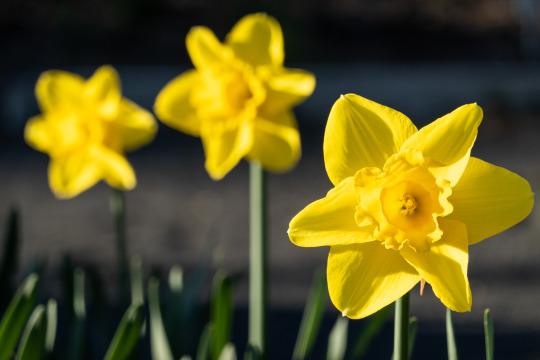
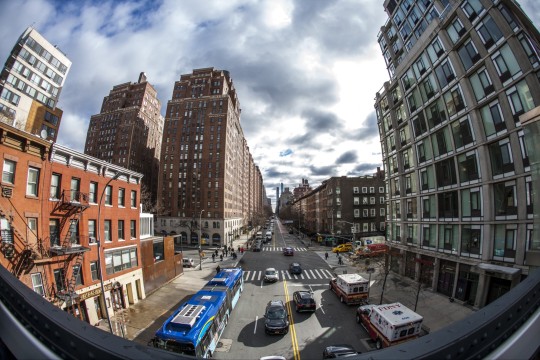
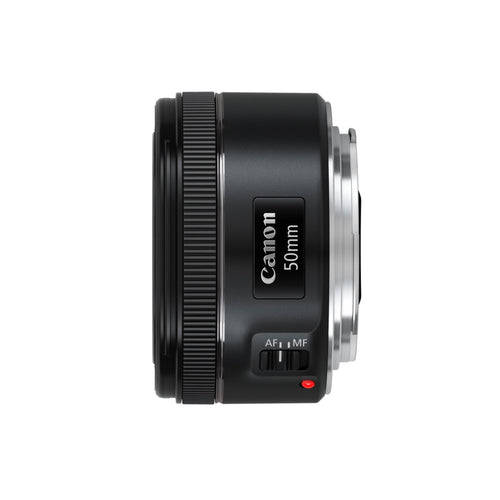
#canon 24mm f/2.8
Text
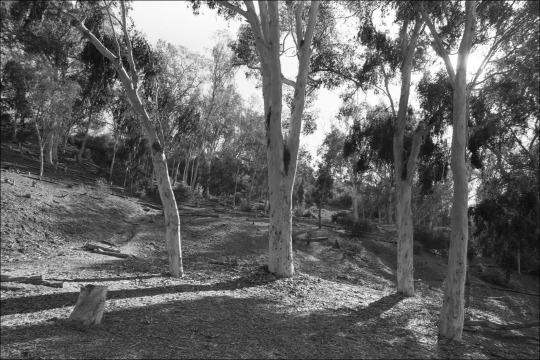

Carlsbad October 2022
#carlsbad#california#b&w#blackandwhite#black and white film#black and white#canon 24mm lens#24mm lens#canon 24mm f/2.8#canon eos 650#eos 650#film photography#film camera#westkauai#© all rights reserved#not untitled
1 note
·
View note
Note
Hey Micheal what camera would you reccomend to some one starting out taking photos & what’s your set up?
Hey!
I'm a firm believer in buying an inexpensive DSLR or mirrorless setup with interchangeable lenses. You don't have to break the bank on a starter setup — just focus on buying a camera with a robust selection of first- and third-party lenses.
My usual advice is to start simple and only upgrade gear once you run into a physical or technical limitation that stops you from realizing your vision. For example, if you're not getting the shallow depth of field you want with your current lens and body, then maybe it's time to consider buying a lens with a larger maximum aperture (e.g., f/1.8 or f/1.4).
I started out with a Nikon D50 and a Nikkor 50mm f/1.8. That served me well for nearly five years, before I started running into technical limitations with the sensor that made shooting night photos difficult. That's when I switched to shooting medium format film for a spell, before ultimately settling on a full-frame Canon digital body. All-in-all, that experimentation period took about 17 years (I'm still not done).
That said, shop used for your first camera. Places like KEH or MPB have a great selection of tested and used gear. I personally shop from MPB. Here are a few great beginner full-frame camera bodies. I'll break out lenses later on in this post.
Why full frame? I think you get superior image quality, better depth of field, better image resolution for printing, and phenomenal dynamic range.
Canon EOS 5D Mark III ($714)
Nikon D750 ($774)
Canon 6D Mark II ($884)
Nikon D810 ($819)
Anyone of these are going to get the job done and then some.
The world of lenses is complicated and varied. You'll have “prime purists” that will tell you to eschew zoom lenses and only shoot prime (a lens with no zoom capabilities). You'll have people that say longer telephotos are all you need. The truth is, you'll find your niche the more you shoot. I prefer prime lenses for their simplicity (and the less I have to think about, the better).
I'll break these out by purpose.
Portraiture
Canon EF 85mm f/1.8 ($259)
Canon EF 50mm f/1.8 ($134)
Nikkor 85mm f/1.8 ($184)
Nikkor 50mm f/1.8 ($78)
Landscapes
Canon EF 24mm f/2.8 IS ($294)
Nikkor AF 24mm f/2.8 ($134)
Multipurpose
Canon EF-S 18-55mm f/3.5-f/5.6 IS STM ($54)
Nikon AF-P DX Nikkor 18-55mm f/3.5-5.6G ($73)
I could go on and on, but this is enough to get you a start in the right direction.
If I were to put together a beginner kit with the above options, I would snatch up the Canon 5D Mark III with the Canon 50mm f/1.8 and the Canon EF 24mm f/2.8 IS. Total cost before taxes and shipping would be $1,142. You would have an incredibly flexible kit that lends itself to portraiture, landscapes, and street work, all for the same price as a new “prosumer” kit with only one lens from Amazon or other big box stores. If you don't know which direction you want to go, or you want to save on cost, there's nothing wrong with swapping out the two primes and grabbing the 18-55mm kit lens for next to nothing. That will at least let you dabble with different focal lengths and see what suits you.
I'm happy to answer any other questions here!
P.S. I shoot with a Canon EOS 6D Mark I and usually have a Sigma 35mm f/1.4 lens mounted on it for street portrait/street landscape work. My other carry-around camera is a Ricoh GR III.
10 notes
·
View notes
Text

「ガーデンイルミネーション 2023-2024」
CANON EF CANON EF 24-70mm f2.8L Ⅱ usm
f/2.8 1/60s ISO3200 +0.3step 24mm
2024/1/2 宮城県仙台市 仙台ロイヤルパークホテル
#EOS R6#landscape#illumination#light display#hotel#night view#miyagi prefecture#夜景#イルミネーション#宮城県#仙台ロイヤルパークホテル
7 notes
·
View notes
Text
Sony RX100 VII Thoughts After Two Months
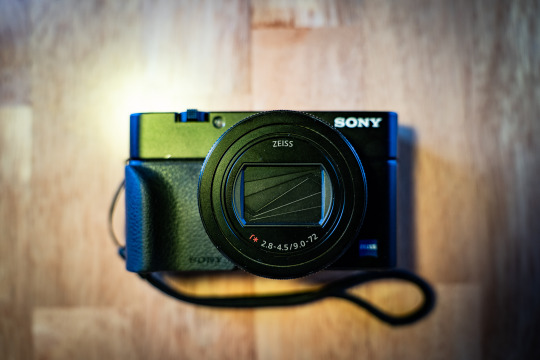
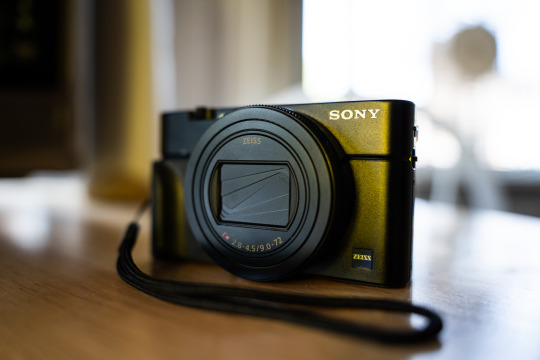
PROS:
Stacked sensors are the future. Well, technically the present considering that Canon, Nikon, Sony, Fuji, and OM Systems all use stacked sensors in their top of the line cameras. Either way, finally getting to experience shooting with one on a daily basis has made me want one in pretty much any camera going forward. The benefits are twofold: Not only do you get shutter speeds up to 20 frames per second, and without a mechanical shutter flipping in the way obscuring your view in between shots, but you also get no rolling shutter while doing it. Pretty much every Sony camera can shoot 10 fps bursts with the silent shutter, but any movement can give you a jello-like effect since the sensor reads out so slow on non-stacked cameras. The only con, at least on this camera, is that you can’t shoot flash at higher than 1/100 with the electronic shutter. That’s still plenty fast for a lot of stuff, but well below the 1/2000 you get when shooting the mechanical shutter.
The fast frame rate wouldn’t make much of a difference if the camera was bad at autofocusing, but this camera is great at it. It has a lot of the same fancy focusing stuff that my full frame Sony has like human/animal eye autofocus and all the tracking modes I’m used to. It actually makes the camera pretty solid for wildlife if you can get close enough at the 200mm end.
Speaking of that, the 24-200mm equivalent is a great range, and one that I missed a lot since I traded away my Tamron 28-200 to help cover the cost of my A7RIV. The small size and extra 4mm on the wide end actually makes it even more convenient than that Tamron.
Aside from covering a broader range than the 24-70 equivalent lens from the older RX100 cameras, this lens also seems noticeably sharper. The last RX100 model I had, the Mk. IV, just didn’t seem as crispy as this lens is.
It has a touchscreen! It’s wild to think that the previous RX100 cameras I owned didn’t have this basic ass feature, but Sony was very late in putting touch screens in their cameras. Ironically, I don’t really use it in this one because the AF is good enough that I can just do focus and recompose with tracking.
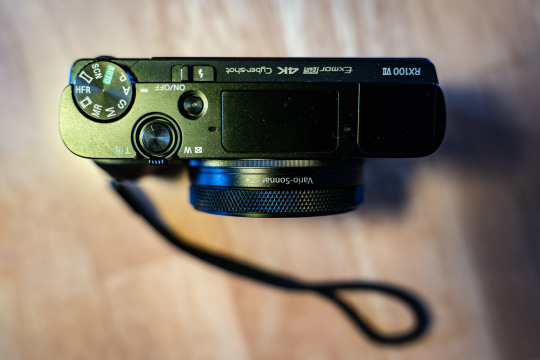
CONS:
It’s still only a 1” style sensor so high ISO isn’t the cameras strong suit. Programs like DXO PureRAW help a lot and let you get somewhat usable images at ISO 6400 in a pinch, but you’re kinda pushing things at that point.
While the lens is sharper and covers a wider range than the older models, it’s also significantly slower. At 24mm equivalent it’s already at f/2.8 where the old cameras were f/1.8. It’s f/3.2 at 25mm, f/3.5 at 33mm, and f/4 at 40mm. From 109mm to 200mm you’re at f/4.5. The relative slowness of the lens combined with the small sensor means that this can struggle getting quality images in low light without a tripod or something.
No USB-C. My Fuji, Ricoh, and larger Sony all have USB-C charging, which is amazingly convenient when traveling. I haven’t really gone anywhere with this camera yet, but having to account for a micro USB cable is annoying since pretty much everything aside from my iPhone uses USB-C.
It’s expensive. Just like my Mk III and Mk IV I got it used so it was cheaper than retail, but the copy I got cost about twice what I paid for the previous models.
Start up time is just a tad bit slower than I’d like. The GRIII and X100V both beat it that regards, albeit those aren’t zoom lens so I have to cut the Sony some slack.
SAMPLE PHOTOS:
(The sample photos were edited in Lightroom Classic and DXO PureRAW2. Also, the sensor creates a roughly 2.7x crop factor, so the 9-72mm lens equates to 24-200ish)
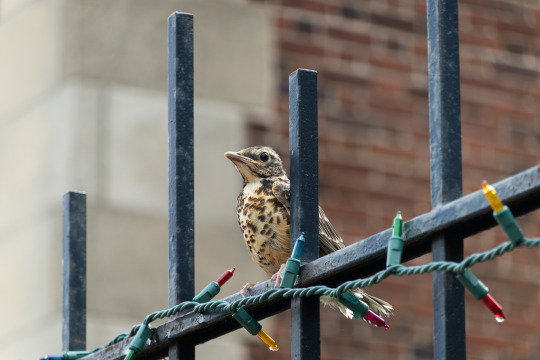
Young Bird | ISO 160. 72mm. f/4.5. 1/200.
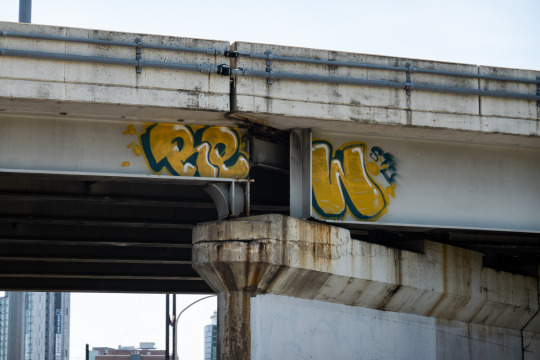
Graffiti Shot from a Car | ISO 100. 33.98mm. f/4. 1/400.
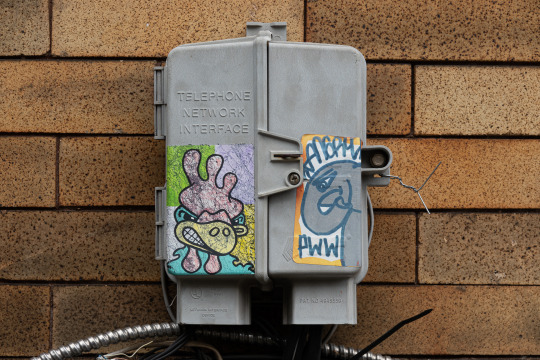
Stickers | ISO 100. 29.67mm. f/4.5. 1/100.
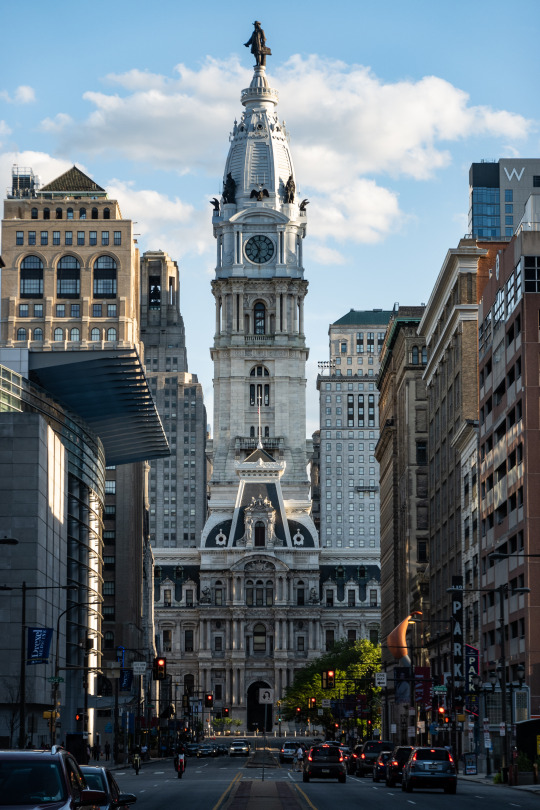
City Hall | ISO 100. 38.13mm. f/4.5. 1/200.
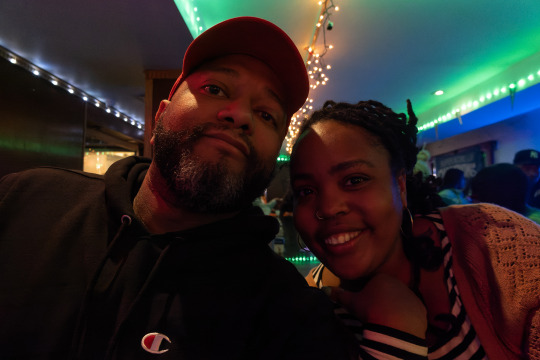
Flip Up Screen Selfie with My Friend Hanae | ISO 3200. 9mm. f/2.8. 1/40.
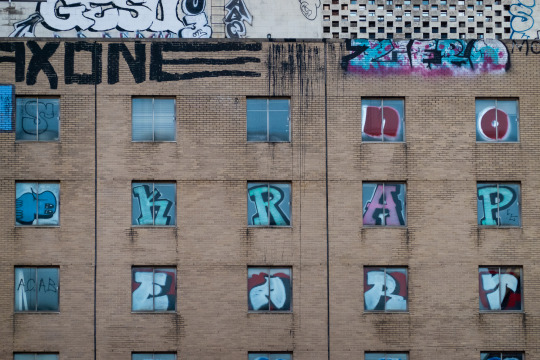
Zoomed in Graffiti | ISO 640. 72mm. f/4.5. 1/500.
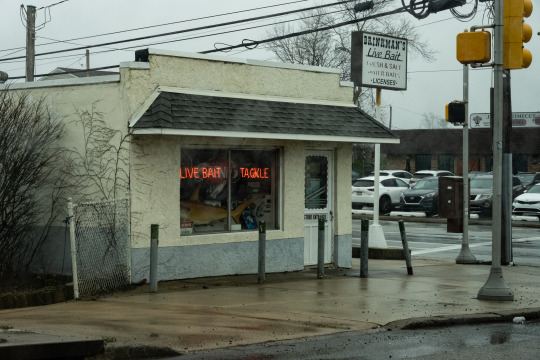
Fishing Store Neon | ISO 800. 28.67mm. f/8. 1/200.
Flowers | ISO 200. 72mm. f/5. 1/640.
Selfie Shots with My Sister | ISO 3200. 9mm. f/2.8. 1/100.
28 notes
·
View notes
Text
Assignment 2
Canon 1Ds-MkII
IMAGE 1: ISO400, f/2.8, 1/1600, 70mm
IMAGE 2: ISO400, f/2.8, 1/2500, 15mm Fisheye
IMAGE 3: ISO400, f/4.5, 1/1600, 15mm Fisheye
IMAGE 4: ISO400, f/2.8, 1/320, 24mm
IMAGE 5: ISO50, f/22.0, 20.00", 15mm Fisheye

4 notes
·
View notes
Photo
Canon EOS 5D Mark IV Canon EF 24-70mm f/2.8L II USM -Aperture: ƒ/2.8 -Shutter speed:10.0s -Focal length: 24mm -ISO: 3200 ========= #OuterSpace #Toyota #LandCruiser #hiking #Landscape #canon5dmarkiv #lightroom #majedphotosf #adventure #trip #Astronomy #canon #500px #vscocam #StoriesOfArabia #freeyourstory #CanonME #كانون_الشرق_الأوسط #اتحاد_المصورين_العرب (at Edge of the world riyadh) https://www.instagram.com/p/ChiXCKaDwxc/?igshid=NGJjMDIxMWI=
#outerspace#toyota#landcruiser#hiking#landscape#canon5dmarkiv#lightroom#majedphotosf#adventure#trip#astronomy#canon#500px#vscocam#storiesofarabia#freeyourstory#canonme#كانون_الشرق_الأوسط#اتحاد_المصورين_العرب
2 notes
·
View notes
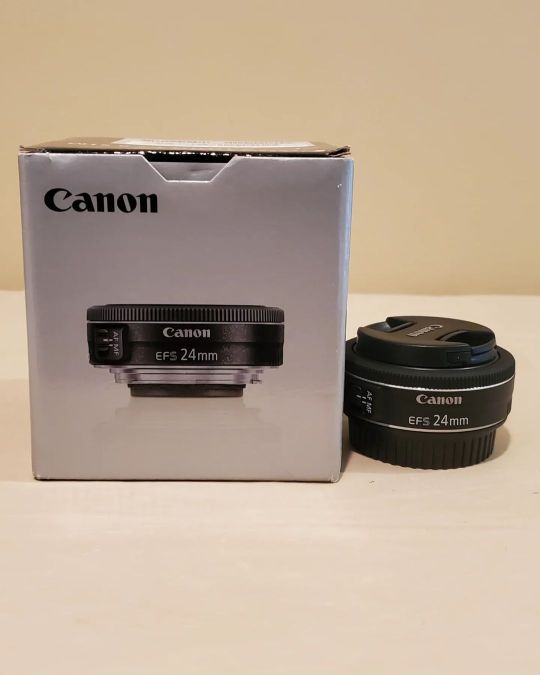
Text

📷 Canon 250D
Canon EF-S 24mm F/2.8 stm
0 notes
Text
0 notes
Text
© 2015 All Rights Reserved
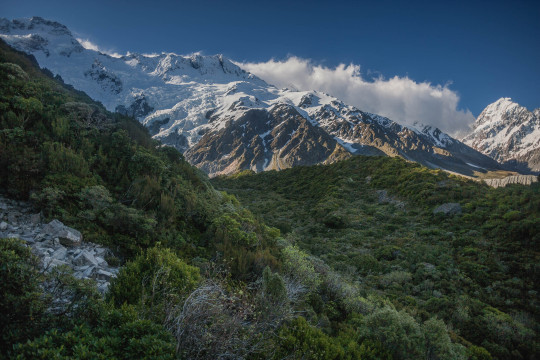
Canon 1Ds Mk II / 24mm f/2.8
A 24mm lens isn't actually all that wide, and yet in this frame I was apparently able to capture all the way from Mount Sefton (at far left) through the Footstool (left of center) across the Hooker Valley to Aoraki-Mount Cook (at far right).
Such an incredible trip…
0 notes
Video
vimeo
Into The Nature from Timeflees - Filippo Rivetti on Vimeo.
Explore and lose yourself in the beautiful nature of Valbelluna, Italy.
It is a vast valley in the Belluno province of Italy offering a wide variety of activities in both summer and winter.
Selections:
October 2015 - 6th International Short Tourism Film Festival of Amorgos
Some of the locations:
Paragliding over Feltre
Nevegal
Lago Santa Croce
Bus del Buson
Brent de l'Art
Catini del Brenton
Cornolade
Basilica Santuario dei Santi Vittore e Corona
This video was part of a project commissioned by the Italian region and produced for Can't Forget Italy: 4 video makers from all around the world produced 4 videos using different techniques.
Check out all the videos here:
youtube.com/user/DigitalDiaryItaly
Thanks to all the local staff for the incredible helpfulness!
1 week of shooting (mostly in wet weather)
525GB of raw data
22,000 raw files and videos
Music: Kings by Ryan Taubert
Equipment used:
Cameras: Canon 5DIII and 6D
Lenses: Canon 16-35mm f/2.8, 70-200mm f/2.8, 24mm f/1.4
Dolly: Dynamic Perception Stage 1 + eMotimo TB3
LICENSING
All sequences available in 4K (and more) resolution.
For any licensing inquiries please contact Diimex at [email protected].
For more info and updates:
timeflees.com
fb.com/Timeflees
youtube.com/FRivettiPhotography
instagram.com/timeflees
twitter.com/FilippoRivetti
0 notes
Text
Luxury Travel Gear for Photographers – Essential Equipment for Shooting in Thailand’s Heat
Capturing the Essence of Thailand's Beauty
Thailand is a land of beauty and wonder, from its stunning beaches to its vibrant cities, from its ancient temples to its lush jungles. With such a diverse range of natural and cultural attractions, Thailand offers endless opportunities for photographers who wish to capture its essence and create stunning images that will delight and amaze their viewers.
Beaches and Islands
For photographers looking to capture the beauty of Thailand's beaches and islands, the essentials are neutral density filters and a sturdy tripod. With these tools, photographers can create stunning long-exposure shots that capture both the movement of the waves and the colors of the sunset or sunrise. The islands of Phuket and Koh Samui offer some of the most picturesque beaches in Thailand, while the Phi Phi Islands offer dramatic cliffs and clear waters.
Cities and Architecture
For photographers interested in capturing the urban landscape and architecture of Thailand, the essential equipment includes a wide-angle lens and a fast prime lens. A tripod is also necessary for low-light shots and long-exposures. Bangkok, with its temples, palaces, and iconic skyline, is a photographer's dream, while the ancient city of Ayutthaya offers opportunities to capture the ruins of ancient temples and palaces.
Nature and Wildlife
For photographers who want to capture the natural beauty and wildlife of Thailand, a telephoto lens and a steady hand are essential. Whether it's the elephants of Chiang Mai, the monkeys of Lopburi, or the birds of Khao Yai National Park, the key is to capture the details and emotions of these creatures in their natural habitat.
Thailand is a fascinating and beautiful country that offers endless opportunities for photographers to capture its essence. Whether you're shooting beaches, cities, or nature, the essential equipment is always a combination of creativity, knowledge, and the right gear. With the right tools and techniques, you can capture the beauty and wonder of Thailand in all its glory.
Cameras and Lenses for the Tropics
Cameras
When choosing a camera for tropical environments, look for compact and rugged models that can handle the heat, humidity, and moisture. The Olympus Tough TG-6 and the Fujifilm FinePix XP140 are two excellent options. They are waterproof, shockproof, and freeze-proof, making them ideal for adventurous photographers.
For those who prefer a more advanced camera, the Sony A7R IV and the Nikon Z7 are both excellent full-frame options. With high-resolution sensors, fast autofocus, and weather-sealed bodies, they are perfect for capturing stunning images of Thailand's lush landscapes and wildlife.
Lenses
When it comes to lenses, it's essential to have a versatile range to capture a variety of subjects in different lighting conditions. A wide-angle lens such as the Canon EF 16-35mm f/2.8L III or the Nikon AF-S Nikkor 14-24mm f/2.8G ED is perfect for capturing expansive landscapes.
A telephoto lens such as the Nikon AF-S Nikkor 70-200mm f/2.8E FL ED VR or the Canon EF 70-200mm f/2.8L IS III USM is ideal for capturing wildlife and portraits from a distance. A macro lens such as the Tamron SP 90mm f/2.8 Di Macro 1:1 VC USD or the Canon EF 100mm f/2.8L Macro IS USM is excellent for capturing intricate details of flora and fauna.
Choosing the right camera and lenses for shooting in the tropics can make all the difference in the quality of your images. Look for compact and rugged models that can handle the heat and humidity, as well as versatile lenses to capture a variety of subjects in different lighting conditions. With the right equipment, you'll be able to capture stunning images of Thailand's natural beauty.
When shooting in Thailand's heat and humidity, it's essential to protect your gear from moisture and high temperatures. A few simple precautions can help ensure your equipment's longevity and performance:
Invest in a good camera bag
A high-quality camera bag with airtight seals and moisture-wicking fabric is essential in Thailand's humid climate. Look for bags with padded compartments to safeguard your gear from jostling and bumps in transit.
Use silica gel packs
Place silica gel packs in your camera bag to absorb any excess moisture. These packs can be found in most camera stores and are an inexpensive way to protect your gear from humidity.
Avoid direct sunlight
UV rays and high temperatures from direct sunlight can damage your gear. Keep your equipment in the shade or use a protective covering when shooting in bright sunlight.
Keep your gear dry
Invest in a rain cover for your camera or carry a small towel to dry your gear in case of rain or sweat. Never wipe your lenses or camera body with your clothing, as this can scratch the lens or damage the camera's sensor.
Use a dry cabinet
A dry cabinet is a great investment for photographers in high humidity climates. These cabinets regulate the humidity inside, keeping your gear dry and safe from moisture damage.
By following these simple precautions, you can ensure your gear stays in top condition while shooting in Thailand's heat and humidity.
Essential Accessories for Outdoor Photography
1. Tripod
A sturdy tripod is a must-have for any outdoor photographer. It allows you to keep your camera steady, especially in low-light conditions, and take longer exposures for beautiful landscape shots. Look for a lightweight but durable option that won't weigh you down while hiking.
2. Polarizing Filter
A polarizing filter is essential for reducing glare and enhancing colors in outdoor photography. This filter can help you capture stunning blue skies and crystal clear water while minimizing reflections and atmospheric haze.
3. Extra Batteries and Memory Cards
Don't let a dead battery or full memory card ruin your outdoor photography adventure. Always bring extra batteries and memory cards to ensure you can keep shooting all day long.
4. Lens Cleaning Kit
Dust, smudges, and fingerprints can easily ruin your outdoor shots. A lens cleaning kit with a microfiber cloth, blower brush, and lens cleaning solution is essential for keeping your gear in top condition.
5. Rain Cover
Don't let unexpected rain or moisture ruin your camera gear. A rain cover can protect your camera and accessories from the elements and allow you to keep shooting no matter the weather.
6. Remote Shutter Release
A remote shutter release allows you to trigger your camera from a distance, perfect for capturing wildlife or self-portraits without disturbing the natural environment.
By investing in these essential accessories, you'll be well-equipped to capture stunning outdoor photography in any environment. Don't forget to pack them in your gear bag before your next adventure!
Lightweight Tripods for Stable Shots on the Go
Why Lightweight Tripods Are Essential for Luxury Travel Photographers
Photography equipment can be heavy and cumbersome, especially when traveling. However, a sturdy, lightweight tripod is a must-have for any luxury travel photographer. Lightweight tripods are designed to provide stability for your camera without adding excessive weight to your gear. They also make it easy to set up and capture stunning shots while on the go, without the hassle of bulky equipment.
Features to Look for in a Lightweight Tripod
When shopping for a lightweight tripod, there are several features to consider. Look for a tripod that is sturdy and well-built, yet lightweight and easy to carry. Carbon fiber is a popular material choice for lightweight tripods, as it is durable, lightweight, and can withstand the elements.
Another feature to consider is the tripod's height and weight capacity. Make sure the tripod can support your camera and lens, and is tall enough to capture the shots you need. High-quality ball heads and quick-release systems also make it easy to adjust your camera and capture stable shots quickly.
Top Picks for Lightweight Tripods
There are many lightweight tripods on the market, but some stand out above the rest. The Gitzo GT1542 Mountaineer Series 1 Carbon Fiber Tripod is a top pick for luxury travel photographers. This tripod is made of carbon fiber, weighs just 2.2 pounds, and can support up to 22 pounds of gear.
Another popular choice is the Manfrotto Befree GT Aluminum Travel Tripod. This tripod is made of aluminum, weighs just 3.9 pounds, and can support up to 22 pounds. It also features a compact design, making it easy to travel with.
For a more affordable option, the Vanguard VEO 2 204AB Aluminum Tripod is a great choice. This tripod weighs just 2.6 pounds and has a maximum weight capacity of 8.8 pounds. It also features a unique design that allows the center column to be removed and turned into a monopod, making it even more versatile for travel photography.
A lightweight tripod is an essential piece of equipment for any luxury travel photographer. Look for a tripod that is sturdy, well-built, and lightweight, with a high weight capacity and adjustable ball head. With the right tripod, you can capture stunning shots while on the go, without the hassle of bulky equipment.
Staying Comfortable and Hydrated While Shooting
When shooting in Thailand's heat, it's important to stay comfortable and hydrated to avoid exhaustion and heat stroke. Here are some tips and gear to keep you cool:
Wear Breathable Clothing
Choose lightweight, breathable fabrics like cotton or moisture-wicking materials. Avoid dark colors that absorb heat and opt for light-colored clothing to help reflect the sun's rays.
Use Sun Protection
Wearing a hat, sunglasses, and sunscreen will help protect you from the sun's harmful UV rays and prevent sunburn. Make sure to reapply sunscreen every few hours.
Stay Hydrated
Drink plenty of water to stay hydrated throughout the day. Consider using a hydration pack or water bottle with a built-in filter to easily refill as needed. You can also try adding electrolyte tablets to your water to replenish lost minerals.
Invest in Cooling Gear
Consider investing in cooling gear such as a cooling towel, fan, or misting bottle. These items can help lower your body temperature and provide relief from the heat.
Take Breaks in the Shade
Take frequent breaks in the shade to give your body a chance to cool down. Try to plan your shoot around the hottest part of the day and take breaks during this time.
By following these tips and investing in the right gear, you can stay comfortable and hydrated while shooting in Thailand's heat.
Packing and Organizing Your Gear for Travel
Make a Checklist
Before you start packing, make a checklist of all the essential items you will need for your trip. This will help you remember everything you need and avoid overpacking. Make sure to include items such as your camera, lenses, batteries, memory cards, and any other accessories you might need.
Invest in a Good Camera Bag
Investing in a good camera bag is important when traveling with photography gear. Look for a bag that is both durable and comfortable to carry. The bag should also have enough compartments to keep your gear organized and easily accessible.
Protect Your Gear
When traveling with your gear, it is important to protect it from impact, moisture, and extreme temperatures. Invest in padded camera inserts, lens pouches, and protective cases to keep your gear safe and secure.
Maximize Space
When packing your gear, aim to maximize space in your luggage. This will not only help you fit more gear but also make it easier to carry. Use packing cubes or ziplock bags to keep small items organized and make use of any empty spaces in your luggage.
Be Prepared for Security Checks
Be prepared for security checks when traveling with photography gear. Keep your gear easily accessible and organized, so it is quick and easy to unpack and repack for security checks. Make sure to also check local laws and regulations for photography gear and accessories in your destination.
By following these tips, you can ensure that your photography gear is packed and organized efficiently for your trip to capture the best shots in Thailand's heat.
Read the full article
0 notes
Text
Quick wide-angle primes can are available in helpful for all kinds of issues, from sweeping landscapes to architectural interiors and environmental portraits, in addition to for road pictures. Introduced in August, Sigma’s new 20mm f/1.4 DG DN | Artwork and 24mm f/1.4 DG DN | Artwork lenses match the invoice completely, out there in each Sony E and Leica L mount choices. Nevertheless, Sigma’s announcement positioned each lenses as being among the many finest in the marketplace for astrophotography, because of their large discipline of view, quick aperture, excellent sharpness throughout the entire body and efficient management of sagittal coma flare.The Sigma 20mm f/1.4 DG DN | Artwork and 24mm f/1.4 DG DN | Artwork launched with claims of well-controlled sagittal coma flare, serving to to retain the pure form of stars and different celestial our bodies, throughout the entire picture body. (Picture credit score: Sigma)August additionally noticed the launch of the brand new Tamron 50-400mm F/4.5-6.3 Di III VC VXD zoom for Sony mirrorless cameras, initially introduced and coated in our information the earlier month.Samyang (additionally badged Rokinon) launched the XEEN CF 135mm T2.2 cine lens in a variety of fashionable mount choices for filmmakers, together with PL, Canon EF and Sony E.See different installments in our 12 lenses of Christmas sequence (opens in new tab)Samyang launched the XEEN CF 135mm T2.2 as a lens for movie-lovers, or no less than those that get pleasure from making them. (Picture credit score: Samyang)In the meantime, Pentax was nonetheless persevering with lenses for DSLRs and launched an up to date lens roadmap. Forthcoming points of interest would come with an up to date 100mm f/2.8 D-FA WR Macro lens and two new lenses, one a telephoto and the opposite a wide-angle.Different information noticed the polar reverse of a lens launch, in that Viltrox adopted the likes of Samyang in pulling Canon RF mount lenses from the market. The favored rumor for the disappearance of those lenses was that Canon had not ‘opened up permission’ for the manufacturing of RF lenses by unbiased corporations.Following July’s bumper crop of lens evaluations, August noticed comparatively slim pickings, though we did run the Leica 24mm Summilux-M f/1.4 ASPH by out labs. The ensuing assessment praised the ultra-sharp picture high quality, glorious construct high quality and 0 distortion, though we had been much less admiring of the exorbitant promoting value.The Leica 24mm Summilux-M f/1.4 ASPH is a factor of magnificence, with spectacular craftsmanship and all-round efficiency, however you’ll want deep pockets to purchase one. (Picture credit score: Sebastian Oakley / Digital Digicam World)Again to fundamentals• What are the finest digital camera lenses to purchase (opens in new tab)?Lenses for pictures genres• Greatest lenses for astrophotography (opens in new tab)• Greatest lenses for hen pictures (opens in new tab)• Greatest lenses for panorama (opens in new tab)Lenses on your digital camera• Greatest Canon lenses• Greatest Fujifilm lenses• Greatest Nikon lenses• Greatest Olympus lenses• Greatest Panasonic lenses• Greatest Pentax lenses• Greatest Sony lenses
#lenses #Christmas #August #starred #pair #Sigma #Astrophotography #optics
0 notes
Text
Canon EF-S 24mm f/2.8 STM
The lightest and thinnest lens in the EF-S series for APS-C sensor cameras, canon wide angle lens the EF-S24mm f/2.8 STM is a pancake lens measuring 22.8mm in thickness (about a third in thickness in comparison to a kit lens) and weighing only 125g (the same weight as a smart phone). The 24mm (35mm equivalent) focal length grants the EF-S24mm f/2.8 STM a natural wide angle view, making it highly versatile for capturing everyday scenes involving pets, food, friends, and environments. Its short focusing distance of 0.16m and maximum magnification of 0.27x also makes it ideal for food photography and capturing small details.
0 notes
Photo
Black Friday Sale ⚫️. Canon EFS 24mm f/2.8 STM $100.00. ...www.WeSellCanonCameras.com... . #canon #photography #canonphotography #photooftheday #nature #photographer #photo #d #portrait #love #instagood #picoftheday #naturephotography #photoshoot #atlcameraguy #art #atlphotographer #model #travel #atlcameraman #beautiful #fashion #portraitphotography #nikon #atlmedia #atlpr #travelphotography #style #landscape #WalilArcher (at Walil Archer Live) https://www.instagram.com/p/ClY7EyOrWAM/?igshid=NGJjMDIxMWI=
#canon#photography#canonphotography#photooftheday#nature#photographer#photo#d#portrait#love#instagood#picoftheday#naturephotography#photoshoot#atlcameraguy#art#atlphotographer#model#travel#atlcameraman#beautiful#fashion#portraitphotography#nikon#atlmedia#atlpr#travelphotography#style#landscape#walilarcher
0 notes
Text
Professional Real Estate Photography Equipment to Assist You
You cannot expect some outstanding photos without using quality photography equipment or gear. That's right; quality and appropriate gear are like oxygen for any aspiring photographer.
And when it comes to real estate photography, using the right camera, lens, tripod, and other gear are mandatory. Alongside these, you’ll need many other pieces of photography gear, like a drone, a tripod head, a filter, and so on, to make your work exceptional.
Wondering how to choose the best from a large number of available manufacturers and models? Don't stress, and just follow this article. Here you’ll get a comprehensive guide to choosing real estate photography equipment to assist you.
Professional Real Estate Photography Equipment to Assist You
Let me get this straight: you don't need a bunch of photography gear for real-estate photography. That's right. With a few basic tools, you can deliver professional-level output in the real estate photography business.
Learn about the photography equipment that will assist you in your real estate photography business:
1. Camera:
Getting the best camera based on your budget should be your first priority. However, always consider two things when choosing a camera for any photography business:
Get the best camera that fits your budget
And always make sure you’re getting a camera with a large full-frame sensor and a 1:1 ratio
When you get a camera that meets the second requirement, that will be perfect for your real estate photography. Choosing a camera with a large full-frame sensor and a 1:1 ratio will give you excellent shots when you use your camera with a wide-angle lens.
However, you also need to make sure some other features on your camera, such as:
Shutter speed
Aperture
ISO manually
Here are some camera models that meet all the requirements:
Canon EOS 6D Mark II
Canon EOS 5D Mark IV
Nikon D850
Nikon D750
2. Lens:
Right after the camera, the second thing you’ll need is the perfect lens that will give you the perfect real-estate photography shot. Well, instead of other types of lenses, go for a wide-angle lens, and also ensure that the lens features around 12-24mm or 10-22mm or more of the lens.
You must go for a wide-angle lens because it makes a tight space look spacious or vast. And when it’s about the lens speed, make sure the camera has f/2.8, f/4, or f/8. However, f/2.8 or 4 is a good camera setting for real estate photography.
Here are some of the lenses that you can try:
Sony 16-35mm Vario-Tessar T FE F4
Canon EF-S 10-18mm f/4.5-5.6
Nikon AF-S NIKKOR 14-24mm f/2.8
Canon TS-E 24mm f/3.5L II Tilt-Shift
3. Tripod:
After a camera and lens, the very next thing you need to have is a tripod. When it’s about still photography, then the use of a tripod is mandatory. This equipment helps to maintain the best shot and avoid camera shake issues.
However, you won’t need to get a super expensive tripod for your real estate photography business, and any affordable tripod will be good enough. Well, I’ll recommend that you buy Manfrotto 190X, it is affordable, portable, high-build quality, and offers a variety of angles.
And if you want to learn more about this tripod, you can check this tripod’s review at gottapics.
4. Tripod Head:
When it’s about casual photography, a tripod head is not that essential. But if you’re doing real estate photography, then this equipment can be handy. Here are some of the benefits that you’ll get by using a tripod head for your photography:
More accurate stability
It’ll ensure a more well-thought-out composition for better pictures.
Enhanced HDR photography
Make your framing process effortless.
These are some of the basic benefits that you’ll get from using a tripod head for your photography. However, if you need suggestions, then I’ll suggest you get one of these:
Benro GX35 Low-profile Ballhead
RRS BH-55
ProMediaGear BH1
5. Polarizing Filter:
When it’s about getting an enhanced photograph with no haze or reflection, then using a filter is a must. You can go for a polarizing filter, and here are some benefits that you’ll get by using a polarizing filter for your real estate photography:
There will be no haze in your photos
Get optimal color saturation
Get rid of reflection issues
Balanced and accurate exposures
If you have never used a filter before, then try this for real-estate photography; trust me, you’ll never regret it.
6. Flash Trigger:
Flash triggers are something that all professional photographers use for bright, excellent, and high-end results. And you can also go for that to enhance your real-estate photography. However, you may not believe that most professional photographers use multiple flash triggers to get excellent output.
7. Drone:
Last but certainly not least, it’ll always be a good idea to have a drone for real-estate photography. It’ll help you reach the tight space as well as get a full view of your client’s house or your project.
Whenever you’re getting a drone, always make sure that the drone has a quality battery and good resolution. Many photographers will say it’s an extra cost, but trust me, once you start using a drone, there is no going back.
Note: If you want, you can add a lot more tools or equipment to make your photography effortless. But, I believe, all the included photography gear is good enough for an ultimate real-estate photography shoot.
Final Thoughts
Starting or earning a decent amount of money on real estate photography is not tough; what is tough is the equipment selection. But, the fun fact is that I’ve made the difficult task easy for you.
Throughout this article, I’ve discussed all the necessary tools or equipment that you’ll need for real estate photography. So make sure you have all these gear before jumping into your business.
Here I have shown only the necessary tools, but it is up to you which brand of product you want to use. So, choose your player correctly, use your strategies to take great shots, and succeed.
Guest Contributor: Lisa Winger
#This Summer#Guest Author#Guest Blogger#Guest Contributor#Guest Post#Guest Writer#Best Ways To Prevent The Most Common Plumbing Problems#Plumbing Problems#broken pipes#leaking pipes#clogged toilets#garbage disposals#prevent drains from clogging#plumber in tinley park#tinley park plumbers#plumber in orland park#orland park plumbers#plumber in homer glen#homer glen plumbers#plumber in frankfort#frankfort plumbers#plumber in mokena#mokena plumbers#plumber in lemont#lemont plumbers#plumber in new lenox#new lenox plumbers#plumber in oak forest#oak forest plumbers#plumber in homewood
0 notes
Text
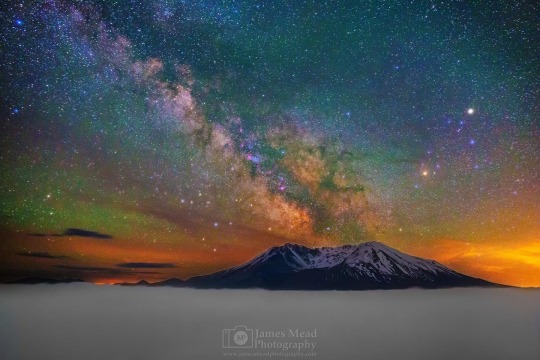
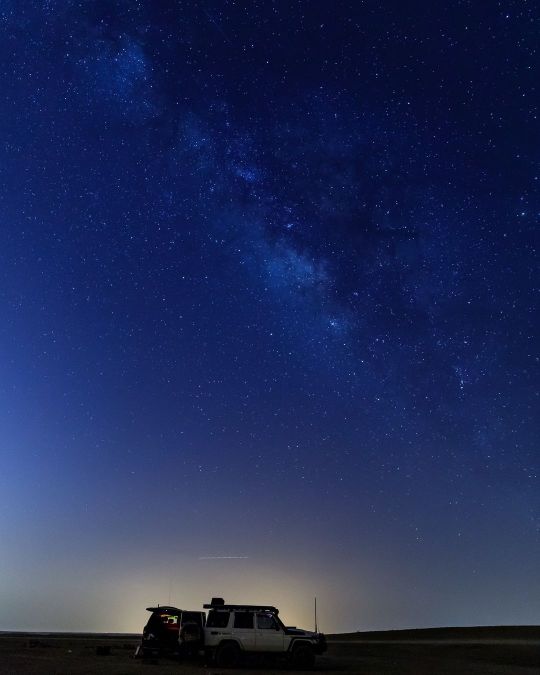
"Celestial Eruption," The Milky Way over Mount St Helens on the 35th Anniversary of the Eruption
__________
This is one of my favorites from a past anniversary of the Eruption (35th anniversary). Things went perfect that night. The 41st anniversary had other plans. Sometimes things go your way in photography, sometimes they don't. I tried to go out on May 18th for the anniversary of the May 18th, 1980 eruption, but St Helens had other ideas. Clouds covered the top all day. In the afternoon they dropped & covered the whole mountain. That was that. I stayed until the temps dropped to near freezing & rain was sleet, at which point I decided to leave before the road turned to ice. Sometimes nature doesn't cooperate with your best laid plans. I was hoping the clouds would drop and fill the valley, leaving the valley below filled with a thermal inversion while the mountain rose out of the clouds like it had on the 35th anniversary. But alas, that didn't happen. I think back fondly of May 18th, 2015. The conditions were perfect, and it felt like I was in heaven as I looked out over the clouds and up into the stars above the mountain in the night sky.
__________
Photo Details: Canon 5DMKIII, Canon 24-70 f/2.8 L II, Canon remote release, Gitzo carbon fiber tripod, Manfrotto 3 way pan and tilt head, Kirk Enterprise L bracket, arca mount adapter, and long rail, Lowepro Vertex 200AW for the gear. Single Exposures: 24mm, f/2.8, 6400ISO, 25 seconds
__________
Fine Art Prints available for my website. Link in Bio. This release is in the Mount Saint Helens Gallery. You can also get to it by entering "Celestial Eruption" on the search page.
Thank you for viewing and have a great day!
#mtsthelens #volcano #washingtonstate
Credit: James Mead and Stephanie Stafford-Mead
0 notes
Last Seen Blogs

niteofthetrill
Nite Of The Trill

westerndigs
WesternDigs.org

jonoosa
flowers for m[A]chines
filmbuzzed
Filmbuzzed

pao-clicks-blog
Panathinaikos Clicks