#best welding rod for drill stem
Text
Buy Drill Rods From India's Best Manufacturer | Techo Enterprise
If you are looking to buy drill rods, Techo Enterprise is the best choice. ✔️ Call 98304 25937 ✔️ Live Chat With Us ✔️ Call Us Today .
#Buy Drill Rods#drill rods#drill bit extension rod#drill rod for sale#drill rod and tool steel#rock drill rods#drilling rods and bits#stainless steel drill rod#oil hardening drill rod#best welding rod for drill stem#drill rod for sale near me#drill rod price#earth rod drilling#extension drill rod
1 note
·
View note
Text
The Only Guide To A Drill Rod You’ll Ever Need
A drill rod is a common term in the machinery and manufacturing industries. You can use drill rods to manufacture various tools such as cutters, hot-work tools, machine parts, punches, files, and more. But, do we know how to choose the right drill rod for our needs?
Drill rods differentiate in regards to toughness, durability, temperature resistance, and applications. With so many different material grades and types to choose from, how do we ensure we choose the correct drill rod?
That’s where we come in – this is the only guide you’ll ever need to drill rods, their uses, and applications. This guide is suitable for complete beginners as well as professionals in the industry.
Let’s see some of the most frequently asked questions on the subject of drill rods!
What Is a Drill Rod?
Simply put, a drill rod is a lengthier steel piece of easy-to-mold tool steel that you can use for machining to produce different tools and parts.
Typically, drill rods are round. However, there are some square ones, such as the square kellys you’ll see below. Drill rods are generally soft enough to be machined into their final form.
Drill rods need to have a clean and smooth surface. To manufacture them in this way, we usually use precision grinding.
What Is a Drill Rod Used For?
Drill rods have many different applications. Producers usually use drill rods for manufacturing drilling bits, shafts, dowel pins, reamers, punches, taps, hammers, files, cutting tools, hot-work tools, etc.
Different grades of drill rods are best suited for specific uses. For example:
W1 is suitable for cold-work tools, hand-held tools, cutting tools, punches, dies, etc.;
O1 grade is best for punches, dies, and gages;
A2 and D2 can be suitable for hobs, rolls, knurls, coining dies, punches, dies, etc.;
S7 gade is perfect for knock-out pins, drift pins, stamps, grippers, track tools, river sets, mandrels, circular pipe cutters, and more;
H13 (or V44) is suitable for hot-work tools, plastic molds, die-casting tools, core pins, ejector pins, and more;
Types of Drill Rods According to the Manufacturing Process
According to the manufacturing process they go through, there are three different types of drill rods: air-hardening, water-hardening, and oil-hardening. Each of these drill rods has various uses and applications. Let’s explain something about each of these different types of manufacturing processes and drill rods & casing.
Air-Hardening
We’re starting from the toughest category of tool steel – the air-hardened drill rod. Air-hardened steel has more alloy, and this is what makes it so hard and resistant. After heat treatment, you can leave air-hardening types of drill rods to harden in still air.
Air-hardening drill rods have superior machinability and wear resistance when compared to oil or water-hardening rods. Furthermore, air-hardening is safer than water or oil-hardening in regards to distortion and dimensional stability.
Oil-Hardening
Oil-hardening drill rods are second in line when it comes to their hardness and durability. Although oil-hardening rods have less alloy than air-hardening rods, they’re still rich enough to withstand welding. On top of that, oil-hardening steel is suitable for machining.
If you’re not sure what the term “oil-hardening” means, it implies heating the rod until it’s glowing red and then dipping it into a pool of warm oil. With this, the steel becomes hard and ready for machining or welding.
Water-Hardening
And finally, we have the water-hardening drill rods, which portray the lowest alloy content but are excellent for machining. However, they’re deficient in alloy content, which signifies that they’re not structurally suitable for welding purposes.
To harden a drill rod with water, we first heat the steel until it becomes glowing red, and then we plunge it into a pool of water to cool off. Once the metal is hard, it can be easily machined but not welded. You can usually use water-hardening drill rods for the manufacturing of files or hammers.
Types of Drill Rods According to Different Threads
We can classify drill rods into three different types according to different threads: ordinary drilling rigs, square kelly rods, and heavy-weight drill pipes.
The Ordinary Drill Rod
We can easily recognize the ordinary drill rod since it’s the central or basic part of the drill stem. At the top, the ordinary drill rod connects to the square kelly (explained below), and at the bottom, it’s attached to the drill collar.
In borehole digging, the function of the ordinary drill rod is to deepen the hole, transmit torque, and move the drill up and down.
Drill Bit Material Types & Coating - Types of Drill Bits
1. Carbon Steel Drill Bit
– Low carbon steel: this is the cheapest option for making a drill bit, due to their poor tempers, low carbon steel drill bits are usually used for drilling softwood and some plastics, and require to be sharpened often to extend the lifespan.
– High carbon steel: a better material than low carbon steel, high carbon steel drill bit can keep their shape and effectiveness longer, so it can be used to cut stronger materials, like hardwood and soft metals.
2. High Speed Steel Drill Bit
Compared with carbon steel bits, high-speed steel drill bit is a more popular choice on the market now. HSS is a special type of carbon steel, maintaining structural integrity while bearing high temperature is a marking advantage of the HSS drill bit, what’s more, high speed steel bit has higher wear resistance and hardness, it can also work well at a normal temperature. HSS drill bits are suitable for most of the wood and metal drilling process, including CNC drilling. Titanium nitride and other types of coatings can be applied on the HSS tool to increase lubricity and reduce friction.
3. Titanium Coated Drill Bit
Titanium is not only a popular aerospace and medical material, but also a versatile drill bit coating material, which can make the drill bit last longer. Due to its high corrosion resistance, good fatigue limit, heat limit, relatively light weight, and longer service life, titanium coated drill bit is perfect for repetitive mass production of drilling into steel, iron, wood, plastic and various surfaces, it allows a faster RPM and shorter cycle time. The most common types of titanium coatings are Titanium Nitride (TiN), Titanium Aluminum Nitride (TiAN) and Titanium Carbon Nitride (TiCN). TiAN and TiCN are considered superior to TiN as they can increase the lifespan to a considerable degree. The drawback of drill bit coating is that once the tooling becomes blunt, it can’t be sharpened to avoid the coating material being worn away.
4. Cobalt Drill Bit
Cobalt is another type of coating for the drill, cobalt drill bit is used for cutting materials that HSS bit can’t, such as stainless steel and other difficult materials, it can retain hardness at much higher temperatures than HSS and not affected by extremely high heat. But cobalt is a too brittle coating.
5. Carbide-Tipped Drill Bit
Carbide-Tipped drill bit is very hard, easy to dissipate heat and can hold an edge longer than other type bits. Similar to the cobalt drill bit, it’s very brittle as well and maybe broken up in improper use. Carbide bits are applicable for drilling fiberglass reinforced plastic and nonferrous heavy metals.
Reaming shells are used to maintain the diameter of the bore hole and to make sure other drilling equipment does not get stuck down the hole. The outside surface of the reaming shell has natural and synthetic diamonds embedded in a resistant matrix.
Reaming shells come in 6, 10 and 18 inches. How do you know when do you use each size?
6 inch reaming shells
The 6 inch reaming shell is the standard that is used for every kind of rock hardness or ground condition and is the minimum reamer requirement to provide minimum stabilization. Since the 6’’ has only one diamond pad, the vibrations from the rods and outer tube can be conducted easily and make deviation more likely.
When drilling is done in difficult ground conditions, such as swelling clay, a shorter reamer is a good choice as it can get through the ground without catching.
10 inch reaming shells
You need to consider a longer reaming shell once deviation becomes an issue. A 10’ inch reamer is a good compromise between the 6 inch and the 18 inch. The 10 inch has two diamond pads so it will provide better stabilization. A 10 inch reamer is a good choice for underground drilling where adequate space can be a challenge. It will do the job in shallower holes requiring stabilization and where an 18 inch reamer may be just a bit too much.
10’’ is also mainly used with 3m core barrels, so you can still pull your 3m inner tube + extension in one shot.
18 inch reaming shells
You should switch to an extended reaming shell when you have to keep your hole on direction and avoid deviation. The more diamond pads that you have on the reaming shell, the more control you will have on deviation and on hole diameter. The 18 inch gives you 4 pads. The front diamond pads will help you stabilize the core barrel and control the direction while the pads in the back will help maintain the diameter of the hole.
You can use an 18 inch reaming shell on the front end and a diamond type locking coupling on the back to make sure you have good stabilization of the core barrel. You can also use two 18 inch reamers when you have a longer core barrel (6 meters or more). It can act as a core barrel extension allowing you to get more core in the tube at one time.
0 notes
Text
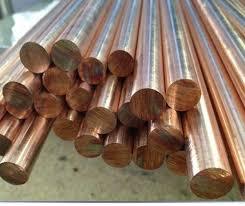
A Comparative Study Of Forging Know The Differences | Pahladrai Forgings
Forging is a familiar word across different industries, but what is it? And why is it so widespread than any other type of metal working? In this article we will have a comparative study between forging materials like forging copper, forged steel etc. and other metalworking processes like casting, fabrication, machine bar etc.
Forging ComparedTo Casting
Forging is stronger and yielded by hot and cold forgings. On the other hand, casting doesn’t have the strength against extreme heat or cold. Moreover, forgings have superior, ductile and resistant ability than cast metals. Forgings also maintain uniform quality all across the forging copper bar, wire or forged steel rings.Casted metals don’t have the grain flow as well as the directional strength. Casting cannot protect a metal from forming particular metallurgic defects. But forgings can filter the impurities from the casting slabs, casting bars etc.As the hot working on metals like copper, steel changes the grain patterns and increases strength, resistance and ductile qualities of the metal, forged metal pieces become stronger and more durable. Moreover, casting has several variations in process and is expensive. Casting requires continuous supervision while processing, but forging is cost-effective, and no process control or monitoring is required. While forging quickly responds to heat treatment, casting requires a controlled practice of melting and cooling processes to avoid any alloy separation. Due to this characteristic, finished cast metals often get varying dimensional features while forgings offer better dimensional stability due to its predictable response to heat treatment.
What is more, the special casting metals require expensive materials and process control whereas the forgings are a less expensive, flexible adaption to meet the high market demand.
Forging Compared to Welding or Fabrication
If forging is compared to traditional welding method or fabrication, forging helps save materials as well as entire production cost. Welded metals are costly when production is performed in large scale. In fact, forging copper, forged steel etc. is the industrial conversion of traditional welding and metal fabrication. It saves total production costing when the volume increases. Moreover, forged metal production decreases labourcosts, scrap and continuous inspection costs.
Next consideration is the strength of the final product. Forgings are stronger than welded and fabricated metals. The metal grain orientation of forged metals is improved and make the forging stronger. On the other hand, welded metals are not free from porosity and a weaker welding or joining of parts make a welded metal weak.Welding often includes fabrication of different components and assembly of the multiple parts. On the other hand, forging is usually one-piece, properly designed. Moreover, forging does not require expert supervision unlike welding and fabrication.Forged metals are more consistent throughout the product and have better metallurgic characteristics. Unlike forgings, welding may yield unwanted metallurgic features including non-uniform grain structure due to its traditional inconsistent heating and cooling processes. This inconsistent property of welded metal may lead to unexpected failure under extreme stress or impact, which is not a concern for the forged metals.While the process of welding and metal fabrication include critical joining of metals, fastening types and sizes, and close inspection of the entire process; forging offers simplified production process without close monitoring.
Forging Compared to Machined Bar or Plate Metals
If there is need for different sizes of copper bars or plates, copper forging is the only option to offer a variety of size and material grade. Machine bar and plates are available in certain sizes only, without much variation of sizes and metal grades, and customisation. On the other hand, forged metal production is inexpensive, and a metal part can be as small as 1 inch in diameter while another can weigh up to 200 tonne.
The grain orientation is a big plus point of forged metals. It results in optimum strength of the metal piece, resistance and ductile properties. While, the directional formation of the grains make the forged metals stronger; the machined bar and plate metals are weaker due to their non-uniform grain patterns.Moreover, forging procedure save on materials and production procedure. While the flame cutting plate causes metal wastage, different fabrication steps to produce metal rings or hubs consume excess raw material in consequential machining procedure. On the other hand, forgings generate least scrap and promote efficient production of one-piece parts. That’s why, forgings have significant cost saving opportunities in large scale production run.
Another benefit of forging over the machined bar or plates is that forging rarely requires expensive secondary operations like spinning, grinding, polishing etc. However, these additional procedures are essential for most of the bars and plates to remove the surface deformities and achieve expected finishing, accurate dimensions, improved strength.
Industries Where Forgings Are Ultimate
There are various industries where forging is ultimate. Some of those industries include Aerospace manufacturing industry, Automotive and Truck manufacturing, Ordnance, Highway construction, Agricultural field, Valves & Fitters manufacturing etc.
·Automotive and Truck Manufacturing IndustryIn automotive and truck production and application, forged elements are usually found at points of pressure and shock.
There are usually more than 250 forgings in a truck or even in cars, and most of these are manufactured from carbon or alloy steel.
Forged engine and power-train components include attaching rods, cranks, gear shafts and forging gear, drive shafts, clutch hubs, differential gears, and general joint yokes and crosses. Forged camshafts, gears, pinions, rocker arms offer the security of selective setting as well as strength. Typified applications like spindle shafts and beams, wheel axles, kingpins, torsion bars, ball studs, steering arms, idler arms, pitman arms, and linkage for passenger buses, cars, and trucks demand extra energy and durability.
· Aerospace and Airbus ManufacturingFerrous and non-ferrous forging metals as well as forging gears are used in helicopters, piston-engine planes, commercial jets, supersonic military aircraft etc. The high strength and weight ratio and architectural fidelity improve performance, reach, and payload capacities of aircraft.There are numerous such aerospace designs where more than 450 structural forgings and hundreds of forged engine parts are involved.
The forged parts in airbus as well in aerospace vehicles include bulkheads, wing roots and spars, engine mounts, hinges, brackets, shafts, beams, crankshafts, bell cranks, wheels, brake carriers and discs, landing-gear cylinders and struts, arresting hooks and many more components. In jet turbine engines, iron-base, nickel-base, and cobalt-base super-alloys are forged into blades, couplings, discs, rings, buckets, chambers, manifolds, wheels, beams and shafts. Stainless steels, maraging steels, titanium, and aluminium forgings find comparable treatments at lower temperatures. Forged missile elements of columbium, titanium, super-alloys, and hard materials produce unduplicated mechanical and physical features under harsh service conditions. Aluminium structural beams, titanium motor cases, nuclear-engine reactor shield, as well as the canisters of magnesium are used in the space shuttle program.
· Highway Construction and Agricultural Tools
Ferrous forgings are usually used in the highway construction business, mining industry to manufacture heavy building equipment, stronger tools, and tough, machinable and economic components. In addition to engine and transmission components, forgings are used for shafts, spindles, forging gears, sprockets, levers, rollers, yokes, ball joints, axle beams, wheel hubs, bearing holders, and linkages.
· Ordnance ManufacturingPractically in every artillery instrument, from rifle triggers to nuclear submarine drive shafts, forged components are inevitable. From heavy tankers to a shell to mortar projectiles, all the equipment contains two or more forged components.
· Valve and FittingsThe mechanical qualities of forgings and freedom from porosity are particularly suited to high-pressure applications to construct valves and fittings. Corrosion and heat-resistant metals are used for valve bodies and stems, flanges, elbows, tees, reducers, saddles, and other fitting instruments. Oil industry applications involve drilling hardware, rock cutter bits, high-pressure valves and fittingsetc.
· Industrial Hardware, Tools, and Equipment
Fixed and shipboard internal oxidisation engines include forged camshafts, crankshafts, valves, gears, rod caps, rocker arms, connecting rods, levers, linkages etc. Outboard motorcycles, motors, power saws offer examples of the perfect use of forgings in smaller engines. Motor and machination industries include forgings for material handling, conveyor, chain-hoist assembly, lift truck etc.
Prevalence of Forgings – The Reasons Behind
Metalworking has proved power, strength, durability, fidelity, and the best quality in a variety of products, since the earlier days of human civilization. Today, these assets of forged components imply the greater value for defining temperature, loads, and stress improvement.
Forging copper, forged steel components make potential designs that provide the highest duties and pressures. Recent advancements in forging technology have considerably widened the range of means available in forging materials.
Moreover, the forged products are also economically attractive due to their natural higher fidelity, enhanced tolerance capacities, and the higher productivity with which forgings can be machined and further treated by automated techniques.
The degree of architectural authenticity achieved in forging copper or other metals is superior to any other metalworking methods discussed above. There are no inside gas pockets or voids, which might cause unanticipated breakdown under stress or shock. Moreover, the metal forging procedure helps in improving chemical segregation of the forging stock by influencing the centreline material to multiple locations everywhere within the forging.
The fundamental probity of forgings means safety factors based on the substance that will react predictably to its conditions without special and expensive processing to improve for the intrinsic defect.
Materials engineers, as well as the designers, acknowledge the growing influence of resistance to impact and burnout as a share of total element authenticity. With the use of proper materials and precise heat treatments when required, the enhanced impact energy of forged components is feasible.
Moreover, the higher strength and weight ratio can be used to overcome excess section thickness in part designs without imperilling the enforcing aspects of safety. Weight cut, even in the parts that are produced from cheaper materials, can count to significant cost savings over the life of a stock run.
The texture of material from one forging to the next, and between separate portions of forgings is remarkably high. Forged parts are made through a controlled series of manufacturing steps rather than a haphazard flow of material into the required shape.
Evenness is another big benefit of forging over other metalworking processes. Forged components ensure reproductory response to heat treatment, least variation in machinability, and uniform property levels of the complete parts.
Dimensional properties are also exceptionally durable for forging copper, forged steels or forged brass and more. Consecutive forgings are constructed from the same die impression, and because die impressions use control over every shape and form of the forged part, the probability of transfer deformity is reduced.
For cryogenic reinforcements, forgings have the necessary toughness, high strength and weight ratios, and freedom from the ductile-brittle shift difficulties.
Most used forged metals including forging copper, forged steel ring etc. are fabricated economically in a notably broad range of sizes. With the enhanced use of special piercing, punching, shearing, coining, and trimming practices, there have been abundant improvements in the range of cost-effective forging shapes and the workability of the revised accuracy. However, the parts having smaller holes, inner passages, re-entrant hollows, and critical draft checks usually need more complex forging tooling and more complicated processing and are consequently more reasonable in bigger sizes.
In many uses, forgings are ready for use without surface finishing or machining. Forged surfaces are befitted for painting, plating, polishing, or treatment with ornamental or shielding coatings.
Moreover, the freedom from the internal discontinuities or exterior formations in forgings provides a reliable machining base for metal-cutting methods such as boring, broaching, turning, milling, drilling, and shears spinning. The shaping methods like electrochemical machining, chemical milling, electrical discharge machining, and plasma jet techniques are also performed well on forged components.
After all, forging components are superior to metal parts manufactured by other methods in their congeniality with other manufacturing processes. And, this is the reason why forging is prevalent.
Get in touch with us
Name- Pahladrai Steel Forging Works
Email- [email protected]
Phone No- +91 9792114433
Website- http://www.pahladforgings.com
Adderss- 83/141 Juhi Kanpur - 208014
0 notes
Text
How to Build Pipe Corrals on Your Homestead or Ranch
By Spencer Smith – It’s important to know how to build pipe corrals because of the availability of material and, if done correctly, it will only need to be done once in a lifetime.
When my family moved to Springs Ranch in Fort Bidwell, California, in the early 1990s, the 20-year-old corrals were in rough shape. We went to work improving the corrals by replacing the rotted railroad ties and nailing on new lodgepoles. Fast forward to today, we are confronted with the situation that the corrals need a serious facelift again. This time we are not going to repeat the habit of building out of wood. We are replacing them all with drill stem and sucker rod. My goal is to never rebuild these corrals again.
The facelift I am doing on our corrals at Springs Ranch will take about five years to complete as time and budget allow. We are able to use the corrals as we build them. It does not have to be completed all at once. Make sure to time your project to suit your budget and homestead or ranch needs.
Ready to Start Your Own Backyard Flock?
Get tips and tricks for starting your new flock from our chicken experts. Download your FREE guide today! YES! I want this Free Guide »
How to Build Pipe Corrals – Tools Needed
Welder – either Arc or MIG/wire feed
Metal cut-off saw, plasma cutter, oxy-acetylene, or handheld bandsaw
Post hole digger, auger, or shovel
Concrete
Wheelbarrow for mixing concrete
Some good levels
Chalk line
We went ahead at the onset of this project and bought all of these tools. We thought we could put all of them to work regardless of how much we used them on this specific project. This was our first mistake. The best tool that we have found for cutting the 2 ⅞” drill stem to the exact angles needed, is a Milwaukee portable band-saw. This tool costs about $300 and is the one cutting tool that we simply cannot live without. We spent about two and a half times that much on a metal cutting chop-saw that we found to be much less effective and precise when making any cut for this project. If you are looking for a cutting tool specifically for building metal pipe corrals, I would get this before the $800 chop saw or the $1,500 plasma cutter that we bought. The plasma cutter has proven to be a useful tool, but not as essential for building corrals.
Corral Layout and Build Out
Corral layout is the most important part of building new corrals out of metal. When the project is complete, the corrals will be concreted and welded in place. You do not want to have any second thoughts about design. I am not a big fan of sweeps or tubs that push cattle into a space that then gets compressed. I find this too stressful and counter-intuitive for how livestock wants to move. I am a believer in the Bud Box that allows livestock to search for a way out and allows them to move fast and fluidly through the corrals without getting jammed up and stressed out.
When rebuilding an existing set of corrals you should know what already works well, and what you want to change. When designing a layout of the corrals, I mark my layout with a chalk line. I can measure and mark where all of my posts and gates will go. After my layout is completed, I set my corner posts, then tighten a guide string line and set the other posts in the line. You will need to make sure that your posts are in a perfect line so that the top pipe sets correctly in the saddle cuts.
I like to concrete all the posts in my corrals, my line posts get one bag of concrete and the gate posts get two or more depending on how much pressure that point is likely to see from livestock. If you would like to make archways or bow gates over the span, you can get away with less concrete and have plenty of stability. I like archways in sorting alleys or loading chutes for protection against cattle spreading the corrals. Be careful that the arches are high enough that a cowboy doesn’t hit his head when following or sorting cattle.
Using a band saw, you can cut perfect copes or saddle cuts for each of the rungs you are putting between the posts. There is a little trick to this and once you have it, your corrals will go up fast.
For 2 ⅞” pipe corrals, measure your span two inches longer than what you want and mark the top of the pipe with a straight edge so your copes line up. Then, make the lines around the pipe at the exact length to fill the span. So if the distance between given posts is eight feet, first cut the pipe 8’ 2” and mark a plumb line to ensure your saddles line up perfectly. Then mark one inch off the edge and you are ready to cut your saddles. Now take your band saw and cut a diagonal line from the center of the post to the back of the one-inch line and repeat so that you have a saddle cut that will perfectly go around the post where it needs to match. This method will take you about ten minutes to master and will produce the perfect cut every time. If working with 2 ⅔” pipes, do the same thing but make the line ¾ inches off the end of the pipe.
Many use sucker rod for their spans because they’re cheap and relatively strong. I suggest you either weld clips onto the post that will allow the sucker rod to free float or blow through the posts with a plasma cutter or oxy-acetylene torch and run the sucker rod through and weld tight. The second option gives the best looking and strongest option for a set of pens. I warn against welding the sucker rod to the outside of the post as these tend to pop off when cattle crowd it or during temperature fluctuations.
There are many options for ranch or homestead fencing and it’s important to find the best material at the best price. If budget is a concern, tap into your support network to brainstorm creative and cheap fencing ideas.
For my loading chute, I used pipe and sheet metal because I do not want my cattle able to look out when I am shipping them. Typically, when we ship we have somewhere between five and 10 trucks hauling cattle to and from the ranch. That means five or 10 truck drivers standing at the end of the corrals making eye contact with the cattle. To deal with my frustrations for cow haulers to be in the way, I made my chute solid and without a catwalk for the truckers. This eliminates the occurrence of a trucker sticking his head over the top of the chute and slowing down the cattle.
If you design your corrals well and allow the cattle to flow through them, then there is no need for hollering or hot shots in most cases. In the crowding alley leading to the chute, I chose to use highway guardrail because it is stout and wide enough that livestock won’t try to challenge it. It also has rounded edges to make sure nothing gets caught on a sharp edge.
Knowing how to build pipe corrals is a rewarding endeavor that can benefit generations to come. DIY fence installation makes for a happy homestead or ranch!
Have you learned how to build pipe corrals? If so, let us know your tips and tricks for success in the comments below.
How to Build Pipe Corrals on Your Homestead or Ranch was originally posted by All About Chickens
0 notes
Text
Installing a full suspension on a 1967 Mustang for ultimate handling
Ride and handling are truly subjective things, like Goldilocks’ choice in beds or porridge. One person’s “harsh” ride is just right for someone else; a car that handles acceptably for Joe Blow feels like driving a semitruck to John Smith. Every driver has their own personal tastes and tolerance for the compromises between ultimate handling and/or ride softness/harshness. Similarly, some guys have no problem breaking out the plasma cutter and cutoff wheel to modify a Mustang, while others wouldn’t dream of changing Ford’s original design one iota. Vive la différence!
As we entered into another Week to Wicked project in July 2018, the plan of attack was to build a 1967 fastback (converted from a hardtop into a fastback with Golden Star parts/PG Customs & Bodies labor) and to power the car with a 2018 Gen 3 5.0L Coyote engine from Ford Performance. That obviously meant we weren’t afraid to cut and heavily modify the car—and that big Coyote engine would mandate it anyway—so we went whole hog when it came to the suspension and chose a Total Control Products full kit, front to back. Yes, it requires TCP’s weld-in front clip that replaces the stock front framerails, making it next to impossible to undo the modifications and return the car to stock, but in this case we didn’t care. We were building a hot street car from a beat-up rust bucket so originality mattered not. The goal was ultimate street/track performance without too much sacrifice in civility, and Total Control’s front clip and coilover suspension combined with their Stage 6 rear suspension would satisfy both goals.
Even if you’re not building a car to the level of our Week to Wicked ’67 fastback, the front TCP coilover and clip will dramatically improve both the ride and handling of an early Mustang. The lightweight, thin-wall factory framerails and sheetmetal stampings are not optimum for strength or integrity. Even in perfect condition, their strength (and geometry) pales in comparison to a dedicated performance clip like that from TCP. And if you’re contemplating a Coyote or mod motor swap (or a big-block), the stock shock towers will make you want to kill the closest living thing the first time you have to work on it—one big advantage to a front clip is the elimination of the shock towers, freeing up space underhood.
Complementing the TCP Front Frame Clip and Suspension kit are five different suspension and steering systems with a bunch of options, but they’re all based on a coilover setup that improves both ride and handling over stock, and rack-and-pinion steering that is far more precise than the early Mustang’s sloppy steering. We ordered the full boogie setup that includes upper and lower control arms, double-adjustable VariShock coilovers, a gun-drilled and splined antiroll bar, a power rack, and Wilwood brakes.
We also got the trick stuff for the rear suspension—TCP’s Stage 6 Torque Arm/Panhard Bar leaf-spring system that uses a torque arm, Panhard bar, new leaf springs, polyurethane bushings and shackle set, aluminum-body shocks, leaf-spring plates, and mounting hardware. Linking the front and rear suspensions are TCP’s subframe connectors and bolt-in center support that nearly turn the car into a full-frame car. While the coupe was undergoing the fastback conversion at PG Customs & Bodies in Texas, we had them weld in the front frame clip and subframe connectors before taking it to our shop in California for the suspension installation.
Once in our shop, we had all hands on deck during the Week to Wicked program and had the entire suspension installed in a day. Of course, that’s on a two-post hoist and with about six people working on it—it’ll take longer if you’re on your back in the garage or driveway.
1. Here’s the complete TCI Stage 6 front and rear suspension system for the 1967-1968 Mustang.
2. During the fastback conversion at PG Customs & Bodies in Decatur, Texas, we had them cut off the Mustang’s stock front framerails and install the Total Control Products front clip kit and the subframe connectors (not shown here).
3. Here’s an illustrated view of the TCP products we installed—front frame clip, subframe connectors, and center support—that essentially turn the car into a full-frame car.
4. For the full story on what’s involved with installing the TCP front clip setup, check out Mustang-360.com (mustang-360.com/how-to/chassis-suspension/1608-replace-weak-stock-mustang-framerails-with-a-new-front-subframe).
5. Since our car came to us as a bare, painted body shell, we sourced a 9-inch rearend from Currie Enterprises. It uses the new Currie Centurion heavy-duty Ford 9-inch housing, Sportsman nodular iron gear case, 31-spline performance axles, and comes with a choice of gear ratios—we chose 3.73s on a Truetrac differential. The “crate” rearend package comes with brake options, but we were using Wilwood brakes that we already have, so we left that off the list.
6. Here’s a shot of the TCP chassis brace kit installed aft of the front frame clip. The subframe connectors are welded on to the framerails, which is the best idea. This makes the Mustang stiff as a bridge girder.
7. The torque arm attaches to the rearend and also to the center brace, and it transmits axle rotation under acceleration into the chassis, planting the rearend harder for better traction. It helps in straight line acceleration like on the dragstrip and also on corner exit in a handling situation.
8. We had to remove the centersection from the Currie rear in order to install the torque arm bracket. TCP includes this “gauge” to properly locate the brackets; Tech Center Manager Jason Scudellari (right) then welded them in place before reassembling the rear.
9. TCP’s leaf-spring suspension system comes with new leaves, VariShock adjustable shocks, spring mounts, and all the hardware to install it—including new rear shackles.
10. The Stage 6 kit also includes a Panhard bar, which requires these brackets to be welded to the chassis.
11. The Panhard bar (bare aluminum piece) controls the lateral (side-to-side) movement of the rearend for more stable handling. Leaf springs serve that same function, but not nearly as well—they allow too much movement, whereas the Panhard bar keeps it to an absolute minimum and is adjustable.
12. Christian Arriero, tech center technician, is seen here installing the rod ends in the TCP tubular upper control arms. TCP says, “The most notable feature of our upper control arms is the double-adjustment couplers. Adjustment range is 1 inch, with travel centered at the stock control-arm length. Caster can be varied within a 6-degree range and camber within 5.5 degrees. Alloy-steel rod ends feature low-friction, polymer-bearing races, eliminating deflection and the increasing resistance found with rubber and polyurethane bushings. The arms come with Grade 8 fasteners and shims to compensate for any chassis variances.
13. The upper and lower TCP control arms allow the use of coilover shocks. We went with TCP’s VariShock double-adjustable units (part number VAS 86M21F2) that have 256 combinations of compression and rebound adjustment, allowing the ride and handling combination to be dialed in to the last degree. (Coilovers also allow easy adjustment of ride height.) TCP’s modular shock tower adapter system and spherical-stem assembly provides a choice of stock or lowered ride heights.
14. Part of the TCP front suspension system we went with includes race-and-pinion steering that is light-years better than the Mustang’s stock hydraulic ram-assisted system. TCP’s kit enables correct geometry and a quick ratio. Existing factory mounting locations are used whenever possible to simplify rack installation, and once installed, the rack becomes a rigid crossmember bracing the lower control arm mounts—an improvement over the original bent tubular design. These trick aluminum mounting brackets along with the centerlink are specific to engine type and are used to vary the height of the rack as needed for oil pan clearance.
15. TCP’s gun-drilled and splined antisway bar is full-on race car stuff, and a required option when doing a Coyote swap install in a classic Mustang.
16. The complete Total Control Products front suspension system works with the rear suspension to make our fastback a killer on the street, strip, and open track.
17. To stop the beast and complement the TCP suspension, we went with Wilwood brakes with 6-piston calipers front, 4-piston rear, and 13-inch rotors.
18. The best suspension in the world is worthless without good wheels and tires. We chose Legendary Wheels’ 17×7 and 17×8 LW90s with Gold Haze centers to pop with the Royal Crimson paint. Tires are Falken Azenis RT615Ks—P245/45R17 rear and P225/45R17 front.
19. About to come down off the lift, our Week to Wicked 1967 Mustang, presented by Golden Star Auto Parts, looks amazing. Check back next month for the final reveal!
More on our Week to Wicked 1967 Ford Mustang Build!
Week to Wicked Begins! Convert a 1967 Mustang Hardtop to a Fastback for Under $10,000!
Week To Wicked 1967 Mustang Fastback Build Coming the Week of July 23!
Day one of the Golden Star Presents Week To Wicked 1967 Mustang build!
Day Two of the Golden Star Presents Week To Wicked 1967 Mustang Build!
Day Three of the Golden Star Presents Week To Wicked 1967 Mustang Build!
Day Four of the Golden Star Presents Week To Wicked 1967 Mustang Build!
Day Five of the Golden Star Presents Week To Wicked 1967 Mustang Build!
Installing a full suspension on a 1967 Mustang for ultimate handling
To see more behind the scenes photos, outtakes, and videos, search these hashtags on Facebook and Instagram:
#Goldenstarautoparts
#Currieenterprises
#Thefutureoftraditional
#E3sparkplugs
#E3ProMod
#E3borntoburn
#Whatareyourunning
#Painlessperformance
#Painlesswiring
#Deraleperformance
#Derale
#Wilwood
#Gforce1320
#Duralast
#FordPerformance
#CAChassisworks
#Totalcontrolproducts
#Gearstarstrong
#Pertronix
#Feelingblessed
#Gearstar
#Trustedbythebest
#Yankperformanceconverters
#Covercraft
#Becool
#ididit
#Unitedpacific
#Oldair
#Drakeautomotive
#Tanksinc
#Mustangstofear
#Powerbythehour
#Dakotadigital
#Procarbyscat
#Summitracing
#w2w
#weektowicked
#M360
#Mustangmonthly
#Musclemustangsandfastfords
#jbaperformanceexhaust
#Drakeautomotive
#Tanksinc
#Mustangstofear
#oldairproducts
#UPcarparts
#Pbhperformance
#Dakotadigital
#PGCustomsandbodies
#67fastback
The post Installing a full suspension on a 1967 Mustang for ultimate handling appeared first on Hot Rod Network.
from Hot Rod Network https://www.hotrod.com/articles/installing-full-suspension-1967-mustang-ultimate-handling/
via IFTTT
0 notes
Last Seen Blogs

shivanatarajablog
OBJECTS OF DESIRE: LORD SHIVA AS NATARAJA

suganation
suganation


regretdotcom
im sooo normal and you believe me sooo much

gears2gnomes
gears2gnomes