#and the lighter items can be moved to the sturdier boxes as spaces opens up so the worn box can be recycled first?
Text
Easily the worst part of working night shift is having to spend 30 minutes to an hour of every shift fixing all the things that day shift fucked up that they weren't even supposed to be touching in the first place.
#day shift comes in like#oh this baby formula that was already worked today wont fit on the shelf?#better stuff it behind the diapers so the diapers wont fit properly on the shelf#and no one will find the formula#oh this box of baby food on the backstock cart is perfectly organized?#better move it all around rip the box and break 2 of the jars without actually getting any of it to the shelf#because the shelf is full#because this store is shopped at almost exclusively by people over 70 so no one is buying fucking baby food#oh you organized this cart so that the old worn out boxes hold all the light weight stuff so it doesnt break#and the lighter items can be moved to the sturdier boxes as spaces opens up so the worn box can be recycled first?#better break down and throw away the new sturdy box and put all the heavy stuff in the worn out box#op
1 note
·
View note
Text
Packing Fragile Items 101: Lessons from Top Removalists
Moving to a new home can be both an exciting and challenging experience. Amidst the anticipation of a fresh start, the safety of your belongings, especially fragile items, demands special attention and consideration. Delicate treasures such as glassware, heirlooms, and cherished collectibles are not only valuable in a monetary sense but also hold sentimental significance. Properly packing these fragile items is essential to ensure they arrive unscathed at your new abode when the removalist Maitland professionals come.
Lesson 1: Gather the Right Supplies
Having the right packing materials is essential to ensure the safety of your fragile items during transportation. Here are some additional details on the supplies you'll need:
Sturdy boxes: Choose boxes specifically designed for moving and packing delicate items. Avoid using old or damaged boxes, as they may not provide adequate protection.
Packing paper: Use a sufficient amount of packing paper to wrap each fragile item fully. Avoid using materials like plastic or newspaper, as they may not offer the necessary cushioning.
Bubble wrap: Select bubble wrap with small bubbles for delicate items and large bubbles for larger, less delicate items. Wrap each item carefully, providing multiple layers for added protection.
Packing tape: Use high-quality packing tape to secure the wrapping firmly. Reinforce the corners and seams of the boxes to prevent them from opening during transit.
Styrofoam peanuts or packing peanuts: These materials help fill the gaps between items, preventing them from shifting during the move. Ensure you have enough to provide adequate cushioning.
Labelling materials: Mark each box containing fragile items with prominent labels. Use "Fragile" or "Handle with Care" stickers to alert movers to the contents.
Lesson 2: Wrap with Care
When wrapping fragile items, it's crucial to be meticulous and gentle. Follow these steps for optimal protection:
Clean the items: Before wrapping, make sure your fragile items are clean and free from dust or debris.
Provide padding: Create a cushioning base in the boxes by crumpling up packing paper or using bubble wrap at the bottom.
Individual wrapping: Wrap each fragile item separately to prevent them from touching one another and causing damage. For items with sharp edges, use extra layers of bubble wrap or add cardboard corner protectors.
Lesson 3: Organise and Layer Strategically
The proper organisation within the boxes can significantly impact the safety of your fragile items during the move:
Heavier items first: Place heavier and sturdier items at the bottom of the box to ensure stability.
Delicate items on top: Put lighter and more delicate items on the top layer to minimise the risk of them being crushed.
Compartments: For irregularly shaped or particularly fragile items, consider creating compartments using cardboard dividers or box partitions.
Use soft materials: Fill the gaps between items with packing peanuts or crumpled packing paper for added protection.
Lesson 4: Fill in the Gaps
When packing fragile items, preventing movement within the box is crucial. Here's how to achieve that:
Prevent shifting: Ensure no space in the box that could allow items to move around during transit.
Overpacking: Avoid overpacking boxes, as this may lead to insufficient cushioning and an increased risk of breakage.
Lesson 5: Labelling and Handling
Clear and concise labelling helps ensure that everyone involved in the move handles the boxes with the necessary care:
Labelling language: Use bold, clear, and easily identifiable labels such as "Fragile" or "Handle with Care."
Orientation: Add arrows on the boxes to indicate the proper orientation of fragile items, especially if they need to be kept upright.
Lesson 6: Communicate with Your Removalists
Communicating with your chosen removalists is essential for a successful move:
Specialised services: Ask your movers if they offer specialised packing services for fragile items. Professional movers may have experience in handling delicate objects and can provide additional precautions.
Custom requirements: Share any specific handling instructions for individual items with the movers to ensure their safe transport.
Packing fragile items requires attention to detail, the right materials, and careful organisation. By following these lessons from top removalists, you can minimise the risk of damage and increase the likelihood that your cherished belongings will arrive safely at your new home. Remember, preparation and communication are key to a smooth and successful move, particularly when it comes to handling fragile items with the utmost care.
0 notes
Photo
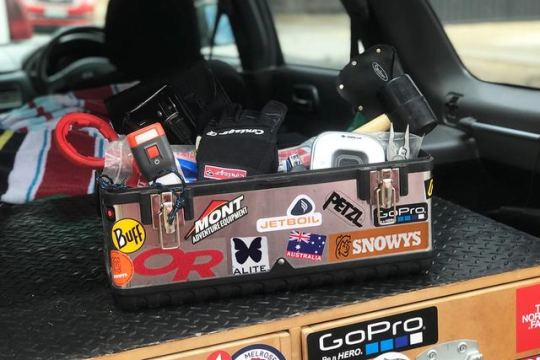
When you think about camping adventures, issues that may arise during your stay are not likely gonna be at the forefront of your mind. Usually, the focus is on where we want to go, what we want to do and how we want to do it.
One small, but important consideration, is the gear we need and how we can ensure it performs during our time away. The frustrating catch is that we spend large amounts of hard-earned money on products that, in the pursuit of our adventures, can at some point break or become damaged. However, this is when the creative fun begins!
Having a toolkit is a pretty handy addition to any setup, whether it be your hiking pack, the storage shed or in your car boot.
Why is it important to have a toolkit?
These toolkits are invaluable for the next time you’re faced with a camping obstacle that needs to be overcome. Whether it be trying to peg into solid ground, getting a fire going in wet and windy conditions, or fixing something that has snapped, ripped, leaked or punctured. Toolkits can save you lots of money as it changes your approach. You can find a creative solution with what’s in your toolbox, which can save you from reaching for your credit card.
Whether you’re kilometres from home, at your favourite campsite or just back after a memorable trip, I’ve listed a range of items you should consider keeping in your toolkit. This will ensure you can get back to doing what you love with the gear you love, for a lot less than replacing it.
A well thought out toolkit can save you plenty of cash and will help make sure your trip runs smoothly.
Toolbox or Bag
The first item you need to get sorted is the box or bag you’re going to keep your toolkit in. Whilst it is easy to get carried away here, aim small because you don’t want this to consume valuable space which can be taken up by other gear.
Solid and durable tool boxes work great for vehicle camping, whereas soft pouches like this Sea to Summit one are fantastic for lightweight adventures.
Pick a toolbox size that’s going to work for your adventures.
Consumables
Once you’ve decided on the size of your tool box or bag, you can then start working on what consumables you might want.
Duct Tape
Capable of many uses, duct tape is a go-to option for when things need to be stuck back together. Covering holes and repairing tears are just some of its many uses.
Cable Ties
Like duct tape, cable ties can be used to re-attach or hold things together. Organising cables, ropes or hoses, closing open food packets, locking tubs or bags, and mending broken hooks and loops on a tent are just some of their many uses.
Lubricant
It might be a screw that has gone tight, a pin that won’t release or a pole that can’t extend. Having a lubricant spray, like WD-40 available will ensure that you can get out of sticky situations easily.
Glue/Sealer
Your shoe sole might be coming apart, your tent seam might be leaking or sleeping pad valve may be seeping air. Fixing tasks like these and many others requires a strong, adhesive and fast drying glue to get the job done.
Having a solid set of consumables in your kit will make small repairs easy.
Repair Tape
A form of glorified duct tape, repair tape is transparent, very adhesive and perfect for mending precious items of gear. It might be a tear in your tent fly, a rip in your rain jacket or a slit in your hiking pack. Repair tape is designed to bring your gear back to life whilst still looking somewhat new.
Sewing Kit
If repair tape can’t fix the rip in your rain jacket, maybe sewing it up can. Whether the seam in your pants gives way, the buttons on your waistband pops or the visor on your hat un-ravels, having a sewing repair kit can take care of all these basic sewing jobs.
It can also prevent issues from becoming worse and ensure that the next favour you ask from your mum is more meaningful.
Paracord
Easy to source, super strong to use and small enough to carry, paracord is fantastic for all kinds of use. It can be used to reinforce your tent, secure your tarp, hang something from a tree, create a clothesline, tow something to your camp or secure something so it doesn’t move. The options with this versatile rope are endless.
Hexamine Tablets
Hexamine tablets burn smokelessly, don’t liquify and leave no trace of burning. They have a high energy density making them fantastic to use as either an emergency stove or as a supercharged fire-lighter.
Tools
The next lot of items to consider are your tools. It’s important to remember that we’re not aiming to build a tradie’s toolbox, our goal is to include multi-purpose gear which can be used across a range of applications. Here’s what makes my list:
Multi-Tool
When it comes to multi-purposeful tools, having a multi-tool on hand like the Leatherman Surge makes perfect sense. With 21 tools and a sturdy feel in the hand, this multi-tool is my tool of choice when tackling any adventure. There aren’t many unique tasks that this tool can’t play a solving role in.
Torch
While we’re likely to have a headlamp or lantern amongst our gear, a multi-purpose lighting back up is never a bad thing. The Goal Zero 250 Flashlight is a fantastic option with 3 ways to recharge (including an emergency crank), which powers either a flashlight, floodlight and red emergency light mode.
Don’t waste valuable space and weight by selecting multi-purpose tools.
Mallet
When it comes to camping and hiking, the value of Coleman Wakjak, is that the peg puller at the end of the handle offers just as much help when its time to pack down and pull all the pegs out of the ground. If you’re more of the lightweight hiker type, you could consider a lightweight mallet like this one from Zempire.
Tri-Fold Shovel
Whether your adjusting the wood on the fire, digging up coals for your camp oven or clearing space for the bowels to open up, having a shovel is incredibly handy. Many chose to opt for adding a long-handled option to their gear kit, however, I often get away with a simple tri-fold shovel in my toolbox. It’s small and compact yet it still gets the job done.
Hatchet
Not critical, but very useful, especially during fire season. Hatchets are great for chipping away at kindling, clearing vegetation at campsites and cutting down wood to fit. They’re also multi-purpose as you can use the other end of the head as a hammer for putting pegs into the ground.
Butane Gun
Sure you can just use matches, but having a butane gun on hand will help to light a fire in testing conditions. Whether you’re lacking tinder or struggling with wet or windy conditions, having a steady flame can be beneficial. Butane refills are very cheap and I find the convenience to be absolutely worth it.
Water Tank Spanner
Again, not critical but very useful especially if you plan to carry water in reusable tanks. Having a tool to ensure your lids and bungs are screwed on tight and that your taps can be removed for transit may not seem that valuable… until your water tanks start leaking.
Spare Parts
Lastly, are the spare parts. While this list can quickly become endless, I’ve identified some common parts that are regularly sought after. Please adopt this for whatever gear you carry as you need. Don’t be afraid to add items after you’ve learnt from your mistakes. It took breaking four buckles on my hiking pack before I started carrying a spare.
Check that you’ve added spare parts to your kit in case you get caught out mid-adventure.
Tent Pole Splint
The unfortunate reality is that no tentpole is indestructible and once it becomes damaged, it’s a pain to manage. Having a sleeve handy makes repairing a crack or break easy. Sleeves are usually included as a spare with your tent. You just slip it over the damage and then reinforce with your duct tape or cable ties as needed. A much sturdier option than a taped pole that doesn’t have much support.
Spare Bungs
Whether it be for your esky or your water tank, having leaking fluid going everywhere is the worst! Spend a couple of dollars to ensure your covered just in case you lose or break your bung.
Stove Service Kit – O-Rings, Knobs, Adapters
Gas Stoves can often be fidgety pieces of gear complete with many different parts that often need maintaining. With hiking stoves, it’s relatively easy as many come with pre-assembled repair kits.
Camping stoves are a bit trickier. A great way to try and stay on top of things is to carry: correct sized rubber o-rings for your seals, stove knobs, and gas hose adapters so you can use it between 3/8 to POL to BOM fittings.
It never hurts to also read the manufacturer instructions in case they make any recommendations on parts as well.
Spare Pegs
If you’ve been camping for a while, you’ll know that broken, misplaced or un-returned tent pegs are a frequent occurrence. Having a few extras on hand can never hurt. It’s pretty easy to get your hands on heavy-duty steel pegs or lightweight alloy pegs.
Repair Buckle
While many wouldn’t even think of buckles breaking, the inconvenience when they do can be pretty frustrating. Whether it be in your tent, backpack or awning – buckles play a part in the setting up of many pieces of gear.
All it takes is for that misplaced footstep, along with some pressure and the next thing you know, the buckle is crushed.
Do you have anything else you take along in your toolkit when you head out on an adventure? Let us know in the comments.
The post How to Build a Camping Toolkit appeared first on Snowys Blog.
0 notes
Last Seen Blogs

muchtoosensitive
Sourpuss


shiimo
Shiimo

avernss
Avern

outofcontextstoryofundertale
story of undertale