#and here comes problem 2 - it's all supposed to be blended with that hand mixer thing you know? but I had forgotten it while moving
Text
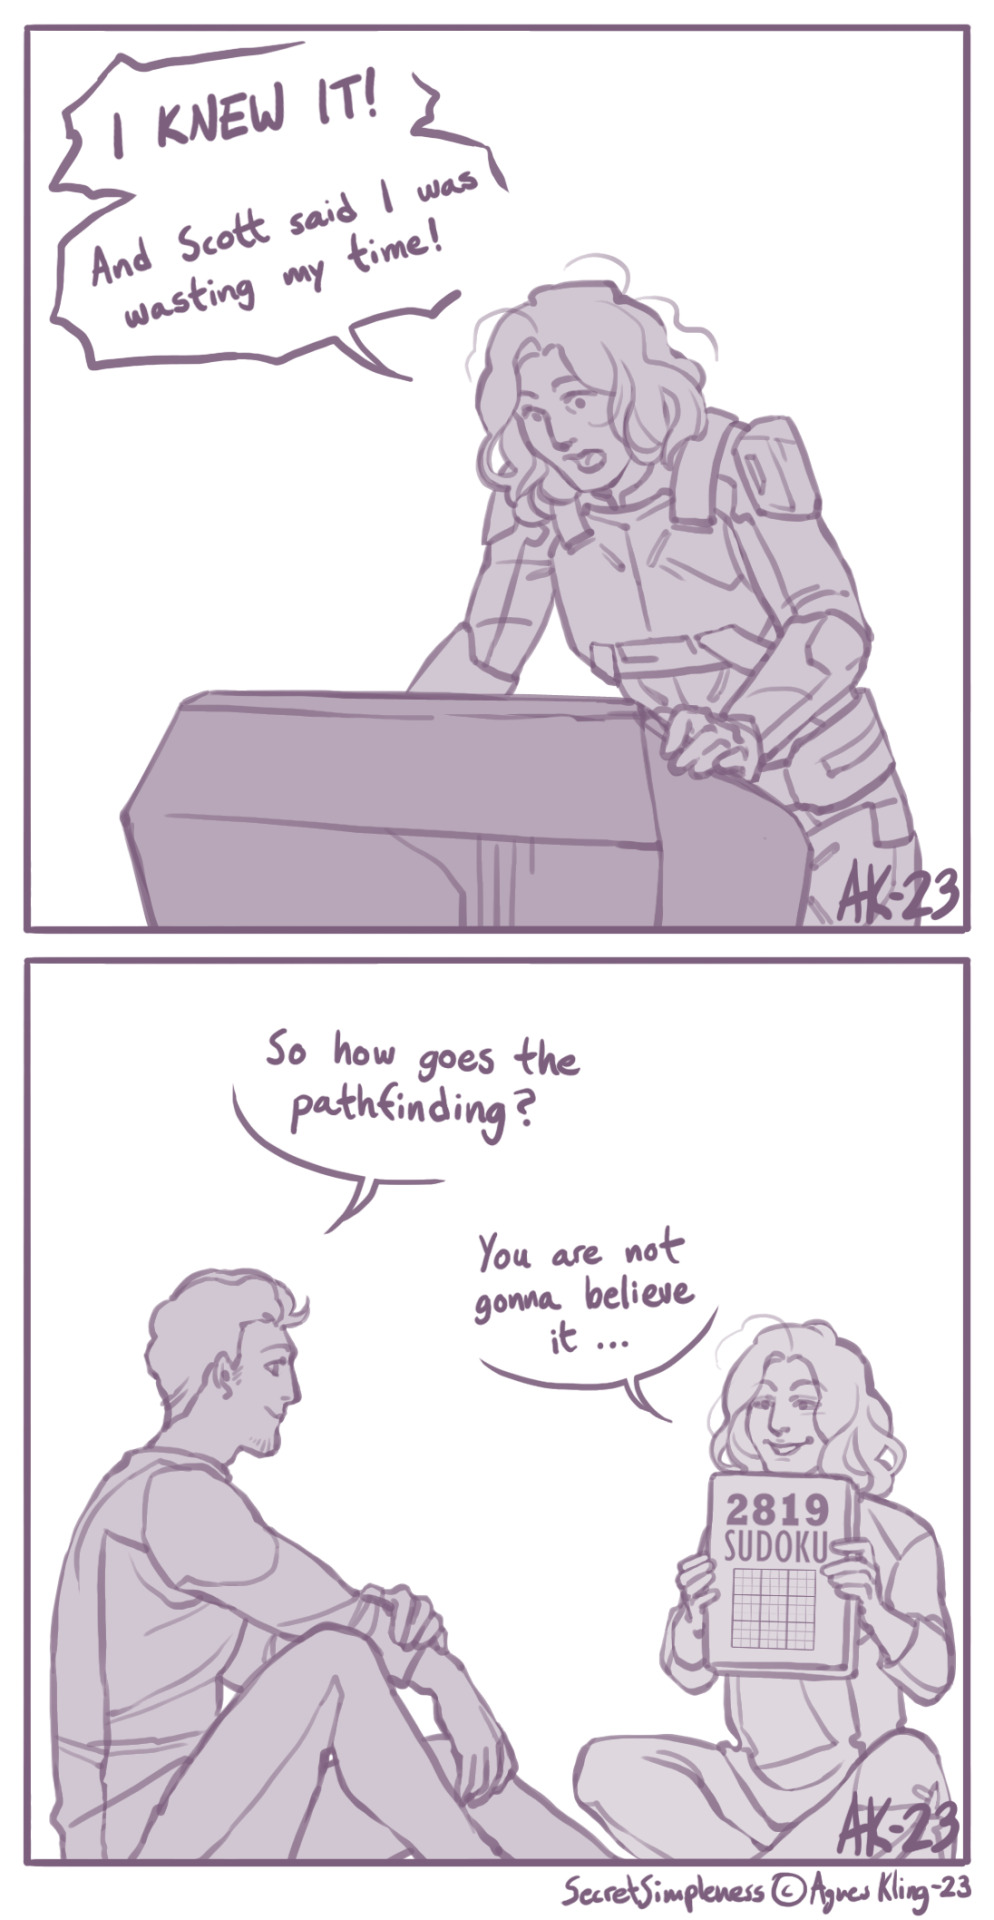
Storytime, when I started a second playthrough it was mainly because I craved sudoku.
Female Ryder (custom), Scott Ryder / Mass Effect Andromeda (c) Bioware
#mass effect#mass effect andromeda#mass effect fanart#bioware#female ryder#custom ryder#scott ryder#comic#sudoku#remnant decryption puzzle#I'm a sucker for logic puzzles what can I say#but only the ones I can manage are good. the rest are obviously designed poorly.#so. I made a really disgusting soup this week because several years ago my mom bought these sliced... beet artichokes? I dunno. anyway#they were forgotten in the basement freezer and when I moved I decided to bring them with me and see if they could be eaten#and you can (usually) make a really nice soup with them and potatoes etc but problem 1 was that they were not properly cleaned#and since they had been frozen I saw no clear way to like. fix them. so I popped them in the pot thinking it would all boil apart anyway#and here comes problem 2 - it's all supposed to be blended with that hand mixer thing you know? but I had forgotten it while moving#so I only had my electric whisk available for like 1 kg of root vegetables and almost 2 l liquid all needing to be crushed together#and I could not do it in the pot because it might damage the glaze or whatever so I stood there scooping everything into a bowl#and then tried to whisk it together into a smooth soup with my little electric whisk. I shall tell you that this was not a good idea.#anyway so I have been eating this lumpy yellow-grey mess with bits of peel in it and while writing this I still have three more days to go#every evening has been me going 'if you eat it you can have something nice after ok? don't look at it just swallow...'#and two weeks before this I made a really lovely fake palak paneer and it was a week of bliss and I suddenly started writing a lot#and after that came this soup#it's fine. it's fine. I would be hard pressed to cook anything worse than this for next week. so it's fine.
144 notes
·
View notes
Text
Cakes for the Evans Part One: The Kai Cake Disaster
Today, dear followers, I began the first step of a long journey that I hope to share with you. Today, I baked a cake.

I had a whole lot of free time this afternoon with a whole lot of nothing to do, so I was hanging out with my sister. We were watching AHS when suddenly, out of nowhere, I had an idea. A “brilliant” idea. I was going to bake a cake.
The original plan was pretty simple. I’d find some ingredients in the cupboard, bake a little cake, and call it a day, but shortly after I gathered up a recipe and an idea for the flavor I though ‘huh, I could make a series out of this!’ So, I did.
From today, whenever I have the time and can gather the ingredients, I’m going to start baking a cake for each Evan (all the Evans in AHS, Warren Lipka, Peter Maximoff, and Ralph Bohner). Today I started with Kai Anderson.
It was, to be fully honest, a fucking disaster, so it being Kai’s cake is fitting.
At first things went well. I had a whole bag of tangerines in the fridge, as well as a few cartons of berries that were going to go bad soon. Me and my sister modified a few family recipes, and soon enough we had our idea.
Originally, the cake was supposed to be a two layer tangerine cake, with blackberry frosting in the middle and an orange blueberry glaze on top. As you can see, that didn’t happen.
We made the cakes themselves with little error. It was delightful to have something work out with no kinks. We took that for granted. With all our success, our egos had soared. There was no way this could go wrong after starting on such a bright note, right? Wrong.
First, the blackberry frosting just... didn’t turn into frosting. Like, we followed the instructions but the berries had a looot of water in them, so it sort of just turned into a sugary mess. We ended up just tossing it in a mason jar and plan to use it for crepes tomorrow.
Then, while I was zesting tangerines, my sister watched in horror as the cakes just... fell apart. Neither of them made it out of the pan fully formed despite the fact that we had greased them with a ridiculous amount of butter. One was salvageable... the other, not so much. We rolled with it, found a can of frosting in the pantry, and made some extra cake pops.
The cake pops.... well, we’ll get to that later.
The tangerine blueberry glaze ended up.... well, it was too thin, so we cooked it down and ended up with another weird sugary syrup slop, only this time it had chunks! Delightful! It ended up tasting pretty good, but took more steps and improv than initially intended.
Once all was said and done, we fetched the cake pops from the freezer only to find they had cemented themselves to the wax paper, and refused to budge. At this point, I was close to tears.
I would not, in all honesty, recommend this process to anyone. It was time consuming, took way too many bowls, and the ending product was kind of a mess. The only thing I can say is that it was, in the end, very delicious.
So, here is a full recipe and guide on how to make Kai Anderson’s Disaster Cake (and bonus cake pops). Good luck, you’re going to need it.

Ingredients*:
Tangerine Syrup
1 1/2 cups (about 4) tangerines, fully peeled
1/2 cup water
1 1/4 cups white sugar
The Cake
1/2 cup butter
1 cup white sugar
2 eggs
Tangerine syrup (measurements above)
1 1/2 cups all-purpose flour
1 3/4 teaspoons baking powder
1/2 cup of milk
Tangerine Berry Glaze
2 tangerines, zested and fully peeled
6 oz. (one carton) blackberries
6 oz. (one carton) blueberries
1 1/2 cups of sugar, food processed but not powdered
4 tablespoons of butter, softened
4 tablespoons of milk
1/3 cup agave syrup
Cake Pops
1 9″ round tangerine cake
1/2 cup Pillsbury cream cheese frosting
Cake Pop Frosting
Remaining Pillsbury cream cheese frosting
1/2 cup tangerine berry glaze
* - These are pretty good, but general approximations of the ingredients I actually used because this cake threw me for a loop and tested my imagination. Nothing worked like it was supposed to... literally.
Now, on to the disaster.
Instructions:
The Cake
First, peel 4 tangerines. Separate each of the sections of fruit and peel the skin off of the small sections.
Add the peeled pieces of tangerine to a medium saucepan with half a cup of water and 1 1/4 cups of white sugar.
Bring the mixture to a boil, stirring continuously to prevent burning. Once a boil has been reached, lower the temperature and bring the mixture down to a simmer.
Use a tool of your choice to mash the fruit as the syrup simmers. Once the fruit is mashed, continue stirring the mixture as it thickens and boils down. This process will take about ten minutes.
After ten minutes, pour the mixture into a food processor and blend until there are no large chunks of pulp left. Then, set the mixture aside to cool as you prepare the batter.
Before starting your batter, set the oven to 350 degrees fahrenheit and allow it to heat up as you work.
Add half a cup of butter, cold, to a bowl with one cup of white sugar. Use a mixer to cream the sugar and butter together.
Once it’s been creamed, add two eggs and mix again with the mixer until the ingredients have been evenly incorporated.
Next, add the flour, baking power, and now-cooled tangerine syrup to the bowl. Fold the ingredients together until there are no chunks of flour and the syrup is fully integrated. Then, fold in the milk.
Pour the batter evenly into two, nine inch round cake pans that have been greased thoroughly with butter or a baking grease of your choice. Crisco is a great alternative!
Bake the cakes at 350 degrees fahrenheit for 30 to 40 minutes. Ours were brown at the edges and cooked all the way through at 35 minutes, but based on your oven the time may vary.
Allow the cakes to cool in their pans, and then carefully turn one of them onto a plate for glazing. If it breaks, no problems! You can just use the other one.
If both cakes survive their trips out of the pan, you can use the tangerine berry glaze both between the layers and on top of the cake. If only one survives, simply put the glaze over top, and set the other, broken cake aside for cake pops.
The Glaze
Take one cup of white sugar and put it in a food processor. Blend it, but don’t do it enough for it to be fully powdered. Be impatient. Cut corners. In the end, you should have sugar with granules that are smaller than normal, but not quite small enough to be considered powdered sugar.
Zest two tangerines. Once you’ve collected all the zest you can, peel them, section them, and take the skin off of the small sections.
Put the tangerine zest and peeled tangerine sections in a food processor, and add your blueberries and blackberries. Next, add your slightly powdered sugar, your melted butter, and your milk.
Use the food processor to combine the ingredients. The mixture, when fully processed, should be slightly chunky, kind of like a jam! Transfer the mixture from the food processor into a sauce pan.
Bring the mixture to a boil, stirring regularly to prevent burning. Once it is at a boil, add your agave syrup. From there, lower the heat and allow the mixture to simmer for 15 minutes as you continue to stir.
If you are only making the cake, pour the glaze over the first cake, put the second layer on top, finally topping the whole cake with the remaining glaze. If you are making cake pops, set aside half a cup of glaze and use the rest to top your single layer cake.
The Cake Pops
If your cake, like ours, came out of the pan in five separate pieces, not to worry! There’s still hope for you yet, unlike Kai.
Put the crumbled pieces of your ruined cake in a bowl with 1/4 of a cup of pillsbury canned cream cheese frosting, preferably one that has sat in your cupboard for a few months after another failed baking experiment.
Get your hands dirty! Crush the cake with your hands to combine it with the frosting and turn it into a thick, doughy substance.
Once the frosting and cake are combined, add half a cup of your tangerine berry glaze to the dough and mix it in by hand again. The ending product will look kind of grey-ish???? and will have little bits of tangerine and blueberry skin throughout.
Roll the completed dough into balls. It should make about ten large pops, but more if you make them smaller.
Set the rolled balls onto a plate covered with wax paper, and add a cake pop skewer to each ball. Toothpicks would work too, I’m not one to judge. Even chopsticks might work if you really have no other options.
Put the newly skewered balls in the freezer until they harden enough to withstand being dipped in hot frosting. While they cool, prepare that.
Melt the remaining cream cheese icing in the microwave. I put it in for about 45 seconds after ripping the label off the plastic container and it worked well.
Add half a cup of your glaze into the icing and mix until they are fully combined.
Once your cake pops have hardened, take them out of the freezer and dip them into the liquid frosting, returning them to their plate to cool. Once they’re all frosted, return the plate to the freezer until the frosting forms a shell around the cake pop.
When it comes time to enjoy your cake pops, remove them from the freezer and then cry, as you find that they’ve become very stuck to the wax paper and refuse to come off. Use a knife and your fingers to try to pry them off, only to smash them a little in the process. Even better, do this while the icing is still slightly tacky! It will make it all the more frustrating.
Then, viola! You have a cake and some cake pops to share with your divine ruler!

In Conclusion
This cake was an experience.
It’s hard to rate this, because I haven’t made any of the others yet, but I’m extremely sure that it will be at the back of the pack. I can only hope none of the others are as terrible as this one was. I give it a 3/10.
On the bright side, it was tasty.
I like to think that this entire process is very reminiscent of Kai himself. It looks like a mess on the outside, and it’s a mess on the inside too. The only redeeming factor to both of them is that they’re yummy...
If I had to assign benign meaning to the actual parts of the cake, the blueberry glaze represents Kai’s awful blue dye job, while the tangerine cake is orange like the president he loves so much. A big thank you to @oublierlegarcon for giving me the idea of making this Kai’s cake. It’s extremely fitting
I have no clue who will come next, only time will tell, but I hope you enjoyed this disaster as much as I did. Until next time, goodbye!

#evan peters#peter maximoff#james patrick march#ahs#kai anderson#kit walker#warren lipka#jimmy darling#kyle spencer#rory monahan#ralph bohner#baking
20 notes
·
View notes
Text
Caramel Cake
Hiya! Happy Saturday!! Don't usually post on the weekends but with the school vacation this past week, I've just been out and about so much that there was little time to sit at the computer and share with you and I miss you guys!! So today it's this showstopping Caramel Cake!! It's incredible--both in the cake and icing department and the sad truth is that I made it almost two months ago for my family during the winter holidays and have been looking for just the right time to post it. First came the new year with all the diets and renewed commitments to healthy eating, so it would have been cruel to tempt you with this concoction then. Next up was the Super Bowl and I nixed it as being too chic for lowly football eating and then Valentine's Day, where it got booted for being neither chocolate nor pink! But now, with the Oscars coming up, I thought finally--now's the time for this star to make its debut! What could be better than a slice of gorgeous luscious caramel cake while watching gorgeous luscious celebrities strut their stuff on the red carpet? If you're looking for the ultimate cake and caramel's your thing, you are going to fall in love!!
So many times, impressive looking desserts just don't taste all that great as say, a simple chocolate chip cookie or brownie. But that's not the case here. Truly, the actual cake layers themselves would be amazing without any frosting! They're light, tender and full of good, eggy vanilla flavor.
Now, this is not a difficult cake to make but the icing does take some time to come together. If you can, I suggest making the cakes a day before and keeping them loosely wrapped at room temperature. This will cut down on the cumulative kitchen hours immensely!
The caramel icing is really a wonder to behold (and taste) and though it takes almost 2 hours to come together, almost 90% of that time is hands-free. You've just got to keep an eye on the boiling process, make small adjustments and be patient. And guys, that patience will be rewarded a thousandfold because what you wind up with is buttery, rich, satiny, true caramel frosting that perfectly complements the golden cake!
Assembling and frosting the layers is fun and relatively stress-free because it's supposed to look a little rustic and homey, with the icing dripping down the sides. It's extremely forgiving to any frosting faux-pas!!
And if you like you can make caramel sugar shards to decorate the top for an extra special presentation. Basically you boil sugar, water and cream of tartar together to form a caramel syrup that gets poured into a pan and allowed to harden into a see through glass-like sheet of caramel that you can break apart and arrange artfully on top of the cake. Just be careful 'cause those caramel shards have sharp edges--I have the scars to prove it!
Every bite is full of the best yellow cake you can imagine bathed in a not-too-sweet, true caramel icing that doesn't harden, even after it's been sitting on the counter all day!!
Make this cake and tomorrow the celebs at the Oscars will not be the only ones receiving thunderous applause!! And invite me over--I'm dying for another bite (or two or three) of this!!!
Caramel Cake
Serves a big crowd
To make this more manageable, make the cake layers a day before you're ready to serve them.
Prep Time for cake: 20 minutes; Bake Time for cake: 27-32 minutes; Prep Time for Caramel Icing: Almost 2 hours; Prep Time for 20 minutes, plus cooling time; Assembly Time: 15 minutes.
Ingredients
For the Cake layers
1 cup (2 sticks) unsalted butter, room temperature
2 1/2 cups sugar
7 large eggs, room temperature
3 cups sifted cake flour
1 teaspoon salt
1/2 teaspoon baking powder
1/2 teaspoon baking soda
1 cup sour cream, room temperature
1/3 cup vegetable oil
1 tablespoon vanilla extract
For the Caramel Icing
3/4 cup (1 1/2 sticks) unsalted butter
2 (twelve ounce) cans evaporated milk
2 cups sugar
Pinch of salt
1 tablespoon vanilla extract
Whole milk to thin out the sauce (I didn't need it)
For the Caramel Shards
1 cup sugar
1/2 cup water
1/2 teaspoon cream of tartar
The Recipe
1. To make the cake: Preheat oven to 325ºF. Spray three 9-inch round cake pans with parchment paper. Line the bottom with rounds of parchment paper and then spray the parchment as well. Set aside.
2. If you have a stand mixer, use the whisk attachment, otherwise a hand mixer is fine--you may just need to beat things a bit longer. Beat the butter for about 2 minutes on high speed until creamy. Add the sugar slowly and cream together for another 5 minutes, or until the mixture is pale yellow and fluffy. Add the eggs in one at a time, scraping the bowl down after each addition and beating well between additions.
3. On low speed, add the flour in 2 additions. Add in the salt, baking powder and soda. Only mix until you can no longer see any dry ingredients. Do not overbeat! Add in the sour cream, vanilla and oil and beat again. Scrape down the sides of the bowl and mix just until everything is combined. The batter should look silky and pale yellow.
4. Divide the batter evenly between the three pans, smooth the tops and bake for 27-32 minutes, or until a toothpick inserted into the center comes out perfectly clean. They should look golden and have a spongy texture. Remove from the oven and let cool in the pans for 15 minutes on a wire rack. Then invert onto the racks and let cool to room temperature, at least one hour. Lightly cover the layers with plastic wrap or foil so that they don't dry out. You can make these up to one day ahead.
5. To make the caramel frosting: The entire process takes about 2 hours but none of it is difficult. First, place the evaporated milk, sugar, butter and salt in a medium saucepan over medium-low heat and allow it to melt. Continue to cook for about 20-30 minutes. You'll see the butter begin to separate and there will be a yellow, oily film.
6. Keep cooking the mixture for another hour or so. You will see the ingredients come to a slow boil and form bubbles on the surface. The bubbles will get more numerous and bigger over time. Stir occasionally and let it keep cooking.
7. You'll start to see some white clumps on the surface. This is fine--just give it all a good stir to blend it all back together. Now you should start to see the mixture changing to a light caramel color. The deep caramel color will slowly begin to emerge and there will be more bubbling in the pot. At this point, turn the heat down to low because you don't want anything to burn. The mixture will start to thicken and become an amber brown. Once the mixture can really coat the back of a spoon and is caramel colored remove it from the heat and stir in the vanilla. Allow the caramel to sit at least 10 minutes before frosting the cake. If it thickens too much, you can always thin it out with a bit of milk, but I did not have this problem. It's not a buttercream icing, so it will never be thick like that.
8. To make the caramel shards: Line a rimmed baking sheet with aluminum foil. Place all the ingredients in a small saucepan and place over medium-low heat. Cook for about 15-20 minutes, until the sugar begins to get light golden brown. Do not stir. Swirl the pan if necessary and use a wet pastry brush to melt any sugar crystals that stick to the side of the pan. Remove from the heat and quickly pour onto the prepared sheet, smoothing out the mixture evenly. Let sit for 20-25 minutes until completely cool. Then, break apart into shards. Use as a garnish. Be careful. Broken pieces have sharp edges!!
9. To assemble the cake: Place one layer on a serving platter or cake plate. Give the icing a good stir and cover the layer with 1/3 of the icing--it's ok if it drips down the sides. Top with another cake layer and more icing. Add the final layer, bottom-side up and frost with the remaining caramel, all across the top and over the sides of the cake as well. Decorate with the caramel shards if you like and let sit for at least 30 minutes before serving.
10. Cake can be made and assembled and kept covered at room temperature up to 2 days before serving.
Enjoy!
Note: Recipe adapted from Grandbaby Cakes by Jocelyn Delk Adams.
#Vegetable Oil#Baking Soda#Cake Flour#Salt#Water#Sugar#Cream of Tartar#Butter#Vanilla Extract#Eggs#Sour Cream#Baking Powder#Evaporated Milk
0 notes
Last Seen Blogs

wintersbookofmagic
Your Heart Has Run Away With Your Head!

heartancientgallery
Untitled

cincodes
Cin Codes

disasterbipippin
pippin but buff

louis-fourel
Louis Fourel