#also this was made without vapoursynth and denoise because i have nothing for giffing on my laptop anymore because she's Retired
Text
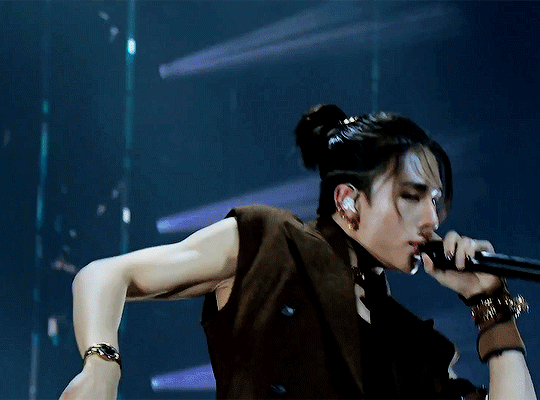

#hyunjin#hwang hyunjin#stray kids#skz#mine: gifs.#i haven't giffed in what? a year. but he looked sexy#anyways bye for another year KJFDSJKFJKDS#also this was made without vapoursynth and denoise because i have nothing for giffing on my laptop anymore because she's Retired
2K notes
·
View notes
Note
henlo! can u post a gif tutorial cause your gifs are so pretty and look amazing, even on mobile which messes up with everythjng 😆
ahh anon u flatter me!! thank you for your kind words!!! i honestly have ways to go, but it means a lot that u say this thank you
so for starters i have a mac + photoshop cs5 so a lot of this tutorial will be based on what you do for that, but i’m sure u could do the same thing on pcs (actually pcs have more programs available so i highly recommend, if u have a pc, finding a tutorial that is based around pcs) and other photoshop versions too! but i think the general process is still the same, a different tutorial might just be more nuanced^^
1. Finding/downloading your video~so for normal mp4 videos on youtube i use this website. it’s pretty useful it can download from actually a wide variety of sites like naver (up till 1080p!) ~for v app videos i use this site~ts files i find on kpopexciting or kpop24hrs (u need an account for kpop24hrs i think to download video but! signing up isnt difficult and its nothing fishy. i use it a lot esp for older ts files it has a good archive, kpopexciting tends to be faster though.)~the higher quality files you find the better! i find that it tends to go mp4~honestly finding the right high quality video is a HUGE part of making gifs look nice2. Extracting your video~there are many many many ways to extract your video but I highly recommend downloading avisynth! There are ways to download it for pc! avisynth is beautiful because it doesn’t really reduce the quality of your video to the extent that photoshop does, plus it can extract 60fps from ts files. some gifs ive made through avisynth ( x x x ) if you’re interested in avisynth further, tumblr user @/brandinator is a good place to start! if you want to know more regarding how to use it and a different tutorial through that, let me know! ~now i’m not sure if there is an avisynth tutorial for mac anymore, BUT theres another great program, vapoursynth, that mac users can look into. here’s a tutorial that i’ve found~Before I got avisynth I used VLC player for ts files but I had to basically screenshot each frame individually. Some gifs I’ve made through this method ( x x x ). these gifs are 60fps only bc i found a user who uploaded the ts file in 60fps. usually you cant get 60fps w/o avisynth. but this is also me saying that if you cant get avisynth or vapoursynth, there are still ways to work around it i think! one of my fav giffers for the longest time didnt use either!! and sharpening and coloring were always on point.~I think pcs can use kmplayer? id look into that if you have a pc~for normal mp4 videos I just use photoshops ‘import video frames to layers’ option (under file in the menubar)! you can use avisynth as well, but for me it takes forever to extract what i want in avisynth (minimum like a minute ish), whereas ps can get the part of the video i want to gif in a couple of seconds. I think it’s self explanatory but basically you find the video you want to extract, find where u want ur gif to start, and for photoshop cs5, you hit the ‘shift’ key and let the part u want giffed in the video play. when youre done u lift the shift key and hit ‘ok’ (idk if it differs for different versions of ps). i extract all!!! frames!! it makes it look smoother too :)
3. Coloring/Sharpening/Cropping/Etc~now this is the step that I can’t really give a tutorial on because honestly it varies for everyone! but i feel that this is the step that a lot of ppl need guidance with (me included) because it is the hardest step, probably because it is so ‘up in the air’ for lack of a better word? there is no one right way of doing it the possibilities are literally endless but here are some tips~Coloring: ~most important rule: don’t whitewash ur gifs!! ~other than that, the world is yours. ~honestly have fun with this part! coloring is something that i haven’t fully learned yet ~i tend to play around mainly with the curves, selective color, hue/saturation, and color balance layers ~you can also download psds other ppl have made (i dont do this myself) and use those! ~also i feel that a lot of the times, the right coloring can make ur gif seem higher quality. coloring can also play a role in reducing gif size if u do it correctly. ~honestly this part is just a lot of experimentation, over the course of a gifset and over the course of time in general. some people find their coloring style easily, but i was not one of those people. ive spent a lot of time trying to figure out how to adjust what layers to get the colors that i want and i think only as of this era ive been able to execute the coloring i had pictured in my mind. so patience is a virtue!!! ~Sharpening: ~ah yes my biggest enemy: sharpening ~first things first, i sharpen my gifs using smart sharpen + topaz ~settings for my smart sharpen are 500%; 0.4 ~check the box that says ‘more accurate’ and i personally remove ‘gaussian blur’ ~some people also use topaz denoise, and/or topaz clean ~ honestly topaz is a lifesaver for me bc it smoothes out a lot of grain that can be introduced via coloring! also!!! it can reduce gif size by a lot!!!!!!!!!!! ~on topaz denoise i hit the ‘light’ setting on the side and adjust the settings accordingly ~idk how to use topaz clean even though I have it, because it refuses to work ~to apply topaz you have to hit ‘flatten frames into layers’ ~some gifs i’ve made with just topaz and no avisynth ( x x x x) ~there are ways to make it look nice without topaz but i’ve forgotten how after i got it ~id duplicate the frame then use smart sharpen and ‘gaussian blur’ under ‘blur’ ~then adjust the opacity levels in some way. ~my settings for the opacity levels aren’t good so i’ll refrain from sharing ~some gifs ive made through this method ( x x ) ~last but not least i’ll bring up avisynth again. avisynth is nice at preserving video quality ~a lot of ppl i know say they don’t even sharpen gifs out of avisynth ~here are some gifs i have made with avisynth + topaz ( x x x x x x x ) ~honestly when it comes to sharpening, im still floundering with it. my sharpening needs a lot of work but, amongst the people who i consider good sharpners, most of them use avisynth, topaz denoise and/or clean, and smart sharpen! so all the resources are here !
~Cropping: ~it’s super important to follow tumblr dimensions otherwise gifs come out looking grainy! even when they’re not ! (case in point: x in which i used 168 instead of 178 for the dimensions)~Timing: ~Timing is so important!!! I almost forgot!! Always make sure u dont have duplicate frames for starters! for 60fps source videos i use .03, for mp4s i typically use .04 but sometimes the frame rate is kinda funky so you may have to go slower accordingly! and the important thing about timing is that if u use smart object, when u save ur gif, it’ll be in a different timing? like .04 gets changed to .07 but in order to fix that, u can simply just save ur gif in the wrong timing, and then reopen the gif in ps, simply change the timing to what u want on all ur frames, and then save it again!! idk if that made any sense but laskdjf this was the biggest mystery for me for so long omg4. Saving the gif~personally the save settings I use are “Selective/Adaptive” ; “Diffusive”; Dither: 100%; 256 colors. sometimes this makes the gif super grainy so i use “pattern” instead of “diffusive” in those instances5. Pray Perseverance ~a lot of the time when you’re giffing, gifs won’t come out the way you want it (i’m sure for every gifset i’ve uploaded on tumblr, there’s a gifset that i started making and never finished because it looked really bad). idk sometimes it feels like photoshop has its own will, sharpenings wont always work the same way each time, video quality won’t be the way you want it, i’m honestly still very experimental right now I don’t have ps figured out at all. so yeah…sometimes all u can do is that when u hit that save for web button (that ruins everything alskf), pray that ps doesnt mess it up too bad ahahaha but also that even when it does, its okay and you can try again! or try something new!
this is a super generic guide! let me know if you need more information!
10 notes
·
View notes
Last Seen Blogs

xanabananadu
no need to rush
xanabananadu
no need to rush

tlocz-nie
Tłocz-nie

viralbugis
Viral Bugis
antoinebertin
Antoine Bertin