#also the way the file said 1080p this was not 1080p
Text
how to clip (redneck ash atthebell edition aka not the most efficient necessarily)
my best methods for clipping & posting to tumblr
tl;dr use clipr for downloading clips from twitch, other methods vary by mileage
Clip on Twitch & Download using Clipr
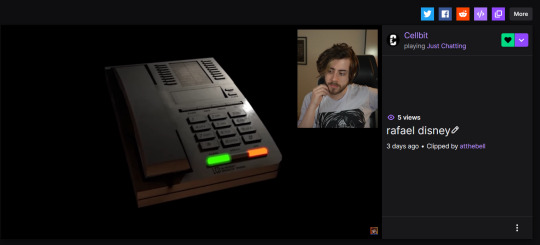

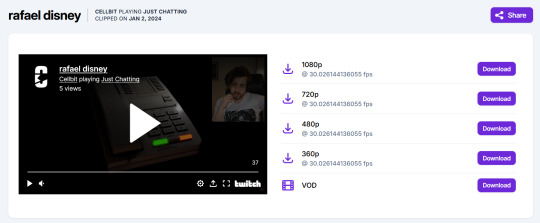
IMO, this is the best method for posting clips. Twitch clips don't always display properly on Firefox, and it also means that if the clip ceases to exist on Twitch for whatever reason, it's still uploaded to Tumblr. You can also guarantee the quality you're downloading in, which is usually 1080p unless the streamer has for some reason lowered their stream quality (happens by accident sometimes).
Downsides: 1) You have to be able to download the clip to your computer, and doesn't work on mobile. Well, it could, but it would be way more difficult and I don't know why you would do that to yourself. 2) If the moment you want to clip is longer than 60 seconds, you have to use another method. Twitch only lets you clip something that long. I bemoan this fact every day.
Screen capture on your computer

The pros of this method are that you aren't limited to 60 seconds, and if you're trying to clip something from a YouTube video, it's easier than trying to download a YouTube clip (have never been able to successfully do this myself) or downloading the entire video and then editing it down to the moment you want to clip.
The cons are that you have to make sure you're not screen capturing sensitive shit from your own computer, and you have to turn off all other audio and make sure your volume levels & video quality are at appropriate levels (aka don't have your volume super low, don't have the video on 480p if possible). If you're clipping off YouTube, you have to deal with having the channel's watermark in the corner, but otherwise it's great for when you want to just clip something from Twitch but it's longer than 60 seconds.
How to do this (on Windows):
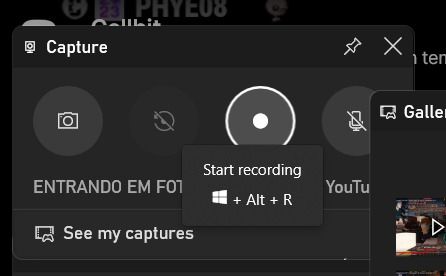
Remember to put your computer on DND (Discord as well) and put the video on highest quality and decent volume levels. Press Windows key + G (if that's your configuration) and select "Start Recording" on the capture window. Remember to give time for the scrub bar and shit from YouTube or Twitch (or whatever) to go away, so go back a little bit before where you want the clip to start. Record until you've got what you want, then open it in whatever video editing software pleases you. You can find the recording in Captures on your computer (usually in some folder chain in Users) or by just pressing Windows key + G again, it'll let you open the recording in file location. I use Microsoft Clipchamp to edit because Windows Media Player crashes my computer and I'm not going to pay for nice editing software rn. Anyway, edit out the bits with you moving your mouse around and the video player UI and get it to whatever length you like. Save or redownload to your computer, upload to Tumblr.
Downloading off Twitter


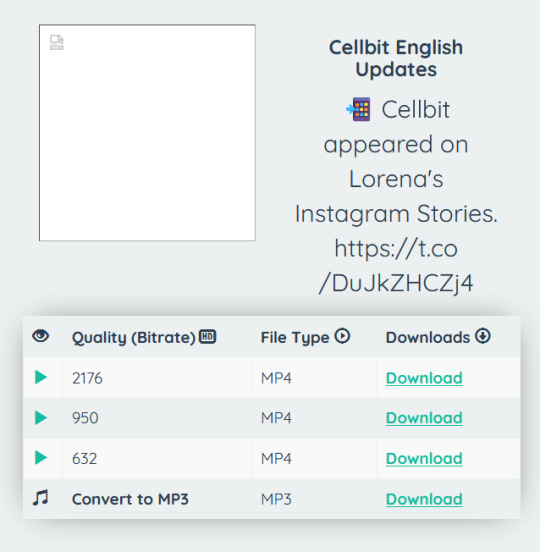
Use twittervideodownloader or twdown. Copy the video address from the video and paste it, then download in whatever quality you'd like. Please attribute said clips, particularly if they went through the trouble of adding subtitles or you're using their translation (or just to let people know where they came from-- i.e. is this from a cc's own IG story, or is it a random fan recording them; the latter means you maybe shouldn't be reposting this video). Translation itself is often a thankless project so it's very appreciated to acknowledge translators. Also if someone else went through the trouble of clipping something, it's just nice to acknowledge them for it. Preferably include a link to the original tweet. This method is best for just needing stuff off Twitter, for IG stories that someone else already screen captured, or if the only clip you can find is on Twitter and the original vod/video is gone for whatever reason.
Extra fun tips:
If you are a frequent clipper, get in the habit of naming your files! If you're keeping them all on your computer, for organization's sake, it will save you SO much time and energy if you just have names on your files. It doesn't have to be anything crazy formal; for example, my format is just "oct 12 cellbit scared by sign tts;" date followed by a very short description.
Similar to the above, it also helps to include some amount of context to clips when you're posting them, particularly if you're not liveblogging. Sometimes people rb clips onto my dash and start freaking out about some kind of lore going on and it's like dude this clip is from two months ago, calm down. Please turn on timestamps also for the love of fuck.
You can download videos straight off Tumblr! If someone else already posted a clip you like and want to have on your computer, you can download it off the dash or off their blog and just have it, no extension or screen capture or website needed. One of the very cool things about this website!
Related, if you really want to find a clip that you know was already posted to Tumblr by someone else, use people's archives. They're also one of the actually functional parts of this website. You can filter by post type, month, and tags, which can usually get you closer to finding what you're looking for than searching will.
RoyalArchivist tends to post and reblog a lot of clips, so they're a good resource alongside myself, pix pixiecaps, and jay cellgatinbo, all of whom clip like maniacs. I also just reblog a lot of things and have a pretty extensive tagging system. RA also has a timestamp archive for QSMP with notes about lore and things-- please check that out if you're interested in helping document events or looking to find a certain moment.
MCYT Archive Project has public vods spreadsheets for QSMP as well as other MCYT projects that are incredibly extensive, so if you're looking for a moment and you remember the date, you should be able to find the vod on the sheet. You can also use the vod archives in junction with wiki articles to figure out exactly or approximately when something happened (the QSMP Miraheze wiki includes citations in their articles, which is a massive help for this kind of thing).
Finally, I am a lunatic who figured this all out through trial and error. There are probably other, somewhat more efficient methods, like I said at the start. If you know of any, please (politely) add onto the post.
#bell.txt#how to clip#whew. okay hope this helps like at least one singular person#tbh i figured a lot of this out just looking it up but i figure it helps for people to see it all in one place
218 notes
·
View notes
Text

hi everyone! I've gotten several requests to make a tutorial on how to make gifs for someone just starting out and I finally got around to slapping a tutorial together.
This tutorial will cover:
software recommendations
choosing what to gif
creating a gif step by step with probably a lot of unnecessary detail
some tips and tricks:)
(This particular tutorial will not cover how to find tv and movies to download and gif, or any specific instructions on coloring. only the basic gif making process.)
so for the purposes of this tutorial, we will be using Adobe Photoshop, which is the most common program for making gifs, and the one I recommend. the version you have doesn't make a major difference in terms of capabilities but the interface may be slightly different looking if you have an older version or a different type of device. you cannot make or edit gifs in any mobile version of the photoshop application.
Optionally, we will also be using Adobe Premiere Rush/Pro or another video editing software of your choice. wherever you are downloading Photoshop, whether from Adobe or a third party, you should easily be able to acquire Premiere as well.
I am aiming to be as detailed as possible in this tutorial, so it may sound more time consuming than it really is. once you get the hang of things, it goes fast. the most time consuming part by far is the editing and coloring.
in my opinion, one thing that majorly saves time while giffing is knowing your keyboard shortcuts and using your mouse/trackpad as little as possible. I will be going over these in this tutorial as well.
before we begin, some general tips:
gifs of single shots that do not cut between angles or subjects generally will look the best, barring exceptions
for a single gif set, choosing scenes and shots with similar lighting will be easiest to get to look uniform when compiled together, since editing wildly different looking scenes to have similar coloring and lighting is hard and takes some practice!
avoid shots that will require you to majorly crop or zoom to properly frame the subject, as this will greatly diminish quality
speaking of quality, gifs will look best using 1080p video, but you can get away with 720p as well. I would not recommend giffing with anything lower resolution than that
Tumblr's upload capacity for image and gif files is 10mb. be sure when exporting your finished gif that it is under that size. if it is a bit over, you can try trimming a few frames off your gif in the video timeline.
if you get frustrated, don't give up! giffing is hard and complicated especially if you are new to photoshop. I tried to make this tutorial as detailed as possible so it's easy to understand (although im sure I still forgot some stuff)
ok onto the tutorial!!!
STEP ONE: choose what range of frames you want to gif, and how.
once you have decided what you want to gif, there are two main way to convert your episode into a range of frames to make into a gif. the first is by screencapping. this involves downloading a program like mplayer or vlc which can be used to convert video files into "stacks" of screencaps, which can then be separated into whatever range of frames you want and imported into photoshop. this is seemingly by far the most common method I have seen amongst gifmakers*, but personally I don't care for it and I think it's more confusing and time consuming overall, so I will be explaining the second method: importing video frames to layers.
now, normally what this would mean is opening the full episode in photoshop and using the pathetic little playheads on either end of the scrub bar to trim the file into a clip. this is where your video editing software comes into play.
open whatever episode or movie you want to gif in your program. if it is a large file like a long movie in 1080p, this may take a few seconds. like I said, I am using Premiere Rush. I will be using a random episode of 9-1-1 for my example gif.
in your media browser, hover over whichever episode you want (you can also just add the whole episode to your project and scrub through, but that can take longer unless you know what time stamp you're after). click the fullscreen button by the bottom righthand corner.
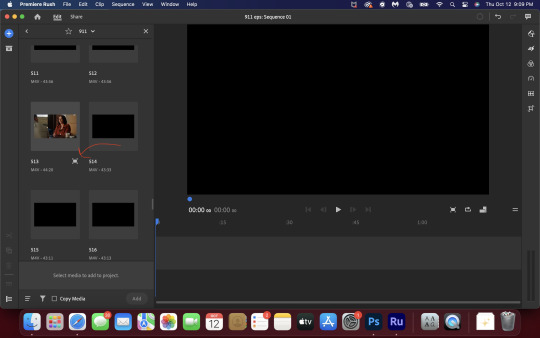
now you can scrub through and trim the episode before you even import it to premiere. this makes trimming your clip even easier.
use the trim bar (yellow outlines) to trim as close as you can around the scene you want to gif.
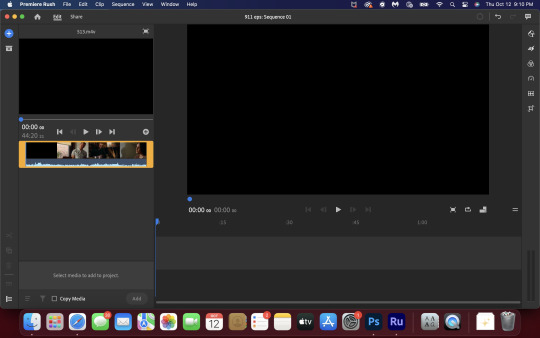
then click this plus, and then "add" below. this will add the clip to your project.
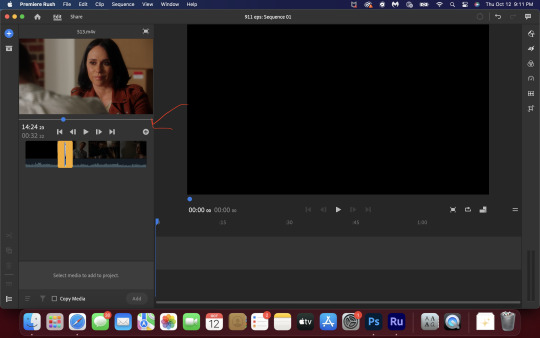
now, move the blue playhead up to the frame you want your gif to start on. then, use the scissors button off to the left to slice the clip. select the portion before the playhead, and delete it.
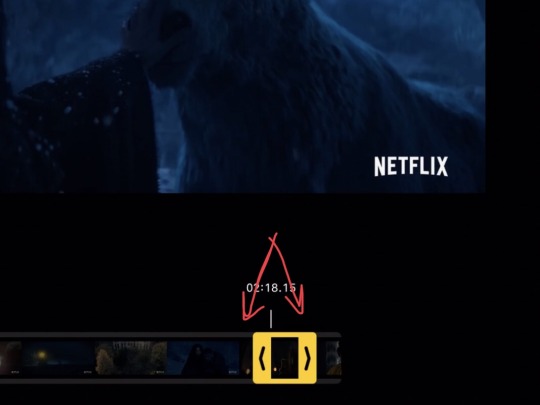
now move the playhead to where you want the gif to stop. a good length for most gifs is around 1.5-2 seconds in my opinion. some may be shorter depending on how long the shot is, or longer if you plan on making them smaller (remember, the uploading capacity on Tumblr is 10mb per file.) trim again, now delete the portion after the playhead. you can also use the left and right arrows beside the play button to move frame by frame, and you can adjust the side of the horizontal scroll bar below your clip to “zoom” in on it and make scrubbing easier.
once you have your clip, go up to where it says "share". your clip will be rendered, and then you can click export to save it.
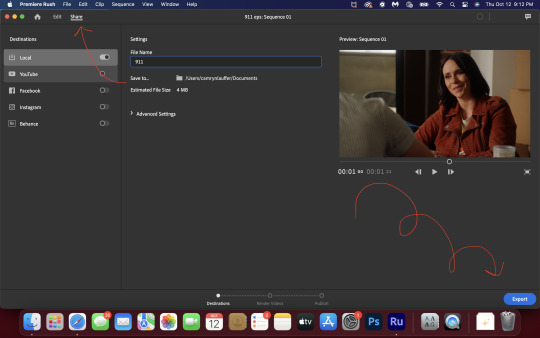
repeat step one as many times as you want for each gif. I know this may sound complicated, but like I said above once you get in the rhythm this step takes only a few seconds.
STEP TWO: create your gif!
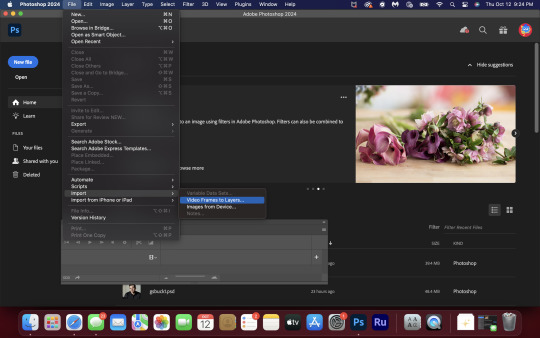
close premiere. open photoshop. head to the control bar at the top. select file > import > import video frames to layers.
navigate to whatever folder you exported your clip to. select it, and hit enter. a second popup will appear asking you to select your range of frames. since you have already trimmed your clip to your liking, simply hit enter a second time.
now your screen looks like this, and we are going to crop and resize our gif! (troubleshooting: if you do not see the timeline bar at the bottom, select window from the control bar, scroll down, and make sure timeline is selected as part of your workspace. Adjustments and layers should be there automatically but if not add them too).

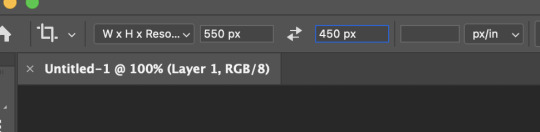
Tumblr posts are 540px wide, so in order to make my gifs as small as possible while maintaining quality, I typically crop my gifs to be around 550-600px wide, with varying heights depending on what shape I want the gif to be. experiment with this a little and decide what works for you. just don't make the width lower than 540px. once you have the portion of the frame you want inside the cropping grid, hit enter again. sometimes you have to hit it twice.
here are the measurements I am using for this gif
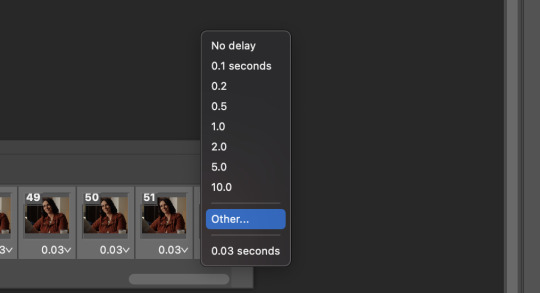
now in your timeline, select frame 1. hold down the shift key and scroll to the end to select the very last frame, thereby highlighting them all. from here we will edit our frame delay rate. photoshop will automatically set it to .03s, which will make your finished gif awkwardly fast. I typically use .05s, or .06s if I want a gif to be subtly slower (this comes in handy if the shot you are trying to gif is very short). anything longer than .06s will look weird though. choose "other" from this menu and type in your delay rate. make sure not to miss the zero after the decimal.
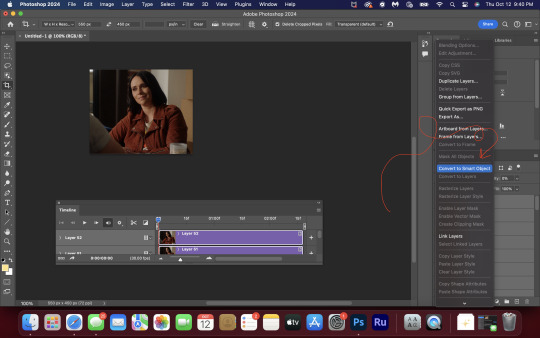
once you've set your frame rate, go to the other end of your timeline and click here to convert your frames into a video timeline.

then press option + command + A (on Mac) or windows + alt + A (on PC) to select all layers. then right click (control + click with a trackpad) on any one of the highlighted layers in your layers tab off to the right. scroll down in the popup menu and select Convert to Smart Object.
THAT'S IT!! CONGRATULATIONS!!!!! WE HAVE GIF!!!
from here comes the fun part!! you will begin adding action filters like sharpening as well as adjustment layers to color and edit your gif. experiment with different adjustments and styles until you find something you like. too many adjustment layers will up the size of the finished gif though, so I tend to keep mine to 3-4 layers max unless its a really hard to color scene. if anyone is interested in a separate coloring tutorial, please let me know!
once you are finished editing your gif, click file > export > save for web (legacy) OR hit shift + option + command + S. play your gif in the export window to make sure it looks okay, and then hit save!
I hope you guys find this helpful and informative! please hit up my in box if you have any questions or if anything doesn't make sense. happy giffing!!!
*one reason people seem to prefer screencapping to this method, is saving all the individual clips as video files does take up a lot of space on your scratch drive, which in turn can cause your computer to work slowly or crash programs. this can be rectified by making sure to delete the clips from your computer once you are done making the gifs. another space hoarder to look out for is the proxy files of your episodes that will be automatically saved to your hard drive whenever you add an episode to your project in Premiere. Periodically, go through your storage and delete all the .proxy video files. this will not delete the original episode files, only the proxy files created by Premiere.
tagging some mutuals to sb hehe: @shitouttabuck @lover-of-mine @honestlydarkprincess @eddiediaaz @compactdiscmp3 @eddiebabygirldiaz @bigfootsmom @callaplums @athenagranted @firemedicdiaz @sibylsleaves @loserdiaz @buck2eddie @diazass @eddiediaztho @giddyupbuck @monsterrae1 @icecreampotluck @sunflowerdiaiz @swiftfootedachilles @singlethread @aziraaphales @911onabc
117 notes
·
View notes
Text
yes! here it is :)
does anyone know if this is their real home? i'm sure it's a set but i love imagining this is their home lmaooo
sure here ya go :)

yes, here is the complete series!
sorry that s02 isn't in hd :( if anyone has that and wants to send it my way bless you...
i fuuucking love meet the richardsons muahaha apparently a lot of brits are sick of jon's and lucy's faces because they're on repeat so much on dave, but since i don't have that problem i have ZERO!!! richardsons fatigue and ofc can't wait to see lucy on taskmaster!!!
it's been unhinged as always but i gotta say david and georgia tennant took me OUT, russell kane shitting on lucy every time cuts to him is one of my fave running gags, and is it just me or is richard herring, like, a good actor?
YESSS here are s29 & s30 of the new buzzcocks with greg davies!!!!!!!
here's hoping they announce s31 in august since it usually premieres in september! i am actually obsessed with the reboot it is actually INSANE
ps. "Speaking about the last recommission, Greg Davies said: 'I’m delighted that Buzzcocks is coming back. I can’t wait to give more musicians the chance to increase their cool by hanging out with fat uncle Greg and his three odd children.'" 💀
i wasn't planning on it just because it's so easy to find on youtube, but would it be helpful if i made a chronological youtube playlist of the episodes? is there one missing that you need? i was planning to do this with catsdown as well...
i also wasn't necessarily planning on re-uploading taskmaster to drive, though i might throw up the 1080p files i have in case they're better quality than what's on youtube. still, with youtube so readily available, most people will stream or cast that, right? i can definitely get the extras & outtakes organised though :)
—
ps. if anything can't be streamed because it's processing, just download to watch :)
56 notes
·
View notes
Note
your gifs are so nice! would you be willing to share your sharpening? and if it's not too much trouble do a quick rundown of your coloring process?
hi anon! it's no trouble at all, if it helps i'm happy to share <3
first i'd like to say that the size and speed of your gifs is key for the sharpen to look good! an incorrectly sized gif will look wonky on desktop (mobile is not very noticeable but desktop is where your gifs can potentially look bad if you size incorrectly) and same for slow-ish gifs, the slower your gif is the more the imperfections show so a correct speed hides the ugly parts lol
these are the standard tumblr photoset sizes

now with that out of the way i'm going to put everything under the cut bc it's probs going to be very long lol if you have any questions after reading all of this, do not hesitate to come back and i'll try to explain better!
okay! first i’d like to point out that i use an older photoshop, simply bc i like how they work lol i work on photoshop cs6 so to enable the same options i’m going to show you here you’ll have to have enabled the legacy option in the smart sharpen filters.
my sharpen varies depending on my source material tbh here are some examples:
source material: music videos
i actually use mvs downloaded from vimeo but these take longer to be up bc the directors don't usually upload at the same time the video is coming out unlike youtube mv, so if i'm working with something from youtube i like to get the biggest format available, so 4k and if it's not available then 1080p will do
i like to do big gifs for mvs so thats 540px width, these are my crop settings (putting it like that i don’t have to manually resize to 540px after cropping bc it’s going to be already the correct size)

and my sharpen for these is this

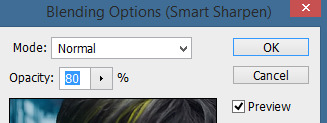
and then i lower the opacity of it to 75/80%, double clicking here

this is the result:


and my gif speed for mvs in particular is this

looks very crispy and ready to color away!
source material: stage videos in .ts format
for stages i like to work with .ts files since they are very high quality recordings of the stages and generally the gifs come out nicer. for stages that are from youtube the next part of this will probs help but this part will be focused on .ts files.
i get my files from kpop24hrs which is invite only right now and invites are a bitch to get a hold of but if you have access it’ll make your life so easy when giffing stages, there’s also twitter to look up files! for stray kids the fastest .ts uploader on twitter is @/STEii_e but if you look up the date + stray kids + .ts the tweets will show! anyway, back to the important thing
for .ts files i work with AviSynth! my computer hates vapoursynth so i use it’s older sibling lol it does the work just fine for what i use it imo bc i usually end up sharpening on photoshop. if you’d like an avisynth tutorial, this is what i used to learn about it and if you’d like to try vapoursynth there’s tons of tutorials from tumblr if you google, the most complete one is from user realstraykids
i modified my avisynth processor for it to have a denoiser (which is a feature from vapoursynth) to have my gifs look a little more smooth but that effect can also be achieved using topaz tbh

these are the output settings i get on the resizer

like i said i modified some things to have a denoiser so it won’t look like this on a regular avisynth
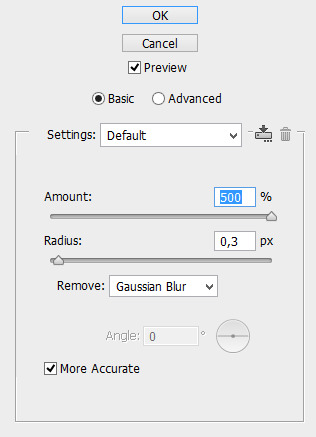
using debilinear usually makes my gif already look a bit sharp, so if i see it’s good i don’t use a sharpen, if i see it need a little push i’ll use a smart sharpen of 500% radius and 0.3px amount, and i’ll use a gaussian blur filter set to 0,3 and i lower it’s opacity to 75/80%


results:

and my gif speed for .ts stages

now it’s all ready to color!
final source material: your regular youtube/twitter/vlive video
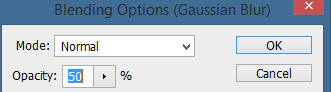
anyone that ever worked with a lq-ish video know how they just look ugly no matter how your try to sharpen, specially vlives and now channie’s rooms on youtube (*shaking fist in the air* damn you 720p videos!!) so i found a way to make them look decent, in this case i oversharpen using a 500% 0.4px smart shapen and then i slap a gaussian blur of 0,3 (lowered to 50% opacity) on top of it to smooth things out, more often than not it works very well but some videos are just plain bad (looking at you twitter) so this will work if you tweak the gaussian blur to your liking. i also recommend to work with small gifs if your video is not 1080p bc they’ll look better, but if you like pain like me and love big gifs this is what i do:


my results:


and my gif speed for these kind of videos

that’s about it for my sharpen tricks!
for coloring i like to do vibrant gifs, i adapted my latest method from this and this, and another tutorial that i can’t find rn, but for my base what i do is two curves layers, a levels layer to bring up darks, then i do a hue/sat to fix up colors, then i do vibrance and finally i selective color to fix things up. i’m going to show you on this binnie and minho gifs
first we use a curves layer and we set it on automatic (no worries if it gets too bright, we’ll be fixing as we go)

now we do a second curves layer, for this one we’ll use the black color picker from the curves layer and pick the darkest point on our gif

now we fix the darks and we bring some brightness with a levels layer
now we do a hue/saturation layer, here i fix up the reds and yellows, sometimes i skip it if the gif already looks good after the first 3 layers if that’s the case i go directly to the next step which is vibrance, in this case i only did minho in this step bc i felt like binnie’s was okay after the first 3 layers
now it’s the vibrance layer, for making the colors pop out more

and now the final layer: selective color! here we fix again red and yellows

that was my base coloring! sometimes i put in a gradient map in between the curves layers and the levels but only sometimes. after this if i want to mess around with colors i mostly go with another hue/sat layer or just use selective color, hue/sat is great for color manipulation. anyway, this is the finished result and my saving settings!


that was really long lmao, i hope it helps somehow? like i said if anything isn’t clear pls come back and we’ll go around it again <3
109 notes
·
View notes
Note
could you make a detailed tutorial on how you do your big gifs, specifically the hotd ones? i struggle a lot with coloring cause everything is so grainy and dark. i have every episode in 1080p but the quality just doesn't seem to be that good once it's giffed
hi anon!
i have a comprehensive tutorial of sorts in the works, but i have, uh, absolutely no idea when it will be done. that said, i do have some tips/example psds i'm happy to share right now ✨
basic tips
to start off: my giffing process is the same no matter the size of the gifs. i use the process outlined in tay's incredible tutorial, so just follow that if you want to do exactly what i'm doing
always gif from 1080p or higher (i’m using 1080p here)
use the "load files into stack" method (see tutorial above) instead of "import video frames to layers"; this will give you much clearer, crisper gifs
crop once and do not attempt to resize once you have cropped; resizing/recropping will introduce a lot of fuzz
coloring tips
some caveats! coloring is hard, yo, and there are a million different way to go about it. the best (and least immediately helpful) advice i can give you is honestly to just screw around and figure out exactly what each adjustment option does—curves, exposure, levels, channel mixer, etc.—and start piecing together your own style
when it comes to "grainy" gifs, there are gifs with film grain and gifs that are noisy/fuzzy. hq footage will have film grain, and lightening aggressively tends to highlight that. if you're worried about noisy or fuzzy gifs, "files into stack" and cropping only once should help minimize those issues
also, hbo hates gifmakers. got and hotd are both straight up nightmares to color, so if you feel like you're struggling, just know that everyone is struggling :/
lighten first: i usually try one or two curves layers first to see if i like what the rgb "auto" option gives me. if i don't, i move on to exposure and adjust using that tool
darken the blacks: it sounds counterintuitive, but as you lighten the scene, you need to make sure you're not washing it out as well. darken blacks using selective color or increase contrast using levels (or both)
adjust colors: hotd is hideously yellow a lot of the time, so channel mixer is your friend here. i typically increase the green slider in the blue output channel and then fine tune by decreasing yellows in selective color. if i'm still struggling, i'll go to hue/saturation and adjust the yellows there
smooth artifacts: artifacts are blocky sections that don't match the coloring on the rest of the gif. do your best to correct them by adjusting in selective color or by cheating and applying a black and white gradient map over the gif— set the blend mode to color and reduce the opacity to around 10-20% to smooth out some of the artifacts
duplicate + blur: if you're really struggling with excessive fuzziness/artifacts, you can duplicate your base gif directly on top of the original, add gaussian blur at 3.5, and set the opacity to somewhere between 10-25% to smooth out the mess. be aware that this will increase your overall file size
adjust export settings: i use "diffusion" exclusively, but that's a personal preference. some people think "pattern" looks cleaner, and sometimes it can help reduce noise
and finally, here's a selection of psds i've used for hotd scenes:
psd #1
psd #2
psd #3
psd #4
there you go! these psds should give you a pretty good look at how i color, but feel free to send me another ask if you any more questions or want tips on coloring a particular scene!
good luck!
78 notes
·
View notes
Text
About time I blew some dust off here.

It would seem with the recent updates from Twitter, the original Moments I had on my Rekkit account are broken. Meaning that all the tweets I had for all the episodes for each season release are no longer showcased but the tweets still exist deep within the site.
I may take the time to dig deep in finding them again, but that would get in the way of the bigger project at hand.
Speaking of which, I should explain more about that.
Back when I was diving in the deep web to obtain the episodes nearly a decade ago, the video quality was passable but not true HD. In fact, it was more like 480p upscaled to 1080p as you could see some jpeg artifacts in some scenes.
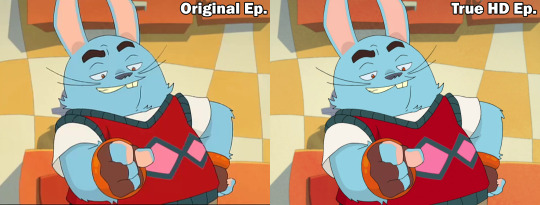
The new project is essentially a true HD replacement but with an added bonus. It will have subtitle files for each episode, as no "official" service has ever provided it as an option. It'll also allow people to use the files to make their own fan made subs for their preferred language, if they have strong willpower to do so.

I've currently have done only one episode with English subs, as it is a very long and tedious process to not only type out a transcript from scratch but to make sure what you're typing is exactly what they are saying, as well as constantly pause and playing scenes over and over again.
I hope those who attempt to make fan subs in other languages will make things a bit easier, due to following the English transcript as a base reference and taking the time to localize it to translate it better in said desired language.
While I still have a lot on my plate, the Rekkit Returns Project will continue on. I just wish I had a lot more time dedicated to it.
4 notes
·
View notes
Note
hey! how do you make your gifs look so fucking clear and how do you add subtitles if you don’t mind me asking!!! thanks🫶🏾🫶🏾🫶🏾
thank you for saying my gifs look clear omg!!!! hoenstly i have found that the best thing to do for that is download large file sizes of high quality for the stuff you want to gif, like 1080p and a minimum of 5gb file size (for movies, for tv i would say about 3gb per ep depending on the length of the eps). i dont tend to do much larger than that bc my wifi is SO slow that it would literally take days to download anything bigger, but i really think it is soooo helpful for making gifs look more crisp and it makes coloring a breeze. like you'll notice that anything i gif that just comes from youtube where i dont have a lot of control over the quality and file size tends to look um. well i dont love the way those gifs come out!! smart sharpen is also the most important tool for this and these are my settings:

very occasionally i use 2 sharpens if i'm working with something of lower quality (or if i just like the way it looks) and so i use the settings above and then another sharpen with these settings

as for the subtitles i have a saved psd file that i just drag and drop to every new gif i make!! these are my text settings (i tend to play around with the font size and color with every set):
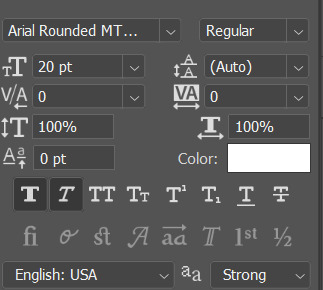

if it's easier i have also uploaded the psd i use to mediafire (do people still use mediafire...) right here!!
i hope any of this was helpful i know im not the best at explaining things so please let me know if anything i said makes no sense or if you have any other questions!!! i'd be happy to help in any way i can <33
#answered#anonymous#if there is an ad for the mediafire link just know i make no money from that LOL#i know people download WAY bigger file sizes but i am just way too lazy for that <3 and i think my laptop would explode
4 notes
·
View notes
Text
2023/April 14th - Creative
I have been a bit exhausted the last few days.
My sleep schedule got kinda messed up, though this is not entirely out of character for me when I get fixated on a new idea. I decided about a week or two ago that I would try to revitalize my interest in video production. I probably should preface this by saying that I tried running a YouTube channel back in 2020. Probably not the best time to get into it, but it was what it was.
When I did it, I was narrating some of the novels that I have written over the years. Writing is my passion, yet it’s not a compatible medium with many of the passions and interests of most people these days. People want interactive media – it’s why they turn to visual novels or YouTube videos or games to get their reading in.
The videos I made honestly never really felt like they were at their fullest potential. It felt like I didn’t have the proper tools to bring my words to life, and I became very frustrated by the outcome. While I reached 60 subscribers during that time period, I eventually became so bothered by the quality of my own content that I deleted all of it from existence and put the channel on hiatus.
Recently, though, I have had a change of direction in my life. I decided that because racing videogames have been a lifelong hobby of mine, I would like to do highlight videos surrounding my favorite racing games. As such, I’ve spent the last several days prepping videos for a May 1st debut. I have about seven completed already.
What I’ve noticed so far is that because I have better equipment now, that alone has given me more confidence in my abilities. In 2020, I was video editing on a Chromebook (which many of you might not think possible, but I assure you, it is). The videos were serviceable, but they lacked the kind of professional quality that I wanted of them.
Now, though, I have an enterprise-level Windows desktop with an enterprise-level GPU that I was using for CAD applications during my last round of college (see my post about going to college three damn times).
Since my drafting stuff is currently on hiatus, I figure that I should probably get my money’s worth from the machine, and it turns out that it can encode a 10 minute 720p video in about 45 seconds. Not bad. As far as the games, I am recording them on an Xbox One X which I have calibrated to record in 720p because Xbox DVR requires your clips be processed over the cloud, and my internet – while good in terms of download speed – is terrible at upload speed.
I learned recently that Xbox DVR files corrupt very easily. Audio sync issues are also very common. So… Not the best start.
Nonetheless, I do feel like the way I have things set up lends itself to my style of video production. What I’m doing is recording individual races and events in-game and then creating highlight reels from them. Some of these highlight videos have a story to them, even.
The audio sync is easy enough to fix using the video editing software. That said, I have lost a handful of good clips due to file corruption – which led to much sulking.
To prevent myself from going insane, I’m probably only gonna upload twice a week – Monday and Thursday. This gives me 2-3 days between videos to work on each one. So far, I’ve noticed it takes approximately 90 minutes to encode enough clips for a 10 minute video, and then editing takes two to four hours depending on storyboarding, effects used, and also needing to create the thumbnails for each video.
And of course, my videos are going to have overlays that show my channel name and eventually things like a Twitter link, Ko-Fi link, etc. If I ever decide to stream, those same overlays could be used to show stream-related info (I think that’s how it works). But getting that sophisticated is gonna take time, I guess.
For the first month, I figure I will use a compact overlay (just a banner, really). Then after, I will make a full-screen overlay in 1080p with the 720p gameplay footage in windowed mode. That’s the plan, anyway. There’s still so much I need to figure out, and I am doing all of this myself.
I would say that my goal is simply to attract people who love the same things I love and who I can share memories with. Like, as a gamer, I often play alone. I don’t really have “gaming friends.” I’d like that to change.
0 notes
Note
is there any way to request content for just a particular actor in a film or episode? for instance, if an actor we’d like to gif has a small role in a specific episode of a series that you have already sourced, could we ask for a compilation of just their clips instead of the entire film to save us both the stress and file space?
anonymous asked: do you offer scenepacks?

hi anon! sorry this took so long to reply, i wanted to make sure i answered everything and also give you information that i think would be helpful. long story short, no, i don’t do scene packs because i unfortunately don’t have the time. i work full time and also juggle this blog with my vidding channel and my indie. that being said, there are resources out there on twitter if you’re looking for good scene packs accounts! my personal favorites are jazzzyx_ & sceneclipshd. they often have their requests open so you might be able to get something you’re looking for. you can also find good scene packs on youtube by searching the name of the actor/tv show/movie you’re looking for and the keywords logoless, scenes, 1080p etc. for example, if you look up “ steve harrington s03 scene pack 1080p” you’ll see good results and most uploaders have them available to download on mega through their video description. i would also suggest the amazing youtube channel scene seekers. the purpose of the channel is to help you find specific scenes of characters/actor and what time that specific scene is shown in the movie/episode. hope this helps!
1 note
·
View note
Text
My initial thoughts on Doom 64 Absolution/TC port
Hi there.
If you noticed by the title, you should’ve already guessed that this is not exactly the review of Doom 64 Absolution/TC. The reason behind this is, 1. I already played Doom 64 a few days ago and I’m not really interested in doing it again. And 2. The engine this port runs is quite a bitch to cooperate with. For instance, the screen shats itself if I even try to Alt+Tab from this port to look at something else. And I didn’t find an option to turn off full-screen mode.
So this will be my impression based on the first 10 levels that I played, without counting secret maps.
For starters, this port has some new content. New enemies and levels.
There are six levels added to the game. Almost all of the original secret levels were moved to normal levels. While Fun Levels were repurposed as secret maps. There are also two Bonus Levels which I think function more like tech demos of the port. The new level I played, Nukage Facility, was rather good. It makes me wonder what other new levels play like.
There are also some changes in the original levels, like the switch puzzle that leads to Outpost Omega being changed into a BFG secret, toxic sludge in the sewer part of Research Lab being changed into regular water (probably due to the Nukage Facility), and Outpost Omega itself changing the location of the red key for instance.
I encountered two new monsters during my check-out. Both are Nightmare variants of Spectre and Caco. The former one is green and is much tankier than the normal Spectre, while the latter one is red, can teleport, and fires a series of three fireballs instead of just one; it also has more health alongside other buffs.
I’ve noticed some changes in the original monsters. Zombies have additional sound effects while Nightmare Imps now fire two fireballs in a series. Also, the latter ones, alongside Spectres (that are probably no more yellow) stay partially invisible when dead.
As for the weapons, I didn’t notice any changes asides from the effects on the Unmaker.
And as for the quality of the port itself, there is no denying, folks, it didn’t really age well. It still functions rather well, but it suffers from the old man’s WAD syndrome, where you have to do some mental gymnastics to install and/or launch it instead of a typical, modern way of dropping into the source port of your choice (or just starting it if it’s just a WAD file).
This port offers features that don’t appear in the official 2020 port like mouse-looking, additional particle effects, and crosshair for instance, although, as I said at the beginning, it’s kind of hard to work with it. Most of the features are in the so-called Control Panel in the options, and even then it feels like something that looks like an options section from the port’s launcher. The resolutions for 1080p monitors for instance are not exactly supported for this port. You have to choose something else or write it down to match your demands.
Options don’t save unless you turn the port off by yourself. Sometimes I felt like the brightness resets to default values despite the fact I changed it to make it brighter unless I slightly move the sliders. And speaking of gameplay, sometimes I felt like auto-aiming didn’t work that well.
Although, thankfully it’s not really that buggy. I only encountered one moment where I saw a gap in the void in Tech Center but that’s as far as I can recall the bugs.
There are many things in this port that leave a lot to desire. But, truth be told, I can’t hate this Doom 64 port. Yes, it is an archaic port that didn’t age that well, but despite all of that, it’s still somewhat of a good port of this game. Hell, it even adds new content. Sure, the 2020 port is significantly better, but this one has its own charm and exclusive stuff that the official port doesn’t have. And hey, both of these ports are related to Samuel Villarreal (Kaiser), who lead the project of the 2003 port and is now working for Nightdive Studios which created the 2020 port. He even made a 2008 port titled Doom 64 EX, which was a bridge between TC and the official port.
In the future, I might fully play this port of Doom 64 if I’ll have the motivation to do so. This port might be archaic, but it’s still fun to play. You can check it out as a time capsule, to see how it was in the past.
As for me, it’s time for another two weeks of break from reviewing Doom stuff. After that, we will finally start taking a look at (almost) all of the WADs that were placed in the first Cacowards ceremony.
See you all next time.
Bye!
0 notes
Text
Nexus 6p software stabilization

#Nexus 6p software stabilization install#
#Nexus 6p software stabilization manual#
#Nexus 6p software stabilization full#
#Nexus 6p software stabilization software#
The cynic would tell you that Google just wanted to create a disparity of features between the Nexus 5X and the Nexus 6P to entice more people to buy the more expensive device. Like I said, there could be a number of reasons as to why Google decided not to put this feature in.
Look Toward the Bottom and Make Sure ‘Enable Video Stabilization’ is Toggled On.
Tap on the ‘Resolution & Quality’ Option.
Tap the ‘Settings’ Option to Enter the Google Camera Settings.
Wait Until You See the Toast Message Saying the File is Saved.
Then Press Enter on the Keyboard to Create a New Line.
Scroll All the Way Down to the Bottom of the Build.Prop File.
Tap the Pencil Icon at the Bottom to Enable Edit Mode(or tap the 3-dot menu icon at the top right and press edit).
Whether not this is true(although I presume there could be some side effects from the feature), we can now enable this EIS feature on your Nexus 5X as long as you have root access.
5.5-inch 1440P AMOLED Screen – Brighter than Note 5, best screen.The Nexus 5X though, doesn’t have either of these two video features(the slow motion or EIS) out of the box and Google said it was because the Snapdragon 808 SoC inside the Nexus 5X just wasn’t powerful enough for the features.
#Nexus 6p software stabilization software#
Excellent EIS/Gyro in 4K (perhaps the king of 4K), also offers EIS/Gyro + software stabilization for 1080P.
Excellent low-light photography w/ wide dynamic range, still “shares” king of low-light photos with Nexus 6P.
5.5-inch 1440P AMOLED Screen – Not as bright as Note 5 but still brighter than LG V20.
Snapdragon 821 – Performance is not faster than 820, about the same.
#Nexus 6p software stabilization install#
Android 6.0.1 Marshmallow – Software takes quite awhile to get updated but you can root and install custom ROM to get updates faster.
Excellent OIS and software stabilization offered for 4K and 1080P.
Excellent low-light photos/videos, not as good as 6P/Pixel for photos but better than LG V20.
5.7-inch 1440P AMOLED Screen – Even though it’s last year’s phone, the screen is still more advanced than most, still brighter than LG V20.
Android 7.1.1 Nougat – Software can easily be upgraded to Google’s official Android Nougat.
Excellent low-light photography w/ wide dynamic range, still “shares” king of low-light photos with Google Pixel phones.
IR Blaster/TV Remote, Secondary screen for notifications/shortcuts, HD Audio recording, Quad-DAC.
Also you can carry extra batteries for longer battery life.
Android 7.0 Nougat – Software is up to the latest and best Android OS.
Excellent OIS stabilization offered for 4K and OIS + software stabilization for 1080P.
#Nexus 6p software stabilization manual#
LG V20 is king of manual mode, better than Samsung phones.
#Nexus 6p software stabilization full#
Full native manual mode for both photos and videos.Offers wide-angle camera to capture wide-angle photos and 4K videos.Not the best low-light performer but better than most.Although not in the same class of phones, if you are willing to settle on smaller 5.5-inch smartphones, you can also consider Pixel XL or Galaxy S7 Edge, which are phones that came out in 2016. We could probably talk about every little feature of LG V20 all day but really, wouldn’t you want to know how it compares to other similar-sized smartphones? In the 5.7-inch class, LG V20’s only competition are the last year’s Nexus 6P and Galaxy Note 5. It is also the ONLY 5.7-inch “flagship” smartphone you can buy this year. With Galaxy Note 7 out of the way, LG V20 is a very impressive 5.7-inch phablet you can buy this year that comes loaded with features other flagships don’t offer. Battery life is the longest of all LG phones I have tried with an SOT (Screen-On-Time) of 6+ hours. LG V20 is probably LG’s best smartphone in terms of features, design, and also battery life. LG V20 also comes with a quad-DAC with a more powerful amplifier that’s capable of powering headphones (that usually require amps). In this review of LG V20, we will be comparing its core features against other flagships like the Pixel XL, S7 Edge, Nexus 6P, and Note 5.įirst, LG V20 is a 5.7-inch phablet smartphone with 1440P IPS LCD w/ secondary screen, 2 back cameras (One F1.8 16MP and One 8MP F2.4 wide-angle), 1 front wide-angle camera (that also crops in), Qualcomm Snapdragon 820 processor, removable back cover (made from aircraft-grade aluminum), 3200mAh removable battery, IR blaster, micro-SD card slot, and an active noise-cancellation microphone.
0 notes
Text
Dying light 2 gameplay

#DYING LIGHT 2 GAMEPLAY PATCH#
CPU - Intel Core i3-9100 / AMD Ryzen 3 2300X.60fps will be more of a realistic target than 144fps, particularly at 1440p resolution and above, so expect to make some quality concessions even after Techland’s patching efforts.ĭying Light 2 PC requirements and performanceĭying Light 2 minimum PC specs (ray tracing off, 1080p, 30fps): Hope you’ve got one of the best graphics cards, because even on higher-end hardware, Dying Light 2 asks a lot of your PC. General performance could also do with another optimisation pass, or six. I was apparently lucky enough to dodge any save file corruption or progress-blocking bugs, but have encountered missing sounds and fuzzier-than-expected DLSS, both of which have been identified for early fixes.
#DYING LIGHT 2 GAMEPLAY PATCH#
That said, if you are indeed eyeing this on launch day, your best course of action may be to… wait a bit? Developers Techland have already confirmed a “day one” patch for consoles containing over 1,000 bug fixes, and some of these issues have definitely found their way into the PC version too. That goes double if you want to dolly up this post-apocalypse with some shiny ray tracing features, so even if you’ve got a rig that can breeze through most games, I’d recommend reading on for a guide to Dying Light 2’s best settings. Not in the hours to completion sense, or even difficulty in general – Matthew’s review found a rather unthreatening strain of undead – but in how tricky it is to get running smoothly on PC. Dying Light 2 is out and hoo boy, is it a tough nut to crack.
0 notes
Text
Geforce now download no request

#GEFORCE NOW DOWNLOAD NO REQUEST HOW TO#
#GEFORCE NOW DOWNLOAD NO REQUEST 1080P#
#GEFORCE NOW DOWNLOAD NO REQUEST APK#
#GEFORCE NOW DOWNLOAD NO REQUEST REGISTRATION#
#GEFORCE NOW DOWNLOAD NO REQUEST ANDROID#
Please dont use this form to report bugs or request add-on features this report will be sent to Mozilla and not to the add-on developer. Allow the usage of the GeForce NOW web app on unsupported operating systems. Forge Auto Clicker brings new, never seen before features to auto clicking. Change click speed, cursor position, hotkeys and more with all settings saved. As the games currently supported are all GoG (CDProject RED) own products, I would guess that there are legal issues somewhere, maybe with the installation process and accepting the Eula for the end-user which they cannot simply adjust like their own licences? Who knows. Download GeForce NOW Unlocker for Firefox. Fully-fledged with many modes of automatic clicking. With that being said, no, I doubt they do it because they want you to buy it twice, even though they would probably appreciate it.
There are now BIOS updates for four models: GeForce RTX 2080 Ti and 2080 Gaming OC, and GeForce RTX 2080 Ti and 2080 Windforce OC.
2X RTX 2080 TI (NVLink SLI)email protected But it also saw a jump About Bios Rtx Custom 2080. 3 x HDMI, 3 x DisplayPort, 1 x USB Type-C. comedy, news, and sports shows are now available on your Mac with Apple Podcasts. You could either follow/contribute to those discussions and request NMS support there or directly contact GoG support and Hello Games support (I doubt the latter have ever read anything written to them). 38 minutes ago &0183 &32 GeForce® RTX 2080. Visit the iTunes Store on iOS to buy and download your favorite songs. GoG is slowly adding support for GeForce Now according to : Afaik, neither of them read these forums, so putting such a request here is for vain.
#GEFORCE NOW DOWNLOAD NO REQUEST HOW TO#
Or with other words, they publish their own game. HOW TO GET GEFORCE NOW WITHOUT WAITLIST (WORKING 20 AND 2) If playback doesnt begin shortly, try restarting your device. It does so by using the horsepower of Nvidia’s servers, which are equipped with high-performance processors and video cards.
#GEFORCE NOW DOWNLOAD NO REQUEST 1080P#
Publisher (and Developer) of NMS is Hello Games. GeForce NOW is the cloud-based gaming service from Nvidia that allows Android, Nvidia Shield TV, macOS, and Windows gamers to play popular video games at 1080p resolution at 60 frames per second.
#GEFORCE NOW DOWNLOAD NO REQUEST APK#
How to install XAPK / APK file Use APKPure APP. NVIDIA GeForce NOW Download APK 8434 (85.9 MB) If the download doesnt start, Click here. But in none of the files I found had the displayed version number 1.17.1.18. Download APK (85.9 MB) Download in Progress. If I download a game, will it be deleted if it leaves PC Game Pass or my membership. I also enabled the columns 'File Version' and 'Product Version' in FreeCommander. PC Game Pass now includes EA Play on Windows PC at no extra cost.
So its not CA/SEGA its fault, but its Nvidia not giving us a proper driver. dll files in the folder C:UsersAppDataLocalNVIDIA Corporation.
Step it up and collect your coins in these arcade games. Climb the leaderboards and show your skills. Fight your way to the top of these action games. The free tier lets you stream games for up to 1-hour sessions, though these sessions are subject to a queue during peak times.Well, GoG is not the publisher of NMS, it's just a distributor. First off, your Laptop might require Certified drivers. Click on the play button to play these games instantly in the browser on your PC or Mobile without any need to download or install. Access 1000+ games, with more released every GFN Thursday. Gamers can play PC titles they already own or purchase new games from popular digital stores like Steam, Epic Games Store, Ubisoft Connect, and Origin. Sure Fortnite already has touch input natively on Android, but the idea is to bring touch input to other games that are streamable through the platform.Īll members are eligible for the Beta, even those with a free GeForce Now account. NVIDIA GeForce NOW transforms your device into a powerful PC gaming rig.
#GEFORCE NOW DOWNLOAD NO REQUEST ANDROID#
The Android version of the GeForce Now app will introduce support for touch controls, developed by the GeForce Now team and Fortnite will be the first to support them. Members will be admitted to the beta in batches of the coming weeks.
#GEFORCE NOW DOWNLOAD NO REQUEST REGISTRATION#
The beta is open for registration for all GeForce Now members, and will help test our server capacity, graphics delivery, and new touch controls performance. The limited-time closed beta will launch for mobile users who stream the service using the Android app or Safari browser on iOS. Remember, GeForce now is a cloud gaming service that lets you stream from 1000 titles when you link Steam or Epic Games Store. On Thursday, Nvidia is announcing that Epic Games’ Fortnite is coming to iOS Safari and Android in a closed beta it’s launching for GeForce Now.
1 note
·
View note
Text
Pros of youtube mp4 converter
YouTube is without a doubt one of the most popular websites today. With millions of people visiting every day and watching hours upon hours of content, it can get a little hard to keep track of what's uploaded on said website. Well, if you're looking for something to record videos with, youtube's got you covered - but what about files? Youtube doesn't offer native ways to convert your videos into different formats (like mp4), so this blog article has some tips on how to solve that problem!
What is youtube mp4 converter?
youtube mp4 comconver is a software that helps you to convert youtube videos into mp4 format. The mp4 format is an emerging video format that is popular among mobile users because it allows for high-quality playback on devices such as smartphones and tablets.
When you convert a youtube video into mp4, you can save the file on your computer or transfer it to a mobile device. You can also use the mp4 converter to convert videos that are not from youtube.
The benefits of using a youtube mp4 converter include the following:
You can use the mp4 converter to save videos for offline viewing.
You can use the mp4 converter to share videos with friends and family members.
You can use the mp4 converter to create multimedia presentations.
How to use youtube mp4 converter?
If you want to watch a youtube video on your iPhone or iPad but the video is in MP4 format, you can use a youtube mp4 converter app to convert the video to an iPhone or iPad compatible format.
There are a number of different youtube mp4 converter apps available in the App Store, so it is important to find one that meets your needs. Some of the most popular youtube mp4 converter apps include YouTube Mp4 Converter, MX Player HD for YouTube Mp4, and iFunBox for YouTube Mp4.
Once you have found the right youtube mp4 converter app, open it and select the video you want to convert. The app will then start converting the video.
Once the conversion process is complete, you will be able to view the converted video on your iPhone or iPad.
How to convert youtube videos to mp4?
YouTube videos can be converted to mp4 for easier viewing on a phone or other portable device. There are many different tools that you can use to convert youtube videos to mp4.
Some of the most popular tools that you can use to convert youtube videos to mp4 include Google Video Converter, VLC Media Player, and Windows Media Player.
To convert a youtube video to mp4, first open the YouTube video that you want to convert. Next, use one of the tools listed above to convert the video to mp4. You can then save the file on your computer or transfer it to your phone or other portable device.
What are the benefits of using a youtube mp4 converter?
There are many benefits to using a youtube mp4 converter. Some of the most popular benefits include:
1. Easily convert videos from youtube to mp4 for viewing on your phone or tablet.
2. Convert videos quickly and easily without any loss of quality.
3. Convert videos between different file formats, including mp4, 3gp, and avi.
4. Make backups of your videos before converting them to MP4 to ensure the highest quality possible.
5. Convert videos with ease and without any extra software required.
6. Adjust video quality settings to achieve the perfect results for your viewing experience.
7. Export your converted videos as mp4 or 3gp files for easy sharing online or offline.
8. Use the provided help document for additional tips and advice on how to convert videos successfully.
FAQ About youtube mp4 converter
What are the best tools for recording videos on Youtube?
If you are thinking of starting a YouTube channel, then the best tools for recording videos on Youtube is software like Camtasia and Jing. They're both capable of recording anything from your desktop to your webcam. No matter which you choose, be sure to record videos at 1080p and 60 fps. Be sure to use the highest quality settings for your video so that it doesn't look blurry when uploaded.
How can I convert my video into mp4 format?
Download youtube mp4 converter, then follow the 4 detailed steps : Firstly, select a video. Secondly, you can use the conversion parameters to customize the output formats. Thirdly, click on Convert button and it will start converting. Lastly, after a successful conversion, the files can be downloaded from the Completed tab.
How can I download youtube videos?
There are three methods of converting youtube videos. 1) You can download an individual video by clicking a download link or 2) you can use our online conversion tool to convert any and all your downloaded videos into different formats like mp4, webm, or 3gp. If you're interested in creating your own online video content for free, we have an online tutorial about that!
What is the difference between a video and an mp4
An mp4 video is a movie file format with the extension mp4. It is the most commonly used video format in the world and supports both high-definition and standard-definition playback, using a H264/AVC. An mp4 video can be carried on many other multimedia file formats such as AVI, 3GP, MOV, WMV, MKV, FLV or MP4A.
Is there an easy way to convert videos on Youtube to mp4?
Now, you can easily convert videos from Youtube to mp4 and other formats. Also, once you download the files from the converter, you can transfer them with a USB/SD card or upload them directly to your YouTube channel without any format changes.
What is the best way to record videos from youtube?
Youtube is not recommended since editing a youtube video can be difficult, and also it will not allow you to download the videos. It does not provide an option for downloading videos that are embedded on websites. Video Bloggers may find it easier to create an account at their blog host's website and then upload the videos there. The options for students are limited: either take screenshots and save them or record with your phone's camera app
What is the best software to convert a YouTube video into an mp4 file?
There are many ways to do the task, but the only one I can confidently recommend is TechSmith's. Its trial version allows you to convert all kinds of files with even higher quality and conversion speed.
Is there a way to convert youtube videos into a mp4 format?
You may use our online converter where you can convert videos into mp4 format or download the application to convert videos onto a computer. Also, please be aware that some software from links given on youtube will not allow us to enter your password when downloading so if using this tool, make sure you have the software downloaded and save it in a safe location.
How youtube mp4 converter Works
1. Identify the video file format: Once you've identified the video file format, you'll need to find a software that can convert videos in that format.
2. Download and install the software: After downloading the software, install it on your computer.
3. Convert the video: After installing and launching the software, select the video you want to convert from your computer and click on "Convert".
Pros of youtube mp4 converter
• Converts youtube videos to mp4 format quickly and easily.
• Option to convert videos in high or low quality.
• Can change video resolution, aspect ratio, and more.
• User-friendly interface.
• Free trial available.

0 notes
Text
hello all! so i’ve been making gifs on my sad little ipad air 2 for almost 2 years now, and i’ve learned quite a lot in those times, often through trial and error. i know there’s lots of people out there wanting to learn how to gif, but not being able to afford a laptop, or not being able to download photoshop, etc. so i thought i’d share what i’d learned about giffing on iOS devices! note: i don’t have and have never had an iphone, so i am not certain about what works for them, but i guess that anything which works on an ipad, will also work on an iphone! so with that said, let’s get into it :)
this is going to be quite a long and image-heavy tutorial, so i’ve put the rest under a read-more :)
you will need:
an iOS device (not sure how this works on all devices, but i think as long as it’s still receiving software updates, you’ll be fine!)
app: inshot
app: vont
optional: a VPN
youtube app or download folders (will be explained!)
these are all the steps i go through when making a gif and the apps/websites i use for them. in this post, i’ll be explaining all of them:
choose & download video (youtube/mega/gdrive)
trim & crop video (photos app)
colour & overlay (inshot)
text (optional) (vont)
convert video to gif (ezgif)
resize (optional) (ezgif)
post! (tumblr site)
without further ado, let’s get into it!
1. CHOOSING AND DOWNLOADING THE VIDEO
there are two ways to find and download a video to gif: through youtube or through download links like mega or google drive. here, i’ll be explaining both of them.
1.1. downloading via youtube
first, find the video that you want to gif. always make sure the quality is high enough! 1080p is the best, and you should always try to find it. 720p is also doable but really the minimum, anything below that is basically not worth it.
copy the link of the video you want to gif, then go to https://yt1s.com/en130 to download it. (you may need an adblocker to block the popups, but clicking them away works as well, for the rest the site is super clean!)
paste the link into “search or paste youtube link here” and press convert, then in the drop down menu, select the highest quality possible (preferably 1080p, as said before).
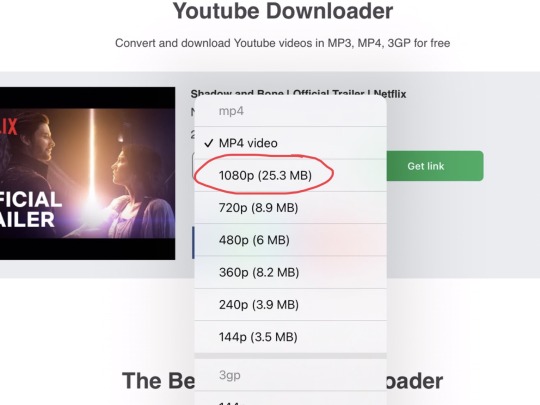
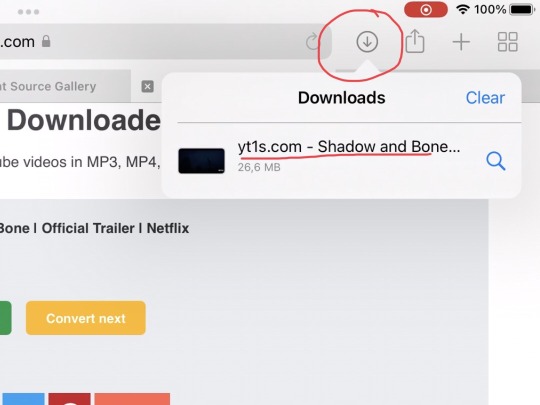
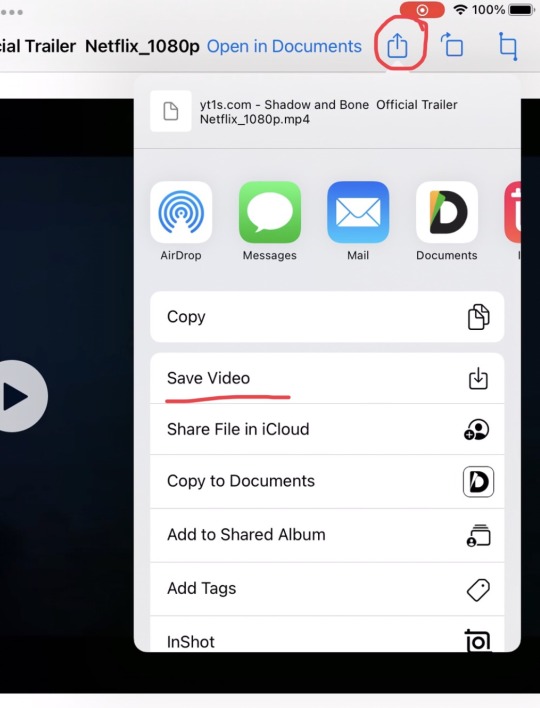
press “get link” and then press “download”. a popup will appear, asking you to press download again. if you press this, an arrow symbol will appear next to the search bar at the top. press this symbol, select the video, then press the “send” symbol and choose “save video”. the video is now saved to the photos app!
1.2. downloading via download folder
download folders work in a pretty similar way to downloading youtube videos, the hardest part is just finding the folders! for this, i recommend either asking some friends or mutuals (especially if they make high quality gifs – very likely that they’ll have some hq torrented shows or movies) or look around on several download or logoless twitters, like downloadinhd, logolessdesires or logolesspro. these accounts do often compress the files, so the quality might be a bit lower than it should be, but it’s definitely better than nothing!
both mega and google drive folders work basically the same way: select the file you need and find a download button somewhere. after this, it’s basically the same steps as the last part – find the video in the download part next to the search bar and save to photos.
TIP: if mega stops you from downloading because you’ve exceeded the download limit, you can use a vpn to mask your IP address! some free ones are windscribe, justvpn and urbanvpn, but if you have some money to spare, there’s excellent paid ones like expressvpn, surfshark or freedome.
2. TRIMMING AND CROPPING VIDEOS
we’ve found all the episodes or videos we want to gif! cool, now it’s time to find all individual scenes so that we can start editing. to trim and crop the videos, you don’t need a new app, this can just be done in the normal photos app!
if you already have an exact scene in mind, you can just go to that timestamp immediately, but if you’re still not sure, just scroll through the video to find some good ones. to trim the video down to the scene that you want, use the edit function and move the arrows at both sides of the video to the exact start and end point of your scene. if you want to be more accurate, press and hold the arrows to lower the timespan that they are editing at that moment.
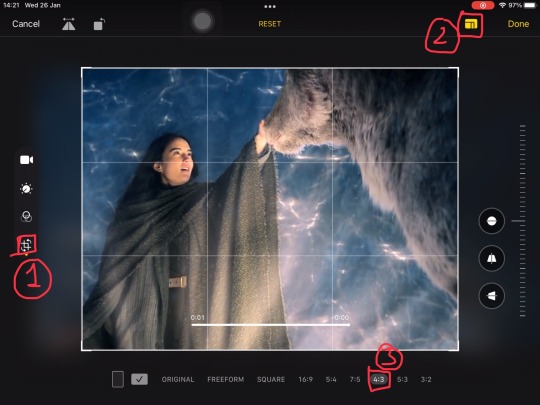
after you’ve trimmed the scene you want, go to the cropping setting and choose a predetermined ratio to crop the video in – this way, all the gifs you crop will be the same size. i usually use 9:16, 4:5 or 3:4, but anything works!
3. EDITING (COLOURING/OVERLAY) editing!
now we’ve done the boring stuff, we can start having fun !! we’re gonna start colouring the video now and optionally adding an overlay, which we’re going to do with the app “inshot”, which you can download just from the app store! this app has a pro-version which unlocks some of the editing options and removes ads but it works just fine without – i would only consider buying it to remove the ads but just putting your device in airplane mode fixes that as well, so it’s not really worth it imo! this app does both editing and overlays, so i’ll be explaining how both of those work.
first, start by pressing “create new video” and choosing the clip you just trimmed and cropped.

3.1. editing and colouring the video
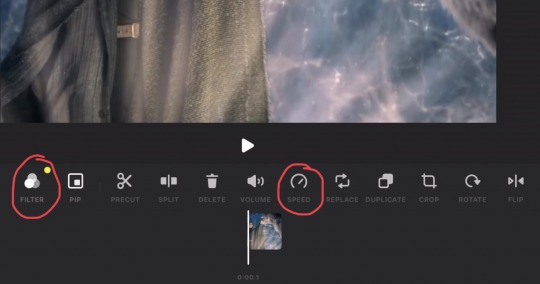
all actions to edit the video can be found at the bottom. first, start with slowing down the video to about 80-60% of the original speed, it looks much smoother and nicer in a gifset!
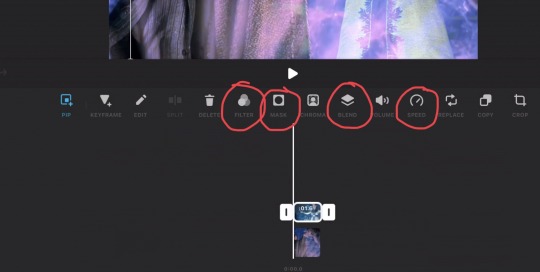
after this, you can start colouring, by going to filter > adjust at the bottom. this gives you a new set of actions to use.
first, put up the sharpness to about 20-30, depending on what looks best. don’t go much higher than this though, it won’t look great lmao.
then play around with the brightness, contrast and saturation. you can do a lot with these already: to make a black and white gif, for example, turn down the saturation completely and up the brightness and contrast a bit, it’ll look great already! if you’re not satisfied yet, though, don’t worry, all will be fixed in the next step.
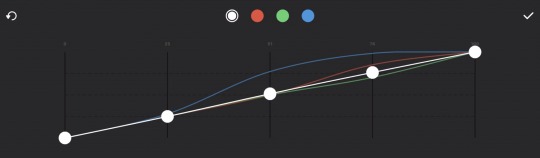
we’re getting to curves now! they are the best thing in this app and pretty good for a photoshop replacement as far as i know. for this part, i can’t really tell you how to do it, you’ve just gotta play around with it for a while and get a feel for it! it takes some time, but practice definitely pays off.

3.2. adding an overlay
to add another video to the video you’re editing, press the “PIP” (picture in picture) action in the main menu. choose the video you want to insert and also slow this down to about 80-60% of the original speed. try to make sure both videos are about the same length, so you won’t have to trim it down again after you’re done.
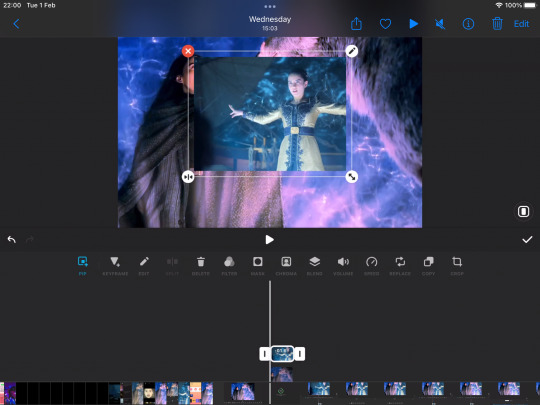
after this, size the video and move it to where you want it, then use the “mask” function to make sure only the part of the video that you want to see is shown. dragging the little symbol at the edge (shown below) lets you “blend” the edge of the video so it’s less of a line, more of a gradual transition
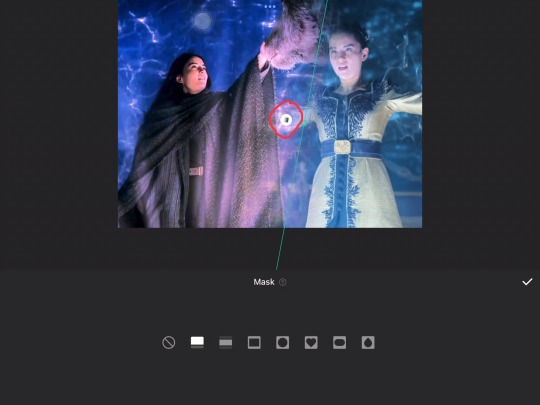
optional: you can also use the blend function on the PIP video to make it blend with the base vid! it doesn’t always look nice but there’s loads of different options to work with.
once you’ve positioned, masked and blended the video how you like it, you can edit it in the same way as the base video! once again, choose filter > adjust and follow the same steps used for the other video.
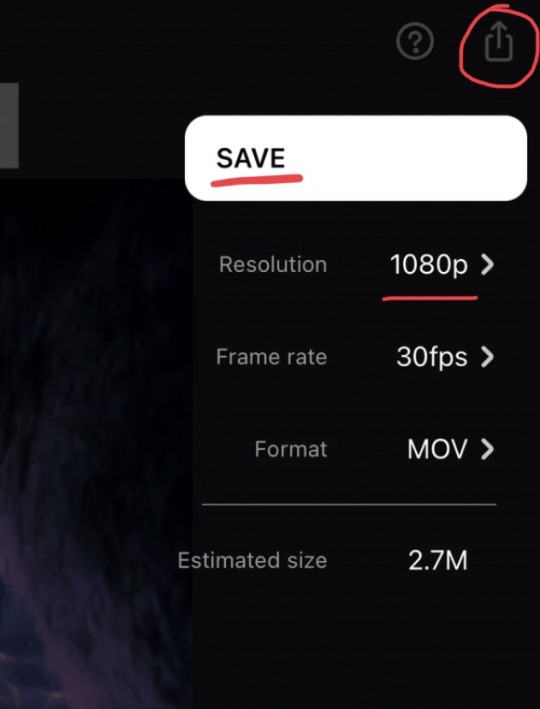
once you’re satisfied with the entire video, press the “send” icon at the top right, make sure the resolution is set to 1080p, and save! now you’re done colouring, it’s time for the next part (which is optional but very fun): adding text to your video.
4. ADDING TEXT
this is my favourite part! for adding text to your gifs, download the vont app from the app store. once again, this app has a pro version, but unless you really need to add more than 4 textboxes per gif, the free version works fine! the ad problem can again be fixed by just putting your device in airplane mode, and even the four textboxes per gif problem can be worked around by clever placements and multiple sentences in one box. now, let’s start!
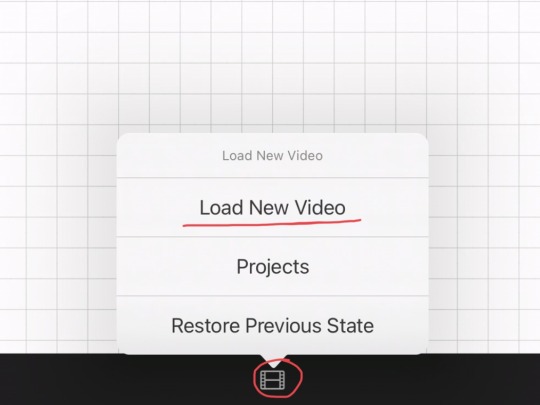
open the app and press the video icon at the bottom, then choose “load new video” and select the video you edited in the previous step
press anywhere on the video; a pop-up saying “add text” will appear. press this and type the text you want in the textbox that pops up
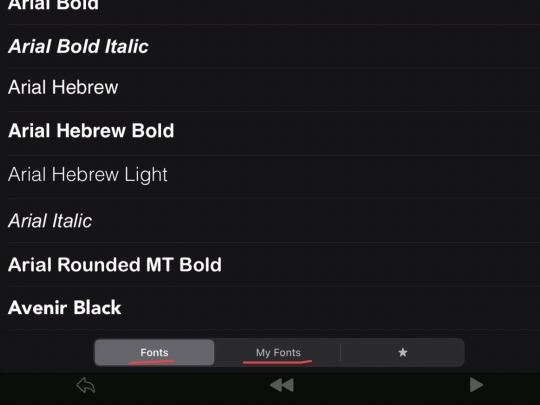
choose the font you want in the “font” menu - there are not going to be any fonts in the “my fonts” section when you start, these can be downloaded from various font packs readily available on tumblr (i recommend checking @fontarchive out for something to start with! if you would like more, feel free to hmu, i am sure i have some links laying around)
to download a font, get a dropbox link or any other link, press a download button somewhere on the page and it will be saved to the “files” app
to add the font to the vont app, find the font in your downloads, open the file, press the send icon at the top and then choose “open with vont”
the app will give you a button saying “add to vont”, press this button and you’re done!
change the size of the text with the “size” button, then slide it around or use the “move” option to position it to where you want it (tip: use “layout” to get a text to be positioned exactly in the middle)
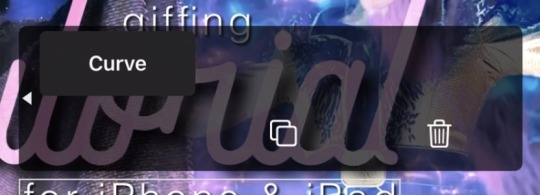
you can tilt the text as well, and curve it to form a circle if you want (make sure to swipe the actions menu, the curve option will show up!)

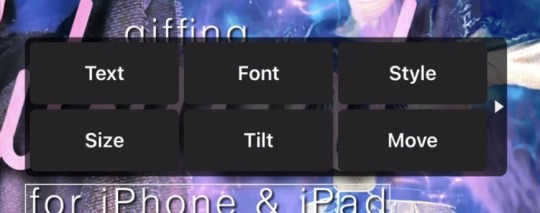
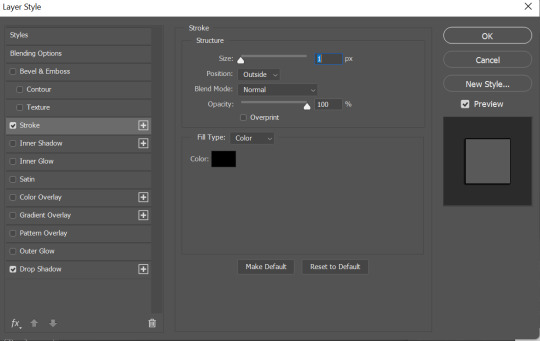
use the “style” option to change the colour, drop shadow, stroke, background, spacing and blending option of the text (another tip: always add a drop shadow to the text! it makes it so much easier to read, and if you change its colour, it can be part of the colouring of the set as well)
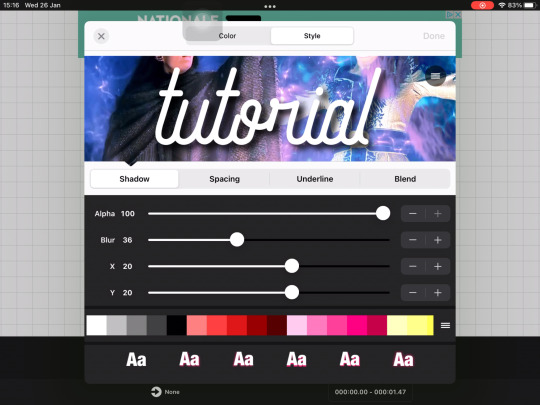


when you’re done, press the send icon in the bottom right corner. first, press “save project” – this will save your progress in the app itself, so that if you notice something wrong after you’ve saved the video, you can always go back to change it. after that, press save video, and the video with text will be saved to the photos app!
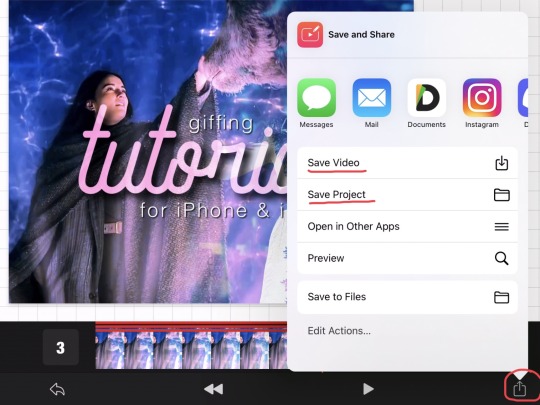
5. CONVERTING TO GIF
now we’re done with the fun parts sadly, here comes the tedious part lmao: converting videos to gifs! this is one of the last parts, we’re almost there :)
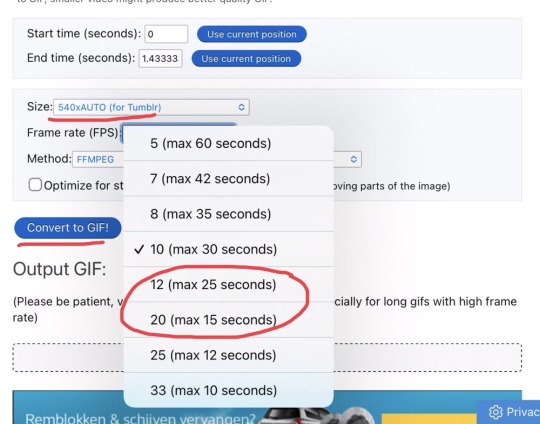
open the website https://ezgif.com/ and go to the “video to GIF” tab in the header
upload your gif in the “Select video from your computer” box (then press “upload video”)
under the video, there is a drop-down menu to choose the size. now this depends on what size your gif is going to be in the gifset, but if you want only one gif per row, choose the 540xAUTO option (this also has “for tumblr” behind it, so it’s easy to find slfjdslk) if you are going for more gifs per row, just leave the setting as is, we will fix this next
under that is the frame rate option. i usually switch between 12 and 20 FPS, depending on the size of my gif in the end (it has to be under 10Mb for tumblr to upload it to a post)
if you’ve done this, press convert to GIF and longpress the converted gif to save to your photos app!
6. RESIZING (optional)
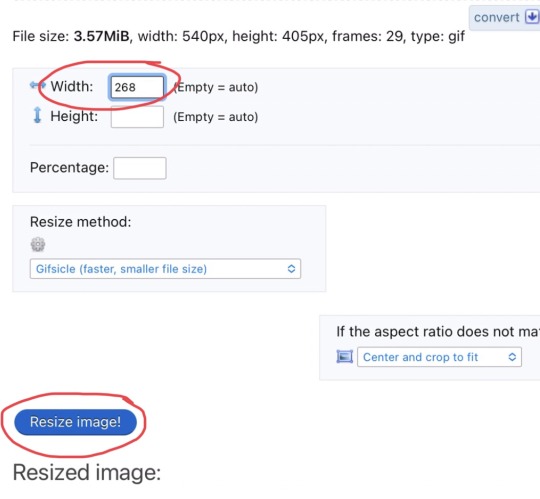
we’re almost done, just hang in there!! now we’re going to resize the gif if needed. this is because if you want to put multiple gifs in one row, they need to be a certain size, otherwise tumblr will compress the gifs and they will show up in a much lower quality. this post shows exactly what the dimensions should be per amount of gifs per row!
to resize the gifs, you can stay on ezgif, but this time choose the tab at the top that says “resize”
upload the gif in the “upload image from your computer” box
fill in only the width dimension (the height one is not needed!) and press “resize image”
once again longpress the resized gif to save it to your gallery
7. POSTING
the final part! this part i also love, especially because i love editing the caption hehe, though deciding what to tag the post is not my favourite part lmao. for this part, a tumblr app is not recommended, as it does not have the different post types needed for a gifset, so we’re doing it on the website!
go to the tumblr website and log in
press the new post button and choose “photo”
upload your gifs to the post
if you have a laptop available, save the post as a draft on your apple device, and edit the caption and tags further on that laptop (it works much better!)
if you don’t, editing on mobile works fine as well, but it won’t let you add html captions (so the nice colourful gradients some people have, etc) but it’s obviously not required to do that, so this works fine as well!
tagging the post can be quite tricky, my go-to strategy is tag all the characters, ships and fandoms first, and then tag all sourceblogs that apply (some general ones are bbelcher, chewbacca etc. but there’s tons of sourceblogs for almost every fandom out there if you know how to look for them!) and lastly, tag some friends who will definitely like the post, so that they will surely see it :) it’s also smart to use a tag for your creations like mine, mygifs, *mine etc. so that you can easily find them all back!
when you’re completely satisfied with your caption and tags, press post, and.. you’re done!
i really hope i’m able to help people with this ! i spent a lot of time on this so even if you won’t use it, i would very much appreciate a signal boost <3 if anyone has any questions feel free to send me an ask or a dm, i’d be happy to answer all your questions!
lots of love and happy giffing, sas <3
#gif tutorial#tutorial#gif resources#completeresources#don't know if there's anything else i could tag sdlfkjdsk#*#resources
52 notes
·
View notes
Note
Hey I have been thinking of making gifs but i have no idea where to start so I thought y not ask a fellow carat who makes awesome gifss❤️
A little guidance would mean a lot!!
aww, anon!! thank you for coming to me for this. i love talking people’s ears off!! DFJKJDFKDF but that being said, i’ll keep this under a keep reading since i’ll go through things quite thoroughly!
there’s really a million and one ways to make gifs, but i’ll show you how i do it and the basics in general (+ maybe some alternatives). keep in mind that i use windows though, so i’m not sure how helpful this will be if you’re on a mac. anyhoot, i’ll be dividing this tutorial into 6 parts, namely sourcing, choosing a program to resize/import with (vapoursynth and/or KM player basics), photoshop basics (KM Player tutorial extension), sharpening, coloring, and exporting.

the primary issue with sourcing is that the videos we want to gif come from different sources, and not all of them are conveniently downloadable. i’m going to list a few different sites/programs (that are free! <3) which allow me to download them!
4k Video Downloader: this program allows you to download from multiple sites, but i mainly use this for youtube. it’s better than other online alternatives (such as y2mate, which you can use if you can’t download this!) since it allows you to download above 1080p and also allows you to download subtitles if you want to. make sure to download it as .mkv though because options above 1080p will not show up if you’re downloading in .mp4!
Soshistagram: this is my go-to vlive downloader! it also allows you to choose the quality of your download.
Twitter Video Downloader & Instagram Downloader: exactly as their name implies, lol. twitter and instagram don’t really provide HD videos so i don’t mind downloading them through these. (the 2nd link also enables you to download from a number of other sources!)
Inspect Element: when worse comes to worst and if you're incredibly desperate to gif something that cannot be downloaded from any of these, you can (almost) always rip it off from the source code, lol. i won’t get into too much detail about this since so much information about this is readily available on the internet!
as you may have noticed, i’ve been mentioning quality for a lot of these. while being able to download content may be the priority, it is also really important (maybe even equally important) to download high quality resources. it’s not a very good idea to gif from anything below 720p as they usually don’t come out as nice, so to get videos like these, i usually go to either the sources themselves (e.g: their official youtube account, music shows’ respective youtube accounts, studio choom, etc.) and if i won’t be able to find them there, they’re surely on our beloved and reliable rosebay (who provides almost every svt content out there! people usually go here to get performance stages and huya streams, but almost everything is literally here, lol). you can also find performance stages on kpopexciting and kpop24hours (which requires membership, so watch out for when they open registrations up!). that being said though, it’s quite hard to find sources for chinaline, but legohouse is the best for this!
when sourcing from fansites, always check if they allow editing first! if it’s not explicitly said, you can always ask them. (most of them reply :D) if you don’t know how to, here’s a good guide for such! thank you @hanwooz for making this guide. <3
it’s also worth noting that performance stages and a few other high quality content come in .tp/.ts files which you might need a different media player for. for this, i use vlc for everything! this is also available for mac.
sometimes, you might also need to extract files (as sources compress them to take up less space during upload). i use peazip to do this! it’s a great AND FREE alternative to winrar.
you might also encounter download limits on gdrive. you can simply make a copy of the file, put it in a folder, then download the whole folder.

on to the more interesting part, we finally start making our gif! for this, i use photoshop cc (i downloaded it here lol) and vapoursynth OR KM player. these aren’t the only programs you can use, but these are what worked for me and my old 32-bit laptop, lol. you can find 64-bit and mac alternatives on the links as well i believe, and if not, you can just do a bit of digging around those sites!
(additional notes: another alternative for photoshop is GIMP but i don’t really remember how to use it. photopea’s also a web-based alternative, but i can’t say much about it since i haven’t dabbled there yet. there are also add-ons for photoshop such as topaz, but i (again) cannot use those, but i heard that they help a lot with making gifs look clean! avisynth is also an alternative to vapoursynth, but vapoursynth has added features i believe)
gifs are basically just moving pictures, so you can either capture moments you like as a video or as a series of images. photoshop accepts both, but as for me, i cannot import videos directly to photoshop so i do them frame by frame. to capture these images, one method is processing them through KM Player.

km player is basically a media player with a feature that allows you to get snapshots of videos continually (therefore, the series of images).
step 1: simply go to the timestamp of the moment you want to gif (i usually watch the videos first and type out all the timestamps of all the moments i want to gif) and press CTRL + G

this window would then show up. you can choose where you want your snapshots to go by changing the folder that’s highlighted. keep in mind that you need separate folders for each gif! if you don’t change the folder, the new screencaps would overwrite the frames you previously captured. as for the image format, i only use either PNG or JPG/JPEG, as they capture the best quality from this media player. PNGs take a lot longer to capture though. the numbers to extract tells you how many frames it would capture. i set it to ‘continuously’ so gifs don’t come out choppy/look like they’re skipping. it’s almost the same principle with the other panel named frames to extract. as for the rest, just make sure to follow every setting on screenshot! (you can always explore/experiment with the rest of them later on)
step 2: afterwards, click start, and play your video. your laptop might get quite slow when this process starts.
step 3: when you’ve gone through your timestamp, press 'stop’, and go to the folder you previously chose!
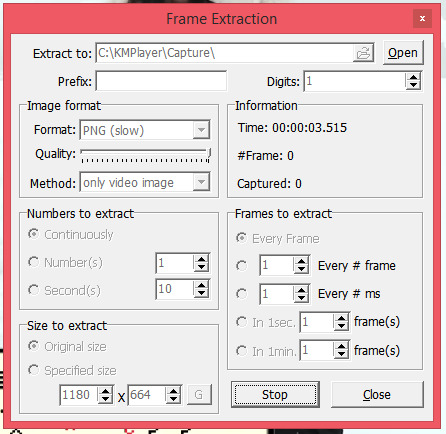
your folder should look similar to this:
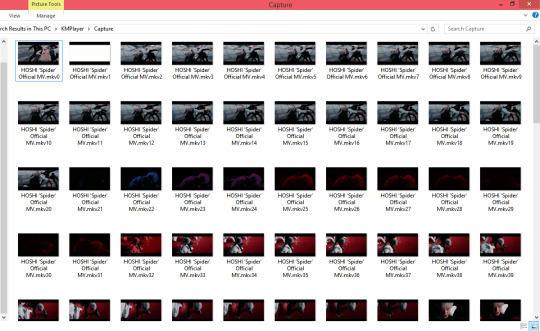
simply erase all the frames that you don’t want to be included in your gif, and you’re ready to import! we’ll be keeping these aside for now and learn another way to get frames.

another alternative is to use vapoursynth. to me, this is a whole LOT easier and basically does all of the work for you. i really recommend this! ever since i got it to work just a few months ago, i can never really make gifs without it anymore. i use the old version though (rip </3), so i won't have the new preprocessors, denoise filters, and sharpening. i suggest you always take the most updated one because i heard they make a lot of difference output-wise!
bear in mind that vapoursynth uses python, so if you encounter some errors, it might just be that you don’t have it downloaded yet. just follow the instructions here! (for the longest time i couldn’t figure out why my vs wouldn’t work and it was because of this.... lol)
it’s very important to know tumblr size dimensions when it comes to gifs (whether you’re going to use vapoursynth or not), but i’m including it on this part since it’s crucial to how vs (vapoursynth) works. your gifs may look good on photoshop, but if they’re the wrong size they’ll inevitably end up blurry on tumblr unless someone clicks on them. here are the dimensions (image made by @dazzlingkai):

you can use any height for these gifs, but these are the width dimensions you need to follow! **UPDATE: the middle gif for a 3-set is now also 177px!
nibreon has a video on how to gif using vs, but if you like text better, i can also provide it step by step for you.
step 1: to get started, simply drag your file to the vs shortcut (entitled “vapoursynth (drop video file on me)”). and this window should appear. (i’m using hoshi’s spider mv for this tutorial btw!)
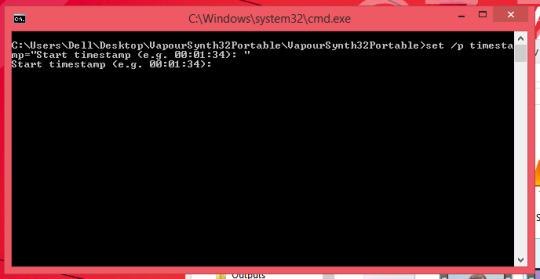
simply encode your chosen timestamp (in this case mine is 00:02:02) and press enter. (i don’t really trim my videos as other CCs do and just send them straight to vs, haha.)
step 2: this second line then asks you how long you want the video to be trimmed/previewed for. if your timestamp is 00:02:02-00:02:08, then what you’ll encode on this line is 00:00:06. (basically the duration of the video/part of the video)

step 3: after it processes, this resizer will then show up in your default browser.
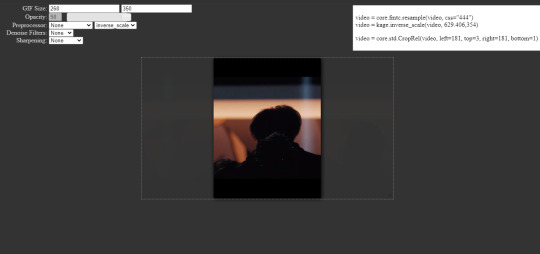
this is where the size dimensions become important! choose the size of your liking and resize the video as you want. i find resizing much easier with vs as you have more control over the size with real time feedback.
additional notes:
opacity: just allows you to view the area outside of your size width. doesn’t really matter much, but i love it as it helps me precisely resize gifs especially when i don’t want to include captions/subtitles.
preprocessor: refers to how vs would process (lol??) your gifs frame by frame. this is crucial to how your gifs would look! it is explained very well and thoroughly here, but basically, it tells you the speed and the manner in which the images/initial video of your gif will be exported in. this one doesn’t matter much on regular videos, but for performances (.ts/.tp files, etc.) it does make a lot of difference. i usually use qtgmc 60 slow on performances. for the rest, i use qtgmc 30 fast (or 60 fast when there are very few frames just so they would run smoother). i’m also always on resamplehq (the second part of preprocessing)! a lot of CCs don’t use preprocessing for regular videos though (.mp4, .mkv, etc.). if it’s still unclear for you, i’ll include more tutorials and examples (although very few) at the end, dw! **UPDATE: i’m now on the 64bit ver. as i’m using a new laptop, my preprocessor is now debilinear (instead of resamplehq). i also am now a changed woman and discovered that you really don’t need to use the fps preprocessor for regular videos BECAUSE they’re not rendered “splicely”, it just takes more of your time. they look exactly the same. <3
denoise filters: smoothens out your gifs. very useful especially if the source is grainy! i always use KNLM for this but you can try BM3D as well. bm3d takes much longer to process though!
sharpening: pretty self-explanatory. it just makes your gifs look clearer/sharper! i use finesharp almost always set to 1, but it really depends on your preference. i also do additional sharpening on photoshop most of the time though! **UPDATE: recently changed how i make gifs and i don’t use this sharpening anymore because my preferences have changed, but it’s still a good place to start if you’re just beginning to make gifs!!
step 4: after this, go onto the vs window. the lines of code initially look like this:
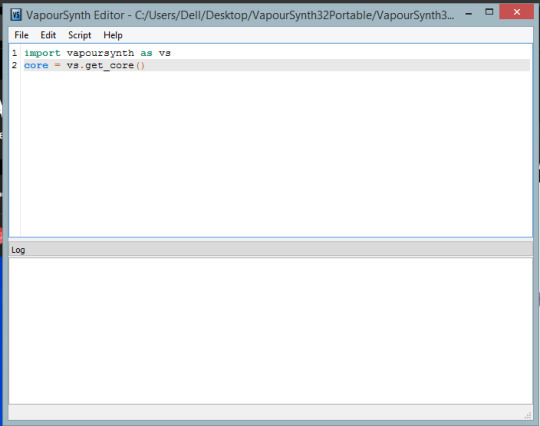
but in order to process the video for gif purposes, we need to use vapoursynth’s plugins. you can modify this later on (which is really unnecessary, but it’s possible if you want to experiment more fjdjkdf), so for now, just open up the included script from the vapoursynth folder (gifs).
if you’ve downloaded vapoursynth directly from their site and not from the link i’ve included, this won’t show up in the folder and you’d have to assemble it all yourself. this is what i meant when i mentioned that you can modify vapoursynth’s plugins yourself! i’ve never seen anyone do that, but just so you know lol.
your code should now look similar to this:

note: you can also lessen the ram usage of vs so your laptop won’t lag as much!! just follow what line 9 says <3
step 5: then, copy and paste the text that’s in the upper right corner to vapoursynth. you must paste it after the 13th line! it should look similar to this.
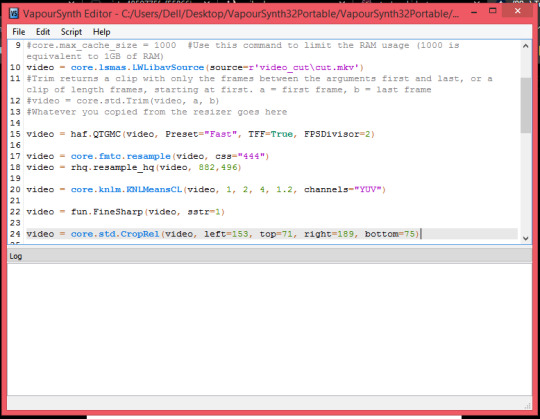
step 6: just press f8 (or go to script, then encode video). this window will show up.
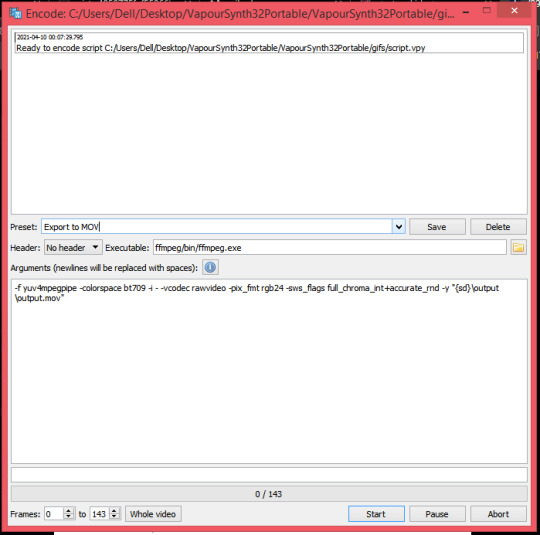
this is what you’ll usually do if you want to save it as a video, but since i can’t import videos, i change the preset to ‘export to png sequence’. some CCs like trimming the video here (as you can see at the bottom, there’s a label for the number of frames), but just like what we did with KM Player i just export it all (by pressing start). make sure your header is also set to Y4M if you’re exporting to PNG!
step 7: you’ll see all of your frames on the vs folder and if you didn’t trim (like me jdsjdskj), you can just erase unwanted scenes (just like what we did for KM Player)! if you’re making more than one gif, transfer these pngs to another folder (or rename them) as in the case of kmplayer. you need separate folders/names for each gif as not changing the folder/name and exporting again would overwrite the frames you previously captured.
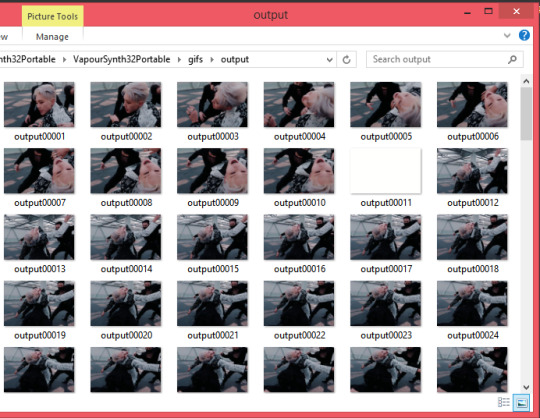
and this is where it ends for vapoursynth!

now that we have all the frames ready, we’re going to be using photoshop and get all the fun stuff going!

KM Player is a lot more tedious (can’t believe i used this for more than a year omg), so we’re gonna have to do a few more steps and pick up from where we’ve left.
step 1: import your frames by going to file, scripts, then ‘load files into stack’
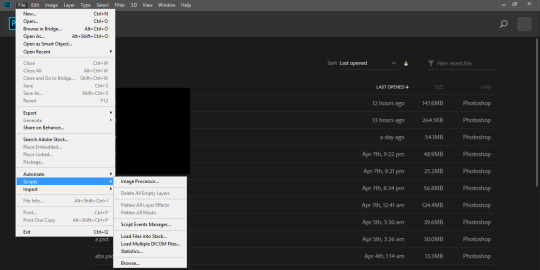
step 2: click browse, select the folder you saved your frames in, select all the frames, click enter, and then press ‘OK’.
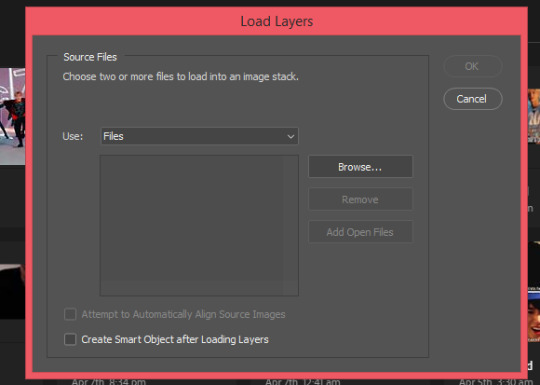
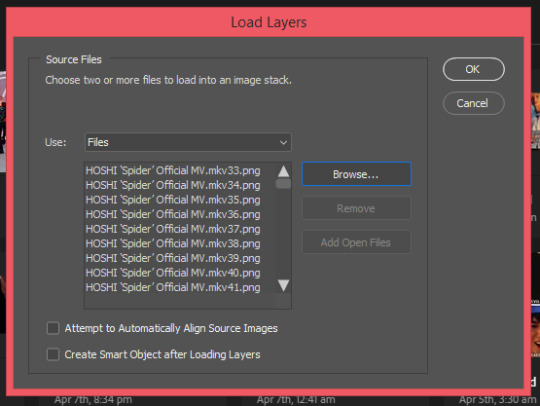
step 3: your workspace should look something like this. click create frame animation (if that doesn’t initially show up and your window says ‘create timeline animation’, just click the little arrow beside it and switch it to frame).
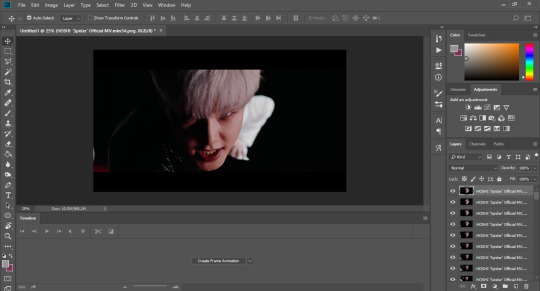
(additionally, if you don’t see the timeline below, you can enable it by going to window, then check the timeline option)
step 4: make frames from layers.
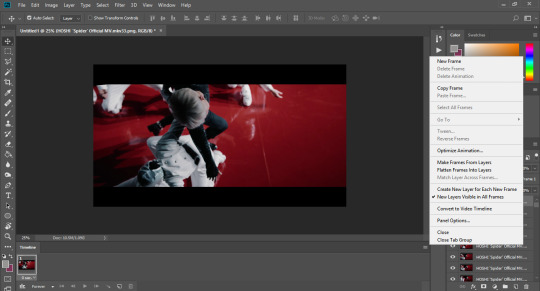
step 5: reverse frames.

step 6: the trickiest part of giffing from km player!! (thankfully, we’re only making 540px gifs for this tutorial) estimate the area you want to include, then crop your canvas by pressing ‘C’ on your keyboard or selecting the crop tool on the toolbar (it’s the 5th icon here on my screen).
**UPDATE: you can also crop by ratios using the crop tool as seen on the screenshot below!
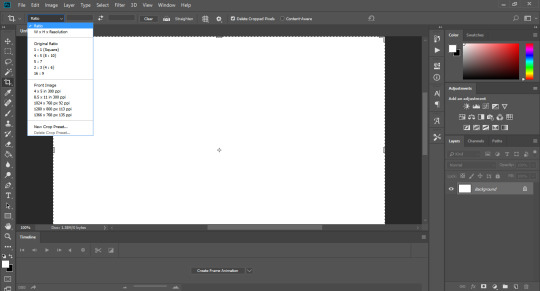
after cropping, your workspace should look similar to this.
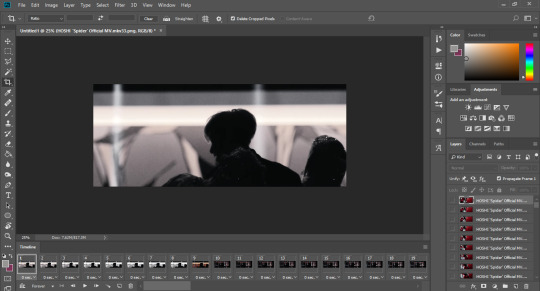
step 7: and now we FINALLY resize like barbarians :D i always like shortcuts (which you can prob tell by now) a.k.a the easier and more convenient route, so just click ‘CTRL + ALT + I’ so the image resizing window can pop up. alternatively, you can go to image, then image size.

now set the width to 542 (which is 2 pixels larger than tumblr’s required width) and press ‘ok’.
step 8: as you can see, there are weird white/kind of faded pixels on the outer edges of the gif, and that’s the exact reason why we needed those 2 extra pixels from the last step. you can remove this the hard way by zooming at 1800% and removing 2 pixels per side or we can always go the easy route and press ‘CTRL + ALT + C’ (or go to image, then canvas size) and then resize the canvas width to 540 (don’t forget to remove 2 pixels from whatever height u have too!) <3
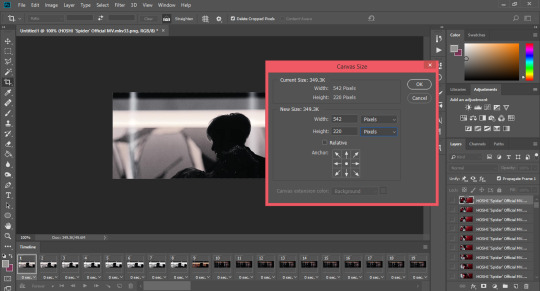
step 9: now we have a clean and sexy gif. you can completely stop here, and start exporting, but coloring and sharpening make all the difference (to me at least)!
as for vapoursynth, you only need to follow steps 1 to 5 (aka importing <3)

these steps aren’t ‘necessary’ but these are the essence and what makes tumblr gifs tumblr gifs (aka prettie <3).
there is so much potential with sharpening alone! usually, if they haven’t used the sharpening settings on vs, CCs may choose to do it through photoshop (although i personally always do additional sharpening on ps even if they’ve already gone through vs) by converting these frames into a smart object. you can do so by:
step 1: press ‘CTRL + ALT + A’ on your keyboard. this will select all of your frames IN THEIR LAYERS (not the ones on the timeline)
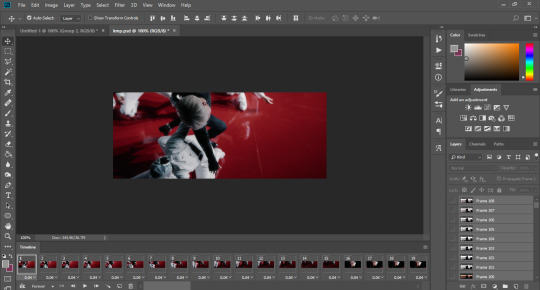
as you can see, they’re all highlighted on the bottom right panel.
step 2: place all of them in a folder by clicking this one!
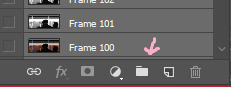
step 3: then, convert your frame animation into a timeline by clicking the tiny icon beside the ‘forever’ loop.
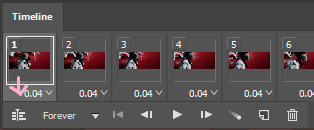
it should look like this afterwards:
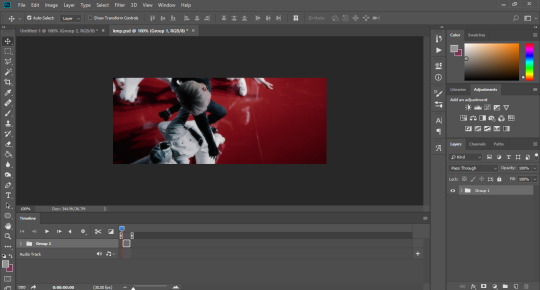
step 4: now we finally convert to smart filters by clicking filters, then convert to smart filter
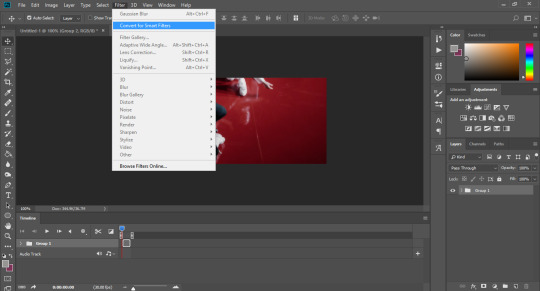
which turns out like this after being converted
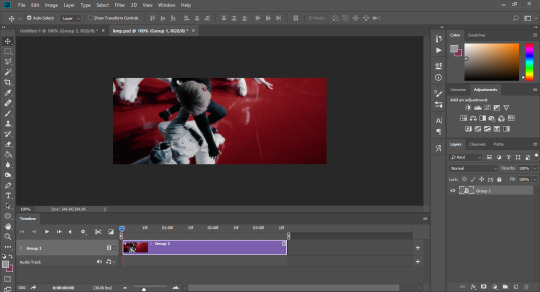
step 5: now sharpen to your liking! go to filters, sharpen, then smart sharpen. these are the settings i use, but i usually just play around with them until i like what i see. i won’t go in depth about this because there are a lot of tutorials that talk about this (which i will link some of below!!). the most important part to adjust is the amount and radius though!
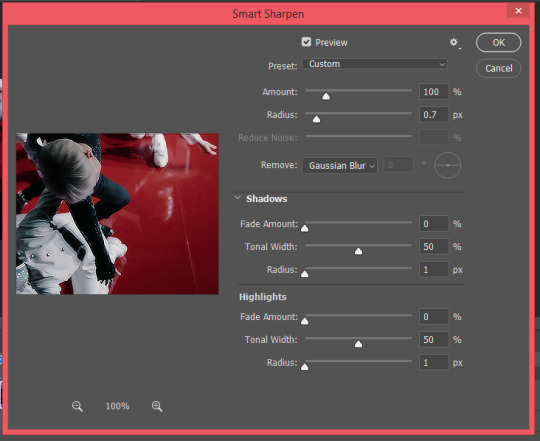
again, you can stop here, but i like adding a bit of glow to my gifs, which is done by adding gaussian blur (another filter)! i learnt this method from this tutorial. i don’t think i can add any more to it as it’s perfectly complete as is, so i won’t be elaborating anymore!
additionally, if you don’t want to do all of that manually (although i suggest you learn how to do it manually first), there are available sharpening actions you can see around the internet. just choose one that’s to your liking! here are a few of them. you can also save your own settings as an action if you don’t wanna do them repeatedly.

my personal favorite! this is what makes the giffing process so rewarding for me. for coloring, adjustment layers are your best friends! you can try messing around with all of these.
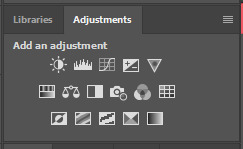
i usually use selective color (my beloved <3), levels, curves, saturation, exposure, vibrance, color balance, photo filter, channel mixer, and gradient maps (not specifically in that order). i won’t actually do a specific tutorial as coloring extremely varies from each gif (one psd/coloring might work for another but may look absolutely horrifying on one lol, this applies even to frames that are from the same video!!) but i’m just going to give a few tips and refer to a few tutorials that might help you out!
generally, the more colors there are in your gif, the bigger the gif size will be. this is also important when you are exporting! (gifs that have very few frames with a lot of color and gifs that have up to 200 frames but have very few colors in them can actually save as the same size)
if you wanna lessen the file size and noise, gamma, and off-set are your best friends! (make the gifs a bit darker) you can also delete a few colors as shown in this tutorial!
i used to be unaware of this when i was a new gifmaker, but be careful of whitewashing! dreamy (@scoupsy) has an excellent tutorial that combats this. annie (@imjaebumaf) also touches a bit more on this!
resources are always available for you to learn! one good way of learning how to color is by seeing how others also do it, and that is through their psds. i really love izzie’s (@coupsnim) colorings, and she recently put out a set for her blog’s anniversary too, so you can check that out! <3 i’ve also seen a lot of psds here from tumblr resource blogs, and deviantart has really good ones as well.
i don’t really have things i keep in mind other than those. just have fun and i’m sure in time it’ll turn out great! again, practice is everything!

last but not the least, we address the speed of the gif before we export! it’s the decimal places under the frames on the timeline. make sure that you select all frames if you want a consistent speed! you can always play around with it though.
for 30fps gifs, i usually do 0.03 to 0.035. photoshop shows 0.035 as 0.04, but i’m pretty sure it isn’t the exact same speed as 0.04. as for 60fps gifs, my speed ranges from 0.01 to 0.025.

and finally, we go to the settings themselves! i used to take exporting settings very lightly, but lately i have realized that it also impacts the way your gifs look by a lot! to export, press ‘CTRL + SHIFT + ALT + S’ on your keyboard, or simply go to file, export, then save for web.
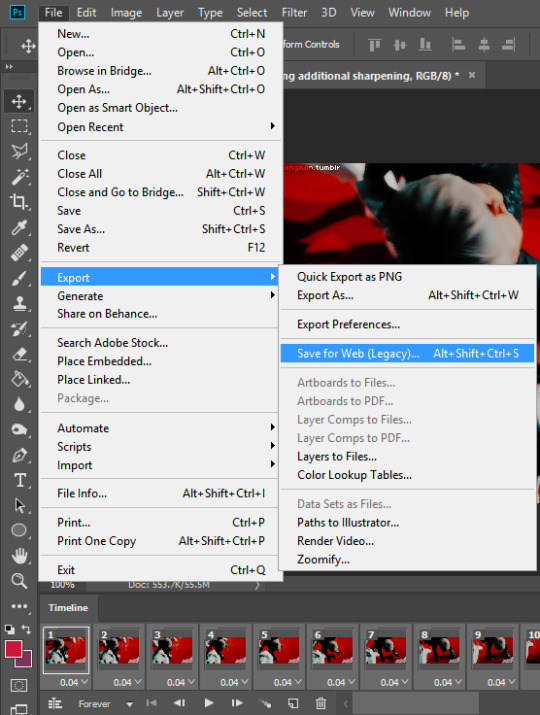
there are so many ways you can play around with it, but here are my current settings.
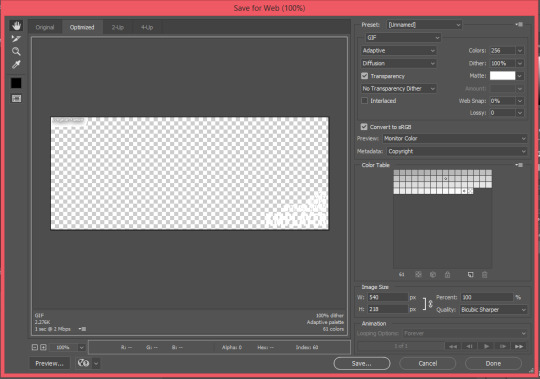
the color reduction algorithm (i.e: adaptive, selective, etc.) is one of the most important things as this determines the quality and color table of your exported gif! it really differs for each gif, but lately i lean towards the adaptive setting as i like the way it has been making my gifs look.
also very important to remember that tumblr’s current gif size limit is 10MB so make sure to keep your gifs under that size!!
you can also remove a few frames/skip every nth frame to lessen size if you’re running over the limit. :)

to show you how different each process will make a gif look, i’m including some examples (actually the ones we were working on during the tutorial!) to demonstrate a bit better.
this is specifically for an mv, but this tutorial has been really long now jdkjkfdjkfd so i will link down resources that show examples of it w/ performance stages (you can see a much bigger difference here)! also note that the vs one has slightly lesser frames (they could have the same frame number and size but i didn’t wanna redo it lol 😭). again, the .035 indicated is the speed used.

i know this is a bit much for an intro, but i wanted this to be a one-stop guide so you won't have to scramble for more resources. however, if some parts are hard to understand, here are a few tutorials that might help! (1, 2, 3 by @jinims, 4 by @soonhoonsol, 5, 6 is another general tutorial but i find the sharpening part especially helpful!)
and a few more resources that helped me out when i was beginning
sparkle tutorial
sparkle action
blurring captions
**UPDATE: my own sharpening tutorial <3, update 2
**UPDATE: my own color reduction algorithm tutorial
i hope this was helpful, and i can’t wait to see your gifs! <3
#a bit all over the place but#i learnt all of this on my own and through tutorials as well but i hope this at least makes sense!!#this is literally everything i know ig lol#don't hesitate to ask if some parts are unclear <3#all of this is also intimidating at first but i'm sure you'll get the hang of it!!#it's really just dexterity sdksdjk trial and error!#i hope i didn't forget anything? i might also edit this if i find the need to/i rmb to add smth <3#i didn't know tutorials took this much time omg i respect tutorial blogs even more now#literally took me more than 4 hours omg and i know u can tell the exact moment i started losing it#edit: i put those tags on while i saved the draft but i literally sat here for 5+ hours making this but it's worth it and i really enjoyed!!#i'll proofread this tmr it's 3 am now and my brain is fried from uni too <3#anon#y.ask#flashing tw#ok i just proofread this but it already has 20 notes that's so embarrassing <3#u can literally witness my sleep deprivation#anyway it's fine now i think (or my sleepy brain thinks it is)#i'll prob revisit this again tmr#y.psd#y.tutorial
227 notes
·
View notes
Last Seen Blogs

bumblingwitch
Raccoonalope
obsessedwiththedragonprince
The Dragon Prince

sufferthesea
dream girl evil

catdadeddie
i don't know if i identify as a menace