#also if you want instructions or io files ask and I might provide
Text
!!Please Read!!
Heya I am just here to say if you wanna use my MOCs for something or steal building techniques that I use go ahead. Just put a credit/link or something.
I used to have different opinions about this but they have changed. Use my stuff if you wanna.
2 notes
·
View notes
Text
How to Install Cricut Design Space App on a Computer/Mobile?
Hey, if you just got a new Cricut machine and want to install Cricut Design Space app on your device, you are in the right place. I remember the day my brother (a pro crafter) first bought his Cricut Explore Air 2 machine. The most challenging task was setting up his Cricut machine.
As usual, he asked me for help, which I easily provided by following Cricut’s user manual. My brother is a little lazy and not very interested in tech, so he always relies on me for machine setup or technical stuff.
However, this might not be the case for you. I know some beginners struggle and don’t understand how to set up and download Cricut Design Space. So, whether you want to run this software on a computer/smartphone, this blog post will be helpful for you! Let’s delve into it to learn more.
Install Cricut Design Space App on Your Windows PC
My brother’s laptop had a Windows operating system, so the first time I installed this software was on a Windows computer. Later on, when he switched his Windows computer to a Mac, I also learned how to install it on a Mac computer.
So, let me show you how I installed and downloaded the Cricut software on a Windows computer:
First of all, I opened the browser on my laptop and visited design.cricut.com.
As I reached the website, I selected the checkbox to agree to Cricut’s Terms of Use and Privacy Policy.
Now, I hit the Download button to initiate the downloading process.
After downloading the app, double-click the downloaded file in my Downloads folder.
You will be asked whether you trust the application. You have to select the option to trust the app.
After that, your installation procedure will start.
Install Cricut Design Space App on a Mac Computer
Are you a Mac user or want to download Cricut Design Space on a Mac system? Look no further than the steps I have mentioned below. The instructions I have given below are based on my experiences when I installed the software on my brother’s Mac.
Advertisement
Here’s how to download and install the Cricut Design app on a Mac computer:
First of all, you have to open the browser and go to the design.circuit.com.
After that, you have to click on the ‘I agree’ checkbox to accept the Terms of Use and Privacy Policy.
Now, you will see a new screen where you have to select the location to save your file. But, by default, it may show you the downloads folder.
After choosing the download folder, you have to hit the Save button to begin downloading.
When the app is downloaded to your folder, you have to open your .dmg file by navigating to the Downloads folder.
On the next screen, you need to drag the Cricut symbol to the Applications folder. It will start the installation.
Finally, the app is added to your application folder.
You have learned the process of downloading and installing Cricut software and a complete step-by-step installation process.
Install Cricut Design Space App on Your Android Device
Here, you will learn to install the Cricut app on Android. Hence, if you want to use the app on your Android mobile, then perform the steps in the section below:
First of all, you have to open the Google Play Store app.
Then, you need to search for Cricut Design Space.
After that, the Design Space app will appear. You need to click on it and then hit the Install tab to install.
Finally, after installation, you will find your app on your phone’s home screen.
Install Cricut Design Space App on an iOS Smartphone
For iOS users, follow the instructions I have provided below. These steps will ensure the smooth installation of the Cricut app on iPhone or iPad.
Here are the steps to download and install the Cricut Design app on iOS:
You will need to launch the App Store on your iPhone or iPad.
You need to type Cricut Design Space on the search bar, and the Cricut app will appear.
Click on the Cricut app and hit the Get button to download.
Once you have completed the download and installation, you are ready to set up your Cricut machine.
Let’s Recap
Installation of Cricut Design Space is a must when you have a Cricut machine. You can’t use your Cricut machine without this software. This Cricut app is also used in the Cricut machine setup. Due to this, our computer can easily communicate with the Cricut machine and command it to perform a certain action. As I have explained the installation process for each operating system, you will not need to wander here and there on the internet. Just follow the steps and start setting up your Cricut.
FAQs
Question 1: What do I need to connect my Cricut machine to my computer?
Answer: To connect your Cricut machine to your computer, you must have a USB cable for a wired connection setup. On the other hand, if you want a wireless connection, you can use a Bluetooth connection. But one thing that is the most important while establishing the connection is Design Space. This software is a must if you want your computer to command the Cricut machine.
Question 2: Why is Cricut Design Space not working on my Mac computer?
Answer: If you are finding it difficult to use your Cricut app on your Mac computer, then don’t worry. You can simply clear the application cache, which will resolve the issue. Besides clearing the cache, you should check your internet connection to see whether it works properly.
Question 3: Why am I unable to open my Cricut Design Space?
Answer: If you are facing this issue, you must check your internet connection. Ensure that your internet is working properly. If it is not working, then you need to resolve this issue first. Ensure that you have a minimum of 2 Mbps internet speed so that it can work smoothly on your computer. So, don’t worry; check the internet connection first.
Source :- https://newmachineprocess.wordpress.com/2024/02/03/how-to-install-cricut-design-space-app-on-a-computer-mobile/
0 notes
Text
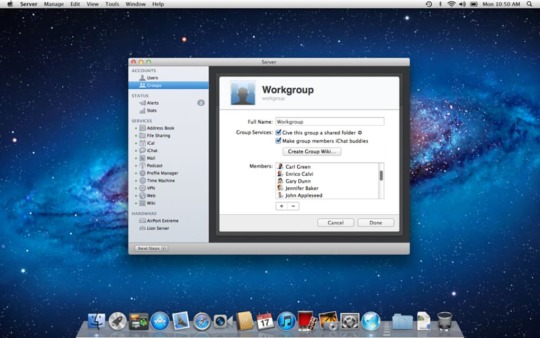
Mac Os X Server Download

Mac Os X Server Iso
Mac Os X Lion Server Download
Apple Mac Os X Download
Download Mac Os X Free
Mac Os X Installer Download
So, you’ve decided to download an older version of Mac OS X. There are many reasons that could point you to this radical decision. To begin with, some of your apps may not be working properly (or simply crash) on newer operating systems. Also, you may have noticed your Mac’s performance went down right after the last update. Finally, if you want to run a parallel copy of Mac OS X on a virtual machine, you too will need a working installation file of an older Mac OS X. Further down we’ll explain where to get one and what problems you may face down the road.
A list of all Mac OS X versions
Download Free Mac Apps and Mac Games for Apple Mac. Designed for OS X and iOS devices, OS X Server makes it easy to share files, schedule meetings, synchronize.
Designed for OS X and iOS devices, OS X Server makes it easy to share files, schedule meetings, synchronize contacts, develop software, host your own website, publish wikis, configure Mac, iPhone, and iPad devices, remotely access your network, and more. OS X Server is an application you can add to OS X right from the Mac App Store.
The latest version of OS X Server is unknown on Mac Informer. It is a perfect match for Automation in the System Tools category. The app is developed by Apple Inc. And its user rating is 4.7 out of 5.
Apple's macOS Server (formerly called OS X Server) is specially designed for macOS and iOS powered hardware devices to easily configure iPhone, iPad, iPod touch and Mac devices, share files, sync contacts, schedule meetings, publish wikis, develop software, remotely access network, host own website and many more things in easy way. MacOS Server is the software application available for macOS.
We’ll be repeatedly referring to these Apple OS versions below, so it’s good to know the basic macOS timeline.
Cheetah 10.0Puma 10.1Jaguar 10.2Panther 10.3Tiger 10.4Leopard 10.5Snow Leopard 10.6Lion 10.7Mountain Lion 10.8Mavericks 10.9Yosemite 10.10El Capitan 10.11Sierra 10.12High Sierra 10.13Mojave 10.14Catalina 10.15
STEP 1. Prepare your Mac for installation
Given your Mac isn’t new and is filled with data, you will probably need enough free space on your Mac. This includes not just space for the OS itself but also space for other applications and your user data. One more argument is that the free space on your disk translates into virtual memory so your apps have “fuel” to operate on. The chart below tells you how much free space is needed.
Note, that it is recommended that you install OS on a clean drive. Next, you will need enough disk space available, for example, to create Recovery Partition. Here are some ideas to free up space on your drive:
Uninstall large unused apps
Empty Trash Bin and Downloads
Locate the biggest files on your computer:
Go to Finder > All My Files > Arrange by size
Then you can move your space hoggers onto an external drive or a cloud storage.
If you aren’t comfortable with cleaning the Mac manually, there are some nice automatic “room cleaners”. Our favorite is CleanMyMac as it’s most simple to use of all. It deletes system junk, old broken apps, and the rest of hidden junk on your drive.
Download CleanMyMac for OS 10.4 - 10.8 (free version)
Download CleanMyMac for OS 10.9 (free version)
Download CleanMyMac for OS 10.10 - 10.14 (free version)
STEP 2. Get a copy of Mac OS X download
Mac Os X Server Iso
Normally, it is assumed that updating OS is a one-way road. That’s why going back to a past Apple OS version is problematic. The main challenge is to download the OS installation file itself, because your Mac may already be running a newer version. If you succeed in downloading the OS installation, your next step is to create a bootable USB or DVD and then reinstall the OS on your computer.
How to download older Mac OS X versions via the App Store
If you once had purchased an old version of Mac OS X from the App Store, open it and go to the Purchased tab. There you’ll find all the installers you can download. However, it doesn’t always work that way. The purchased section lists only those operating systems that you had downloaded in the past. But here is the path to check it:
Click the App Store icon.
Click Purchases in the top menu.
Scroll down to find the preferred OS X version.
Click Download.
This method allows you to download Mavericks and Yosemite by logging with your Apple ID — only if you previously downloaded them from the Mac App Store.
Without App Store: Download Mac OS version as Apple Developer
If you are signed with an Apple Developer account, you can get access to products that are no longer listed on the App Store. If you desperately need a lower OS X version build, consider creating a new Developer account among other options. The membership cost is $99/year and provides a bunch of perks unavailable to ordinary users.
Nevertheless, keep in mind that if you visit developer.apple.com/downloads, you can only find 10.3-10.6 OS X operating systems there. Newer versions are not available because starting Mac OS X Snow Leopard 10.7, the App Store has become the only source of updating Apple OS versions.
Purchase an older version of Mac operating system
You can purchase a boxed or email version of past Mac OS X directly from Apple. Both will cost you around $20. For the reason of being rather antiquated, Snow Leopard and earlier Apple versions can only be installed from DVD.
Buy a boxed edition of Snow Leopard 10.6
Get an email copy of Lion 10.7
Get an email copy of Mountain Lion 10.8
The email edition comes with a special download code you can use for the Mac App Store. Note, that to install the Lion or Mountain Lion, your Mac needs to be running Snow Leopard so you can install the newer OS on top of it.
How to get macOS El Capitan download
If you are wondering if you can run El Capitan on an older Mac, rejoice as it’s possible too. But before your Mac can run El Capitan it has to be updated to OS X 10.6.8. So, here are main steps you should take:
1. Install Snow Leopard from install DVD.
2. Update to 10.6.8 using Software Update.
3. Download El Capitan here.
“I can’t download an old version of Mac OS X”
If you have a newer Mac, there is no physical option to install Mac OS versions older than your current Mac model. For instance, if your MacBook was released in 2014, don’t expect it to run any OS released prior of that time, because older Apple OS versions simply do not include hardware drivers for your Mac.
But as it often happens, workarounds are possible. There is still a chance to download the installation file if you have an access to a Mac (or virtual machine) running that operating system. For example, to get an installer for Lion, you may ask a friend who has Lion-operated Mac or, once again, set up a virtual machine running Lion. Then you will need to prepare an external drive to download the installation file using OS X Utilities.

After you’ve completed the download, the installer should launch automatically, but you can click Cancel and copy the file you need. Below is the detailed instruction how to do it.
STEP 3. Install older OS X onto an external drive
The following method allows you to download Mac OS X Lion, Mountain Lion, and Mavericks.
Start your Mac holding down Command + R.
Prepare a clean external drive (at least 10 GB of storage).
Within OS X Utilities, choose Reinstall OS X.
Select external drive as a source.
Enter your Apple ID.
Now the OS should start downloading automatically onto the external drive. After the download is complete, your Mac will prompt you to do a restart, but at this point, you should completely shut it down. Now that the installation file is “captured” onto your external drive, you can reinstall the OS, this time running the file on your Mac.
Boot your Mac from your standard drive.
Connect the external drive.
Go to external drive > OS X Install Data.
Locate InstallESD.dmg disk image file — this is the file you need to reinstall Lion OS X. The same steps are valid for Mountain Lion and Mavericks.
How to downgrade a Mac running later macOS versions

If your Mac runs macOS Sierra 10.12 or macOS High Sierra 10.13, it is possible to revert it to the previous system if you are not satisfied with the experience. You can do it either with Time Machine or by creating a bootable USB or external drive.
Instruction to downgrade from macOS Sierra
Instruction to downgrade from macOS High Sierra
Instruction to downgrade from macOS Mojave
Instruction to downgrade from macOS Catalina
Before you do it, the best advice is to back your Mac up so your most important files stay intact. In addition to that, it makes sense to clean up your Mac from old system junk files and application leftovers. The easiest way to do it is to run CleanMyMac X on your machine (download it for free here).
Visit your local Apple Store to download older OS X version
If none of the options to get older OS X worked, pay a visit to nearest local Apple Store. They should have image installations going back to OS Leopard and earlier. You can also ask their assistance to create a bootable USB drive with the installation file. So here you are. We hope this article has helped you to download an old version of Mac OS X. Below are a few more links you may find interesting.
These might also interest you:
OS X Server 5.1.7
Designed for OS X and iOS devices, OS X Server makes it easy to share files, schedule meetings, synchronize contacts, develop software, host your own website, publish wikis, configure Mac, iPhone, and iPad devices, remotely access your network, and more.
OS X Server is an application you can add to OS X right from the Mac App Store. Anyone can quickly and easily turn a Mac into a server that’s perfect for home offices, businesses, schools, developers, and hobbyists alike.
Here’s what you’ll get with OS X Server:
File Sharing
File sharing for Mac, PC, iPhone and iPad
Standards-based SMB, AFP, and WebDAV file services
Flexible file permissions
Spotlight searching
Profile Manager
Mobile device management for Mac and iOS devices
Simplified management and deployment of iOS and OS X.
Distribution of institution licensed apps and books purchased from the Volume Purchase Program to users or devices
Install Software Updates on devices running iOS 9 and OS X El Capitan
Device Enrollment Program integration
Web-based administration console
Self-service user portal for clearing passcodes, remote lock, and remote wipe
Caching Server
Speed up the download of software distributed by Apple
Locally cache apps, books, iTunes U, software updates, and OS X Recovery images
Accelerate the download of iCloud data, including documents in iCloud Drive and photos.
Fault-tolerant design with multiserver cache replication and load balancing
No client configuration required
Xcode Server

Use Xcode to create continuous integration bots that build, analyze, and test on any Mac running OS X Server
Configure bots to integrate at a specific time, or continually as code is committed to the repository
Automate testing of OS X and iOS apps, executing on multiple connected iOS devices
Host your own Git repositories on OS X Server or connect to remote Git or Subversion hosts
Remotely access detailed integration summaries and nightly builds using the Web interface
Time Machine
Provide a backup destination for Mac computers on your network
Monitor which computers have backed up, when they last backed up, and size of backup
Set limits on the amount of Time Machine storage a user can use
Calendar Server
Share calendars, schedule meetings and events, and book conference rooms
Standards-based CalDAV server for access from Mac, iPad, iPhone, and PC
View availability with free/busy lookups
Email invitations and push notifications
Contacts Server
Mac Os X Lion Server Download
Synchronize contacts with Mac, iPad, and iPhone
Allow multiple users to access and update contacts
Standards-based CardDAV server
Wiki Server
Point-and-click page edit to change formatting and insert images, movies, and attachments
Access controls
Tags and comments
Revision history
Document sharing
Quick Look previews
Apple Mac Os X Download
Mail Server
Standards-based SMTP, IMAP, and POP server
Push notifications
SSL encryption
Adaptive junk mail filtering
Virus detection and quarantine
Virtual Private Network
Remote access for your network services
Encrypted VPN connections for Mac, iPad, iPhone, and PC
Xsan 4
Block-level SAN file sharing with concurrent read/write access
Xsan volume hosting and configuration
Volume management, storage pooling, stripping, and volume mapping
Real-time monitoring, graphs, and event notifications
Metadata controller failover and file system journaling
Server App
Local and remote management
Users and group settings
View real-time graphs of server usage
Receive alerts on network changes, certificate expiration, storage usage, and more
Version 5.1.7:
Fixed an issue affecting Server installations configured with a third-party SSL certificate that prevented MDM enrollment using DEP
SCREENSHOTS
Download Mac Os X Free
Title: OS X Server 5.1.7
Developer: Apple Inc.
Compatibility: OS X 10.11.4 or later
Language: English, Dutch, French, German, Italian, Japanese, Korean, Simplified Chinese, Spanish, Traditional Chinese
Includes: Pre-K'ed
Size: 158.36 MB
View in Mac App Store
Mac Os X Installer Download
NitroFlare:
1 note
·
View note
Text
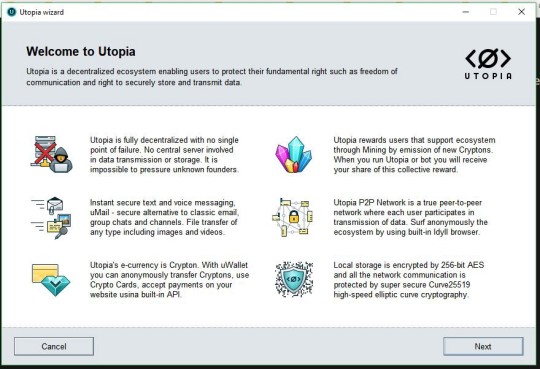
Utopia A New Decentralized Ecosystem And Blockchain
Utopia — Revolutionary Decentralized P2P Ecosystem

Would it fascinate you if you would stumble upon a decentralized peer-to-peer ecosystem that consists of instant secure messenger, mail system, mineable cryptocurrency, file storage and a built-in browser ?
If any of the above mentioned aspects and the video you just watched got your attention, you are in for a great treat today. Keep on reading because you will be impressed with what I am going to share.
Email with Digital Utopian Claims
It started with an ordinary outreach email , where the media firm was asking for advertisement of their ‘Program’ , but when I read through the email and the claims it made I was certain that either its another scam or something really big (i was bit inclined towards the scam thing) , quoting text from email
We spent more than five years secretly working on its development. At the moment, it is at a beta stage and we are ready to introduce it to the community. With your help, we would like to invite as many beta testers and specialists in this sphere as possible to take part in the testing of our product. You can also help us to inform the community about the launch of our beta testing and to tell people about our unique solution.
30MilesNorth PR Firm further outsourced their campaign to another marketing firm while ‘CryptoHill.io’ didn’t even bother to get back to me when I replied to the email. Not a good start.
Update: CryptoHill contacted and outsourced 30MileNorth and not the other way.

Little I knew that my opinions would change when would visit their beta portal and as I started digging , I found the concept intriguing with potential and an actual ‘working’ beta product for us to take out for a ride.
Utopia — Anti 1984 Ecosystem
Utopia is a decentralized peer-to-peer network, With Utopia you can send instant text and voice messages, transfer files, create group chats and channels, send emails and conduct a private discussion. Currently Utopia is an application for Windows, iOS and Linux which offers all the features within one application. Utopia users get on their ‘Utopia ecosystem‘ as the application also provides a built-in Idyll browser to view websites within Utopia peer-to-peer network . Utopia comes with a Cryptocurrency which is called ‘Crypton‘ and is Proof-of-Stake. uWallet allows you to store,transfer your Crypton(CRP) or even create vouchers and credit cards, Utopia Network includes Utopia Name System (UNS) which is a decentralized registry of names that are impossible to expropriate, freeze or corrupt by 3rd-party as no one has control over the system rather its self-governed by rules set in place which are applicable to everyone. After you join Utopia you may wanna drop by our Hackology channel, which you can search in the Channel Manager
JOIN UTOPIA
Register yourself as a Beta Tester, Contributor or a Promoter. Each category gets to enjoy the ecosystem while the rewards vary (reward system will be explained shortly).
Utopia ecosystem is a culmination of multi-year effort by a group of technology enthusiasts dedicated to freedom of self-expression and privacy. We call ourselves a 1984 Group. Among us there are top-notch professionals in almost every IT field, such as cryptographic, software, networking engineers and many more. This has been a long and challenging journey. After all this had never been done before! Finally, we present an ecosystem that will change the way World communicates and handles financial transactions.
Utopia brief taken from their official website. Mentioning ‘financial transactions’ makes one wonder that Bitcoin was also disrupting the conventional financial system
Utopia Encryption
Each user participates in transmission of network data but only the recipient can decrypt the data. Advanced encryption ensures interception-proof communication channel to all Utopia users. All communication is secure and protected by Curve25519 high-speed elliptic curve cryptographywhile local storage is encrypted by 256-bit AES. Big Brother is no longer watching you!
Installing Utopia
Once you register on the Beta Portal you have to download Utopia Application. After installing the application you will be given a Hardware ID and a Private Key, these keys are required to activate your beta license which can be done from the Activation Page. Please keep in mind that your beta portal website login credentials are not linked with Utopia Application and you can have a different username for the app and the website. Once you activate the license your utopia account will be tied with your beta portal account. A step by step procedure for easy understanding of the activation procedure:
Register at Utopia Beta Portal
Download Utopia software
Install the program by following simple instructions on installation wizard
Run Utopia and Create your account. You will be provided with Public Key and Hardware ID. Those are needed to activate your Utopia software
Login to your account
Click on JOIN BETA
Agree to the Rules and click SUBMIT
Click on NEW ACTIVATION and Enter Public Key and Hardware ID
Click ADD
Now your Utopia is activated and you are ready to test it
Utopia Dashboard
Utopia is a feature-rich platform that is specifically designed to protect privacy of communication, confidentiality and security of personal data. It was created for privacy-conscious public who believe that privacy is paramount. Utopia is a decentralized network, with no central server involved in data transmission or storage. The network is supported by people who use it’s many high quality features.
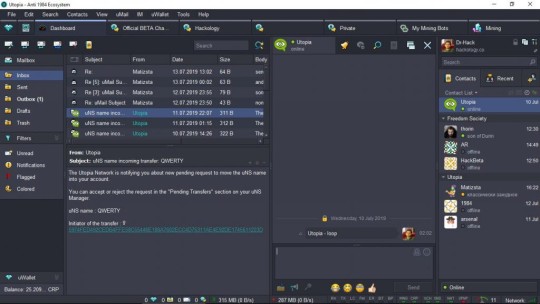
The first glimpse we get of the application is at the Dashboard which has navigational menu for easy access to all of its many features for us to explore, use and report bugs while it is in beta testing phase.
uMail (Utopia Mail)
uMail is a secure alternative to classic e-mail. uMail can be sent to Utopia users that are in your contact list for now. uMail has all functionality of email localized to Utopia ecosystem. No servers are used for mail transmission or storage. uMail account, that is created by default when you join the Utopia network, enables unlimited messaging and attachment storage. Utopia ecosystem encryption guarantees the security of mail transmission and storage. Your uMail, as an internal part of Utopia, cannot be blocked or seized.

All those who value their data privacy would find this useful including activists and journalists knowing that their data is going straight to the designated user and no 3rd party can intercept their data. Currently the limit set for the attachments is 100 MB but as per the team it may be increased in future.
uWallet (Utopia Wallet)
All financial functionality can be found in Utopia built-in uWallet. uWallet allows you to make and accept payments denominated in Utopia cryptocurrency ‘Crypton‘, accept payments at your website, pay by Crypto Cards without revealing your Identity or bill fellow Utopia users for your services. With uWallet you can store value in Cryptons, receive mining rewards, use uVouchers, request payments and accept payments using the built-in API.

All of this while you remain anonymous. All payments are instant and cannot be reversed. Decentralized nature of Utopia ensures that your balance cannot be expropriated.
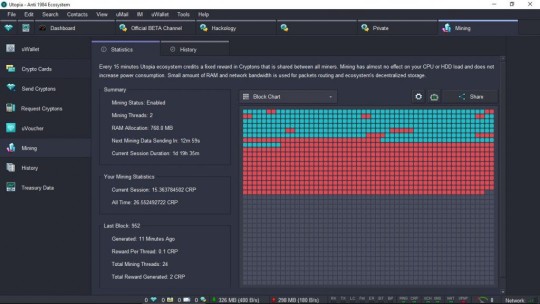
Utopia Mining — Crypton
Utopia has an inbuilt cryptocurrency called Crypton (CRP), which is proof-of-stake therefore a modest machine can also be used to mine cryptons through the GUI based Utopia application or with terminal based Mining bot which comes with the application.

Utopia rewards users that support the ecosystem through Mining by emission of new Cryptons. When you run your Utopia software or bot you will receive your share of collective reward. Mining does not slow your computer down and is environmentally friendly. You may also run a number of bots at several servers or computers to multiply the Crypton mining speed.
uNS (Utopia Naming System)
Utopia has introduced uNS (Utopia Naming System) which is a unique naming system and independent from the conventional Domain Naming System. DNS is subject to pressure and censorship from less than prefect international laws. Domains can be revoked or suspended due to multiple reasons, such as non-response to WhoIS inquiry or other register policies, non-payment, government actions and so on.
uNS, in contrast, is a truly decentralized non-censored registry hosted by Utopia Network participants with no expiration dates, renewal fees, suspensions and revocations. There is only one rule: First come, First served.
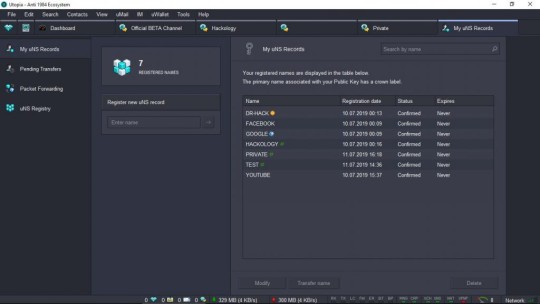
uNS registered name should be unique. You may register as many uNS registered names as you want while registration is not free and costs are paid in crypton:
Single letter uNS costs 1000 CRP
Two letter uNS costs 500 CRP
Three letter uNS costs 5 CRP
Four letter or more costs 0.1 CRP
Miscellaneous Features
Making Groups, Adding users, Chatting and Emailing, Sending Mails and Mining Cryptons might be the highlights but Utopia claims to be an ecosystem therefore they had to incorporate many more features so that users of Utopia ecosystem do not feel the need to go out of the system. List of other useful features within the Utopia Application are listed
Packet Forwarding : uNS Manager lists option of ‘Packet Forwarding’ which is an internal system allowing any utopian user to host a website which can be accessed by the Idyll browser, the naming system of the website is explained above, if you register hackology uNS you can make a website and it will open when you visit http://hackology/ and that is it. This option allows to tunnel any kind of data between users in ecosystem, making possible to host different types of resources including websites inside Utopia Network. At the time of writing few fellow Utopia users made Utopia sites which can be accessed at utopia://trade/ and at utopia://crystalforest etc. If you have ported your site to Utopia let me know so I may add it here aswell. I am ported some of my sites to Utopia aswell, utopia://blog.drhack.net , utopia://paste.drhack.net, utopia://drhack.net can all be accessed in Idyl Browser inside utopia.

File Manager : All files which are sent or received in Utopia can be accessed from the builtin file manager which also includes an image viewer. As of now the file transfers are limited to 100MB.
Voice Notes : Utopia also supports sending and receiving of Voice messages which you can send to those who are added with you.
Dark Theme : The program comes in standard theme but how can they miss out a Dark Theme for the privacy savvy ? Users can opt for dark theme by going to Tools > Settings > Interface and selecting the ‘Dark Space‘ theme
Utopia API : Utopia comes with a comprehensive API for users to incorporate in their own projects. For instance, using API you can accept payments denominated in Crypton at your website, automatically manage your channels, send instant messages and much more. To get started once you enable the API you can also access the API documentation.
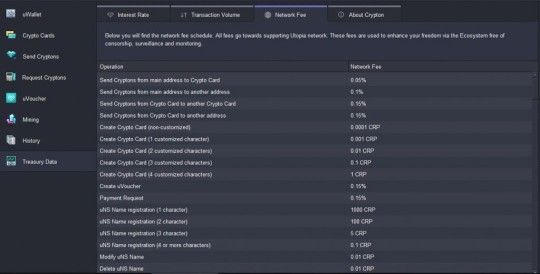
Network Fee Structure : Utopia provides us with an option to view all the network enforced fee and they are updated live on the network as the fee structure changes, thus one can stay updated with the current fee structure. You can access the Network Fee from uWallet > Treasury Data > Network Fee
Game : Utopia also supports in-app games which can be played in multiplayer, as of writing there is a working Chess game.
File Storage / Hosting : A team user nickname 1984 in Utopia Chat Lobby mentioned that as of now there is no File storage. But In future Utopia will have some kind of music and video streaming online services, decentralized file, image and blog hosting. The reserved amount of RAM for mining ‘ll be used as cache for the whole network. For example 1,300,000 online users with current RAM allocation will provide about 1 Petabyte of raw storage for caching purposes.
Utopia Reward System
Utopia is providing a very lucrative reward system, where Beta Testers, Contributors & Promoters all can join the beta portal and help test and find bugs which in return gets you ‘pts‘ where 1 pt equals to 1 USD which are paid in BTC.
We truly believe that your participation has to be exciting and mutually beneficial. Utopia Beta Program rewards your enthusiasm, commitment and dedication. No matter what is your skill set you will find an opportunity to contribute to Utopia P2P Project development.
At the time of writing I have already cashed out $560 and transferred them to my own bitcoin wallet. I can vouch that if you have the eye to spot bugs it is a good place to help them and in return get paid. Uptil now Utopia team has paid out $7683 to beta testers which is a decent figure keeping in view that they launched 35 days back and still 2 months of beta testing period is left.

If you are not a bug finding sort you can still help and give them suggestions and ideas on how to improve their application or go ahead and share this on social media pages and get paid for being a ‘promoter’. Withdrawals are done manually and as per the rule it can take up-to 48 hours, but I have noticed that within an hour or so they release the funds.
Do Earn but DONT SPAM they have mentioned categorically that have zero spam tolerance
Trust Utopia or NOT

Utopia might be very good project but it does give birth to some questions.
Anonymous Creators : Here is an example, Utopia was created by a group of LEA’s to cater for a particular drug mafia and they made an app for it and will let it float and gain credibility and as we don’t know who made the App we have no idea to know what the ‘real’ intent was.
Closed Source : Lets not disclose the owners but why would the App source be closed ? Ok Fine it is not infected with malware but how can the community trust a closed source eco-system ? How can we take their word for it ?
Forced Alteration : Another scenario is that we don’t know but somehow the founders of the application are exposed at some level and are being forced to enter backdoor into the software what indications will we have that it is still pure ?
Long Way to Go : Utopia will be out of Beta by October 2019 , there are alot of things which the team is actively addressing and improving. Many of the queries will also be answered by then aswell and having an alternative in this era is a great thing. An alternative which is not monitored and controlled and promises to give us the privacy of our data which we deserve and is our right.
Peers Control : In later stages the peer count might increase to give stability to the system but blocking network peers by an ISP could result in disrupting the ecosystem, as of now we have 8–14 peers to which our Utopia network connects and the transmission although encrypted goes to these IP addresses which are in clear plain-text. As the network is closed source, only those peers can be add to the network which are selected by Utopia Team thus the process would require constant involvement of the team to keep the network running and stabilized. What Software is run on the Peers ? No one knows answer to that until one day someone exploits a system running the network-peer-control-system.

Utopia Team Responds

I asked the queries from Utopia to get their feedback, I raised the same questions which I have stated above, carry on to read their response
Anonymous Creators : I have to say that given the scope and nature of the project, disclosing the identity of creators is not really an option. Think about it, Utopia ecosystem is literally a game changer in secure communication. There is no need to worry about censorship, surveillance, deanonymization and so on. The software is destined to make an impact and that impact comes with unpredictable consequences. We simply do not want our team to be subjected to any kind of pressure.
Closed Source : We may disclose certain parts of code, specifically related to communication and encryption. However, decentralized protocol will not be released. Utopia is a very knowledge intensive software. A lot of time, effort and resources went into this product and we do not want to share all of our know-how as it will result in forks which in turn may result in instability of our main network. Fork will lead to division of the community, while our intention is unification of community of like-minded individuals. The bottom line here is that a lot of software is closed source and this does not hurt them a bit.
Forced Alteration : In addition to the Anonymous Creators point, we can implement a warrant canary and place it right into About section of software.
Community Trust Options : On Anonymous Founders and Source Code, we will try to think about other ideas that will assure community to trust Utopia.
Peer Control : Peers are people who use Utopia and mining bots. Obviously they are the key to network stability and performance as they provide connectivity i.e. they participate in data transmission in encrypted mode. The reason why we implemented such an unusual mining model, is that we want to motivate and reward users to stay
online/keep bots online hence provide a lot of routing options. If a peer is disconnected, Utopia client will automatically connect to another peer and so on.
Crypton on External Crypto Exchanges : The decision to list Crypton is the discretion of the exchanges. However, we plan to implement our own built-in exchange.
Why Crypton : Crypton is meant to serve as means of payment within Utopia. It is fast and convenient to use. The fees collected will go towards maintaining the network and is a way to control total amount of Cryptons in circulation. Mining, by definition, is emission. Fees, on the other hand, is a way to compensate for this emission by extracting the Cryptons from circulation.
Conclusion

I am impressed by Utopia ecosystem and we should let such systems mature so that they can reach their true potential because I truly believe we need a system were our privacy and our data can stay truly ours, a system where my messages are delivered and read by the recipient I intend sending too, a system where my identity stays private as long as I want it. As of now internet is changing into a place where our identity and our privacy is sold to make other companies profit, profits are done by selling us off. Many say that they do not mind if their data is sold off — It is a matter of time those will also realize the hard way that how much it costs when you are being sold off. Join Utopia, Become a Tester and be part of something unique.
1 note
·
View note
Text
Showbox APK 2019 Download v5.26 For Android, PC, FireStick & Mac

Showbox APK is an entertainment app APK, loaded with all the latest Movies, TV shows which you can stream or you can also watch it LIVE. Showbox APK allows you to stream all content in HD as well as in SD quality and is unquestionably free to watch. The app is currently available for Android, Windows and also on iOS. However, you won’t get the Showbox app APK on any app store neither on Google’s Play Store nor in AppStore, you have to Side-Load it, and we’ll persuade you just how you can get this remarkable app stuffed with all the latest boredom killer content on your smartphone.
Now, there are many sources where you can get this app, but some of them may contain malicious spyware baked within it, so here is the safest resource, from where you should count downloading the Showbox APK file. It has been examined thoroughly, and you get the legit APK file just like the Tutuapp, Emus4U, GBWhatsapp, and AppValley. There are also some methods for Showbox online, but we will talk about them later.
Contents [hide]
Showbox APK Download For Android
Showbox Download For iOS (iPhone, iPad, and iPod Touch)
Showbox App Features
How to download and install Showbox APK on PC
How to stream Showbox to Chromecast
How to Install and Use Showbox on FireStick TV
Watch Showbox in Chrome on your MAC computer using ARCwelder
How to get Showbox on your MAC computer using Genymotion
How to Use/Stream Showbox app on a Tv connected with Xbox One
Showbox APK Download For Android
According to some websites, Showbox 5.26 APK is also available for Android, but the officials say that the latest version is 5.24. You can read the whole report about it here on Showbox 5.26 APK version is available.
So go ahead visit this link => Showbox 5.24 APK download.
Else, you can download the latest Showbox APK file for Android uploaded by us from the above link.
Showbox APK
Installing the Showbox app APK on your Android device is not that tricky. It is the most straightforward process, and you can install Showbox on your Android phone within a few clicks. The official application of the Showbox is available for every Android OS device. It supports Android 4.2 and later releases. Follow the steps given below to install Showbox APK easily.
Step 1 – Download the latest version of Showbox APK file from the link given above.
Note: Before installing the APK file on your Android phone, make sure that “Unknown Sources” is enabled on your Security settings.
Step 2 – Find the downloaded APK file in your File Explorer app or else you would get an automatic option to install the app.
Step 3 – Click on the Install option shown on the screen.
Click on the Install option shown on the screen
Step 4 – Now, the installation process will start automatically.
installation process will start automatically
Step 5 – Now you will find the Showbox APK installed on your Android Phone.
Step 6 – Open the app and enjoy thousands of movies and TV Shows.
enjoy thousands of movies and TV Shows
Showbox Download For iOS (iPhone, iPad, and iPod Touch)
We know many websites are providing fake Showbox iOS apps and claiming that it can be installed on your iPhone, iPad, and iPod Touch. Please, don’t download them as there is no official Showbox app for iOS is currently available. However, you can install the Moviebox app on iOS via following the linked tutorial.
Showbox App Features
► Watch Movies and TV shows in HD
Showbox App HD Content settings
Image: TheLeaker.com
Showbox app features all TV shows and latest Movies in HD, that’s either in FULL-HD while some may be limited to HD only; that’s 720p. Apart from that, SD(480p) resolutions are also available, if you have a slow internet connection like I do or if your device doesn’t support higher resolution. So, there’s quality available to facilitate every type of internet speeds and devices.
► Showbox App Built-in Video Downloader
Showbox built in Downloader
Image shows the Showbox’s built-in Downloader
This is one of Showbox’s greatest strengths as it provides total granular controls over all your downloads. From downloading in a variety of resolutions suitable for your needs. You can download Movies and TV Shows in either 360p, 480p and as well as in 720p and also in 1080p quality if available.
► Various Servers to Watch Content from
Apart from this, you have different high-speed servers to select from, if one doesn’t work or is overloaded with a plethora of traffic. Then there’s also another comfortable option that’s Downloading via Torrents, and the Torrent downloading menu is super helpful, with all the essential insights displayed to you such as the size of Torrents of different resolutions.
► Showbox Download Insights
Showbox Download options
Image shows various resolution of a movie, available in Showbox app
And on top of that ShowBoxapp also serves the seeds available for that particular torrent. Which gives you an idea on when to download and which one of them you should download.
► Dedicated News Section
Showbox also offers the latest trending News section, where you can keep up with the most recent happening in the world of Hollywood. And it doesn’t take you to a browser to view that news content, as it can display the news on the app itself. Stays away from the hassle of switching between the app and web-browser back and forth.
How to download and install Showbox APK on PC
Showbox isn’t just available for Android smartphones; you can also access it on Windows but via an Android Emulator. So, in this section, we’ll talk about how to install the suitable Android Emulator on your Windows PC, be it on any version of Windows and run Showbox on it.
Install the popular Android Emulator BlueStacks to get started:
Showbox for PC
Image shows Showbox app running on Microsoft Windows 8
Download the latest BlueStacks setup file for Windows
Firstly you need to download the BlueStacks software.exe file, which is freeware for your computer.
(What the BlueStacks application does is, emulates the Android OS right on your computer’s Windows OS. Providing you with all the things that you do on your Android smartphone.)
After you have downloaded the BlueStacks Android Emulator, just hit the Setup.exe, click next and select your installation folder & Install it.
Once, you’re done with the installation; you have to Complete the Signup/Sing-In process using your current Google Account, in the same way, you might do it on your Android phone.
When you are done installing the emulator, now all you have to do is Download the Showbox APK from the links we have mentioned above on your PC. Next, right click on the Showbox. APK file and Select the Open with BlueStacks APK Installer. This will install the app with BlueStacks, and you’re ready to Stream whatever you want directly on your PC with the Showbox app. With this, you can easily install Showbox for PC.
How to stream Showbox to Chromecast
Now to stream all your Showbox’s content on your big TV, you need Google Chromecast as well as a FREE app from the Google Play Store called Local Cast to get this to work.
Firstly, Download the LocalCast app from the Play Store by visiting this link here.
Install the LocalCast app, and you are ready to proceed
Next, Open the Showbox app and select anything you want to watch on your TV. Also, you need to hook-up the Chromecast by this time
Select the quality you wish to watch-in and within that same area at the left side tap on those three dots as shown in the reference image belowShowbox app Android
The options menu should pop, now in that you have to Tap on the option above where it says => ” You can use your favorite player, as shown in the image “Showbox Android App
You’ll see three or four options depending on the player you have installed, but we are interested in the Other Player option, Select it
Once, it is done now Play the video by, tapping on WATCH NOW
Showbox on ChromeCast
Image shows a default app(LocalCast) selection to stream to Chromecast from Showbox app on an Android phone
You will be asked to Open it with.., in that Select LocalCast as seen in the image below
Now Select your Chromecast player to stream from the App.
How to Install and Use Showbox on FireStick TV
If you happen to have an Amazon Fire Stock Tv instead of Chromecast, then follow these steps given below so that you download and enjoy all the Showbox content in your living room.
First, you need to Download the Showbox app on your Amazon Fire Stick Tv, to do so, just start performing the given instructions
Image shows the Settings panel on the Amazon Fire Stick TV
Step 1: Open the Settings Section on your Fire Tv, then into > System > Developer Options > Now enable ADB Debugging
Step 2: You also need to enable the Apps from Unknown resources option which is found just below the ADB debugging
Showbox on FireStick
Image shows the Downloader App from the Amazon FireStick TV app store
Step 3: Next, you need to install an app, called Downloader, so search it in the search box and install the app
Step 4: Now, open launch the app and enter this URL –> (https://goo.gl/ChG15F) and Hit the Download button
Step 5: Once, the Downloader downloads the file, install it, and you’re ready to use Showbox on your Amazon Fire Stick Tv.
Watch Showbox in Chrome on your MAC computer using ARCwelder
This is one of the easiest methods to get the Showbox app on your Apple MAC. All you need is the Google Chrome browser installed on your MAC OS and a small plugin known as ARC welder and the Showbox APK file, yes an APK file.
Step 1: Download and install Google Chrome on your MAC
Step 2: Go to the app store on your Google Chrome and search for ARC welder app
Step 3: Once found, install the plugin on your Google Chrome (ARC welder size around 4MB), along with the plugin also start downloading the Showbox APK file
Step 4: Now, open the ARC welder app from your Chrome browser and Select the Choose option, present at the bottom.
Step 5: This is needed to store the apps data, so choose any location on your MAC computer you want and click on save, once selected
ARC Welder
Image of the ARC welder app running on Google Chrome
Step 6: Now comes the main part, the ARC welder app will show you a screen which says Test Your APK and below that an Add icon is present to add your APK
Step 7: Click on the Add you APK and navigate to the yourDownloaded Showbox APK file on your MAC and Select it.
Showbox on Mac
Image shows ARC welder on Chrome testing the Showbox app
Step 8: It will now show you a screen to test the app, do not touch any of the settings as of now, just hit on test app, and you’re good to go, this will now magically open the Showbox APK app on your MAC OS.
How to get Showbox on your MAC computer using Genymotion
Genymotion is an Android Emulator farm for your Mac; it can simulate over 1000+ emulators on your machine. So, with the help of Genymotion, you can use Android Apps on your MAC OS.
Showbox on MacBook
Image shows Showbox running on MAC using Genymotion emulator
Step 1: Download Genymotion on your MAC OS, by visiting here and creating an account
Step 2: Once, you have Genymotion on your system, now you need to download Virtual Box and install it as well. Virtual Box is required for the smooth function of Genymotion on your MAC OS
Step 3: Next launch the Genymotion app, log in to your Genymotion Account
Step 4: Now click on the Add button within the app
Step 5: Next, you have to Select a Virtual device, anything above 720P or a one with 1080p resolution and it should have Android 4.4.4 or above only, as the app supports devices with only Android version 4.2 and up
Step 6: Once, this is set up click on Start to initialize the virtual Android device
Step 7: Now should see your Android device’s home screen in a pop-up window that means you’re ready to use Showbox
Image shows a Showbox apk being dragged into an Android virtual device from Genymotion app
Step 8: Only thing that is remaining is you need to download the Showbox app on your MAC OS and just Drag and Drop it within the Android virtual device’s pop-window.
How to Use/Stream Showbox app on a Tv connected with Xbox One
To get this work, it is required that your Xbox and your smartphone/tablet/iOS or Android device should be connected to the same Wi-Fi network before you start the procedure given below.
Also, do change your Xbox’s name to something unique and easily identifiable furthermore, also Download the ALL Connect App as we’ll be using it to cast the content from Showbox to your Xbox. Lastly, it is assumed that you already have downloaded and installed Showbox app on your smartphone.
Step 1: Connect your smartphone and Xbox to the same WiFi network and Open the All Connect App
Step 2: Once, the All Connect App opens up check if you can see the Xbox, on-Air that means you’re ready to proceed
Step 3: Now Open the Showbox app and select anything you want to watch
Step 4: Select the quality you want to watch-in and within that same area at the left side tap on those three dots as shown in the reference image below
Showbox on Xbox One
Step 5: The options menu should now be visible, now within that, you have to Tap on the option above where it says => ” You can use your favorite player, as shown in the image “
Step 6: Select the Other Player from options and close the menu
Step 7: Next, tap on Watch Now option which will result in a Menu to pop-up and in which you’ll find the All Connect App listed
Step 8: Select it, but Tap on Just Once, and not on Always as this might change your video player by default to All Connect which you don’t want to happen
Step 9: After that, All Connect will open up and as we talked about in Step 2, about your Xbox being Shown in All Connect if you see it Tap on it and the video will start playing.
This will start playing/Streaming all your Showbox Content on your Tv which is connected to the Xbox, and that’s it you’re done.
Note: If you noticed that the video is playing on your Xbox connected Tv, but you can’t hear the sound, reconnect and the sound should be playing again. It is a common problem that the sound doesn’t play on the first attempt, so please do perform the method again, to listen to the audio.
This is what Showbox app offers a complete All-in-one entertainment package for absolutely Free of charge unless it gets taken down.
1 note
·
View note
Text
Visual Studio Laravel

Visual Studio Laravel
Search results for 'laravel', Visual Studio Code on marketplace.visualstudio.com. Out of the blue, Microsoft jumps into the editor wars with an incredible offering that gives Sublime Text an overwhelming run for its money. In fact, it just might surpass it! So come along, as I demonstrate the ins, the outs, the tips, the techniques. Say hello to your new best friend: Visual Studio Code. Laravel Intellisense is a Visual Studio Code plugin by Mohamed Benhida that provides some nice auto-completion for things like Eloquent models, factories, config, and API resources. The extension works only on Laravel projects and a project is considered a Laravel project only if there is an artisan file in the root directory. Gaurav Makhecha; Credits. PHP Parser by Glayzzle. Currently, you're free to use this extension. I would highly appreciate you buying the world a.

Visual Studio Laravel
Travel through your Laravel app by just clicking on links.
Features
Open Latest Log File
Open latest log file from anywhere. Select the Command Laravel Traveller: Open Latest Log File or press Ctrl+o Ctrl+l (Cmd+o Cmd+l for Mac). You can change the default keyboard shortcut as well.
Technical Notes
The following glob pattern is used to search log files: 'storage/logs/laravel*.log'
Route -> Controller
Link to controller + action from the routes files:
Link to controller + action as per route group namespace:
You can add a simple comment // Route::namespace = NAMESPACE to apply group namespace on file. For example, the routes/api.php in the Laravel app has Api namespace applied by default.
Technical Notes
The controller links are added only in the files that are inside /routes directory or sub-directories and end with .php
php-parser by glayzzle is being used to get the AST of the file and add links based on that.
We consider only the static calls to Route::(get/post/put/patch/delete) and add links to the second parameter of those calls.
We suggest you to write route groups like: Route::namespace('Admin')->group(function() (..)) (as per Laravel documentation) instead of Route::group(('namespace' => 'Admin'), function() (..)) (namespace not supported by extension this way).
Automatic Controller Creation
If the controller does not exist, you'll be asked whether the extension should create it for you automatically. Action method will also be added to the controller. If you want to customize the stub that is used to create the controller, Add stubs/controller.plain.stub to your project's root directory. Please check the Stub Customization section of the Laravel documentation for instructions.
Technical Notes
For automatic controller creation, the default namespace is set to AppHttpControllers.
Automatic Method Creation
If the method does not exist, you'll be asked whether the extension should create it for you automatically. If you want to customize the stub that is used to create the method, Add stubs/method.stub to your project's root directory. (( methodName )) placeholder will be replaced with the actual method name.
Technical Notes
php-parser by glayzzle is being used to get the AST of the controller file and add the method to the end of the file. Basic expectations are that there will be a namespace at the top, a class, and at least 1 method in the controller file.
Controller -> View
Link to blade views from the controllers:
Technical Notes
The view links are added only in the files that are inside /app/Http/Controllers directory or sub-directories and end with .php
It uses this regex to find lines with view helper: ^s*return view((')(https://github.com/freshbitsweb/laravel-traveller/blob/master/.*?)(').*).*$
Currently, it links to the blade files in resources/views directory.
Mailable -> View
Link to blade views from the Mail classes:
Technical Notes
The view or markdown links are added only in the files that are inside /app/Mail directory or sub-directories and end with .php
It uses this regex to find lines with view or markdown method call: ^.*->(?:view|markdown)((')(https://github.com/freshbitsweb/laravel-traveller/blob/master/.*?)(').*).*$
Currently, it links to the blade files in resources/views directory.
View -> View
Link to blade views from the blade view:
Technical Notes
The view or markdown links are added only in the files that are inside /resources/views directory or sub-directories and end with .blade.php
It uses this regex to find lines with view or markdown method call: ^.*@(?:extends|include)((')(https://github.com/freshbitsweb/laravel-traveller/blob/master/.*?)(').*).*$
Currently, it links to the blade files in resources/views directory.
Route -> View
Link to blade views from the Route files:
Technical Notes
The view links are added only in the files that are inside /routes directory or sub-directories and end with .php
php-parser by glayzzle is being used to get the AST of the file and add links based on that.
Currently, it links to the blade files in resources/views directory.
Model -> Model
Link to models from the related model files:
Technical Notes
The model links are added only in the files that are inside /app directory and end with .php. and links to models in app directory only.
It uses this regex to find lines with relationship calls: ^s*return $this->(?:hasOne|belongsTo|hasMany|belongsToMany|morphOne|morphMany)((')(https://github.com/freshbitsweb/laravel-traveller/blob/master/.*?)(').*$
Route -> Route
Link to other routes from route files:
Technical Notes
The route links are added only in the files that are inside /routes directory and end with .php.
The definitions needs to be in this format: Route::group((), base_path('(ROUTE_FILE_PATH)'));
Configuration
5 of the features: Route -> Controller, Controller -> View, Mailable -> View, View -> View, and Model -> Model are toggelable: You can disable them from VSCode settings if you do not need them.
Technical Notes
The extension works only on Laravel projects and a project is considered a Laravel project only if there is an artisan file in the root directory.
Authors
Credits
Treeware
Currently, you're free to use this extension. I would highly appreciate you buying the world a tree in return.
Evernote is chinese app store. It’s now common knowledge that one of the best tools to tackle the climate crisis and keep our temperatures from rising above 1.5C is to plant trees. If you contribute to our forest you’ll be creating employment for local families and restoring wildlife habitats.
WPS Office for Mac. WPS PDF to Word 40.3MB. WPS Office For Linux. WPS Data Recovery Master 5.5MB. WPS Office For Android. WPS Office For iOS. WPS PDF For Android. PDF Editor For Android. PDF Converter Pro For Android. WPS Fill & Sign. Wps english download. Download WPS A new generation of office solutions With PDF, Cloud, OCR, file repair, and other powerful tools, WPS Office is quickly becoming more and more people’s first choice in office software.
You can buy trees at for our forest here offset.earth/treeware
To use Astropad Studio you will need to make a user account. Creating a user account is easy, by entering your email and making a password. Your user license for Astropad Studio will be tied to this account. To enter Studio, log in to your user account through your iPad. Luna Display turns any Mac or iPad into a wireless second display for Mac. Makers of Astropad Studio and Luna Display. Turn your iPad into a drawing tablet with Astropad Studio. Extend your Mac display to any iPad or Mac with Luna Display. Astropad. Enjoy a 30-day free trial! Pick a payment plan to get started.
Notes on silencing. Read more about Treeware at treeware.earth
Special Thanks to
Laravel Community
VS Code Community
0 notes
Text
Corsair K95 Software

I have the K95 Platinum and was not being detected with iCue. I disconnected the keyboard and held the ESC while plugging back in and it was detected. Apparently this is a hard reset. I had went through the other typical fixes without success. I had uninstalled and reinstalled older and newer versions of the software. CORSAIR iCUE software enables vivid dynamic lighting control, sophisticated macro programming and full-system lighting synchronization across compatible CORSAIR peripherals, coolers, fans and more. The CORSAIR K95 RGB PLATINUM XT Mechanical Gaming Keyboard immerses your desktop in dynamic RGB lighting with per-key illumination. And, while the Corsair K95 RGB Platinum is an attractive keyboard with a ton of features – Corsair’s ‘iCUE’ software is still a pain to use. Design Corsair K95 RGB Platinum at Best Buy for. When looking at the Corsair K100 and K95 RGB Platinum XT, there is a clear winner. After testing both keyboards out, I can definitively say the K100 RGB is leaps and bounds better than its predecessor. How to: Connect the CORSAIR K83 Wireless Keyboard to an Android TV How to: Set Up Stream Deck integration for K95 RGB PLATINUM XT, K95 RGB PLATINUM, and K55 RGB Best practices for cleaning keyboards.
0 downloads·Added on: May 14, 2021·Manufacturer: Corsair
CORSAIR iCUE is an ambitious undertaking that, when complete, will provide you with more monitoring, lighting, and fan control capabilities than ever before. We’re excited to ask you to join us in these early access stages to help us create the best software possible.
To install this package please do the following:
- Make sure that all system requirements are met.
- Save the downloadable package on an accessible location (such as your desktop).
- Locate and double-click on the newly-downloaded file.
- Allow Windows to run the file (if necessary).
- Read EULA (End User License Agreement) and agree to proceed with the installation process.
- Follow the on-screen instructions.
- Close the wizard and perform a system reboot to allow changes to take effect.
About Keyboard Packages:
Install the proper keyboard software and your system will be able to recognize the device and use all available features. This will also make it possible for owners to configure additional hotkeys.
In case additional keyboard accessories are connected, this step can also improve the bundle's overall stability and compatibility, as well as performance.
Therefore, if you wish to install this release, simply make sure that your computer OS is supported, save the package, extract it if necessary, run the available setup, and follow the on-screen instructions for a complete installation.
Bear in mind that, even though other platforms might be compatible, we do not recommend applying this software version on configurations running under OSes other than the specified ones.
That being said, if you consider applying the present version, download and install the package. Also check with our website whenever you can, in order to stay up to speed with latest releases.
It is highly recommended to always use the most recent driver version available.
Try to set a system restore point before installing a device driver. This will help if you installed an incorrect or mismatched driver. Problems can arise when your hardware device is too old or not supported any longer.
COMPATIBLE WITH:
Windows 7
Windows 7 64 bit
Windows 8
Windows 8 64 bit
Windows 8.1
Windows 8.1 64 bit
Windows 10
Windows 10 64 bit
file size:
768.2 MB
CATEGORY:
Keyboard & Mouse
For
Dedicated macro and media controls.
Responsive, smooth keys.
Attractive aluminum build.
Easy yet customized utility.
16.8 million color options.
Military-grade aluminum frame.
32-Bit Arm Cortex Processor
8MB Profile Storage
Great RGB lighting.
Comfortable wrist rest.
Low actuation force.
Cherry MX Speed switches
Against
Quite expensive
No audio-pass through
Complicated software
Rubber palm rest gets grungy sometimes
Need to customize another OS before using Linux.
Limited switches options.
If you’re a fan of Corsair, you have never heard something bad about their masterpieces, including keyboards, and the K95 RGB Platinum is no exception. I know it’s no denying that it is pretty expensive, but it feels right at home, having a few more requested features.
Corsair Keyboard K95 Software
In The Box, you will get…
Corsair K95 PLATINUM Bundle Picture
Corsair K95 RGB PLATINUM keyboard
Extra textured keys (F,D,E,R,Q, 2x W, A, S, D)
Keycap remover
Detachable wrist rest
A couple of manuals
Price to Value Ratio
Corsair is not only responsible for bringing RGB keyboards into the mainstream. Its K95 Platinum can take your gaming experience to a new level; you will love its integrated light bar.
Now, consider the high $170.26 (£140.58, AU181.67) price tag that this elegance brings with; I know it’s a ton of money for a gaming keyboard. And, the sad part is – Corsair’s ‘iCUE’ software is still a pain to use.
Now, let’s talk about Corsair K95 RGB Platinum’s Design… starting from some basics!
Dimensions
Height – 1.3″ (3.4 cm)
Width – 18.3″ (46.5 cm)
Weight – 2.65 lbs (1.200 kg)
Depth – 6.6″ (16.8 cm)
Depth (with wrist rest) – 9.1″ (23.0 cm)
Yes, you’re right… This keyboard is big and follows a full-size design, so ensure you’ve enough space if used with its detachable wrist rest.
Are cable and connector detachable?
No, both cable and connector are non-detachable; the Corsair K95 RGB PLATINUM’s cable length is quite long – 7.2 ft (2.2 m) – with two USB plug ends, having two plugs means you can use the USB passthrough on the keyboard.
Other wireless compatibility;
Bluetooth – No
Bluetooth Multi-Device Pairing – No
Proprietary Receiver – unavailable
Battery – No Batteries
Corsair K95 RGB Platinum – Overall Look & Feel
To make your gaming life super-smooth and quick, the durable keycap, though it seem a bit cheap, is made out of ABS, following a better build quality, whereas the board is of a solid plastic base topped with a military-grade aluminum plate.

The reworking of Corsair’s predecessor, the K95 RGB Platinum keyboard, has a slight, comfortable layout with authentic Cherry MX Speed linear switches and six dedicated macro keys. Worry not; due to its low pre-travel distance, the switches feel quite responsive and quick!
Want to adjust the backlight brightness, switch between onboard profiles quickly or disable the Windows key? Let a trio of buttons let the magic work.
Meanwhile, its aluminum chassis is sturdy. The given reversible/detachable/magnetic wrist rest (a rougher texture on one side and a smooth micro-finish on the other) is also a good addition – great for both – on-desk and on-lap gaming.
Unfortunately, this wrist rest gets easily dusty, oily, crumby, oils, and all manner of detritus – so get ready for constant cleaning.
Talking about its ergonomics…

Board Design: Straight
Minimum Incline: 3°
Maximum Incline: 8°

Ergonomics are OK with an incline setting and open sideways so that it won’t meet the ground if you put too much pressure accidentally or un-accidentally.
Oh yes, how could this Corsair K95 RGB Platinum review be completed without mentioning my favorite thing – Backlighting – about the keyboard?
So…
Color: RGB
Backlit Keys: Yes
Effects: Yes
Color Mixing: OK
Programmable: Yes
Lighting, well, it has been upgraded with a new 19-zone light bar that runs along the top of the frame; you will love its eye-catchy if excessive touch and how the way colors wash across the Corsair’s logo.
You will all agree to the fact that the Corsair K95’s backlighting is quite amazing; each key is lit, even a strip of underglow as well. The good part is that you can control the brightness on the board.
Cables, Cables, Cables
Cable Length: 7.2 ft (2.2 m)
Detachable: No
Connector: Not Detachable
The Corsair K95 RGB PLATINUM’s cable is extended, ending with two USB plugs so that you can also use the USB passthrough on the keyboard.
Corsair has added an “X” arrangement of two cable channels, which can be molded underside; they’re not for routing the keyboard’s cable but keeping your headset wire out of the way.
Something more than just KEYING
Macro Programmable Keys: Yes
Dedicated Media Keys: Yes
USB Passthrough: Yes
Trackpad / Trackball: No
Windows Key Lock: Yes
Wheel: Yes
Numpad: Yes
Lock Indicator Caps, Scroll & Num lock: Yes
The Corsair K95 has a nice wheel to control volume with a dedicated Windows lock and media keys at the top right – so that your game doesn’t accidentally minimize instantly.
Let’s type with Corsair K95 RGB Platinum
Talking about its overall typing experience… It is excellent, thanks to its stable keys and the spacing between keys – this will help you avoid typos. The linear switches are quiet and easy to function.
On the other hand, the actuation point is quick to reach, so get ready for multiple mis-inputs.
The KEYSTROKES are;
Key Switches: Cherry MX Speed
Operating Force: 45 gf
Actuation Force: 42 gf
Feel: Linear
Pre and total Travel: 1.1 mm and 3.4 mm respectively
When it comes to speed, the K95 RGB Platinum keyboard follows in the footsteps of Corsair’s K70 RGB Rapidfire, featuring Cherry’s latest, highly responsive, linear MX Speed switches; press them lightly to actuate – just 1.2mm of movement and 45g of force will be required.
The keys will require less pressure and bottom-out faster, well suited for twitch shooters or those that require fast reflexes.
Software
Corsair K95 Software Driver
Software: iCUE
Profiles: 6+
Account Required: No
Cloud Sync: No
Onboard Memory: Yes
Macro Programming: Software and Onboard
The iCUE software is customizable, letting you have as many profiles, but you can only save only three on the onboard memory.
FAQ: Last, not least… How compatible is the Corsair K95 RGB Platinum?
Windows Full
Android No
macOS Partial
iOS No
iPadOS No
Linux Partial
Being fully compatible with Windows, some of its keys don’t work on macOS (the scroll lock, pause, print screen, and the G1-G6 macro buttons) and Linux (keys work, but the software, so you can’t customize your keyboard and the G1-G6 macro keys).
However, there’s an onboard memory, which can let you program them on macOS or Windows and use them on Linux.
Corsair K95 RGB Platinum Keyboard – Video Review
My Verdict
Even more than just standard and just six macro keys, the Corsair K95 RGB Platinum is the Rolls Royce of gaming keyboards – both in its styling and its price tag.
No other keyboard matches its classical, all-metal build quality, disco lighting, handy shortcut buttons; so if you can also stomach the price and being OK with its complex software, the Corsair K95 RGB Platinum is worth it. Dowload free games on mac.
If you’re also using Corsair K95 RGB Platinum, feel free to share your reflections or ping me with your favorite gaming keyboard in the comment section below.
Read Also Best browser 10.6.8.
Related posts:
Kylo Smith
Kylo is a tech geek who loves technology and spends time writing about it. He is also an avid gamer, completing his studies in Information technology. He is a co-founder of Reviewsed.
0 notes
Text
Nordvpn Mac Not Connecting

I just downloaded the Nord VPN app from the App store (designed to set up an IKEv2 connection), but when I open it and try to connect, the following dialog box keeps popping up and it keeps coming back no matter what I enter into it:
Apr 21, 2020 Fixes for NordVPN Not Connecting Connect to Another Server You can try connecting NordVPN to a few different servers. If it cannot connect to any, use this app on a different device like your phone. With NordVPN smart DNS, you can easily connect Apple TV to websites and servers using the server in a different location. On top of that, using a NordVPN DNS proxy for Apple TV will not cause you to have connectivity issues and low speeds.
If you're using the OpenVPN or NordVPN platform for accessing the Internet securely, you may have noticed that the Office 365 product (Outlook, Word, Excel, One Note, etc.) have reported that they do not have an internet connection ('NO INTERNET CONNECTION'). Launch NordVPN and connect to any server of your choice, preferably one that can unblock the streaming content you want to access on your Apple TV. Then, connect your Apple TV to this virtual hotspot network and to share NordVPN’s connection with the Apple TV. Set up NordVPN on Apple.
As a result, the IKEv2 NordVPN app from the App store will not connect. I managed to download and begin using the OpenVPN version of the Nord app, but I would like to know what the problem is with the IKEv2 version of the app. I'm running El Capitan on a 2015 Macbook Pro. Anyone else had this sort of problem?
MacBook Pro (Retina, 13-inch,Early 2015)
Posted on
Need a VPN or DNS for your device? Then, subscribe to
Fixing NordVPN connection issue might arise as a result of different reasons. We all know that NordVPN is one of the leading VPNs in the industry. So the tendency of having issues with connecting to the server is common and sometimes high. Though, if you have been battling with how to fix NordVPN connection problems, you landed yourself on the right place to get the right info.
NordVPN is a highly rated VPN provider for Windows, macOS, Linux, Android, and iOS platforms. Connecting to that VPN server is usually straightforward enough, but some NordVPN users might still need to fix connectivity issues.
NordVPN not connecting can be due to conflicting software, corrupted adapters, misconfigured network configurations and more besides.
How to Fix NordVPN Connection Problems
Depending on your devices, here is the list of steps you need to take if you are having difficulties in connecting to the server.
iOS Fix
The process is simplicity itself, you don’t need any specialist here. Is what you can do in a few minutes on your own. Here are the steps:
Step 1 > Delete the NordVPN app, in the actual sense you are to uninstall the app from your device.
Step 2 > Restart the device
Step 3 > Reinstall the app, please download from NordVPN offical website.
Step 4 > Enjoy
You see, these steps are simple and easy to follow, on the iOS devices you had fix NordVPN connection problems.
DON’T MISS IT: NordVPN has a great 66% discount on the 2-year plan, costing you just $3.99/month. It also backs all of its plans with a 30-day money back guarantee.
Fix NordVPN Connection Problems on MacOS
If you have any issues connecting to the internet with NordVPN on any Mac OS device, then try the following:
> You need to install the OpenVPN app version directly from the official website
> Do uninstall the IKE version before installing the new one
> Try using the obfuscated servers or the TCP protocol
Most times, the Canadian servers will work better than all the others. As for this, you need to team up with NordVPN support team to take up from you.
Fix NordVPN Connecting Issues on Linux Fix
In order to avoid any sort of issues when running NordVPN from a Linux device, just follow the next steps:
Step 1 > First of all, open the terminal by pressing (Ctrl+Alt+T)
F1a8. Step 2 > Install the OpenVPN client by entering “sudo apt-get install openvpn”. If you are asked for a password, insert the one you used when setting up your account
Nordvpn Mac Not Connecting Wifi
Step 3 > Go to the OpenVPN directory with this command “cd/etc/openvpn”
Step 4 > Now download the OpenVPN configuration files with the command “sudo wget https://downloads.nordcdn.com/configs/archives/servers/ovpn.zip”
Step 5 > Extract the “config.zip” with the command “sudo unzip ovpn.zip”
Step 6 > Enter the directory where the server configurations are placed
Step 7 > If you want a full list of the server coverage, input the following command “Is -al”
Step 8 > Just choose the server that you want to connect to

Step 9 > Start OpenVPN with the command “sudo openvpn (file name)”, where the file name is the chosen configuration
Step 10 > You will be asked for credentials, so insert those when necessary
Step 11 > You are now fully connected to NordVPN. If you want to disconnect, just boot up the terminal and press Ctrl+C.
DON’T MISS IT: NordVPN has a great 66% discount on the 2-year plan, costing you just $3.99/month. It also backs all of its plans with a 30-day money back guarantee.
Fix NordVPN Connection Problems on Windows 7
Before we move to some basic tips on how to fix NordVPN connection issues on Windows 7. Let quickly look at what we gathered from NordVPN official website.
> Log out of your account and log back in. After that, initiate a new connection and see if there is any change
> You should try connecting to the same network with a different device. This will help locate the source of the problem. Either it has something to do with the network or it’s the device malfunctioning.
> Try switching from TCP to UDP, changing the protocols to check if it changes anything
> Uninstall the application, reboot your device, and try installing it again. Try connecting to the network again.
> It could be that one of the servers is out of order so try connecting to other servers as well to see if it’s a local or a general issue
> For PC users, try disabling your firewall or antivirus. Many times, it’s the underlying protective protocols of these apps that interfere with the VPN network.
With regard to Windows 7 users being unable to connect to NordVPN, Reddit contains a few fixes that are likely to help.
1 > Try changing your account password and then log back in. Apparently, this is all that needs to be done in order to get over this stuttering with the connectivity. Or it could be that you changed your password frequently and the system is glitching, failing to recognize your identity. Again, just log out and sign back in. Ideally, it should solve everything.
2 > Some users have said that the IPv6 protocol was at fault. With it enabled, it was incredibly hard to connect to any server, let alone surf the internet or stream media. However, while this worked for some people, many more complained that it was actually no difference whatsoever when they turned off IPv6.
3 > In this case, try reinstalling the application and follow the instructions on the NordVPN website:
Step 1 > After downloading the installation package, open it
Step 2 > Click install on the first screen
Step 3 > The installation progress will begin, once finished, the application will automatically start
Step 4 > Provide your login details and click on the Login button
Dragon ball z burst limit psp download mediafire. Dragon Ball Z Burst Limit PS3 iso Download تحميل لعبة dragon ball z burst limit ps3dragon ball z burst limit downloaddragon ball z burst limit ps3 iso downloaddragon ball z burst limit controls ps3dragon ball z burst limit demo ps3 downloaddragon ball z burst limit english lyricsdragon ball z burst limit englishdragon ball z burst limit free downloaddragon ball z السلام. Download file - DragonBallZBurstLimitBLES00231.rar. Dragon Ball Z: Burst Limit is revolutionizing the series by entering the realm of next- generation gaming. Complete with fierce online battles and radical 3. D graphic effects only possible on PLAYSTATION®3 system, Dragon Ball Z: Burst Limit will blur the line between video game and iconic anime series. Dragon Ball Z: Burst Limit is revolutionizing the series by entering the realm of next-generation gaming. Complete with fierce online battles and radical 3D graphic effects, Dragon Ball Z: Burst Limit will blur the line between videogame and iconic anime series. Dragon Ball Z Burst Limit. Click the 'Install Game' button to initiate the file download and get compact download launcher. Locate the executable file in your local folder and begin the launcher to install your desired game. A game by: Dimps Corporation, and Bandai Namco Holdings.
Nordvpn Mac Not Connecting Iphone
Step 5 > The main screen will appear. You can see the server list and the map, navigate through the settings and access the server search feature on the top of the application.
Step 6 > On the bottom, you can find the Quick Connect button. This will find the optimal server for you using certain parameters and calculations.
Step 7 > To connect to a certain server in a specific country, click on the country pin on the map. After a successful connection, the app can be found in the system tray area at the bottom right corner of the screen.
DON’T MISS IT: NordVPN has a great 66% discount on the 2-year plan, costing you just $3.99/month. It also backs all of its plans with a 30-day money back guarantee.
Related articles:
0 notes
Text
Arf Player Download For Mac

Webex Arf Player Download For Mac
Download Arf Player For Mac
Play ARF files with 'WebEx Player' As mentioned above, you can use WebEx Network Recording Player to open ARF files on Windows 8/7/10 or Mac OS X El Capitan10.11. But sometimes you may also want to edit ARF contents with Adobe Premier or play ARF files on mobile device. You can play ARF file on PC/Mac with WebEx Network Recording Player. But you are not allowed to directly play ARF files on Windows Media player, QuickTime Player, VLC and other frequently-used media players. If you are looking for an ARF player to help you play WebEx recordings. WebEx Player can be your first and best choice.
ARF player is not actually any player but Arf is a file format. Arf stands for Advanced recording file (ARF). Generally arf file is ends with the extension “.arf”, which file will be recorded from web. And .arf file format is also used for Automatic Response File.
Then, yes, you are using WebEx SaaS and you are referencing a correct web site and link for downloading ARF player, but for some reason that link seems to be broken. There is no WebEx SaaS support community, so with that in mind, I would suggest calling them directly and they should be able to provide you with the ARF player.
Convert MP4 and WMV using Arf player
Every single file type is not similar and created as same format. So they are different file formats for supporting various types of devices. For this purpose it is required to convert the files. In this case we’ll discuss how to convert WMV to MP4 files using Arf player.
You can use the WebEx Player to convert your ARF files to WMV or iSkysoft video converter for Mac/Windows. The converting process in WebEx player is a bit time consuming. ARF is a proprietary recording format used by WebEx to record presentations through the website.
The arf file extension is used for files downloaded from WebEx, an on-line service used for recording internet meetings. The arf files are WebEx recordings directly downloaded by the user and contain the actual video and audio data, and many other information saved on separated panels.
MP4 is Remarkably Popular on computers and android and ios mobiles since it is used by a lot of devices. So it can be accessed by your device on the supported format,so you may choose to convert it.
There are many technical videos and pdf guides on how to convert files online. WMV files are important because these are the sorts of files your home videos have been made from.
This might be the arrangement of your son home recording. On the internet it taught the way to convert WMV files. This guide will describe how to do exactly the reverse. It will describe how to convert MP4 to WMV.

Navigate below:
What is ARF File?
Arf is a file format or file extension for a Webex advanced recording file. The webex advanced recording file will recorded in Network-Based Recorder (NBR). Arf stands for Advanced Recording File. The .arf format is recorded from WebEx Network based recording.
What is ARF Player and How to Open ARF file?
People have a question like what is WebEx? The answer is simple for this question WebEx is Cisco’s Web conferencing Program.
WebEx is a simple way to exchange ideas/ thoughts and information with anyone across the globe. It is useful for desktop sharing and also for mobile recordings.
Some people also call WebEx as online meeting, why because they use this as a business purpose to do business meetings.
WebEx is an online meeting recoding platform which offers to record webinars and seminars. WebEx creates the recored file in .ARF file format for this format people are checking arf players. But in reality there is no arf player arf is just a format.
For playing these Arf file you need a player. Webex provides a Network Recording player for both windows and for Mac Operating Systems, which is useful for playing .Arf files.
You can download this Network recording player at free of cost and this player can open .ARF file. Or you can also convert the .ARF file to windows player and can play on windows with the help of WebEx player.
The .Arf file which we can see are directly downloaded from the WebEx by the user. These files have information like actual video and audio information and much more saved on different panels.
WebEx Advanced recording file:
To play the WebEx advanced recording file we don’t need ant separate arf player but we can use the free player which provided by WebEx.
When any meeting or any webinar recorded by users the recording files will be saved as .Arf Format. And it can be opened with the help of WebEx player.
Types of Contents in ARF File:
In general the .ARF file contains the any of the following types of content,
Video,
Audio
Pools
Q&A Results
File transfer
Annotation
Participant lists
Chat conversations
Desktop shares.
Download ARF Player from WebEx:
The WebEx network recording player is available for both Windows and Mac and it is free of cost provided by WebEx.
When the First time you download your recording from WebEx it will ask you download the WebEx player to play.
The recording will be done in WebEx Network-based recorder (NBR) and they are in Advanced recording file (ARF) format. With the help of WebEx network player you can play and you can also convert the .arf file to Windows Media Format (.WMF) or Shockwave Flash Object Format (SWF).
From WebEx website you can check your video streaming or play your video. The streaming allows users to play the video without downloading.
And you can download arf player and also check the installation steps of WebEx player or Arf player from above.
Installing the Webex Network Recording Player (ARF Player):
You want to play and check the recorded file you need Webex Network Recording Player, available in your computer.
To install webex network recording player Follow the below steps:
First login to your WebbEx.
On WebEx service site, on the left navigation bar, click Support >Downloads.
On the Downloads page, under Recorder and Players, click the Recording and Playback link.
From the Recording and Playback page, click the Download link for the WebEx
Network Recording Player to play Advanced Recording Format (.arf) files.
After Downloading done Click Run.
Follow the instructions in the screen to install the WebEx Network Recording Player.
Webex Arf Player Download For Mac
By following these simple step you can download Network recording player from WebEx and this Network recording player will help you to play .Arf extension files.
After downloading .arf file you can check and play it in your computer with the help of network recording player provided by WebEx.
You can also convert the downloaded .arf file to any other formats like .WMV, .AVI, .MP4, .XVID, or .MPEG. and after converting that file you can send the converted file to your friends who doesn’t have Network recording player in their PC’s.

Check the below video To download and In stall Arf player.
WebEx Player:
If you want any Alternatives for the standard VoIP software for example Skype and ZOHO, then you have to check professional tools provided by the WebEx player and learn about Webex join meeting.
You can Use modern video conferencing packages which are created by WebEx and you can look forward to all the activities much, but this place has to offer additional special benefits.
WebEx Player Functions and its use:
WebEx player also provides with the ability to perform very helpful actions before and during the video conference call. Online exhibitions and webinars along with virtual meetings are possible to capture both key presentations for product presentations and promotions.
The Premium Plan allows you to enjoy toll-free access to one-touch calling options and meetings. These benefits are if you want to go out and attend a specific online event.
Reliable and trusted software:
There is less concern about its performance and reliability as WebEx is developed by Cisco Systems. 24-hour direct support is the ability to view various types of features and simultaneous use of some of the most useful features that can be purchased with this software with seven different video screens simultaneously.
Last Updated on December 30, 2020 by Leo Standy
No idea about how to open .ARF files on your computer or mobile device is totally normal. Before getting into how to open it, we have to figure out what it is.
WebEx is the first SaaS online video conferencing tool that is still the world’s number one in the market. You only need one account, whether it is IOS or Android, whether it is a computer, tablet or mobile phone, you can launch HD video conferences with WebEx. You can share presentations, applications, documents, and desktops anytime, anywhere.
The most surprising thing, however, is that you can download these video conference records to your local device for later viewing. The downloaded video conference records are stored in .ARF file format.
.ARF is the format extension name of WebEx Advanced Recording File, you will see WebEx recordings in .wrf files. ARF is not quite popular since it is specially designed for WebEx webinar recordings, so if you want to open .ARF files on your Windows, macOS, iOS device or Android device, you need the right tools. Here I will show you how to play .ARF videos on your computer.
Quick Navigation:
> #1 How to open .ARF file with Webex Player (Network Recording Player)
> #2 How to convert .ARF file to other popular formats for playing on any device
#1 How to open .ARF file with Webex Player (Network Recording Player)
Webex Player is created by the official for people who need to watch a .ARF or .WRF Webex video recording on their computer. While, please note that WebEx player is only available on Windows and macOS. If you want to play .ARF on other devices, you’d better convert them to a video format with better compatibility among various devices.
Steps to open .ARF file with Webex Player
Download Arf Player For Mac
First, you should download the Network Recording Player for .ARF File, there are Windows version and Mac OSX version. Then, install the player on your computer.
You will find the download links on this page: https://www.webex.com/video-recording.html.
Second, import your ARF file to the program and play it.
Failed to open your ARF files:
You have installed a wrong version of the Webex Player, try to install another one (the one that generated the ARF file will be the best).
Invalid ARF file reference in the Windows registry.
Unexpectedly deleting the description of the ARF file in the Windows registry.
The installation of software applications associated with the ARF format is incomplete or incorrect.
Your ARF file is corrupt (there is a problem with your WebEx Advanced Record file itself).
The device driver for the hardware associated with your ARF file is corrupt or has expired.
Don’t want to handle these problems, convert ARF to a more wide-used video format!
#2 How to convert .ARF file to other popular formats for playing on any device
Although, you can play .ARF file with Network Recording Player on computer mentioned above, it is still not easy for you to share to others or edit the video with video editors. I will suggest you to convert .ARF file to some popular formats like MP4 or WMV. The tool that we will utilize is Leawo Video Converter which is a very powerful and yet easy-to-use video codex conversion tool (a built-in module of Leawo Prof. Media). Let’s get into the guide on how to convert your .ARF file to MP4 or any other video formats.
Step 1 Download Leawo Prof. Media as below. Install it on your Windows or Mac.
Step 2 In the main panel, choose Video Converter module or click Convert tab on the top bar. Then you will be redirected to converting workspace.
Step 3 Add your .ARF files to the program (You can add by clicking Add Video button or dragging the file into the box in the middle).
Step 4 Choose output format for your .ARF files. As we said before, you are free to choose any video formats that you need for later sharing, watching, or editing. I will say MP4 is a wise choice for you. Then choose an output location and click Convert button, you can take a rest and let the program handle the conversion for you.
After the conversion, you can transfer them to any devices like your iPhone, iPad, and Android, you can stream them to Plex and KODI, you can import them to any video editing tools.
0 notes
Text
Get Xcode For Mac

Additional Downloads
Get the latest beta and older versions of Xcode. To view downloads, simply sign in with your Apple ID. Apple Developer Program membership is not required.
Beta Versions of Xcode
Command Line Tools & Older Versions of Xcode
Get a Second-Hand Mac. You gotta ask yourself: Why not get a Mac? Perhaps the simplest option to build iOS apps with Xcode, in this tutorial, is purchasing a Mac for iOS development. If you don’t want to tinker with cross-platform tools, or rent-a-Mac in the cloud, and just want to get started with iOS development: get a Mac.
Videos
Xcode is a complete developer toolset for creating apps for Mac, iPhone, iPad, Apple Watch, and Apple TV. Xcode brings user interface design, coding, testing, debugging, and submitting to the App Store all into a unified workflow. Downloading and updating Xcode. The current release of Xcode is available as a free download from the Mac.
May 23, 2019 Hi, I would like to install Xcode but my MacBook Pro doesn't update anymore (the latest version I have on my Mac is High Sierra 10.13.6) so I can't download the Xcode app from the App Store.
See the latest advances in Xcode presented at WWDC and other events.
Help and Support
Install Xcode Mac Terminal
Get step-by-step guidance on how to use Xcode to build, test, and submit apps to the App Store.
Xcode Help Guide
Xcode Support Page
API Reference and Sample Code
Browse the latest documentation including API reference, articles, and sample code.
Discussion Forums
Ask questions and discuss development topics with Apple engineers and other developers.
Would you like to develop software for Mac OS X or iOS? While it’s easy to develop apps for Linux and Windows on any platform, developing software for Mac requires a toolset called XCode, designed and built by Apple specifically for Mac OS X.
XCode is an incredibly powerful piece of software. Not only is it a complete toolset for developing Mac apps; it’s also an interface builder, testing application, and asset management toolkit.
In this simple guide, you’ll learn how to use XCode on Windows – something that’s normally impossible. All you’ll need is a Windows PC, a copy of Mac OS X, an Apple account, and an Internet connection.
Is this your first time using XCode? Learn how to program software for Mac and iOS with our 1 Hour XCode Introduction.
Installing a virtual PC application with Mac OS X
Since XCode only runs on Mac OS X, you’ll need to be able to simulate an installation of Mac OS X on Windows. This is surprisingly easy to do with virtualization software like VMWare or open source alternative VirtualBox.
For the purpose of this guide, we’ll be using VirtualBox. If you use a different virtual computer application, the process is much the same. Since VirtualBox is open source and free to use, it’s worth downloading it if you don’t already have a copy installed.
Here, I'm running a 32-bit app that won't run in Catalina itself.10. Ignore the warning. 64 bit scanner app for mac. Upgrade the OSNow you can upgrade to Catalina. When the upgrade is complete, start Parallels Desktop and your virtual Mojave machine. (In this screenshot, Mojave is running at night, so it's showing the nighttime desktop image, but it's the same virtual machine shown in earlier screens.
Have you never used VirtualBox before? Learn how to use this powerful virtual PC application by enrolling in our course, QuickStart! – Virtual Box. In addition to Mac OS X, VirtualBox can also be used to run Linux and other operating systems.
Running a virtual computer is quite a demanding process, and you’ll need to have a fairly powerful PC for it to operate successfully. You’ll also need a PC with hardware similar to that of a standard, Apple-constructed iMac, MacBook, or Mac Pro.
To successfully emulate a Mac using a Windows PC, you’ll need the following:
A Dual Core Intel processor
At least 2GB of RAM (4GB+ recommended)
Hardware Virtualization

Is your PC too weak to emulate a Mac properly? Learn how to build a powerful PC for gaming, app development, and more with our Learn How to Build a Computer course.
You’ll also need an installation disc for Mac OS X. You can purchase this online from the Apple Store or, if you already own a MacBook, iMac, or Mac Pro, you can use the install disc you received with your computer.
Once you’ve installed VirtualBox, open the application and choose to install Mac OS X Server 64 Bit. Provide the virtual computer with at least 2GB of RAM (if you have more than 8GB of RAM, choose 4GB+) and more than 30GB of hard disk space.
VirtualBox will automatically configure the operating system, but you’ll still need to make a few changes manually. Open the Settings menu and carry out the following changes:
On the System tab, uncheck Enable EFI
On the Processor tab, select at least two CPUs
On the Display tab, increase the video memory to at least 128MB
Installing Mac OS X and booting your virtual machine
Install Xcode For Mac Mojave
Finally, you’ll need to download a Hackboot boot loader to install OS X. You can find a Hackboot install file by searching Google – in this case, you’ll need Hackboot 1 and Hackboot 2, as well as your OS X disc, to complete the installation.
Select your Hackboot 1 disc image, and then start the virtual machine. Your virtual machine will boot, and you’ll see an OS X screen. Using the menu at the bottom of the screen, launch the disc drive that contains your OS X installation disc.
Amadeus Pro 1.x will run on Mac OS X 10.4 and is still available here. Amadeus Pro supports a variety of Plug-Ins. It is compatible with the popular VST format, as well as with Apple’s Audio Units. Amadeus Pro is an audio editing tool for the Mac that works quickly and easily to record, split, edit, and export audio tracks. While not as feature rich as a tool like GarageBand, it runs a lot. Amadeus for mac. Amadeus Pro enables you to quickly edit multiple audio tracks via simple, intuitive drag and drop actions, in a clean and organized environment. The application enables you to analyze the tracks.
From here, you’ll need to follow the installation instructions for Mac OS X. It takes several minutes to install the operating system. Once the process is finished, you’ll need to switch off your virtual machine and change your boot disc.
Reopen VirtualBox and, leaving all of your other settings the same, switch your boot disc from Hackboot 1 to Hackboot 2. You’ll boot into a screen with two icons. Select Mac OS X and press Enter to initiate the Mac OS X boot sequence.
During the Mac OS X configuration sequence, you’ll need to enter your Apple ID. This is necessary for downloading the XCode toolset later, so make sure you enter a valid Apple account when you configure your operating system.
Installing XCode on your Mac OS X virtual machine
Once you’ve configured your Mac OS X virtual machine, installing XCode is relatively easy. Before you install XCode, you’ll want to configure your virtual machine to your preferred resolution and settings using the System Preferences menu.
Is this your first time using Mac OS X? If you’re a PC user, finding your way around in the new interface can be a challenge. Enroll in Using Mac OS X for Windows Users to learn the basics of the OS X interface, from the Dock to features like Spotlight.
From here, installing XCode is simple. Open the App Store application from the dock and type XCode into the search bar. You might need to reenter your account details, or enter them for the first time if you didn’t do so during Mac OS X configuration.
Navigate to the XCode app and click Install Now to download it. If you don’t have an Apple account, you’ll need to create one in order to download the XCode toolset for your virtual machine.
XCode is quite a large application, and downloading it could take anywhere from a minute to several hours, depending on your Internet connection speed. Once your download is finished, open Applications and click XCode to launch the installer.
Install Xcode For Mac Catalina
Once the installation process is complete, you’ll be able to use XCode within your virtual machine to program apps for Mac OS or iOS. You can also download other Mac apps to use on your virtual machine, although they may not run smoothly.
Update Xcode On Mac
Developing iOS Apps and more using XCode
XCode is an incredibly powerful toolkit for app development. It’s also refreshingly easy to use, especially for developers accustomed to cumbersome and complicated programming software for PC.
Can I Get Xcode On A Older MacBook? | Apple Developer Forums
Learn more about how to use XCode by reading our iOS programming tutorial. It’s a great overview of the XCode interface, the programming characteristics of iOS, and much more.
0 notes
Text
Download Latest Mac Version

So, you’ve decided to download an older version of Mac OS X. There are many reasons that could point you to this radical decision. To begin with, some of your apps may not be working properly (or simply crash) on newer operating systems. Also, you may have noticed your Mac’s performance went down right after the last update. Finally, if you want to run a parallel copy of Mac OS X on a virtual machine, you too will need a working installation file of an older Mac OS X. Further down we’ll explain where to get one and what problems you may face down the road.
Download Latest Mac Version
Mac Os Latest Version Iso
Download Mac Os Latest Version
Download Latest Mac Os Version
Without App Store: Download Mac OS version as Apple Developer. If you are signed with an Apple Developer account, you can get access to products that are no longer listed on the App Store. If you desperately need a lower OS X version build, consider creating a new Developer account among other options.
Stay within the reach with free Skype-to-Skype video/audio calls, videoconferencing, smart messaging, and screen sharing.
This latest version crashes (on the Mac) if I type too fast in Visual Studio on my Windows Desktop at work. I get the spinning beachball- have to exit to the Mac, force quit MRD and restart it, then reconnect. I'm finding myself doing this at least 2 or 3 times per hour!
Download Microsoft Teams now and get connected across devices on Windows, Mac, iOS, and Android. Collaborate better with the Microsoft Teams app.
A list of all Mac OS X versions
We’ll be repeatedly referring to these Apple OS versions below, so it’s good to know the basic macOS timeline.
Cheetah 10.0Puma 10.1Jaguar 10.2Panther 10.3Tiger 10.4Leopard 10.5Snow Leopard 10.6Lion 10.7Mountain Lion 10.8Mavericks 10.9Yosemite 10.10El Capitan 10.11Sierra 10.12High Sierra 10.13Mojave 10.14Catalina 10.15
STEP 1. Prepare your Mac for installation
Given your Mac isn’t new and is filled with data, you will probably need enough free space on your Mac. This includes not just space for the OS itself but also space for other applications and your user data. One more argument is that the free space on your disk translates into virtual memory so your apps have “fuel” to operate on. The chart below tells you how much free space is needed.
Highfive video conferencing download. Highfive makes your meetings awesome with insanely simple video conferencing designed for your meeting rooms, featuring video conferencing hardware and software built together.
Looks like your computer is running a operating system we no longer support, but you can still download and play your games using an older version of Origin. For Windows XP or Vista, click here to download. For Mac OSX 10.7 or 10.8, click here to download.
Note, that it is recommended that you install OS on a clean drive. Next, you will need enough disk space available, for example, to create Recovery Partition. Here are some ideas to free up space on your drive:
Lightroom mac serial.
Uninstall large unused apps
Empty Trash Bin and Downloads
Locate the biggest files on your computer:
Go to Finder > All My Files > Arrange by size
Then you can move your space hoggers onto an external drive or a cloud storage.
If you aren’t comfortable with cleaning the Mac manually, there are some nice automatic “room cleaners”. Our favorite is CleanMyMac as it’s most simple to use of all. It deletes system junk, old broken apps, and the rest of hidden junk on your drive.
Download CleanMyMac for OS 10.4 - 10.8 (free version)
Download CleanMyMac for OS 10.9 (free version)
Download CleanMyMac for OS 10.10 - 10.14 (free version)
Download Latest Mac Version
STEP 2. Get a copy of Mac OS X download
Normally, it is assumed that updating OS is a one-way road. That’s why going back to a past Apple OS version is problematic. The main challenge is to download the OS installation file itself, because your Mac may already be running a newer version. If you succeed in downloading the OS installation, your next step is to create a bootable USB or DVD and then reinstall the OS on your computer.
Mac Os Latest Version Iso
How to download older Mac OS X versions via the App Store
If you once had purchased an old version of Mac OS X from the App Store, open it and go to the Purchased tab. There you’ll find all the installers you can download. However, it doesn’t always work that way. The purchased section lists only those operating systems that you had downloaded in the past. But here is the path to check it:
Click the App Store icon.
Click Purchases in the top menu.
Scroll down to find the preferred OS X version.
Click Download.
This method allows you to download Mavericks and Yosemite by logging with your Apple ID — only if you previously downloaded them from the Mac App Store.
Without App Store: Download Mac OS version as Apple Developer
If you are signed with an Apple Developer account, you can get access to products that are no longer listed on the App Store. If you desperately need a lower OS X version build, consider creating a new Developer account among other options. The membership cost is $99/year and provides a bunch of perks unavailable to ordinary users.
Nevertheless, keep in mind that if you visit developer.apple.com/downloads, you can only find 10.3-10.6 OS X operating systems there. Newer versions are not available because starting Mac OS X Snow Leopard 10.7, the App Store has become the only source of updating Apple OS versions.
Purchase an older version of Mac operating system
You can purchase a boxed or email version of past Mac OS X directly from Apple. Both will cost you around $20. For the reason of being rather antiquated, Snow Leopard and earlier Apple versions can only be installed from DVD.
Buy a boxed edition of Snow Leopard 10.6
Get an email copy of Lion 10.7
Get an email copy of Mountain Lion 10.8
The email edition comes with a special download code you can use for the Mac App Store. Note, that to install the Lion or Mountain Lion, your Mac needs to be running Snow Leopard so you can install the newer OS on top of it.
How to get macOS El Capitan download
If you are wondering if you can run El Capitan on an older Mac, rejoice as it’s possible too. But before your Mac can run El Capitan it has to be updated to OS X 10.6.8. So, here are main steps you should take:
1. Install Snow Leopard from install DVD.
2. Update to 10.6.8 using Software Update.
3. Download El Capitan here.
“I can’t download an old version of Mac OS X”
If you have a newer Mac, there is no physical option to install Mac OS versions older than your current Mac model. For instance, if your MacBook was released in 2014, don’t expect it to run any OS released prior of that time, because older Apple OS versions simply do not include hardware drivers for your Mac.
But as it often happens, workarounds are possible. There is still a chance to download the installation file if you have an access to a Mac (or virtual machine) running that operating system. For example, to get an installer for Lion, you may ask a friend who has Lion-operated Mac or, once again, set up a virtual machine running Lion. Then you will need to prepare an external drive to download the installation file using OS X Utilities.
After you’ve completed the download, the installer should launch automatically, but you can click Cancel and copy the file you need. Below is the detailed instruction how to do it.
STEP 3. Install older OS X onto an external drive
The following method allows you to download Mac OS X Lion, Mountain Lion, and Mavericks.
Start your Mac holding down Command + R.
Prepare a clean external drive (at least 10 GB of storage).
Within OS X Utilities, choose Reinstall OS X.
Select external drive as a source.
Enter your Apple ID.
Download Mac Os Latest Version
Now the OS should start downloading automatically onto the external drive. After the download is complete, your Mac will prompt you to do a restart, but at this point, you should completely shut it down. Now that the installation file is “captured” onto your external drive, you can reinstall the OS, this time running the file on your Mac.
Boot your Mac from your standard drive.
Connect the external drive.
Go to external drive > OS X Install Data.
Locate InstallESD.dmg disk image file — this is the file you need to reinstall Lion OS X. The same steps are valid for Mountain Lion and Mavericks.
How to downgrade a Mac running later macOS versions
If your Mac runs macOS Sierra 10.12 or macOS High Sierra 10.13, it is possible to revert it to the previous system if you are not satisfied with the experience. You can do it either with Time Machine or by creating a bootable USB or external drive.
Instruction to downgrade from macOS Sierra
Instruction to downgrade from macOS High Sierra
Instruction to downgrade from macOS Mojave
Instruction to downgrade from macOS Catalina
Before you do it, the best advice is to back your Mac up so your most important files stay intact. In addition to that, it makes sense to clean up your Mac from old system junk files and application leftovers. The easiest way to do it is to run CleanMyMac X on your machine (download it for free here).
Visit your local Apple Store to download older OS X version
If none of the options to get older OS X worked, pay a visit to nearest local Apple Store. They should have image installations going back to OS Leopard and earlier. You can also ask their assistance to create a bootable USB drive with the installation file. So here you are. We hope this article has helped you to download an old version of Mac OS X. Below are a few more links you may find interesting.
These might also interest you:
High Sierra is an update of MacOS which focuses mostly on back-end developments and a higher level of user security. As such, this operating system lays a foundation for future upgrades.
Stay safe
In essence, High Sierra took what was good with Sierra and developed it into a more comprehensive software.
High Sierra emphasizes the already-existing benefits of MacOS previous system, Sierra. There are few bells and whistles, but the changes are noticeable and positive. The Apple file system is the most significant feature it brought. It enables the storage and encryption of a large number of files. Thus, it boosts performance and helps manage device memory issues.
Apple also introduced new formats for video and photos in this version. These formats compress data - that’s a benefit as files can get huge with ever-rising resolutions. They added support for virtual reality headsets as well.
Besides that, when it comes to Safari, Mac search engine, there are some notable improvements with the update. The users can now control annoying auto-play videos, prevent tracking, and more. There are also notification controls, and you will experience a boost in performance, too.
The most noticeable changes took place in Apple’s Photo App, though. It went through a total revamp both visually in its interface and terms of tools and functions available. Many other discreet changes happened all over the system.
Where can you run this program?

If you’re running Sierra on your Mac, you will be able to run this one as well.

Is there a better alternative?
Yes. Mojave, the newest version of MacOS, brought even more improved features to the table. However, if you can’t run it on your device, this is the second best.
Our take
Download Latest Mac Os Version
High Sierra is not the shiniest upgrade Apple brought, but it’s one that sets the stage for new upgrades to come. Even out of that context, it’s a great operating system.
Should you download it?
Yes, if your device can support it. The new options and better security settings are worth getting.
10.13
0 notes
Last Seen Blogs

these-summer-nights-in-december
These Summer Nights in December

smilez4milez
@Greenhillzonee!!

hal-and-bangtan
Hal and Bangtan

sunsetsarsatequila
i want to navigate this hate in my heart

ambfurniture
The newest in Furniture online