#Yarncraft Diary
Text
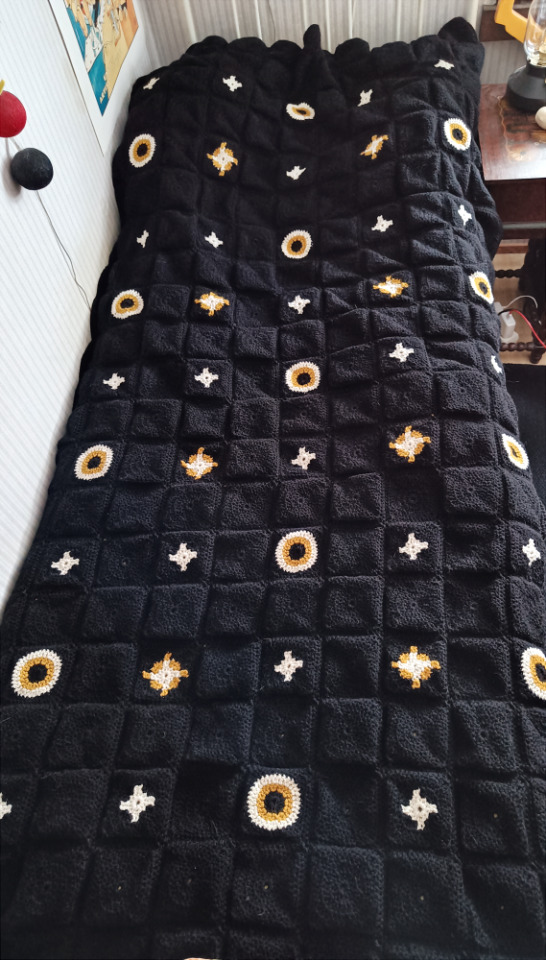

MY BLANKET OF DARKNESS HAS BEEN COMPLETED
✨👁️✨ I AM SO COZY NOW ✨👁️✨
So I started working on this blanket around June of 2022. Got like, maybe half-way through the blanket and then the yarn I needed for the blanket went out of stock at my local yarn shop.
Now I didn't know the yarn would be completely unavailable for like 6 months (until the stop closed permanently), so I just kept on waiting, hoping for it to come back in stock-- but it never did, so in January I finally looked online if I could find the yarn elsewhere and I did, I got the yarn I needed, and finished the blanket.
So it kinda took me 6 months to make this blanket but also not
What made this blanket a truly exciting and fun project for me is that this has been the first blanket I actually made for myself and designed for myself. Like I've enjoyed every single blanket project I've had so far, but having a blanket that's Just For Me is just. It's nice
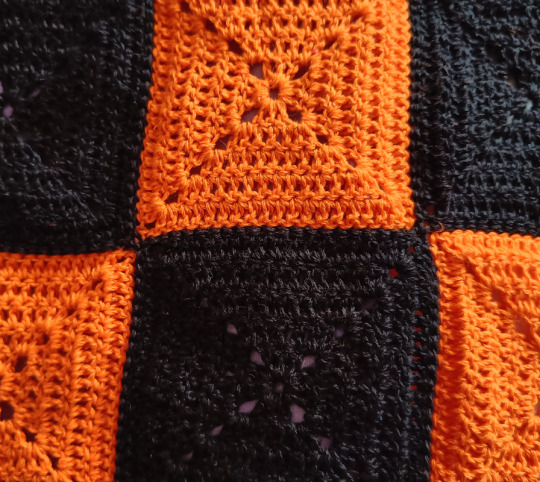
I originally planned the granny squares out digitally because I wanted to have a fun pattern of different granny squares, something that wouldn't be too busy looking and was carefully planned, and here's what I came up with
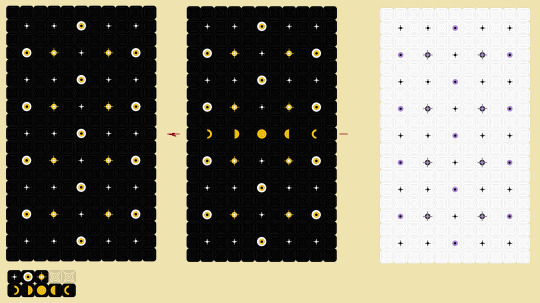
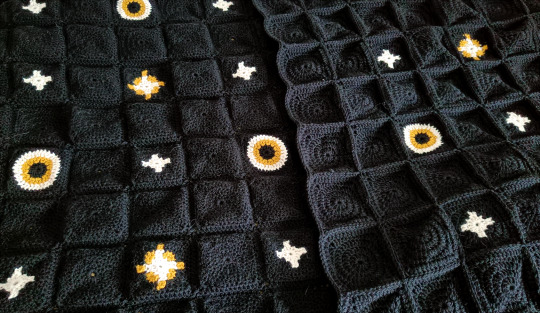
I had two versions of the square pattern, one with moon phases right in the middle of it and another without them. I do like how the moon version looked and part of me kinda regrets not making that one, but I'm not sure the moons would have really gone well with the eyes... So I did go with the first version
(Sidenote, it's not on the pattern above but I added extra rows of just black squares at the top and bottom of the blanket, so there's two rows of black instead of just one)
(Sidenote 2, although I knew I wanted the blanket to be mostly black from the begining, I wasn't entirely sure what accent color I wanted to use, it really was depending on what colors the shop had available. Like I used yellow as kind of a default color since it worked nice with the stars and eyes, but I could've gone with some other color too. In the end, because I didn't like the color options for the yarn at the shop I ended up going with a yellow anyways) (Also I tested out a reverse color version with the pastel purple and white base and no eyes, just for funsies, it looks kinda neat)
But yeah, that's how the planning of the blanket went.
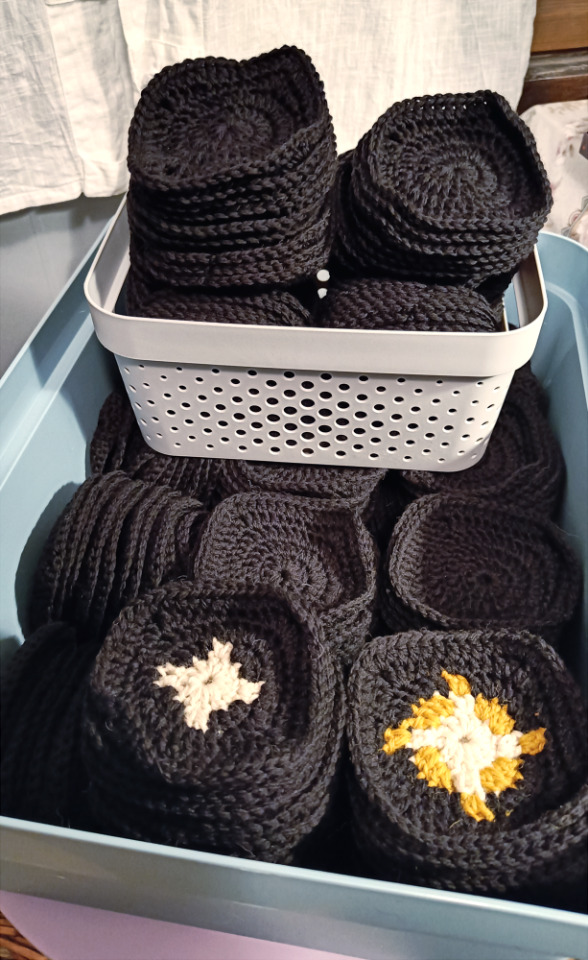
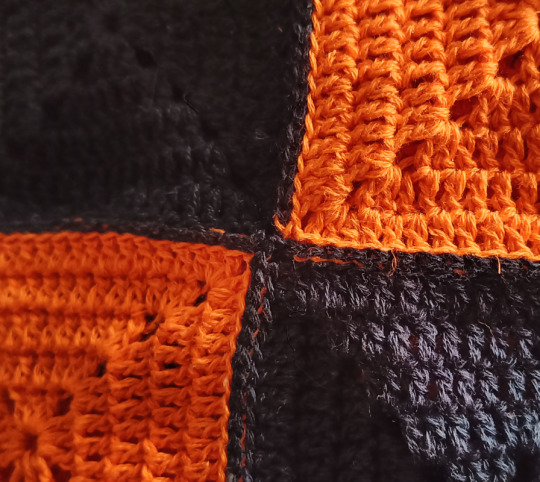
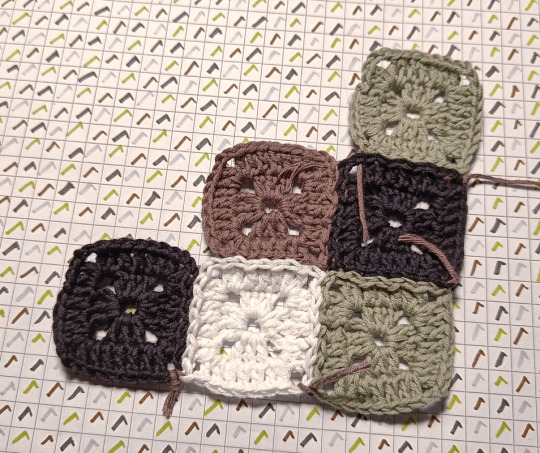
The blanket is made of 231 squares in total, 11x21 rows. 186 of the squares are plain black, the rest are patterned. The star squares were the worst to make because of how many strands of yarn I had to weave in, 0/10, would not reccommend.
I used the Cedro 100% wool yarn (reccomended hook size 5, 50g=100m), and it took me about 38 balls of yarn to finish the blanket (including crocheting all the squares together and doing a single round of double crochet around the blanket to finish it off)
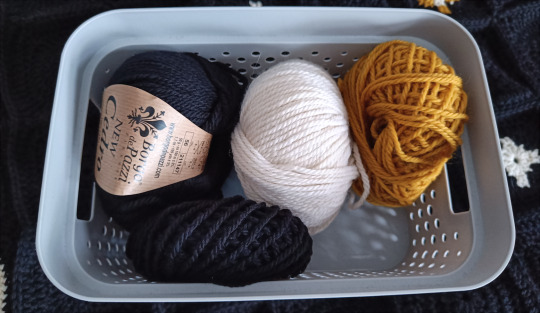
This is literally all the yarn I have left from this blanket; one untouched ball of black and three partially used balls.
I gotta admit.
I'm kind of shocked by the size of the blanket. Like I very carefully measured it to make it the exact size to fit my bed, and it fits perfectly. But I'm still kinda shocked how big it is. (Which is why I didn't make the border of the blanket any bigger, even though I could've with the yarn I have)
Also
It's HEAVY
Like, of course it's heavy, it's 100% wool and thick, but MAN I didn't expect it lmao
But that kind of makes it perfect for cold winters especially, it's super warm and the weight makes it cozy- like who needs a weighted blanket when you can have one of these lmao
Now I just need to figure out how to protect the blanket from being covered in my white cat's hair...
#Yarncraft Diary#Yarncraft#Crochet#Crochetblr#Yarnblr#Emotionally I classify this as a 2022 project even though I didn't finish it until this year#No I did not block the squares before putting the blanket together#I was planning on just ironing the squares to flatten them out but I noticed last minute that...#...the yarn doesn't reccommend it be ironed so. I didn't want to risk ruining it#And I don't really have a blocking board or anything so I just had to let it go#I could probably just hang the blanket on the clothesline in the shower and the weight of it...#...on top of whatever moisture there might be in the air would probably straighten the blanket out a bit#So it wouldn't ''buckle'' the way it does now#But ehhh it's fine#I don't mind it really
3K notes
·
View notes
Photo
This is my diary! Now I need an autograph book for #sdcc! #murphysplush #murphysplushtrips #amigurumi #yarncraft https://www.instagram.com/p/CfnHhsmLnA4/?igshid=NGJjMDIxMWI=
2 notes
·
View notes
Text
Do you ever start a project, thinking it'd be a fun thing to make, only to realize halfway through you hate and have literally no use for it and then get stuck unsure what the fuck you should do with it
Yeah
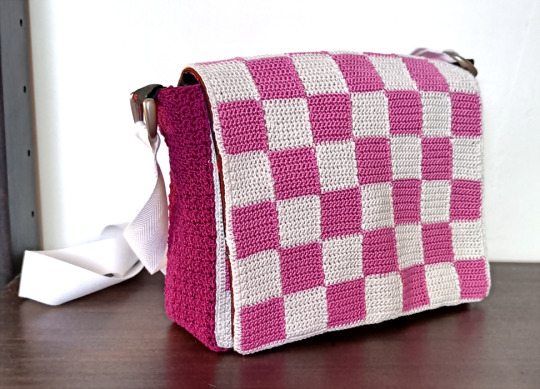
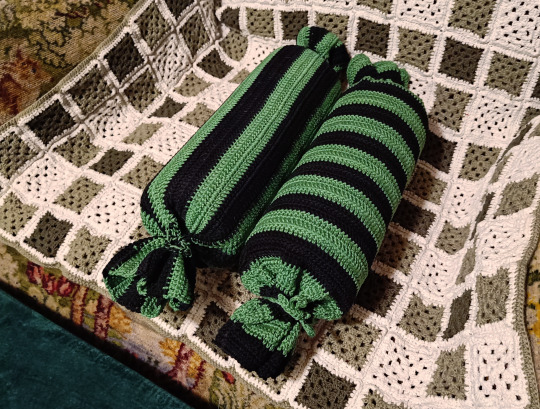
This is my Bag of Regrets
Okay so around March of 2023 I made my first-ever crochet bag out of the leftover yarn I had from my Blanket of Darkness. I loved how that bag turned out, but even then I realized I could've done a better job had I lined the bag, which I should've done really early into the project.
So.
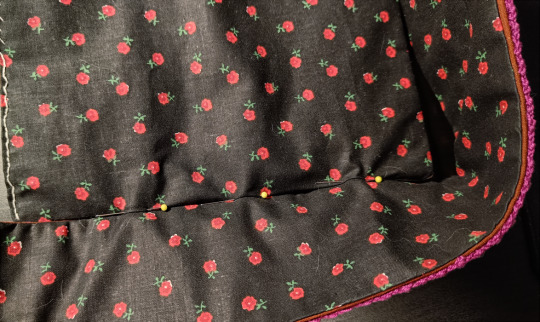
I ended up with a bunch of this super thin cotton yarn, in a few colors. We're not gonna talk about how I got the yarn, I just ended up with it. And I did not know what to do with it, because the pink and the dark maroon-y color just are not my colors, at all. I do not like them what-so-ever. And so like, I had to figure out something to do with the yarn, didn't wanna waste it.
And for some god damn reason I thought I could practise making more crochet bags using this yarn.
Like in theory, this was a fine idea.
But I don't even like pink, what the fuck am I going do with this god damn thing now.
But I was a fucking idiot and did not think about that fact until I was like 80% done with it
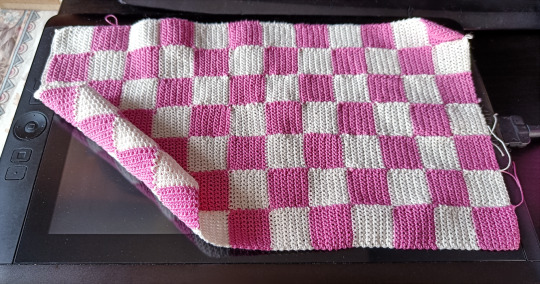
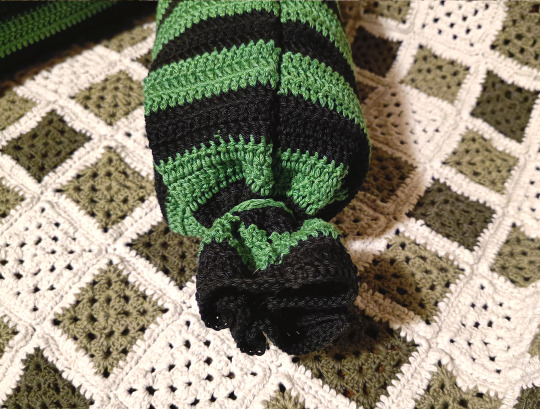
Anyway, I thought it'd be fun to try doing a checkerboard pattern on the tiny crochet bag. This was a huge mistake. I don't know what the fuck it was about it, but I had the worst time of my life trying to make sure the squares were even, with the same amount of rows and that the corners met at the right spots- like sometimes I made the right amount of rows but the corners didn't meet at all and sometimes I did the wrong amount of rows but the corners did meet.
It was a fucking nightmare to crochet. I had a horrible time. Making the front and back panels took me months and I had to restart it so many times just to get it right. It was bad, I hated it man
Also, by the way. I don't mind working with thin yarn at all, but because this was a thin COTTON yarn, I just. The yarn has no stretch, it is hard. Working with it made me feel like I was going to cut off my left finger as the yarn was rubbing against it as I was crocheting.
The bottom piece of the bag was done in that dark purple-maroon-y color with... I can't even remember what stitch I did, it was something Alt Knots has a video tutorial for on their YouTube though
But, I made the three crochet panels
Then I cut out the piece of fabric I would hand-sew the crochet pieces onto. I have a ton of this red-brown fabric that I have no idea wha to do with, and I figured it would work fine for this (since you're not supposed to see this fabric anyways) so I cut the pieces from it
Pinned the pieces down and then I just sewed the pieces onto the fabric. I decided to use sewing thread so it'd blend into the crochet better (being a fine thread and all), using white for the checker board pieces and a dark red/maroon-y color for the bottom piece

Forgot to take a photo of the bottom piece but it's fine, you get the idea
Then I cut out the lining fabric. I didn't really have any fabric that would actually match the checker board crochet at all, and I didn't want to buy anything so I chose to use this black fabric (with itty bitty roses) for lining
Cut the pieces and pinned them down facing each other
I think I originally wanted to do the sewing by hand for a cleaner look but I wasn't happy with it, so after I did my innitial hand-stitching I went over it with a sewing machine, getting as close to the crochet but without sewing over it. And after checking it was okay, I cut the excess fabric and did some clean up to help keep the fabric from fraying.
Folded the pieces inside out and they were looking decent!
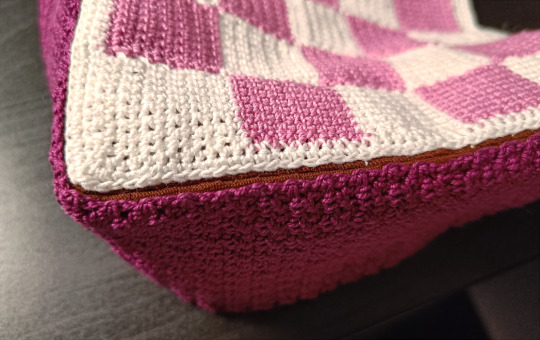
Now yes, I did still have to hand-sew one side shut for each piece, but it wasn't a big deal, though sadly because I had to make sure the handsewing wasn't visible on the outside of the bag, this was going to be a visible flaw on the lining anyways
You can see what I mean on the top edge of the bigger piece (with the white thread)
In hindsight I probably could've sewn the edge shut with a mattress stitch or something instead of going through all the fabric, but alas, I was stupid and didn't not realize this at the time
Sidenote I took like 5 month break from this project after finishing the front and back piece but before I did the bottom piece. Because yeah, this was around when I realized I hated what I was making and that I had no idea what the fuck I was gonna do with it once it was done. And I just could not get myself to even look at it, for months. And it HAUNTED me, made me feel bad about not having completed it every dang day.
But yeah, finally in March I got back to it after finishing my last crochet blanket. Because I wanted to start another project but I did not want to start anything before finishing this fucking thing so yeah.
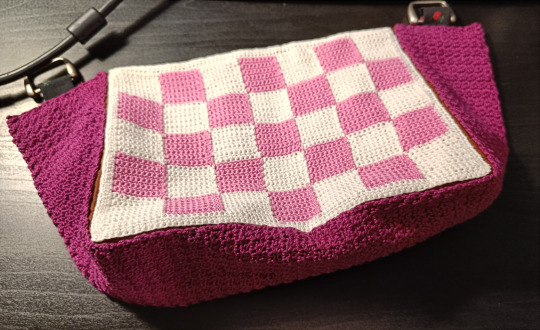
(Oh yeah I also I grabbed some metal accessories from my mom's stash that I attached to the bottom piece, so the bag can have a widdle handle)

With the pieces all done, it was finally time to sew them together. And this I was going to do by hand sewing them with a mattress stitch. I started by just attaching the smaller piece to the bottom, making sure it was centered right, and carefully sewed it together, starting from the middle and making my way up the sides, one at a time.
I did very specifically do sewing on the red-brown fabric
And it was looking good, according to plan!
Did the bigger piece the same way, and then all I had to do...
...Was clean up, by mattress stitching the crochet pieces together. Chose to use white because I figured I'd rather have small amounts of white peeking through on the bottom piece than have the dark red/purple on the front pieces. Though thankfully the white yarn isn't even that noticable, it sinked into the stitches quite nicely
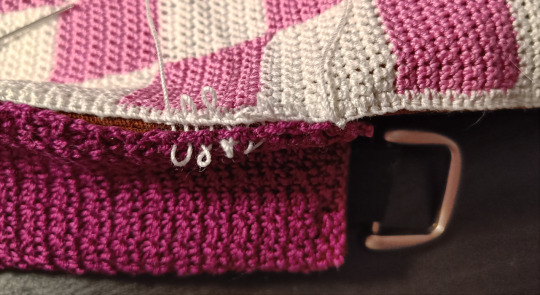
With that done, I did this one final little touch-up. On checker crochet pieces you could kind of see my starting row, as the row had quite large holes in it. And I wasn't a huge fan of how it looked, so I just took some of the white yarn and wove it into the loops to fill it out
One final thing I did but didn't bother documenting was the strap. I did considder crocheting it, and even started it, but I did not like the stitch I was trying to use for it, and at this point I was so fucking done with the project I couldn't be bothered.
I had some white cotton ribbon with nothing to do with it, so I decided to just grab some of that to make a lil strap. It's... not great, it's just that the ribbon is quite thin so it FEELS really flimsy. But I had reached the "I don't give a fuck anymore" stage and so. Yeah whatever
My shitty little bag of regrets is done. Yay.
I probably could've done something to clean the edges of the bag better because you can see the red-brown fabric peeking through, but... Like I can't think of what I could do to fix that, and again, I'm at the point where I don't have the energy to even try anymore
It's done, and that's what matters

Probably throwing it in the trash because what else am I gonna do with it
(Final note; I did have left-over yarn from this, but I used that yarn to make tiny mesh fruit/grocery bags. Ones I will actually use! Yay)
#Moon posting#Yarncraft Diary#Crochet#Crochetblr#Yarnblr#Mandatory ''This started out as a DIY Blog first and foremost'' Disclaimer#Also yeah I finished this god forsaken thing months ago but did not have it in me to post about it#Do not let me start dubious projects ever again. This was a massive waste of time#Did not proof read this we die like men
22 notes
·
View notes
Text
Obligatory "This was a DIY-blog before a fandom blog and so if I wanna post my projects on here THEN I WILL AND YOU CAN'T STOP ME"-disclaimer
New blanket who dis
Another project that started out as an attempt for me to clear out yarn from my mom's stash, this time being some black Tynn Line from Sadnesgarn. There was a decent amount of it, and I didn't know what to do with it. Didn't want to work in just black, so I bought some of the orange yarn (while also doublechecking this was in fact Tynn Line like I suspected, because I wasn't 100% sure)
And I mindlessly started crocheting some basic granny squares.
Originally I figured I could maybe make a granny square cardigan, but once I got going I soon realized I probably had far more yarn than a cardigan would need (this was in fact a false estimate on my part because I am stupid), and I figured, if I had the yarn for it, then why not just make a blanket for myself instead
Now we all know and love the Blanket of Darkness I shared like a year ago, and let me tell you, I love that thing to death, it's a fantastic blanket and it has kept me so warm this whole winter. That said, while that blanket is fantastic in the middle of the winter, I did find myself kind of struggling during the fall and spring, when like. It's just slightly cold enough that I wanted an extra layer, but the thick, pure wool of that blanket was actually a bit too warm.
So when I realized I could make myself a thinner blanket, like, yeah, I wanted to take that. The Tynn Line is 53% cotton, 33 viskoce and 14% linen, and it's a thinner yarn, I used a 3 mm hook for the project. A perfect yarn for me to use for a fall/spring blanket.
And so I ended up committing to it, got more yarn so I'd have enough for a small blanket, and got to work. I think I started working on this around November 2023? Maybe December? Can't remember, foolishly I did not write down when I started working on it.
Now originally I was going to make this a striped blanket, but as I was going along, making those squares I started to rethink that plan a little

I also considdered attaching the smaller squares together to make bigger squares, but after asking friends for a second opinion we all agreed the middle design would actually look the coolest
Not that it mattered too much, I had to first finish the granny squares before I'd actually start putting the blanket together
But eventually I finished the squares. Each square is a little over 8x8 cm so the 10x18 square blanket needed 180 squares.
Now I have my personal preferred way to attaching granny squares, which is zigzagging down from one corner of the blanket to the opposite corner. But I wanted the blanket to look somewhat seamless, and I knew I wouldn't be able to do that if I just started attaching them one by one. So I decided to start by attaching all the squares into 1x3 square strips (as seen on the chart), and once the strips were done, do my usual corner-to-corner zigzag with the strips. This way I was able to attach the orange squares together with the orange yarn so the orange strips looked more solid, while the rest I could do with the black yarn.
Also I found out I had made four granny squares too many, lmao
But it was fine, actually. Because I did then proceed to finish the blanket, only to realize... It just felt too small. I just wasn't happy with the size.
Like the blanket was fine if I wanted to wear it on my lap when sitting or something, but I wanted to throw this thing onto my bed to keep me warm, and the coverage wasn't going to be enough for that.
So as much as it pained me. I ordered four more balls of yarn. And made 68 more squares (those four spare orange squares did not go to waste lmao)
So the total went up to 252 granny squares as I extended the side by two rows and the lenght by one pattern repeat.
But yeah. Made those granny squares. Weaved in the tails as I went along and turned the granny squares into strips too while I was at it. And once done, finally added the extension to the blanket. Finished it off by adding a single row of double crochet around the edge. Badabing badaboom we got a blanket.
Now the blanket does have two sides to it, a good and a bad, because I was lazy and chose to crochet the squares together instead of sewing them with a needle. Had I done it with a needle it would've looked better without a doubt, but god damn, I did not have the patience, not this time.
So the backside looks better than the actual front, and that's fine by me
In anycase, I'm glad I finished this project, it turned out super cute, and now I have a perfect blanket to keep me slightly warmer as the weather changes ✌️✨
#Moon posting#Yarncraft Diary#Crochet#Crochetblr#Yarnblr#Oh and at the end I have like 15 grams of both the orange and black yarns (each ball was 50 grams)#And this took like 7 balls of the orange#Since I used the scraps from my mom I don't know how much black yarn I actually used/needed but definitely more#Since I used it to put the whole thing together in the end#But yeah. I'm so happy with how this blanket turned out. Even my cat had to give it a test ride the second I threw it onto my bed completed
17 notes
·
View notes
Text
Remember my first crochet sweater from forever ago? The one that turned out like shit?

Frogged it and now it's a knit 😎
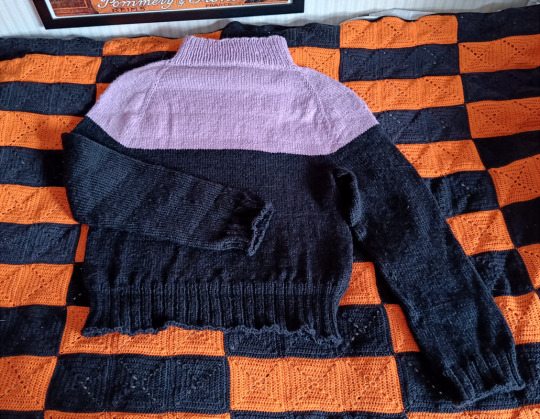
So to recap; I tried making a crochet sweater based on a YouTube tutorial like years ago, and although while making it I could tell it didn't seem... right... I just kept on telling myself to "trust the process" and that "it'd turn out okay in the end"
It did not
The sweater ended up being so square-ish and massive I could've fit three of myself inside of, going well beyond "comfy oversized sweater" straight into "clown clothes" territory. It was bad.
On top of that, although I tried to get the same yarn to do the top of the sweater in a pastel purple, I ended up leaning about this thing called "dye lots" the hard way, as the yarn I had needed to finish the sweater ended up being a completely different shade from what I had used for most of the sweater.
So yeah. The sweater turned out like shit, and I wore it maybe once before putting it into my closet and refusing to even look at it for like IDK two years.
Now I have some nicer yarn that I'd like to make something with, something preferably knit because I like knit fabric more than crochet, but I don't want to practise knitting clothes with that nicer yarn.
And so I figured, if I frogged this crochet sweater I could then practise knitting sweaters, reuse the old yarn (=don't have to buy jack shit), and maybe remake this failed sweater into something I'll actually wear
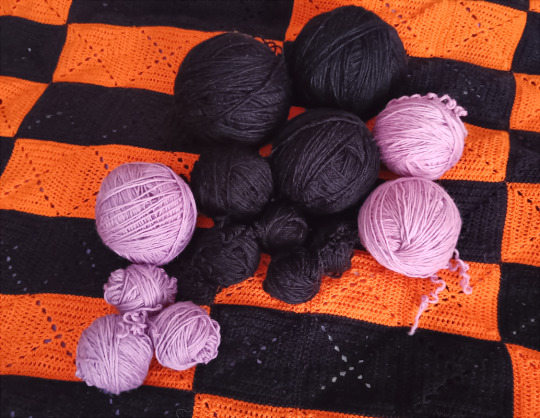
And so the sweater was frogged, this being all the usable yarn from the project. Pastel purple dyelot on the left while the more pinkish yarn (the stuff I had originally used while trying to convince myself it wasn't pink)
You can see the difference in the hue better here
So yeah. Now admitedly after frogging the sweater I did lowkey think about just trying to re-crochet the sweater and did kinda start on that, but I very soon realized that I probably wouldn't have enough yarn to remake the sweater the way I wanted to, and just trying to crochet with it made me double down on how much I just I don't like crochet fabric as clothes. It's just so bulky, man
So I got to knitting instead. And because I'm deranged I chose to... mostly wing it. I did look at a few YouTube tutorials for top-down raglan sweaters to get an idea of what I was supposed to be doing, but in the end, I do kinda learn the best by just winging it.
But what I did make a big note of while remaking the sweater was just trying it on as often as possible, just to make sure I didn't make it as oversized this time.
I did want to make this process relatively simple though and because I didn't want to risk losing out of yarn at an inconvenient point I chose to skip the stripes of the original sweater and just make it a simple two-color sweater. This also had the added benefit where I was able to use up all of the purple yarn on the yolk and just go as far as I could go with it before switching to black.
But yeah, the end result?

It's decent!
Like let's be real, my raglan increases are an absolute fucking mess and the shaping on the yolk is a little funny, AND I did make the collar too big (I was so worried my giant head wouldn't fit through so I made it way bigger than it needed to be, but honestly it's better that way than it being way too small. It looks a little silly but it's not the end of the world), and the sleeves ended up being like maybe 4-5 centimeters too long they could've been a smidge shorter.
But aside from that?
I'm honestly really happy with it
Because the fabric is super soft and nice, it's not too bulky, and most importantly, it fits me. It's not obscenely massive on me, it's just the right size.

And really, that's all I wanted. A sweater I'd actually USE, and yeah, I'm gonna wear the hell out of this next fall/winter when the weather gets cold again. It's not perfect, but it's more than good enough for me.
And most importantly, I now feel infinitely more confident in maybe using that nicer yarn sometime soon to knit something
Now what the fuck am I gonna do with the leftover yarn 'cause boy howdy do I have a ton left
#Moon posting#Yarncraft Diary#Yarnblr#They really weren't joking when they said crochet eats up more yarn than knitting does#Perhaps I will knit a little pink pillow for my cat with the leftovers
8 notes
·
View notes
Text
I did not take any before photos, because all I meant to do was remove this busted ass backpocket from an old pair of pants and leave it at that. This was not supposed to be A Thing that I'd document. It was supposed to be a quick, low-effort improvement
But then I noticed this
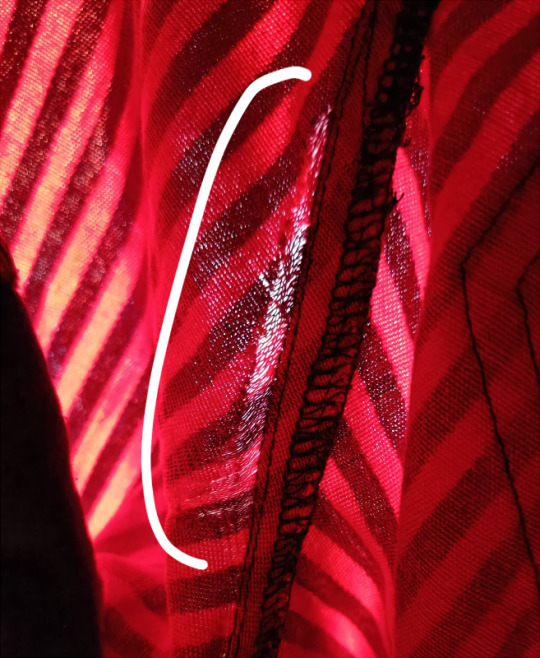
A rip. On the ass seam of my precious pants.
Kinda, it's not quite a hole yet but as you can clearly see, the fabric has deteriorated really badly and is well on its way to becoming a massive hole. On the ass seam.
And so I spent 8 hours mending these god damn fucking pants
If you needed more context as to WHY I'm so deeply upsetti about fixing these pants, here, I'm not even bothering with a TL:DR
The damage was about like 5-7 cm long (did not measure and can't be bothered to go check anymore), quite sizeable and as you can see from the photo above, quite see-thru. Like it wasn't too bad YET, I don't think anybody would've been able to see my underwear through the ripped area but. I wanted to fix it before it got to that point, right
So yeah. Started working on mending the seam at like 4 am, after I super quickly watched like two YouTube videos about mending rips on pants just to get an idea of what to do and just went for it.
Important thing to note is that because I started working on this in the middle of the night, I could not use the sewing machine because it woud wake up the whole bloody neighborhood. So it was gonna be all by hand
So I grabbed some scrap black cotton fabric I had laying around to use as reinforcement for the mending. In one of the videos I watched, the person demonstrating their mending technique used some iron-on adhesive to attach their fabric patch instead of relying on pins. Because I wanted to make this as easy as possible and because I figured it could help stabilize and strenghten the broken fibers a little bit (maybe?), I used some fabric glue because it's all I happened to have on hand
So I very gently dabbed a tiny bit of glue onto the the damaged area (inside the pants) and slapped my fabric piece onto it, cutting it slightly smaller after the glue was dry enough
And yes I failed the apply the patch straight so the first like centimeter of the damaged area didn't even get the patch on it. But like. Whatever man fdjghskdjfg
I picked some sewing thread that matched the pants' colors the best and just. Got to mending/borderline embroidering. On the bottom picture, you can see the first litle bit of mending I did on the right side, mostly on one red stripe and just a smidge on the black to the right of it.
It looks like ass.

Also, although I tried to apply as little glue as possible to the area, I still appearently managed to apply too much, so there's like visible glue residue on the ripped area. The glue also made the fabric really stiff and thick, which I could notice because I could tell if I did any mending outside the glue area, like my needle could pass so much easier through the two layers of fabric if there was no glue.
This alone made the process of just mending this rip take eight fucking hours. Also using a single thread of sewing thread did not help, I did realize on the final four stripes I could hold two threads at once for better coverage, so better late than never, but jesus christ I'm a dumbass
(Also no I absolutely do not expect the sewing thread of hold up super well, it'll last however long it'll last and that's that)
But yes. I kept on mending. For eight hours. From 4 am to noon. I did take like two brief snack breaks but that was p much it. Eventually, I had this on my hands

Cleaned it up a little bit and it turned into this

Now this cotton I used to reinforce the rip probably wasn't the best pick because it did want to start fraying immidiately, so I ended up applying just a smidge of the fabric glue onto the black cotton too, just to help it last a smidge longer maybe and keep it from fraying
But yeah, with that, the mending was done. I did have a Moment of Fear when I realised that the black cotton was quite thick and I was suddenly So Afraid the patch would become visible once I'd put the pants on-- like the shape of the patch ghosting on the other side. Which, considdering the shape and the location of it would be absolutely mortifying
But, when I did a quick test try-on of the pants I realized that the rip was actually much lower than I first thought, closer to my crotch than butt. Also, while the mending looks horrendous close-up, ain't nobody going to notice it from a distance when it's so low in my crotch.
So it's all good! The mending worked out!

Again, it doesn't look good close-up, it's super wonky (since the glue spread the fibers and left them stuck in the position they were in and I was just trying to follow the stripes), but it's good enough
Anyway, at that point I figured. I've gone out of my way to fix this rip when all I meant to do was remove a back-pocket. I might as well go all the way and fix that pocket properly too
To me back-pockets on pants have no purpose aside from maybe protecting the actual fabric of the pants from wearing out so fast by taking the damage instead. So I didn't need a pocket replacement (hence I considdered it optional to begin with)
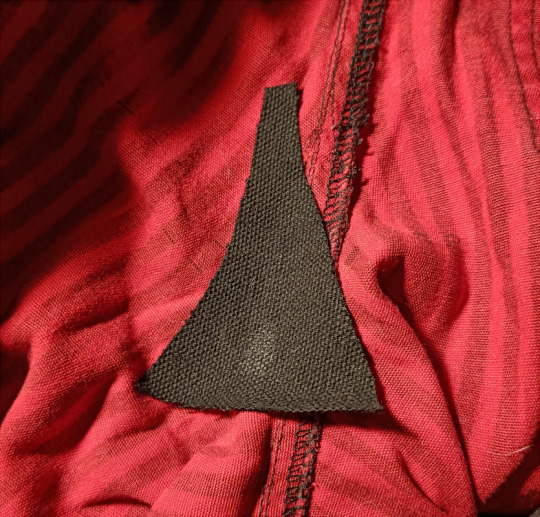
But when I ripped the pocket off you coud see where the pocket had originally been, and while the indentation could probably be fixed by ironing the pants a bit, there were these small holes from where yarn had gone through the fabric so like. Yeah let's just replace the pocket
(Also sorry about the cat hair, did not clean it for this photo because god knows it would've been covered in a whole new layer 2 minutes later, you know how it is)

Using the same black cotton (since it's what I have and it fits just fine here), I freehanded the pocket like a gremlin.

Could not be bothered to do a better job, but again, I don't need it to be a functional pocket.
The good news though was that by this point it was noon, so I could bring out my sewing machine to finish the job for me

(I could have hemmed the sides, but did not bother. It's going on the inside, this is good enough)
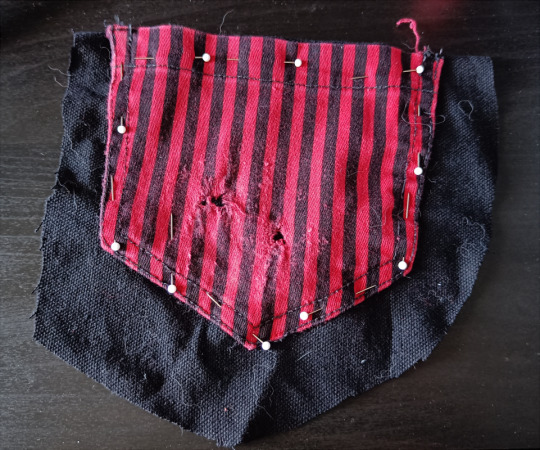
Pinned it down to where the original pocket had been (using the indentation as a guide) to sew it on

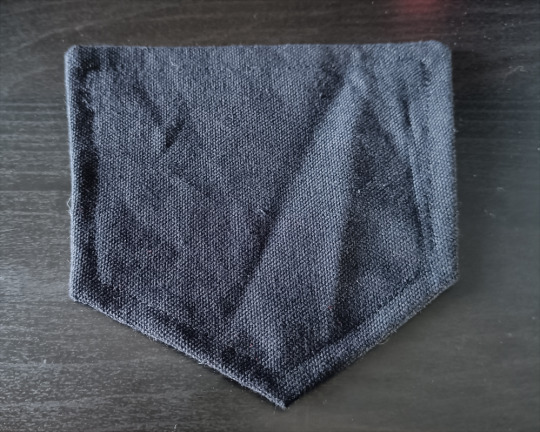
And boom, pants fixed

The pocket took me like less than two hours to add (but this doesn't include the time it took me to remove the original pocket in the first place), so, yeah, much faster than hand-mending the rip.
In hindsight, I probably should've replaced both pockets if only because the fabric on the other pocket is wearing down, but like
By the time the thought crossed my mind I had already lint rolled all the cat hair off the pants and ironed them, the sewing machine was already put away so I did not want to bother with it. It's fine

But ye, you really need to look close to notice the mending, my 13~ish year old pants from approx. middle school are okay now, they have been saved. And now I can wear them to tomorrow's convention. Wheeeeeee
#Moon posting#Yarncraft Diary#Alt DIY#Goth DIY#Spending 8 hours mending pants while deeply sleep deprived made me feel like I was becoming the Gollum#Like when I was done I was mentally just screaming ''YES WE'VE GOT THE PANTS BACK POCKETSES DONE YES THE POCKETSES''#If I wasn't so sleep deprived and had the brain cells it would've been fun to write this whole thing as if it was written by Gollum#But posting this rn was more effort than enough lmao
23 notes
·
View notes
Text
Hey remember when this used to be a DIY blog
Me neither

Blanket! Gifting this to my aunt this Crimbus. Whee
Made with some Léttlopi yarn.
My mom had this unfinished knitted sweater (...I think it was supposed to be a sweater...) in the purple maroon and between me not knowing how to finish it (there were some wonky ass cables in it and the torso was not completed) and knowing full well I don't even like this color... I chose to frog the thing to repurpose the yarn.
Like it felt a little bad to do, but if I didn't do that then I was going to throw out the project entirely, because there was nothing else I'd do with it, and I'm not gonna waste perfectly good yarn man

And hey, this was a good amount of yarn (I know I did weight how much yarn this actually was but I can't remember for the life of me anymore, sorry) (Just believe me when I say that ball was heavy as fuck)
Not enough for a whole blanket but definitely a good start. I bought like 18 more balls of yarn (white and more of the purple maroon, though more white since I already had a ton of the poiple mawoon), and eventually got to working
Not gonna lie though, working with Léttlopi kinda sucks. Like it is a good quality 100% wool yarn (and it's not superwashed with plastic, amazing, love that), it's just that the yarn is so scratchy it was kind of painful to work with. Like to the point even the blanket was kind of unpleasant to touch because of the fibers sticking out
Thankfully the yarn softened A TON when I washed and blocked the blanket, kinda wish I had tried softening the yarn before even working with it but ehhhh it be like that, and I'm sure it'll soften even more with additional washes (but that's up to my aunt to deal with lmao)
But yeah, it sure is a blanket.
I've done so many granny square blankets by this point I thought it'd be fun to do a different type of crochet blanket, especially one where I wouldn't have to sew the damn thing together at the end for once. And it was fun, would do that again
My only regret was making the stripes of the blanket a bit too thin. There's two rows of granny clusters with a row of single crochet between them (just to add a bit more bulk to the rows). But, in hindsight, I wish I had done four granny cluster rows for each stripe, IDK I think thicker stripes would have looked better. But, it is what it is, just a good reminder for myself if I ever make another blanket like this (for myself) (in different colors)
#Moon posting#Yarncraft Diary#Yarnblr#Crochetblr#Fun fact I finished this blanket months ago and I just could not be bothered to take a photo of it#I did take a photo of it at one point but the lighting was so bad I figured I should retake the photo#And I couldn't be bothered. Until today. Because I needed to wrap this Crimbus Present for Crimbus#Y'know#I am so sorry to the people who followed me for crochet content 6+ months ago the anime brainrot has been unreal
10 notes
·
View notes
Text

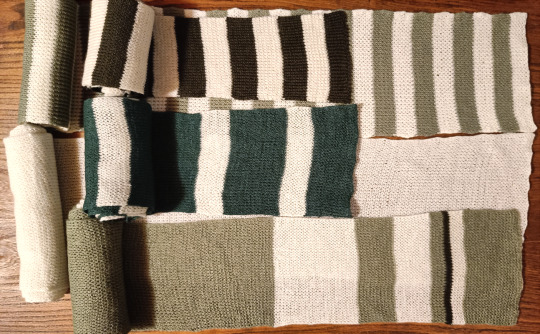
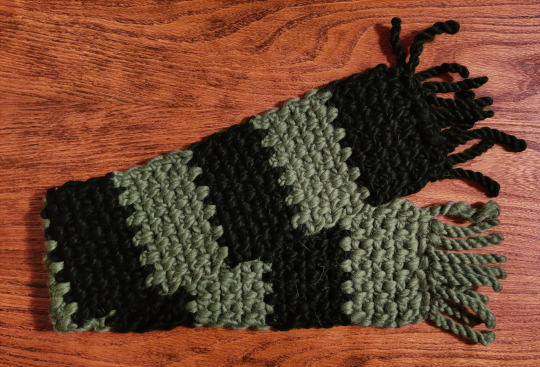
I have been stuck in Knitting Jail for most of this year, slowly working on making just a bunch of basic ass scarves to give out on Crimbus
They are wonky, they're frankly put downright laughable, but they're usable and extremely soft and that's what really matters
#Yarncraft Diary#Moon posting#Somehow fucked up the color balancing on the second photo so they look really red in that one but I can't be bothered to fix that#No I did not bother with rolling them all out because. They're just wonky ass scarves man. They're not that interesting#One is just a plain white scrf and three have like even striping patterns on them#Really the only ''interesting'' one is the bottom one on the second photo since the middle section of it is green#So there's only stripes on the ends of it#But yeah. They're just rectangles. Extremely wonky rectangles#Yes I did block them you can even see it on the slightly pointy sides of the scarves lmao#Tbh the wonkiness kinda looks worse when they're just rolled out on a flat surface like this#Like if you were actually wearing them the wonkiness wouldn't be that noticable (probably)#Also to be fair I probably could've finished these sooner had I not taken breaks to do other projects between scarves but like.#Knitting scarves is not interesting. I was losing my fucking mind. I needed breaks desperately#So I did other shit from time to thime#But it's fine now 'cause these fuckers are DONE and I am FREE from Knitting Jail and can return to Crochet My Beloved
7 notes
·
View notes
Text
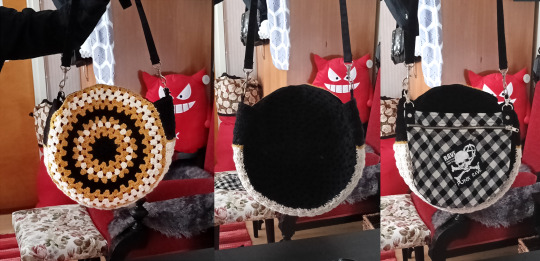
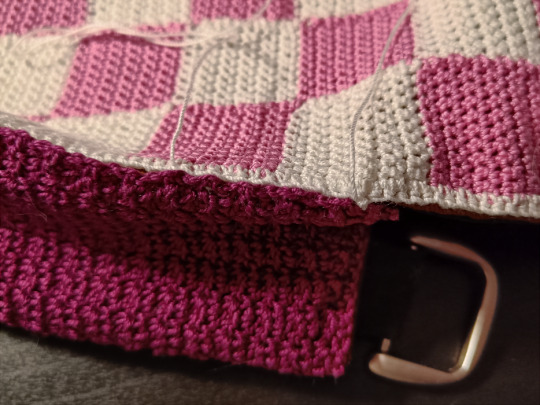
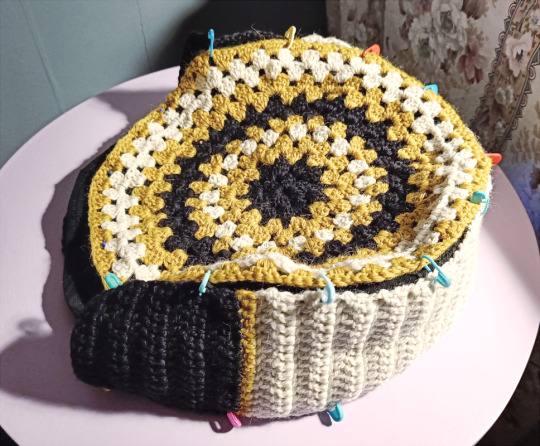
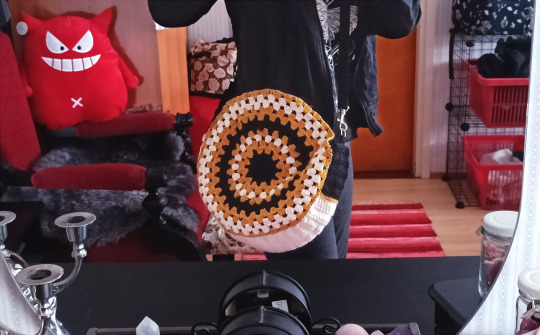
A relatively quick and quite experimental crochet project to kiiinda start the year off; a crochet bag from scrap yarns! (And other scrap materials now that I think about it)
So I had some yarn left over from my blanket of darkness (I can't believe the rounds that post is making, what on earth), one untouched ball of black yarn and then three balls of yarn I had used misc amounts of. I knew right away there wouldn't be much yarn there for any big project, I did kinda considder just making myself a simple scarf but right now I'm actually in the middle of knitting four scarves to give out to family on Christmas* so between the reality that I probably wouldn't wear a striped scarf in these particular colors and me having enough scarf projects to do anyways... yeah, the idea wasn't particularly appealing
*(GOTTA GET STARTED EARLY, also it's the misc yarn I bought when our yarn shop was shutting down, the stuff I have no idea what to do with. Currently on Scarf 2, I'll probably share photos when all four are done. Eventually. Knitting is slow. So slow I had to do a crochet project between the first two scarfs because I was losing my marbles.)
Now I have Instagram so I can post art there once every six months, I'd hardly considder myself like an Insta user, but sometimes it is kind of nice to browse the things Insta reccomends because there are some lovely things posted on there. A while back, this post of these crochet bags got reccomended to me and they have been haunting me ever since. Like look at them, they're really pretty. And yeah, when I was wondering what I could do with these scrap yarns in particular... The idea of trying to make a bag seemed really fun
And specifically, making a crochet bag with a lining on it, so it'd be like, actually kind of usable. I've never made a bag, not a crochet one nor a sewn one, and I didn't want to up any tutorials or help on how to make a lined crochet bag either, I wanted to just wing it and figure it out by myself (for better or worse) (mostly worse)
So I started the project by just making the actual crochet part of it
This whole thing involved a lot of math, trial and error to figure out the Max Size of the bag I could make (also I wanted to a round bag for some god forsaken reason) with the yarn I had. I didn't have too much of this specific yarn, and I didn't want to buy any more, just use what I already had.
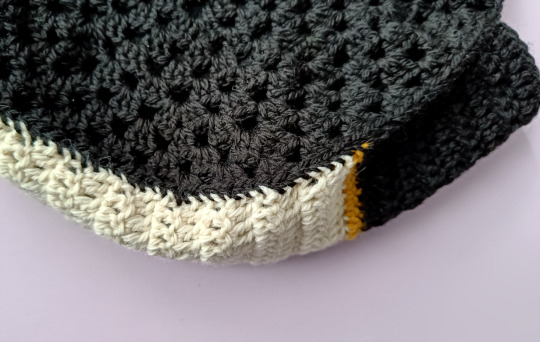
At the time I thought it'd be a good idea to make the "backside" of the bag a plain black, since not only the largest amount of yarn I had was black, but also because it'd be the "inside facing side" that you'd theoretically never see if I wore the bag. In hindsight I regret that decision but we'll get back to that later
I did try out a few different color layouts, tested how many stripes of what colors I could do with the yarn I had (again, math), for some reason this was the one I liked the most though (don't ask me what the numbers mean I can't remember anymore) (something about the stitches/rounds), though I did add one more round since I had just enough yarn for it

But, here is how my pieces turned out. At this point, I had no yellow yarn left and only a Very Very Small Amount of white and black, not enough to do any more rounds or make the bag or the bottom piece bigger/longer, but just enough for some sewing later on
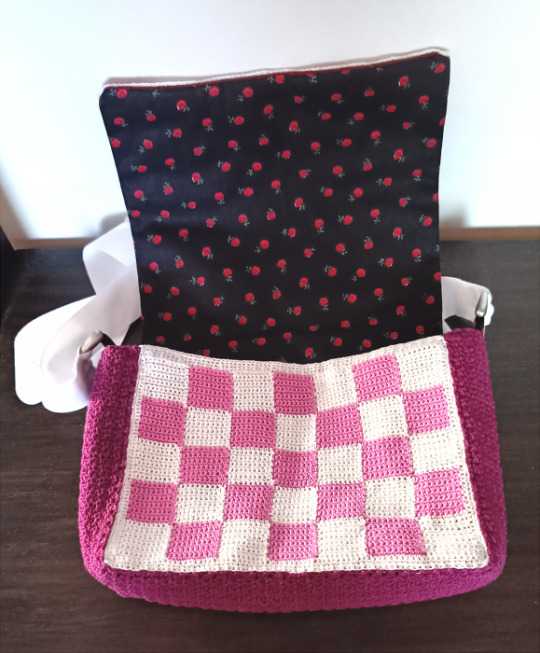
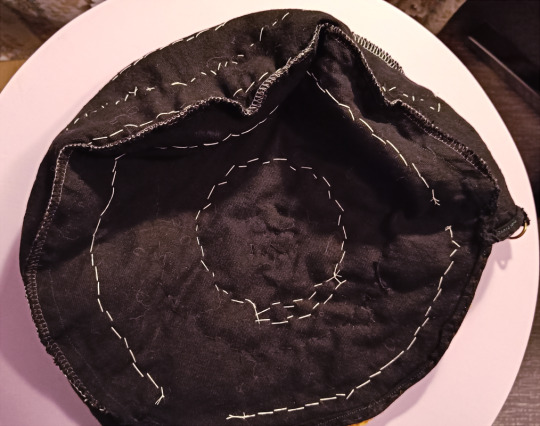
But, with the pieces completed, it was time for me to do the lining

I've had this black fabric for years now, I got it for some project that I never actually did so it had been just sitting around, collecting dust for years, so I'm glad I finally got around to using it.
I laid it down, put the crochet pieces on top, traced them and cut 'em ✂️✨ Followed by sewing them together, a process I did not bother to take photos of because it wasn't particularly interesting.
((Also I had to take a massive break at one point because I realized I really actually needed my mom's serger but that thing was covered in decades worth of tobacco, dust and grime so it needed to be cleaned bad. There was no way in hell I was putting my fabric pieces on that filthy thing. (Also I've never used a serger before so I had to look up tutorials how to use it jdfhjkdfg)))
Once I had put the lining together I washed it (just to get any excess dust and cat hair off it) and ironed it ✨
It looks like an absolute mess, lmao, you can tell I don't do sewing (it almost looks like a tulip... And man, a tulip shaped bag could be super cute...)
But it's fine, because this lining's getting covered in crochet pieces >:)c So ain't nobody gonna see the wonky sewing once it's done! (Also to be fair, big part of the reason it looks horrendous here is because the fabric itself was like, quite floppy. Like there's nothing to hold it up and keep its structure and shape at this point)
Now, one important thing needs to be addressed here. Although at the time I thought this was the best way for me to make the bag, in hindsight I know I should've done the opposite.
I thought it'd be easier for me to first sew the fabric together and then sew the crochet pieces on top, mainly because I believed it'd be harder for me to try to do sewing if the fabric pieces also had the crochet pieces attached to them. Like they'd add bulk to the fabric and increase the risk of me sewing over the crochet and somehow damaging the crochet and/or my sewing machine (or something, I dunno).
And while in theory that might be true, I now know that I would've gotten a much nicer, cleaner looking bag if I had sewed the crochet pieces onto this fabric first, because then I would've been able to add an extra inner lining. You'll see why that would've been prettier a bit later
I just want to point this out because while the way I made the bag works just fine for me, it's not the ideal way to do it, it's not the smartest nor the prettiest way to do it, and I can't reccomend it to anyone. Just wanted to give out this disclaimer, do as I say, not as I do lmao
Anyway, with the lining done, I started working on attaching the crochet onto the fabric with the bottom piece, first pinning it down and then hand sewing it onto the fabric.
Then I did the side pieces. I was careful to start from the middle of each crochet piece, slowly moving outwards to the edges as I was attaching the pieces, leaving the edges unsewn for now...
...because next, I wanted to sew the crochet pieces together. The crochet had more stretch to it, so I figured first sewing them together and then attaching the edges of the crochet to the lining would result in a cleaner look.
Sadly I didn't have much/any yarn left to so I couldn't crochet the crochet pieces together, somekinda slipstitch would've looked much cleaner and prettier, but with the little yarn I had left I didn't want to risk running out in the middle and having to unravel it or something.

So yeah, not particularly pretty, but it worked. And with that done, it was time for me to add a strap to the bag, before I'd go finish sewing the crochet pieces onto the fabric! You'll see why I did this now!
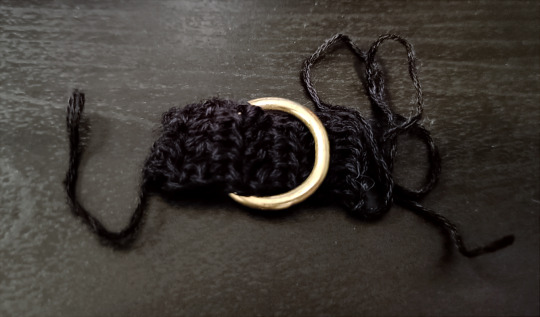
So I had some random ass, thin, black yarn leftover from... something, so I figured I could use some of that up and I did! I made tiny crochet straps and slipped small metal rings (from my mom's hoard) on them, and sewed them onto the bag
Specifically sewed them onto the fabric, didn't want them to be visible on top of the crochet lining (which is why the edges around the bag's opening were still unsewn at this point)
And in the spirit of using things I already had, I have these two straps from one of my old goth pants (though they're actually shorts now). And they just happened to be like, the perfect lenght for an over-the-shoulder bag
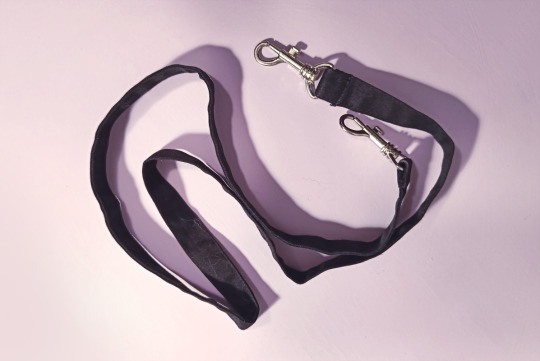
No the metals don't match but beggars can't be choosers and it's fiiiiiiine. What matters is that I got a free bag strap without having to make one >:)c
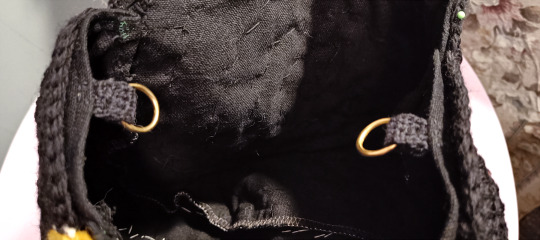
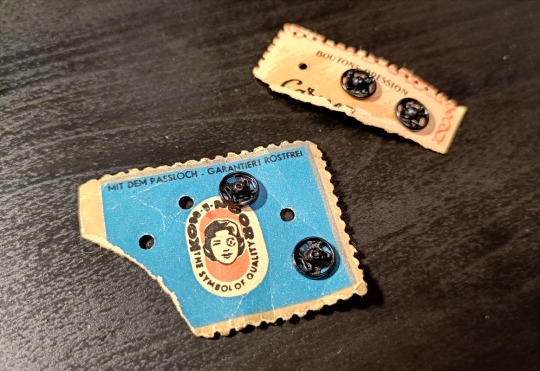
One last thing I did was add some buttons to the bag to hold it closed. I wasn't originally going to add anything but when I tried the bag on, I realized it was just a little too floppy on the opening. I didn't want to try to figure out how to add a zipper or anything, so I grabbed these ancient buttons (from my mom's hoard) and sewed three of them onto the bag, so it holds its shape better
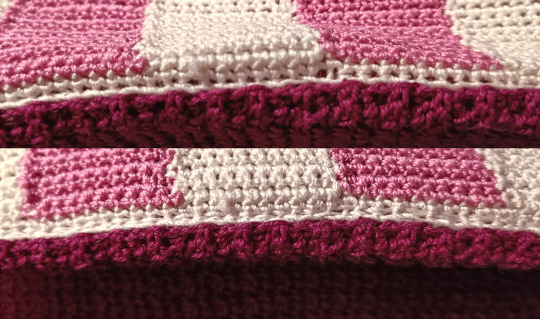
Finished sewing crochet pieces onto the fabric and finished up the very very outer edges as well, and the bag was pretty much done!
Indeed. The inside looks like ass. Although it's mainly just the white yarn that I used, since I didn't want the sewing to be too obvious on the outside I tried to match the thread I used for the sewing to the part of the crochet I was attaching.
If I had an inner lining, the inside would look much nicer since all of this would be hidden underneath it, but at this point there was no way in hell I was going to rip these pieces apart just to add a lining, nah, it's fine, it's good enough for me and good enough for my first bag. But yeah, if you want to make a bag, learn from my mistake here
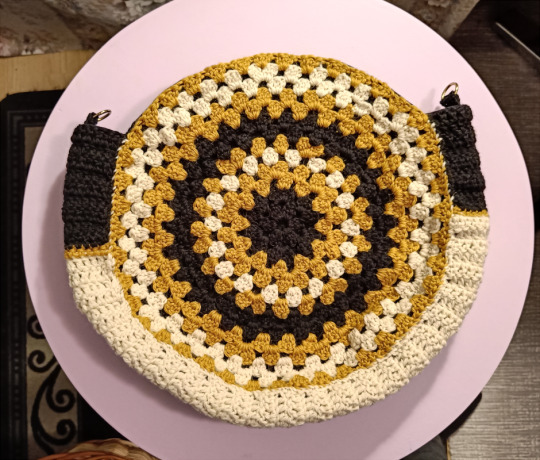

But, with all that done, the bag was done!
And yeah, here you can see why I regret doing the colors the way I did. More specifically, I regret making the bottom white. Like, I thought it would look cool and interesting, and I thought it'd be a waste of the white yarn to use it on "the backside" (the side noone would ever see), and I didn't have enough yarn to make the bag symmetrical on both sides (at least not without severely down playing the part of the yellow yarn in the design).
But in the end, because the bag doesn't hold its shape SUPER WELL, it makes the bottom piece more visible than I expected it to be. Like sewing on the crochet parts did add some structure to it, but it doesn't hold the tin cookie jar shape the way I had hoped it would. So the bottom is much more prominent because of that, and because the bottom part has like, some interest to it with the contrasting colors and whatever, it draws in the eye even more. Like, I really should've just made the bottom piece pure black and used whatever leftover yarns I had to make the backside of the bag.
But, it is what it is. I've made my mistake and now I get to learn from them!
In anycase, here is the bag, despite looking like an absolute mess and not turning out the way I had hoped it would, it still turned out pretty cute.
SHEER COINCIDENCE, I realized that I had this ancient little extra pocket thing (possibly from the same old goth pants as the strap, though I'm not sure, I can't remember) which just HAPPENED to be the exact same size/width as the bag. Like, I did not plan for that at all, but it's the perfect size, so I can straight up just keep the pocket on this bag and use it as an extra, separate compartment if I need one. Lmao, what are the odds
Also the strap from my old pants really is like the perfect lenght for this bag (/me, since I'm short, and it's not adjustable or anything)
Weirdest thing about this project is that it hasn't made me want to make more crochet bags, but it did make me want to learn to do embroidery so I could make custom embroidered bags jkdfhjahgfdg
(Disclaimer, the yarn part of the bag is 100% wool, I don't want to have to deal with washing it, and I don't want to get it dirty, so realistically, I am never going to wear this bag outside dfjghsdjfgh)
#Mine#Yarncraft Diary#Yarnblr#Crochetblr#Yarncraft#I shall now disappear into the void as I go into Knitting Jail
13 notes
·
View notes
Text
When life gives you lemons, you make lemonade
Or in this case, you attempt to crochet some cushion covers for some uncovered bolster pillows?
You know how it is, mom died, left me with her yarn stash, etc etc
So we have a bunch of these foam tube pillows around the house, ones my mom had actually made crochet covers for herself. But the thing is... There were some problems with them.
First, I fucking hated the colors she had used. They were these hideous, desaturated denim-blues + mustard yellows, colors that I maybe wouldn't mind on their own but absolutely could not stand together (but blue just does not belong in my color palettes in general)
Second, she had crochet'd the covers shut. So you could not remove those pillow cases and wash them without destroying them.
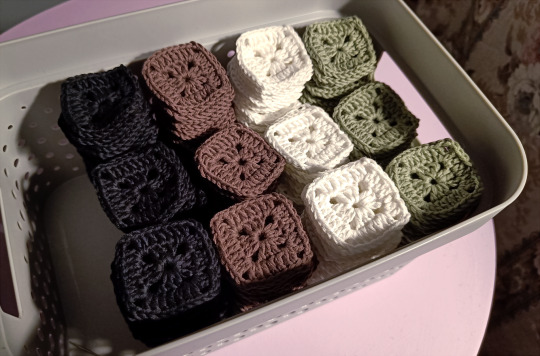
So I looked at the random yarns I had around, found this green cotton yarn and figured. If I supplement it with black, I could make cute covers for these pillows. And so I did.
I used slightly less than six balls of Schachenmayr Catania for this (colors 0412 and 00110). I only had the one ball of green yarn to start with, I didn't know how much I was going to need to do just one cover but I knew I wanted these to be black+green striped covers. So I ordered one ball of black yarn to start with, just to get started and see how far I could get with those two balls of yarn.
Once I realized I'd need like one and a half balls per color just to finish one cover, I figured I might as well do a second pillow case while I was at it, so I'd have two matching pillow cases and hopefully wouldn't be left with awkward amounts of scrap yarn at the end. And so I did that, ordered four more balls of yarn (after taking a multi-month break from the project) and finished these pillow cases
And yeah, these were really easy to do actually. I did considder doing single crochet instead of double, because you wouldn't be able to see the foam through the gaps in the crochet as well, but I feared single crochet would eat up too much yarn and I wasn't against making these pillow cases as fast as possible, so I went with the double
And yeeeaah, I just. Crochet'd some rectangles in the right size, sewed the sides together to make a tube. And to make the covers easy to wash, I left the ends open, tying them together with some yarn. Again, mainly just so they'd be easy to wash, but also, I figured that'd make the pillows look almost like wrapped candies and I thought they'd look kind of cute.
Honestly I think these turned out really cute, my only regret is that the second one I made, I messed up with my measurements and made the fabric too wide, so the cover is way too big for the foam piece. The only way to have fixed that would've meant just completely unraveling the whole thing and starting from the begining with fewer crochet stitches and... I do not care that much. It's fine
But hey, that's one more project completed, whee
#Moon posting#Yarncraft Diary#Yarnblr#Crochetbr#Another one of those ''I could've posted about this like a month ago but could not be bothered to do so''
2 notes
·
View notes
Photo


This blanket took fucking forever to finish good fucking god
I mean it’s not that shocking, this blanket is made of 1092 tiny granny squares, crocheting that many squares is going to take some time, not to mention sewing them all together. But, I did it, I completed this absolute nightmare project of a crochet blanket, here it is
Right so I started working on this blanket on November 12th and I was originally aiming to make it a 1120 square blanket. It was also meant to be a Christmas present for my dad but. Alas. I couldn’t finish it on time. Not even close. I finished the blanket on January 9th.
The main reason I failed to make it by Christmas was that I SEVERELY underestimated how long it’d take me to just sew the squares together- like I was hoping it’d maybe take a minute and a half per square, but it ended up taking almost 5 minutes per two sides of a square. Mind you, part of that is because (to avoid having to weave in lots of yarn) I tried to sew the squares together with strands of yarn as long as possible, and that made it take forever. But yeah. 5 times 1092 squares turned into 91 HOURS of sewing the the squares together.
And that was just the sewing part, of course just crocheting them took forever too. But because I didn’t think the sewing would take that long, I didn’t at all account for it when planning my deadlines- like I figured if I did about 30 squares per day I’d have all my squares done by December 15th and then I’d have like a week to finish the blanket, but not only did I not quite have those squares done by then, but then I also got really sick with a flu. Like, “I feel so horrible I can’t do jack shit”-sick. Just before Christmas.
And then I had to start doing convention prep. Not to mention I had commission work here and there.
I was originally so desperate to get the blanket done BEFORE Christmas that I genuinely considdered making it like a full 6-7 rows (300+ squares) shorter than I originally intended just to finish it on time but it became really obvious really fast that even if I did make it smaller, I still wouldn’t make it in time, not to mention it wouldn’t be long enough for a grown ass man, so... I did start sewing tha blanket together before I had all my squares finished (and made more squares later on once I had most of the other squares sewn together already)
I did end up cutting out the last row of the blanket, though this was mainly because I ran out of yarn and I didn’t want to go buy four more balls of yarn just so I could add one more row to the blanket (and if I did get the extra yarn, I could add like 6-7 more rows, since one balls made about 52 squares and one row needed 7 squares of each color). So yeah, the blanket is one row shorter thanI originally intended but that’s fine
But yeah hubris kicked my ass with this project, but I did manage to finish it in January, washed it and ironed it before gifting it to dad (and he seemed to like it)
Anyways about the blanket
So I made this blanket entirely with Sandnes Garn yarn, their Mandarin Petit, which is a 100% cotton yarn. Each 50g ball had about 180 meters of yarn and to make this blanket I used in total 20 balls of green, white, black and brown (5 balls of each), as well as about one and a half balls of brown to sew the squares together and for adding the edge around the blanket.
As mentioned before, it’s a 1092 square blanket, with 273 squares per color. It’s 28 x 39 squares big (almost 125x180 cm, each square is about 4,5 x 4,5 cm, but I didn’t measure the blanket after doing the edge and ironing it so I don’t know how big it ended up actually turning out, but that was the size I was aiming to make it, so it’s somewhere in that region)
I had wanted to kind of make a blanket out of tiny granny squares for a while and this project ended up being like “the perfect opportunity” for me to do that- I wanted to make my dad a cute blanket, something with fun colors (but also something a middle aged man might tolerate) and when I saw these yarns at the local yarn shop, it just seemed perfect.
And I do think the yarns and the color palette were cute, but that said, I do kinda regret the colors I picked. Not because they’re bad, but because they’re kind of high-contrast, and with a blanket with so many tiny squares, it looks really busy with the high-contrast palette. I think a more subtle palette with more similar colors would’ve worked better with the tiny squares, OR I should’ve made the squares much larger. But, I realized that mistake far too late into the project to really fix it so it is what it is (although I think I maybe could’ve compensated for it if I had sewn like smaller sections of the blanket together and then done brown rims around those before putting it all together, but that would’ve required a lot of planning and re-measuring etc and I didn’t have the energy to do that anymore)
I did originally considder crocheting the squares together but after my innitial test I didn’t really like the look that much, so I tried sewing the squares together and liked it a lot more. And I did choose to do the sewing in brown because I figured if any color would be visible on the seams etc, I’d prefer it to be the brown- white would’ve been too obnoxious, black too dark, and green just... didn’t seem right. Brown felt perfectly neutral here (which is also why I picked it for the edge of the blanket)
But yeah. I wanted this to be my final project of 2022 but it ended up being my first project of 2023. Oops (I’ll still considder it a 2022 project)
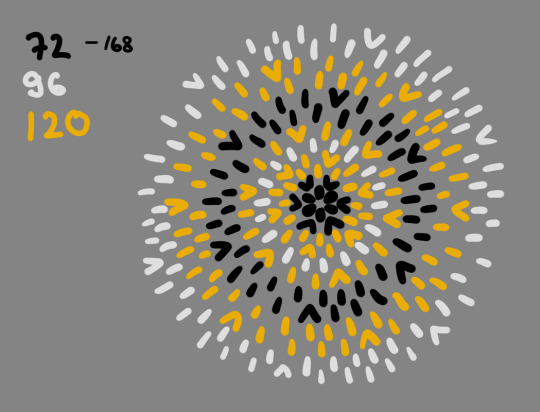
Oh yeah here’s a chart I did when I was trying to figure out what kind of a layout I wanted to do with the blanket, because I wasn’t sure of the pattern

#Yarncraft Diary#Yarncraft#Yarnblr#Crochet#What I learned from this project is that I never want to do another blanket with mini granny squares#(I would like to do a hexagon blanket at some point)#(And maybe a chevron blanket? [Thinking emoji])#(But I have another blanket I still haven't finished so I really need to finish that before I start another project)#((Our yarn shop has been out of the yarn I was using for the blanket for like 6 months okay!! I would've finished it already otherwise!!)#(I just need to order the yarn online and then I can finish it))#Mine
16 notes
·
View notes
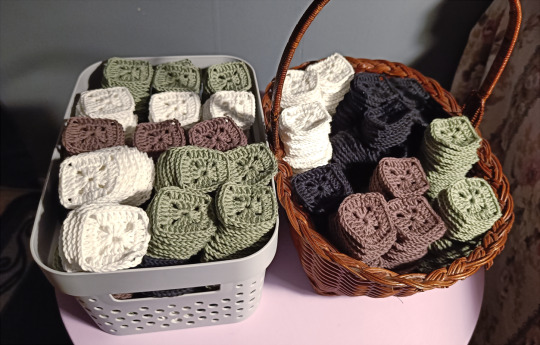
Text
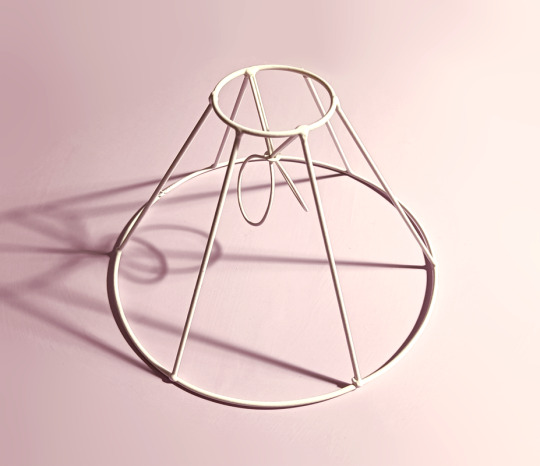


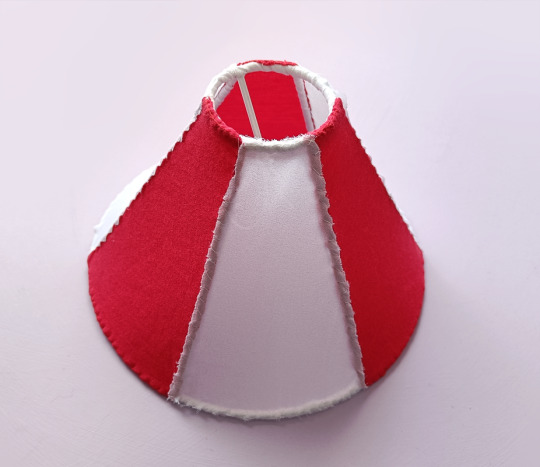


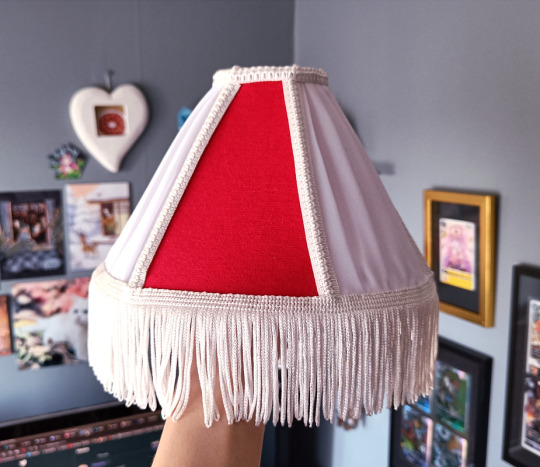
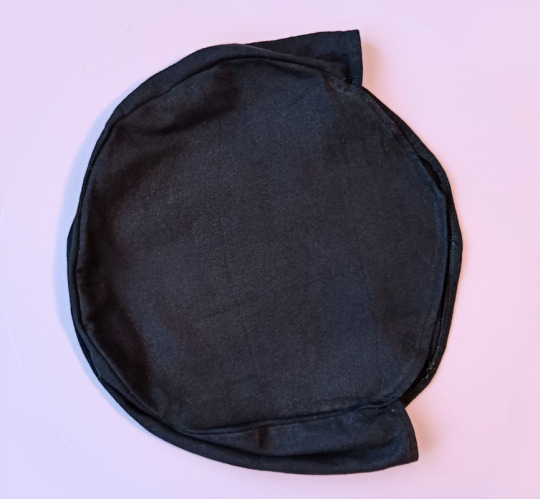
Certainly turned out wonky but I sure did make a lampshade
Okay so earlier this year I started getting reccomended a bunch of videos of a woman (re)upholstering (not sure if that's the right word to use here but w/e) vintage lampshades on Instagram. Unfortunately for me, she made it look really fun and easy.
Even more unfortunately for me, I just happened to have this small lampshade frame sitting in our attic
So of course I wanted to give it a shot
I could not fuckin resist man
So for this project I did have to buy some cotton ribbon to wrap the frame, some fabric glue and the decorative ribbon, but all these things together were like 15 bucks at most (if even that). The frame was free and I used some random fabric scraps I already had, so, ye
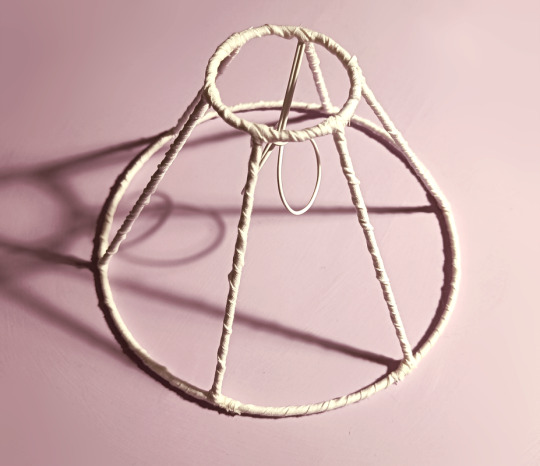
So, kinda using those videos as a guide, I did start by wrapping the frame with the ribbon (so I could sew the fabric onto something). Then I sewed on some red fabric on the frame, followed by white
Now I originally wasn't even going to buy the fabric glue, but the white fabric (I think it might've been chiffon but I can't say for sure) was actually shedding like, A LOT. To the point I was worried the fabric would fall apart if left alone, so I actually got the fabric glue so I could just gently dab some onto the edges of the white fabric so it'd just stick to itself and stop fraying. And it actually worked really well
Anyway, after doing one layer of white fabric, I did come to the conclusion the white was much more transparent than the red, and I did want to try to do something more interesting than just two flat fabric types
So I tried pleading an extra layer of white of top
I have never tried to plead fabric before
It turned out like shit
(At least the first panel did, by the time I finished the third and final panel I had kinda figured out what I was doing, but man, the first panel looked like ass)
But hey this was just a fun little project for myself, it didn't have to turn out good lmao
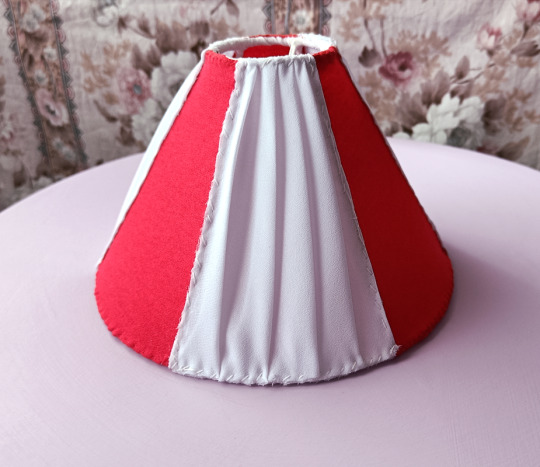
Now I did actually get some lace fabric with the intent of putting it over red, but the fabric scrap I got from the fabric store was actually like... Like the lace pattern on it was too dense, so it made it a lot more opaque than I had expected, and the pattern was too big too. So I did end up scrapping the idea (I can use the fabric for something else, it's fine)
But it might've been for the best because... Like if you watch Ace of Shades' videos, there's a reason you see her always sew the fabric and the lace together- the more fabric layers you need to sew on top of the frame, the harder it actually gets to sew. Like I had three layers by the time I had added the pleaded part, a fourth layer would've been a nightmare to try to add man
Anyway, with the panels done, I started glueing the decorative ribbon onto the frame (I had originally intended to sew it on but, since I knew how hard it was to sew and since I had the glue, I just went with the glue instead)
Now I actually glued some ribbon right on top of the frame, when I realized... I wanted to actually block the top of the frame too. I had intended to leave it open but when I put the ribbon down, I realized it looked really ugly because you could kinda see inside
So I carefully removed th eribbon before the glue finished trying, got some more red fabric and very painstakingly sewed on a tiny piece of fabric on the top. Then I just reglued the top ribbon, did the ribbon on the bottom edge of the shade, and yeah. Lampshade done!
Like I said, it turned out wonky, but considdering this was my first time trying to make a lampshade, it's arguably kinda decent. And it's mine so whatever
Now I just need to find an actual lamp I can use it with LMAO
#Mine#Yarncraft Diary#Refinish Diary#Don't know which to tag this with so let's go with both lmao#I did actually finish this project like over a month ago (if not longer) but I just never got around to posting#But hey here it is
3 notes
·
View notes
Photo
Needed to make a super quick crimbus present for some family so here’s a simple crochet scarf. Made with super thick wool(+alpaca) yarn so it’s super warm and soft, done in moss stitch because I just like that stitch and the texture it has and I thought it would look cute in stripes.
I’d say this took me like a day to make but to be fair, I did completely unravel and redo the scarf from scratch so realisticly it took even less time. My first attempt I did like 5 rows of each color but the scarf was wider, but once I got to the end I realized the scarf wouldn’t be long enough to be usable. So I frogged it, reduced the stitches on each row enough so I could do 7 rows of each color instead, and that made the scarf just long enough to be usable.
And with the leftover yarn I did quick fringes at the end. One of which my cat chewed off while I wasn’t looking and had to redo :)
#Yarncraft Diary#Yarncraft#crochet#yarnblr#For the record the yarn was not particularly cheap so I only got two balls of it so like. I really wanted to make sure I could make...#...the whole scarf with what I had. I did not want to go and buy any more yarn for this. Two skeins and that's it#It's a very simplistic present but for a good reason mainly the fact that I'm still making a blanket for my dad and it's not done yet#So I really needed a project that would be easy and most importantly FAST TO FINISH#And this was exactly that do soooo yeah#Mine
2 notes
·
View notes
Photo

Oh look I knitted like half a sweater
Okay so amongst my mom’s knitting projects there were a few unfinished sweaters, including this off-white sweater. She had knit most of the torso piece (in the round) and had started working on the sleeves, but unfortunately the sleeves had partially fallen off the needles and had started unravelling.
For a long time I didn’t know what to do with this unfinished sweater. I didn’t really like the color, I don’t really enjoy knitting, and I’ve never knitted a sweater, so I wouldn’t even know how to finish this project even if I wanted to. But also... I didn’t want to just frog it, it was my mom’s project, a lot of time and effort had gone into it. I felt bad just thinking of unravelling it entirely.
So I sat on it for a long time, and I ended up taking yarn from this project to make a blanket. I took some balls of unused yarn, but I also unravelled what remained of the sleeves (rolling them into balls), and because I didn’t have quite enough yarn to finish the blanket otherwise, I unraveled a few rows from the torso until I had enough to finish the blanket.
With that project done, I was left with most of the torso and no idea what to do with it. Skip about 7 months into the future and I finally decided to pick this project up and try to figure out what to do with it (after having done a few tiny knitting projects).
As I mentioned before, I didn’t really like the off-white color of the sweater and I knew that I would never wear it if I finished it in that color, so (even if I hadn’t used up the rest of this yarn for the blanket) I had to get more yarn so I could finish the sweater. They no longer make this recycled-denim yarn, so I did have to go for a different yarn entirely, so there is a slight difference between texture and the size, but... I don’t mind it. Aside from black just being my favorite color, I think the extreme intentional contrast between the yarns works kind of nicely, since you can VERY CLEARLY see which part of the sweater was made by my mom and what I knit.
Now fortunately for me mom had done most of the knitting here, so all I had to do really was knit the sleeves and just a little bit on the torso before figuring out the arm+neck holes (and then finally doing a collar). And fortunately for me, the sleeves were super easy to do, as was the collar, and the first few rounds of black on the torso
But god, the neck hole. And the arm holes. That’s where everything went wrong
(Disclaimer: I have no fucking clue how to read knitting instructions. I would not have been able to look up any knitting tutorials on how to make a sweater to help me, I can not wrap my head around those things for the life of me, and I’m too lazy to learn)
So, first attempt I knitted a few rows and decided I would “split” the torso into a front and back part to knit the top of the sweater like this
Then all I’d have to do was connect the shoulder straps and attach the sleeves before doing a collar and I’d be done! But then... I started thinking... Remembering the sweater I crocheted last year, and how absolutely massive it turned out.
I got worried that if I tried to use what was essentially the same technique on this sweater, it would end up looking weird. So I consulted YouTube and came to the conclusion that I needed to do some shaping and make like a U shaped hole for the arms (instead of just splitting the round knit into two sides like I had done). Which meant I had to unravel quite a few rows on both sides of the sweater. And this was kind of a struggle
Like I tried to look up tutorials on how to unravel, I tried to do it the safe way by putting a knitting needle through the knit material and like pick up the row where I wanted to restart, but my yarn was quite tight so I couldn’t get my needed to go through for the life of me. I ended up having to pick up the row with a sewing needle and yarn, and while I managed to unravel safely, getting the shit back onto knitting needles just... It did not want to work out, it didn’t want to go back on the needles, the loops were so tight. I did manage to do it in the end, after hours of struggling, but there is a very obvious line going across the sweater now where I restarted the knitting. So that sucks
But that wasn’t the worst part yet, oh no, it was the neck hole.
So I redid the arm holes, this time shaping them in the hopes the sweater won’t look like a tent on me. And as I knitted upwards I started binding off etc to make a hole for a head to fit through. And during all this, because I had no idea what I was doing, I did cut my yarn many a time while knitting and purling from one direction to another, slowly making that U shaped hole as I made the straps.
And then came the time for me to check if the straps were long enough they’d go over my shoulders comfortably. And they didn’t, I had to make them longer. Which would’ve been fine, but that meant I’d also be lowering the already-accidentally-way-too-low neckline.
But, because of the fucked up method I had used to make the neckline... I mean in theory I could unravel it, but it’d be so much fucking effort to try to fix that... I gave up. I let it go. I made the straps long enough so they wouldn’t pinch my shoulders, and knit them together. Finished the sleeves and connected them to the torso.
Time to try to fix that neckline.
Now, in hindsight, what I should’ve done was to just do the whole thing in ribbing entirely, since from the start I had the plan to just make the biggest collar I possibly could using up all the remaining yarn I had left. But being a dumbass, I thought it’d be a good idea for me to try to knit a few rounds around the neckline normally to try to make the neckhole smaller. And, well I did do that, but it looks like ass with the knitting going in the wrong direction for 2/3rds of the neckhole, and my weird fucking attempt at decreasing (I really should’ve looked up how to decrease properly, dumbass) causing these very obvious holes to appear in a few spots.
So it looks like ass. I should’ve just done the whole thing in ribbing. I should’ve unraveled the neck before getting too deep into it. But I didn’t and now I have to live with the concequences of my actions.
Anyway, using up literally the rest of my yarn, I indeed made a massive collar, the idea being that depending on my mood I can either weird it loose and tall or fold it over (inside or outside; it looks better folded in, since it hides the bind off at the top, but also, folded outside it an kind of cover up the neckline issues a little bit).
I can say this was a big learning experience. I did learn a lot from my mistakes. I don’t think I’ll ever knit a sweater ever again. I just don’t enjoy knitting that much, I prefer crochet. But I finished that sweater my mom never did, and while it looks like ass... I dunno, I feel good about it being completed. (And it’s fine if it looks like ass I’d never wear it outside the house anyways lmao)
#Yarncraft Diary#diy#knitting#For the record I have been working on a really big crochet blanket since like early summer#I've been just stuck because the yarn I've been using has been out of stock for MONTHS#And I very specifically want to use the same yarn for it#I don't like having multiple ongoing projects at once (per medium) but since I can't finish that blanket until the yarn comes back#I had to think of something else to do lest I lose my mind#Hence I picked up this sweater#IDK I got into the habit of crocheting (or knitting) for like an hour or two every day after dinner before I'd start working#And now if I don't get to crochet I go bananas#I need to do something with my hands to relax aaaaaaa#Mine
2 notes
·
View notes
Photo


I have this massive ball of this custard-yellow/yellow-ochre yarn. And I was trying to figure out what the hell I could do with it. So I made my third neck warmer (because my throat gets sore easily so better keep it warm) (and having different colored options is nice) and some wonky fingerless gloves ✨
#Yarncraft Diary#Somehow I still have more of this yarn left#Not enough to make like a beanie or anything#But enough to make SOMETHING with it#I have no idea what though HELP#Maybe I'll try to crochet something small with it#Like the 15th panholder or something#Mine
2 notes
·
View notes
Text
So here's a stupid ass project I probably shouldn't have done
So I had this leftover yarn from my mom that I didn't really know what to do with because of its color, until I realized I could maybe make a blanket out of it for my aunt as a Christmas present. Problem is that I didn't have enough yarn to make a blanket out of it.
Now I wasn't entirely sure what yarn it was but after some guessing I figured it might be Istex's Lettlopi yarn. But I wasn't sure. And I didn't want to risk buying any of that yarn for the blanket if I wasn't sure it was the right yarn.
And then I remembered that for a while now I had thought it could be fun for me to try to cross stitch/tuft(/punch needle without a needle punch) a moon plushie. But if I wanted to make that, I'd need yarn for it. So I figured I could buy one ball of white Lettlopi, to confirm if it was the same yarn my mom had left me with. If it was, I'd know I could buy more of it, and if it wasn't I'd still use it for the moon plush.
I was right, it was the same yarn! And while I could've just gone off and buy the yarn I'd need for the blanket, I figured I didn't want to do that yet (because I was still in Knitting Jail at the time and didn't want to start any LARGE projects). But I figured, I had the yarn, and I was sick and tired of knitting. So let's just go do plushie.
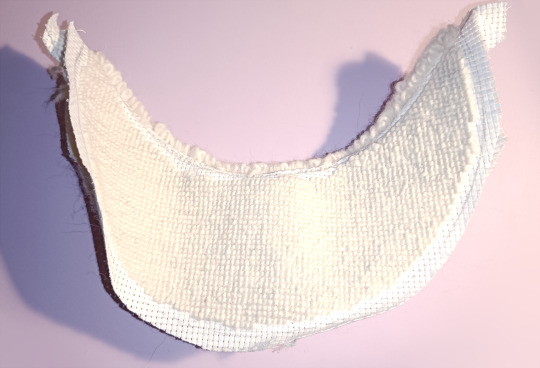
It was easier said than done

Started by just drawing a moon shape onto some paper that I could then draw twice onto my scrap cross stitch fabric. I did use some other (purple) yarn (that my cat had stolen, played and chewed on so it was gross, covered in dust and went into the bin) just to test the stitch I wanted to use for the plush before jumping into it
But I jumped into it, began doing simple X stitches (and soon after cut the fabric piece once I felt like it'd work out and could Commit To It)


And yeah, it was slow
Also, I realized I fucked up. See, while I did test the stitch before jumping into it, the yarn I used was indeed an entirely different one, much softer and squishier than the Lopi and possibly a smidge thinner too. So when I did my test, the Xs were very soft and bouncy
But with the Lopi, they were dense as fucking hell
And like. I told myself it'd be fine and to not worry about it, because by the time I realized it was a mistake I just thought it'd be more effort to try to undo my work and start all over.
But no, not restarting was the bigger mistake. But alas, I was stubborn and committed to doing it the way I originally wanted to, like a dumbass
And after many, many, many, many hours I did complete the first side of the moon

(I did leave the edges unstitched because I figured it'd help with sewing later on)
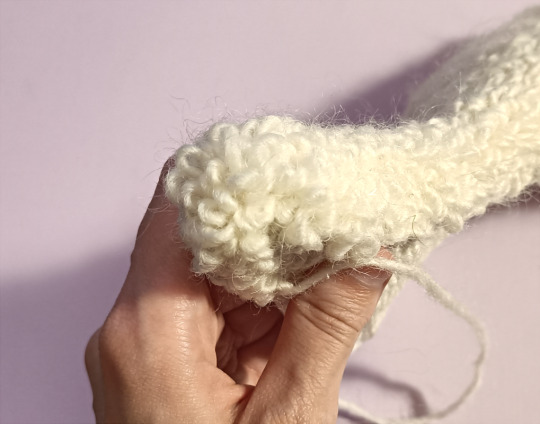
But with the first side done, it was time for the other side. Now full disclosure, I can't remember if this was my plan from the begining or if I decided to do this after the first side went so bad, but I did decide I wanted to try to kinda tuft the other ("front") side of the plush to make it squishier
I did a very small test of how it'd feel if I did lots of these loops on the fabric and I did like how it felt, so I just got to it
Once again, this was a mistake
Like it might not be very obvious from this photo, but the loops were actually REALLY DENSE. I didn't realize it when I did my TINY TINY test, but after doing this much I realized that because I did a loop in every single hole of the fabric, the loops were too close to each other. So the loops actually lost their squish and were forcing the fabric to curl so they could spread out slightly

But once again, I was a stubborn idiot, and thought it'd be more effort for me to restart than to just continue on. So I just continued on. Like a fool.
But eventually I did finish the second side too

(Just for funsies, here's how the reverse sides of the two pieces looked)

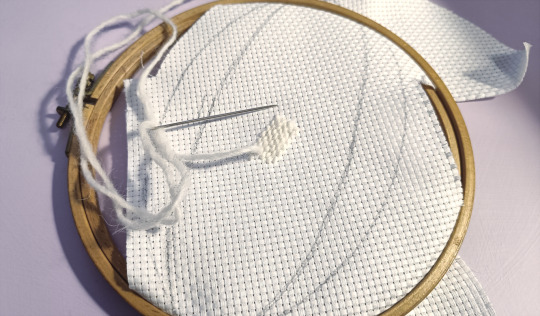
With that done though, I should attach the two moon pieces together by their inner curve. Now I'm no seamstress but I figured that I just put these two pieces together and showed stuffing inside, I'd end up with a slightly thick moon-shaped yarn pancake. Like it'd just be flat. And I wanted it to be more 3D, and to do that I'd have to add a third piece to the outer curve of the moon. And in my mind it felt like it'd be easier for me to figure out how big etc that piece would have to be once I had the inner curve like sewn together
So yeah, onto the sewing, starting with simply attaching the two pieces (inside out)

And I just used more Lopi to do the sewing by hand, figured it'd just blend in the best

Turned the thing inside out and here's how it was looking

Definitely a mess but surely it'd still be workable
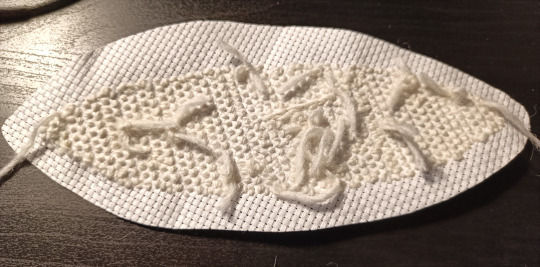
Still I figured I should do the tips of the moon too before anything else, so I first trimmed the excess fabric from the tips (to make it easier to get a nice point when turning it inside out)

And I finished stitching the tips, adding the tufting (since I hadn't gone all the way to the edges yet), since it'd just get harder to do later
And while I was at it I also finished stitching the inner curve too, letting the tufting reach the backside

But with that done, it was time to finally do the final piece of the plushie, the part I'd hope would add like dimension to it
Only problem is that I did not know anything about sewing something like this, but you'll get to enjoy the results of my poor 3D imagining skills later
Anyway I figured that this part of the plush would end up being "the bottom" so it wouldn't ever really be visible, so I thought doing just a simple stitch would be good enough, no point in doing the loops. (Also didn't bother doing Xs, I had learned my lesson by this point and did not care)

Finished the stitching and cut the piece to size
I sewed the bottom piece to the front of the plushie, and filled out the empty part of the fabric with more loops since it was convenient to do it now
With it sewn on, the plushie was starting to get... 3D but also very wonky. This is when I realized I should've made that bottom piece much longer. But alas, it was too late for that. All I could do was pray that once the plushie was stuffed it'd look better

Speaking of stuffing
I have a fuck ton of upholstery foam for various reasons, and more importantly, a ton of small scrap pieces that I had hoarded for no good reason.
I figured, instead of buying some stuffing for the plush, I could just cut up those awkward tiny foam pieces and use that as stuffing instead- not like I had much else I could do with them anyways
This is not even all of foam pieces I ended up using, I just cut more and more as I crammed more in until the plush felt consistently filled
With the moon filled though, it was time to sew that hole shut

And to finish things off, do some stitching across the seam so you couldn't see the original fabric anymore
And boom, we have a wonky little moon plushie
Or as I like to call it, my fucked up little yarn croissant
It is misshapen and wonky as hell, holy fuck
Truly, I was not blessed with an understanding for sewing
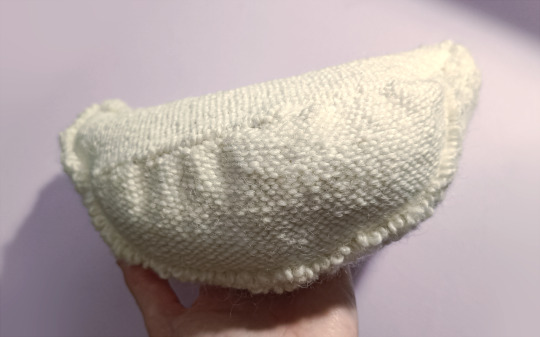
Also, I regret doing the entire bottom piece in the simple stitch because it looks really strange when you look at the backside of the plushie, like, I should've done half of it with loops so it would've matched the front better

But it is what it is
Like, not gonna lie, I am really disappointed with how this turned out and regret most of my decisions with it, especially because of how fucking long this plushie actually took to make. Like, me taking multiple week long breaks aside, this genuinely took me from May to August to finish. (I just couldn't be bothered to post about it until now)
I know I shouldn't beat myself up about it, since it was my first plushie etc, you learn from your mistakes and I would genuinely be able to do a better job if I made another one. But it is still annoying
I don't know if it's good news or bad news though, but my cat has taken a great liking to this plushie. Like I kept it on my bed for a weeks as cute little decor until one morning I found it on the kitchen floor, and my cat has ever since tried to steal it so she could rip it to shreds. I even have to try to fix some loops she pulled out and clean dust off of it because because she dragged it around the house I literally have it hidden in my yarn cabinet to keep her from getting to it
Like it's cute she likes it but also that is a pure wool moon plush I spent multiple months painstakingly making one stitch at a time, I do not wish to have food crumbs on it Honey
#Moon posting#Yarncraft Diary#Moral of the story is that if I ever want to try needle punching ever again I should just buy a fucking punch needle#Doing it with a regular needle sucked ass alright#Though I don't think it'd be worth the effort + I'm always afraid of hairy things collecting dust...#Not helped by how Insta has been showing me this account of a person who makes toys out of felt#And they are extremely cute#I do not need another hobby jesus christ#But boy howdy are the felt plushies cute#And felt would be easy to work with since it doesn't fray#God damn
1 note
·
View note
Last Seen Blogs

lentzouille-blog
savoureux

meowww-ffxiv
FFXIV Shenanigans

luposolitario5881
Semplicemente mi fa schifo vivere.

sweet-cherrybell
sweet-cherrybell

teainspoons
Tea in Spoons