#Studio Boolean
Text
999: Hiphop Heaven Drop Juice Wrld Inspired Key Chain
Hiphop Heaven collaborated with Studio Boolean to create this amazing “Goodbye & Good Riddance” which has driven off into the sunset waiting for fans to cop! This awesome collectible sees the blue Porsche turned into a hot wheels sized key chain with all the details like the bird flying out the window to the license plate having 999 on it. It is homed in a very dope packaging that is very…

View On WordPress
#Collectibles#Goodbye & Good Riddance#Hiphop Heaven#Juice Wrld#Studio Boolean#The Musical Hippie
2 notes
·
View notes
Text

14 notes
·
View notes
Text
so I made a search engine of taylor swift songs
hello! so um. yeah. I made a pure HTML, CSS, and JavaScript search engine of Taylor Swift songs because I'm not normal.
Swift Song Search v. 1.0
Catalog:
All studio albums including all bonus tracks and some remixes
Both rerecordings excluding ATW10 Sad Girl Autumn and Short Film versions
The Holiday Collection and Beautiful Eyes
Features:
field search by song title, writers, or producers EDIT: producers search is not working and writers search is glitching. looking into it!
filter by album
filter by type of album/collection (studio album, rerecording, EP)
filter to only show songs Taylor owns
filter to only show self written songs
filter to exclude alternate versions - remixes, demos, acoustic versions, etc.
combine any number of filters, though some will obviously produce zero results (ex. filter by Reputation and Taylor owns)
combine the field search with any number of filters, or just use filters to search the full catalog
click the song title to show/hide more detailed song info
fully responsive
Important notes:
Songs that have been rerecorded are labeled as alternate versions
All Too Well and ATW10 are considered unique versions
Results will display below the filters box, so you will have to scroll to see them on mobile
Credits are from Wikipedia (I know >.< but it was the quickest way) so lmk if something is inaccurate
Also just give me feedback in general if you wanna! this is my first real JS project so i'm still learning for sure
This is just the first iteration of this project, so feel free to follow here or the tag #songsearchupdates for updates! I will be adding the rest of her catalog bit by bit and adding functionalities like searching featured artists and boolean searching. My ultimate goal is to add subject tags for themes like heartbreak or falling in love and for motifs like rain, midnight, or gold, which is well beyond the capabilities of one person. If you are interested in helping with data entry for this project, please send me an ask here on tumblr or email me at [email protected] and I will get in touch when it's time to start on that phase of the project.
cool thank u for reading happy new year
#swiftology updates#songsearchupdates#taylor swift#neocities#idk how to tag this but im so proud yall my brain is melting asdjaldknasdk
319 notes
·
View notes
Photo
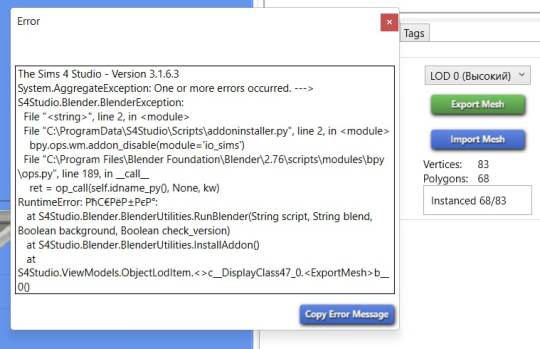

Hi, my esport is not working 🤪🤡
I tried to install two versions of the blender, after which I started getting this error. I have deleted and rebooted both blender and Sims 4 Studio, but nothing works. The path to the folders is correct, the blender version is correct. I tried to solve this problem using the tutorial, but to no avail. Maybe someone has encountered the same error?
@platinumaspiration recommended downloading the Blender 2.79b version and everything worked!
“The Sims 4 Studio - Version 3.1.6.3
System.AggregateException: One or more errors occurred. ---> S4Studio.Blender.BlenderException:
File "<string>", line 2, in <module>
File "C:\ProgramData\S4Studio\Scripts\addoninstaller.py", line 2, in <module>
bpy.ops.wm.addon_disable(module='io_sims')
File "C:\Program Files\Blender Foundation\Blender\2.76\scripts\modules\bpy\ops.py", line 189, in __call__
ret = op_call(self.idname_py(), None, kw)
RuntimeError: Ошибка:
at S4Studio.Blender.BlenderUtilities.RunBlender(String script, String blend, Boolean background, Boolean check_version)
at S4Studio.Blender.BlenderUtilities.InstallAddon()
at S4Studio.ViewModels.ObjectLodItem.<>c__DisplayClass47_0.<ExportMesh>b__0()
at System.Threading.Tasks.Task.InnerInvoke()
at System.Threading.Tasks.Task.Execute()
--- End of inner exception stack trace ---
---> (Inner Exception #0) S4Studio.Blender.BlenderException:
File "<string>", line 2, in <module>
File "C:\ProgramData\S4Studio\Scripts\addoninstaller.py", line 2, in <module>
bpy.ops.wm.addon_disable(module='io_sims')
File "C:\Program Files\Blender Foundation\Blender\2.76\scripts\modules\bpy\ops.py", line 189, in __call__
ret = op_call(self.idname_py(), None, kw)
RuntimeError: Ошибка:
at S4Studio.Blender.BlenderUtilities.RunBlender(String script, String blend, Boolean background, Boolean check_version)
at S4Studio.Blender.BlenderUtilities.InstallAddon()
at S4Studio.ViewModels.ObjectLodItem.<>c__DisplayClass47_0.<ExportMesh>b__0()
at System.Threading.Tasks.Task.InnerInvoke()
at System.Threading.Tasks.Task.Execute()<---“
8 notes
·
View notes
Text
Some one help😭
I can't create object package files in sim4studio, every time this error message comes up. I did everything, I just wanna make some cute cc. Another category doesn’t have any problem.
The Sims 4 Studio - Version 3.2.0.6
System.AggregateException: One or more errors occurred. (startIndex cannot be larger than length of string. (Parameter 'startIndex'))
---> System.ArgumentOutOfRangeException: startIndex cannot be larger than length of string. (Parameter 'startIndex')
at System.String.Substring(Int32 startIndex, Int32 length)
at S4Studio.Core.CloneEngine.GetNameRootFromObjectName(String object_name, String creator, String ts)
at S4Studio.Core.CloneEngine.CloneObj(IDBPFPackage result, String hash_salt, CloneObjectOptions opts, IStringTableCache global_stbl, IResourceProvider game, Sims4FileTable game_filetable, UInt64 instance, String creator, Boolean& swatchable)
at S4Studio.Shared.ObjectFeatureViewModel.Clone(IDBPFPackage package, String hash, IEnumerable`1 selected_prototypes)
at S4Studio.Shared.FeatureViewModel.<>c__DisplayClass28_0.<CreateItem>b__0()
at System.Threading.Tasks.Task.InnerInvoke()
at System.Threading.Tasks.Task.<>c.<.cctor>b__272_0(Object obj)
at System.Threading.ExecutionContext.RunFromThreadPoolDispatchLoop(Thread threadPoolThread, ExecutionContext executionContext, ContextCallback callback, Object state)
--- End of stack trace from previous location ---
at System.Threading.ExecutionContext.RunFromThreadPoolDispatchLoop(Thread threadPoolThread, ExecutionContext executionContext, ContextCallback callback, Object state)
at System.Threading.Tasks.Task.ExecuteWithThreadLocal(Task& currentTaskSlot, Thread threadPoolThread)
--- End of inner exception stack trace ---
Someone help ;-;
3 notes
·
View notes
Text
Using script studio tutorials

Using script studio tutorials how to#
Using script studio tutorials mod#
Using script studio tutorials code#
Using script studio tutorials windows#
I trust you know that a delegate is a reference type variable that, instead of referencing an object, references a function. In Reflector, you'll find a delegate handler called OnWorldLoadFinishedEventHandler in.
Using script studio tutorials mod#
At that time, our mod can't do anything fancy, because almost none of the interesting stuff is running yet. The parsing XML and calling static constructor stuff will be happen really soon, long before the main menu will show for the first time. We will make sure TS3 actually finds an XML resource for our tunable variable later when it comes to building the package.
Using script studio tutorials code#
TS3 assigns a value to our static variable, the static constructor of our class will be called, and badda bing we have a foot in the door to get our code running. TS3 on the other hand parses all XML resources, and assigns the tunable values it finds in there to the related variables in the related classes. That is to make sure that everything is in decent shape before the class has to interact with the rest of the world. This rule goes as follows: The first time a static field, property or method of a class gets accessed, the static constructor of that class will be called. We will "exploit" one of these rules to get our script up and running in TS3. Now might be a good moment to explain why we do this. Protected static bool kInstantiator = false I always use a boolean variable called kInstantiator which is a hidden homage to twallan. You can use a float or int just as well as a bool. The "nature" of that field isn't really important. Now add the static constructor and a static field with the Tunable attribute to your class. I am using TwoBTech for my mods, but you must use something else! Don't use someone else's namespace just like that! Afterwards, the code should look like this: You don't want your namespace to clash with an EAxian namespace or with another modder's namespace. Change the namespace and class name to something more sensible.Ĭhoose wisely when it comes to your namespace and pick something that hopefully will be unique.The bare code skeleton VS created should still look like this: Now bring up the actual code file of your project again. To get VS to stop whining about some ostensible errors, close and re-load the project in VS. Change these attribute values to modify the information General Information about an assembly is controlled through the following Add using Sims3.SimIFace and to it and save. When VS first opens AssemblyInfo.cs, it will probably throw lots of errors at you. Double-click on AssemblyInfo.cs to open it.Open the Solution Explorer for your project.I'll explain why we need to do that later in this tutorial. Start Reflector and load the core libraries with it.īefore we look at the actual code, we need to set up the VS project to support tunable values.Create a game-compatible Visual Studio project as explained here: Sims_3:Creating_a_game_compatible_Visual_Studio_project.Sims3Metadata.dll (from scripts.package).Sims3GameplaySystems.dll (from gameplay.package).Sims3GameplayObjects.dll (from gameplay.package).Sims3StoreObjects.dll (from gameplay.package).When done, you must have the following list of libraries extracted to the same folder, with the following names: Repeat steps 3 to 7 for every package listed under step 2.Repeat steps 4 to 6 for every S3SA resource in the package.Choose a sensible folder for the library and save it under the exact name it gives you.Right-click on the resource and choose "Export DLL".Note that S3PE shows some information about that resource in the preview area. In this folder are three packages: gameplay.package, scripts.package, and simcore.package Navigate to the installation folder of The Sims 3 and from there to the sub-folder where the executable is located.Extract the core libraries with S3PE if you haven't already.If you fail to accomplish that, you can't hope to successfully write scripting mods. A game that is properly set up to support scripting mods.A basic understanding of the C# syntax or at least any C-like language.NET Reflector, simply called Reflector later on NET assembly browser/decompiler - this tutorial refers to redgate. Sims3 Package Editor - simply called S3PE later in this tutorial.
Using script studio tutorials windows#
Or Microsoft Visual Studio Express 2012 for Windows Desktop.
Microsoft Visual C# Express 2008 - simply called VS later in this tutorial.
For today we will make a handy little mod that pauses the game after loading a save game. While getting started is a bit more complicated than for an object mod, the actual coding can be as simple or complicated as you want.
Using script studio tutorials how to#
This tutorial will explain how to make a pure scripting mod, i.e.
11 Where Does The Newborn Go From Here?.
4 Additional Preparations In Visual Studio.
2 notes
·
View notes
Photo


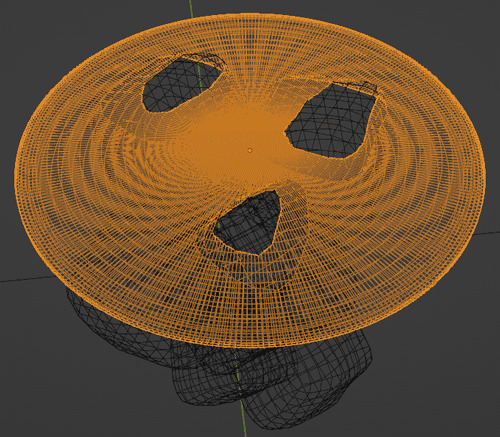
Burger On The Grill
Part 13: Pouring a Drink--Dropping Cubes
After completing the donut tutorial by BlenderGuru, I was challenged to create something similar by myself, so I made a burger. I will make that burger into a meal with a soda and fries. Last time, I showed you 3 ways of creating foam. Now we will add in some ice cubes.
Model Ice Cubes
To start, add a 1 meter cube. In Edit Mode, select all and subdivide with 1 cut. Repeat this, subdividing again with 1 cut. Add a Subdivision Surface Modifier with 1 level and apply it. Now we have enough geometry to work with! Shade smooth.
Add a Displace Modifier with a Strength of 0.2 and a Midlevel of 0.2. Duplicate your cubes until you have 4. Create a New Texture to control the Displace Modifier for each cube with Type: Stucci, Noise Basis: Voronoi F1, Size: 1 and a Turbulence that varies from cube to cube.
After you are satisfied with the shapes of your ice cubes, apply the Displace Modifiers. Scale the cubes down so that their longest size is 2.86cm.
Position With Physics
Add a cylinder. Scale and add subdivisions to approximate the shape of your liquid.
Add Rigid Body settings to the container with Type: Passive, Shape: Mesh, Friction: 1 and Margin: 0.00004m.
Duplicate your cubes and position them above the container. Vary their position and rotation relative to each other.
Add Rigid Body to one cube with Type: Active, Shape: Mesh, Friction: 1 and Margin: 0.00004. Select all the cubes. Hit F3 to Search for “Copy” and select Object > Rigid Body > Copy from Active.
Under Scene Properties > Rigid Body World > Cache, set the Simulation End to 160 and click Bake. When you get a result you like, hit F3 to Search for “Apply” and select Object > Rigid Body > Apply Transformation.

That first simulation approximates how the cubes would be positioned if they were in an empty glass. Since there is liquid in this glass, we also need to simulate the force of buoyancy which opposes gravity.
One way to do this in Blender 3.2 is to rotate the cubes and container around the world origin by 180 degrees and do a second simulation.
Alternatively, under Scene Properties > Gravity > Z, you can change the sign from negative to positive to reverse the direction for your second simulation.
Close the bottom of your container by adding a face. Delete the extra cube that intersects this bottom face. With the same rigid body settings on the cubes and container, delete the previous bake and run another to 80 frames. Apply this transformation as you did before.

Select the container and all the cubes, hit F3 to Search for “Remove” and select Object > Rigid Body > Remove.
Rotate your selection around the world origin by 180 degrees, so it is right-side up again, or change your gravity settings back to normal.
Adjust the level of the cubes so that they look like they are floating on the surface of the liquid.

Cut Through Foam
Duplicate the ice cubes and join them into one object.
Add a Boolean Modifier to the foam set to Difference and target the merged ice object. This will cut holes in the foam so that the ice cubes show up better in the render.
For the High Level Foam, drop this Boolean Modifier above the Adaptive Subdivision.
Ice Texture
Create a material for the ice.
Copy the tricky glass shader from the soda glass material and use a noise texture to vary the roughness and bump. Set the IOR to 3.09. Add a Volume Scatter Shader to give the illusion of a crystalline structure within the ice.
Procedural Ice Material by Ryan King Art
To see your ice material clearly, you can use an HDRI environment texture.
With Viewport Shading set to Rendered using Cycles, click the downward arrow for more options. Uncheck Scene World and several options for Studio Light will appear. Select an environment with a nice bright sky.

Follow me to keep watch for the next part! We will be taking the foam to a max level of detail with more rigid body physics.
Review the previous part.
See overview for links to all parts of this tutorial series!
See more of my work: Check out my archive.
Join me on my journey: Follow me on tumblr.
Support my creative profession: Buy me a coffee on KoFi.
#blender#tutorial#soda#glass#ice cubes#rigid body#foam#coca cola#3d art#art process#blender guru#food art#3d artist#art#digital art#3d render#blender3d#blendercommunity#blender tutorial
3 notes
·
View notes
Text
MySQL Full-Text Search

MySQL full-text search is a powerful tool for effectively seeking data in databases. It allows creating complete text indexes that simplify search query performance. It's relevant while working with textual content, especially when you need to quickly find corresponding information using various search modes such as Natural Language, Query Expansion, and Boolean.
With dbForge Studio for MySQL, users can execute complex search queries efficiently. The tool seamlessly integrates with existing MySQL databases and eliminates the need for complicated setup procedures or data migration processes. Users can leverage its full-text search capabilities within their existing database infrastructure without significant disruptions to their workflows.
Read in full: https://www.devart.com/dbforge/mysql/studio/mysql-fulltext-search.html
0 notes
Text
CSG
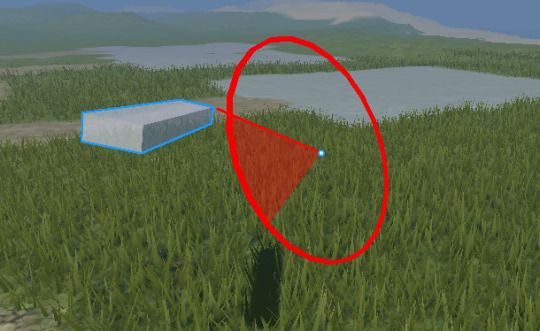
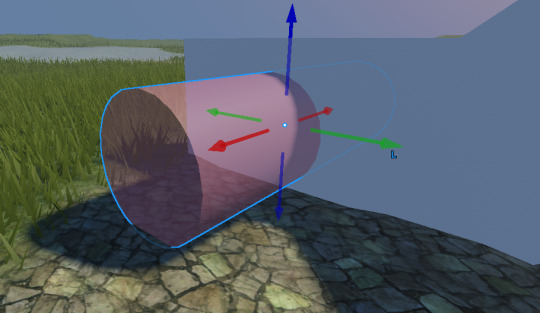
CSG, or Constructive Solid Geometry, is a method of modelling within Roblox Studio.

It can be used to manipulate Part classes, like the one above. One thing that is unique about Part classes is that when using the "Scale" tool, we're actually extruding the part instead. This is done by simply grabbing the handle of the desired axis and dragging:

We can also rotate the part using the Rotate axes tool:

And move it, using the move tool:

An important thing to remember when using this tool is that the orientation of the origin (the white/blue dot in the centre represents the position of the origin) is the orientation of the tool axes - this means it will slide along the same axes if they are rotated. This can be overriden by pressing Ctrl+L or right clicking the part and clicking "Use World Space":

Or, alternatively, by rotating the Pivot by selecting Edit Pivot in the Model tab, this rotates (or moves) the pivot using a combined rotation/movement tool:

Once the Pivot has been moved, we can rotate or move the part around this pivot:
It's also worth noting that the Scale tool does not utilise the origin as a centre point with Part classes.
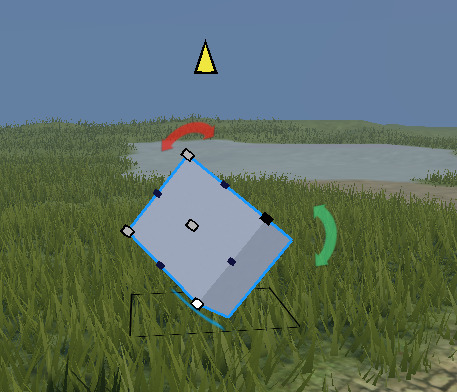
The transform tool is a more in-depth tool that also does not use the Pivot as the origin point, however I will go intot moer detail about this tool in another post (shown above).
We can also easily join parts together by selecting multiple Part classes (MeshPart classes are incompatible with CSG) and clicking Union, shown below:

This creates a UnionOperation class, which acts as if the two parts were joined together - they can now be scaled and transformed as if they were one Part.

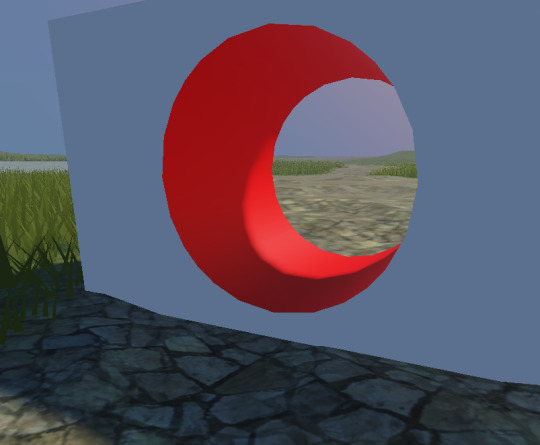
We can also use the "Negate" tool to create interesting shapes -
The red cylinder is a NegateOperation (also called NegativePart), and can now be Unioned with regular Part classes or UnionOperations to remove material from those objects, like below:

We can also use the Separate tool to reverse this operation, then negate both the NegateOperation and the Part class or UnionOperation and create the inverse:
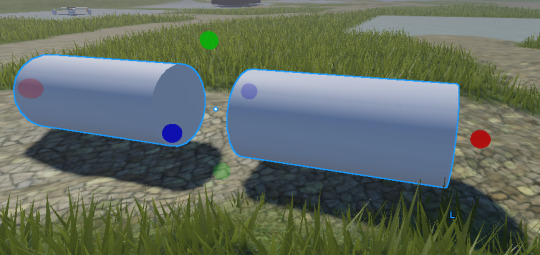
This is very similar to the Boolean operation in AutoDesk Maya and Blender, however it is worth noting that CSG parts cannot be re-coloured, they inherit the colour of their original parts. If I was to change the colour of the cylinder to "Really Red" (BrickColour for Pure Red), then follow the same steps, we get this as a result:
0 notes
Text
A Beginner's Guide to Java Development

Welcome to the world of Java development! If you're aspiring to become a Full Stack Java Development service, you're on the right path. Java is a versatile and powerful programming language used in a wide range of applications, from web development to mobile apps and even in big data processing. In this beginner's guide, we'll walk you through the fundamentals of Java development, essential concepts, and the steps to embark on your journey to becoming a Full Stack Java Developer.
1. Getting Started with Java
Java is known for its "Write Once, Run Anywhere" philosophy, which means you can develop code on one platform and run it on any other platform that supports Java. To start your Java development journey, you'll need a few essential tools:
Java Development Kit (JDK): This includes the Java Runtime Environment (JRE) and the Java Compiler (javac). Download and install the latest version of JDK from the official Oracle website or an open-source alternative like OpenJDK.
Integrated Development Environment (IDE): An IDE simplifies the development process. Popular Java IDEs include Eclipse, IntelliJ IDEA, and NetBeans. Choose the one that suits your preferences.
Text Editor: If you prefer a lightweight approach, you can use a text editor like Visual Studio Code or Sublime Text with Java extensions.
Once you have these tools in place, you're ready to write and run Java code.
2. Understanding Java Basics
Before diving into Full Stack Java Development, you should have a solid grasp of the fundamental Java concepts:
Variables and Data Types: Java supports various data types, including int, double, char, and boolean. Variables hold data, and their types must be declared explicitly.
Control Flow: Learn how to use conditional statements (if-else), loops (for, while), and switch-case statements for decision-making in your programs.
Functions (Methods): In Java, functions are called methods. Understand how to define and call methods, pass parameters, and return values.
Classes and Objects: Object-oriented programming (OOP) is at the core of Java. Learn how to create classes, instantiate objects, and define class members like fields and methods.
3. Object-Oriented Programming (OOP)
Java's OOP principles are essential for becoming a proficient Full Stack Java Developer. OOP helps you structure your code in a way that is modular and easy to maintain. Key OOP concepts in Java include:
Encapsulation: Wrapping data (fields) and methods (functions) together within a class to restrict access and protect data integrity.
Inheritance: Creating new classes from existing ones to reuse code and establish a hierarchy of classes.
Polymorphism: The ability of objects to take on multiple forms. This allows you to write flexible and extensible code.
Abstraction: Simplifying complex systems by breaking them down into smaller, manageable components.
4. Java Libraries and Frameworks
Java's extensive standard library and third-party frameworks make development more efficient. As a Full Stack Java Developer, you'll encounter several libraries and frameworks, such as:
Spring Framework: A popular framework for building robust and scalable Java applications. It provides support for various aspects, including dependency injection and aspect-oriented programming.
Hibernate: An object-relational mapping (ORM) framework that simplifies database interactions by mapping Java objects to database tables.
Apache Struts: A framework for building web applications with Java EE. It follows the Model-View-Controller (MVC) architecture.
Explore these libraries and frameworks to streamline your Java development projects.
5. Full Stack Java Development
Becoming a Full Stack Java Developer means mastering both front-end and back-end development using Java technologies. Here's how you can start:
Front-End Development:
For front-end development, Java developers often use JavaServer Pages (JSP), JavaServer Faces (JSF), or Thymeleaf. These technologies allow you to create dynamic web pages with Java on the client side. Additionally, you'll need to learn HTML, CSS, and JavaScript for a well-rounded skill set.
Back-End Development:
The back-end development in Java typically involves creating server-side applications. Popular choices include Java Servlets, which handle HTTP requests, and Java Persistence API (JPA) for database interactions. You'll also need to work with databases such as MySQL, PostgreSQL, or Oracle.
Furthermore, a crucial aspect of Full Stack Java Development is understanding how to integrate the front-end and back-end seamlessly. This involves handling data transfer, user authentication, and maintaining a responsive user interface.
6. Building Your Portfolio
To become a Full Stack Java Developer, practical experience is invaluable. Create a portfolio of projects that demonstrate your skills and showcase your abilities to potential employers. Consider working on:
Web Applications: Develop web applications that incorporate front-end and back-end components. Showcase your ability to create interactive and responsive user interfaces.
Database Projects: Work on database-centric projects, such as building e-commerce websites or content management systems, to demonstrate your data handling capabilities.
API Development: Create RESTful APIs using Java to showcase your ability to build scalable and interoperable services.
Having a diverse portfolio not only strengthens your skills but also makes you a more attractive candidate to potential employers.
7. Staying Updated
The tech industry is constantly evolving, and Java development is no exception. Stay updated with the latest trends, libraries, and frameworks in the Java ecosystem. Join online communities, participate in forums, and follow influential Java developers on social media to keep your knowledge up to date.
8. Conclusion
Congratulations on taking the first steps towards becoming a Full Stack Java Developer! In this beginner's guide, we've covered the essentials of Java development, from setting up your development environment to mastering key concepts like OOP and exploring libraries and frameworks. Remember that practice and hands-on experience are crucial in your journey. Start small, build projects, and continuously expand your skills to become a proficient Full Stack Java Developer.
As you embark on your Java development journey, remember to stay curious, ask questions, and seek out resources to help you along the way. Becoming a Full Stack Java Developer is a rewarding path that offers a world of opportunities in the ever-growing field of software development.
#digitalmarketing#digitalmarketingagency#digitalmarketingcompany#java development company#java development solution
0 notes
Link
"Akai GX-747 Reel-to-Reel Tape Recorder" The model was partly made in Bryce and in Vue Studio with boolean techniques. Everything was then exported to OBJ and brought together in Daz Studio. The textures were created in Photoshop and applied to the parts. About:Many people believe that the Akai GX-747 and its successor the GX-747dbX were the finest reel-to-reel decks ever produced by Akai, or any one else for that matter (others insist it was Akai s Pro 1000). It was extremely well made and utilized the evolving technology of its predecessors. Superficially, the GX-747 looks like an advanced version of the GX-646, with all of the functions of the latter and then some. As it was a 4 track machine, it did not feature 15 IPS which many of the competition could offer at the time. It featured six heads, four of them being of the Akai GX (glass-crystal) type one each for forward record, forward playback, reverse record and reverse playback. The heads were arranged along with the two erase heads in the head block in perfect symmetry, resulting in an accurate, stable tape path with absolutely no contact error. Three independent motors drove the capstan, supply reel and take-up reel. The extremely stable AC servo capstan motor maintained perfect speed at all times, while keeping wow & flutter to a negligible level. Motorized tension arms made tape threading easy. During fast forward or rewind, they automatically sensed and corrected for tape slack or potential snagging; and at the end of the tape, they opened automatically to facilitate tape loading. Feather-touch, microcomputer controls allowed effortless transport operation. Tape travel direction was verified by a lighted indicator. Direct mode changes between any two transport functions were possible so that one could jump quickly from one to the other without fear of damage to the tape or transport. A bright, 24-segment LED bar graph with 1 second peak hold made record level monitoring extremely easy. Akai produced 5 variations of the 747, silver and black with the following options depending on the time of production- VU or LED meters and DBX. Coming soon: https://3d-stuff.net/ #daz3d #dazstudio #3drender #3dart #daz3dstudio #irayrender #3dartwork #blender #blenderrender #blenderart #noaiart #noaiwriting #noai https://3d-stuff.net/
0 notes
Text
Python Programming for Beginners
Introduction
Python is an incredibly popular programming language known for its simplicity and versatility. Whether you're a complete beginner or have some coding experience, Python is an excellent language to start with. In this SEO-friendly blog, we will delve into the basics of Python programming, making it accessible and engaging for beginners.
Why Learn Python?
Before we dive into the nitty-gritty of Python, let's understand why learning this programming language is a great choice, especially for beginners:
Ease of Learning: Python has a clean and straightforward syntax, making it easier to read and write code. It's often compared to plain English, which makes it an ideal choice for beginners.
Versatility: Python is a multi-purpose language. You can use it for web development, data analysis, artificial intelligence, scientific computing, and much more. This versatility opens doors to a wide array of career opportunities.
Strong Community and Resources: Python has a massive and active community. This means you'll find a plethora of tutorials, documentation, and forums to help you along your learning journey.
In-Demand Skills: Python is highly sought after by employers. Learning Python can boost your career prospects and job opportunities.
Setting Up Python
The first step in your Python journey is setting up the programming environment. Here's how to do it:
Install Python: Visit the official Python website and download the latest version of Python. Follow the installation instructions for your operating system IDLE (Integrated Development and Learning Environment): IDLE is a Python-specific development environment that comes bundled with the Python installation. You can use it to write and run Python code.
Text Editors or Integrated Development Environments (IDEs): If you prefer more advanced tools, you can choose from a variety of text editors and IDEs like Visual Studio Code, PyCharm, or Jupyter Notebook.
Your First Python Program
Let's start with a classic example - the "Hello, World!" program. This simple program displays the text "Hello, World!" on the screen. Open your Python environment, and in a new file, type:print("Hello, World!")
Save the file with a .py extension (e.g., hello.py) and run it. You should see "Hello, World!" printed to the console. Congratulations, you've just executed your first Python program!
Python Variables and Data Types
In Python, variables are used to store data. You can think of them as containers that hold different types of information. Python supports various data types, including:
int: Integer data type (e.g., 5, -10, 1000).
float: Floating-point data type (e.g., 3.14, -0.5, 2.0).
str: String data type, used for text (e.g., "Hello, Python!").
bool: Boolean data type, representing True or False values.
You can assign values to variables like this:age = 25 height = 6.2 name = "John" is_student = True
Python Operators
Operators are used to perform operations on variables and values. Python provides a wide range of operators, including:
Arithmetic Operators: Used for mathematical operations (e.g., +, -, *, /, % for addition, subtraction, multiplication, division, and modulus).
Comparison Operators: Used to compare values (e.g., ==, !=, <, >, <=, >= for equal, not equal, less than, greater than, less than or equal, greater than or equal).
Logical Operators: Used for logical operations (e.g., and, or, not for logical AND, logical OR, logical NOT).
Assignment Operators: Used to assign values (e.g., =, +=, -=, *=, /= for simple assignment, addition assignment, subtraction assignment, multiplication assignment, division assignment).
String Operators: Used for manipulating strings (e.g., + for string concatenation, * for string repetition).
Here's an example of how to use arithmetic operators:x = 10 y = 5 addition = x + y subtraction = x - y multiplication = x * y division = x / y print("Addition:", addition) print("Subtraction:", subtraction) print("Multiplication:", multiplication) print("Division:", division)
Python Control Structures
Control structures allow you to control the flow of your program. The most common control structures in Python are:
If you want to know more information about Python training visit here https://pythontraining.net/
Conditional Statements: Conditional statements, like if, elif, and else, are used to make decisions in your code.
x = 10 if x > 5: print("x is greater than 5") elif x == 5: print("x is equal to 5") else: print("x is less than 5")
Loops: Loops, such as for and while, allow you to repeat a block of code multiple times.
# Using a for loop to iterate through a list fruits = ["apple", "banana", "cherry"] for fruit in fruits: print(fruit) # Using a while loop to count to 5 count = 1 while count <= 5: print(count) count += 1
Functions: Functions are reusable blocks of code that you can define and call whenever you need them.
def greet(name): return "Hello, " + name result = greet("Alice") print(result)
Python Data Structures
Python offers several built-in data structures that help you organize and store data efficiently. Some of the most common data structures include:
Lists: Lists are ordered, mutable collections of elements.
fruits = ["apple", "banana", "cherry"] fruits.append("orange") print(fruits)
Tuples: Tuples are ordered, immutable collections of elements.
coordinates = (5, 3) x, y = coordinates print("x:", x) print("y:", y)
Dictionaries: Dictionaries are unordered collections of key-value pairs.
person = { "name": "John", "age": 30, "city": "New York" } print(person["name"])
Sets: Sets are unordered collections of unique elements.
colors = {"red", "green", "blue", "red"} print(colors) # Output: {"red", "green", "blue"}
Strings: Strings are sequences of characters and support various text operations.
text = "Hello, Python!" print(len(text)) # Output: 13 print(text[0]) # Output: "H" print(text[7:]) # Output: "Python!"
Conclusion
This blog has provided you with a solid introduction to the basics of Python programming. You've learned about Python's simplicity, variables, data types, operators, control structures, functions,
and data structures. Armed with this knowledge, you're well on your way to becoming a Python programmer. Continue practicing, exploring, and building as you embark on your exciting coding journey. Python's versatility and the vast resources available to you will make your learning experience enjoyable and rewarding.
1 note
·
View note
Text
How to do programming in PHP
PHP, short for Hypertext Preprocessor, is a popular web programming language. Simplicity, adaptability, and dynamic and interactive online applications are its hallmarks. This is the spot to learn PHP programming for beginners. This guide will teach you PHP fundamentals step-by-step.
Prerequisites
Basic HTML and CSS expertise is helpful before learning PHP. Understanding these languages simplifies PHP code integration into web sites.
Setting Up Your Environment
PHP programming requires a development environment. The essential setup stages are:
Web Server: XAMPP, WAMP, or MAMP, which include PHP, Apache, MySQL, and other technologies, can be used. Use a cloud-based development environment instead.
Text editor or IDE: Use Visual Studio Code, Sublime Text, or PhpStorm, which supports PHP.
PHP Installation: Without XAMPP, you must install PHP individually. The official PHP website (php.net) offers the newest version.
Writing Your First PHP Script
Start with a simple "Hello, World!" example to learn PHP:
```php �?php echo "Hello, World!"; ?>
Save the code as a .php file (e.g., hello.php) and store it in your web server's document root folder.
To run the script, navigate to http://localhost/hello.php in your browser. The page should say "Hello, World!"
The PHP syntax
PHP code is contained in <?php and ?> tags. The server interprets PHP code within these tags.
These syntactic components are important:
Statements terminate with a semicolon (;).
Variables begin with a $ symbol (e.g., $variable_name).
Comments can be single-line (//) or multi-line (/* */).
Web page content is produced using echo commands. Variables, data types
PHP supports integers, floats, texts, booleans, arrays, and objects. The variables must begin with a $ and are case-sensitive. Example of variable usage:$name = "John"; $age = 25; $isStudent = true; The Control Structure PHP offers standard control structures such as `if`, `else`, `while`, `for`, and `switch`. These enable code choices and loops.
php if ($age < 18) { echo "You are a minor."; } otherwise { echo "You are an adult."; }
Functions
PHP functions encapsulate reusable code. How to define and invoke a function:
PHP function greet($name) { echo "Hello, $name!"; }
Say hello to "Alice"
Working with Forms
PHP processes HTML form data. To retrieve form data, use the $_POST or $_GET superglobal arrays. Simple form example:
```html Also in `process_form.php`: PHP <?php $username = $_POST["username"]; echo "Welcome, $username!"; ?>
This guide laid the groundwork for PHP programming. As you master the basics, you may learn about databases, user authentication, and dynamic web applications. PHP's large community and copious documentation make it a superb web development language, and there are many online resources to help you learn PHP. Get coding and develop PHP web applications!
#dissertation#essay writing#research paper#thesis#case study help#homework help#report#reportwriting#php#phpdevelopment#php script#php programming
0 notes
Text
Informática👍
Mayo 17 del 2023
//Funciones
//Función sin parámetros - sin retorno
function saludar()
document.write("Hola,buenos dias + "
")
}
saludar()
Function sumar(){
a = 8
b = 5
document.write(a+b)
Para que el usuario ingrese el número que quiera:
a=parseInt(prompt("Digite primer número"))
b=parseInt(prompt("Digite segundo número"))
console.log(multiplicar(a,b))
//Función con parámetros y retorno
function name(n1,n2){
return n1*n2
//var x = name (2,3)
console.log(name(6,9))
Mayo 10 del 2023
CALCULADO
alert("Hola")
//Operadores Matemáticos
var a = 5+7
document.write(a)
var b = 15
document.write("")
var s = a+b
var c = prompt("Por favor ingrese el primer número")
var d = prompt("Por favor ingrese el segundo número")
//Potencia
var pot = c**d
console.log(pot)
//ParseInt
= Concatenación o suma
//Math
Math.random()
x = Math.random()
console.log(x)
//Math.ceil -> Convierte un flotante a un entero más próximo por encima.
z = 4.3
console.log(Math.ceil(z))
//Math.floor -> Convierte un flotabte a un entero más próximo por debajo.
console.log(Math.floor(z))
[8:20 p. m., 7/6/2023] 𝙷𝚎𝚒𝚍𝚢: Abril 26 del 2023
-Datos: Es un valor que representa la información que el programador utilizará.
-Tipos de variables: Una variable es un elemento vacío que espera ser usado con un valor.
-Concatenar
var-> VARIABLE
document.write("
");-> PARA DEJAR ESPACIO
Tipos de variables
-Indefinida:
var = variable -> ///var
var name:
-Entero
var x= 17;
var número= 2;
document.write(x);
console.log(numero)
-Tipo Carácter
var text= "Hola";
var a= "Bienvenidos"
console.log(text);
document.write(a);
-Tipo Booleana
var verdadero= true;
var falso= false;
console.log(Boolean(x));
-Tipo arreglo
var meses= ["enero","febrero","marzo"];
console.log(meses);
document.write("
");
document.write(meses);
Concatenaciones
Se usa el signo "+"
document.write("
");
document.write(a+número);
document.write("
");
document.write(a+" "+número);
-Segunda concatenación
document.write(text+" "+x)
document.write(text+" ,tengo"+x+"años");
-Nota de nombres
var primerNombre; -> Así está bien escrito cuando son dos palabras
[8:20 p. m., 7/6/2023] 𝙷𝚎𝚒𝚍𝚢: Abril 19 del 2023
Los guiones: Conjunto de instrucciones que se le dan a un sistema, los sistemas de JavaScript se les llama guiones.
VISUAL STUDIO CODE
-document.write
-console.log
-index.html
-.js
-Ctrl+S=Guardar
[8:20 p. m., 7/6/2023] 𝙷𝚎𝚒𝚍𝚢: Abril 12 del 2023
cd -> Ingresar a algún lugar
bytes -> Números binarios
255 -> Numero máx. de dirección ip
cls -> Limpiar pantalla
md -> Crear carpeta
dir -> Confirmar si se guarda la carpeta
cd.. -> Borrar -> cls
rmdir -> Borrar carpeta
rename "nombre" "Nuevo nombre" -> Cambiar nombre de carpeta
Ejercicio mandado por teams
1 note
·
View note
Text
Beginner's Guide to the Fundamentals of Coding

Coding, also known as programming, is the process of creating computer software, websites, mobile apps, and other digital products by writing instructions in a programming language that a computer can understand. With the rise of technology, learning how to code has become an essential skill for many people. In this article, we will discuss the basics of coding for beginners.
Choose a Programming Language
There are many programming languages to choose from, and each has its unique features and purposes. Some popular programming languages include Python, Java, C++, Ruby, and JavaScript. To start coding, you need to select a programming language that matches your goals and interests. For example, if you want to develop websites, HTML, CSS, and JavaScript are the primary languages to learn.
Learn the Fundamentals
Before you start coding, it is essential to understand the fundamentals of programming. This includes learning programming concepts such as variables, functions, loops, and conditional statements. These concepts are the building blocks of programming and are used in almost every programming language.
Get a Code Editor
A code editor is a software application that is used to write, test, and debug code. There are many free and paid code editors available, such as Visual Studio Code, Atom, and Sublime Text. Code editors come with features such as code highlighting, auto-completion, and error highlighting, which make coding easier and more efficient.
Practice, Practice, Practice
Like acquiring any other skill, learning to code involves practice. Write simple programmes at first, then progress to more complicated ones. Several online sources, like Codecademy, Udemy, and Study24x7, provide tutorials and courses to assist beginners in learning to code.
Debugging
The process of debugging involves locating and repairing flaws in your code. Every programmer needs this ability, but it takes practise to master. Debugging entails looking over your code to identify the error's cause. Once you have located the issue, you may update your code to resolve it.
Collaboration and Learning from Others
Collaboration and learning from others are important aspects of coding. Joining online coding communities, attending coding events, and participating in coding challenges are great ways to learn from others and improve your coding skills. You can also work on coding projects with others, which can help you learn new coding techniques and approaches.
Basic programming concepts are fundamental ideas and principles that underpin all software development. Here are some of the most essential concepts:
Variables: A variable is a named storage location in a program's memory where data can be stored and retrieved later. Variables can hold different types of data, including numbers, text, and Boolean values.
Control structures: Control structures are constructs in programming languages that enable developers to control the flow of program execution. The most common control structures are loops (for, while, do-while), conditional statements (if-else, switch-case), and functions.
Data types: A data type defines the kind of data that a variable can hold, such as integers, floating-point numbers, characters, and strings.
Operators: Operators are symbols that represent specific operations to be performed on data. Examples of operators include arithmetic operators (+, -, *, /), comparison operators (==, !=, >, <), and logical operators (&&, ||, !).
Functions: A function is a block of code that performs a specific task. Functions can be called multiple times from different parts of a program, making code more modular and reusable.
Input/output: Input/output (I/O) refers to the process of exchanging data between a program and the user or the system. Common I/O operations include reading from and writing to files, displaying output on the screen, and accepting input from the user.
Debugging: Debugging is the process of finding and fixing errors in a program's code. Debugging tools and techniques include print statements, breakpoints, and step-through debugging.
These basic programming concepts are essential building blocks that are used in almost all programming languages and applications. Understanding the basics of coding for beginners is critical for anyone who wants to learn programming and build software.
In conclusion, coding is a valuable skill that can open up many opportunities in today's digital world. To get started with coding, choose a programming language, learn the fundamentals, get a code editor, practice, practice, practice, debug your code, and collaborate and learn from others. With patience and dedication, anyone can learn to code and become a successful programmer.
#Programming Basics#Software Development#Algorithm Design#Data Structures#Syntax and Semantics#Control Structures#Coding Standards#Debugging Techniques#Code Optimization#Programming Paradigms#Version Control
0 notes
Text
Zbrush 4r8 update

ZBRUSH 4R8 UPDATE SERIAL KEY
ZBRUSH 4R8 UPDATE GENERATOR
Pixologic ZBrush 4R8 2022.7.1 Crack With Product Code New Version 2021 To get a breakdown of the title’s themes, make sure you mention names and the chapter listing. Over two phases, Sculptris Pro and Tesselate’s fundamentals discussed, then demonstrated using the toolset. Sculptress Pro is among the most exciting developments allowing us to sculpt to dynamism in real-time without concern for subdivision amounts. Madeleine also covers the curve brush style. ZBrush 2021 Crack is exhibited such as SnakeCactus, Sculptris Pro, Project Primitive, Snakehook2, Shakespeare, General UI upgrades, and PolyGroupIt. Keyshot, lessons on functioning with ZBrush in conjunction with this circumstance, are included. Madeleine then moves to the respective feature sets, such as all the newest features and plugins such as ZBrush, such as Booleans, VDM brushes, 3D Alphas, 3D Text, and much more, while revealing how a lot of the qualities and tools operate together in a context. The lessons begin with a succinct summary of the UI for the newcomer, together with a couple of Quickstart classes on carving with various core techniques in addition to an in-depth lesson about painting monster skins from scratch utilizing poly paint.
ZBRUSH 4R8 UPDATE SERIAL KEY
Pixologic ZBrush 4R8 2022.7.1 Crack With Serial Key Download shown detailing, texturing, and sculpting workflows. ZBrush Crack With Serial Key freeload
ZBRUSH 4R8 UPDATE GENERATOR
Multi-language is supported, ZBrush 4r8 Windows Crack as well as many other enhancements such as a new transformation tool, the Gizmo 3D, and a new text generator that will allow the artist to create text and logos with real-time adjustments. Many new features provide increased design freedom, such as Live Boolean and Vector Displacement Mesh. Pixologic ZBrush 4R8 2022.7.1 Keygenexpand upon the digital sculpting workflow within ZBrush 4r8 Crack Updated Version. Anyone utilizes this product with legitimate ways or gets the most extreme yields because of all the more amicable use interface. Shading coordinating, blend, and perfect subjects make your product progressively alluring and organic product full for clients. This product you can likewise get a wide range of present-day includes just as a forward-thinking choice for altering or making a wide range of photographs with speedy outputs. You can likewise download all sorts of programming or applications from this site completely free. Pixologic Pixologic ZBrush 4R8 2022.7.1 Crack With Keygen is a tool that is used by game developers, artists, and film studios all over the world. You can get feedback instantly with the use of this application. Pixologic ZBrush 4R8 2022.7.1 Crack is an amazing 3D digital sculpting application where you can use various customizable brushes for shaping, texturing, and painting virtual clay.
0 notes
Last Seen Blogs

weareallconnected
We are All Connected

therenmystore
Homewares, Decor, Gifts, Signs & Natural Soaps

deathonfoot
Untitled

davidfrancu
david f.

rafaunico
Rafael Nadal Photoblog