#Stainless Steel Trim Molding
Photo

Traditional Home Bar - Home Bar
Seated home bar - huge traditional galley light wood floor and beige floor seated home bar idea with an undermount sink, raised-panel cabinets, medium tone wood cabinets, marble countertops, gray backsplash and subway tile backsplash
0 notes
Photo

Contemporary Kitchen
Mid-sized trendy u-shaped medium tone wood floor and brown floor enclosed kitchen photo with a farmhouse sink, shaker cabinets, white cabinets, granite countertops, white backsplash, ceramic backsplash, stainless steel appliances and no island
#white crown molding#white window trim#white on white kitchen#kitchen & dining#shaker style#farmhouse kitchen sink#stainless steel hardware
1 note
·
View note
Photo
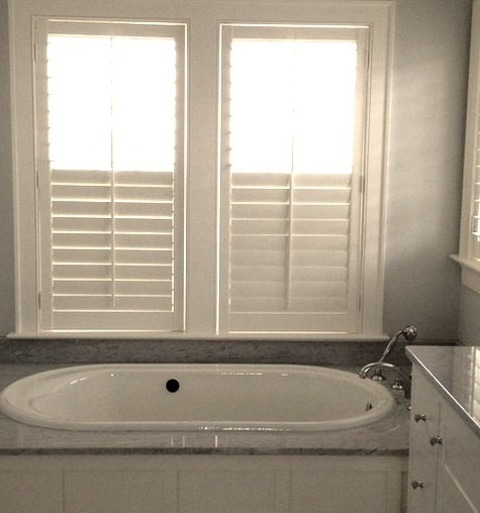
3/4 Bath - Bathroom
Inspiration for a mid-sized timeless 3/4 mosaic tile floor and gray floor drop-in bathtub remodel with beaded inset cabinets, white cabinets, blue walls, an undermount sink and marble countertops
#jersey shore#window treatments#stainless steel faucets#3/4 bath#round tile flooring#white crown molding#blue walls white trim
0 notes
Text
🇺🇲 1948 OLDSMOBILE 98 FUTURAMIC CUSTOM CONVERTIBLE
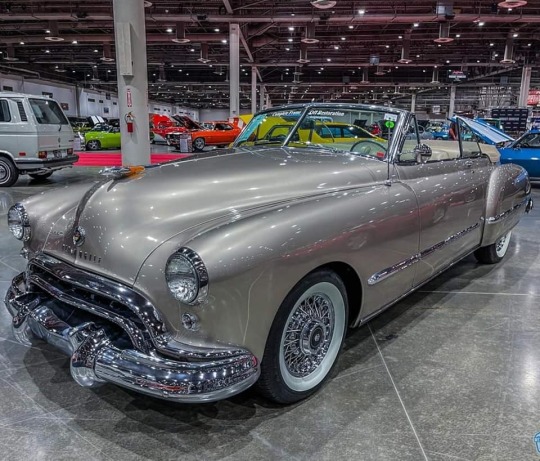
For the first time since 1940 Oldsmobile offered totally different styling during a single model year. Third generation (1948–1953)
The top of the line 1948 Oldsmobile 98 was also included in a marketing campaign for what Oldsmobile called "Futuramic" on all 1949 Oldsmobiles primarily focused on the automatic transmission 1948 Oldsmobile Futuramic introduction. Standard equipment on 98s included a solenoid starter, fender skirts, E-Z-l rearview mirror, and foam rubber seat cushions. The 98s also included front and rear bumper guards, vacuum booster pump, plastic radiator ornament, dual horns, dual sun visors, and cigarette lighter. Deluxe equipment added front and rear floor mats, Deluxe steering wheel, wheel trim rings, rear seat armrests, and hydraulic window, seat and top controls on all convertibles. Upholstery was either broadcloth or leather. The standard tire size was 6.50 x 16. The Custom Cruiser name was retired until 1971 when it was used to denote full-size Oldsmobile station wagons. The new styling was apparently popular with a record 65,235 98s sold, exceeding the number of 90s sold in 1940 for the first time.
The following year the new styling was joined by a new engine, the now famous Rocket V8. In February 1949, several months into the model year, General Motors introduced three highly styled "hardtop convertible" coupes, the Oldsmobile 98 Holiday, the Cadillac Series 62 Coupe de Ville, and the Buick Roadmaster Riviera, the first hardtop coupes ever produced. The Holiday was exclusive to the 98 series that year. Available in four special Holiday colors, as well as four two-tone combinations, it was priced the same as the convertible, and was similarly equipped, with hydraulically operated windows and seat. Only 3,006 Holidays were sold in its first year compared to 20,049 Club coupes. Total sales reached 93,478 in 1949, setting yet another record.
The 1950 Oldsmobile 98 repeated its 1948 precedent of previewing some of next years styling cues for the 88. The 98 was restyled after only two years. It was the first totally slab sided Oldsmobile and the first sedan with wraparound rear windows. A 4-door 98 fastback appeared for one year only in 1950 and was called the Town Sedan, selling only 1,778 units. Standard equipment included bumper guards, dual horns, parking lamps, dome light, rubber floor mats, aluminum sill plates, foam rubber seat cushions, chrome interior trim, lined luggage compartment and counterbalanced trunk lid. Deluxe 98 equipment included rear seat armrest, Deluxe electric clock, Deluxe steering wheel and horn button, special door trim and stainless steel wheel trim rings. Upholstery choices spanned nylon fabric, striped broadcloth or leather. Standard tire size was 7.6 (193) by 15 inches (381 millimetres). In 1950, Oldsmobile stopped naming the 98 series and so from then through 1996, with the exception of 1957 when it was called the Starfire 98, and in 1961 when it was called the Classic 98, it was simply known as the Oldsmobile 98. Sales of the 98 Holiday nearly tripled to 8263, approaching the 11,989 sold of the Club coupe. Given the rapidly growing popularity of the 2-door Holiday hardtop, 1950 was the last year for the pillared Club coupe. Total sales set yet another record of 106,220.
The 98 topped the Oldsmobile line again for 1951 with Three body styles available. The 4-door sedan and convertible came only with Deluxe equipment, while the Holiday hardtop was available with either Deluxe or Standard trim. The 98 standard equipment included bumper guards, cigarette lighter, dome light, rubber floor mats, stainless steel moldings, lined trunk, illuminated ashtray, foam rubber seat cushions and extra chrome moldings. Deluxe equipment was special rear door ornament, rear center armrests, Deluxe electric clock, Deluxe steering wheel with horn ring and special chrome trim. Upholstery choices were nylon cord, nylon cloth and leather. The pillared Club coupe was no longer offered. With the only choice in a closed 2-door 98 now being the hardtop, Holiday sales nearly doubled to 17,929 units.
Read the full article
6 notes
·
View notes
Text
Cold Heading Machine Market - Forecast (2022 - 2027)
Cold Heading Machine Market size is forecast to reach US$5.49 million by 2027, after growing at a CAGR of 4.30% during 2022-2027. The cold heading machine is professional equipment supporting the automatic thread rolling machine in the whole plant of the industry. Its purpose is to use selected metal forming such as carbon steel, stainless steel, aluminum, copper, and others with suitable molds, according to the allowable compression ratio of the wire, under the action of the slider driven by the crankshaft connecting rod, automatic and fast. The cold heading machine automatically processes the wire into semi-finished products. High production efficiency, good product quality, and adjustable diameter and length. In sheet metal forming anisotropic hardening effects receive frequent attention, as spring-back. The operations required to prepare stock for cold heading are heat treating, drawing to size, machining, descaling, cutting to length, and lubricating. Cold heading machines are employed to manufacture headed parts, which are widely utilized to fabricate terminals of automobile control units, pressure sensors, engine controls units, and other mechanical machinery. The cold heading machine is also used to manufacture bolts, screws, rivets, taper roller heading, and others. Moreover, the expansion of automotive and constructional industries is estimated to boost the cold heading machine market.
COVID-19 Impact
The outbreak of COVID-19 companies operating in the market has experienced irregularity in demand. The companies have witnessed a moderate influx of demand for applications such as repairing and operations and general industrial services. Automotive manufacturing facilities had also faced a shutdown during COVID-19 with the consumers focusing on essential products, and services, the demand for automobiles declined. The effect of the pandemic on the aerospace industry was catastrophic. The dramatic drop in air transport due to the pandemic and containment measures threatened air transport feasibility. However, with the commencement of vaccinations and adoption of the new normal, the automotive, construction, and other key end-user sectors have started getting back on their feet since the last quarter of 2020.
Request Sample
Report Coverage
The “Cold Heading Machine Market Report – Forecast (2022-2027)”, by IndustryARC, covers an in-depth analysis of the following segments of the Cold Heading Machine Industry.
By Type: Single-Die, Two-Die Three-Header, Multiple Header, and Others
By Tooling Type: Punches and Dies
By Distribution Channel: Direct and Indirect
By Techniques: Upsets and Extrusions (Forward Extrusions and Backward Extrusions)
By Operation: Sizing, Piercing, Trimming, Thread rolling, Blank rolling, Pointing, and Others
By End-Use Industry: Aerospace & Defense, Automotive (Ball Studs, Piston Pins, Sparkplug Shells, Valve spring Retainers, Engine Poppet Valves, Transmission Shafts, and Others), Building and Construction, Electrical (Appliances, Others), Infrastructure (Bridges, Dams, and Others), and Others
By Geography: North America (USA, Canada and Mexico), Europe (UK, France, Germany, Italy, Spain, Russia, Netherlands, Belgium, and Rest of Europe), APAC (China, Japan, India, South Korea, Australia and New Zealand, Indonesia, Taiwan, Malaysia and Rest of APAC), South America (Brazil, Argentina, Colombia, Chile, Rest of South America), and Rest of the world (Middle East and Africa)
Key Takeaways
Asia- Pacific dominates the cold heading machine market owing to a rapid increase in the automotive industry.
The region has a reputation as being inland to certain of the world's most esteemed vehicle manufacturers like Toyota, Honda, Hyundai, Kia, Tata, and others with a production of 44.2 million in 2020, according to the Organisation Internationale des Constructeurs d'Automobiles (OICA).
Increasing demand from the construction and electronics sectors are the key driving factors mentioned in the market report
The growing demand for cold-headed machines in the aerospace industry is another factor that is driving the major factors of the cold heading machine market.
Decreasing automotive production and sales are likely to have a negative impact on the demand for the market.
Cold Heading Machine Market Segment Analysis - By Operation
Thread rolling held the largest share in the cold heading machine market in 2021 and is estimated to rise at a CAGR of 3.7% in terms of revenue during the forecast period from 2022-2027. The demand for Thread rolling operation to produce fasteners like internally threaded which are likely to use in construction, railways, and, automotive manufacturing. It is mostly preferred by most of the contractors as internal thread cuts trenches in the material and supports to pull fastened materials together and avoid pull-out. These fasteners are self-tapping in and require a pre-drilled hole. Innovations in the designs to provide better performance and vibration resistance are projected to have a positive impact on the market. Stainless steel is commonly used to manufacture internally threaded fasteners. Alloy steel and aluminum are the other materials used to manufacture these fasteners. Thus, it is expected to have a positive impact on cold heading machine growth over the forecast period.
Cold Heading Machine Market Segment Analysis - By End-Use Industry
The automotive segment held the largest share in the cold heading machine market in 2021 and is estimated to rise at a CAGR of 5.6% in terms of revenue during the forecast period 2022-2027. The automotive industry is expanding at a steady pace. The need for metal terminals, such as rivets and bolts, is rising in the industry. Besides, some of the measures taken by the government in different regions to overcome the pandemic loss, for instance, France committed to making clean vehicles, i.e., to increase the output of electric and hybrid cars to more than one million per year over the next five years and for the US$ 9.7 billion rescue plan has been announced to the car industry. Thus, indicating growth in the automotive sector.
The automotive industry is likely to expand with a substantial increase in sales. The rise in the sale of leading motor vehicles is anticipated to propel the global cold heading machine market during the forecast period. With the exponential development in the sector, for instance, the United States has one of the largest automotive industries in the world, with light vehicle sales reaching 17.2 million units in 2018. Besides, the Indian automotive industry is expected to reach US$251.4-282.8 billion by 2026, which market report is expected to boost the cold heading machine market in the forecast period.
Inquiry Before Buying
Cold Heading Machine Market Segment Analysis - By Geography
Asia-Pacific had accounted for the largest share of 39% in 2021 and is estimated to grow with a CAGR of 4.1% during the forecast period 2022-2027. Rapid industrialization coupled with economic improvement in the region has resulted in high demand. The development and investment in the growing end-use like automotive, construction, and others are escalating the market growth. For instance, according to Invest India, by 2021, India is projected to emerge as the third-largest market for passenger vehicles in the world. Also, passenger vehicle sales rose by 2.70% in FY 2018-19 as compared to FY 2017-18. The growing construction industry in China, Japan, India, Thailand, and Taiwan is further expected to fuel market growth. According to International Trade Administration, China is the world’s largest construction market, recently launched a new Infrastructure campaign to offset the economic impact of the COVID-19 pandemic and boost sustainable growth. Besides, the infrastructure sector has become the biggest focus area for the Government of India. India plans to spend US$1.4 trillion on infrastructure during 2019-23 to have a sustainable development of the country. Such continual expansion of these sectors is anticipated to drive the need for cold heading machines over the forecast period in Asia-Pacific.
Cold Heading Machine Market Drivers
Increasing Demand from Construction and Electronics Sectors
The electrical industry uses cold heading machinery for making cold-headed electrical contact rivets. The most popular ones are solid and bi-metallic. In special occasions, electrical appliances also require custom cold-headed parts, such as rivets and fasteners. Screws, rivets, bolts, and taper roller heading are basic mechanical terminal parts needed in various industries. Expansion of the construction industry is projected to boost the use of cold heading machines. Cold heading machines are employed to produce fabrication terminals, which are extensively used in the construction industry. Thus, investment and development in the sector will boost the cold heading machine market growth. For instance, according to Statistics Canada, in April 2021, the investments made in the residential, industrial, commercial, institutional and governmental sectors were US$12,241.4 billion, US$770.59 billion, US$2,456.7 billion, and US$1,123.8 billion, as compared to the investments made in March 2021 i.e. US$10,412.41 billion, US$762.78 billion, US$2,475.46 billion, and US$1,110.55 billion, respectively
Growing demand in the Aerospace industry
A cold heading machine which is professional equipment supporting the automatic thread rolling machine in the whole plant of the fastener industry is extensively used during the manufacturing process of aircraft, as they hold the ability to affix critical structural components together and high tensile strength. Considering the requirement for fuel-efficient and lightweight aircraft, there is a huge demand for lightweight, and high-performance fasteners. The escalating claim for comfortable, fast traveling solutions, and cost-effective along with boosted international air travel, are some of the basic factors that assist the growth of industrial fasteners in the aerospace and aircraft industry. The uprising air traffic in some regions, such as the Asia Pacific, North America, and others are constantly boosting the market. According to Invest India, Indian airlines to satisfy the projected rise in demand for commercial air travel, have placed large orders for aircraft which is projected to quadruple in size to approximately 2500 airplanes by 2038. Besides, the growing aircraft modernization programs in North America, for instance, according to Select USA foreign direct investment (FDI) into the U.S. aerospace industry totaled nearly US$22 billion. And followed by Europe are driving the market during the forecast period. Innovations in research and development in the aerospace sector will drive the cold heading machine market in the forecast period.
Schedule a Call
Cold Heading Machine Market Challenges
Fluctuation in the automotive sales and production
Decreasing automotive production and sales in the different regions are likely to have a negative impact on the demand for the market studied. Fluctuation in the Automobile’s sales graph, for instance, the worldwide passenger vehicles have seen a strip downfall of 14% in 2020 compared to 2019 and along with those unstable economies may hamper the overall growth. Besides, fasteners require holes, which weaken the components, leave visible bond lines and add extra weight. Although, the growing availability of industrial fasteners will neutralize and build new avenues in the global industry.
Cold Heading Machine Industry Outlook
Technology launches, acquisitions, and R&D activities are key strategies adopted by players in the Cold Heading Machine Market. Cold Heading Machine top 10 companies include:
Asahi Sunac Corporation
Carlo Salvi S.p.A.
Chun Zu Machinery Industry Co., Ltd.
Hatebur Umformmaschinen AG
Komatsu Ltd.
Sakamura Machine Co., Ltd
Samrat Machine Tools
Sijin Intelligent Forming Machinery Co., Ltd.
Wrentham Tool Group LLC
Buy Now
Related Reports:
Foundry Machinery Market - Forecast(2022 - 2027)
Report Code: AIR 0258
Virtual Machine Market - Forecast(2022 - 2027)
Report Code: ITR 0058
Industrial and Factory Automation Market - Forecast(2022 - 2027)
Report Code: AIR 0009
For more Chemicals and Materials Market reports, please click here
#Cold Heading Machine Market#Cold Heading Machine Market size#Cold Heading Machine industry#Cold Heading Machine Market share
2 notes
·
View notes
Photo

This is a Stratford Warwick blue lever fill fountain pen and pencil set c. 1948-1953. The cap is two pieces, with a metal bottom section and an injection molded cap top. The clip and trim are gold plated. The gold plated stainless steel nib is very firm. The 5 1/4 inch long pen is made of injection molded plastic and came in red, blue, green and black. Warwick was a Stratford product. The Stratford Pen Company was previously known as Salz Brothers, Inc., with the transition happening sometime between 1945 and 1946, based on advertisements. The pen sold for 50 cents. A boxed matching set with a pencil sold for $1. In 1951 a three piece set with a ballpoint pen was introduced for $1.50. Several style versions were made with either gold plated trim or anodized aluminum with silver color trim. This set is available on eBay: https://www.ebay.com/itm/225083276434 #pencollecting #fountainpen #stratford #salz #warwick #waterman #taperite #citation #penhero https://www.instagram.com/p/CgSlFEoPmIE/?igshid=NGJjMDIxMWI=
3 notes
·
View notes
Text
Preventative Measures: How to Keep Your Log Cabin Mold-Free
Mold in a log cabin can compromise structural integrity, indoor air quality, and the overall aesthetic appeal of your rustic retreat. Preventing mold growth is crucial to maintaining the health and longevity of your log cabin. This blog delves into the preventative measures you can take to ensure your cabin remains mold-free, preserving its beauty and ensuring a healthy living environment.

Understanding Mold and Its Causes
Mold thrives in moist, warm environments and can be a common issue in log cabins if not properly managed. Key contributors to mold growth include high humidity, inadequate ventilation, and water intrusion, which can stem from leaks, condensation, or poor drainage around the cabin.
Regular Inspections and Maintenance
The first line of defense against mold is regular inspections and maintenance. Check your cabin seasonally for any signs of water damage, leaks, or condensation, particularly in areas prone to moisture, such as bathrooms, kitchens, and basements. Ensure that gutters and downspouts are clear and direct water away from the cabin’s foundation to prevent water accumulation.
Control Humidity Levels
Maintaining optimal indoor humidity levels (between 30% and 50%) is vital in preventing mold growth. Use dehumidifiers if necessary, especially during humid months, and ensure adequate ventilation in high-moisture areas like kitchens and bathrooms. Simple actions like using exhaust fans and opening windows can significantly improve air circulation and reduce humidity.
Proper Ventilation
A well-ventilated cabin ensures that moist air is expelled, and fresh, dry air is circulated. Ensure that your log cabin has a good ventilation system in place, including operable windows, vents, and exhaust fans. Attic ventilation is also crucial to prevent moisture buildup that can lead to mold growth.
Waterproofing and Sealing
Protect your log cabin from water intrusion by applying waterproofing treatments to the logs and ensuring that all seals and caulking are intact. Pay special attention to windows, doors, and roof lines, where leaks often occur. Regularly reapply sealants and stains to the exterior logs to maintain their water-resistant properties and prevent mold spores from taking hold.
Landscaping and Drainage
Proper landscaping and drainage are essential in preventing water from accumulating near the cabin's foundation, which can lead to mold issues. Slope the ground away from the cabin to facilitate water runoff, and consider installing French drains or other drainage solutions if necessary. Keep vegetation around the cabin trimmed and away from the walls to improve airflow and reduce moisture.
Use Mold-Resistant Materials
When building or renovating your log cabin, choose mold-resistant materials for areas prone to moisture. For example, using stainless steel, galvanized metal, or specially treated wood can prevent mold growth. In areas like bathrooms and kitchens, consider mold-resistant paints and tiles that withstand moisture.
Educate and Prepare
Understanding the conditions that lead to mold growth and being prepared to address issues promptly can prevent minor problems from becoming major infestations. Educate yourself and anyone else involved in the cabin’s upkeep on the signs of mold and the steps to take if it is detected.
Conclusion
Keeping your log cabin mold-free requires a proactive approach, focusing on moisture control, regular maintenance, and the use of appropriate materials. By implementing these preventative measures, you can enjoy the rustic charm of your log cabin without the worry of mold, ensuring a healthy and enduring space for years to come.
0 notes
Text
How are Forged Pipe Fitting Made?
In the tricky global of piping systems, the reliability and durability of fittings play a pivotal function. Among diverse kinds of fittings available, solid pipe fittings stand out for their robustness and resilience, making them integral components in industries ranging from oil and gasoline to chemical processing. But have you ever wondered how those vital additives are made? Let's delve into the fascinating system of forging pipe fittings.
Understanding Forged Pipe Fittings:
Forged pipe fittings are manufactured thru a manner known as forging. Unlike cast fittings, which might be made by using pouring molten metal into molds, cast fittings are crafted by way of applying heat and stress to form solid pieces of metal into the preferred shape. This method complements the mechanical residences of the fittings, making sure superior power and integrity.
The Forging Process:
1. Selection of Raw Materials:
The first step in crafting cast pipe fittings is the cautious selection of raw materials. High-first-rate metals inclusive of stainless-steel, carbon steel, and alloy metal are usually used because of their energy and corrosion resistance.
2. Heating:
The selected steel stock is heated to a temperature where it turns into malleable but does now not attain the melting factor. This temperature varies relying at the form of metallic used and the preferred houses of the final product.
3. Forming:
Once the steel reaches the premiere temperature, it is positioned right into a forging die, which contains the poor influence of the favored fitting. A hydraulic press or hammer applies severe stress to the metallic, forcing it to take the form of the die. This procedure may be achieved in a couple of degrees to gain elaborate designs and precise dimensions.
4. Trimming and Finishing:
After the forging process is complete, the fittings may additionally go through additional trimming and completing operations to dispose of extra fabric and refine the surface finish. This guarantees uniformity and enhances the aesthetics of the very last product.
Advantages of Forged Pipe Fittings:
The precise manufacturing system of forged pipe fittings gives numerous benefits over other forms of fittings:
Strength and Durability: Forged fittings showcase superior mechanical residences, including higher tensile energy and effect resistance, making them perfect for excessive-pressure and excessive-temperature programs.
Enhanced Corrosion Resistance: The dense grain shape of solid fittings minimizes the danger of corrosion, prolonging their provider life in corrosive environments.
Dimensional Accuracy: The precision forging manner permits for tight tolerances and regular dimensions, making sure right suit and alignment inside piping systems.
Versatility: Forged fittings are available in a wide range of sizes, shapes, and configurations to house numerous piping requirements.
Conclusion:
In conclusion, the meticulous art of crafting cast pipe fittings entails a mixture of metallurgical knowledge and advanced production strategies. By subjecting solid metal to warmness and stress, producers create fittings renowned for his or her power, durability, and reliability. Whether inside the oil and gasoline industry, chemical processing plants, or other vital packages, cast fittings play a important function in retaining the integrity of piping systems.
When it comes to the sector of tube clamps and dairy pharma fittings, one call sticks out as a leader within the enterprise - Bu-Lok. Renowned for their understanding and superb products, Bu-Lok makes a speciality of hydraulic pipe tube clamps, heavy-responsibility tube clamps, and mild-responsibility tube clamps. As pioneers inside the subject, they may be devoted to sharing their information and offering pinnacle-notch answers for all tube clamping wishes.
In essence, whilst solid pipe fittings ensure the structural integrity of piping systems, Bu-Lok ensures the efficiency and reliability of tube clamping answers, making them critical companions in various commercial sectors.
Through their commitment to excellence, Bu-Lok continues to set the standard for first-class and innovation in the realm of tube clamps and fittings.
0 notes
Text
The Perfect Hand Tools and Garden Tools to Upgrade Your Garden
Whether you're a home gardener looking to prune your trees or a landscaping professional undertaking major garden renovations, having the right tools makes all the difference. Multitec Hand Tools and Garden Tools offers a wide range of high-quality equipment to help you achieve gardening greatness.
With headquarters in Delhi and distribution across India, Multitec provides both durability and accessibility. Read on to discover some of their top products that no garden should be without.
Anvil Pruning Shear PSA01:Keep Your Trees neat with Pruning Shears
Overgrown trees and shrubs quickly become an eyesore. Pruning shears are essential for keeping branches tidy and under control. Multitec provides multiple options to suit both light household use and heavy-duty landscape work.
For household pruning, the Anvil Pruning Shear PSA01 offers effortless snipping of branches up to 15mm thick. At just 190mm long, it conveniently fits smaller hands while still providing leverage for tough cuts. The stainless steel blade retains sharpness while the ergonomic CA handle prevents fatigue.
For thicker branches, upgrade to the larger Anvil Pruning Shear PSA02. At 210mm long with a 25mm maximum cut, stubborn stems are no match for its hardened steel. Like all Multitec tools, its sturdy build and easy locking mechanism make it ideal for frequent use in home gardens.
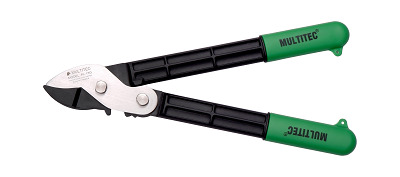
Multitec Bypass Pruning Shear PSB08: Gain Precision with Bypass Pruning Shears
While anvil shears use a flat blade to cut against a plate, bypass shears work more like scissors with two curved blades passing each other. This makes them extra sharp and suitable for detail work like flower trimming.
The Multitec Bypass Pruning Shear PSB08 brings fine pruning capability to any gardening kit. Its 19mm cut capacity handles stems for everything from roses to shrubs. At 216mm long, it allows for comfortable extended use.
High-grade stainless steel keeps the PSB08 sharper for longer compared to cheaper metals. Ergonomic TPE handles maximize comfort to reduce hand strain. Whether deftly shaping your garden by hand or maintaining potted patio plants, these shears enable precision cuts.
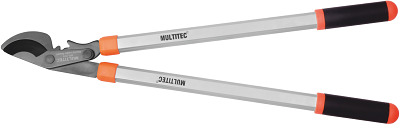
Telescopic Geared Bypass Lopper BPL37XG: Tackle Tough Stems with Telescopic Loppers
For truly thick branches that laugh at ordinary shears, loppers add extra leverage and cutting power. Multitec offers an innovative geared design that multiplies force for chopping robust wood up to 40mm thick.
The Telescopic Geared Bypass Lopper BPL37XG combines solid gearing with lightweight extendable handles. SK-5 steel blades withstand intense pressure, slicing smoothly through tree boughs. Handles extend from 25 to 37 inches for increased reach and cutting control.
Aluminum alloy handles keep weight low for easy operation while soft grips provide a comfort boost on big cuts. The BPL37XG collapses down for convenient storage when yardwork wraps up.
Whether maintaining fruit trees, clearing brush, or tackling landscape overhaul, these telescopic loppers muscle through tasks that leave standard tools struggling. Tough stems meet their match.
Built Tough for Reliability
From tiny clipping snips up to branch-busting loppers, all Multitec tools share sturdy stainless steel construction for lasting performance. Compared to cheaper chrome varieties, stainless better resists corrosion and retains integrity after years of use.
Ergonomic shaping on handles and grips reduce hand strain for comfortable operation even during extended yardwork. Generous locking mechanisms keep cutting edges safely folded away when not in use.
Made from weather-resistant materials, Multitec tools withstand sun, rain, and dirt while on the job. Smart storage keeps them functioning smoothly season after season.
With hardened steel for strength and precision molding for comfort, these shears, loppers, and snips tackle garden maintenance with ease. Whether you’re an avid home gardener or a full-time landscaper, Multitec delivers reliable and efficient cutting year after year.
Features Of The Multitec Hand Tools And Garden Tools: Overview
Tool
Features
Anvil Pruning Shear PSA01
- Length: 190mm - Cutting Capacity: 15mm - Stainless steel blade - CA handle - Sturdy construction for long life - Ergonomic handle for comfort - Easy locking mechanism
Anvil Pruning Shear PSA02
- Length: 210mm - Cutting Capacity: 25mm - Stainless steel blade - CA handle - Sturdy construction for long life - Ergonomic handle for comfort - Easy locking mechanism
Bypass Pruning Shear PSB08
- Length: 216mm - Cutting Capacity: 19mm - High grade stainless steel blade - TPE handle - Ultra-sharp blades - Long handles for comfort - Lightweight construction - Easy locking mechanism
Telescopic Geared Bypass Lopper BPL37XG
- Length: 37 inches - Cutting Capacity: 40mm - SK-5 steel blade - Aluminium alloy handles with soft grips - Hardened for tough cuts - Extendable handles - Lightweight, heavy duty build
Gear Up for Gardening Greatness
Don’t settle for lackluster landscaping – keep your outdoor space looking its best with high-quality tools from Multitec. Their durable stainless steel shears, loppers, and other equipment make yardwork a pleasure rather than a chore.
Distributed across India, Multitec brings heavy-duty gear to homes and work crews nationwide. Upgrade from flimsy hardware store finds to professional-grade instruments purpose-built to take on the toughest branches.
With the right tools on hand, you can shape lush landscapes limited only by your imagination. Prune plants precisely, clear acres efficiently, and maintain order through the seasons. Choose Multitec for handshake-worthy curb appeal and garden greatness.
The cutting edge of performance starts here. Browse Multitec’s catalogs today to discover durable, ergonomic tools ready to elevate every landscape. Great gardens take grit - power through yardwork easily with equipment guaranteed to go the extra mile. Don’t just maintain your outdoor space, master it with Multitec Hand Tools and Garden Tools.
Visit for more at: multitectools.com
Contact us: 8037402470
#WireStripper#ScrewDriver#HexKey#HandTool#Gardentool#Agrotool#StainlessSteelTools#NippersMicroShears#Pilers#CableCutters#PowerBits
0 notes
Video
vimeo
9735 Quakertown Ave Chatsworth (Branded) from Alex Gandel on Vimeo.
Welcome to this charming turnkey single-story ranch-style home in Chatsworth. Boasting 3 bedrooms, 2 bathrooms, and 1,435 square feet of comfortable living space, this home is situated on a generous 7,535 square foot landscaped lot, offering ample space for outdoor enjoyment. The updated kitchen features stainless steel appliances including a gas range, microwave, and dishwasher, complemented by decorative tile countertops, dark wood cabinetry and an attractive backsplash. A pantry closet provides additional storage space. The kitchen flows effortlessly into a large formal dining room and living room, highlighted by a cozy fireplace and oversized windows that flood the space with natural light. For more casual gatherings, a separate family room offers a comfortable retreat and provides access to the covered patio and spacious backyard, perfect for entertaining or simply enjoying the outdoors. This home is adorned with fine features such as lighted ceiling fans, crown molding, neutral paint colors with white trim, chair railing, and upgraded lighting fixtures throughout. Updated tile and carpet flooring add to the appeal, while air conditioning and forced heating ensure year-round comfort. The spacious master bedroom is a peaceful sanctuary, complete with dual closets featuring mirrored doors, a window seat, and an updated ensuite bathroom with a shower. Two thoughtfully designed secondary bedrooms and an updated hall bathroom with a shower over tub and glass enclosure provide additional comfort and convenience for family and guests. Conveniently located near parks, shopping, restaurants, and recreational facilities and is just a short distance to the 118 Freeway, ideal for commuters. Don't miss the opportunity to make this delightful Chatsworth residence your own.
0 notes
Text
How to Make Exposed Tile Edges Look Finished: Expert Tips & Tricks

To make exposed tile edges look finished, you can use tile trim or bullnose tiles for a clean and polished appearance. Additionally, you can apply edge treatments like metal strips or wood molding to hide the exposed edges and provide a finished look to the tiles.
2. Understanding Exposed Tile Edges
In this section, we will delve into the world of exposed tile edges and gain a comprehensive understanding of their significance. Knowing what exposed tile edges are and why they need to be finished is key to achieving a polished and professional-looking tile installation. So, let's explore further!
2.1 What Are Exposed Tile Edges?
Exposed tile edges refer to the sides or ends of tiles that are visible in a tile installation. Unlike the enclosed edges that are nestled against walls or other surfaces, exposed edges are left open, leaving the raw edges of the tiles exposed.
Without proper finishing, exposed tile edges can appear unrefined and unfinished, detracting from the overall aesthetics of the tiled area. Therefore, it becomes essential to pay attention to these edges and take appropriate measures to ensure they look as clean and polished as the rest of the tiled surface.
2.2 Importance Of Finishing Exposed Tile Edges
Finishing the exposed tile edges is crucial to achieving a professional and sophisticated look in your tile installation. Not only does it enhance the overall appearance, but it also provides functional benefits:
- Preventing tile damage: Unfinished tile edges are susceptible to chipping, cracking, or breakage. By properly finishing these edges, you can protect the tiles from potential damage caused by day-to-day use or accidental impacts.
- Facilitating easier cleaning: Exposed edges can accumulate dirt, debris, or moisture more easily than enclosed edges. When the edges are properly finished, cleaning becomes easier, allowing you to maintain a hygienic and pristine tiled surface effortlessly.
- Enhancing durability: Finished tile edges provide structural support and stability to the tiles. This helps to prevent loosening, shifting, or dislodging of the tiles over time, ensuring a long-lasting and durable tile installation.
To achieve the desired finish for exposed tile edges, various methods and materials can be used, such as bullnose tiles, trim pieces, or edge profiles. These options not only add a polished look to the edges but also create a seamless transition between tiles, resulting in a cohesive and visually appealing tile installation.
Now that we have gained a clear understanding of exposed tile edges and their importance, it's time to explore the different techniques and materials that can be utilized to ensure these edges look finished. Stay tuned for the next section!

3. Types Of Finishes For Exposed Tile Edges
When it comes to finishing the edges of your tiles, there are several options available. These finishes not only add a polished look to your tiled surface but also provide protection to the exposed edges. Let's explore three popular types of finishes for exposed tile edges.
3.1 Bullnose Tiles
Bullnose tiles are a great option for achieving a polished and professional finish on exposed tile edges. These tiles have one or more rounded edges, which create a smooth and continuous transition from the face of the tile to the edge. Bullnose tiles are available in various sizes and can be easily incorporated into your tile design.
With bullnose tiles, you won't have to worry about rough or unfinished edges. These tiles provide a clean and elegant look while protecting the vulnerable edges from damage. Whether you're working with ceramic, porcelain, or natural stone tiles, you can find bullnose options that complement your chosen tile material perfectly.
3.2 Metal Edge Trims
Metal edge trims are another popular choice for finishing exposed tile edges. These trims are made of durable materials such as stainless steel, aluminum, or brass, which not only protect the edges but also add a stylish and contemporary touch to your tile installation. Metal trims come in various profiles, including L-shaped, round, and square, allowing you to select the one that suits your design aesthetic.
Installing metal edge trims is relatively straightforward. These trims are usually fixed in place using adhesive or mortar, ensuring a secure and long-lasting finish. Metal trims offer excellent protection against impact and chipping, making them a wise choice for high-traffic areas or spaces prone to wear and tear.
3.3 Wood Edge Trims
If you're looking for a warm and natural finish for your exposed tile edges, wood edge trims are an excellent option. These trims are typically crafted from hardwood or engineered wood, which provides a soft and organic feel to your tile installation. Wood trims come in various styles, including flat, rounded, or beveled, offering versatility in design.
Wood edge trims are often used to create a seamless transition between tile and other flooring materials, such as hardwood or laminate. They can be stained or painted to match your existing decor or left in their natural finish for a rustic charm. It's worth mentioning that wood trims may require regular maintenance to prevent moisture damage, so sealing them properly is essential.
When it comes to finishing exposed tile edges, bullnose tiles, metal edge trims, and wood edge trims are three great options to consider. Each provides its unique benefits, ensuring a polished look while protecting the vulnerable edges of your tiles. Whether you prefer a modern, sleek finish or a warm, natural feel, there's a finish out there to suit your style and design preferences.
4. Choosing The Right Finish For Your Tile Edges
When it comes to making exposed tile edges look finished, choosing the right finish is crucial. It not only adds a polished touch to your tiles but also ensures their longevity and durability. In this section, we'll explore three factors to consider when selecting the finish for your tile edges:
4.1 Consider The Tile Material
Before choosing a finish for your tile edges, it's important to consider the material of the tiles themselves. Different tile materials require different finishes to achieve the desired look and protection. Here's a quick breakdown:
Tile Material
Recommended Finish
Ceramic
Glazed or polished finish
Porcelain
Polished or unglazed finish
Natural Stone
Honed or polished finish
Glass
Smooth or polished finish
By matching the tile material with the appropriate finish, you'll not only ensure a cohesive look but also enhance the overall durability and performance of your tiles.
4.2 Evaluate The Application Area
When choosing a finish for your tile edges, it's important to evaluate the application area. Is it a high-traffic space like a kitchen or a bathroom? Or is it a low-traffic area like a bedroom or a study room? Evaluating the application area will help you determine the level of durability required for your finish.
In high-traffic areas, a more robust finish, such as a metal trim or bullnose edge, is recommended to protect against frequent wear and tear. In low-traffic areas, you may opt for a simpler finish, such as a rounded edge or a beveled edge.
4.3 Match The Finish With The Overall Design
It's essential to match the finish of your tile edges with the overall design of your space. The finish you choose should complement the style and aesthetic of the room. Here are some factors to consider:
- Color: Ensure the finish color complements or contrasts harmoniously with the tile color.
- Texture: Consider whether a smooth, polished finish or a more textured finish would best complement the surrounding materials.
- Style: Determine whether a modern, sleek finish or a more traditional, ornate finish would align with the overall design theme.
By considering these design elements, you can create a seamless transition from the tile edges to the rest of the room, resulting in a polished and cohesive look.
5. Steps To Install Bullnose Tiles On Exposed Edges
When it comes to finishing exposed tile edges, installing bullnose tiles is a popular and effective solution. Bullnose tiles have a rounded or beveled edge that provides a smooth and finished look to your tile installation. In this section, we will go through the step-by-step process of installing bullnose tiles on exposed edges.
5.1 Measure And Mark The Tile Edges
Before you begin installing the bullnose tiles, it is important to measure and mark the tile edges accurately. This step ensures that the bullnose tiles fit perfectly and create a seamless transition between the exposed edges and the tiled surface.
To measure and mark the tile edges:
- Measure the length of each edge: Use a tape measure to determine the length of each exposed edge where the bullnose tiles will be installed.
- Mark the center point: Mark the center point of each edge using a pencil or marker. This will help you align the bullnose tiles properly.
5.2 Cut And Shape The Bullnose Tiles
After measuring and marking the tile edges, it's time to cut and shape the bullnose tiles to fit the edges perfectly. This step requires careful attention to detail to ensure a clean and professional-looking finish.
To cut and shape the bullnose tiles:
- Prepare the necessary tools: Gather a wet saw or a tile nipper, a straight edge or a tile file, and safety goggles.
- Measure and mark the bullnose tiles: Measure and mark each bullnose tile according to the dimensions of the exposed edges.
- Cut the tiles: Use a wet saw or tile nipper to cut the bullnose tiles along the marked lines. Take your time and make precise cuts for a clean look.
- Shape the edges: Use a straight edge or a tile file to smooth and shape the cut edges of the bullnose tiles for a seamless fit.
5.3 Apply Adhesive And Install The Bullnose Tiles
Now that the bullnose tiles are prepared, it's time to install them on the exposed edges. Applying adhesive properly is crucial to ensure a strong bond and a long-lasting finish.
To apply adhesive and install the bullnose tiles:
- Prepare the adhesive: Follow the instructions on the adhesive packaging to prepare it correctly.
- Apply the adhesive: Use a notched trowel to spread a layer of adhesive onto the back of each bullnose tile.
- Align and press: Align the bullnose tiles with the marked center points on the edge and press them firmly onto the adhesive.
- Allow to dry: Let the adhesive dry for the recommended amount of time according to the adhesive manufacturer's instructions.
5.4 Grout And Clean The Installed Tiles
After the bullnose tiles are securely installed, it's essential to grout and clean the tiles for a polished and finished appearance. Grouting fills in the gaps between the tiles and protects them from moisture and dirt.
To grout and clean the installed tiles:
- Prepare the grout: Mix the grout according to the manufacturer's instructions until you achieve a smooth consistency.
- Apply the grout: Use a grout float or a rubber grout float to apply the grout onto the tiled surface, ensuring that the gaps between the tiles are completely filled.
- Clean the tiles: Use a damp sponge or a grout cleaning tool to remove excess grout from the tiles, working in a diagonal motion.
- Allow to dry: Let the grout dry for the recommended time specified by the grout manufacturer.
- Final clean up: Once the grout is dry, use a clean, dry cloth to buff and shine the tiles, revealing their finished beauty.
6. Installing Metal Edge Trims For A Polished Look
When it comes to achieving a sleek and professional finish for your exposed tile edges, installing metal edge trims is the way to go. These trims not only protect the edges from chipping and cracking but also add a touch of elegance to your tile installation. In this section, we will walk you through the process of measuring, cutting, applying adhesive, and attaching metal edge trims to your tile edges. Let's dive in!
6.1 Measure And Cut The Metal Edge Trims
Before you start the installation process, it is crucial to accurately measure and cut the metal edge trims to ensure a seamless fit. Here's how you can do it:
- Using a measuring tape, measure the length of the exposed tile edge where you want to install the trim. Be sure to account for any corners or angles.
- Transfer the measurements onto the metal edge trim using a pencil or marker.
- Using a hacksaw or tin snips, carefully cut the metal trim along the marked lines. Take your time to ensure clean and precise cuts.
6.2 Apply Adhesive And Attach The Trims To The Tile Edges
Now that you have your metal edge trims ready, it's time to attach them to the tile edges. Follow these steps:
- Clean the tile edges thoroughly to remove any dirt, dust, or debris.
- Apply a thin layer of tile adhesive along the edge of the tile where the trim will be installed.
- Press the metal edge trim firmly onto the adhesive, making sure it aligns perfectly with the tile edge.
- Use a rubber mallet or a block of wood to gently tap the trim into place, ensuring it adheres securely to the tile.
- Repeat the process for each exposed tile edge, taking your time to achieve a neat and even installation.
6.3 Clean And Polish The Metal Edge Trims
To complete the polished look of your metal edge trims, it's essential to clean and polish them after installation. Here's what you need to do:
- Wipe down the trims with a damp cloth to remove any adhesive residue or dirt.
- Apply a metal cleaner or polish to a soft cloth and gently buff the trims to enhance their shine.
- Continue polishing until the trims are free from smudges and fingerprints.
- Inspect the trims for any uneven spots or imperfections and make necessary adjustments.
By following these steps, you can ensure that your exposed tile edges have a polished and finished appearance. Installing metal edge trims not only adds a decorative touch but also protects your tiles from potential damage. Now that you know how to achieve a professional look, it's time to take your tile installation to the next level!
7. Enhancing Tile Edges With Wood Edge Trims
The exposed edges of tile installations can often look unfinished and unprofessional. But there's a simple solution to enhance the appearance of these edges – wood edge trims. By using wood trims, you can add a touch of elegance and sophistication to your tile edges, making them look polished and complete. In this section, we will explore how to choose the right wood trim for your tile edges, measure, cut, and attach the trims, and finally, sand and finish them to achieve a flawless result.
7.1 Choose The Right Wood Trim For Your Tile Edges
When it comes to selecting the right wood trim for your tile edges, there are a few factors to consider. First, choose a type of wood that matches or complements the overall style of your space. Popular wood options include oak, maple, and pine, among others.
Additionally, ensure that the wood trim is the appropriate size and shape for your tile edges. You can opt for straight or curved trims, depending on your design preference. For a seamless transition between the tiles and the trim, consider the thickness and width of your tile when choosing the trim.
7.2 Measure, Cut, And Attach The Wood Trims
To ensure a precise fit, begin by measuring the length of each tile edge that requires a wood trim. Use a tape measure to measure the distance from one end of the edge to the other. Note down the measurements for each tile, as they might slightly differ.
Next, using those measurements, carefully cut the wood trims to the appropriate length. Use a miter saw for accurate and clean cuts. Remember to double-check your measurements before cutting, as precision is key.
Once the trims are cut, it's time to attach them to the tile edges. Apply a strong adhesive or tile adhesive along the back of the trim and press it firmly onto the edge of the tile. Make sure the trim is perfectly aligned with the edge, and use clamps or tape to hold it in place while the adhesive dries.
7.3 Sand And Finish The Wood Trims
After the wood trims are securely attached to the tile edges, it's important to sand and finish them to achieve a polished look. Start by using sandpaper to smooth any rough edges or imperfections on the wood. Sand in the direction of the wood grain for the best results.
Once the trims are smooth, wipe away any dust or debris. Then, apply a wood finish or stain of your choice to enhance the natural beauty and protect the wood from moisture and wear. Use a clean brush or cloth to evenly apply the finish, making sure to follow the manufacturer's instructions.
Allow the finish to dry thoroughly before handling or placing any objects on the trims. This step will not only protect the wood but also give it a visually appealing sheen and luster.

8. Other Creative Ways To Finish Exposed Tile Edges
When it comes to tiling, achieving a polished look is essential, and that includes finishing those exposed tile edges. While standard tile trim is commonly used, there are other creative ways to add a unique touch and make your tile edges stand out. In this section, we will explore three distinct methods: mosaic borders, tile edge paint, and decorative molding.
8.1 Mosaic Borders
If you're looking for a visually striking way to finish your exposed tile edges, mosaic borders are a fantastic option. By incorporating small tiles or glass pieces of various colors and shapes, you can create a border that complements your tile design. This method adds personality and a custom touch to your tiling project.
Read the full article
0 notes
Text
The Marvel of Hard Capsules
The Marvel of Hard Capsules
In the realm of pharmaceuticals, hard capsules have emerged as a versatile and effective means of drug delivery. They are two-piece shells, typically made from gelatin or a vegetarian substitute, that encase a variety of medicinal substances. Get more news about Hard Capsules,you can vist our website!
Hard capsules offer numerous advantages. Firstly, they are tasteless and odorless, making them more palatable for patients. Secondly, they can be filled with a wide range of substances, including powders, granules, liquids, semi-solids, and even other capsules. This versatility allows for the encapsulation of drugs with diverse physical and chemical properties.
The production process of hard capsules is a testament to precision and quality control. The capsules are formed by dipping stainless steel molds into a bath of gelatin solution. The gelatin adheres to the mold, and after drying and trimming, the capsule halves are ready to be filled.
The filling process can be tailored to the specific requirements of the drug. For instance, if the drug is sensitive to heat or moisture, the filling environment can be controlled to ensure stability. Additionally, hard capsules can be designed to release their contents at specific points in the digestive tract, enhancing the effectiveness of the medication.
Hard capsules also offer benefits in terms of branding and product differentiation. They can be printed with logos or other identifying marks, and can be produced in a variety of colors. This not only aids in brand recognition but also helps to prevent medication errors.
Despite their many advantages, hard capsules are not without challenges. The primary concern is their susceptibility to changes in humidity, which can affect their stability and integrity. However, advances in capsule technology and storage solutions continue to mitigate this issue.
In conclusion, hard capsules represent a significant advancement in drug delivery technology. Their versatility, patient acceptability, and potential for customization make them a preferred choice for many pharmaceutical applications. As research continues and technology advances, it is likely that the role of hard capsules in medicine will continue to grow.
0 notes
Text

Automotive stamping mold is a high-precision, high-strength tool that requires regular maintenance to ensure its long-term and effective use. Here are some ways to repair automotive stamping mold:Cleaning Molds: Before servicing molds, they must be cleaned. The oil and dirt on the surface of the mold can be removed with suitable cleaning agents and tools.Inspect the mold: During the cleaning process, the surface and interior of the mold can be inspected for problems such as cracks, deformation and wear. A comprehensive inspection of the mold is required to ensure that the mold is in the best condition before use.Repair molds: If a mold is found to be worn or otherwise damaged, it needs to be repaired. Restoration includes operations such as welding, grinding, trimming, strengthening, etc. to ensure the integrity and stability of the mold.
0 notes
Video
youtube
Watch our latest video - Mike and Pam's '68 Chevy Flower Wagon -
The Chevrolet Bel Air is a full-size car produced by Chevrolet for the 1950–1981 model years. Initially, only the two-door hardtops in the Chevrolet model range were designated with the Bel Air name from 1950 to 1952. With the 1953 model year, the Bel Air name was changed from a designation for a unique body shape to a premium level of trim applied across a number of body styles. The Bel Air continued with various other trim level designations, and it had gone from a mid-level trim car to a budget fleet sedan when U.S. production ceased in 1975. Production continued in Canada, for its home market only, through the 1981 model year.
For 1965, the full size Chevrolet was totally restyled, and the cars were stretched to 213.3 in (5,420 mm) overall, even though the wheelbase remained the same. The new stamped grille had a lower extension below the bumper which was slightly veed. Curved window glass and round taillights mounted high characterized the new styling. The interiors were also redesigned and a very attractive dash resulted. The standard V8 remained the 283 CID model of 195 hp (145 kW), but options included two new 396 cu in (6,490 cc) CID engines of 325 hp (242 kW) and 340 hp (250 kW) and two 409 CID blocks of 400 hp (300 kW) and 425 hp (317 kW).
The Bel Air used a stainless-steel belt and rocker molding, identifying signature on the rear fenders, a glove compartment light and power tailgate on 9-passenger wagons to distinguish itself from the lower-priced Biscayne series.
For 1966, Chevrolet was in its second season of a totally new body change, so mild facelifting sufficed including forward thrusting, blunted front fenders and a revised grille. At the rear, a break with the traditional round taillamps took place. Bel Air and Biscayne featured dual rectangular lamps with back-up lamps built in. Overall length was 213.2 in (5,420 mm). The standard six-cylinder engine this year was the larger 250 CID version of 155 hp (116 kW). New for the speed set was a 427 cu in (7,000 cc) V8 of 390 hp (290 kW) or 425 hp (317 kW). Bel Air was readily distinguishable from Biscayne by its full length body side molding and rear fender Bel Air signatures. All-vinyl interiors were now standard on station wagons while cloth and vinyl trims continued on sedans.
For 1967, full-sized Chevrolets featured a new body with bulging rear fenders, one of this year's styling trends, not necessarily appreciated by everyone. Bel Air 2 and 4-door Sedans continued in addition to 6 and 9-passenger wagons. This year Bel Air featured triple taillights unlike Biscayne's dual units. Standard engines remained the same as the previous year. Optional engines were a 327 CID V8 of 275 hp (205 kW), the 396 CID V8 of 350 hp (260 kW); or the 427 CID V8 of 385 hp (287 kW), plus various speed packages.
#belairwagon #baggedlswagon #lswagon #lsswappedwagon #baggedwagon #austincollins #1964wagon #1964chevybelairlsbuild #lsswappedbelair #1964chevybelair #garagebuiltlsswap #jaylenosgarage #turbocamaro #lsswappedlowrider #lsswap #lsswapcamaro #ratrod #turbochargedcamarols #loweredlifestyle #hotrodheavenusa #garagebuiltls #lsmotor #billytoledo #lsx #turbo #lowrider #autotopiala
0 notes
Text
Mild Steel Angle Bar - Applications and Benefits
Do you understand what Ms Angles are and why they are employed in so many applications? Mild steel angle bar is a popular material because of its strength and longevity. It has a wide range of applications, from structural framing to project support. This blog article will go over the advantages of utilizing mild steel angle bars and how they can be utilized in a variety of applications.
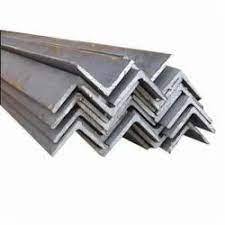
Mild Steel Angle Bar
A mild steel angle bar is a low-carbon steel L-shaped flat metal bar. The low carbon content makes it easier to mold and also makes it less expensive than other metals such as stainless or aluminum. Because of its flexibility, it is one of the most often utilized metals in building, industrial, and engineering applications.
Benefits of Using Mild Steel Angle Bar
Mild steel angle bar offers several qualities that make it an excellent choice for use in construction and engineering applications. It has a high tensile strength, making it resistant to deformation under pressure or stress. It's also very corrosion-resistant, which means it won't rust or corrode over time like other metals. This makes it ideal for outdoor applications where more fragile metals such as aluminum or stainless steel may be damaged by the elements. Moreover, mild steel is very affordable when compared to other types of metals, making it the favored choice for cost-conscious applications.
Uses of Mild Steel Angle Bar
Mild steel angle bars are extremely adaptable and are frequently used in several applications such as structural framing, shelf brackets, bracing trusses, fencing and gate supports, window frames, racking systems, vehicle frames, and much more! Mild steel angle bars can carry big weights with ease and will withstand wear and tear over time due to their strength and durability. You may even paint them if you want to add some color!
Metal stamping or punching, for example, can be used to create a large number of perforations on a steel angle, resulting in a visually appealing framing component. Handrails, utility carts, interior moldings, trimmings, paneling, cladding, and other custom-built designs can all be supported by steel angle framing.
Conclusion:
Because of its strength and longevity, Mild Steel Angle Bar is an extremely versatile material that may be utilized in a broad range of applications. Its corrosion resistance also makes it perfect for outdoor applications, where harsh weather conditions might normally harm more sensitive materials such as aluminum or stainless steel. Moreover, mild steel angle bars are very affordable when compared to other types of metals, making them the favored choice for cost-conscious applications. Consider utilizing mild steel angle bars for your next project if you need a robust yet economical material.
We are pleased to introduce 'Sydney Metal Trade L.L.C.' as one of the top importers and exporters of Structural Steel Angles, aluminum goods, and other building supplies. Since 2004, we have been dealing with steel and its products. We have a robust distribution channel network in the UAE and the GCC region.
0 notes
Photo
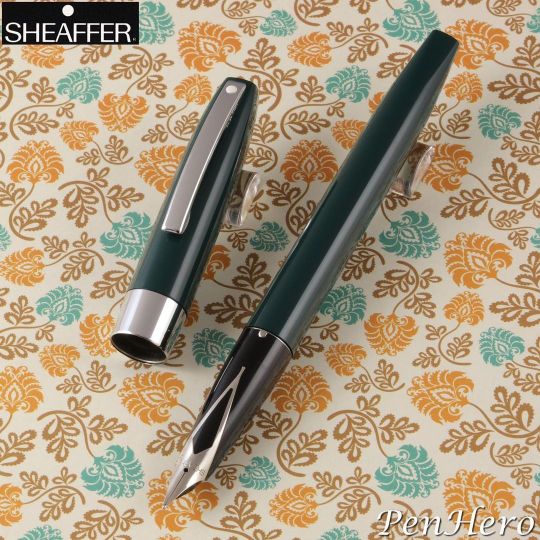
This is a Sheaffer Triumph Imperial Green model 2333 c. 1995-1999. It's a 5 3/8 inches long cartridge / converter pen. It has the same look as the Sheaffer cartridge Imperials and Lifetime pens of the 1960s and 1970s. The White Dot is on the top of the bar clip. The cap and barrel are green injection molded plastic, the trim is chrome plated, and the Inlaid stainless steel nib is mounted in a black injection molded section and stamped SHEAFFER. This was the introductory level fine pen for Sheaffer in the late 1990s. Sold in blister packs and paperboard boxes. Matching reminder clip ballpoint and capped rollerball pens were also made. #pencollecting #fountainpen #sheaffer #sheafferpen #triumph #imperial #penhero https://www.instagram.com/p/Cgh6ODSvk23/?igshid=NGJjMDIxMWI=
5 notes
·
View notes
Last Seen Blogs

brfran
what the fuck is a brfran

t-r-e-s-s-a
.TRESSA.

commander-duckie
commander-duckie

artsyebonyrose
💜my art blog💜

justinsfoley
justinsfoley