
Last Seen Blogs

not-quitenormal
"the many faces of galinda the glorious"

cotsumephoto
CotsumePhoto.

jihoonluvarchive
now @96wz


juanjoltaire
Wigs Draws Junk
Text
Calculate How Many Wood Panels I Need: Proven Calculator

To calculate how many wood panels you need, measure the length and height of the wall, then divide by the panel size. When planning a wall paneling project, determining the exact number of wood panels required is crucial for a successful outcome.
The process involves measuring the dimensions of the wall and performing a simple calculation to estimate how many panels to purchase. By following specific steps and using a reliable tool such as a panel calculator, you can streamline the planning process and ensure an efficient and accurate installation.
Understanding the process of calculating the number of wood panels needed can save time, money, and effort, resulting in a beautifully paneled wall that enhances the aesthetic appeal of any space.
Calculating The Number Of Wood Panels Needed
To calculate the number of wood panels needed for your project, measure the length and height of the wall in square units and divide by the area of one panel. This will give you an estimate of the panels required, making it easy to plan your wood paneling project.
Measure The Wall
To calculate the number of wood panels needed for your project, start by measuring the length and height of the wall you plan to panel. Be sure to measure in square units, such as square meters. This will give you the total square area of the wall.
Account For Obstructions
Next, take into consideration any obstructions on the wall, such as windows, doors, or outlets. Measure the dimensions of these obstructions and subtract their square area from the total square area of the wall. This will give you a more accurate calculation of the wall space that needs to be covered by wood panels.
Calculate The Total Square Area
Now that you have the adjusted square area, calculate the total square area by multiplying the length and height of the wall together. This will give you the total square area that needs to be covered by the wood panels.
Determine The Area Of One Panel
Next, determine the area of one wood panel. Measure the length and height of a single panel and multiply these dimensions together to get the panel's square area.
Divide Total Square Area By The Area Of One Panel
Finally, divide the total square area of the wall by the area of one wood panel. This calculation will give you an estimate of the number of panels needed to cover the wall completely. Round up to the nearest whole number to ensure you have enough panels for the project.
By following these steps and using this calculator, you can easily determine the number of wood panels needed for your project. Whether you're adding an accent wall or completely renovating a room, knowing how many panels you need will save you time and ensure you have enough materials for a successful installation.
Other Calculators For Wood Paneling
When planning your wood paneling project, it's essential to have the right tools to ensure accurate measurements. In addition to the Wood Panels Calculator, there are several other helpful calculators that can assist you in determining the materials needed for your project.
Lumber Calculator
The Lumber Calculator helps you determine the amount of wood required for your paneling project. Simply input the dimensions of your wall, and the calculator will provide you with an estimate of the lumber needed.
Plank Calculator
With the Plank Calculator, you can easily determine how many wood planks you need for your wall paneling. Input the dimensions of your space, and the calculator will give you a precise estimate of the number of planks required.
Material Needs Calculator
The Material Needs Calculator is a comprehensive tool that considers all aspects of your wood paneling project. By entering the necessary measurements and specifications, you can get a detailed list of materials needed, including panels, lumber, and additional supplies.
https://www.youtube.com/watch?v=wyxG_VJNwmA
Calculating Wood Panels For Specific Projects
When undertaking a wood paneling project, it’s essential to accurately calculate the number of wood panels required. Calculating the right amount of panels ensures you complete the project without excess or shortage. Whether it’s for fencing or other wood paneling projects, having the correct number of panels is crucial for efficiency and cost-effectiveness.
Fence Material And Post Centers Calculator
When planning a fence construction project, determining the required fence materials and post centers is essential. Calculating the number of wood panels needed significantly impacts the overall efficiency and success of the project. The Fence Material and Post Centers Calculator tool provides a convenient way to estimate the quantity of materials needed, ensuring precise and accurate measurements for your project.
Wood Fence Calculator
Utilizing a Wood Fence Calculator is crucial to accurately determine how many wood panels are required for a particular project. This tool assists in estimating the number of panels needed, considering the dimensions and specifications of the project. By using the Wood Fence Calculator, it becomes easier to plan and execute wood paneling projects effectively, ultimately resulting in a successful and cost-efficient outcome.
Frequently Asked Questions For How Many Wood Panels Do I Need Calculator
How Do I Calculate How Much Paneling I Need?
To calculate how much paneling you need, measure the length and height of the wall in square units. Divide the total square area by the area of one panel to estimate the number of panels needed.
How Many Wooden Panels Do I Need?
Measure wall length and height in square units, then divide by one panel's area for the number needed.
How Do I Calculate How Many Wood Planks I Need?
To calculate the number of wood planks you need, measure the length and height of the wall in square units. Then, divide this area by the area of one panel to estimate the number of panels needed. Alternatively, you can use online panel calculators for precise estimations.
How Far Apart Should Panelling Be?
To determine the spacing for wall paneling, measure the length and height of the wall in square units and account for any obstructions. Then, divide the total square area by the area of one panel to estimate the number of panels needed.
Conclusion
Calculating wood panels is a key step for your project’s success. Taking accurate measurements and using the right tools will ensure a smooth installation process. By using our wood panel calculator, you can easily determine the quantity of panels needed.
Simplify your project with precise calculations today.
Read the full article
0 notes
Text
How to Use Calculator for Log: Master the Logarithm Functions

To use a calculator for log, simply press the "Log" button and enter the number. Logarithms help solve complex mathematical problems by finding the exponent for a given number.
Logarithms are a fundamental mathematical concept with numerous applications in fields such as science, engineering, and finance. Using a calculator to compute logarithms can simplify complex calculations and help in problem-solving. By understanding how to use the log function on a calculator, individuals can efficiently determine the power to which a base must be raised to produce a specific number.
This can aid in various scenarios, such as analyzing exponential growth or decay, calculating the time required for an investment to double, and solving equations involving exponential functions. Mastering the use of log on a calculator can enhance mathematical proficiency and streamline problem-solving processes in diverse academic and professional settings.
Using A Calculator
When it comes to solving logarithms, using a calculator can be a real time-saver. With the convenience of modern graphing calculators, you can easily calculate logarithms of any base, simplify complex equations, and perform calculations with small numbers.
In this blog post, we will explore different ways to use a calculator for logarithms. Whether you are a student or a professional, this guide will help you make the most of your calculator's 'Log' button, enter logarithms on a graphing calculator, use other log bases, handle small numbers, and even divide natural logs with ease.
Using The 'log' Button
The 'Log' button on your calculator is specifically designed to calculate logarithms. To use it, simply enter the number you want to calculate the logarithm for and press the 'Log' button. The result displayed on your calculator is the exponent of the base number you entered. It's that simple! This feature is especially useful when you want to quickly find the logarithm of a number without manually performing complex calculations.
Entering Logarithms On A Graphing Calculator
If you're using a graphing calculator, entering logarithms is a little different. Most graphing calculators have a dedicated 'Log' button, usually located near the trigonometry functions. To calculate a logarithm on a graphing calculator, enter the base of the logarithm, followed by the value you want to find the logarithm of.
For example, to calculate the logarithm base 10 of 100, you would enter "log(100,10)" into the calculator. The result will be displayed on the screen, giving you the logarithm of the specified number with the specified base.
Using Other Log Bases
Calculators usually default to base 10 logarithms. However, you may come across equations that require logarithms with different bases. Fortunately, most calculators allow you to enter logarithms with any base you desire. Simply use the log function followed by the base number in parentheses. For example, to calculate a logarithm base 2 of 8, enter "log(8,2)" into your calculator. The resulting value will be the logarithm of 8 with base 2.
Using Logarithms With Small Numbers
Working with small numbers can be tricky, but calculators make it much easier. To calculate the logarithm of a small number, simply enter the number as it appears in scientific notation. For example, if you want to find the logarithm of 0.001, you would enter "log(1 x 10^-3)" into your calculator. The calculator will then display the logarithm of the small number, giving you the solution you need.
Dividing Natural Logs With A Calculator
Dividing natural logs can be cumbersome, but with a calculator, it's a breeze. To divide natural logs, use the division operation ("/") and enter the two natural logs you want to divide. For example, to divide the natural log of 10 by the natural log of 2, you would enter "ln(10) / ln(2)" into your calculator. The result will be displayed on the screen, providing you with the answer to your division problem.
Tips And Tricks
When dealing with logarithms, there are various tips and tricks that can streamline the process and make calculations faster and more efficient. In this section, we will uncover some useful hacks that can help you quickly calculate logarithms without the need for a calculator.
Quickly Calculate Logarithms Without A Calculator
Calculating logarithms without a calculator can be simplified by utilizing a few strategic techniques. One method involves using the concept of inverses. Since logarithms are inverses of exponentials, you can utilize this relationship to simplify certain calculations. For example, if you need to find the logarithm of a number to a specific base, you can transform it into an exponential form and simplify the calculation.
Another handy trick for quickly computing logarithms is to remember the common logarithm values. Having key logarithm values such as log 2, log 3, and log 5 memorized can aid in swiftly approximating logarithms of other numbers. Additionally, familiarizing yourself with the properties of logarithms, such as the product and quotient rules, can expedite the computation process and minimize the need for a calculator.
https://www.youtube.com/watch?v=kqVpPSzkTYA
Calculating Logarithms On Different Calculator Brands
Calculating logarithms using different calculator brands can be a versatile skill. Below, we explore how logarithms can be calculated on various popular calculator brands.
Using Logarithms On A Casio Calculator
Calculating logarithms on a Casio calculator is straightforward. Follow these steps:
- Press the "Log" button on your Casio calculator.
- Enter the number you want to find the logarithm of.
- Press the "=" button to display the result.
Using Logarithms On An Iphone Calculator
Utilizing logarithms on an iPhone calculator is convenient. Here's how you can do it:
- Open the Calculator app on your iPhone.
- Turn your iPhone to landscape mode to reveal the scientific calculator.
- Tap the "Log" button followed by entering the number to calculate the logarithm.
By following these simple steps, you can efficiently compute logarithms on your Casio calculator or iPhone calculator.

Frequently Asked Questions On How To Use Calculator For Log
How Do You Do Log On A Calculator?
To calculate a logarithm on a calculator, press the "Log" button and enter the number you want to find the logarithm of.
How Do You Do Log On A Normal Calculator?
To find the logarithm on a normal calculator, press the "Log" button followed by the number.
What Is The Easiest Way To Calculate Logs?
The easiest way to calculate logs is using a calculator. Press the "Log" button, enter the number, and the result is the logarithm.
How Do You Calculate Log10?
To calculate log10, use a scientific calculator by pressing the "log" button and entering the number. The result displayed is the logarithm with base 10.
Conclusion
Using a calculator for logarithms can simplify complex calculations and save time. By following the steps outlined in this blog post, anyone can harness the power of logarithms in their mathematical endeavors with ease. So, go ahead, grab your calculator, and dive into the world of logarithms with confidence.
Read the full article
0 notes
Text
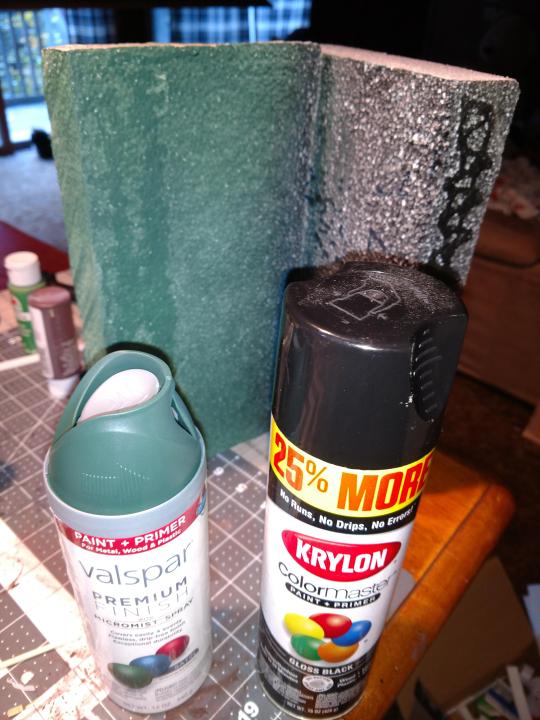
How to Spray Paint Styrofoam Without Melting: Pro Tips for Flawless Results

How to Spray Paint Styrofoam Without Melting
Spray painting Styrofoam can be a great way to add color and personality to your craft projects. However, traditional spray paints can sometimes cause the Styrofoam to melt or dissolve due to the chemicals they contain. To avoid this issue and ensure a successful painting process, it's important to use the right materials and techniques. In this guide, we'll explore how to spray paint Styrofoam without causing any damage.
Credit: www.reddit.com
Choose the Right Paint
When selecting a paint for Styrofoam, it's crucial to choose a type that is specifically formulated for use on foam materials. Look for paints that are labeled as "foam-safe" or "Styrofoam-friendly." These paints are designed to adhere to Styrofoam without causing any damage, ensuring a smooth and successful painting process.
Prep the Surface
Before you start spray painting, it's essential to prepare the Styrofoam surface to ensure proper adhesion and optimal results. Begin by gently sanding the surface of the Styrofoam with fine-grit sandpaper. This will create a slightly rough texture that allows the paint to adhere more effectively. After sanding, use a clean, dry cloth to remove any dust or debris from the surface.
Use Thin, Even Coats
When applying the paint, it's important to use thin, even coats to prevent the buildup of paint that could cause the Styrofoam to melt. Hold the spray can approximately 6 to 8 inches away from the surface of the Styrofoam, and apply the paint using smooth, sweeping motions. Avoid saturating the Styrofoam with paint, as excessive moisture can lead to melting or deformation.
Avoid Harsh Solvents
Some spray paints contain harsh solvents that can be damaging to Styrofoam. When choosing a paint, opt for water-based or acrylic formulations, which are less likely to cause melting or deterioration of the foam material. Always read the label carefully to ensure that the paint you select is safe for use on Styrofoam.
https://www.youtube.com/watch?v=dpVg9kCNBjk
Allow for Proper Drying Time
After applying the paint, allow the Styrofoam to dry thoroughly according to the manufacturer's instructions. Rushing the drying process can result in uneven or incomplete adhesion of the paint, leading to potential damage to the foam. Ensure that the painted Styrofoam is placed in a well-ventilated area with proper airflow to facilitate drying.
Consider Protective Coatings
To provide an extra layer of protection and enhance the durability of the painted surface, consider applying a clear protective coating or sealer specifically designed for Styrofoam. This additional step can help safeguard the paint against chipping, scratching, and other forms of damage, ensuring that your painted Styrofoam retains its vibrant appearance over time.
Safe Handling and Storage
Once the painting process is complete, handle the painted Styrofoam with care to prevent any accidental damage. Avoid exposing the painted surface to excessive heat or direct sunlight, as these conditions can potentially cause the paint to soften or degrade. Proper storage in a cool, dry environment will help maintain the integrity of the painted Styrofoam.

Credit: inmyownstyle.com
Frequently Asked Questions On How To Spray Paint Styrofoam Without Melting: Pro Tips For Flawless Results
How Can I Spray Paint Styrofoam Without Melting It?
Spray painting styrofoam without melting it requires using a specific type of paint made for styrofoam, and following proper technique to minimize heat buildup.
What Type Of Paint Should I Use To Spray Paint Styrofoam?
To prevent melting, it is crucial to use water-based acrylic or enamel paint specially designed for styrofoam. These paints have a low heat emission that won't damage the foam.
Can I Use Regular Spray Paint On Styrofoam?
Regular spray paint can cause styrofoam to melt due to its strong solvents. It is best to avoid using regular spray paint on styrofoam to prevent damage and maintain the foam's integrity.
How Should I Prepare The Styrofoam Before Spray Painting It?
To ensure proper adhesion, gently sand the surface of the styrofoam with fine-grit sandpaper. This will create a rougher texture for the paint to cling to. Make sure to remove any dust before painting.
Conclusion
Spray painting Styrofoam can be a rewarding and creative endeavor, provided that the appropriate precautions and techniques are employed. By choosing the right paint, preparing the surface, applying thin coats, and allowing for proper drying time, you can achieve beautiful, long-lasting results without risking any damage to the foam material. With careful handling and storage, your painted Styrofoam creations can be enjoyed for years to come.
Read the full article
0 notes
Text
Can You Spray Paint Concrete Blocks: Transforming Techniques for Stunning Results
Concrete blocks are a versatile building material used in various construction projects. Whether you are looking to add a pop of color or revamp the look of your concrete block wall, spray painting can be a great way to achieve a fresh, modern look. But can you spray paint concrete blocks? Let's explore the possibilities and best practices for spray painting concrete blocks.
Credit: www.amazon.com
Preparation is Key
Before you begin spray painting concrete blocks, it is important to properly prepare the surface. Start by cleaning the blocks using a pressure washer or a mixture of water and mild detergent. This will remove any dirt, dust, or debris that could affect the paint adhesion. Once clean, allow the blocks to dry completely before proceeding.
Choosing The Right Paint
When it comes to spray painting concrete blocks, selecting the right type of paint is crucial for achieving a long-lasting, professional finish. Look for spray paints specifically designed for masonry or concrete surfaces. These paints are formulated to adhere to porous surfaces and provide excellent durability.
Priming for Success
Applying a primer to the concrete blocks before spray painting can significantly improve the adhesion and longevity of the paint. Look for a high-quality masonry primer and apply it according to the manufacturer's instructions. This extra step can help the paint bond better to the surface and prevent it from peeling or flaking over time.
Mastering the Technique
Once the surface is prepped and primed, it's time to dive into the spray painting process. When spray painting concrete blocks, it's essential to use smooth, even strokes to ensure full coverage and a professional finish. Hold the spray can approximately 8-12 inches away from the surface and apply the paint in thin, overlapping layers to avoid drips and achieve a smooth, uniform coat.
https://www.youtube.com/watch?v=UcFP26T0qn0
Weathering the Elements
Concrete block walls are often exposed to the elements, so choosing a paint that is designed to withstand UV rays, moisture, and temperature fluctuations is essential. Look for spray paints that offer weather-resistant properties to ensure that your freshly painted concrete blocks maintain their color and finish over time.
Enhancing Curb Appeal
Spray painting concrete blocks can be a cost-effective way to enhance the curb appeal of your property. Whether you are refreshing a worn-out wall or adding a splash of color to your outdoor space, the versatility of spray paint allows you to unleash your creativity and customize the look of your concrete blocks to suit your aesthetic preferences.
Maintenance and Longevity
With proper preparation, quality paint, and meticulous application, spray painted concrete blocks can withstand the test of time. However, it's important to keep up with regular maintenance to ensure that the paint finish remains vibrant and intact. Periodic cleaning and touch-ups can help preserve the appearance and longevity of your spray painted concrete blocks.
Conclusion
So, can you spray paint concrete blocks? The answer is a resounding yes! With the right preparation, paint selection, and application technique, spray painting concrete blocks can breathe new life into your architectural elements and outdoor spaces. Whether you are tackling a DIY project or seeking professional results, spray painting provides a convenient and effective way to transform the look of concrete blocks and elevate the visual appeal of your property.
Frequently Asked Questions For Can You Spray Paint Concrete Blocks : Transforming Techniques For Stunning Results
Can You Spray Paint Concrete Blocks?
Yes, you can spray paint concrete blocks to give them a fresh, new look.
What Type Of Paint Should Be Used For Spraying Concrete Blocks?
For spraying concrete blocks, it is recommended to use a high-quality acrylic latex paint specifically designed for outdoor surfaces.
How Should I Prepare The Concrete Blocks Before Spray Painting?
Before spray painting, make sure to clean the concrete blocks thoroughly using a pressure washer or a brush and soapy water. Remove any dirt, dust, or loose particles to ensure proper adhesion of the paint.
Should I Apply A Primer Before Spray Painting Concrete Blocks?
Applying a primer before spray painting concrete blocks is highly recommended. A good primer will help the paint adhere better and improve the overall lifespan of the paint job.
Read the full article
0 notes
Text
Is Rust-Oleum Spray Paint Oil-Based : The Ultimate Guide to Oil-Based Spray Paints

Is Rust-Oleum Spray Paint Oil-Based
In the world of DIY projects and home improvement, Rust-Oleum spray paint has been a staple for decades. However, when it comes to the composition of the paint, there may be confusion regarding whether it is oil-based or not. Let's delve into the details of Rust-Oleum spray paint to understand if it is oil-based and what that means for your projects.
https://www.youtube.com/watch?v=6-eW46yFoQs
Understanding Oil-Based Paint
Oil-based paint contains synthetic or natural resins, which act as the binder in the paint, alongside pigments and solvents. These resins are derived from oils, such as linseed, alkyd, or soya, and create a durable, glossy finish when dried. Oil-based paints are known for their resistance to wear and tear, making them suitable for high-traffic areas or surfaces exposed to harsh elements.

Credit: www.theraleighpaintcontractor.com
The Characteristics of Rust-Oleum Spray Paint
Rust-Oleum offers a wide range of spray paints designed for various applications, including metal, wood, plastic, and more. While the company produces both oil-based and water-based paints, its flagship product, the Rust-Oleum Universal Metallic Spray Paint, is extensively used for adding a metallic finish to surfaces. This particular product is oil-based, providing a durable and long-lasting coating.
It's important to note that the oil-based nature of Rust-Oleum spray paint contributes to its ability to create a protective layer, which is particularly advantageous for outdoor projects or surfaces that endure significant wear. This feature makes it a popular choice for those seeking a robust and weather-resistant solution.

Credit: www.amazon.com
The Benefits of Oil-Based Spray Paint
When considering whether to use oil-based or water-based spray paint for your project, it's essential to understand the advantages of each. Oil-based spray paint, such as Rust-Oleum's offerings, is known for its superior adhesion, providing excellent coverage and protection against rust and corrosion. Furthermore, oil-based paints usually require fewer coats to achieve the desired finish, making them more efficient and cost-effective.
Additionally, the durability of oil-based spray paint ensures that the coating remains intact for an extended period, even in challenging environments. This makes it ideal for surfaces that are exposed to moisture, heat, or physical abrasion, as the strong bond formed by oil-based paint withstands various external factors.
Application Considerations
While the benefits of oil-based spray paint are compelling, there are certain aspects to consider when applying this type of paint. Oil-based paints emit strong fumes and require proper ventilation during application and drying. Furthermore, adequate drying time is crucial to achieve the desired results, as oil-based paints typically take longer to fully cure compared to water-based alternatives.
It's crucial to follow the manufacturer's instructions regarding application, drying time, and recommended surfaces for the specific Rust-Oleum spray paint being used. Proper surface preparation and priming are also essential for achieving optimal adhesion and longevity of the paint finish.
Frequently Asked Questions For Is Rust-oleum Spray Paint Oil-based : The Ultimate Guide To Oil-based Spray Paints
Is Rust-oleum Spray Paint Oil-based?
Rust-Oleum Spray Paint is available in both oil-based and water-based formulations. It is important to check the specific product label to determine if it is oil-based.
What Are The Advantages Of Using Oil-based Spray Paint?
Oil-based spray paint offers excellent adhesion, durability, and coverage. It is suitable for various surfaces, provides a smooth finish, and is resistant to chipping, peeling, and fading.
Can I Use Rust-oleum Spray Paint Indoors?
Yes, Rust-Oleum spray paint can be used indoors. However, ensure proper ventilation and use protective gear such as masks to avoid inhaling fumes.
Does Rust-oleum Spray Paint Require A Primer?
It depends on the surface being painted. Some surfaces may require a primer for better adhesion and coverage, while others may not. Always refer to the product label for specific instructions.
Conclusion
In conclusion, Rust-Oleum's spray paint range includes both oil-based and water-based options, catering to a diverse array of project requirements. The oil-based formulations offer exceptional durability, weather resistance, and adhesion, making them a preferred choice for various applications. Understanding the unique characteristics of oil-based spray paint equips DIY enthusiasts and professionals with the knowledge to select the most suitable product for their specific projects.
Whether enhancing outdoor furniture, protecting metal surfaces, or adding a vibrant finish to intricate designs, the oil-based Rust-Oleum spray paint provides an enduring solution that withstands the test of time and environmental elements.
Read the full article
0 notes
Text
Can I Use a Carpet Cleaner on My Mattress : Expert Tips for Cleaning at Home

Yes, you can use a carpet cleaner on your mattress for effective cleaning and stain removal. However, it is important to consider the type of mattress you have and follow the manufacturer's instructions to avoid any damage.
Regular cleaning can help maintain a hygienic and fresh sleep environment, ensuring a better night's rest. Additionally, it is recommended to use a mattress protector to prevent spills and stains, prolonging the lifespan of your mattress.
Understanding Mattress Cleaning
Understanding Mattress Cleaning
Mattresses can be cleaned using vacuuming, steam cleaning, or spot cleaning techniques.
- Improves air quality by removing dust mites and allergens.
- Extends mattress lifespan by preventing dirt buildup.
- Enhances sleep quality by promoting a clean sleeping environment.
Credit: www.businessinsider.com
Can You Use A Carpet Cleaner On Your Mattress?
Many people wonder if they can use a carpet cleaner to clean their mattress. While it may seem like an easy solution, there are a few things to consider before using a carpet cleaner on your mattress. Let's explore the different types of carpet cleaners and important considerations.Types Of Carpet CleanersBefore using a carpet cleaner on your mattress, it's essential to understand the different types available:
- Steam cleaners: These use hot water vapor to clean and sanitize surfaces, including mattresses. They are effective in removing deep-seated dirt and stains.
- Upholstery cleaners: Designed specifically for cleaning fabric surfaces, these cleaners are suitable for mattresses. They typically have a handheld attachment for targeted cleaning.
- Dry cleaners: These cleaners use dry compounds or solvents to clean surfaces without the need for water. While they can be used on carpets, they may not be as effective on mattresses.
Considerations Before Using A Carpet Cleaner On Your MattressWhile using a carpet cleaner on your mattress may sound like a convenient option, there are a few important considerations to keep in mind:
- Manufacturer's instructions: Always check the manufacturer's instructions for your mattress. Some mattresses may not be compatible with carpet cleaners, and using them could void the warranty.
- Fabric type: Different mattresses have different fabric compositions. Ensure that the cleaner you choose is safe to use on the fabric of your mattress.
- Allergies and sensitivities: If you or anyone in your household has allergies or sensitivities, check for cleaners that are hypoallergenic and free from harsh chemicals.
- Spot testing: Before using a carpet cleaner on your entire mattress, perform a spot test in an inconspicuous area to ensure it doesn't damage or discolor the fabric.
- Adequate drying time: Ensure you have enough time for your mattress to dry completely before using it again. Moisture trapped within the mattress can lead to mold or mildew growth.
Before using a carpet cleaner on your mattress, evaluate these considerations and choose a cleaner that is suitable for your specific mattress type and needs. Keep in mind that professional mattress cleaning services may also be a viable option, especially for mattresses with stubborn stains or odors. Always prioritize the longevity and comfort of your mattress when deciding on a cleaning method.
https://www.youtube.com/watch?v=XEheV37JyXw
Expert Tips For Cleaning Your Mattress
When it comes to maintaining a clean and healthy sleep environment, cleaning your mattress is often overlooked. However, it's crucial to regularly clean your mattress to remove dust, allergens, and stains. In this post, we'll provide expert tips for cleaning your mattress, from pre-cleaning preparations to the step-by-step cleaning process.Pre-cleaning PreparationsBefore you begin cleaning your mattress, there are a few pre-cleaning preparations to keep in mind:
- Remove all bedding and wash them in hot water to kill any dust mites.
- Vacuum the mattress to remove surface dust and debris.
- Spot treat any stains with a gentle stain remover suitable for mattresses.
Step-by-step Mattress Cleaning ProcessHere's a step-by-step cleaning process to ensure your mattress is thoroughly cleaned:
- Prepare a cleaning solution by mixing a small amount of mild detergent with water.
- Using a cloth, gently dab the mattress with the cleaning solution to remove stains.
- Allow the mattress to air dry completely before making the bed with fresh linens.

Credit: www.realsimple.com
Natural Alternatives To Commercial Cleaners
When it comes to mattress cleaning, many people are often concerned about using commercial cleaners that may contain harsh chemicals. If you're looking for a natural and eco-friendly approach to cleaning your mattress, there are various effective DIY alternatives that you can consider. These natural alternatives not only help in removing stains, odors, and allergens but also contribute to a healthier indoor environment for you and your family.
Benefits Of Using Natural Cleaners
Using natural cleaners on your mattress offers several benefits. They are safer for both your health and the environment, and they help in reducing your exposure to potentially harmful chemicals. Furthermore, natural cleaners can effectively eliminate common mattress concerns such as dust mites, mold, and mildew without leaving behind any chemical residue
Diy Mattress Cleaning Solutions
- Vinegar and Baking Soda: This powerful combination can help in neutralizing odors and removing stains.
- Essential Oils: Adding a few drops of essential oils, such as lavender or tea tree oil, to a homemade cleaning solution can provide natural antimicrobial properties.
- Cornstarch: Sprinkling cornstarch over the mattress and letting it sit can help in absorbing excess moisture and odors.
- Hydrogen Peroxide: Diluting hydrogen peroxide with water can be effective in removing blood stains or other tough stains.
Maintaining A Clean Mattress
When addressing mattress cleanliness, consider using a carpet cleaner as an effective solution for removing dirt and stains. Always check the manufacturer's guidelines to ensure compatibility and maintain hygiene in your sleeping environment. Regular maintenance is key to extending the lifespan of your mattress and promoting a healthy sleep environment.
Regular Maintenance Tips
Maintaining a clean mattress is essential for a good night's sleep and overall wellbeing. Regular maintenance helps to prolong the lifespan of your mattress and ensure that it remains hygienic. Here are some easy-to-follow tips for regular mattress maintenance:
- Invest in a high-quality mattress protector to safeguard against spills, dust, and allergens. A waterproof protector is especially handy for protecting against bedwetting accidents.
- Rotate your mattress every three months to distribute the weight evenly. This helps to prevent sagging and maintains the integrity of the mattress.
- Vacuum your mattress regularly using the upholstery attachment to remove dust, dead skin cells, and other debris that may have accumulated over time.
- Airyour mattress by stripping off the bedding and opening the windows. Fresh air helps to eliminate odors and keep the mattress smelling fresh.
- Keep pets off the bed to minimize the amount of pet hair, dander, and other allergens that could get trapped in your mattress.
Dealing With Stains And Spills
Accidents happen, and if you're dealing with stains or spills on your mattress, it's important to address them promptly. Here are some tips to effectively deal with stains and spills:
- If the spill is liquid, such as urine or coffee, blot it with a clean cloth or paper towel immediately. Avoid rubbing as it can push the liquid deeper into the mattress fibers.
- To remove stains, create a mixture of mild detergent and water. Gently dab the stain with a clean cloth soaked in the solution. Avoid using excessive water as it can lead to mold or mildew growth.
- For stubborn stains, you can try using a mixture of hydrogen peroxide and dish soap. Apply the solution to the stain, let it sit for a few minutes, and then blot it with a clean cloth.
- Once the stain is removed or minimized, allow the mattress to dry completely before putting on clean bedding.
Taking the time to maintain a clean mattress not only improves its longevity, but it also contributes to a healthier sleeping environment. Incorporate regular maintenance into your routine and be proactive in addressing any stains or spills that may occur. By doing so, you'll ensure a clean and comfortable sleep surface that promotes a restful night's sleep.
Health Benefits Of A Clean Mattress
Improving Indoor Air Quality
Maintaining a clean mattress can improve indoor air quality.
- Dust mites and allergens are reduced, enhancing breathing.
- Fresh air circulates better, promoting a healthier environment.
Preventing Allergies And Respiratory Issues
Clean mattresses help in preventing allergies and respiratory issues.
- Reduces exposure to dust mites for allergy-prone individuals.
- Minimizes irritation that can trigger asthma symptoms.

Credit: www.goodhousekeeping.com
Frequently Asked Questions For Can I Use A Carpet Cleaner On My Mattress
Can I Use A Carpet Cleaner On My Mattress?
Using a carpet cleaner on a mattress is generally safe, but it's essential to check the manufacturer's recommendations. Some mattresses may not be compatible with certain cleaners. Always spot test in an inconspicuous area first and ensure the mattress is completely dry before use.
What Type Of Stains Can A Carpet Cleaner Remove From A Mattress?
Carpet cleaners can effectively remove common mattress stains, such as urine, sweat, and spills. They are especially useful for deep cleaning and deodorizing the mattress fabric. However, for stubborn or specialized stains, it's advisable to consult the mattress manufacturer or a professional cleaner.
How Often Should I Clean My Mattress With A Carpet Cleaner?
Regular mattress maintenance is essential. Using a carpet cleaner every 6 months can help eliminate dust mites, odors, and spills. However, consider steam cleaning for a deeper clean, especially if you suffer from allergies or asthma. Always adhere to the manufacturer's cleaning guidelines to avoid damage.
Conclusion
Maintaining a clean and fresh mattress is crucial for a good night's sleep. While a carpet cleaner may seem like a convenient option, it's essential to consider the potential risks involved. Instead, opt for professional mattress cleaning methods that are specifically designed to tackle dirt, dust mites, and other allergens.
Prioritizing your health and well-being, coupled with expert advice, ensures your mattress remains in optimal condition for years to come. So, make a smart choice and invest in appropriate techniques to preserve your mattress's longevity and hygiene.
Read the full article
0 notes
Text
Using Laundry Detergent in Carpet Cleaner: Powerful Stain-Fighting Solution

Laundry detergent can be used in carpet cleaners to effectively remove dirt and stains. Maintaining clean and fresh carpets is a priority for many homeowners, as carpets are prone to accumulating dirt, stains, and odors over time.
While professional carpet cleaners are available, they can be expensive. As a cost-effective alternative, some people wonder if using laundry detergent in carpet cleaners can achieve the same results. Laundry detergent contains surfactants and enzymes that help break down and remove stains and dirt from clothes, making it a viable option for cleaning carpets as well.
However, it is important to understand how to properly use laundry detergent in carpet cleaning to avoid damaging the carpet or leaving behind residue. This article explores the advantages, disadvantages, and appropriate usage of laundry detergent in carpet cleaning to help you make an informed decision.
Types Of Stains
When it comes to carpet stains, they can vary in intensity and type. Here are some common types of stains that you may encounter:Common Carpet Stains
- Food and beverage spills
- Dirt and mud tracks
- Pet accidents
- Ink and marker stains
Tough Stains That Require Extra Cleaning Power
- Grease and oil stains
- Red wine stains
- Blood stains
- Permanent marker stains
For these tougher stains, it's important to use a powerful carpet cleaner with laundry detergent to effectively remove them from your carpet fibers.

Credit: www.amazon.com
Choosing The Right Laundry Detergent
When it comes to choosing the right laundry detergent for your carpet cleaner, it's important to understand what ingredients to look for and how to avoid harsh chemicals. Using laundry detergent in your carpet cleaner can be a cost-effective and efficient way to deep clean your carpets. However, not all laundry detergents are suitable for this purpose, as some may contain ingredients that can damage your carpets or leave behind residue. By selecting the right laundry detergent, you can ensure a thorough and safe cleaning process.Ingredients To Look ForWhen choosing a laundry detergent to use in your carpet cleaner, there are a few key ingredients to look for. These ingredients are gentle on your carpets while still providing effective cleaning power. Here are some ingredients to consider:
- Enzymes: Look for laundry detergents that contain enzymes, which are effective in breaking down and removing tough stains like pet urine or food spills.
- Surfactants: Surfactants help to lift and remove dirt and grime from your carpets. Look for detergents with mild and biodegradable surfactants to ensure both clean carpets and an eco-friendly cleaning process.
- Plant-based Ingredients: Opt for laundry detergents that use plant-based ingredients as these are often gentler on carpets and better for the environment.
Avoiding Harsh ChemicalsWhen using laundry detergent in your carpet cleaner, it's crucial to avoid harsh chemicals that can damage or discolor your carpets. Harsh chemicals can also pose a risk to your health and the health of your family or pets. Here are some chemicals commonly found in laundry detergents that you should avoid:
Chemical
Effect on Carpets
Potential Health Risks
Bleach
Can cause discoloration and weaken carpet fibers.
Eye and skin irritation, respiratory problems.
Ammonia
Can damage carpet fibers and cause color fading.
Irritation to respiratory system and eyes.
Chlorine
Can strip carpet color and weaken fibers.
Skin and respiratory irritation, can produce harmful fumes.
By avoiding laundry detergents containing these harsh chemicals, you can ensure a safe and effective carpet cleaning experience.
Precautions And Safety Measures
Using Laundry Detergent in Carpet Cleaner
Before using laundry detergent in your carpet cleaner, it's important to be aware of the precautions and safety measures to ensure effective and safe cleaning.
Testing On A Small Area First
It's vital to test the laundry detergent solution on a small, inconspicuous area of the carpet before proceeding with cleaning the entire carpet. This small test helps in ensuring that the detergent does not cause any discoloration or damage to the carpet fibers.
Proper Dilution Ratios
When using laundry detergent in a carpet cleaner, it's crucial to adhere to the recommended dilution ratios provided by the manufacturer. Improper dilution can lead to excessive sudsing, which may be challenging to rinse out completely and can leave a residue on the carpet.
Step-by-step Guide
Using Laundry Detergent in Carpet Cleaner
Here is a detailed guide on how to effectively use laundry detergent in a carpet cleaner to remove tough stains and freshen up your carpets.
Preparing The Carpet Cleaner Solution
Follow these steps to prepare the carpet cleaner solution using laundry detergent:
- Begin by filling the carpet cleaner's reservoir with warm water.
- Add 1-2 tablespoons of laundry detergent to the reservoir. Use a low-sudsing, biodegradable detergent for best results.
- Mix the solution thoroughly to ensure the detergent is well-dissolved.
Application And Cleaning Process
Once the solution is prepared, you can proceed with the application and cleaning process:
- Start by vacuuming the carpet to remove any loose debris and dirt.
- Test the carpet cleaner solution on a small, inconspicuous area of the carpet to ensure it doesn't cause any discoloration or damage.
- Using the carpet cleaner, apply the solution to the carpet following the manufacturer's instructions.
- Work the solution into the carpet using the cleaner's brush or attachment, focusing on stained or high-traffic areas.
- Allow the carpet to air dry thoroughly before walking on it.
Alternative Solutions
Discover an innovative approach to cleaning carpets by utilizing laundry detergent in your carpet cleaner. Effectively remove stains and odors while saving money with this alternative solution. Keep your carpets fresh and clean with this simple and cost-effective method.
Natural Ingredients As Substitute
When it comes to alternative solutions for carpet cleaning, natural ingredients can be a great option. Not only are they safe for the environment, but they are also gentle on your carpets. Here are a few natural ingredients that you can use as a substitute for laundry detergent in your carpet cleaner:
1. Baking Soda: Baking soda is a versatile cleaning agent that can help remove stains and odors from your carpets. Simply sprinkle it on the affected area, let it sit for a few minutes, and then vacuum it up.
2. Vinegar: Vinegar is another natural ingredient that can be used to clean carpets. Mix equal parts vinegar and water in a spray bottle, then spray the solution onto the stained area. Let it sit for a few minutes before blotting it with a clean cloth.
3. Lemon Juice: Lemon juice is a natural bleaching agent that can help remove tough stains from your carpets. Mix lemon juice with water and apply it to the stain. Let it sit for a few minutes before blotting it with a clean cloth.
4. Salt: Salt can be used to absorb liquid spills and prevent stains from setting into your carpets. Simply sprinkle salt onto the spill, let it sit for a few minutes, and then vacuum it up.
Professional Carpet Cleaning Services
If natural ingredients are not effective in removing tough stains from your carpets, you may want to consider hiring professional carpet cleaning services. These experts have the knowledge, experience, and specialized equipment to deep clean your carpets and remove even the most stubborn stains.
Benefits of professional carpet cleaning services include:
- Deep Cleaning: Professional services use high-powered equipment to reach deep into the fibers of your carpets, removing dirt, allergens, and stains that regular vacuuming can miss.
- Stain Removal: Professional cleaners have access to powerful stain-removing products that can tackle even the toughest stains, leaving your carpets looking fresh and clean.
- Time-Saving: Hiring professionals to clean your carpets saves you time and effort. They can complete the job efficiently, allowing you to focus on other tasks.
- Extends Carpet Lifespan: Regular professional cleaning helps extend the lifespan of your carpets by removing dirt, debris, and allergens that can cause damage over time.
Remember, whether you decide to use natural ingredients or opt for professional services, always test a small, inconspicuous area of your carpet before applying any cleaning solution to ensure it does not cause damage or discoloration.
Credit: hoover.com
Effectiveness And Results
Using Laundry Detergent in Carpet Cleaner: Effectiveness and Results
Using laundry detergent in a carpet cleaner can yield impressive results. Before application, stains and dirt can make your carpet look worn out. After cleaning, the carpet appears refreshed and vibrant.
- Apply a mixture of laundry detergent and water directly on the stain.
- Gently scrub the affected area with a brush to work the solution into the fibers.
- Let the solution sit for a few minutes before using the carpet cleaner to extract the dirt.
- Rinse the carpet thoroughly to remove any detergent residue.
https://www.youtube.com/watch?v=ZRTiSXRvZJ8

Credit: hoover.com
Frequently Asked Questions On Using Laundry Detergent In Carpet Cleaner
Can Laundry Detergent Be Used In A Carpet Cleaner?
Yes, you can use laundry detergent in a carpet cleaner, but it's important to dilute it properly to avoid excessive sudsing. Also, make sure to test the detergent on a small, inconspicuous area of the carpet first to ensure it doesn't cause any damage.
What Are The Benefits Of Using Laundry Detergent In Carpet Cleaning?
Using laundry detergent in a carpet cleaner can help to effectively remove dirt, stains, and odors from your carpet. It can also be a cost-effective alternative to buying specific carpet cleaning solutions, especially if you already have laundry detergent on hand.
How Should I Dilute Laundry Detergent For Carpet Cleaning?
To avoid excessive sudsing, it's important to dilute laundry detergent properly for carpet cleaning. A good rule of thumb is to mix 1/4 cup of laundry detergent with 1 gallon of water. Be sure to follow the guidelines provided by your specific carpet cleaner as well.
Conclusion
To summarize, incorporating laundry detergent in your carpet cleaner can be a cost-effective and efficient solution to deal with tough stains and odors. By following the proper mixing ratios, you can effectively remove dirt and grime, leaving your carpets fresh and clean.
However, it is essential to test the detergent on a small area of your carpet before applying it to the entire surface. Remember to always read the manufacturer's instructions for your carpet cleaner and detergent to achieve the best results.
Read the full article
0 notes
Text
Bissell Professional Carpet Cleaner Solution: Ultimate Stain Eliminator
The Bissell Professional Carpet Cleaner Solution effectively removes tough stains and odors from carpets. It provides deep cleaning and leaves carpets looking fresh and revitalized.
Having a clean and fresh carpet is essential for maintaining a healthy and inviting home or office environment. The Bissell Professional Carpet Cleaner Solution is a reliable and efficient product that easily tackles stubborn stains and spills. With its powerful formula, it penetrates deep into the carpet fibers to lift dirt and grime, leaving your carpets looking and feeling like new.
By using this professional-grade solution, you can enjoy a clean and hygienic living or workspace that is free from unsightly stains and odors. Say goodbye to dingy carpets and hello to a fresh and rejuvenated space with the Bissell Professional Carpet Cleaner Solution.
Benefits Of Bissell Professional Carpet Cleaner Solution
Bissell Professional Carpet Cleaner Solution offers various benefits.Deep Cleaning Power
- Penetrates deep into carpet fibers
- Removes embedded dirt and grime effectively
Effective Stain Removal
- Tackles tough stains like wine and pet messes
- Leaves carpets looking new and fresh
Refreshes Carpet Fibers, Ensuring
- Eliminates odors and rejuvenates the carpet
- Makes carpets feel softer and look revitalized
Credit: www.goodhousekeeping.com
Features Of Bissell Professional Carpet Cleaner Solution
When it comes to finding the right carpet cleaner solution, the Bissell Professional Carpet Cleaner Solution stands out for its exceptional features. Let's take a closer look at what makes this product a top choice for keeping your carpets clean and fresh.Professional-grade FormulaBissell Professional Carpet Cleaner Solution boasts a professional-grade formula that is designed to tackle tough stains and dirt effectively. Its powerful cleaning action ensures that your carpets are thoroughly cleaned, leaving them looking fresh and revitalized.Safe For All Carpet TypesThis carpet cleaner solution is gentle yet effective, making it safe for use on all types of carpets. Whether you have plush carpets, delicate rugs, or high-traffic areas, you can trust that Bissell's formula will clean them without causing any damage.Pleasant ScentWith a pleasant scent, Bissell Professional Carpet Cleaner Solution leaves your carpets smelling fresh and inviting. The light fragrance ensures that your home not only looks clean but also smells clean, creating a welcoming environment for you and your family.
https://www.youtube.com/watch?v=b26BDy_djoM
How To Use Bissell Professional Carpet Cleaner Solution
Discover the optimal way to effectively utilize the Bissell Professional Carpet Cleaner Solution to achieve a spotless and fresh carpet. Simply follow the instructions provided on the solution's label for best results in maintaining the cleanliness of your carpets. Ideal for deep cleaning and enhancing the overall appearance of your carpets.
Using the Bissell Professional Carpet Cleaner Solution is a simple and effective way to keep your carpets looking fresh and clean. This professional-grade cleaning solution is specially formulated to remove deep stains and dirt, leaving your carpets revitalized and odor-free. In this section, we will guide you through the step-by-step instructions on how to use the Bissell Professional Carpet Cleaner Solution, as well as the recommended usage frequency.
Step-by-step Instructions
To achieve the best results with the Bissell Professional Carpet Cleaner Solution, follow these step-by-step instructions:
- Fill the clean water tank of your Bissell carpet cleaner with hot tap water up to the designated fill line.
- Add the recommended amount of Bissell Professional Carpet Cleaner Solution to the tank. Refer to the instructions on the solution bottle for the correct measurement.
- Securely attach the clean water tank back to the carpet cleaner, making sure it clicks into place.
- Plug in the carpet cleaner and turn it on.
- Begin cleaning by pressing the trigger on the handle to release the cleaning solution onto the carpet.
- Slowly run the carpet cleaner over the desired area, making overlapping passes to ensure thorough cleaning.
- For tough stains, consider using the Bissell SpotClean Pro or applying some extra solution directly to the stain before cleaning.
- Once you have finished cleaning, empty and rinse the dirty water tank, clean the brush roll, and let the carpets air dry.
Recommended Usage Frequency
The frequency at which you should use the Bissell Professional Carpet Cleaner Solution depends on your carpet's condition and level of traffic. As a general guideline, we recommend cleaning high-traffic areas every 3-6 months to maintain the cleanliness and appearance of your carpets. However, heavily soiled or stained carpets may require more frequent cleaning.
By following these simple step-by-step instructions and adhering to the recommended usage frequency, you can ensure that your carpets remain clean, fresh, and free from deep stains. The Bissell Professional Carpet Cleaner Solution is a powerful tool that will help extend the lifespan of your carpets, making them look and feel their best for years to come.
Credit: www.goodhousekeeping.com
Customer Reviews And Testimonials
Satisfied Customer FeedbackBissell Professional Carpet Cleaner Solution has garnered glowing reviews from numerous satisfied customers. Many users have praised the solution for its efficiency in lifting tough stains, leaving their carpets looking and smelling fresh. Customers also appreciate the solution's long-lasting scent that keeps their homes smelling clean for extended periods. The ease of use and affordability have also been pointed out as major selling points by reviewers.Real-life Stain Removal ExamplesReal-life experiences shared by customers have showcased the remarkable stain removal capabilities of the Bissell Professional Carpet Cleaner Solution. From pet accidents to food and beverage spills, consumers have attested to the solution's ability to eradicate even the toughest stains, restoring their carpets to their original state. These testimonials serve as a testament to the product's reliability in handling various types of stains.
Comparison With Other Carpet Cleaner Solutions
When comparing carpet cleaner solutions, it's important to consider the effectiveness, safety, and convenience of each product. Let's examine Bissell Professional Carpet Cleaner Solution in comparison to its competitors.Bissell Vs. CompetitorsWhen pitted against its competitors, Bissell Professional Carpet Cleaner Solution stands out for its advanced formula and deep cleaning capabilities. While some generic brands may promise similar results, Bissell's specialized solution is designed to penetrate deep into carpet fibers, effectively lifting dirt, stains, and odors.Pros And Cons
Pros
Cons
- Powerful cleaning performance
- Safe for use in Bissell machines
- Eliminates tough stains and odors
- May be more expensive than some generic brands
- Availability may vary in certain regions
Credit: www.bissell.com
Tips For Maintaining Clean Carpets
Keeping your carpets clean is essential for maintaining a healthy and aesthetically pleasing home environment. Regular maintenance not only extends the lifespan of your carpets but also enhances the overall look and feel of your living space. Here are some effective tips to help you maintain clean carpets with the help of the Bissell Professional Carpet Cleaner Solution.Regular VacuumingVacuuming your carpets on a regular basis is the first step in keeping them clean and free from dirt and debris. Make it a habit to vacuum at least once a week, focusing on high-traffic areas such as hallways, living rooms, and entryways. By removing loose dirt and particles, you prevent them from settling into the fibers of your carpets and causing damage over time.Prompt Stain TreatmentAccidents happen, and when they do, it's crucial to address stains immediately. With the Bissell Professional Carpet Cleaner Solution, you can effectively treat stains and spills to prevent them from becoming permanent marks on your carpets. Start by blotting the stain with a clean cloth or paper towel to remove excess liquid. Then, apply a small amount of the Bissell Professional Carpet Cleaner Solution directly on the stain and gently blot it with a clean cloth. Repeat this process until the stain is completely gone. Remember to test the solution on a small, inconspicuous area of your carpet before treating the stain.Professional Cleaning ScheduleWhile regular vacuuming and prompt stain treatment are essential, it's also crucial to schedule professional carpet cleaning sessions. Professional carpet cleaners have the expertise and equipment to deep clean your carpets, removing embedded dirt, allergens, and stubborn stains. To ensure your carpets receive the care they deserve, establish a regular professional cleaning schedule. Depending on your lifestyle and household, professional cleaning every 12 to 18 months is generally recommended. By investing in professional cleaning, you not only maintain the cleanliness of your carpets but also enhance their lifespan and overall appearance.
Frequently Asked Questions On Bissell Professional Carpet Cleaner Solution
What Are The Benefits Of Using Bissell Professional Carpet Cleaner Solution?
Bissell Professional Carpet Cleaner Solution not only cleans but also leaves a fresh scent and extends the life of carpets. The concentrated formula also helps save money and reduces packaging waste due to its smaller bottle size.
Can The Bissell Professional Carpet Cleaner Solution Be Used In Upholstery Cleaning Machines?
Yes, the Bissell Professional Carpet Cleaner Solution is safe and effective for use in upholstery cleaning machines, making it versatile for all your cleaning needs. Its powerful formula can tackle tough stains on various surfaces, providing convenience and value.
How Often Should I Use Bissell Professional Carpet Cleaner Solution?
For high-traffic areas or heavily soiled carpets, use the solution as needed. However, for regular maintenance, cleaning with the Bissell Professional Carpet Cleaner Solution once every 3 to 6 months is recommended to keep carpets fresh, clean, and well-maintained.
Conclusion
To sum it up, the Bissell Professional Carpet Cleaner Solution is the ultimate solution for maintaining and revitalizing your carpets. Its powerful formula effectively tackles tough stains and odors, while leaving your carpets looking and smelling fresh. With its easy-to-use design and compatibility with Bissell carpet cleaning machines, this professional-grade solution guarantees exceptional results every time.
Say goodbye to dirty and smelly carpets, and say hello to a cleaner, healthier home. Order your Bissell Professional Carpet Cleaner Solution today and transform your carpets instantly.
Read the full article
0 notes
Text
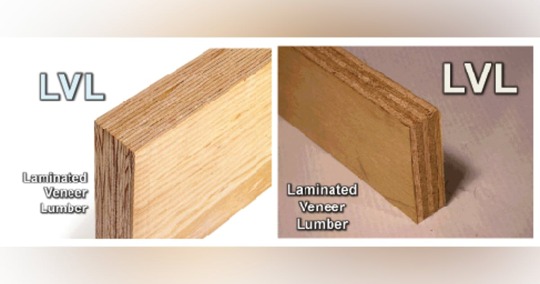
LVL (Laminated Veneer Lumber) Weight Calculator

Are you looking to calculate the weight of laminated veneer lumber? Use our Laminated Veneer Lumber Weight Calculator to determine the weight quickly and accurately.
LVL (Laminated Veneer Lumber) Weight Calculator
LVL (Laminated Veneer Lumber) Weight Calculator
Length (in meters):
Width (in meters):
Thickness (in meters):
Density (in kg/m^3):
Calculate Weight
Laminated Veneer Lumber (LVL) is a strong and versatile engineered wood product commonly used in construction. Its weight can be determined based on the dimensions and density of the specific LVL product. Whether you are a builder, engineer, or DIY enthusiast, knowing the weight of LVL can help in planning and logistics for projects.
By using our LVL weight calculator, you can easily input the dimensions and get the weight of the lumber, making your construction or renovation projects more efficient and precise. Let's explore how this calculator works and how it can benefit your building endeavors.
What Is Laminated Veneer Lumber?
Laminated Veneer Lumber (LVL) is a versatile construction material made from thin layers of wood veneer glued together. It offers high strength and stability, making it suitable for various structural applications, including beams, headers, and studs. To determine the weight of LVL, use a reliable Laminated Veneer Lumber weight calculator.
Overview Of Laminated Veneer Lumber
Laminated Veneer Lumber (LVL) is a type of engineered wood product made by bonding thin layers of wood veneers together to create a strong and durable material.
Benefits Of Using Laminated Veneer Lumber
- Strong and durable construction material
- Highly versatile in various structural applications
- Resistant to warping, splitting, and bowing
Credit: eurodita.com
Factors Affecting The Weight Of Laminated Veneer Lumber
Factors affecting the weight of laminated veneer lumber play a crucial role in determining the structural and functional attributes of the material. Understanding these factors is essential for builders and engineers to make informed decisions when utilizing laminated veneer lumber in construction projects.
Type And Thickness Of Veneer
The type and thickness of the veneer used in laminated veneer lumber contribute significantly to its weight. Thicker veneers add more mass to the final product, while different types of wood can impact density and, consequently, weight.
Adhesive Used
The adhesive used in the lamination process affects the weight of the final product. Denser adhesives result in a heavier end product, as they contribute to the overall mass of the lumber.
Number Of Veneer Layers
The number of veneer layers used in laminated veneer lumber construction directly influences its weight. More layers contribute to a heavier product, as each layer adds to the overall mass of the lumber.
Using The Laminated Veneer Lumber Weight Calculator
Laminated Veneer Lumber (LVL) is a versatile and sustainable engineered wood product used in construction. Calculating the weight of LVL is crucial for structural design and transport considerations. The Laminated Veneer Lumber Weight Calculator is a valuable tool that simplifies this process, providing accurate weight estimates based on specific parameters.
Understanding The Calculator
The Laminated Veneer Lumber Weight Calculator utilizes industry-standard formulas to determine the weight of LVL based on various input parameters. By inputting specific details related to the dimensions and specifications of the LVL, the calculator generates a precise estimation of the lumber's weight, aiding in project planning and logistics.
Input Parameters
- Dimensions: Length, width, and thickness of the LVL
- Species: Type of wood species used in the LVL construction
- Moisture Content: Percentage of moisture present in the lumber
- Grade: Quality and strength classification of the LVL
Calculating The Weight
Upon entering the required parameters into the Laminated Veneer Lumber Weight Calculator, the tool processes the information and delivers the anticipated weight of the LVL. These calculations aid in determining the overall load and support requirements for structures, ensuring precise and efficient construction practices.

Credit: www.yalongwood.com
Importance Of Knowing The Weight Of Laminated Veneer Lumber
Laminated Veneer Lumber (LVL) weight calculator is a crucial tool for various applications. Understanding the weight of LVL is essential for safety, transportation, handling, and efficient construction planning.
Safety Considerations
- Heavy LVL pieces may pose safety risks during handling and installation.
- Knowing the weight helps in determining the required manpower and equipment for safe operations.
Transportation And Handling
- Accurate weight data assists in planning the logistics and transportation requirements for LVL.
- It helps in selecting appropriate lifting and handling mechanisms to prevent accidents.
Design And Construction Planning
- Understanding the weight of LVL aids architects and engineers in designing structures with precise load-bearing capacities.
- It influences the choice of structural components and assembly methods during the construction phase.
Advantages Of Laminated Veneer Lumber
Laminated Veneer Lumber (LVL) is an engineered wood product that is gaining popularity in the construction industry, thanks to its numerous advantages. This versatile material offers a combination of strength, durability, and sustainability, making it a preferred choice for many builders and architects. Let's take a closer look at some of the key benefits of using LVL in construction:
Strength And Durability
Laminated Veneer Lumber delivers exceptional strength and durability, making it suitable for a wide range of construction applications. With its unique composition of multiple layers of wood veneers glued together, LVL offers superior load-bearing capacity and structural stability. Its strength-to-weight ratio surpasses that of traditional solid timber, allowing for larger spans and reduced material usage.
Versatility In Construction
One of the major advantages of Laminated Veneer Lumber is its versatility in construction projects. It can be easily cut, shaped, and customized to fit specific project requirements. Whether it's used as beams, headers, columns, or even in curved or arched applications, LVL proves to be a flexible and adaptable material. Its uniformity and predictable performance also make it an ideal choice for engineered wood products, such as I-joists and trusses.
Sustainability And Environmental Benefits
Laminated Veneer Lumber offers significant sustainability and environmental benefits. Unlike traditional solid timber, LVL makes efficient use of wood resources by using thin veneers, which optimizes the yield from each log. Additionally, the manufacturing process of LVL requires less energy and produces fewer greenhouse gas emissions compared to other building materials. By using LVL, builders are able to contribute to sustainable construction practices and reduce the carbon footprint of their projects.
Applications Of Laminated Veneer Lumber
Discover the versatility of Laminated Veneer Lumber Weight Calculator and how it aids in precise weight calculation for various applications. Enhancing efficiency and accuracy in construction projects, this tool optimizes the use of LVL for structural design and planning.
Laminated Veneer Lumber (LVL) is a versatile and widely-used material in various construction applications. Its exceptional strength, durability, and dimensional stability make it a popular choice for both residential and commercial projects, as well as industrial applications. Let's take a closer look at the different uses of LVL.
Residential Construction
LVL is highly valued in residential construction due to its structural integrity and reliability. It is commonly used for framing, such as beams, headers, and floor joists. LVL beams provide excellent load-bearing support, allowing for larger open spaces and flexible floor plans in residential buildings. By using LVL, contractors and architects can confidently create stable and long-lasting structures, ensuring safety and comfort for homeowners.
Commercial Construction
In commercial construction, LVL has found its place in various applications. It is often used in the construction of commercial buildings, schools, hospitals, and retail spaces. The strength of LVL beams makes them ideal for larger spans, allowing for wider open areas in commercial properties. Additionally, LVL is frequently used for creating sturdy and durable interior and exterior doors, offering both aesthetics and security.
Industrial Applications
LVL's exceptional strength and load-bearing capabilities make it suitable for a wide range of industrial applications. It is commonly used in the manufacturing of wooden trusses, scaffolding, and formwork systems. LVL's dimensional stability ensures accurate and consistent results in these applications, while its light weight makes it easier to handle and transport on job sites. Moreover, LVL is also utilized in the production of shipping pallets and crates, providing a reliable and cost-effective solution.
With its versatility and outstanding qualities, Laminated Veneer Lumber has become a preferred choice in the construction industry. Whether in residential, commercial, or industrial settings, LVL offers the strength, durability, and stability required for various applications. By incorporating LVL into construction projects, builders can enhance structural performance, increase design flexibility, and ensure long-lasting results.
Comparing Laminated Veneer Lumber With Other Building Materials
Comparison With Solid Wood
Laminated Veneer Lumber (LVL) vs. Solid Wood:
- LVL: High strength, consistently uniform.
- Solid Wood: Natural variance in strength and quality.
Comparison With Plywood
LVL vs. Plywood:
- LVL: Greater load bearing capacity, minimal warping.
- Plywood: More prone to warping and bending under heavy loads.
Comparison With Steel Beams
LVL vs. Steel Beams:
- LVL: Lighter in weight, easier to handle and install.
- Steel Beams: Heavier, more complex installation process.
Conclusion
Calculating the weight of laminated veneer lumber is made easy with our calculator tool. Understanding the weight of LVL can aid in various construction projects. Making informed decisions based on accurate calculations ensures project success. Explore the benefits of using our LVL weight calculator for your next construction endeavor.
Read the full article
0 notes
Text
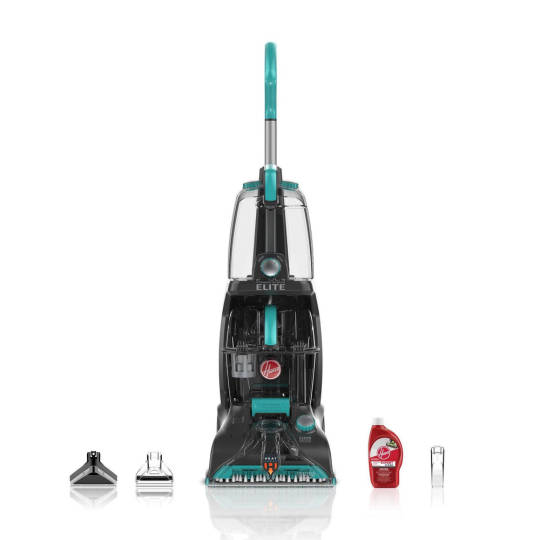
Hoover Power Scrub Elite Pet Carpet Cleaner: Deep Cleaning Power
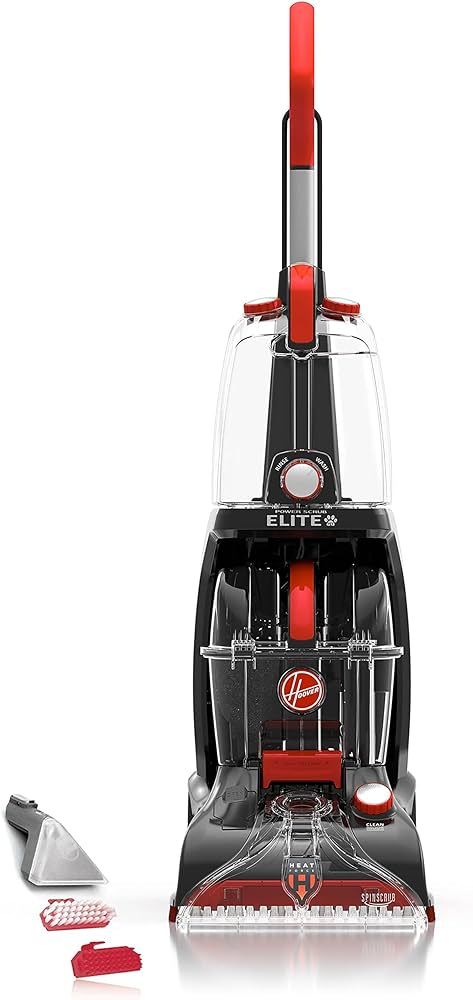
The Hoover Power Scrub Elite Pet Carpet Cleaner is a highly effective cleaning solution for pet owners, delivering professional-grade results. This versatile cleaner tackles tough stains and odors, leaving your carpets looking and smelling fresh.
Introducing the Hoover Power Scrub Elite Pet Carpet Cleaner, the ultimate cleaning solution for pet owners. With its powerful suction and advanced cleaning system, this carpet cleaner effectively removes stains and odors caused by pets, leaving your carpets looking and smelling fresh.
Save time and effort with this easy-to-use machine that delivers professional-grade results in the comfort of your own home. Whether you have stubborn pet stains or just want to freshen up your carpets, the Hoover Power Scrub Elite Pet Carpet Cleaner is the ideal choice. Say goodbye to dirt and odors and hello to clean, fresh carpets.
Features
The Hoover Power Scrub Elite Pet Carpet Cleaner is a top-notch cleaning tool designed for homes with furry friends. Let's dive into its standout features:Pet-focused Design
- Specially engineered to tackle tough pet stains and odors
- Equipped with SpinScrub brushes to deep clean carpets
- Includes a unique antimicrobial pet tool for targeted cleaning
Powerful Cleaning Performance
- Delivers strong suction power to extract embedded dirt and debris
- Features a dual tank system for clean and dirty water separation
- Offers a quick clean mode for rapid touch-ups
Convenient Design
- Lightweight and easy to maneuver around furniture and obstacles
- Includes a wash/rinse selector for custom cleaning options
- Boasts a large tank capacity to reduce the frequency of refills
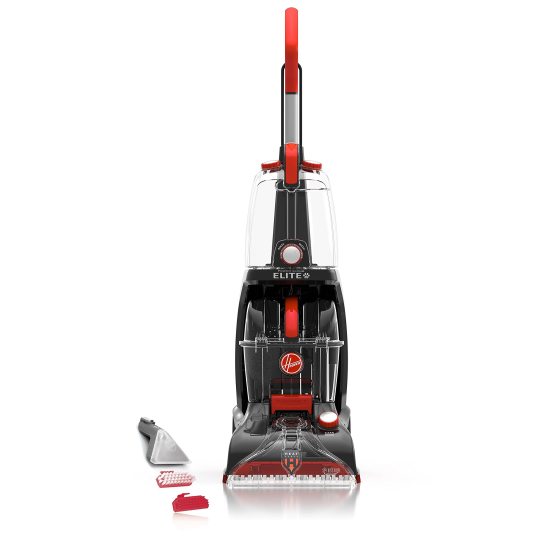
Credit: www.amazon.com
How It Works
When it comes to keeping your carpets fresh and clean, the Hoover Power Scrub Elite Pet Carpet Cleaner is a game changer. This innovative carpet cleaner is designed to tackle even the toughest pet stains and odors, leaving your carpets looking and smelling like new.Dual Tank SystemThe Hoover Power Scrub Elite Pet Carpet Cleaner features a unique dual tank system that separates clean water from dirty water. This not only makes filling and emptying the tanks a breeze but also ensures that clean water is always used to wash your carpets. With separate tanks, you can say goodbye to spreading dirt and grime around your carpets and hello to a truly deep clean.Spinscrub Brush TechnologyEquipped with SpinScrub brush technology, this carpet cleaner gently scrubs every fiber of your carpet, removing deeply embedded dirt and stains. The SpinScrub brushes are designed to rotate in a 360-degree pattern, providing thorough and consistent cleaning. Say goodbye to those stubborn stains and hello to fresh, rejuvenated carpets.The SpinScrub brush technology not only cleans your carpets but also helps in the process of drying. By agitating the fibers, the brushes help to loosen and lift any excess water from your carpets, making the drying time faster and more efficient.In addition to its powerful cleaning capabilities, the Hoover Power Scrub Elite Pet Carpet Cleaner also offers a range of other features to make your cleaning experience as effortless as possible. The automatic detergent mixing system ensures that the right amount of detergent is dispensed for optimal cleaning results, while the heat force function helps to speed up the drying process.With the Hoover Power Scrub Elite Pet Carpet Cleaner, you can enjoy cleaner, fresher carpets that are free from pet stains and odors. So why wait? Invest in this powerhouse of a carpet cleaner and experience the difference it can make in your home.
Target Users
Pet OwnersPet owners know the struggle of keeping their carpets clean from pet-related accidents and odors. The Hoover Power Scrub Elite Pet Carpet Cleaner with its exceptional deep cleaning and odor-fighting capabilities is tailored to meet the needs of pet owners. This innovative carpet cleaner effectively tackles tough stains and eliminates pet odors, making it a must-have for those with furry friends.Homeowners With High-traffic AreasHigh-traffic areas in homes face significant wear and tear, making it challenging to maintain the cleanliness and freshness of the carpets. The Hoover Power Scrub Elite Pet Carpet Cleaner caters to the needs of homeowners with high-traffic areas, offering powerful cleaning performance that revitalizes and restores carpets to their former glory. Its efficiency in removing embedded dirt and reviving worn-out carpet fibers makes it an ideal choice for those dealing with heavy foot traffic.
Credit: hoover.com
Benefits
The Hoover Power Scrub Elite Pet Carpet Cleaner offers a range of benefits that make it an essential tool for pet owners and households looking to maintain clean and odor-free carpets. With its advanced features and efficient cleaning performance, this carpet cleaner ensures that pet-related messes are effectively dealt with, leaving your carpets refreshed and looking their best.Eliminates Stubborn StainsThe Hoover Power Scrub Elite Pet Carpet Cleaner is equipped with a powerful cleaning mechanism that targets tough and stubborn stains, including those caused by pets. The scrubbing action penetrates deep into the carpet fibers, effectively eliminating even the most deeply entrenched stains, restoring the carpet's original appearance.Removes Pet Odors EffectivelyWith its specially formulated cleaning solution and powerful suction, this carpet cleaner efficiently removes pet odors from carpets, leaving behind a fresh and clean scent. The combination of thorough scrubbing and extraction ensures that pet-related odors are completely eradicated, creating a more pleasant indoor environment.
Comparison
Discover the efficiency and power of the Hoover Power Scrub Elite Pet Carpet Cleaner. Say goodbye to pet stains with this advanced cleaning technology that brings your carpets back to new. Its strong suction and brush system makes it the perfect choice for pet owners.
If you're tired of struggling with dirty carpets due to pet messes, then it's time to consider investing in a reliable carpet cleaner. But with so many options on the market, which one should you choose? In this section, we'll compare the Hoover Power Scrub Elite Pet Carpet Cleaner with traditional carpet cleaners and other pet-specific cleaners to help you make an informed decision.
Vs. Traditional Carpet Cleaners
Traditional carpet cleaners may get the job done, but they often fall short when it comes to handling stubborn pet stains and odors effectively. The Hoover Power Scrub Elite Pet Carpet Cleaner, on the other hand, is specifically designed to tackle the messes left behind by our furry friends. With its powerful suction and SpinScrub Brush System, it can deeply clean your carpets and remove even the toughest stains.
When it comes to convenience, the Hoover Power Scrub Elite Pet Carpet Cleaner excels as well. Its lightweight and compact design make it easy to maneuver around furniture, saving you precious time and energy. You don't have to worry about dragging a heavy unit up and down the stairs or struggling with cumbersome attachments.
Vs. Other Pet-specific Cleaners
While there are other pet-specific carpet cleaners available, the Hoover Power Scrub Elite Pet Carpet Cleaner stands out for several reasons. Firstly, it offers a wide cleaning path, allowing you to cover larger areas in less time. This is particularly useful when you have a busy household or multiple pets.
Another advantage of the Hoover Power Scrub Elite Pet Carpet Cleaner is its HeatForce technology. By applying heat to the cleaning solution, it helps to speed up the drying process, so you can get back to enjoying your clean and fresh carpets sooner. Plus, its Clean Boost Control feature allows you to add an extra boost of cleaning solution for those extra tough stains.
In conclusion, the Hoover Power Scrub Elite Pet Carpet Cleaner surpasses traditional carpet cleaners and offers unique features that set it apart from other pet-specific cleaners. With its powerful cleaning performance, convenience, and innovative technologies, this carpet cleaner is a game-changer for pet owners everywhere. Don't let pet messes ruin your carpets any longer - invest in the Hoover Power Scrub Elite Pet Carpet Cleaner and experience the difference for yourself.
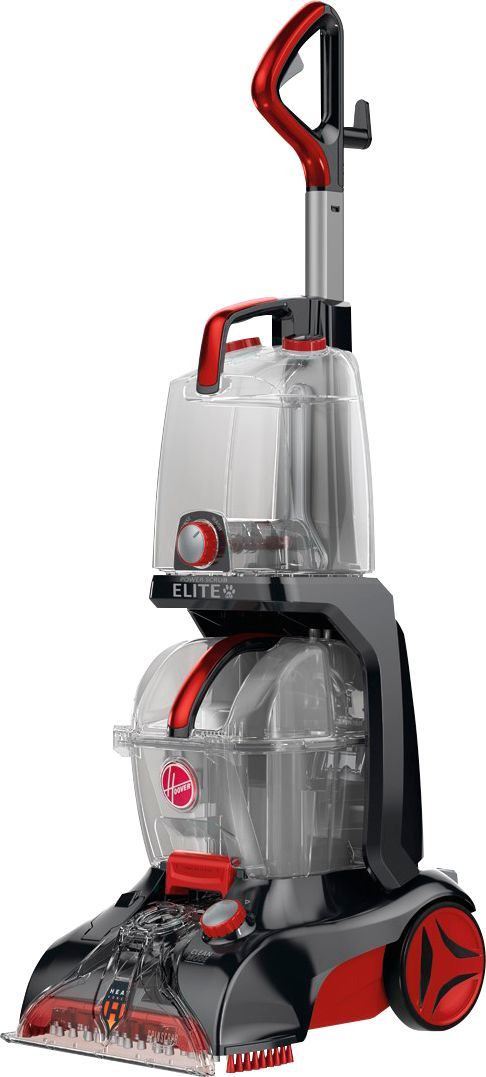
Credit: www.bestbuy.com
Maintenance Tips
To keep your Hoover Power Scrub Elite Pet Carpet Cleaner in top condition, follow these maintenance tips. Always empty and clean the dirty water tank after each use, and regularly check and clean the brushes and nozzles to prevent clogs.
Keeping your carpet cleaner well-maintained will ensure optimal performance and longevity.
Maintenance Tips
Cleaning the Machine Regularly
To keep your Hoover Power Scrub Elite Pet Carpet Cleaner performing at its best, it is essential to clean the machine regularly.
Make sure to remove and rinse the water tanks after each use to prevent buildup of debris and odors.
Clean the brushes and nozzle to ensure optimal performance. Regular maintenance will extend the lifespan of your machine.
Proper Storage Practices
Proper storage is key to maintaining the integrity of your carpet cleaner. When not in use, empty the tanks and let them air dry to prevent mold growth.
Store the machine in a cool, dry place away from direct sunlight to prevent damage. Follow these storage tips to prolong the life of your carpet cleaner.
https://www.youtube.com/watch?v=_3gW_DL8baM
Frequently Asked Questions Of Hoover Power Scrub Elite Pet Carpet Cleaner
What Makes The Hoover Power Scrub Elite Ideal For Pets?
The Hoover Power Scrub Elite features a deep clean mode that effectively removes pet stains and odors, while the antimicrobial pet tool provides enhanced cleaning for pet messes.
How Does The Hoover Power Scrub Elite Tackle Tough Stains?
Equipped with a spin scrub brush system and a powerful suction, the Hoover Power Scrub Elite effectively removes embedded dirt and tough stains, leaving carpets clean and fresh.
Can The Hoover Power Scrub Elite Be Used On Upholstery?
Yes, the Hoover Power Scrub Elite includes a versatile 2-in-1 antimicrobial pet tool that is suitable for cleaning upholstery, ensuring a thorough and effective cleaning process for your home.
Conclusion
To keep your carpets clean and fresh, look no further than the Hoover Power Scrub Elite Pet Carpet Cleaner. Its powerful suction and deep cleaning capabilities make it the ideal choice for pet owners. With its easy-to-use design and advanced technology, this carpet cleaner tackles even the toughest pet stains and odors.
Give your carpets the care they deserve with the Hoover Power Scrub Elite Pet Carpet Cleaner. Say goodbye to pet messes and hello to a cleaner home.
Read the full article
0 notes
Text
Glue Coverage Calculator

A glue coverage calculator determines the amount of adhesive needed for a project. It factors in surface area and glue specifications.
Glue Coverage Calculator
Glue Coverage Calculator
Area to be Glued (square inches):
Glue Amount (ounces):
Thickness of the Glue Layer (inches):
Calculate Coverage
Crafting or construction projects often require precision in the amount of materials used, and glue is no exception. Ensuring you have the right amount of adhesive can make the difference between a successful project and a sticky situation. A glue coverage calculator simplifies the estimation process, saving time and reducing waste.
Whether you're laying down hardwood floors, assembling homemade crafts, or dealing with intricate model-building, accurately calculating glue coverage helps maintain both efficiency and budget. This handy tool assists in tailoring purchase quantities to project needs, promoting more sustainable practices by avoiding overconsumption.

Credit: www.gluegun.com
The Basics Of Glue Coverage
Understanding the fundamentals of glue coverage is crucial for everyone from DIY enthusiasts to professional carpenters. It's not just about slathering your material with glue. Optimal glue use ensures a strong, long-lasting bond without waste.
Defining Glue Coverage
Glue coverage refers to the amount of glue applied on a surface to create an effective bond. This is usually measured in grams per square meter or ounces per square foot. Too little and your bond weakens; too much can cause issues like warping and increased drying times.
Glue Coverage Calculator tools help to estimate the correct quantity. They use the size of your project and glue specifications. With this, you get a custom guideline for your specific task.
Importance Of Accurate Glue Application
- Saves Money: Using the right amount prevents buying extra glue.
- Improves Strength: Correct coverage means stronger bonds.
- Reduces Mess: Avoids overflow and cleanup time.
- Enhances Appearance: No excess glue means a cleaner look.
Types Of Adhesives And Their Coverage
Selecting the right adhesive is crucial for any project. The coverage of glue, meaning how much area it can adhere with a certain volume, is a key factor. This depends on the type of adhesive. Let's explore different types and their coverage to ensure your project's success.
Pva Glues
PVA glues, or Polyvinyl Acetate, are water-based adhesives. They work well with wood, paper, and fabric. PVA glues are popular due to their easy cleanup and non-toxic nature. The coverage varies, but a single gallon can cover approximately 200 square feet when applied thinly.
Epoxy Resins
Epoxy resins are known for their strong bond and chemical resistance. They are two-part adhesives, combining a resin and hardener. Suitable for many materials, epoxy resins have a varied coverage. For example, a 1-gallon kit can cover around 12 to 150 square feet, depending on thickness.
Contact Adhesives
Contact adhesives are ideal for quick fixes. They bond materials on contact and are great for laminate, rubber, and leather. Coverage highly depends on the application method. Approximately, one quart can cover up to 60 square feet when spread thinly.
Construction Adhesives
Construction adhesives boast high strength. They're perfect for heavy materials like stone, concrete, and wood. A 10-ounce tube can cover about 20 to 30 square feet, but this can vary with material type and weather conditions.
Understanding the coverage of different adhesives helps avoid waste and ensures durability. Always check the manufacturer's guidelines for the best results.
Factors Influencing Glue Coverage
Understanding the various factors that impact glue coverage is crucial for any project. Whether in woodworking, crafting, or construction, knowing these factors ensures the right amount of glue is used. This prevents waste, saves money, and guarantees a strong bond. Let's dive into the key elements that play a role in glue coverage.
Material Surface Area
The size of the surface getting glued is a primary factor. Measure length by width to calculate the area. Use a calculator to find the total. Larger areas need more glue. Keep measurements accurate for the best results.
Glue Thickness
How thick the glue layer must be varies with the project. A thin layer might suffice for tight-fitting pieces. A thicker layer might be needed for gaps. Check the glue manufacturer's guidelines. Aim for even distribution across the surface.
Porosity Of Surfaces
Porosity means how much a material can absorb. Porous materials like unsealed wood absorb more glue. Non-porous materials like plastic need less. Adjust glue amount based on porosity to avoid weak bonds or excess squeeze-out.
Summary - Factors Influencing Glue Coverage
- Surface Area: Calculate size for proper glue amount.
- Glue Thickness: Determine needed thickness for the bond.
- Surface Porosity: Porous materials may require more glue.
Quick Reference for Glue Coverage Factors
Factor
Impact on Glue Quantity
Material Surface Area
More area, more glue needed
Glue Thickness
Varies with the gap between surfaces
Porosity of Surfaces
Porous surfaces absorb more glue
Calculating Glue Amounts
Before starting any project, knowing how much glue to use is vital. Not enough glue means weak bonds. Too much, and you waste resources. The Glue Coverage Calculator simplifies this. It tells you how much glue your project needs. Let's break down how to calculate glue volume for various tasks.
Basic Calculation Formulas
Understanding basic formulas is the first step. Take the area of the surface and multiply it by the glue manufacturer's recommended coating thickness. This tells you the volume of glue needed. Always measure surfaces in square footage or square meters for accuracy.
The formula looks like this: Glue Volume = Surface Area x Recommended Coating Thickness.
To ensure precision, use a coverage calculator. Enter your figures, and get the exact glue amount.
Examples Of Common Projects
Let's apply the formula to real-life situations. Here are a few examples:
- Woodworking: For a tabletop, measure its length and width for the area. Then, use the recommended thickness.
- Scrapbooking: Small pieces need a light glue layer. Calculate total album area and adjust for thinner coverage.
- Tile Adhesive: Floor dimensions give the surface area. Factor in notching size for precise adhesive volume.
Project
Surface Area
Recommended Thickness (inch)
Total Glue Volume
Wooden Tabletop
30 sq ft
0.01
0.3 cubic feet
Scrapbook
2 sq ft
0.003
0.006 cubic feet
Tile Flooring
100 sq ft
0.02
2 cubic feet
Tools For Measuring Glue Coverage
Tools for Measuring Glue Coverage are essential for precise application in a range of projects, from woodworking to crafting. Knowing how much glue to use can save time and materials, and ensure a strong bond. Whether preferring tried-and-true manual techniques or modern digital solutions, an array of options exists.
Manual Methods
Manual methods for measuring glue coverage rely on simple techniques and tools. These are cost-effective and easy to execute:
- Spread charts: Visual guides that suggest the right amount of glue.
- Glue gauges: Tools to measure the thickness of glue application.
- Weight-based measurements: Using a scale to measure glue quantity.
A typical manual method includes spreading a known weight of glue over a test area and calculating coverage from the results.
Digital Glue Calculators
Digital glue calculators streamline the process with algorithms and are accessible online or as apps:
- Input the project's dimensions.
- Select the glue type.
- Get instant recommendations for coverage.
Many digital calculators also account for glue type and substrate porosity for precision. They remove the guesswork, offering quick, reliable coverage calculations.
Type
Advantages
Usage
Manual
Cost-effective, no tech needed
Small projects, traditional methods
Digital
Precise, fast, versatile
Large projects, modern practices
Credit: www.armacell.us
Maximizing Glue Efficiency
Maximizing glue efficiency is crucial in crafts, woodworking, and construction. Using a Glue Coverage Calculator helps ensure you use the right amount of adhesive for your project. Doing so prevents waste and saves money, giving you optimal results every time.
Best Practices For Glue Application
For the best glue application, consider the following:
- Measure precisely using a coverage calculator.
- Choose the right type of glue for your material.
- Prepare surfaces by cleaning them.
- Apply glue in a thin, even layer.
- Use clamps to secure surfaces as the glue dries.
- Allow ample drying time before stress is applied.
Common Mistakes To Avoid
Avoiding these mistakes can enhance your project's longevity:
Mistake
Problem
Solution
Overapplication of glue
Creates a mess, wastes glue
Use coverage calculator
Under-application
Weak bonds, project failure
Follow manufacturer's guidelines
Uneven application
Uneven adhesion, poor finish
Use a spreader or brush
Not clamping
Inadequate bond strength
Clamp during curing time
Rushing drying time
Compromises bond integrity
Allow full drying time
Following these practices and avoiding common pitfalls can greatly improve your project's durability and appearance. Remember, a Glue Coverage Calculator is a handy tool to guide you in using just the right amount of glue for maximum effectiveness.
Glue Calculator Software Features
Discover the robust features of Glue Calculator Software. It's a tool for professionals and hobbyists alike. This software makes any gluing project simple and efficient
User Interface Elements
The glue calculator's user interface is simple and intuitive. Here's what you can expect:
- Clear layout: Find features quickly and easily.
- Visual aids: Graphics help users understand the data.
- Responsive design: Work on any device with ease.
Adjusting For Different Variables
Accurate glue coverage is vital. The software allows for adjustments based on:
Variable
Adjustment Feature
Material type
Select from a dropdown menu
Surface area
Input dimensions for precise calculations
Glue type
Choose from various glue options
Change settings to fit your project's demands. Your results will be as accurate as possible.
Case Studies: Glue Coverage In Action
Understanding how much glue you need is important. It saves time and money. Here are real-world examples. They show glue coverage in different settings. Each case offers insights into the right glue amount.
Furniture Manufacturing
Furniture makers use lots of glue. They want strong, durable pieces. Calculating the right amount means no waste. Let's look at a company scenario:
Project
Glue Type
Surface Area
Required Amount
Wooden Chair
PVA Glue
3 sq. meters
80 ml
A calculator helped them. The company saved 20% on glue costs last year.
Craft Projects
Glue is key in crafts. But, too much glue means a mess. A local school project shows this:
- Paper Mache Globe: A small batch of glue was needed.
- Cardboard Fort: Used a calculator to find needed glue.
- Measure surface area.
- Choose glue type.
- Get exact glue amount.
Students finished their projects neat and clean.
Industrial Applications
Industries require precision. A local factory's example clarifies this:
Conveyor Belt Repair: Needed a quick-fix solution. The glue calculator ensured they used the right amount of industrial adhesive.
No delays occurred. The production ran smoothly. The factory maintained its schedule.
Avoiding Waste And Ensuring Quality
Avoiding waste in any project is crucial for both cost-effectiveness and environmental responsibility. When it comes to bonding materials, a Glue Coverage Calculator becomes an essential tool. It helps to ensure quality by calculating the exact amount of adhesive needed. This precision avoids overuse, which can compromise the adhesive's effectiveness, and prevent underuse, which can result in weak bonds.
Conservation Techniques
Effective conservation starts with planning. Utilizing a Glue Coverage Calculator, professionals and DIY enthusiasts can both minimize waste. Below are techniques to use adhesive judiciously:
- Calculate precise coverage area.
- Select the right glue type for the material.
- Apply glue evenly to avoid excess.
Quality Control Measures
Ensuring the lasting bond and integrity of materials is paramount. The following quality control measures are necessary:
Step
Action
1
Test glue on small area first.
2
Use Glue Coverage Calculator for accuracy.
3
Adjust based on environmental conditions.
By adhering to these quality control measures, the chances of future failure significantly decrease. Projects will stand the test of time with the right amount and type of glue applied.
The Future Of Adhesive Application
The advancement of adhesive application methods is revolutionizing how we approach bonding materials. A Glue Coverage Calculator stands at the forefront of this innovation. With precision and efficiency in mind, these tools are set to reshape our use of adhesives in various industries.
Technological Advancements
Embracing tech improvements, Glue Coverage Calculators bring forth significant benefits:
- Accuracy: Deliver exact amounts of glue, reducing waste.
- Consistency: Offer uniform application for better bond quality.
- Data Analysis: Record and analyze usage patterns for optimization.
These tools incorporate AI and machine learning for smarter application. They adapt to different surface materials to ensure optimal glue use.
Sustainability Considerations
Today’s calculators focus on sustainable practices. Key features include:
- Reducing adhesive waste, which lessens environmental impact.
- Regulating usage to conform with eco-friendly standards.
- Promoting the use of biodegradable adhesives.
These advancements not only conserve resources but also support a greener planet. With calculators, businesses move towards sustainable production.
Conclusion
Wrapping up, our Glue Coverage Calculator is a must-have tool for any bonding project. It saves time, reduces waste, and helps ensure a perfect application every time. Remember, precise calculations lead to professional results. For your next venture, trust this calculator to guide you through to a flawless finish.
Read the full article
0 notes
Text
Hoover Power Scrub Carpet Cleaner How to Use: Ultimate Tips for Perfect Results

Use the Hoover Power Scrub carpet cleaner following the specified instructions for effective cleaning. The Hoover Power Scrub carpet cleaner is a powerful tool designed to provide optimal cleaning results for your carpets.
With its advanced features and technology, this carpet cleaner can effectively remove embedded dirt, stains and odors, leaving your carpets fresh and revitalized. To maximize its cleaning performance, it is important to use the machine correctly. In this guide, we will outline the step-by-step process of how to use the Hoover Power Scrub carpet cleaner to ensure you achieve the best results for your carpet cleaning needs.
So, let's dive in and discover how to effectively use this carpet cleaner.
Setting Up The Hoover Power Scrub
Setting up the Hoover Power Scrub carpet cleaner is quick and easy. Begin by filling the clean water tank, adding cleaning solution, then turn on the power switch and start cleaning your carpets with ease. Remember to empty the dirty water tank once finished for optimal performance.
Assembling The Machine
1. Unbox the Hoover Power Scrub and lay out the components.
2. Attach the handle to the main unit following the instructions.
3. Securely connect the hose to the designated port on the machine.
- Use the provided clips to ensure a tight fit.
4. Insert the cleaning solution tank into its slot on the machine.
5. Check all connections to avoid leaks during operation.
Preparing The Cleaning Solution
1. Locate the cleaning solution tank on the Hoover Power Scrub.
- Fill the tank with a recommended carpet cleaning solution and water.
2. Ensure the tank cap is securely closed to prevent spills.
3. Mix the solution by gently shaking the tank.
4. Verify that the solution tank is properly loaded before use.
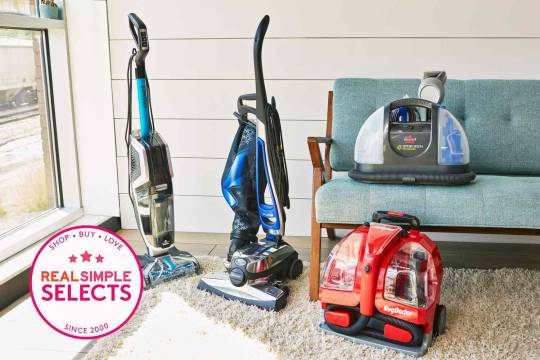
Credit: www.realsimple.com
Using The Hoover Power Scrub
Having a clean and fresh-looking carpet is essential to maintaining a healthy and inviting home. The Hoover Power Scrub carpet cleaner is a reliable and effective tool that can help you achieve just that. This powerful machine is designed to deep clean carpets and remove stubborn dirt and stains. In this section, we will guide you through the process of using the Hoover Power Scrub effectively, ensuring you get the best results.Choosing The Right Cleaning ModeBefore you begin cleaning your carpets with the Hoover Power Scrub, it's important to select the appropriate cleaning mode for your specific needs. This versatile machine offers multiple cleaning modes to accommodate different carpet types and conditions. Here are the three cleaning modes you can choose from:
- Normal Mode: This mode is ideal for routine cleaning and maintenance. It provides a thorough and effective cleaning for most carpets.
- Gentle Mode: If you have delicate or lightly soiled carpets, the gentle mode is the right choice. It ensures a more delicate cleaning process while still effectively removing dirt.
- Spot Mode: For concentrated areas of heavy stains or traffic, the spot mode is your go-to option. It provides extra power and targeted cleaning to tackle stubborn spots and high-traffic areas.
By selecting the appropriate cleaning mode, you can optimize the cleaning power of the Hoover Power Scrub and achieve the best results for your carpets.Operating The Machine EffectivelyOnce you have chosen the right cleaning mode for your carpets, it's time to operate the Hoover Power Scrub effectively. Follow these steps to ensure a successful cleaning process:
- Prepare the machine: Fill the clean water tank with a mixture of warm water and Hoover cleaning solution, following the recommended dilution ratio. Attach the tank back to the machine, ensuring it is securely in place.
- Pre-treat stains: Before starting the cleaning process, it's recommended to pre-treat any stubborn stains or high-traffic areas with Hoover pre-treat solution or a suitable stain remover.
- Cleaning technique: Start cleaning from the furthest corner of the room, working your way backward. Pull the machine trigger to release the cleaning solution while pushing the machine forward, and release the trigger while pulling it back to suction up the dirty water. Repeat this technique systematically across the entire area to be cleaned.
- Empty and rinse: Regularly empty and rinse the dirty water tank to prevent it from reaching its maximum capacity. This will ensure continuous suction power and efficient cleaning.
- Drying time: Allow your carpets to fully dry before walking on them or replacing furniture. Proper drying time ensures that the carpets are clean, fresh, and ready to be enjoyed.
By following these steps and operating the Hoover Power Scrub effectively, you can feel confident in your ability to deep clean your carpets and achieve remarkable results. Remember to read the user manual and instructions provided by the manufacturer for additional guidance and safety precautions.
https://www.youtube.com/watch?v=2unkNaDWGBY
Tips For Optimal Cleaning
If you want your carpets to look their best, using the Hoover Power Scrub Carpet Cleaner with the right techniques is essential. These tips for optimal cleaning will help you achieve a thorough and effective carpet cleaning experience.Pre-treating StainsBefore using the Hoover Power Scrub Carpet Cleaner, it's essential to pre-treat any stubborn stains. This will ensure that the cleaner can effectively lift and remove the blemishes from your carpet. For tough stains, use a targeted stain remover and allow it to sit for a few minutes before starting the cleaning process to achieve the best results.Ensuring Proper Drying Of CarpetsAfter using the Hoover Power Scrub Carpet Cleaner, it's crucial to allow your carpets to dry thoroughly. Proper drying prevents the growth of mold and mildew, ensuring a healthier environment. To expedite the drying process, open windows and use fans to promote air circulation. Avoid walking on the damp carpet until it is completely dry to prevent any potential damage.
Maintenance And Cleaning
Learn how to effectively use the Hoover Power Scrub carpet cleaner for maintenance and cleaning. The step-by-step guide covers everything from preparing the machine to efficiently removing dirt and stains. Keep your carpets looking fresh and clean with these simple yet effective tips.
Maintenance and Cleaning
Regular maintenance and cleaning of your Hoover Power Scrub Carpet Cleaner is crucial to ensure its optimal performance and longevity. By following simple guidelines for maintaining and storing your machine, you can ensure it remains in top condition for years to come.
Cleaning the Machine After Use
After using the Hoover Power Scrub Carpet Cleaner, it’s essential to clean the machine thoroughly to ensure it's ready for the next use. Follow these simple steps to clean the machine after each use:
1. Empty the Dirty Water Tank: Remove the dirty water tank and empty it in the sink or toilet. Rinse the tank with clean water and allow it to air dry before replacing it.
2. Clean the Brushes: Remove the brush assembly and rinse it under running water to remove any dirt or debris. Use a soft brush to gently clean the bristles, ensuring there is no buildup of hair or lint.
3. Wipe Down the Exterior: Use a damp cloth to wipe down the exterior of the machine, including the control panel and handle. Ensure all detergent and water residue is removed.
4. Check the Filter: Remove the filter and clean it according to the manufacturer's instructions. This will ensure optimal suction power for your next cleaning session.
Storage Tips
Proper storage of your Hoover Power Scrub Carpet Cleaner is essential to prevent damage and maintain its functionality. Here are some storage tips to keep in mind:
1. Empty the Tanks: Always ensure that the dirty water tank and clean water tank are emptied and dried before storing the machine. This will prevent the growth of mold and bacteria.
2. Store in a Dry Place: Store the carpet cleaner in a cool, dry place away from direct sunlight. Avoid areas with extreme temperatures or high humidity, as these can affect the machine's components.
3. Wrap the Cord Neatly: To prevent tangling and damage, wrap the power cord neatly around the cord hooks provided on the machine. This will also make it easier to unpack for the next use.
Following these maintenance and storage tips for your Hoover Power Scrub Carpet Cleaner will ensure that it continues to deliver optimum cleaning performance for years to come. Regular cleaning and proper storage are essential for maintaining the machine's efficiency and longevity.
Common Issues And Troubleshooting
While the Hoover Power Scrub Carpet Cleaner is a powerful device designed to make your carpet cleaning experience a breeze, like any other appliance, it may encounter some common issues. Knowing how to troubleshoot these issues can help ensure that your cleaning process goes smoothly and efficiently. In this section, we will discuss two common problems that users may encounter with the Hoover Power Scrub Carpet Cleaner and provide simple steps to resolve them.Dealing With ClogsClogs can occur in the Hoover Power Scrub Carpet Cleaner, impeding its performance and preventing it from effectively cleaning your carpets. If you suspect a clog, follow these steps to resolve the issue:
- First, switch off the power and unplug the carpet cleaner.
- Next, remove the dirty water tank and empty it.
- Check the nozzle and brush attachment for any debris or blockages. Use a small brush or toothpick to dislodge and remove any clogs.
- Inspect the suction pathway for any obstructions. Clear away any debris that may be blocking the suction.
- Reattach the dirty water tank and ensure it is securely in place.
- Plug the carpet cleaner back in, switch it on, and test it on a small area of your carpet to ensure the clog has been resolved.
Fixing Spray Nozzle ProblemsIf you're experiencing issues with the spray nozzle on your Hoover Power Scrub Carpet Cleaner, such as low or no spray, here are some troubleshooting tips to help you fix the problem:
- Turn off the carpet cleaner and unplug it.
- Check the water tank to ensure it is filled with clean water and securely attached.
- Inspect the spray nozzle for any clogs or blockages. Remove any debris using a toothpick or small brush.
- Ensure that the solution tank is properly attached and aligned with the spray nozzle.
- Check the solution dial on the handle to make sure it is set to the desired level.
- Plug in the carpet cleaner, turn it on, and test the spray nozzle on a small section of your carpet. Adjust the solution dial as needed.
By following these troubleshooting steps, you can quickly address common issues that may arise while using the Hoover Power Scrub Carpet Cleaner. Resolving these problems will help you maintain the optimal performance of your carpet cleaner and ensure that your carpets are left clean and fresh.
Credit: www.amazon.com
Enhancing Cleaning Results
Using Carpet Cleaning AccessoriesCarpet cleaning accessories like the upholstery tool and crevice tool help in reaching tight spaces effectively.Benefits Of Regular Carpet CleaningRegular carpet cleaning eliminates dust mites, allergens, and ensures a healthier indoor environment.
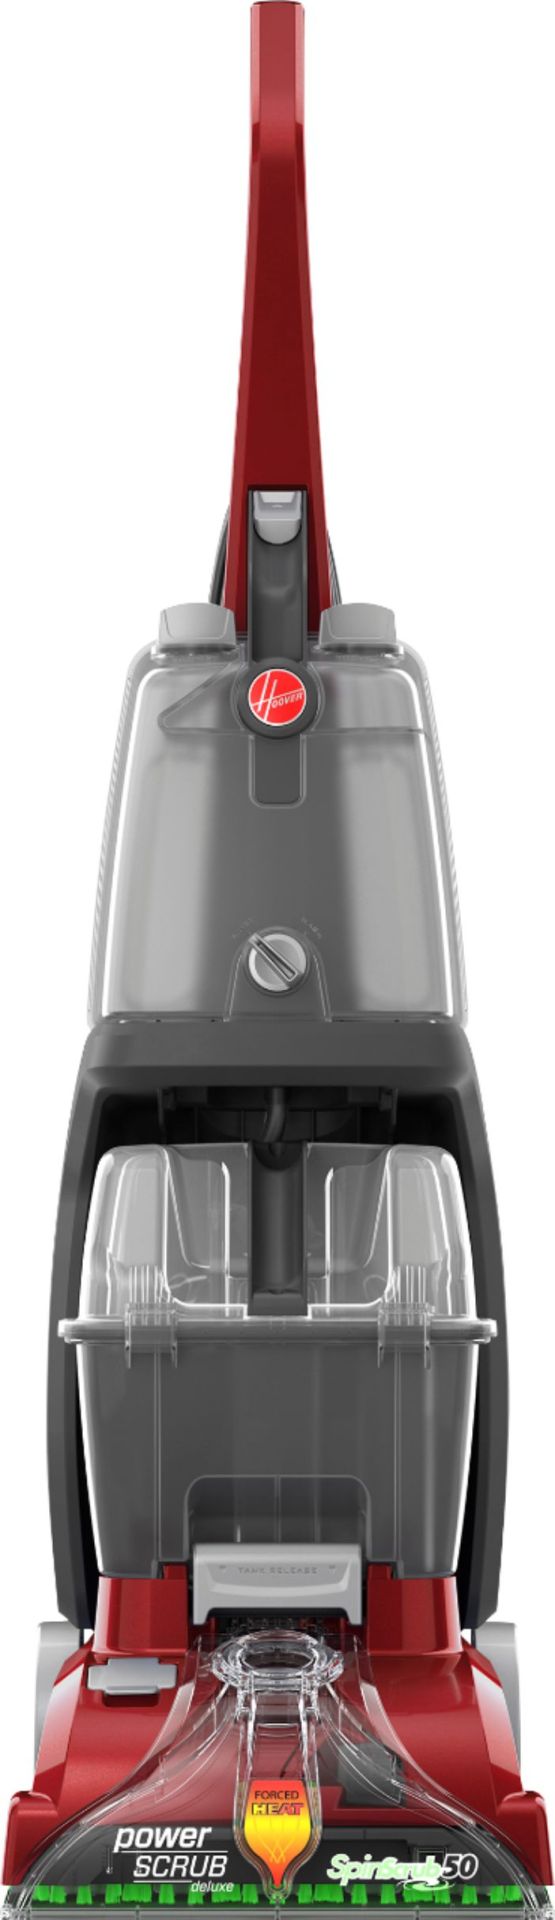
Credit: www.bestbuy.com
Frequently Asked Questions For Hoover Power Scrub Carpet Cleaner How To Use
How Do I Fill The Hoover Power Scrub Carpet Cleaner With Water?
To fill the Hoover Power Scrub Carpet Cleaner with water, simply remove the clean water tank and fill it with hot tap water up to the water fill line. Then, add the appropriate amount of Hoover carpet cleaning solution and replace the tank securely.
What Is The Best Way To Clean The Hoover Power Scrub Carpet Cleaner After Use?
After using the Hoover Power Scrub Carpet Cleaner, it is best to empty the dirty water tank, rinse the tank, and let it air dry. Additionally, it is recommended to run clean water through the machine to flush out any remaining cleaning solution.
How Often Should I Clean The Brushes Of The Hoover Power Scrub Carpet Cleaner?
It is recommended to clean the brushes of the Hoover Power Scrub Carpet Cleaner after each use. Remove any debris or hair that may have accumulated on the brushes to maintain their effectiveness and prevent clogging. This will ensure optimal cleaning performance.
Can I Use The Hoover Power Scrub Carpet Cleaner On Upholstered Furniture?
Yes, the Hoover Power Scrub Carpet Cleaner can be used on upholstered furniture. Simply use the appropriate attachment and follow the same steps as you would when cleaning carpets. Always check the manufacturer's recommendations for cleaning upholstery, and perform a spot test in an inconspicuous area.
Conclusion
To summarize, utilizing the Hoover Power Scrub Carpet Cleaner is a simple and effective way to refresh and revitalize your carpets. The step-by-step guide provided in this post offers valuable insights on how to properly use this powerful cleaning tool.
By following these instructions, you'll be able to achieve professional-quality results, leaving your carpets looking and feeling like new. With the Hoover Power Scrub Carpet Cleaner, maintaining a clean and fresh home has never been easier. So, why wait? Start enjoying cleaner, healthier carpets today!
Read the full article
0 notes
Text
Bissell Carpet Cleaner Proheat Instructions : Expert Cleaning Tips!

The Bissell Carpet Cleaner Proheat instructions are easy to follow and provide step-by-step guidance for effective carpet cleaning. Introducing the Bissell Carpet Cleaner Proheat--a user-friendly and efficient solution for keeping your carpets spotless and fresh.
With its easy-to-follow instructions, this cleaning machine ensures a hassle-free experience. In just a few simple steps, you can effectively remove dirt, stains, and odors from your carpets, leaving them looking and feeling brand new. Whether you're a professional cleaner or a DIY enthusiast, the Bissell Carpet Cleaner Proheat is designed to deliver exceptional results.
In this guide, we will walk you through the step-by-step instructions to ensure that you get the most out of your cleaning experience.

Credit: www.nytimes.com
Getting Started
Let's dive into the world of Bissell Carpet Cleaner Proheat with a focus on Getting Started.
Unboxing And Setup
Upon receiving your Bissell Carpet Cleaner Proheat, follow these simple steps to get started:
- Remove the cleaner from the packaging.
- Unwind the power cord and fill the water tank with hot water.
- Attach the appropriate nozzle and power it on.
Understanding The Features
Take a moment to familiarize yourself with the key features of the Bissell Carpet Cleaner Proheat:
- Dual DirtLifter PowerBrushes for efficient cleaning.
- Heatwave Technology to maintain water temperature.
- Removable nozzle for easy cleaning and maintenance.
Preparation
Before you start cleaning your carpets with the Bissell Proheat carpet cleaner, it's important to properly prepare. Following these steps ensures that you achieve the best results and extend the life of your machine.Choosing The Right Cleaning SolutionTo get the most out of your Bissell Proheat carpet cleaner, it's essential to select the right cleaning solution. The cleaning solution you use will depend on the type of carpet and the kind of stains you are dealing with. Bissell offers a range of cleaning solutions that are specially formulated for different types of carpets and stains.Here are some factors to consider when choosing a cleaning solution:
- Type of carpet: Determine whether your carpet is made of synthetic fibers or natural fibers like wool or silk. Different cleaning solutions are designed for specific carpet types to avoid any damage.
- Type of stains: Identify the specific stains you are dealing with, such as pet stains, coffee spills, or general dirt and grime. Bissell offers specialized cleaning solutions to effectively tackle different types of stains.
Refer to the Bissell Proheat user manual or the Bissell website for guidance on which cleaning solution is best suited for your specific carpet and stains.Pre-treating StainsBefore you begin using the Bissell Proheat carpet cleaner, it's a good idea to pre-treat any stubborn stains to ensure they are effectively removed. Pre-treating stains involves applying a stain remover or pre-treatment solution directly to the affected areas.Here's how you can pre-treat stains:
- Identify the stains: Take a close look at your carpet and identify any spots or stains that need extra attention.
- Apply the stain remover: Use a stain remover or pre-treatment solution that is recommended for your specific stain. Follow the instructions on the product's label to apply it directly to the stains.
- Allow time for the pre-treatment to work: Give the stain remover enough time to penetrate the stains and break down the dirt and grime. This usually takes a few minutes, but follow the instructions on the product for the recommended duration.
Pre-treating stains helps to loosen and dissolve stubborn dirt, making it easier for the Bissell Proheat carpet cleaner to remove them during the cleaning process. Remember to always test the stain remover on a small, inconspicuous area of your carpet before applying it to larger and more visible stains.
Using The Bissell Carpet Cleaner Proheat
The Bissell Carpet Cleaner Proheat is a powerful and effective tool for keeping your carpets clean and fresh. To ensure you get the most out of this cleaning machine, it's important to understand how to properly operate it and use it to achieve the best results. In this guide, we'll walk you through the step-by-step instructions for using the Bissell Carpet Cleaner Proheat, as well as provide some useful tips for achieving effective cleaning.Operating The MachineWhen using the Bissell Carpet Cleaner Proheat, it's essential to familiarize yourself with its operational functions. Follow these simple steps to operate the machine effectively:
- Fill the clean water tank with hot tap water and the recommended cleaning solution.
- Plug in the machine and switch it on.
- Press the trigger to release the cleaning solution onto the carpet.
- Hold down the trigger and slowly push the cleaner forward, then release the trigger and pull it back over the same area to suction up the dirty water and debris.
- Continue this process, working in small sections, until the entire carpet has been cleaned.
- Empty the dirty water tank and rinse it thoroughly after use to maintain the machine's performance.
Tips For Effective CleaningTo achieve the best results when using the Bissell Carpet Cleaner Proheat, consider the following tips for effective cleaning:
- Pretreat any heavily soiled or stained areas with a pre-treating solution before using the carpet cleaner.
- Work in a systematic pattern, ensuring that each section of the carpet receives thorough cleaning and extraction.
- Use overlapping passes to ensure even cleaning and extraction of the cleaning solution.
- Allow the carpet to dry completely before walking on it or replacing furniture to prevent any potential damage.
- Clean and maintain the machine regularly to ensure optimal performance and longevity.

Credit: www.telegraph.co.uk
Maintenance
Discover how to properly maintain your Bissell Carpet Cleaner Proheat with clear and easy-to-follow instructions. These maintenance steps will ensure your cleaner operates efficiently and effectively. Regular upkeep is key to prolonging the lifespan of your carpet cleaner.
Maintenance is crucial to ensure the efficient performance and longevity of your Bissell Carpet Cleaner Proheat. Proper care and upkeep can help you get the most out of your carpet cleaner. Here are some important instructions for maintenance:
Cleaning and Storage
To maintain the optimal performance of your Bissell Carpet Cleaner Proheat, regular cleaning and appropriate storage are essential. After each use, ensure that you clean the brushes and nozzles thoroughly. This will prevent any accumulation of dirt or debris that could hinder the machine's functionality. In addition, proper storage in a dry and dust-free area can help prolong the life of your carpet cleaner.
Troubleshooting Common Issues
When using the Bissell Carpet Cleaner Proheat, it's important to be aware of common issues that may arise and how to troubleshoot them effectively. Here are a few common problems and their solutions:
1. Loss of Suction: This issue often arises from a clogged hose or filter. Check for any blockages and ensure they are cleared to restore full suction power.
2. Leaking: If you notice any leaks from the machine, it may be due to a loose or damaged hose. Inspect the hoses carefully and tighten or replace them as needed.
3. No Spray: If the machine fails to spray water or cleaning solution, check the tanks to ensure they are properly inserted and the solution lines are not clogged.
4. No Power: In case the carpet cleaner fails to turn on, check the power cord and outlet for any issues. If the problem persists, contact customer support for further assistance.
By following these maintenance instructions and troubleshooting common issues, you can ensure that your Bissell Carpet Cleaner Proheat remains in top working condition for years to come.
Advanced Techniques
Welcome back to our step-by-step guide on using the Bissell Carpet Cleaner Proheat! In this section, we will explore advanced techniques that will help you tackle tough stains and enhance the freshness of your carpets. Let's dive right in!Dealing With Tough StainsTough stains can be a real headache, but with the Bissell Carpet Cleaner Proheat, you can easily remove them and restore the beauty of your carpets. Follow these simple steps:
- Identify the type of stain you're dealing with. Is it a red wine stain, pet urine stain, or food stain?
- Depending on the stain, choose the appropriate cleaning solution from Bissell's range of stain removers.
- Apply a small amount of the cleaning solution directly to the stain.
- Let the solution sit on the stain for a few minutes to penetrate and break down the stain.
- Using the Bissell Carpet Cleaner Proheat, run the machine over the stain in a slow, steady motion.
- Repeat the process if necessary until the stain is completely removed.
- After cleaning, allow the carpet to dry completely before walking on it.
Enhancing Carpet FreshnessIt's not just about removing stains; you also want your carpets to smell fresh and clean. With the Bissell Carpet Cleaner Proheat, you can easily achieve this by following these simple steps:
- Before starting the cleaning process, sprinkle some baking soda on your carpets.
- Baking soda helps absorb odors and freshens up your carpets.
- Let the baking soda sit on the carpets for about 15 minutes.
- Then, proceed with the regular cleaning process using the Bissell Carpet Cleaner Proheat.
- The cleaning solution will work together with the baking soda to eliminate any odors.
- Once you've finished cleaning, make sure to let the carpets dry completely.
- As a final touch, vacuum the carpets to remove any remaining baking soda residue.
By following these advanced techniques, you'll be able to effortlessly tackle tough stains and enjoy fresher, cleaner carpets with the help of the Bissell Carpet Cleaner Proheat.
Safety Precautions
Before operating the Bissell Carpet Cleaner Proheat, it is crucial to follow safety precautions to ensure a smooth and accident-free cleaning process.Avoiding Hazards
- Always unplug the machine before cleaning or performing maintenance tasks.
- Avoid using the carpet cleaner on surfaces that it's not designed for.
- Keep the machine away from heat sources to prevent fire hazards.
Protecting Your Floors And Furniture
- Place a mat or towel under the machine to prevent any water damage to your floors.
- Test a small inconspicuous area of the carpet before cleaning to ensure compatibility.
- Use furniture protectors or lift furniture legs to prevent any damage during cleaning.

Credit: www.bissell.com
Frequently Asked Questions For Bissell Carpet Cleaner Proheat Instructions
How Do I Set Up My Bissell Proheat Carpet Cleaner?
To set up your Bissell Proheat Carpet Cleaner, start by assembling the machine as per the instructions in the manual. Fill the water tank with the recommended cleaning solution and water. Plug it in, turn it on, and you're ready to start cleaning!
What Type Of Cleaning Solution Should I Use With Bissell Proheat?
For best results, use Bissell cleaning solutions specifically designed for use with the Proheat Carpet Cleaner. These solutions are formulated to work effectively with the machine and help maintain the warranty. Using other products may void the warranty and could affect cleaning performance.
How Do I Clean The Brushes On My Bissell Proheat Cleaner?
To clean the brushes on your Bissell Proheat Cleaner, first, ensure the machine is unplugged. Remove the brush cover and clear any debris or hair wrapped around the brushes. You can rinse the brushes under warm water to remove stubborn dirt or grime.
Can I Use The Bissell Proheat Carpet Cleaner On Delicate Rugs?
While the Bissell Proheat Carpet Cleaner is designed for deep cleaning, it's important to test it on a small, inconspicuous area of delicate rugs first. Some delicate materials may not be suitable for deep cleaning, and it's important to ensure the cleaning solution does not cause any damage.
Conclusion
Maintaining a clean and fresh carpet is made simple with the Bissell Carpet Cleaner Proheat. By following these step-by-step instructions, you can effortlessly deep clean your carpets and remove even the toughest stains. With its user-friendly design and powerful cleaning capabilities, this carpet cleaner is sure to make your cleaning routine a breeze.
Say goodbye to dirt and hello to a pristine, beautiful carpet with the Bissell Carpet Cleaner Proheat. Try it out today and see the remarkable results for yourself!
https://www.youtube.com/watch?v=JBuzaEUsxsc
Read the full article
0 notes
Text
Turning Online Calculators

Wood Turning Online Calculator
Wood Turning Online Calculator
Diameter of Wood (in inches):
Length of Wood (in inches):
Calculate Turning
Online calculators are powerful tools that can enhance user engagement on your website. Whether you run a business, manage a blog, or operate an e-commerce site, integrating online calculators can offer a range of benefits. From improving user experience to increasing lead generation and sales, the potential of online calculators is vast.
The Importance of Online Calculators
Online calculators provide immediate value to your website visitors. They offer a convenient way for users to make quick calculations, solve problems, and obtain valuable insights. By providing these tools, you can enhance the overall user experience, leading to increased user satisfaction and loyalty.
Moreover, online calculators have the potential to attract and retain visitors on your site. People are often drawn to websites that offer tools or resources that can make their lives easier. By integrating relevant calculators, you can effectively capture and retain the attention of your target audience, increasing the time spent on your website.
Enhancing User Engagement and Retention
When visitors find a useful tool on your website, it encourages them to explore further and potentially return in the future. This increased engagement can lead to a lower bounce rate and higher conversion rates, as users are more likely to interact with your content and take the desired actions.
Additionally, online calculators can promote social sharing, as users are more inclined to share valuable resources with their networks. In this way, integrating calculators can contribute to the organic growth of your website's traffic and user base.
Credit: visyond.com
Types of Online Calculators
There is a wide range of calculators that you can incorporate into your website to cater to different user needs and interests. Some popular types of online calculators include:
- Mortgage Calculators
- Loan Payment Calculators
- Body Mass Index (BMI) Calculators
- Calorie and Nutrition Calculators
- Retirement Savings Calculators
- Investment Return Calculators
By understanding your target audience and their potential requirements, you can select the most relevant calculators to integrate into your website, thereby providing maximum value to your visitors.
Design and Integration Best Practices
When implementing online calculators on your website, it's essential to consider the design and integration process. To ensure a seamless user experience, follow these best practices:
- Choose a clean and user-friendly design for the calculator interface.
- Optimize for mobile responsiveness to accommodate users on all devices.
- Integrate interactive elements to enhance user engagement and usability.
- Provide clear instructions and labels for input fields and results.
- Test the calculator thoroughly to eliminate any potential errors or issues.
SEO Benefits of Online Calculators
Implementing online calculators on your website can also have positive impacts on your search engine optimization (SEO) efforts. Relevant and useful calculators can attract organic traffic and enhance the overall authority and relevance of your website. Additionally, if users spend more time on your site interacting with calculators, it can lower your site's bounce rate, signaling to search engines that your content is valuable and engaging.
Furthermore, by providing valuable resources in the form of calculators, you can potentially earn backlinks from other websites, further strengthening your website's authority and SEO performance.
Conclusion
Integrating online calculators into your website can significantly enhance user engagement, provide value to your visitors, and contribute to the overall success of your online presence. By understanding the importance of online calculators, selecting relevant types, and following best practices for design and integration, you can effectively leverage these tools to improve your website's performance and meet the needs of your target audience.
Read the full article
0 notes
Text
Wood Shrinkage Calculator

Wood Shrinkage Calculator
Wood Shrinkage Calculator
Original Width (inches):
Moisture Content Change (%):
Shrinkage Coefficient (per % MC):
Calculate Shrinkage
Discover the simple ways to calculate wood shrinkage!
Building with wood? It's vital to understand wood shrinkage.
Shrinkage happens as wood dries. Wood loses moisture over time, causing this.
Why worry about wood shrinkage? Well, it affects wood's size and shape.
Knowing about shrinkage helps create long-lasting wood items.

Credit: www.popularwoodworking.com
What is Wood Shrinkage?
Wood shrinkage is a natural process.
It's how wood behaves when it dries. This process occurs in all wood.
As moisture leaves, wood becomes smaller. This shrinking can lead to gaps or cracks.
Understanding this helps in making great wooden things!
How to Calculate Wood Shrinkage?
A Wood Shrinkage Calculator can predict it. It's super useful!
- Measure the wood's original size. You need this to start.
- Know the wood's moisture content. Content affects shrinking a lot.
- Understand the species shrinkage factor. Different trees shrink differently.
- Use these numbers in a Shrinkage Calculator to find the new size.
Sample Wood Shrinkage Calculation
Original Size
Moisture Content
Shrinkage Factor
Shrunk Size
10 inches
15%
0.002
9.98 inches
Note: The calculator gives an estimated new size.
The Importance of Using a Wood Shrinkage Calculator
Why use a calculator? It ensures better project results.
Knowing shrinkage ahead prevent mistakes.
It's key for things like flooring, cabinets, and shelves.
Tips for Minimizing Wood Shrinkage
Want to reduce shrinkage? Here's how!
- Use wood with proper moisture levels for your environment.
- Store wood well to keep it from water and heat.
- Seal the wood to help it hold moisture.
- Choose wood with low shrinkage rates for best results.
Conclusion
Wood shrinkage is easy to grasp. Just follow some simple steps.
Using a Wood Shrinkage Calculator is smart. It makes woodworking fun!
Keep learning and enjoy making things with wood!
Read the full article
0 notes
Text
Waste Weight Calculator

Wood Waste Calculator
Wood Waste Calculator
Density (lbs per cubic yard):
Volume (cubic yards):
Waste Weight (lbs):
Calculate Waste
Make a sustainable choice and manage your waste smartly!
What is a Waste Weight Calculator?
A Waste Weight Calculator is a tool. It helps you know how much your waste weighs.
Anyone can use it, from kids to adults.
It shows how to recycle and reduce waste at home.
Why Should You Care About Your Waste?
Caring for waste is good for our planet.
- It helps keep our environment clean.
- We save energy when we manage waste well.
- Recycling can reduce the need for raw materials.
How Does the Waste Weight Calculator Work?
This tool is simple and easy to use.
- Put your waste on the scale.
- Write down the weight.
- Use the calculator to add the weights together.
- See your total waste weight.
Credit: www.usgbc.org
Benefits of Using the Waste Weight Calculator
Benefit
Description
Track Progress
See how your waste changes over time.
Educational
Learn about different types of waste.
Eco-Friendly
Helps you live a greener lifestyle.
Use the calculator to help our Earth.
Steps to Reduce Your Waste
Here are ways to make less trash:
1. Recycle Properly: Sort out what can be recycled.
2. Compost Food Waste: Turn scraps into garden food.
3. Buy Less Plastic: Choose reusable items instead.
These steps are easy and do a lot of good!
Using the Calculator to Teach Kids
Show kids how to measure their waste.
They'll understand why recycling matters.
Final Thoughts
The Waste Weight Calculator is a super-helpful tool.
It guides us to keep the Earth happy.
Read the full article
0 notes
Text
Woodworking Project Time Estimator

Woodworking is a craft that blends art and skill. Get your projects done on time with our handy tips!
Woodworking Project Time Calculator
Woodworking Project Time Calculator
Number of Tasks:
Average Time per Task (in minutes):
Calculate Project Time
Understanding the Basics of Time Estimation
Knowing how long a project will take is key. It can be tricky, but we will make it simple!
Why Estimate Time?
- It helps plan your projects better.
- You can use your time wisely.
- It allows you to set realistic deadlines.
- You won't be in a rush, so you make fewer mistakes.
Step-by-Step Guide to Estimating Woodworking Time
Follow these steps to guess how long your project will take.
Step 1: List All The Tasks
Write down every step, from cutting wood to adding finish.
Step 2: Break Down Complex Tasks
Some tasks are big. Cut them into smaller, easier steps.
Step 3: Assign Time To Each Task
Think about how long each step will take. Be honest with your skill level.
Step 4: Add Extra Time For Complex Tasks
Hard tasks need more time. Add a little extra to be safe.
Step 5: Consider Your Experience
If you're new, tasks might take longer. That's okay!
Step 6: Add Time For Setups And Cleanups
Don't forget the time to set up your tools and clean up afterward.
Step 7: Account For Drying Or Curing Time
If your project uses glue or finish, it needs time to dry. Add this in too.
Step 8: Review And Adjust
Look at your list. Make changes if you need to. Now, you have your estimated time!
Factors Affecting Woodworking Time Estimation
Some things can change how long your project takes.
Factor
How It Affects Time
Experience Level
Beginners may need more time than experts.
Tools Available
Better tools can make work go faster.
Project Complexity
Hard projects need more time.
Project Size
Big projects often take longer than small ones.
Material Quality
Good wood can be easier to work with.
Tips for Accurate Time Estimation
Ready to guess your project time? Here are some tips to help you.
Tip 1: Use Past Projects As A Guide
Think about your old projects. How long did they take? Use that to guess new times.
Tip 2: Always Add A Buffer
It's smart to add extra time just in case something pops up. It's better to finish early than late!
Tip 3: Review Often
Look at your time plan often. Are you on track? If not, figure out why and learn from it.
Conclusion: The Joy of Timely Completion
Estimating time takes practice. It's a skill that helps you finish woodworking with a smile. With good time guesses, you can make beautiful things, without the rush!
Read the full article
0 notes