#How to find path for mysql on mac
Text
How to find path for mysql on mac

How to find path for mysql on mac how to#
How to find path for mysql on mac install#
How to find path for mysql on mac android#
How to find path for mysql on mac password#
Step 2: There you will find the Download button.
How to find path for mysql on mac how to#
How to Delete a File or Folder using CMD?.
How to find path for mysql on mac install#
How to Install Oracle Database 11g on Windows?.How to Recover a Deleted File in Linux?.Authentication Bypass using SQL Injection on Login Page.How to check Active Network Connections in Windows?.
How to find path for mysql on mac password#
How to Remove the Password from a Zip File?.
How to find path for mysql on mac android#
How to Install and Set up Android Studio on Windows?.
How to Change the Theme of Netbeans 12.0 to Dark Mode?.
How to Install and Use Metamask on Google Chrome?.
How to Install and Run Apache Kafka on Windows?.
How to integrate Git Bash with Visual Studio Code?.
How to install requests in Python - For windows, linux, mac.
How to filter object array based on attributes?.
How to Connect Two Computers with an Ethernet Cable?.
How to setup Anaconda path to environment variable ?.
How to set up Command Prompt for Python in Windows10 ?.
How to set fixed width for in a table ?.
How to Install OpenCV for Python on Windows?.
How to Check Incognito History and Delete it in Google Chrome?.
Different Ways to Connect One Computer to Another Computer.
How to install Jupyter Notebook on Windows?.
How to Find the Wi-Fi Password Using CMD in Windows?.
ISRO CS Syllabus for Scientist/Engineer Exam.
ISRO CS Original Papers and Official Keys.
GATE CS Original Papers and Official Keys.
Add a line at the end of the file that specifies the location of your MySQL folder:Įxport PATH=$PATH:/home/location/of/mysql/bin/folder.
To add the path to the MySQL directory, open the.
The output provides a current list of all the folders it searches. To do so enter the following in your terminal window:
List the directories the system searches when executing a command.
You have received the 'Command Not Found' error. Start the MySQL shell by typing the following command in your terminal window: mysql -u root -p The commands are identical for both Linux distributions. This section of the tutorial shows what actions to take to fix the 'Command Not Found' error on CentOS 7 or Ubuntu 18.04. Fix MySQL 'Command Not Found' Error in Linux (Ubuntu 18.04, CentOS 7) You have successfully logged in to your MySQL bash shell and can start working on your databases. If the system is not able to execute the command, it presents the following error. Start the Windows cmd prompt and enter the command to launch MySQL: mysql -u root -p Fix MySQL 'Command Not Found' Error in Windows The following sections outline how to set the PATH environment variable in Windows, Linux, and macOS. If you run a command, and it’s not found in any of the folders in your defined PATH, then it displays the 'Command Not Found' error. The PATH variable lists all the directories that your system looks through and tries to find a command you have entered in the terminal. The PATH environment variable has not been set: If you have confirmed that MySQL is active and running, the next step is to determine the correct path. If you need assistance with installing MySQL, we have resources that can help you install MySQL on CentOS7, Ubuntu 18.04, or install MySQL on Windows with ease.Ģ. If that is the case, a fresh MySQL installation is necessary. Corrupt MySQL installation: In some instances, the MySQL installation process might be corrupted. Two of the most common reasons for this error are:ġ. The 'Command Not Found' error indicates that your system was not able to locate the program you want to run. Whenever you enter the command to start the MySQL interface, the system searches its directories and tries to execute it.
A functioning local installation of MySQL.
A Windows, Linux or macOS based system with an administrator account.
0 notes
Text
Leading Node.js frameworks for app development in 2023

The building of websites makes use of a wide variety of technologies, but there is no question that Node.js is indeed the sweetheart of the developer community.
Node.js developers for hire are a highly sought-after asset, but it’s also important to take note of the leading frameworks for app development.
But which are the best ones in 2023, and how to hire a Nodejs developer this year? We’ll find out!
First of all, what is Node JS?
Before you start looking for Node JS developers for hire, you need to know what Node.js is.
Node.js is an environment for running JavaScript code that gives developers the ability to build applications that run on servers.
Because it is cross-platform and open source, developers may use it to construct scalable apps that can run on any platform, including Windows, Mac, and Linux servers.
JavaScript is used in the development of Node.js apps, and the Node.js runtime, which is based on the V8 JavaScript engine that Google Chrome utilizes, is required for the applications to function correctly.
Node.js has a straightforward event-driven programming architecture, which makes it very easy to create programs that can run multiple tasks in parallel.
Real-time online applications, such as chatrooms or multiplayer games, find Node.js a perfect platform because its applications can manage tens of thousands of concurrent connections with very little overhead.
In addition, the non-blocking I/O mechanism of Node.js makes it simple to construct practical network applications like web crawlers and RESTful API servers.
Of course, you should be aware that Node js isn’t popular without a reason. There are a couple of different types of frameworks, all suited for different needs.
Different types of Node JS frameworks
In case you need to hire Node JS programmers, you should know the exact needs of your project, and the tasks you assign employees. Why? Because there are several types of Node.js frameworks.
There are a lot of capabilities included into Node.js that may be used to construct web applications. It is able to employ a variety of different frameworks, which is one of the most crucial aspects.
Three primary types of frameworks may be built with Node JS: an HTTP server, an MVC, and a REST API.
HTTP server frameworks offer an organizational method for your code and a path for HTTP requests to take. In addition, they come equipped with functions such as session management and error handling already pre-installed.
Web applications that process a significant amount of data can benefit from the structure that MVC frameworks provide. In most cases, they are equipped with in-built templating engines and support for popular databases like MySQL and MongoDB.
REST API frameworks are intended to develop application programming interfaces (APIs) that are usable by other devices or computer systems.
Authentication, rate limitation, and caching are just a few of the features that are included with them.
So if you hire a Node JS developer, they’ll most likely use one of the popular frameworks. Let’s see which they are.
Most popular Node.js frameworks
Most companies hire Node JS experts who are acquainted with these frameworks, so it’s worth noticing. But which are the most prominent names?
Express.js
Express.js is a popular minimalist web framework for Node.js. It provides a set of robust features for building web applications and APIs, making it easy to create routes, handle requests, and deliver responses.
One of the key benefits of using Express.js is its simplicity. It is lightweight and easy to use, making it a good choice for small projects.
It also has a large and active community, which means you can find a lot of support and resources online.
However, Express.js is a minimalistic framework and does not come with many features out of the box. This means you will have to use third-party libraries or build your own solutions for certain functionality.
Despite this, Express.js is still a very popular choice among Node.js developers and is used in many production applications.
Koa.js
Koa.js is a web framework designed by the team behind Express.js. It is built on top of Node.js and uses async functions as middleware, making it more lightweight and efficient than Express.js.
One of the key features of Koa.js is its use of async functions, which allows you to write middleware and routes that are easy to understand and maintain.
It also has a small footprint, making it a good choice for building microservices and serverless applications.
However, Koa.js is a relatively new framework with a different level of support and resources than some of the more established frameworks like Express.js.
It also requires a deeper understanding of async/await and Promises in JavaScript, which may be a challenge for developers unfamiliar with these concepts.
Despite these limitations, Koa.js is a powerful and popular choice for building web applications and APIs with Node.js.
Sails.js
A contemporary MVC framework for Node.js called Sails.js makes it simple to create unique, enterprise-level applications.
Because it is made to look like the well-known MVC style used by frameworks like Ruby on Rails, it is simple for developers to pick up.
Using Sails.js has many advantages, one of which is its emphasis on convention over configuration. This indicates that it includes a set of patterns that facilitate the speedy development of applications without requiring extensive design.
You may discover a lot of help and information online because of its sizable and vibrant community.
Sails.js can be a bit opinionated; thus, it might not be the ultimate solution for projects that require a lot of customization.
It also has a more extensive code base than more straightforward frameworks, like Express.js, which can make it less appropriate for little-funded or resource-constrained projects.
Despite these drawbacks, Sails.js is a well-liked option for creating robust and scalable Node.js applications.
#coding#development#developer#frameworks#nodejs#expressjs#programming#software developer#webdev#webdevelopment
0 notes
Text
Everybody Should Know Web Development and SEO Company in New York Trick
If you're looking to gain online visibility, the best place to start is with the experts in New York City. We've compiled a list of the best web development and new york seo company in the city and highlighted their specialties so that you can see exactly what they can do for your business.
Unveiling New York's Top Web Dev & SEO Firm
What is a Web Developer?
Web developers are the people who build the web pages, websites and applications. They design, develop and maintain these digital products for businesses or individuals. A good web developer should be able to work on multiple platforms like Windows, Mac OSX & Linux so that he can create codes that run on all these operating systems without any issue. A good web developer will also know how to use databases such as MySQL database or PostgreSQL database in order to manage data stored in them securely. He/she must have excellent skills in JAVA programming language because it's one of the most important languages used nowadays by developers who want their software programs running smoothly on smartphones devices like iPhone or Android smartphones etc.,
What is SEO (Search Engine Optimization)?
SEO stands for Search Engine Optimization which means improving your website's visibility among search engines like Google etcetera so that more visitors can find you through their search engine results pages (SERPs).
Mastering Web Development & SEO in NYC
If you're looking to master web development company in new york and SEO in NYC, then it's important that you know where to go. Here are some of the best places:
Web Designer on The Go is a great resource for learning about web design, development and even marketing. They have a lot of different resources available including videos and articles that can help you learn everything from HTML5 to responsive design. You can also find out more about how Google ranks your website on their top results page by using their online tools such as Moz Local Ranking or Keyword Planner Toolbar!
[Pigment Creative] Pigment Creative has been providing affordable web design & development services since 2003 so they know what they're doing when it comes down having quality services at reasonable prices!
Unleash Your Digital Potential with NYC Experts
If you're looking for a place to live, work and start your business, then New York City is the best choice. This city has been ranked number one in multiple categories by Forbes Magazine including "Best City For Business" and it's also known for being home to some of the most innovative companies in the world!
NYC's Best-Kept Secrets: Web Dev & SEO Mastery
The best way to power up your business is by developing a solid foundation of knowledge. The information below will help you get started on the right path and make sure you're better prepared for success.
Unlock Success with NY's Premier Web Dev & SEO Company: If there's one thing we know about New York City, it's that there are plenty of options when it comes to web development companies. But which ones should you go with? The answer may surprise you! We've got everything from expert developers and designers to marketing experts who can help grow your business into something big—and fast!
Revealing NY's Web Dev & SEO Wizardry: You might think that staying up-to-date with all things related to technology would require an army of consultants, but not if those people are working together at [our company]. Our team knows how important it is for businesses large or small alike (particularly those located near NYC) so they work hard every day toward creating amazing websites that will bring them more clients than ever before...and maybe even some awards along the way!
Elevate Your Online Presence with NYC Pros
If you are looking to elevate your online presence, then it is essential that you get the best out of your web developer, SEO expert and web designing company in new york. The following tips will help you achieve this:
Get a good web developer. A good web developer can help provide solutions for any issues that may arise when building or maintaining your website. They may also be able to develop new features or provide enhancements that enhance the user experience on their sites.
Find an SEO expert that specializes in helping businesses grow by improving rankings in search engine results pages (SERPs). An experienced professional will have extensive knowledge about how search engines work and how they affect businesses' ability to gain exposure through organic SERP rankings."
Insider Tips from NYC's Web Dev & SEO Gurus
Be friendly.
Be approachable.
Be helpful.
Know your stuff! It's not enough to be knowledgeable, you also have to be honest and reliable—and this is where the web development and SEO gurus come in handy because they can help you develop a strategy that will help you meet all of those goals at once! You want people who are honest with their clients, but also professional enough not to take advantage of them or waste their time (or yours). A lot of people are looking for someone they can trust so they don't feel like they're being taken advantage of when it comes time for payment; this is why we recommend hiring only reputable companies who have been around long enough so there isn't any question about whether or not what's being sold works as promised."
The Ultimate Guide to Web Development & SEO in NY
If you're looking for a place to live, work, learn and be, New York City is the place. It's one of the most vibrant cities in the world—and that's something you'll notice immediately when you step off your plane or train at JFK Airport. The skyscrapers of Midtown Manhattan rise up into a beautiful sky like giant mountains; there are so many parks that they feel like they were created just for us humans (and dogs).
New York City has been around since 1624 but has changed dramatically over its long history: buildings have been destroyed by wars or natural disasters; entire neighborhoods have disappeared under water during floods; entire streets have been renamed after famous people who lived here long ago (like Franklin Delano Roosevelt Avenue). But despite all these changes over time, NYC still feels like home today because it's still full of life!
Uncover the Hidden Gems of NY's Web Dev & SEO
When it comes to web development and SEO company in new york, New York is the place to be. There are so many top-notch firms and gurus out there that you can find them easily. But what makes some of these companies stand out from the rest?
The answer: their ability to uncover the hidden gems of NY's web dev & SEO industry. If you're looking for a new job or just want some advice on how best use your skill set in this industry, then read on!
Unlock Success with NY's Premier Web Dev & SEO Company
If you're looking to build your business, or if you simply need a web development and SEO company in New York City that will help you unlock success with its premier web dev & SEO company. You've come to the right place!
We have been helping clients like yours since 2007. Our reputation as one of NY's premier web dev & SEO companies is well-deserved; we pride ourselves on our ability to deliver results that will bring value to your business goals.
Revealing NY's Web Dev & SEO Wizardry
Revealing NY's Web Dev & SEO Wizardry
NY is a city that has a rich history and culture, but it's also a place where you can find some of the best developers in the country. This makes sense, considering that most of our residents are from New York or have been here for years. You might think about moving here if you're a web developer yourself—or even just someone who wants to learn more about their profession!
If you're looking for an agency with talented employees who offer quality services at reasonable prices, look no further than our team at NY Web Dev & SEO Titans. We pride ourselves on being one of the top agencies in New York City because we understand how important it is for our clients' businesses to succeed online today - which means creating websites that convert traffic into leads and sales opportunities will help them achieve success faster than ever before!
Empower Your Business with NY's Web Dev & SEO Titans
The best web developers and new york seo agency are the ones you can trust with your business. They know how to build websites that will help you grow, not just make a quick buck. If you're looking for a company that has years of experience, then this is the place for you!
If you want to learn how to get the best web development and SEO service providers in New York City, then look no further than these tips:
If you're looking for a web developer and SEO company in New York, then look no further than Web Dev & SEO Help. We have helped businesses of all sizes from small to large scale achieve their digital goals and give them the tools they need to succeed online. Our team of experts has been working together since 2008, so you can trust that when we say something is possible we will make it happen!
Get in Touch!
Address - 99 Wall Street STE#1597 New York NY 10005
Phone - +1(929)-474-6244
Email - [email protected]
Website - https://www.perfectmarketingsolution.com/
#seo services in new york#seo company in new york#new york digital marketing agency#new york web designing agency
0 notes
Text
Mac terminal edit file in python

#Mac terminal edit file in python how to#
#Mac terminal edit file in python install#
#Mac terminal edit file in python update#
#Mac terminal edit file in python download#
#Mac terminal edit file in python update#
How do I update python in Kali Linux 2020? You need to update your update-alternatives, then you will be able to set your default python version. But we should check what versions of Python are installed in your Linux. Does Kali use Python?Įxecuting Python scripts in Kali linux is easier as Python is installed by default. You are done! Now check your default interpreter version by simply run “python -V” command in the terminal. Open terminal and write “alias python=python3” and hit enter. 2019 How do I make Python 3 default in Kali Linux? Step 6: Add Python Path to Environment Variables (Optional)Meer items. Step 4: Verify Python Was Installed On Windows.
#Mac terminal edit file in python download#
Step 2: Download Python Executable Installer. Python 3 Installation on WindowsStep 1: Select Version of Python to Install. Once the installation is complete, verify the installation by checking the pip version: pip3 -version.
#Mac terminal edit file in python install#
Installing pip for Python 3Start by updating the package list using the following command: sudo apt update.Use the following command to install pip for Python 3: sudo apt install python3-pip. On terminal type - sudo su.Write down the root user password.Execute this command to switch to python 3. Steps to Set Python3 as Default On ubuntu?Check python version on terminal - python -version.Get root user privileges. It does not come bundled with Python and must be installed separately. This is not to be confused with the previously mentioned depreciated pyvenv script. If you wish to use multiple versions of Python on a single machine, then pyenv is a commonly used tool to install and switch between versions. Can I have 2 versions of Python installed? You'll see path to one of the python installations, change that to path of your desired version. On bottom you'll find 'Environment Variables'Double-click on the Path. How do I change Python version?įor Windows:Advanced System Settings > Advance (tab). Whenever your programs need to work with files, folders, or file paths, you can refer to the short examples in this section. Path is a module inside the os module, you can import it by simply running import os. How do I change directory in Jupyter notebook? How do I install a specific version of PIP?.How do I install the latest version of Python in Kali Linux?.How do I update python in Kali Linux 2020?.How do I make Python 3 default in Kali Linux?.Can I have 2 versions of Python installed?.How do I get the current path in Python?.How do I know where Python is installed?.Where is the working directory in Jupyter notebook?.How do I navigate to a different drive in Jupyter notebook?.How do I change directory in Jupyter notebook?.
#Mac terminal edit file in python how to#
So how to install python 3.7 as the standard-python-installation on a mac? (Could be also python3.8 by all means). I also ran the following command with an error: $ brew switch python 3.7Įrror: python does not have a version "3.7" in the Cellar.Īnd restarted the computer, but without success. bash_profile, but still python is only 3.6: $ python -V I also executed the suggested line to have python 3.7 symlinked: echo 'export > /Users/me/.bash_profile So I tried to install python 3.7 as follows brew install a lot of output. It was migrated from homebrew/cask to homebrew/core. There seems to be python 3.7 available: $ brew search pythonĪpp-engine-python boost-python3 ipython python-markdown reorder-python-importsīoost-python gst-python micropython python-yq ✔ wxpythonĪwips-python kk7ds-python-runtime mysql-connector-python I am running MacOS Mojave (10.14.6) and want to install python 3.7.Ĭurrently I have python 3.6 installed: $ python -V
0 notes
Text
Html5 Editor For Mac

Javascript Editor For Mac
Css Editor Mac
In the TextEdit app on your Mac, choose File New, then choose Format Make Plain Text. Enter the HTML code. Choose File Save, type a name followed by the extension.html (for example, enter index.html), then click Save. When prompted about the extension to use, click “Use.html.”. The web editor for Mac is back.For people who make delightful, innovative and fast websites — in an app to match. Espresso helps you write, code, design, build and publish with flair and efficiency. Sophisticated text features, amazing Live Preview with Browser Xray, CSSEdit tools, the Navigator, Dynamo auto-building, and Server Sync.
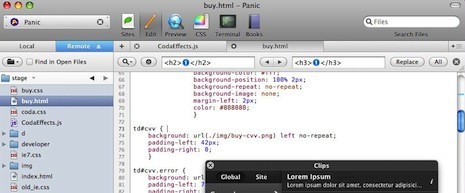
Good question. Coda is everything you need to hand-code a website, in one beautiful app.
While the pitch is simple, building Coda was anything but. How do you elegantly wrap everything together? Well, we did it. And today, Coda has grown to be a critical tool for legions of web developers around the world.
More than anything else, Coda is a text editor. It’s got everything you expect: syntax highlighting for tons of languages. Code folding. Project-wide autocomplete. Fast find and replace. Indentation guides. Automatic tag closing. Fast commenting and shifting of code. The works. But Coda’s editor has features you won’t find anywhere else. For example, the Find and Replace has this revolutionary 'Wildcard' token that makes RegEx one-button simple. And as you type, Coda Pops let you quickly create colors, gradients, and more, using easy controls. There are nice touches everywhere.

But an incredible text editor is just a nice typewriter if you can’t easily handle all of your files — from anywhere. Coda has battle-tested, deeply integrated file management. Open local files or edit remotely on FTP, SFTP, WebDAV, or Amazon S3 servers. Use the Files tab and move, rename, copy, transfer from server-to-server... anything. Track local changes for remote publishing. There’s even support for Git and Subversion.
Then you’ll want to see what your code looks like. Use our WebKit Preview, which includes a web inspector, debugger, and profiler. Then, on top of that, we added AirPreview, a revolutionary feature that lets you use your iPad and iPhone with Code Editor to Preview pages as you code on your desktop.
Believe it or not, we’ve just scratched the surface. Open Coda’s Sidebar to discover a rich set of utilities that make you work better. Like Clips, which let you create frequently used bits of text that you can insert into your document with special triggers. And project-wide Find and Replace that’ll work across multiple files. There’s also an HTML Validator, a Code Navigator, and more.
Javascript Editor For Mac
Finally, hiding behind the Plus button in the tab bar is a built-in Terminal and MySQL editor, two amazingly powerful Tab Tools. The Terminal can open a local shell or SSH. MySQL lets you define structure, edit data, and more.
Css Editor Mac
And it’s all wrapped up in our Sites, which get you started quickly. Opening a Site sets your file paths, your root URLs, where your files Publish to, source control settings, and more. And with Panic Sync, our free and secure sync service, your sites follow you on any computer.
Coda is a very good app.
Html5 Editor For Mac
1 note
·
View note
Text
Mariadb Client For Mac

Powerful database management & design tool for Win, macOS & Linux. With intuitive GUI, user manages MySQL, PostgreSQL, MongoDB, MariaDB, SQL Server, Oracle & SQLite DB easily.
Mariadb Client For Mac Os
Mariadb Client For Mac Installer
Introduction
PhpMyAdmin is a free and open source tool for the administration of MySQL and MariaDB. As a portable web application written in PHP, it has become one of the most popular administration tool for MySQL.
In this tutorial, we will learn the steps involved in the installation of phpMyAdmin on MacOS.
Just installed MariaDB (with homebrew). Everything looks like it’s working, but I can’t figure out how to have it automatically startup on boot on my Mac. I can’t find any Mac-specific docs for this. I have an issue with processing for the pip install mysqlclient for Python3 on MAC OS Sierra. Running buildext building 'mysql' extension creating build/temp.macosx-10.12-x8664-3.6 clang -DNDEB. MariaDB Connector/J is used to connect applications developed in Java to MariaDB and MySQL databases. The client library is LGPL licensed. See this article for. DbForge Studio for MySQL is a universal GUI tool for MySQL and MariaDB database administration, development, and management. The IDE allows to create and execute queries, develop and debug stored routines, automate database object management, analyze table data via an intuitive interface. DbForge Studio for MySQL – Click image to enlarge.
Prerequisites
MacOS
Login as an administrator on terminal.
Homebrew must be installed on the system.
PHP 5.x or greater
Installation
Installation of phpMyAdmin includes following steps
1) Download the file Sign in to google drive file stream.
To install the file on MacOS, we need to download a compressed file from the official website of phpMyAdmin https://files.phpmyadmin.net/phpMyAdmin/4.7.6/phpMyAdmin-4.7.6-all-languages.tar.gz
2) Extract the file
$ tar xvfz Downloads/phpMyAdmin-4.7.6-all-languages.tar.gz
3) Start the development server
To access phpMyAdmin from localhost, we need to start the development server. First, we need to change our working directory by typing the following command:
Development server will be started having the root server in the phpmyadmin directory. Now, type localhost:8080 to access phpmyadmin on localhost. It will appear like this.
Window will prompt us to fill our MySQL username and password. Fill the required details and press GO.
Now we have successfully installed phpMyAdmin on MacOS.
Next TopicHow to Install Eclipse on Mac
Introduction
MariaDB is an open source database management system. MariaDB intends to maintain high compatibility with MySQL. It is one of the most popular databases in the world. MariaDB is named after the name of younger daughter Maria of its founder Michael 'Monty' Widenius. In this tutorial, we will learn the steps involved in the installation process of MariaDB on MacOS.
Prerequisites
MacOS
Login as an administrator on terminal
Installation
Installation includes following steps.
1) Update the local repository index of homebrew package installer
Following command can be executed to update the local repository index of homebrew.
$ brew update
2) Install with homebrew
MariaDB can be installed by using homebrew package installer. Following command is executed to install MariaDB.
Mariadb Client For Mac Os
3) Start MariaDB
To start MariaDB, MySQL.server needs to be started which is located inside /usr/local/Cellar/mariadb/10.2.12/support-files. We can start the server by using following command.
$ ./mysql.server start
To execute the command, we need to either change our working directory to usr/local/Cellar/mariadb/10.2.12/support-files or change the PATH variable by editing .bash_profile.
4) Working on command line
To get started with the MariaDB shell, following command can be executed.
For this, change the working directory to /usr/local/cellar/mariadb/10.2.12/bin or edit .bash_profile.
Create database command is responsible for creating the database named as javatpoint in the records.
5) Stop MariaDB
To stop MariaDB server, we run the following command.
$ ./mysql.server stop
Hence, we have installed and get started with MariaDB.
Mariadb Client For Mac Installer
0 notes
Text
Javascript Editor For Mac

Good question. Coda is everything you need to hand-code a website, in one beautiful app.
JavaScript editor and IDE for macOS / Mac OS X, Windows, and Linux features such as syntax highlighting, the JavaScript code builder, the JavaScript code assistant, and the JavaScript. Download star wars old republic for mac.
While the pitch is simple, building Coda was anything but. How do you elegantly wrap everything together? Well, we did it. And today, Coda has grown to be a critical tool for legions of web developers around the world.
Visual Studio Code - A Faster JavaScript Editor Fast and free JavaScript editor and debugger that runs on macOS, Linux, and Windows. Download for Mac Stable Build Download for Windows Stable Build. Textmate is state of the Art editor, but if someone is thinking about developing on several platforms without awkward memory eaters monsters like jedit, eclipse, netbeans etc take a look at geany (geany.org). The only problem the editor has not esthetic look and feel on Mac OS X:). I'm a classic example of early adopter: I have tried Sublime, Atom, Brackets and others all in their early versions (and later versions too). After going through all of them, only one is still installed in my Mac: Sublime Text 3, and this is why.
With these, you’ll never forget a task that you need to complete. Day one for mac cost. You’ll eventually form a habit that doesn’t require a reminder.After a while, you’ll notice the beneficial tools it advertises. These include the in-app flashbacks and entries, memory enhancement section, and a way to print your journal entries into book format.You can preserve moments with premium by making use of the unlimited journal entry and photo storage options.
Hackintosh for mac os. More than anything else, Coda is a text editor. It’s got everything you expect: syntax highlighting for tons of languages. Code folding. Project-wide autocomplete. Fast find and replace. Indentation guides. Automatic tag closing. Fast commenting and shifting of code. The works. But Coda’s editor has features you won’t find anywhere else. For example, the Find and Replace has this revolutionary 'Wildcard' token that makes RegEx one-button simple. And as you type, Coda Pops let you quickly create colors, gradients, and more, using easy controls. There are nice touches everywhere.
But an incredible text editor is just a nice typewriter if you can’t easily handle all of your files — from anywhere. Coda has battle-tested, deeply integrated file management. Open local files or edit remotely on FTP, SFTP, WebDAV, or Amazon S3 servers. Use the Files tab and move, rename, copy, transfer from server-to-server.. anything. Track local changes for remote publishing. There’s even support for Git and Subversion.
Then you’ll want to see what your code looks like. Use our WebKit Preview, which includes a web inspector, debugger, and profiler. Then, on top of that, we added AirPreview, a revolutionary feature that lets you use your iPad and iPhone with Code Editor to Preview pages as you code on your desktop.
Believe it or not, we’ve just scratched the surface. Open Coda’s Sidebar to discover a rich set of utilities that make you work better. Like Clips, which let you create frequently used bits of text that you can insert into your document with special triggers. And project-wide Find and Replace that’ll work across multiple files. There’s also an HTML Validator, a Code Navigator, and more.
Finally, hiding behind the Plus button in the tab bar is a built-in Terminal and MySQL editor, two amazingly powerful Tab Tools. The Terminal can open a local shell or SSH. MySQL lets you define structure, edit data, and more.
And it’s all wrapped up in our Sites, which get you started quickly. Opening a Site sets your file paths, your root URLs, where your files Publish to, source control settings, and more. And with Panic Sync, our free and secure sync service, your sites follow you on any computer.
Install Android File Transfer The software - can we just call it AFT from now on? - is made by Google itself and is available from Android.com. It requires Mac OS X 10.7 or later. Android File Transfer. Browse and transfer files between your Mac computer and your Android device. For Mac OS X only. No extra software is needed for. Samsung file transfer for mac.
Best Javascript Editor
Coda is a very good app.
0 notes
Text
Install Mods For Mac

Install Mods Minecraft Mac Forge
Install Mods Mac Steam
How to install Stardew Valley Mods
Php mysql apache for mac os x. Install MySql on Mac OS X Download the MySql DMG file from MySql Download Website. Open the DMG file and install MySql server and Preference Pane for starting and stopping MySql server easily. Start the MySql server if its not running and optionally you can select the checkbox to automatically start MySql server on startup. OSX 10.8 Mountain Lion Version OSX 10.9 Mavericks Version Apache and PHP already come preloaded in OS X 10.7 Lion and 10.6 Snow Leopard, the versions on 10.7 Lion are PHP 5.3.6 and Apache 2.2.20, these 2 pieces of Open Source software are part of the “AMP” stack with MySQL the missing third component. A – Apache M – MySQL P – PHP. I found the default version already on the system a pain to manage due to some osx specific config in apache's httpd.conf. But you can use mac ports or homebrew (my preferred) for a custom php/apache install. My preferred and in my opinion the cleanest way is to install virtualbox and run a full LAMP stack.
First, open your game folder (the folder that contains Stardew Valley’s .exe file). This is where you normally find it:
PlatformPathWindowsGOG: C:Program Files (x86)GOG GalaxyGamesStardew Valley
or C:GOG GamesStardew Valley
Steam: C:Program Files (x86)SteamsteamappscommonStardew ValleyLinuxGOG: ~/GOGGames/StardewValley/game
Steam: ~/.local/share/Steam/steamapps/common/Stardew ValleyMacGOG: /Applications/Stardew Valley.app/Contents/MacOS
Steam: ~/Library/Application Support/Steam/SteamApps/common/Stardew Valley/Contents/MacOS
How To Install Mods On Mac: 1. Click on Home, Library, Application Support, minecraft 3. Go to minecraft.jar, and right click it 5. Click on open with. Archive Utility, then delete the original minecraft.jar and then rename the minecraft file to minecraft.jar. If you want to install a mod, simply unzip it into the Mods folder. It’s good if every mod has its subfolder, and no trailing numbers. For instance, if your mod is PineapplesEverywhere, your file structure should be as follows: Stardew Valley/-Mods/ –PineapplesEverywhere/ —PineapplesEverywhere.dll —manifest.json. Become an Official Catto! This is an updated tutorial of my previous how to install mods video. Become an Official Catto! This is an updated tutorial of my previous how to install mods video.
NOTE: DTS Plug-in for DivX Converter only works with Windows, however DTS Plug-in for DivX Player works with both Windows and Mac. DivX Software includes a free 15-day trial of DTS-HD plug-in. We get it, ads can ruin a good experience. It’s a great way to help keep our software free, but that doesn’t mean you want to see ads in. Divx video converter.
If it is not there, try the following:
Option 2: SMAPI
Start SMAPI.
Enter the following command in the SMAPI console (it will be the second window that opens together with the game):
show_game_files
Option 3: Steam
You have to open the Steam client.
Click on Stardew Valley (it has to be right-click).
Next – click on Properties.
The click on the tab Local Files.
Finally, go to Browse Local Files… and open the game folder.
Install Mods Minecraft Mac Forge
Option 4: GOG Galaxy
Go to the GOG Galaxy client.
Click on Stardew Valley (it has to be right-click).
Go to Manage Installation > Show Folder and then open the game folder.
Install mods
If you want to install a mod, simply unzip it into the Mods folder. It’s good if every mod has its subfolder, and no trailing numbers. For instance, if your mod is PineapplesEverywhere, your file structure should be as follows:
Stardew Valley/
-Mods/
–PineapplesEverywhere/
—PineapplesEverywhere.dll
—manifest.json
If you have a lot of mods, you can optionally organise them into subfolders. SMAPI will automatically search inside each folder until it finds one with files.
Stardew Valley/
-Mods/
–Fruit mods/
—PineapplesEverywhere/
—-PineapplesEverywhere.dll
—-manifest.json
—ApplesNowhere/
—-ApplesNowhere.dll
—-manifest.json
If a folder of yours looks like PineapplesEverywhere-1234567890, see inside it, whether the actual mod folder is there. Folders with this kind of names frequently have other folders inside them and sometimes readme files as well.
In case you decide to disable a folder, all you have to do is put a dot in front of the folder name (e.g. .disabled mods). Windows does not allow you do that by default, however, you can place a dot at the end and you’ll be sorted (e.g. .disabled mods.).
Installing SMAPI on Windows
We hope you found our concise guide on how to install Stardew Valley mod helpful and you afre feeling more at ease when supplementing your game with great new mods. We guarantee that it is definitely worth having all these new and exciting Stardew Valley mods.
Install Mods Mac Steam
Now that you know how to install Stardew Valley mods, you are free to begins browsing. New mods are added daily, which means you can find all sorts of different exciting Stardew Valley mods all the time and add new features to your game to make it even more thrilling. Maps, Crops, Buildings, Items and even more mods are made available to all the dedicated fans by the creative and passionate members of the Stardew Valley team. And since now you have become expert on adding new mods and you can install Stardew Valley mods easily, you can add as many mods as you feel like. This will make the game more suited to your individual needs and preferences and you will enjoy it even more than before.
Stardew Valley community is getting better all the time, and you can grow with us as well. Just remember to update your game regularly with new mods and you will always be on track with all the lat4est development in the game`s world. Feel the latest trends that take the community by storm and be the part of the global development. Now it is easier than ever to build a game exactly the way you like it. You can easily customize it thanks to the wide diversity of Stardew Valley mods. Go ahead – have fun!
(5 votes, average: 4.40 out of 5)
Loading..
0 notes
Text
Mysql Mac Start

Table of Contents
MySQL Cluster is a real-time open source transactional database designed for fast, always-on access to data under high throughput conditions. MySQL Cluster Plus, everything in MySQL Enterprise Edition.
MySQLTutorial.org is a website dedicated to MySQL database. We regularly publish useful MySQL tutorials to help web developers and database administrators learn MySQL faster and more effectively. All MySQL tutorials are practical and easy-to-follow, with SQL script and screenshots available.
MySQLTutorial.org is a website dedicated to MySQL database. We regularly publish useful MySQL tutorials to help web developers and database administrators learn MySQL faster and more effectively. All MySQL tutorials are practical and easy-to-follow, with SQL script and screenshots available.
2.1 General Installation Guidance
2.1.1 Supported Platforms
2.1.2 Which MySQL Version and Distribution to Install
2.1.3 How to Get MySQL
2.1.4 Verifying Package Integrity Using MD5 Checksums or GnuPG
2.1.5 Installation Layouts
2.1.6 Compiler-Specific Build Characteristics
2.2 Installing MySQL on Unix/Linux Using Generic Binaries
2.3 Installing MySQL on Microsoft Windows
2.3.1 MySQL Installation Layout on Microsoft Windows
2.3.2 Choosing an Installation Package
2.3.3 MySQL Installer for Windows
2.3.4 Installing MySQL on Microsoft Windows Using a noinstall ZIP Archive
2.3.5 Troubleshooting a Microsoft Windows MySQL Server Installation
2.3.6 Windows Postinstallation Procedures
2.3.7 Windows Platform Restrictions
2.4 Installing MySQL on macOS
2.4.1 General Notes on Installing MySQL on macOS
2.4.2 Installing MySQL on macOS Using Native Packages
2.4.3 Installing a MySQL Launch Daemon
2.4.4 Installing and Using the MySQL Preference Pane
2.5 Installing MySQL on Linux
2.5.1 Installing MySQL on Linux Using the MySQL Yum Repository
2.5.2 Replacing a Third-Party Distribution of MySQL Using the MySQL YumRepository
2.5.3 Installing MySQL on Linux Using the MySQL APT Repository
2.5.4 Installing MySQL on Linux Using the MySQL SLES Repository
2.5.5 Installing MySQL on Linux Using RPM Packages from Oracle
2.5.6 Installing MySQL on Linux Using Debian Packages from Oracle
2.5.7 Deploying MySQL on Linux with Docker
2.5.8 Installing MySQL on Linux from the Native Software Repositories
2.5.9 Installing MySQL on Linux with Juju
2.5.10 Managing MySQL Server with systemd
2.6 Installing MySQL Using Unbreakable Linux Network (ULN)
2.7 Installing MySQL on Solaris
2.7.1 Installing MySQL on Solaris Using a Solaris PKG
2.8 Installing MySQL on FreeBSD
2.9 Installing MySQL from Source
2.9.1 Source Installation Methods
2.9.2 Source Installation Prerequisites
2.9.3 MySQL Layout for Source Installation
2.9.4 Installing MySQL Using a Standard Source Distribution
2.9.5 Installing MySQL Using a Development Source Tree
2.9.6 Configuring SSL Library Support
2.9.7 MySQL Source-Configuration Options
2.9.8 Dealing with Problems Compiling MySQL
2.9.9 MySQL Configuration and Third-Party Tools
2.10 Postinstallation Setup and Testing
2.10.1 Initializing the Data Directory
2.10.2 Starting the Server
2.10.3 Testing the Server
2.10.4 Securing the Initial MySQL Account
2.10.5 Starting and Stopping MySQL Automatically
2.11 Upgrading MySQL
2.11.1 Before You Begin
2.11.2 Upgrade Paths
2.11.3 Changes in MySQL 5.7
2.11.4 Upgrading MySQL Binary or Package-based Installations on Unix/Linux
2.11.5 Upgrading MySQL with the MySQL Yum Repository
2.11.6 Upgrading MySQL with the MySQL APT Repository
2.11.7 Upgrading MySQL with the MySQL SLES Repository
2.11.8 Upgrading MySQL on Windows
2.11.9 Upgrading a Docker Installation of MySQL
2.11.10 Upgrading MySQL with Directly-Downloaded RPM Packages
2.11.11 Upgrade Troubleshooting
2.11.12 Rebuilding or Repairing Tables or Indexes
2.11.13 Copying MySQL Databases to Another Machine
2.12 Downgrading MySQL
2.12.1 Before You Begin
2.12.2 Downgrade Paths
2.12.3 Downgrade Notes
2.12.4 Downgrading Binary and Package-based Installations on Unix/Linux
2.12.5 Downgrade Troubleshooting
2.13 Perl Installation Notes
2.13.1 Installing Perl on Unix
2.13.2 Installing ActiveState Perl on Windows
2.13.3 Problems Using the Perl DBI/DBD Interface
This chapter describes how to obtain and install MySQL. A summary of the procedure follows and later sections provide the details. If you plan to upgrade an existing version of MySQL to a newer version rather than install MySQL for the first time, see Section 2.11, “Upgrading MySQL”, for information about upgrade procedures and about issues that you should consider before upgrading.
Mysql Mac Start Stop

If you are interested in migrating to MySQL from another database system, see Section A.8, “MySQL 5.7 FAQ: Migration”, which contains answers to some common questions concerning migration issues.
MySQL Community Edition is a freely downloadable version of the world's most popular open source database that is supported by an active community of open source developers and enthusiasts. MySQL Cluster Community Edition is available as a separate download.

Installation of MySQL generally follows the steps outlined here:
Install or update the Netflix app. If you're using an Android device, you can download and install Netflix from the Google Play Store. On iPhone and iPad, you can download Netflix from the App Store. To update Netflix on Android, open the Google Play Store and search 'Netflix' in the search bar at the top. Select the free Netflix app from Netflix, Inc. To install the app, tap the cloud icon. If you can't download the Netflix app from the App Store, visit Can't find the Netflix app in app stores. Once installed, try Netflix again. Download netflix on computer mac. Since Netflix is available for Windows, you can download Windows on your Mac, run it and install the Netflix app there to watch the downloaded content. It may be a bit tedious, but if you really want to download Content from Netflix, it works.
Determine whether MySQL runs and is supported on your platform.
Please note that not all platforms are equally suitable for running MySQL, and that not all platforms on which MySQL is known to run are officially supported by Oracle Corporation. For information about those platforms that are officially supported, see https://www.mysql.com/support/supportedplatforms/database.html on the MySQL website.
Choose which distribution to install.
Several versions of MySQL are available, and most are available in several distribution formats. You can choose from pre-packaged distributions containing binary (precompiled) programs or source code. When in doubt, use a binary distribution. Oracle also provides access to the MySQL source code for those who want to see recent developments and test new code. To determine which version and type of distribution you should use, see Section 2.1.2, “Which MySQL Version and Distribution to Install”.
Download the distribution that you want to install.
For instructions, see Section 2.1.3, “How to Get MySQL”. To verify the integrity of the distribution, use the instructions in Section 2.1.4, “Verifying Package Integrity Using MD5 Checksums or GnuPG”.
Install the distribution.
To install MySQL from a binary distribution, use the instructions in Section 2.2, “Installing MySQL on Unix/Linux Using Generic Binaries”. Alternatively, use the Secure Deployment Guide, which provides procedures for deploying a generic binary distribution of MySQL Enterprise Edition Server with features for managing the security of your MySQL installation.
To install MySQL from a source distribution or from the current development source tree, use the instructions in Section 2.9, “Installing MySQL from Source”.
Perform any necessary postinstallation setup.
After installing MySQL, see Section 2.10, “Postinstallation Setup and Testing” for information about making sure the MySQL server is working properly. Also refer to the information provided in Section 2.10.4, “Securing the Initial MySQL Account”. This section describes how to secure the initial MySQL root user account, which has no password until you assign one. The section applies whether you install MySQL using a binary or source distribution.
If you want to run the MySQL benchmark scripts, Perl support for MySQL must be available. See Section 2.13, “Perl Installation Notes”.
Instructions for installing MySQL on different platforms and environments is available on a platform by platform basis:
Unix, Linux, FreeBSD
For instructions on installing MySQL on most Linux and Unix platforms using a generic binary (for example, a .tar.gz package), see Section 2.2, “Installing MySQL on Unix/Linux Using Generic Binaries”.
For information on building MySQL entirely from the source code distributions or the source code repositories, see Section 2.9, “Installing MySQL from Source”
For specific platform help on installation, configuration, and building from source see the corresponding platform section: Soundflower mac download 2020.
Linux, including notes on distribution specific methods, see Section 2.5, “Installing MySQL on Linux”.
Solaris, including PKG and IPS formats, see Section 2.7, “Installing MySQL on Solaris”.
IBM AIX, see Section 2.7, “Installing MySQL on Solaris”.
FreeBSD, see Section 2.8, “Installing MySQL on FreeBSD”.
Microsoft Windows
For instructions on installing MySQL on Microsoft Windows, using either the MySQL Installer or Zipped binary, see Section 2.3, “Installing MySQL on Microsoft Windows”.
For details and instructions on building MySQL from source code using Microsoft Visual Studio, see Section 2.9, “Installing MySQL from Source”.
macOS
For installation on macOS, including using both the binary package and native PKG formats, see Section 2.4, “Installing MySQL on macOS”.
For information on making use of an macOS Launch Daemon to automatically start and stop MySQL, see Section 2.4.3, “Installing a MySQL Launch Daemon”. Descargar os x el capitan iso.
For information on the MySQL Preference Pane, see Section 2.4.4, “Installing and Using the MySQL Preference Pane”.
MySQL Community Edition is a freely downloadable version of the world's most popular open source database that is supported by an active community of open source developers and enthusiasts.
MySQL Cluster Community Edition is available as a separate download. The reason for this change is so that MySQL Cluster can provide more frequent updates and support using the latest sources of MySQL Cluster Carrier Grade Edition.
Mysql Mac Startup
MySQL 8.0 is the most current GA release. Download MySQL 8.0 »
Learn What's New in MySQL 8.0 and view the Performance Benchmarks.
Start Mysql Mac Brew
Online Documentation:
Installation Instructions, Documentation and Change History
for the MySQL 8.0 Generally Available (GA) Release
Installation Instructions, Documentation and Change History
for the MySQL 5.7 Generally Available (GA) Release
Installation Instructions, Documentation and Change History
for the MySQL 5.6 Generally Available (GA) Release
Looking for previous GA versions?
Please report any bugs or inconsistencies you observe to our Bugs Database.
Thank you for your support!
0 notes
Text
Denon Heos App For Mac

Denon Heos App For Mac Desktop
Denon Heos App For Mac
Denon Heos App For Macbook Pro
Shop Denon AVR-S960H 8K Ultra HD 7.2 Channel (90 Watt X 7) AV Receiver 2020 Model Built for Gaming, Music Streaming Black at Best Buy. Find low everyday prices and buy online for delivery or in-store pick-up. Price Match Guarantee. HEOS Link HEOS wireless pre-amplifier: turn any stereo system into a wireless zone. The HEOS Link is part of the HEOS wireless multi-room sound system that enables you to enjoy your favorite music anywhere and everywhere around your home. By utilizing your existing wireless home network and the HEOS app on your iOS or Android device, you can explore, browse, and play music from your own music.
Setting up the HEOS App for playing music from a home network.
Search
With HEOS wireless technology built-in, you can listen to Spotify, TIDAL, Internet radio and more in renowned Denon sound quality. Thanks to the award-winning Denon Setup Wizard and the comfortable HEOS App, the AVR-S650H is just as easy to set up as to enjoy. HEOS is the controller app for the world’s biggest and best range of connected audio gear. It is a smart music streaming technology found in all models with HEOS Built-in from Denon, Marantz and HEOS. HEOS is for music lovers who want a beautiful & intuitive way to enjoy the latest advances in con. Please find below the changelogs for the HEOS app and firmware: Firmware from (U25.2) for Denon Home products (150, 250, 350) HEOS iOS App (1.583.161). HEOS Remote lets you control your local HEOS devices. 30 days free trial so you can be sure it everything works on your network. This is not an official 'HEOS by denon' app and is not associated with Denon. It CANNOT be used to setup your HEOS devices. Better control in your back pocket. The free Denon AVR Remote app for iOS and Android makes using the AVR-X2600H even easier — adjust volume, turn it on or off, mute the music, select a source or switch to the HEOS app for wireless music streaming. Download the Denon AVR Remote app and the HEOS app to your smartphone today.
With the release of the latest HEOS App, you will now see a new option in the HEOS App called “Network Shares”.
Network Shares will allow the user to access music files (including iTunes music) from a PC or Apple Mac making the music files accessible from the HEOS App.
To make this feature work, you will need to setup your HEOS device using the HEOS App and also setup your computer to allow access to the music on your PC. (Windows or Mac).
Computer Setup
You will need to change the folder sharing settings to allow the users access to the music files on your computer from the HEOS App.
HEOS Device setup
Windows 7 Home Premium This edition contains features aimed at the home market segment, such as Windows Media Center, Windows Aero and multi-touch support. It was available in both 32-bit and 64-bit versions. Windows 7 Professional This edition is targeted towards enthusiasts, small-business users, and schools. Windows xp home edition activator. Activate Windows 7/ 8/ 10/ Vista by KMSpico Activator. Microsoft Office & Windows Operating Systems both are most popular and useful application for all the users. Millions of Computers in today’s digital world are running on Windows Operating System. Microsoft already stopped Windows XP, and they will shut down Windows 7 very soon. They are focusing only Windows 10 system. So, most of the people are using Windows 10 on their CPU. To activate your Windows 10 operating system, Windows 10 activator is the best solution for you. It is not easy to activate Windows 10, but there are many ways to.
Fix me stick free download. Therefore, if the files in the flash drive matter to you, before applying a USB repair utility to the drive, you may want to recover all your data from the broken drive.Since you can't access what's inside the pen drive right now, you need to use, a software utility that can recover files from a corrupted flash drive and save them on a computer. Therefore, this post will start with USB drive data recovery tool to extract files from the problematic flash drive, then cover 3 flash drive repair tools to fix your drive back to normal. Here we go.You May Also Like:.Before USB Repair: Recover Data from USB DriveSome USB flash drive repair tools will format your USB drive(which will erase everything) to fix its software problem. Pictures, videos, documents(.doc,.pdf,.xls, etc.), audio files can all be extracted from the USB drive with FonePaw Data Recovery.It takes 4 steps to get back files from a USB drive with the FonePaw utility.Step 1 Run Broken USB Data Recovery ToolDownload FonePaw Data Recovery to your Windows or Mac computer.After installation, run the utility.Step 2 Recognize the USB Flash DrivePlug the corrupted flash drive to your computer.
You need to add the share to one of the HEOS devices on your network, where it (The share) will be configured.
To configure the share, you will need to know the name of the folder you want to share, the path to the folder’s location, your PC user name and password. With the exception of your PC’s password, all this information could be easily retrieved from your computer.
After configuration, the folder in your PC and its content become available on the HEOS App.
Click below for instructions on how to configure or setup your Windows 7 or Windows 10 PC to share a folder or music folder.
English
Le Français
Deutsch
Nederlands
Click below for instructions on how to configure or setup your Mac PC to share a folder or music folder.
They Let Me Drive a Cruise Ship And This Happened - Floating Sandbox - Duration: 13:47. Ship simulator download full game. Unsubscribe from Quan KAGA? Ship Simulator Download Full Game 3,8/5 4486 votes.Ship simulator 2008 free download Quan KAGA.
English
Le Français
Deutsch
Nederlands

Click below to configure or setup you HEOS App to play music shared on a home network.
English
Le Français
Deutsch
Nederlands
Your rating has been submitted, please tell us how we can make this answer more useful.
Answers others found helpful
Print
Email this page
Windows 10 & Xbox One
Switch for Sonos.
View in Store
WiFi Sync for Canon Cameras.
View in Store
Remote Control for Lumix.
View in Store
Wireless Tether for Olympus.
View in Store
Controller for Yamaha MusicCast.
View in Store
Remote Control for Fujifilm.
View in Store
Switch for Roku.
View in Store
In Development.
(Coming Soon)
iPhone/iPad
Switch for Sonos.
View in Store
Editor for
Microsoft Access Database.
View in Store
Mac
Switch for
BOSE SoundTouch.
View in Store
Remote for Yamaha MusicCast.
View in Store
Denon Heos App For Mac Desktop
Editor for
Microsoft Access Database.
View in Store
SQL Server Manager Pro.
View in Store
Android
Denon Heos App For Mac
Access Database Manager
View in Store.
Speed Dial
Download.
Mysql Manager Pro
View in StoreBrowse and manage your mysql database on your phone.
Task Manager
Download.
Denon Heos App For Macbook Pro
Dot Graph Viewer for Graphviz
View in Store
Contacts Backup
Download
Android Wear
Speed Dial
for Android Wear
View in Store
Sphero Robot Controller
for Android Wear
View in Store
0 notes
Text
Why Linux administration course is the future Know more about Linux administration.
Why Linux administration path is the future? Identify further about it
A Linux career is always fruitful, and it is evergreen for a lot of scenarios and recession-proof. If you are looking forward to having a career in Linux you can be sure of a great future as Linux certified professionals’ requirement is always zooming up, which is good and quite consistent. A course in Linux is a great option for you and can ensure you a luxurious life. And currently, Linux is seeing an ocean of jobs, and mainly for the professionals with system administration skills. All are in the hunt for Talent in Linux. You will find recruiters caking for anyone who has Linux experience. And hence, the demand for Linux professionals is seeing major growth each day. And the development in the tech world is seeing new colors each day. That has now made Linux the best operating system to explore. And if you want to learn all this, you can contact Naresh I Technologies. We offer complete Linux training for all Linux certifications. Naresh I Technologies also is the number one computer training institute in Hyderabad. And it is among the top five computer training institutes in India.
How much is Linux used?
You will find Linux everywhere. May it be a website, a mobile application, or any device. You should know that all of them are Linux-based infrastructures if we consider the server-side. And all the top companies dealing with web-like Google, Facebook, Amazon, Netflix, and various others operate their infrastructures at scale through Linux servers. And Linux hence is seeing major growth in the corporate world. Also, quite a large part of the Linux publishing business is run on Linux, MySQL, PHP, and Apache, and a hence unlimited number of Linux professionals are in demand. You will also find that Android phones plus tablets are run using Linux. Even the iPhone on Mac and the Windows machine make use of Linux on large scale. Linux hence is rocking undoubtedly,
If you will infer the applications that we use daily like Uber, WhatsApp, Flipkart, Ola, and Zomato, then we can realize that a lot of requirements exist for tendering the Linux server. Either it is the online food ordering, the TV you see the movies on, the smartphones, to book a cab, or to record heath parameters, to a real book or you want to contact a friend, you make use of the Linux technology for all these activities, and what we know in computer terms as operations.
Did you ever think of an idea of how big a Linux market is now? And how many vacancies are there for the Linux professionals for covering the whole requirement? Have you an idea that Linux supports how many users, and where each data is stored, retrieved, and finally goes through processing? And all these require very intensive backend infrastructure that makes use of the Linux servers finally.
Linux Jobs Types
The three main use cases of Linux skills usage are technical support or a system admin or a developer.
The Linux workstations and the Desktops require technical support, the Network, system, and the Admin for webserver requires system administration. And the System and app development requires a System Administrator.
Let’s discuss this one by one.
Technical Support
This kind of job requires carrying out partitioning, services, installations, as well as user management, network troubleshooting, troubleshooting problems related to Operating systems, and basic scripting.
System Administrator
In this, you have to manage various essential services like the creation of file systems, user administration, DNS, HTTP, FTP, backup setup, Cron Jobs, and various other tasks related to administration. You need to secure the systems as well as the servers, ensure firewall management and do the management of packages. And if you acquire a good knowledge of Linux OS, networking, troubleshooting, and administration, you will find huge growth in your career as a DevOps Engineer/Linux Administrator/Site Reliability Engineer/ Operations Engineer/ and so on. The majority of Linux system administrators work on server-based distributions like Debian, CentOS, Red Hat Linux Enterprise edition, and also Ubuntu.
Application and Web-Programmer
Linux programmers have to look after the development, debugging, and documentation of the computer programs for the Linux OS and various relevant software applications. That covers plugin writing, coding in various languages such as C++, Python, or any of the programming languages, database designing, and application designing, formulating add-ons, and scripting in any language plus management of services.
Some of the other job profiles that make use of Linux are like Security Engineers, DevOps Engineers, Network Engineers, Java Engineers, C++ Developers, Python Developers, and so on.
Payscale of the Linux System Administrators
They get in hand a salary pf around INR 390000 per annum if you are in India, and this is an average salary. And if you have experience then PayScale can be highly lucrative. The Skills in Linux that can ensure high pay for you are IBM AIX, Nginx, Python, Tomcat app server, and Shell scripting. And if you look at the current scenarios, we find companies such as CISCO, Amazon, EMC Corporation, and intel offering a very huge PayScale for the employees with Linux knowledge. It’s a challenging, rewarding, and interesting career to select, the Linux administrator.
Certifications You should opt for
Below is the list of Linux certifications, which are recommended for IT professionals. And these are in huge demand in almost each job portal, and you will find numerous jobs in each of them, and hundreds are posted each day.
CompTIA Linux+
RHCSA
RHCA
RHCE
If you are planning to go for a course in Linux then you might end up getting a very good job as the requirement for Linux certified experts is huge, and increase more with time.
You can search through history, and you will find that Linux professionals have always been in great demand. It’s now becoming more and more common. It is turning now into the default OS for the cloud, mobile, and Big data, which are the trending technologies transforming all the industries.
You can contact Naresh I Technologies for your online training in various computer technologies. We provide Linux training in Hyderabad and USA, and in fact, you can contact us from any part of the world through our phone or online form on our site. Just fill it and submit it, and one of our customer care executives will be contacting you. And what else you get:
You have the freedom to choose between the best Linux training institutes and classroom training.
Chance to study from one of the best faculties and one of the best computer training institutes in India
Nominal fee affordable for all
Complete training
You get training for tackling all the nitty-gritty of Linux.
Both theoretical and practical training.
And a lot more is waiting for you.
You can contact us anytime for your Linux training and from any part of the world. Naresh I Technologies caters to one of the best Linux training in India. Feel free to contact us anytime.
For more details please visit: https://nareshit.com/linux-administration-online-training/
0 notes
Text
Connecting LibreOffice to MySQL. On Old Macs. In 2020. (of course).
I like old computers. Especially old Macs. I like seeing what I can do with old Macs. So, I’m going to connect the LibreOffice Base database software running in Mac OS X Tiger to a MySQL database server running in Mac OS X Snow Leopard. In short, I’m using MySQL to store data and using LibreOffice Base to make a more user friendly way for someone to edit and use that data.
Note that the software I’m using here is very old (obviously) but is still under active development, which means you can get modern version that will work just fine on modern systems. Also, for security reasons, I would never advocate running such an out of date version of any database server in an actual production environment, but for development and demonstration, its fine. Also, the software shown here is cross-platform, meaning it will run on just about any operating system out there: Mac, Windows, Linux, etc...

So, here we have a 2007 Mac Mini running Mac OS X 10.6 Snow Leopard. If you’re curious, it has an Intel Core 2 Duo 1.83 GHZ CPU with 3 GB of ram.
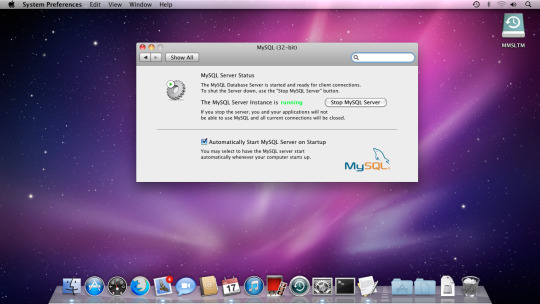
I’ve installed MySQL version 5.1.73 to the Mac Mini.
Using the MySQL client, I’ve created a database, a user account, and a few tables.

So here we have an early 2005 PowerMac G5. This is going to be the client system. Again, if you’re curious, this Mac runs dual 2.0 gHZ PowerPC G5 processors with 4 GB of RAM.
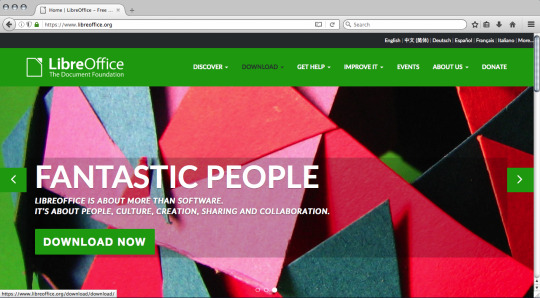
The next step is to download our client software, LibreOffice. So, navigate your web browser to the
LibreOffice
web site and click one of the Download links.
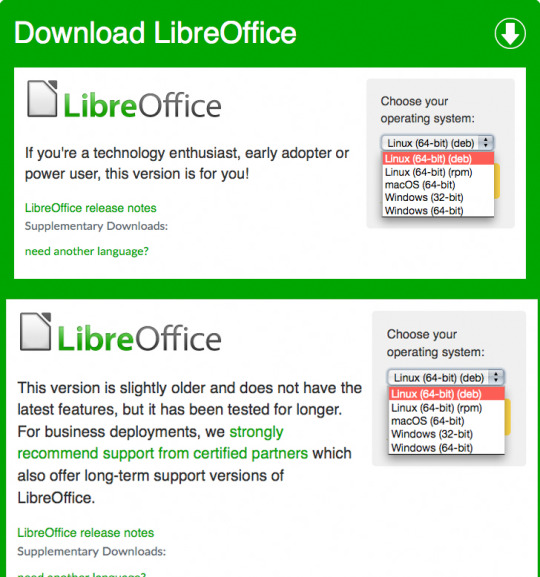
This takes you to a page to download a latest version – either the absolute latest “bleeding edge” or the latest stable version. There is no build for 32 bit PowerPC Macs of either of these, so...
Scroll to the bottom of the page to find a link to an archive containing older versions of LibreOffice. Give it a click...

You’re presented with a VERY long list of previous versions, with absolutely no indication of what platforms each version is compatible with. I had to hunt for it, but it looks like version 4.0.6.2 is the final version with a build for PowerPC based Macs, so click on that link.
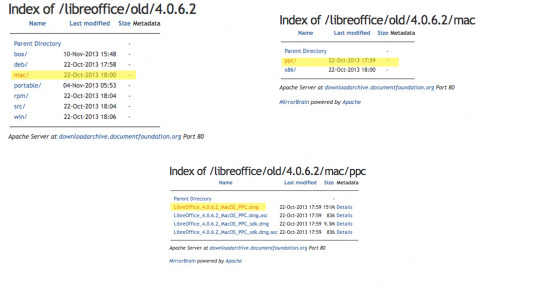
Click through the links to the correct version, finally arriving at the download link itself. You know what to do...

I’ve moved the downloaded file to my desktop for easy access.
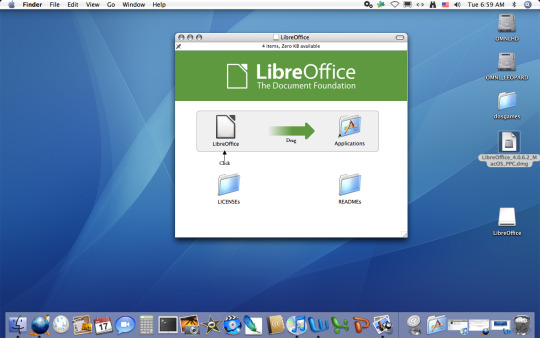
The LibreOffice installer is packaged in a DMG image file, so double click it to mount it and access its contents. Click and drag the LibreOffice icon into the Applications folder icon to install the software.
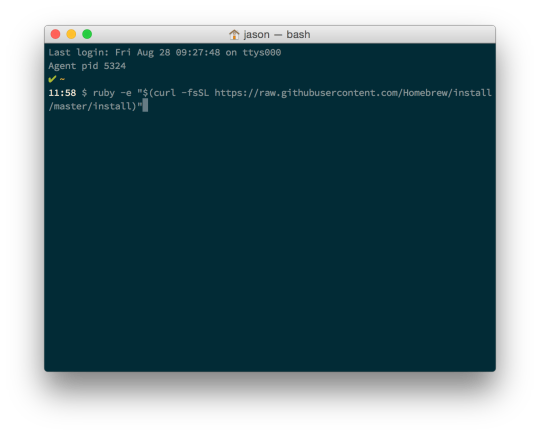
LibreOffice Base depends on Java for a lot of its functionality. Fortunately, these old versions of Mac OS seem to have an (old) version of Java installed. That should go nicely with our old copy of LibreOffice...
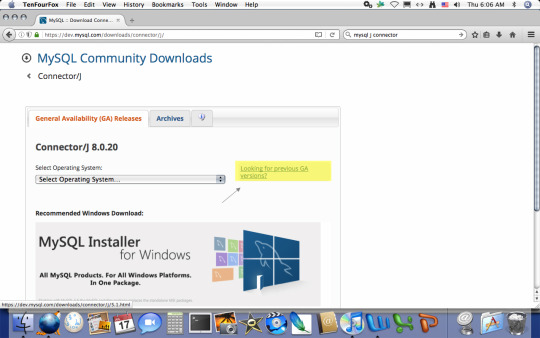
Next, we’re going to need a database driver to enable our LibreOffice client to connect to our MySQL server. LibreOffice uses Java DataBase Connectivity technology for this, and this is provided through the MySQL Connector/J. This driver is written in Java, so you don’t really have to worry about the operating system. The
download
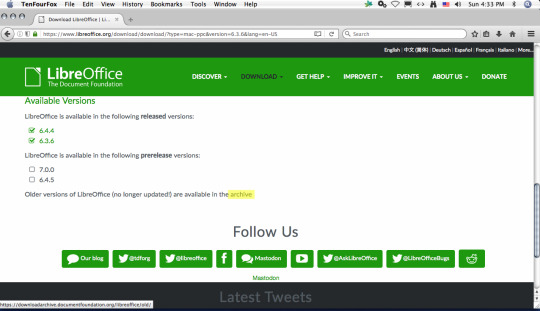
page by default links to the latest version of this driver. I wouldn’t be too optimistic about this working with our old setup, so click on the link “Looking for previous GA versions?”
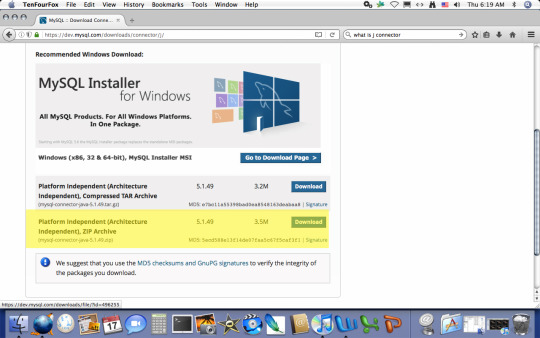
There are two available downloads for this older version of the driver. It’s platform independent, so don’t worry about the operating system. You can download it in either a ZIP file, or a compressed TAR archive. Since we’re on a Mac, we’ve got the software to handle either format, but for the sake of this example, I’m just going to go with the ZIP file.
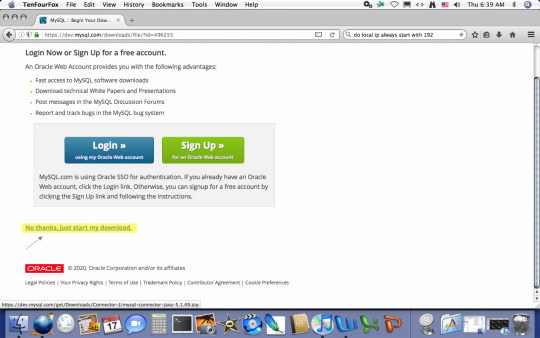
You’re given the option of logging into or creating an Oracle account. (Oracle owns Java.) You don’t have to, so I’m just going to click “No thanks, just start my download.”
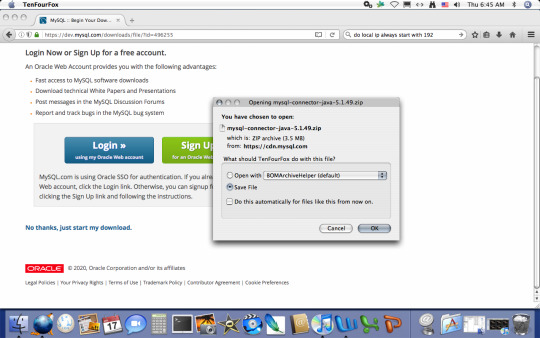
You’ll have the option of opening or saving the file. Go ahead and save it.

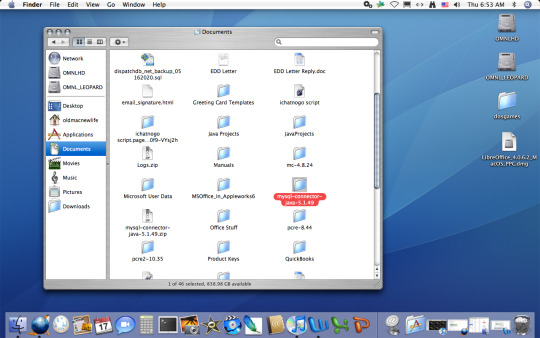
The location of the Connector/J folder on your system doesn’t matter (as long as you remember where you stash it.) I moved the ZIP file to the Documents folder. You still need to extract the files from the archive. Under Mac OS, you can do this by simply double clicking the ZIP file, which leaves a folder containing the Connector/J files.
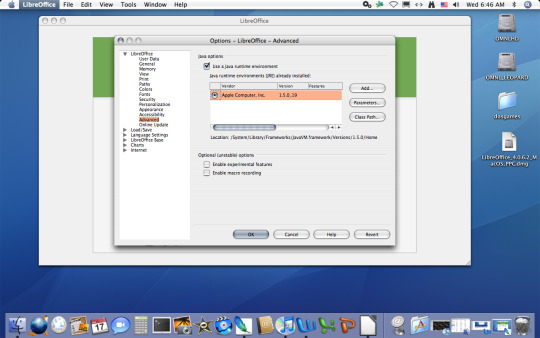
Now we have to tell LibreOffice where to find the JDBC driver. So, fire up LibreOffice and access Preferences.
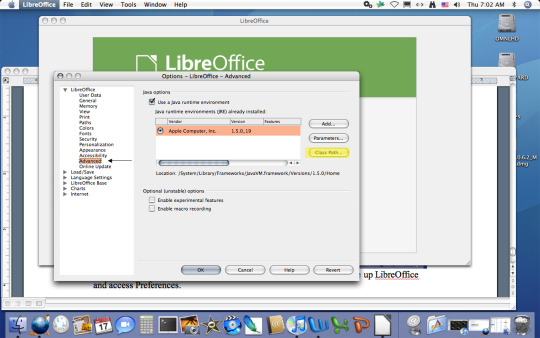
Under Advanced Options, click the “Class Path” button.

Click the Add Archive button.
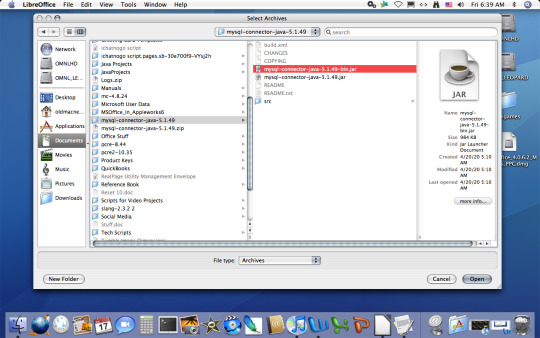
From the file dialog, navigate to the folder you extracted from the downloaded zip file, and select the file “mysql-connector-java-version.number-bin.jar.” (Substituting the text version.number with the actual version number, of course.) Click “Open”.

With LibreOffice now “aware” of the JDBC driver, click OK in the “Class Path” dialog. The “Options” dialog sitting in the background can be dismissed with an “OK” as well.
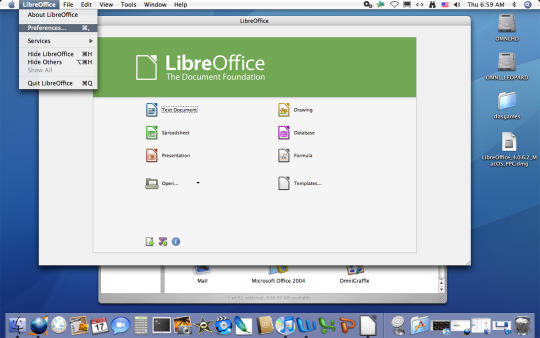
We’re now ready to start linking a LibreOffice client to the MySQL server. From your Applications folder, open LibreOffice. In the app’s main window, click “Database.”
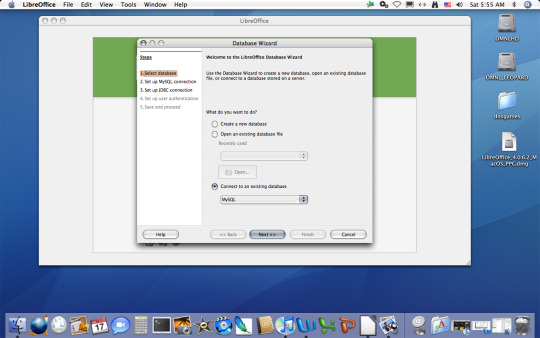
This launches the Database Wizard. Select “Connect to an existing database”, making sure MySQL is also selected in the drop down list, then click “Next.”
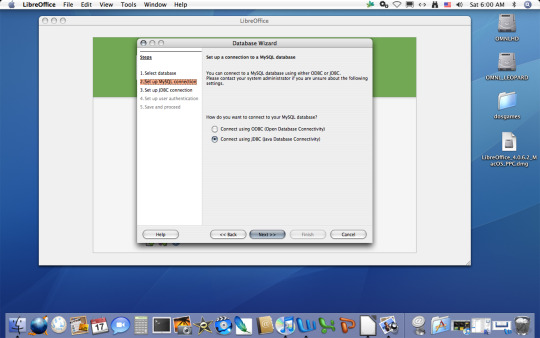
Select “Connect using JDBC (Java Database Connectivity)”, then click “Next.”
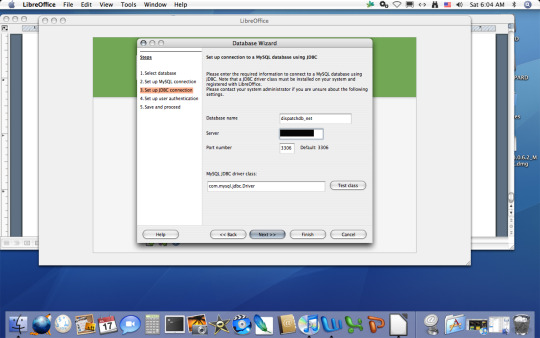
Next, we need to tell LibreOffice how to find the MySQL server. Enter the name of the database on the server you want to connect the client to, as well as the ip address of the server machine and the port number the server is listening on. The MySQL JDBC driver class should be left to its default setting. Click “Next.”

Go ahead and enter the user name for your MySQL server account. If you password protected this, select “Password required.” It’s probably a good idea to test the connection, so, click “Test Connection.” If you selected “Password Required”, you’ll be prompted to enter it.
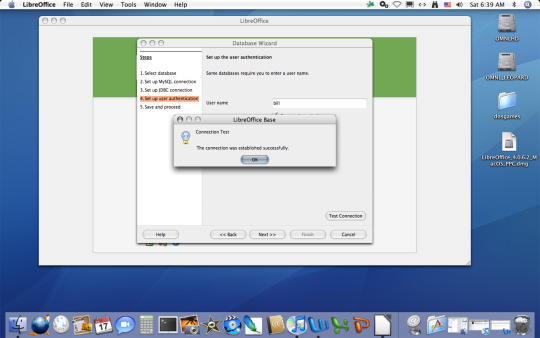
So far, so good. You can OK your way out of that dialog, then click “Next” in the Database Wizard.
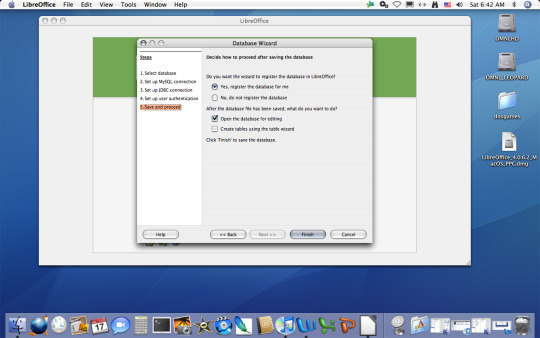
Almost done! Leave these at default and click “Finish.”
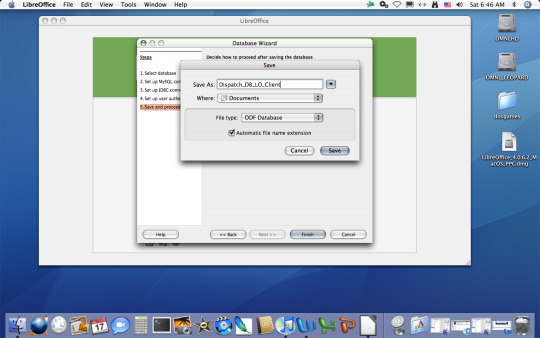
You’ll be prompted to save your new database client. You can name it whatever you want and save it wherever you want. I don’t think you can actually change the file type, so leave that part alone and click “Save.”

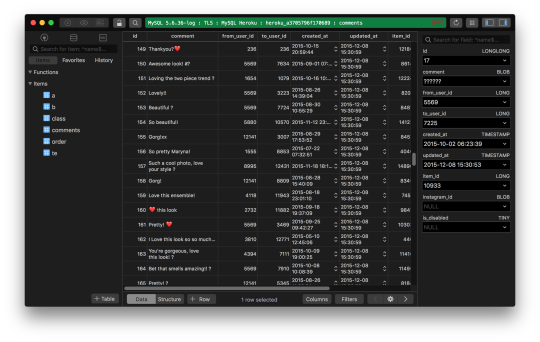
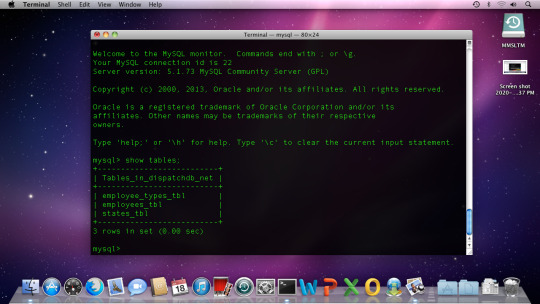
It works! We can see the LibreOffice client listing the tables from the database running on the MySQL server.
#computers#apple#mac#macintosh#macos#mac os x#mac os x tiger#mac os x snow leopard#mysql#databases#libreoffice
0 notes
Text
2020’s Best macOS Apps For Web Developers
The life of a web developer mostly revolves around creating and testing applications, writing codes, using programming languages, integrate audio, graphics, videos into a website, and monitoring website traffic. They are responsible for the construction of a website and how it looks. But some advanced applications can take some of the workloads off their shoulders.

We have mentioned some of the apps that are available for free, that a web developer can use to increase their productivity.
VirtualHostX
This is a great app where you can build and test web apps and even host a production web server on your desktop. The creators of this app have rebuilt the UI and added a status bar that helps you keep tabs on your websites and server. All your databases and files are safe as you can take a backup on this app or store them on iCloud, Google Drive, or Dropbox to keep them synced with your Mac. They also have a VirtualHostX Pro version that uses modern UI for faster web service restarts and other exciting features. The guide to install VirtualHostX is available on their website.
iPhone Emulator
To use this app, you have to sign in to the Apple Developer or create a new Apple ID and password. This app helps to test the websites, and before downloading this app, you will have to install Xcode from the App Store.
Keka
This open-source app will help you compress your files in 7z, zip, tar, DMG, ISO, or rar format and export them in CAB, RAR, EXE, PAX, and other formats. It uses AES-256 encryption for 7z files and Zip 2.0 legacy encryption specification for Zip files. You can easily store huge files by splitting them into pieces. It automatically deletes the source file after compressing or extracting them. It requires Mac OS X 10.9 or later. You can download this app directly from their website.
Koala
It is a GUI application for Sass, Less, CoffeeScript, and Compass framework. The real-time compilation feature listens to the files and automatically compiles them when it notices any changes in files. It also provides support for the project to create a global configuration, and if it finds any error during compilation, it will show you an error message.
Automator
This app will work as your automation assistant, which lets you use the drag and drop procedure to create and run automation recipes to perform simple and complex tasks. You can create a contextual menu to rename files, change file extensions, crop multiple images at once, and create thumbnail images easily using this app.
Devdocs
This app combines multiple documentation in an organized and searchable interface. You can easily find the documentation, syntax, functions, finding codes, and code snippets on their website in one place, on their webpage. This also works offline and on mobile. Also, you can install it on Google Chrome. It offers a lot of keyboard shortcuts that enable you to work faster.
Poedit
It is a powerful and intuitive translation editor app that translates the apps and sites with the support of gettext APIs. This app is used by many PHP and Python projects. It checks all the boxes for safety. You can easily manage the files and templates as it offers an intuitive interface. It has built-in support for Crowdin to provide effective collaboration. It provides access to all your projects so that you can translate everything directly from the app.
Icons8
It is a companion app that helps you drag icons to any software. All of their icons have at least 20 tags for effective search. Their icons are available in various styles, and you can browse from over 50 categories that include around 50 to 200 icons each. You can let the app generate a re-colored version of SVG or PNG by picking any color of your choice. This app also features vector icon files with high-grade paths and strokes. It lets you build your font; all you need to do is pick the icons of your choice.
Sequel Pro
This database management app gives you direct access to your MySQL databases on both local and remote servers. It offers web development companions to help your workflow get streamlined easily. It requires macOS X 10.6 or later to work efficiently.
Source: https://bloggers-news.com/2020s-best-macos-apps-for-web-developers/
0 notes
Text
How to install Nginx + php + MySQL on WSL Windows 10

Although Nginx is available for Windows 10/8/7, however, to really understand, experience, build or test web application around, I recommend to use it on Linux. And the Windows 10 WSL is the best option to run Linux+Nginx+PHP+MySQL stack to get a complete Linux based web server without really installing a separate Linux distro.
Thus, let's see how to install Linux+Nginx+PHP+MySQL stack on Windows 10 WSL (Windows Subsystem for Linux).
What is Nginx?
Nginx (engine x) is a high-performance HTTP and reverse proxy web server that also provides IMAP/pop3/smtp services.
It is distributed under a BSD-like agreement and characterized by less memory and strong concurrent power. Nginx can be compiled and run on most Unix & Linux os and has a Windows port too.
In the case of high concurrency, Nginx is a good alternative to the Apache service: Nginx is one of the software platforms that bosses web hosting business supporting responses up to 50 000 concurrent connections thanks to Nginx for choosing Epoll and Kqueue as the development model.
The Nginx code is written entirely from the c language and has been ported to many architectures and operating systems including Linux, FreeBSD, Solaris, mac os x, AIX and Microsoft windows.
Nginx has its own library of functions, and in addition to zlib, PCRE, and OpenSSL, standard modules only use system C library functions. Also, these third-party libraries may not be used if you do not need or consider potential authorization conflicts.
Step 1: Install Windows 10 WSL for Nginx + php
If you don't have Windows 10 WSL (Windows Subsystem for Linux) enabled on your system yet, then simply go to the search section of Windows 10 and type "Turn Windows feature on or off" after that scroll and look for Windows subsystem for Linux option, check it and click on the OK button. This will enable it on your system. For step by step guide see this: How to enable WSL on Windows 10.
Step 2: Choose Linux Distro App for WIndows 10 WSL
Once you enabled WSL on your system, the next step is to procure some Linux distro app from Microsoft store. Here we are installing and using Ubuntu app on Windows 10 WSL. Just search for Microsoft store on your Windows 10 system and then in the search box type: Run Linux on Windows. The instructions of installing Nginx stack will be the same for Debian and Kali Linux WSL images.
And select Ubuntu and then Get it.
Step 3: Run Ubuntu to install Nginx + php on Windows 10 WSL
Once you open the Linux Ubuntu 18.04 WSL on your Windows 10 system it will exactly look and behave like any other Linux command terminal.
The first thing which we do is to update the Ubuntu Wsl, use the below-given command:
sudo apt-get update
sudo apt-get upgrade
Second is running of commands to install Nginx on Windows 10 Ubuntu WSL:
sudo add-apt-repository ppa:nginx/stable
sudo apt-get update
sudo apt-get install -y nginx
Step 4: Start Nginx web server service on WSL
We have successfully installed the Nginx on our Windows 10 WSL Linux app, now the thing which we have to do is starting off its service. For that use the below command
sudo service nginx start

Step 5: Test Nginx Webserver
Open your Windows 10 browser and type http:localhost:80
It will show the welcome screen of this web server as shown below in the screenshot.
"Welcome to nginx!
If you see this page, the nginx web server is successfully installed and working.
Further configuration is required.
For online documentation and support please refer to nginx.org.
Commercial support is available at nginx.com.
Thank you for using nginx."

Step 6: Installing PHP for Nginx on Windows 10 WSL
The Webserver is ready now we have to install and configure PHP to use with Nginx open-source web server. Here we install modules PHP-FPM and PHP-MySQL to use PHP with both Nginx and MySQL.
Add repo:
sudo add-apt-repository ppa:ondrej/php
Check latest PHP version available to install
sudo apt-cache show php
According to the available version, install the following PHP modules, in our case the latest version was php7.2
sudo apt-get install php7.2-cli php7.2-fpm php7.2-curl php7.2-gd php7.2-mysql php7.2-mbstring zip unzip
Check the installed version
php --version
Output:
h2s@DESKTOP-9OOKS69:~$ php --version
PHP 7.2.19-0ubuntu0.18.04.2 (cli) (built: Aug 12 2019 19:34:28) ( NTS )
Copyright (c) 1997-2018 The PHP Group
Zend Engine v3.2.0, Copyright (c) 1998-2018 Zend Technologies
with Zend OPcache v7.2.19-0ubuntu0.18.04.2, Copyright (c) 1999-2018, by Zend Technologies

Step 7: Start PHP-fpm service
Here is the command to start the installed PHP-fpm service
sudo service php7.2-fpm start
Step 8: Configure PHP-fpm for Nginx on Windows 10 WSL
We have to configure PHP-fpm for Nginx otherwise PHP would not be able to contact Nginx and it through an error such as:
"502 Bad Gateway”
“502 Bad Gateway NGINX”
“502 Proxy Error”
“502 Service Temporarily Overloaded”
“Error 502”
“HTTP Error 502 – Bad Gateway”
“HTTP 502 Bad Gateway”
Thus, open the php-fpm configuration file
sudo nano /etc/php/7.2/fpm/pool.d/www.conf
In the file find the php-fpm listening socket path
In our case, it was like given below and might be same in yours too.
/run/php/php7.2-fpm.sock
Copy it.
Now, open Nginx Default site configuration
sudo nano/etc/nginx/sites-available/default
Here find:
If we want to use PHP with Nginx, first we have to add index.php in the Nginx configuration file...
# Add index.php to the list if you are using PHP
index index.html index.htm index.nginx-debian.html;
# Add index.php to the list if you are using PHP
index index.php index.html index.htm index.nginx-debian.html;
Now find the below lines and do editing as mentioned below:
#location ~ \.php$ {
# include snippets/fastcgi-php.conf;
#
# # With php-fpm (or other unix sockets):
# fastcgi_pass unix:/var/run/php/php7.0-fpm.sock;
# # With php-cgi (or other tcp sockets):
# fastcgi_pass 127.0.0.1:9000;
#}
Remove the # or uncomment the following things which are in yellow colour and also change the socket path from
/var/run/php/php7.0-fpm.sock; to /run/php/php7.2-fpm.sock;
location ~ \.php$
{
include snippets/fastcgi-php.conf;
#
# # With php-fpm (or other unix sockets):
fastcgi_pass unix:/run/php/php7.2-fpm.sock;
# # With php-cgi (or other tcp sockets):
# fastcgi_pass 127.0.0.1:9000;
}
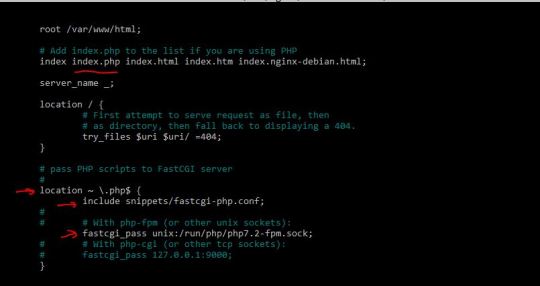
After all the changes press CTRL+X and type Y and then press the Enter button to save the changes.
Restart Nginx and PHP-FPM services
sudo service nginx reload
sudo service php7.2-fpm restart
Step 9: Create a test PHP file
Create an index.php file
sudo touch /var/www/html/index.php
Open it:
sudo nano /var/www/html/index.php
And add the following lines in that ]
Read the full article
#LinuxTutorial#nginx#nginxphpmysqlwindows#nginxphpwindows#nginxserver#nginxstackwindows#phpmysql#phpserverhost#tutorial#windows10
0 notes
Text
How to Install Nextcloud on Ubuntu Server
New Article has been published on http://computingondemand.com/install-nextcloud-ubuntu-server/
How to Install Nextcloud on Ubuntu Server
There are a lot of things Windows Server does well. However, coming off of the NAS environment, there are a lot of things that it doesn’t. One of these is a simple method for web access to various files and folders, along with the ability to share them via user login or simple url. Until recently, there had been only one real player in this space, OwnCloud. I had fiddled with the product for some time, but features were slow to show and it just didn’t work the way I had been hoping it would.
When I had finished the last server build, I had been looking for a way to simply address the needs that QNAP had been fulfilling for me with ease. With MyQNAPCloud I could easily share files or folders without issue. While on the hunt for the latest release of OwnCloud, I hit Google and just tried something. I tried “OwnCloud vs” and let the magic of Google happen. That is how I found Nextcloud.
While I won’t get into how Nextcloud came to be, I will tell you that there are a ton of similarities between the two products. When you do some research, it will become clear why that is. However, that is neither here nor there, the product is attractive, seamless, but a major pain in the … to get running. As usual, the best things in life are on linux. With that in mind, I created a Hyper-V hosting Ubuntu Server LTS 16.04 and started my journey.
Much of what I detail out here will be under the assumption that you have a CLEAN Ubuntu LAMP server up and running. For me, Hyper-V was a quick and logical start, but that doesn’t limit you to anything. Feel free to run VirtualBox, VMWare, or dedicated hardware.
Considerations
Before you build out your virtual machine for this install, there are some considerations to make. For instance, you need to plan for the amount of space that your VM will occupy. For me, it is easy, all my folders reside on another server, so a 100GB virtual hard drive is overkill. I have seen some “paid” for preconfigured VMs running around in 500GB and 1TB flavors.
System Requirements
(Taken Directly from Nextcloud.com)
Memory
Memory requirements for running an Nextcloud server are greatly variable, depending on the numbers of users and files, and volume of server activity. Nextcloud needs a minimum of 128MB RAM, and we recommend a minimum of 512MB.
Recommended Setup for Running Nextcloud
For best performance, stability, support, and full functionality we recommend:
Red Hat Enterprise Linux 7 / Ubuntu 16.04 LTS
MySQL/MariaDB
PHP 7.0 +
Apache 2.4 with mod_php
Supported Platforms
Server: Linux (Debian 7, SUSE Linux Enterprise Server 11 SP3 & 12, Red Hat Enterprise Linux/CentOS 6.5 and 7 (7 is 64-bit only), Ubuntu 14.04 LTS, 16.04 LTS)
Web server: Apache 2 (mod_php, php-fpm) or Nginx (php-fpm)
Databases: MySQL/MariaDB 5.5+; PostgreSQL; Oracle 11g (currently only possible if you contact us <https://nextcloud.com/enterprise> as part of a subscription)
PHP 5.6 + required
Hypervisors: Hyper-V, VMware ESX, Xen, KVM
Desktop: Windows XP SP3 (EoL Q2 2015), Windows 7+, Mac OS X 10.7+ (64-bit only), Linux (CentOS 6.5, 7 (7 is 64-bit only), Ubuntu 12.04 LTS, 14.04 LTS, 14.10, Fedora 20, 21, openSUSE 12.3, 13, Debian 7 & 8).
Mobile apps: iOS 7+, Android 4+
Web browser: IE11+, Microsoft Edge, Firefox 14+, Chrome 18+, Safari 7+
Database Requirements for MySQL / MariaDB
The following is currently required if you’re running Nextcloud together with a MySQL / MariaDB database:
Disabled or BINLOG_FORMAT = MIXED configured Binary Logging (See: MySQL / MariaDB with Binary Logging Enabled)
InnoDB storage engine (MyISAM is not supported)
“READ COMMITED” transaction isolation level (See: Database “READ COMMITED” transaction isolation level)
Installing Ubuntu Server
Download: https://www.ubuntu.com/download/server/thank-you?version=16.04.1&architecture=amd64
Walking through the standard install, for the most part, is a series of next and enter clicks. There isn’t much excitement. After you get past choosing your language, Install Ubuntu Server.
The installation will guide you through a series of pretty standard questions:


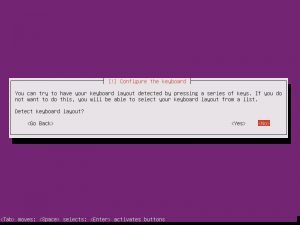
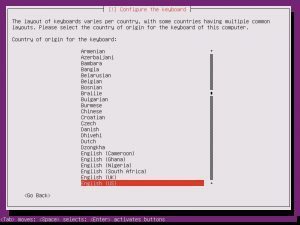
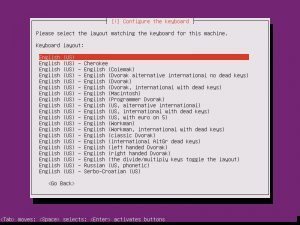
Once the additional components are completed, it is time to pick your system’s hostname. If you don’t know, a hostname is a label assigned to a device for identification. I named mine “nextcloud”, but while creating this tutorial, I left the default in place.

The username and password you choose are completely up to you. Make them something you will not forget!
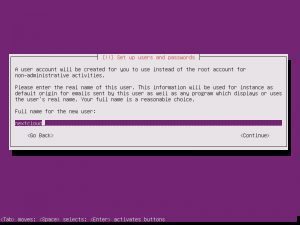
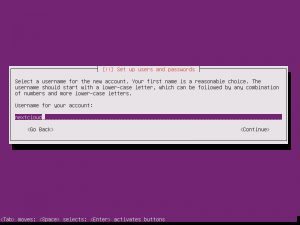
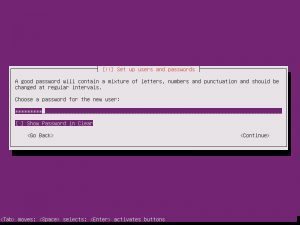
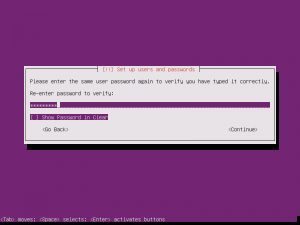
When asked the next few questions, the easiest way to go is with the defaults, that is until you get to Paritition Disks.
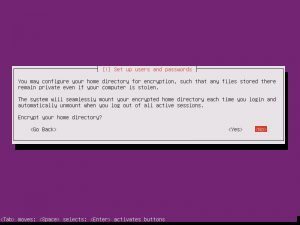
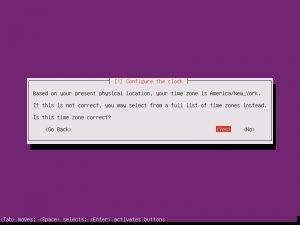
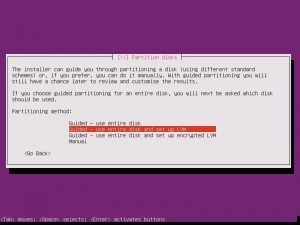

Partition disks, Yes. Full Size, Yes. Write Changes, Yes. Proxy, continue.
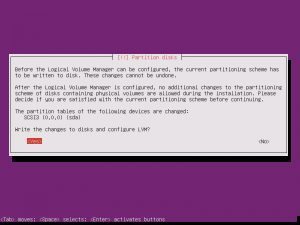
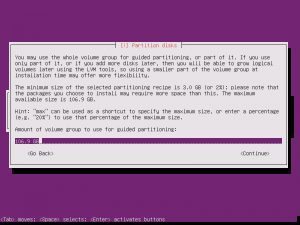
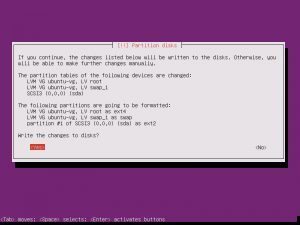
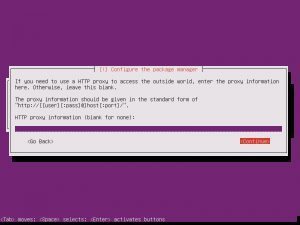
Choosing whether Ubuntu will install updates automatically is up to you, this is something you can change.
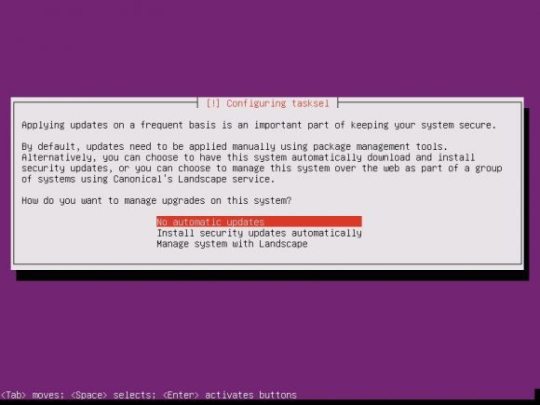
Software selection is the start. Here, the easiest way to proceed is to select LAMP, SAMBA, OpenSSH.
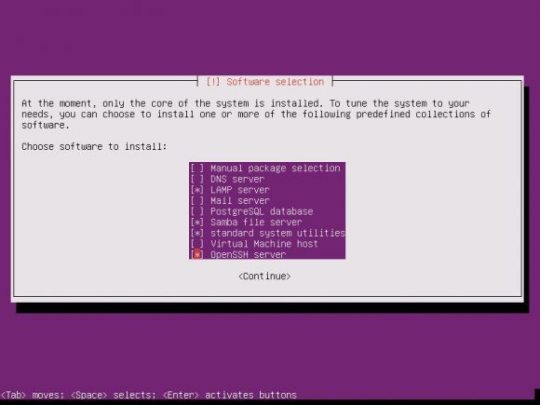
If you selected the previous recommendations, you will eventually be asked for a MySQL password. Pick a password that is easy to remember but hard enough to guess.
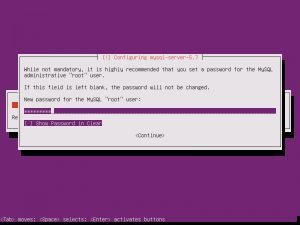

Install GRUB
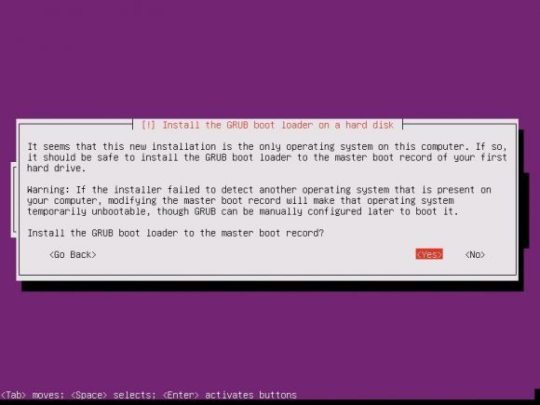
As your installation finishes, it is important to take note that you have a basic install of Ubuntu Server. This is not a hardened version nor are there any security considerations made. Security is not something to take lightly and there are plenty of threads on many great sites that can get you going.

Installing Nextcloud
Once your system has rebooted, the fun work of installing Nextcloud can begin. I would like to start off by saying, I am not the author of this entire process. While some of it is mine, I have also collected the information from various websites and collected them into a single tutorial.
Log into your system with the username and password you provided during your install.
When you first log into your server, you will be dropped in your user’s home directory. The path for this will be, by default, /home/username
There are a few modules that Nextcloud will need
sudo apt-get install libxml2-dev php-zip php-dom php-xmlwriter php-xmlreader php-gd php-curl php-mbstring
Let’s start by fetching the latest build, available at the time of this tutorial, of Nextcloud
wget https://download.nextcloud.com/server/releases/nextcloud-11.0.1.tar.bz2
Now, we need mod_rewrite
a2enmod rewrite
Restart Apache
sudo service apache2 reload
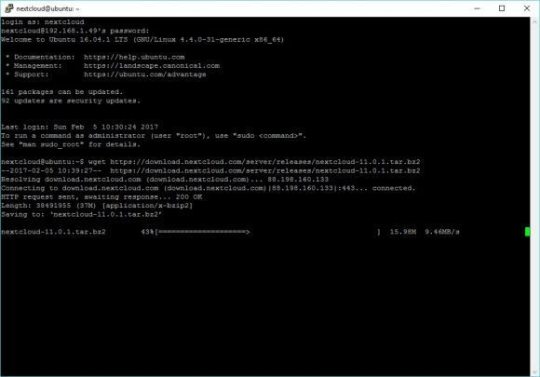
Once the download has completed, let’s untar.
tar -vxjf nextcloud-11.0.1.tar.bz2
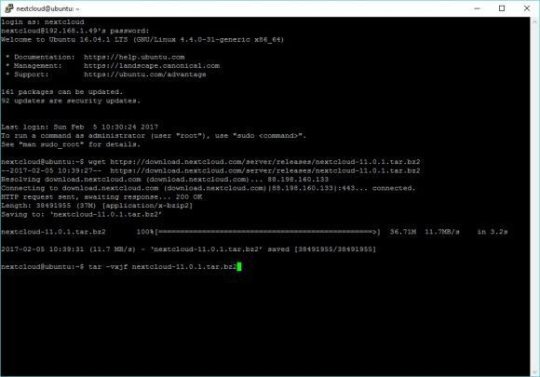
Move the folder to /var/www. When you first run “sudo” you will have to re-enter your password.
sudo mv nextcloud /var/www
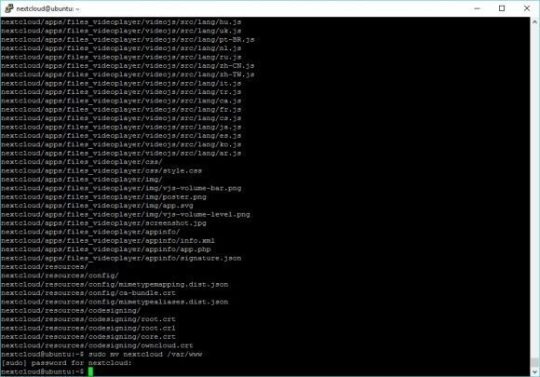
If you plan on connecting Nextcloud to your Windows Server, like I am, you will have to make sure you have Samba installed and configured. In my efforts, I have found that SMB2 is required for Nextcloud to function properly.
sudo apt-get install smbclient php-smbclient
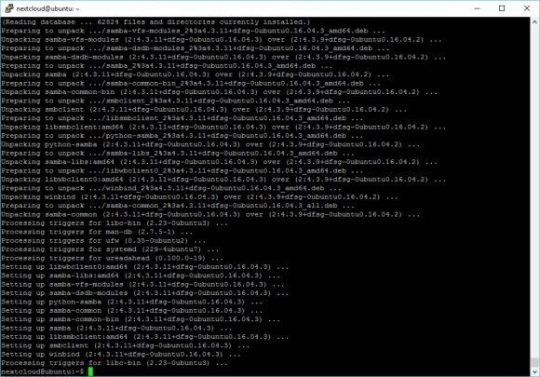
Change the configuration of samba for SMB2
sudo nano /etc/samba/smb.conf
When the file opens, you will have to add teh following lines under [global]
max protocol = SMB2
client max protocol = SMB2

To exit the editor CTRL-X and click Y to confirm, then Enter to save
Create the apache configuration file
sudo nano /etc/apache2/sites-available/nextcloud.conf
Paste the following into the file and save.
Alias /nextcloud "/var/www/nextcloud/"
Alias /nextcloud “/var/www/nextcloud/”
Options +FollowSymlinks
AllowOverride All
Dav off
SetEnv HOME /var/www/nextcloud
SetEnv HTTP_HOME /var/www/nextcloud
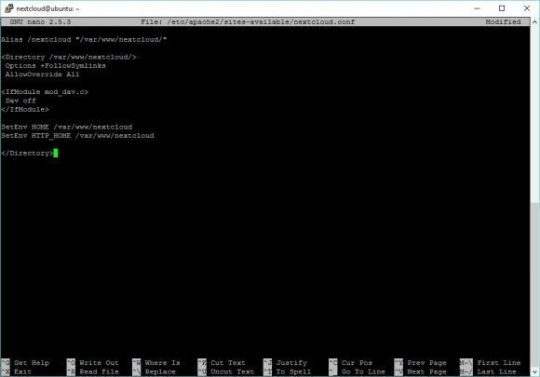
To exit the editor CTRL-X and click Y to confirm, then Enter to save
Create a symbolic link for apache
sudo ln -s /etc/apache2/sites-available/nextcloud.conf /etc/apache2/sites-enabled/nextcloud.conf
Enable the apache modules required for Nextcloud.
sudo a2enmod headers
restart apache
sudo service apache2 reload
Create the DB for Nextcloud
sudo mysql -u root -p
When prompted, enter the password your created for your database during the install
Create the user for your database. In the example below, I chose nextcloud as the password for the user nextclouduser. DO NOT USE THAT PASSWORD! Create your own password.
CREATE USER nextclouduser@localhost IDENTIFIED BY 'nextcloud';
Grant all privileges for that user
GRANT ALL PRIVILEGES ON nextcloud.* TO nextclouduser@localhost;
Exit
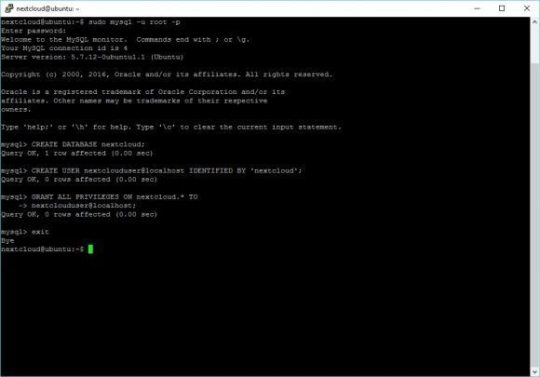
Secure and provide write abilities for Nextcloud (nextcloud in the example below is the username I chose during install)
sudo nano /home/nextcloud/grantperm.sh
Paste the following
#!/bin/bash
ocpath='/var/www/nextcloud'
htuser='www-data'
htgroup='www-data'
rootuser='root'
printf “Creating possible missing Directories\n”
mkdir -p $ocpath/data
mkdir -p $ocpath/updater
printf “chmod Files and Directories\n”
find $ocpath/ -type f -print0 | xargs -0 chmod 0640
find $ocpath/ -type d -print0 | xargs -0 chmod 0750
printf “chown Directories\n”
chown -R $rootuser:$htgroup $ocpath/
chown -R $htuser:$htgroup $ocpath/apps/
chown -R $htuser:$htgroup $ocpath/config/
chown -R $htuser:$htgroup $ocpath/data/
chown -R $htuser:$htgroup $ocpath/themes/
chown -R $htuser:$htgroup $ocpath/updater/
chmod +x $ocpath/occ
printf “chmod/chown .htaccess\n”
if [ -f $ocpath/.htaccess ] then
chmod 0644 $ocpath/.htaccess
chown $rootuser:$htgroup $ocpath/.htaccess
fi
if [ -f $ocpath/data/.htaccess ] then
chmod 0644 $ocpath/data/.htaccess
chown $rootuser:$htgroup $ocpath/data/.htaccess
fi

To exit the editor CTRL-X and click Y to confirm, then Enter to save
Grant execution privileges
sudo chmod +x grantperm.sh
Run the script
sudo ./grantperm.sh
Open a browser, navigate to the IP address or hostname of the server you just completed to finalize the Nextcloud install
http://ipaddress/nextcloud
If you don’t know the IP address of the machine, you can use ifconfig to find it
ifconfig


Fill in the required fields and enjoy. If you followed this tutorial to the letter, pick a username and password for nextcloud admin
Database user: nextclouduser
Password: nextcloud
Database: nextcloud
Database host: localhost
There are more things to do, for instance, there are a ton of security concerns to consider. There are also caching recommendations. I also highly recommend that you consider using https for your server.
Caching: https://docs.nextcloud.com/server/11/admin_manual/configuration_server/caching_configuration.html
Security: https://docs.nextcloud.com/server/11/admin_manual/configuration_server/harden_server.html
Backups: https://docs.nextcloud.com/server/11/admin_manual/maintenance/backup.html
0 notes
Text
Web Scraping With Django

In this tutorial, we are going to learn about creating Django form and store data into the database. The form is a graphical entity on the website where the user can submit their information. Later, this information can be saved in the database and can be used to perform some other logical operation. Hi,Greetings for the day I have deep knowledge web scraping. Feel free to contact me. I am Python and Website developer I worked on the below technologies: Back End: - Python with Django and Flask Framework - RE More.
Macro Recorder and Diagram Designer
Download FMinerFor Windows:
Free Trial 15 Days, Easy to Install and Uninstall Completely
Pro and Basic edition are for Windows, Mac edition just for Mac OS 10. Recommended Pro/Mac edition with full features.
or
FMiner is a software for web scraping, web data extraction, screen scraping, web harvesting, web crawling and web macro support for windows and Mac OS X.
It is an easy to use web data extraction tool that combines best-in-class features with an intuitive visual project design tool, to make your next data mining project a breeze.
Whether faced with routine web scrapping tasks, or highly complex data extraction projects requiring form inputs, proxy server lists, ajax handling and multi-layered multi-table crawls, FMiner is the web scrapping tool for you.
With FMiner, you can quickly master data mining techniques to harvest data from a variety of websites ranging from online product catalogs and real estate classifieds sites to popular search engines and yellow page directories.
Simply select your output file format and record your steps on FMiner as you walk through your data extraction steps on your target web site.
FMiner's powerful visual design tool captures every step and models a process map that interacts with the target site pages to capture the information you've identified.
Using preset selections for data type and your output file, the data elements you've selected are saved in your choice of Excel, CSV or SQL format and parsed to your specifications.
And equally important, if your project requires regular updates, FMiner's integrated scheduling module allows you to define periodic extractions schedules at which point the project will auto-run new or incremental data extracts.
Easy to use, powerful web scraping tool
Visual design tool
Design a data extraction project with the easy to use visual editor in less than ten minutes.
No coding required
Use the simple point and click interface to record a scrape project much as you would click through the target site.
Advanced features
Extract data from hard to crawl Web 2.0 dynamic websites that employ Ajax and Javascript.
Multiple Crawl Path Navigation Options
Drill through site pages using a combination of link structures, automated form input value entries, drop-down selections or url pattern matching.
Keyword Input Lists
Upload input values to be used with the target website's web form to automatically query thousands of keywords and submit a form for each keyword.
Nested Data Elements
Breeze through multilevel nested extractions. Crawl link structures to capture nested product catalogue, search results or directory content.
Multi-Threaded Crawl
Expedite data extraction with FMiner's multi-browser crawling capability.
Export Formats
Export harvested records in any number of formats including Excel, CSV, XML/HTML, JSON and popular databases (Oracle, MS SQL, MySQL).
CAPCHA Tests
Get around target website CAPCHA protection using manual entry or third-party automated decaptcha services.
More Features>>
If you want us build an FMiner project to scrape a website:
Request a Customized Project (Starting at $99), we can make any complex project for you.
This is working very very well. Nice work. Other companies were quoting us $5,000 - $10,000 for such a project. Thanks for your time and help, we truly appreciate it.
--Nick
In August this year, Django 3.1 arrived with support for Django async views. This was fantastic news but most people raised the obvious question – What can I do with it? There have been a few tutorials about Django asynchronous views that demonstrate asynchronous execution while calling asyncio.sleep. But that merely led to the refinement of the popular question – What can I do with it besides sleep-ing?
The short answer is – it is a very powerful technique to write efficient views. For a detailed overview of what asynchronous views are and how they can be used, keep on reading. If you are new to asynchronous support in Django and like to know more background, read my earlier article: A Guide to ASGI in Django 3.0 and its Performance.
Django Async Views

Django now allows you to write views which can run asynchronously. First let’s refresh your memory by looking at a simple and minimal synchronous view in Django:
It takes a request object and returns a response object. In a real world project, a view does many things like fetching records from a database, calling a service or rendering a template. But they work synchronously or one after the other.
Web Scraping With Django Using
In Django’s MTV (Model Template View) architecture, Views are disproportionately more powerful than others (I find it comparable to a controller in MVC architecture though these things are debatable). Once you enter a view you can perform almost any logic necessary to create a response. This is why Asynchronous Views are so important. It lets you do more things concurrently.
It is quite easy to write an asynchronous view. For example the asynchronous version of our minimal example above would be:
This is a coroutine rather than a function. You cannot call it directly. An event loop needs to be created to execute it. But you do not have to worry about that difference since Django takes care of all that.
Note that this particular view is not invoking anything asynchronously. If Django is running in the classic WSGI mode, then a new event loop is created (automatically) to run this coroutine. Holy panda switch specs. So in this case, it might be slightly slower than the synchronous version. But that’s because you are not using it to run tasks concurrently.
So then why bother writing asynchronous views? The limitations of synchronous views become apparent only at a certain scale. When it comes to large scale web applications probably nothing beats FaceBook.
Views at Facebook
In August, Facebook released a static analysis tool to detect and prevent security issues in Python. But what caught my eye was how the views were written in the examples they had shared. They were all async!

Note that this is not Django but something similar. Currently, Django runs the database code synchronously. But that may change sometime in the future.
If you think about it, it makes perfect sense. Synchronous code can be blocked while waiting for an I/O operation for several microseconds. However, its equivalent asynchronous code would not be tied up and can work on other tasks. Therefore it can handle more requests with lower latencies. More requests gives Facebook (or any other large site) the ability to handle more users on the same infrastructure.
Even if you are not close to reaching Facebook scale, you could use Python’s asyncio as a more predictable threading mechanism to run many things concurrently. A thread scheduler could interrupt in between destructive updates of shared resources leading to difficult to debug race conditions. Compared to threads, coroutines can achieve a higher level of concurrency with very less overhead.
Misleading Sleep Examples
As I joked earlier, most of the Django async views tutorials show an example involving sleep. Even the official Django release notes had this example:
To a Python async guru this code might indicate the possibilities that were not previously possible. But to the vast majority, this code is misleading in many ways.
Firstly, the sleep happening synchronously or asynchronously makes no difference to the end user. The poor chap who just opened the URL linked to that view will have to wait for 0.5 seconds before it returns a cheeky “Hello, async world!”. If you are a complete novice, you may have expected an immediate reply and somehow the “hello” greeting to appear asynchronously half a second later. Of course, that sounds silly but then what is this example trying to do compared to a synchronous time.sleep() inside a view?
The answer is, as with most things in the asyncio world, in the event loop. If the event loop had some other task waiting to be run then that half second window would give it an opportunity to run that. Note that it may take longer than that window to complete. Cooperative Multithreading assumes that everyone works quickly and hands over the control promptly back to the event loop.
Secondly, it does not seem to accomplish anything useful. Some command-line interfaces use sleep to give enough time for users to read a message before disappearing. But it is the opposite for web applications - a faster response from the web server is the key to a better user experience. So by slowing the response what are we trying to demonstrate in such examples?

The best explanation for such simplified examples I can give is convenience. It needs a bit more setup to show examples which really need asynchronous support. That’s what we are trying to explore here.
Better examples
A rule of thumb to remember before writing an asynchronous view is to check if it is I/O bound or CPU-bound. A view which spends most of the time in a CPU-bound activity for e.g. matrix multiplication or image manipulation would really not benefit from rewriting them to async views. You should be focussing on the I/O bound activities.
Invoking Microservices
Most large web applications are moving away from a monolithic architecture to one composed of many microservices. Rendering a view might require the results of many internal or external services.
In our example, an ecommerce site for books renders its front page - like most popular sites - tailored to the logged in user by displaying recommended books. The recommendation engine is typically implemented as a separate microservice that makes recommendations based on past buying history and perhaps a bit of machine learning by understanding how successful its past recommendations were.
In this case, we also need the results of another microservice that decides which promotional banners to display as a rotating banner or slideshow to the user. These banners are not tailored to the logged in user but change depending on the items currently on sale (active promotional campaign) or date.
Let’s look at how a synchronous version of such a page might look like:
Here instead of the popular Python requests library we are using the httpx library because it supports making synchronous and asynchronous web requests. The interface is almost identical.
The problem with this view is that the time taken to invoke these services add up since they happen sequentially. The Python process is suspended until the first service responds which could take a long time in a worst case scenario.

Let’s try to run them concurrently using a simplistic (and ineffective) await call:
Notice that the view has changed from a function to a coroutine (due to async def keyword). Also note that there are two places where we await for a response from each of the services. You don’t have to try to understand every line here, as we will explain with a better example.
Interestingly, this view does not work concurrently and takes the same amount of time as the synchronous view. If you are familiar with asynchronous programming, you might have guessed that simply awaiting a coroutine does not make it run other things concurrently, you will just yield control back to the event loop. The view still gets suspended.
Let’s look at a proper way to run things concurrently:
If the two services we are calling have similar response times, then this view should complete in _half _the time compared to the synchronous version. This is because the calls happen concurrently as we would want.
Let’s try to understand what is happening here. There is an outer try…except block to catch request errors while making either of the HTTP calls. Then there is an inner async…with block which gives a context having the client object.
The most important line is one with the asyncio.gather call taking the coroutines created by the two client.get calls. The gather call will execute them concurrently and return only when both of them are completed. The result would be a tuple of responses which we will unpack into two variables response_p and response_r. If there were no errors, these responses are populated in the context sent for template rendering.
Microservices are typically internal to the organization hence the response times are low and less variable. Yet, it is never a good idea to rely solely on synchronous calls for communicating between microservices. As the dependencies between services increases, it creates long chains of request and response calls. Such chains can slow down services.
Why Live Scraping is Bad
We need to address web scraping because so many asyncio examples use them. I am referring to cases where multiple external websites or pages within a website are concurrently fetched and scraped for information like live stock market (or bitcoin) prices. The implementation would be very similar to what we saw in the Microservices example.
But this is very risky since a view should return a response to the user as quickly as possible. So trying to fetch external sites which have variable response times or throttling mechanisms could be a poor user experience or even worse a browser timeout. Since microservice calls are typically internal, response times can be controlled with proper SLAs.
Ideally, scraping should be done in a separate process scheduled to run periodically (using celery or rq). The view should simply pick up the scraped values and present them to the users.
Serving Files
Django addresses the problem of serving files by trying hard not to do it itself. This makes sense from a “Do not reinvent the wheel” perspective. After all, there are several better solutions to serve static files like nginx.
But often we need to serve files with dynamic content. Files often reside in a (slower) disk-based storage (we now have much faster SSDs). While this file operation is quite easy to accomplish with Python, it could be expensive in terms of performance for large files. Regardless of the file’s size, this is a potentially blocking I/O operation that could potentially be used for running another task concurrently.
Imagine we need to serve a PDF certificate in a Django view. However the date and time of downloading the certificate needs to be stored in the metadata of the PDF file, for some reason (possibly for identification and validation).
We will use the aiofiles library here for asynchronous file I/O. The API is almost the same as the familiar Python’s built-in file API. Here is how the asynchronous view could be written:
This example illustrates why we need asynchronous template rendering in Django. But until that gets implemented, you could use aiofiles library to pull local files without skipping a beat.
There are downsides to directly using local files instead of Django’s staticfiles. In the future, when you migrate to a different storage space like Amazon S3, make sure you adapt your code accordingly.
Handling Uploads
On the flip side, uploading a file is also a potentially long, blocking operation. For security and organizational reasons, Django stores all uploaded content into a separate ‘media’ directory.
If you have a form that allows uploading a file, then we need to anticipate that some pesky user would upload an impossibly large one. Thankfully Django passes the file to the view as chunks of a certain size. Combined with aiofile’s ability to write a file asynchronously, we could support highly concurrent uploads.
Again this is circumventing Django’s default file upload mechanism, so you need to be careful about the security implications.
Where To Use
Django Async project has full backward compatibility as one of its main goals. So you can continue to use your old synchronous views without rewriting them into async. Asynchronous views are not a panacea for all performance issues, so most projects will still continue to use synchronous code since they are quite straightforward to reason about.
In fact, you can use both async and sync views in the same project. Django will take care of calling the view in the appropriate manner. However, if you are using async views it is recommended to deploy the application on ASGI servers.
This gives you the flexibility to try asynchronous views gradually especially for I/O intensive work. You need to be careful to pick only async libraries or mix them with sync carefully (use the async_to_sync and sync_to_async adaptors).
Disney plus on switch. Hopefully this writeup gave you some ideas.
Web Development With Django
Thanks to Chillar Anand and Ritesh Agrawal for reviewing this post. All illustrations courtesy of Old Book Illustrations
0 notes
Last Seen Blogs

soixxiesuix
LILITH🕷

voidwelcome
Untitled

pomodoko
doing my goddamn best

wizzie-crime
I Control The Die.

holly-shet-blog
Peach