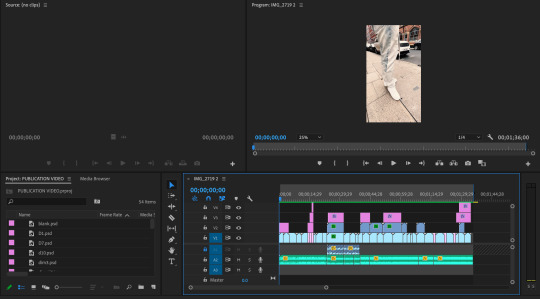
#But I also used Premiere Pro for some sound editing too.
Text
...Um. Super, super late DP Invisobang 2023 art?
The fic by Rockity Sock is still an unpublished WIP so far, but it's really nice and will hopefully be completed and published later.
It begins at the end of the Ultimate Enemy episode, with Dan getting trapped in the thermos. And... I'm not sure how much I can say without spoiling it, but a lot of really cool stuff happens. It's a psychological type of fic, about different types of prisons and punishments, and has time stuff and pocket dimensions, and redemption stuff. (I was only planning on drawing one illustration for IB, but when I saw the WIP, I wanted to see so many things animated. So many awesome visuals. I wish I could've animated them all.)
This is the part I did animate:
He just walked for now, searching for the tiniest crack. The darkness went on for seemingly forever though, and no matter how far he walked it kept on going
Dan kept moving
He tried his best to break through the walls but every ectoblast he formed fizzled out. Fading into the darkness.
Oh, now it makes sense.
His powers are being limited, it takes him a few more tries to believe it. The fact that he’s trapped with nothing whatsoever. Endless hours spent, and wasted. Powers he has built up from the ground with no mentor, ones he trained endlessly after a decade.
Gone, disappeared, muffled. Limited. Dan let out a laugh, one with no humor. A laugh that turned into a cackle, he couldn’t stop.
Here's Rockity Sock's AO3 account: https://archiveofourown.org/users/rockitysockity and tumblr account: https://rockitysock.tumblr.com/
(I also uploaded the video on deviantArt and YouTube)
#invisobang 2023#danny phantom#dan phantom#animation#asj art#...this took so much longer than it should've D:#I think it has 232 images of Dan.#I tried a few things for the fog rustle sound effect but I think I went with rubbing my hand back and forth across a soft comforter blanket#(I was originally going to go with swishing my hand back and forth inside a wet bowl but it'd ended up sounding like dry leaves.)#the cape sound effects are from snapping a little throw blanket up and down.#I forget now exactly what I'd used to made the zap sound. It took some time in Cakewalk to figure out and I'd tried looking up tutorials.#The moving background was made by making a 'bg tile' that I could stack horizontally.#And for the fog on the 'floor' there's 8 cycling images at the start of the animation and 9 cycling images for the end of the animation.#For the spin I was going to make 112 frames for the background ...but after working on it for awhile I realized it'd take really long. :/#So I reused the background tile but put it in reverse and overlaid a rotation version at the end. (...though the fog obscures a lot of it)#I'd used the magicposer website mannequin as reference to draw the key frames of Dan's spin.#I drew the images in Photoshop with the animation feature and then saved each one as a png.#Then imported them into Premiere Pro to add a few effects (the zoom for the first shot and the movement of the bg).#Lexx helped me a lot with figuring out music stuff and using Cakewalk for some sound editing.#But I also used Premiere Pro for some sound editing too.#(At one point I'd planned on animating three scenes and having a song in the bg. The growing sound in the first shot is the bass part.#(And things were going to be added onto the song in the other two scenes. ...But then I'd dropped the other two scenes.)#(I was also originally going to have Dan do two more quick ectoblasts after the first one but decided to cut them out for time.)#(also it's not that I can't draw hands. it's just that I knew it would take longer if I did. I'd decided to cut time by not drawing them.)#(...though most of my shortcuts ended up being long-cuts that also hurt the quality. ...Should've done things right.)
56 notes
·
View notes
Text
Make Rap Beats Online
Compression is useful which you want to even out variations in volume and control sound attack. Fast attacks accentuate the body of a given sound. Slow attacks increase definition. The areas that benefit the most from compression the actual bass, vocals, and kick drums. However, some other areas might do well with it as well. Be specific to listen to all tracks with and without compression to figure out what's going to work the best.
But, additionally it is easy stop creating original music with online music secretion. It can be easy to use too much technique in the expense to become creative. If so, you may notice that maintain sounding identical shoes you wear. This means it is a person to mix things up, think laterally, to get creative. Then, you could be truly efficient at online music production!
That is why it is usually recommended for anyone trying songs how generate dubstep music to start with simpler, more user-friendly computer system software. ableton live Torrent is important fully grasp the basics of music production, as well as to use the software before moving to expert level programs. Currently one belonging to the hottest programs for beginners is Dubturbo. It is often a professional quality program much more geared toward those not used to the martial art.
There are video tutorials for pretty much all these softwares on YouTube, but, within my opinion, Windows Movie Maker is ridiculously easy to use; but Adobe Premiere has more tools and effects that you are able do video. ableton live License Key presents green screen keying, which Movie Maker does not have. If you feel the need to make music video production or music production a future career, I suggest you look into a college called Full Sail Secondary education. ableton live Registration Key is known the "Harvard of Entertainment and Media Schools" and has one with the three best film programs in the planet and Ableton Live extremely best 5 Recording Arts programs in the actual. It is a high-paced school, and discover receive your Bachelor's in either program in 20 months' time. To look further into this school, visit the full Sail web presence.
Dubturbo is evidently essentially the most user-friendly Dubstep making program available. This means incredibly simple to use, additionally, it has all of the wonderful Dubstep sounds we always require. Compared to other high grade music editing software the Dubturbo absolutely does live of up to its discover.
Don't disassociate with the proven fact that auto-tuning would seem to be hard because lots of famous singers use it, its not quite as hard as you'd believe that. One of the most commonly searched tutorials is how you can sound like T-pain, and guess precisely what? He doesn't use a big fancy studio, he makes use of a MacBook Pro and Logic and sometimes, even Garage Rock band! So it is possible!
All speed you need will be available through the program, furniture from beats to loops to whatever it's fancy. You might like to produced some music, you're able export it directly to MP3 format through the program, also upload it directly onto the internet. This program is perfect for anyone who loves music and creating their own pieces.
2 notes
·
View notes
Text
Storyboards | Draft Animatic and SFX

The Soul Sri Lanka
Conceptualisation for this version of the film ultimately began during a brainstorm session, where I was listening to a song by a local band. That song was Optical Illusion by the local sensation The Soul Sri Lanka. I felt that the song captured the mood and feel of my film, even reflected in some of its lyrics, so I was determined to use it in my film in some way. But I was worried about the legal loopholes that would come with using it in my film.
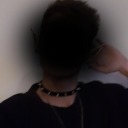
So I just asked! Dave Free Roberts (bottom right, blue T shirt) is the lyricist and vocalist of The Soul. He also happened to be a creative director at Dilmah HQ, where I spent some of my time during my internship. Luckily, he saw no objections to my using the song in the film, so I was ready to set sail.
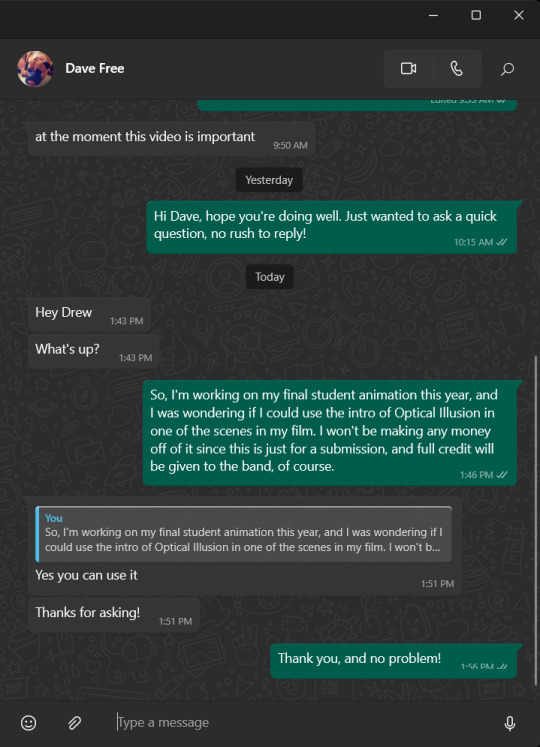
My film is quite reliant on sound to create immersion, so I wanted to have a certain level of control of the several aspects of this song such that it did not drown the important parts out. So, I did a little bit of digging and found the website Moises, which is free to use on the internet. The site essentially takes audio files and separates it into distinct channels (in my case, I only needed four); Vocals, Drums, Bass and "Other", which comprised of all the other instruments in the track (there was also a smart metronome feature, but that wasn't relevant to me, so I did not use it). Using this, I isolated the drums, bass and other instruments in the track and exported them as individual files.
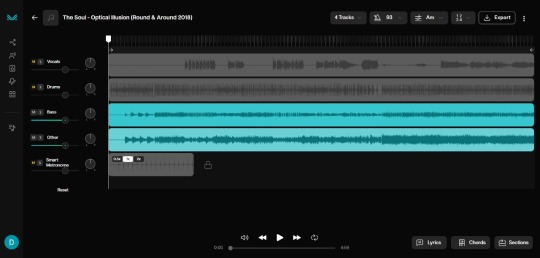
Then, I exported my edited frames from Storyboarder as an XML to open in Premiere Pro. I did this in order to preserve the timing of my boards which would save time while I was editing them further. All the other sounds were those that I had downloaded from Pixabay. These, however, are not the only sounds that I will be using. For the final film, I intend on recording more specific sounds for specific scenes later on.
Here is the first draft of this animatic, which is indicative of most of the sounds that will be present in my final animation sans voice acting and a couple of others. I am decently satisfied with how this turned out, however there is room for plenty of improvement. For example, I feel that I can play around a lot more with the sound design for the impact frame during Katu's journey, and the same could be said for the Tuk scene. However, I do not want to muddy the animation with too many sounds. I'll have to look into this going forward.
0 notes
Text
Developing the Experience
Angelique Shelley (MA Concept Art)
Blog Post #7
Sound
As production in After Effects continued, it became clear that it would make more sense for me to add and composite together the audio. The main reason for this is that the After Effects project file, complete with image sequences from Unreal added up to over 60GB so syncing that between team members could be problematic, especially since I am remote. There was also quite a lot of sickness in the group which I was fortunate enough to avoid.
Ana selected and shared some excellent sounds throughout the project for us to use.
We also received feedback from staff on how we should avoid just sticking sounds straight on but should pay attention to blend them together carefully.
I found that Premiere Pro was far more capable in the sound department than After Effects so exported the final composition from After Effects as an mp4 with a manageable file size that could render in real time in Premiere Pro. To avoid double-compression by encoding to mp4 twice though I decided to edit the sounds over the pre-rendered mp4 and then bring in the processor-intensive after effects file directly into Premiere Pro with the dynamic link at the very end and render that instead. This ensures maximum video quality and ease of editing along the way.
While it could be argued that our visuals may seem disconnected throughout the video I hoped that the sound could help tie it together with more cohesion.
After adding the first sounds of rocks banging down and slate grinding and stone chips falling, I noticed that the sound effects seemed laughably ‘small’ compared to the size of the giant heads rotating into position. I found that adding a Bass effect made the sounds sound larger and a Studio Reverb with the equalizer set to custom>great hall with some extra tweaks made it more echoey in between the pillars of the first scene (see fig. 1).
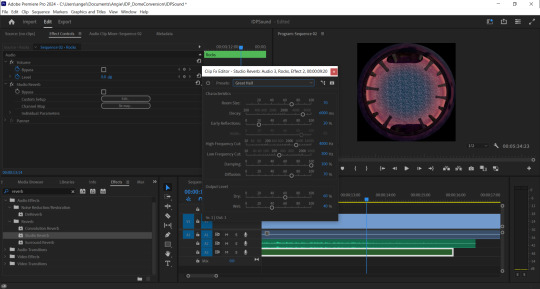
Fig. 1 A screenshot showing the application of Studio Reverb.
The echoes unfortunately did not extend beyond the audio clip length so although echoing through the clip, ended abruptly. If this was After Effects I would assume that a precomposition of the audio layer would allow the software to echo even where there is no actual audio clip. I found that the premiere version of precompose is called ‘nest’. Indeed this worked as I intended. Duplicating a small audio file, adding it beyond the end of the composition and nesting that too allowed the final audio clip to echo as well.
The sounds now matched the scene far better. The sound links below show the originals and how small they sound in comparison.
I added the sound of wind and calm water to connect the viewer to the scene more as well.
The sound of the clock increasing in speed was a challenge as the speed ramp effect only worked on video instead of audio but I found that I could increase the speed of the whole layer linearly so just duplicated the audio layers, speeding each one up with a fade between them all.
I applied similar effects to all of the above for the wormhole and final scenes, but layering the sounds for the wormhole effect was both fun and challenging (see fig.2).
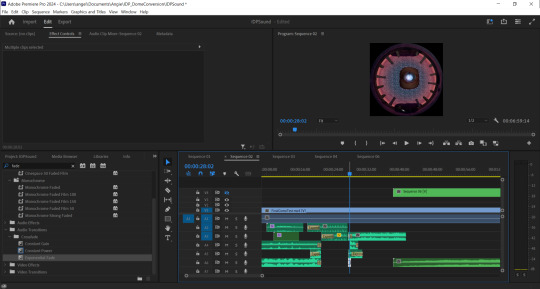
Fig. 2 A screenshot showing some of the final layers of sound for the wormhole effect.
The music we chose had an ethereal, mysterious and slightly unsettling feel and worked well as a more ambient track that did not draw too much attention to itself and did not overpower the direct environmental sounds such as the rocks or wormhole. I feel that the overarching music helps tie everything together and make it a more harmonious experience.
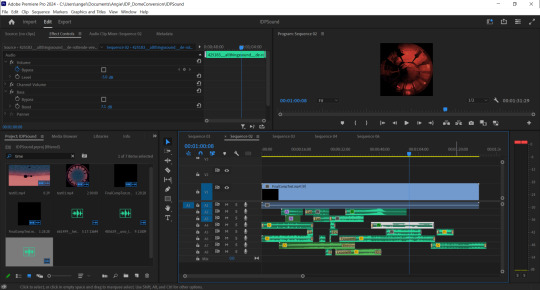
Fig. 3 Screenshot of final sound composition.
The Final Composite
youtube
References:
allthingssound (2018). de rottende veerboot. [Sound]. Freesound.org. [Online]. Available at: https://freesound.org/people/allthingssound/sounds/425183/ [Accessed 12 February 2024]
carmsie (2012). PB It is time.wav. [Sound]. Freesound.org. [Online]. Available at: https://freesound.org/people/carmsie/sounds/168303/ [Accessed 12 February 2024]
carmsie (2012). PB Remember Remember v2.wav. [Sound]. Freesound.org. [Online]. Available at: https://freesound.org/people/carmsie/sounds/168305/ [Accessed 12 February 2024]
DylanTheFish (2018). Warp Speed.wav. [Sound]. Freesound.org. [Online]. Available at: https://freesound.org/people/DylanTheFish/sounds/454683/ [Accessed 12 February 2024]
felix.blume (2023). River bank, waterfall distant loud, lapping water, close recording, bird, subtle cicada in indigenous village Salto Hacha in Amazon rainforest. [Sound]. Freesound.org. [Online]. Available at: https://freesound.org/people/felix.blume/sounds/674104/ [Accessed 12 February 2024]
f-r-a-g-i-l-e (2019). Buttery Breakbeat Synth, octave playthrough. [Sound]. Freesound.org. [Online]. Available at: https://freesound.org/people/f-r-a-g-i-l-e/sounds/500662/ [Accessed 12 February 2024]
het_HCKM_DS_... (2022). Mortality Boring Death Dying clock tick tock klok tik tak incl 20 Hertz sometimes. [Sound]. Freesound.org. [Online]. Available at: https://freesound.org/people/het_HCKM_DS_huis/sounds/661499/ [Accessed 12 February 2024]
Jovica (2008). Pad 006 - Whispering Ears - D4.flac. [Sound]. Freesound.org. [Online]. Available at: https://freesound.org/people/Jovica/sounds/52489/ [Accessed 12 February 2024]
kernschall (2018). SFX_Stone_Calcit_DeadSea_Avalacne_foot #3-178.wav. [Sound]. Freesound.org. [Online]. Available at: https://freesound.org/people/kernschall/sounds/425017/ [Accessed 12 February 2024]
klankbleed (2017). wind gap indoors 001 170305_1100.wav. [Sound]. Freesound.org. [Online]. Available at: https://freesound.org/people/klankbeeld/sounds/383139/ [Accessed 12 February 2024]
Robinhood76 (2021). 10105 big stone crush impact.wav. [Sound]. Freesound.org. [Online]. Available at: https://freesound.org/people/Robinhood76/sounds/567840/ [Accessed 12 February 2024]
X3nus (2020). Ardanbanapolis Interstellar Hub.flac. [Sound]. Freesound.org. [Online]. Available at: https://freesound.org/people/X3nus/sounds/513487/ [Accessed 12 February 2024]
Zimbot (2011). Portal_Continuous_Rumble.wav. [Sound]. Freesound.org. [Online]. Available at: https://freesound.org/people/zimbot/sounds/122972/ [Accessed 12 February 2024]
0 notes
Text
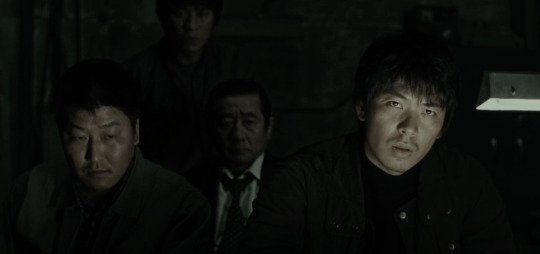
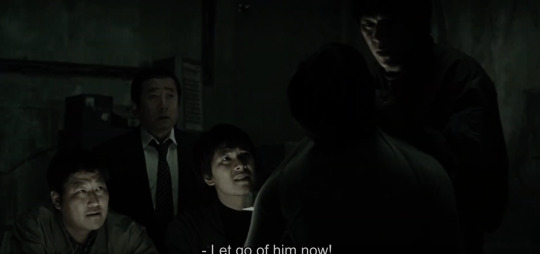
Group 8 Scene Recreation - Memories of Murder Production Breakdown
Brainstorming
For the final week of the production workflow module, my group were tasked with recreating a scene of our choice. Bar some budgetary and time concerns, nothing was off the table.
Eventually we settled on the interrogation scene from Bong Joon-Ho's Memories of Murder. I personally had not seen the film but was excited to tackle it based on seeing the director's other work Parasite.
Pre Production
We had plenty of kit to acquire in order to convey an accurate recreation of the scene:
Camera:
Blackmagic Pocket PRO 6K, Samyang Xeen Cinema Lens Kit, Smallrig Tripod
Sound:
Sennheiser 416, Sound Devices MixPre3-Recorder and Mixer, Large Boom Pole, Microphone Stand.
Lighting:
LEDGO LG-B308K 3x 308 light Daylight Reporter LED Lighting Kit, Gloves
Other:
Polyboard (White), Black Flag x3, Floor Cable Cover, Clapper, Sandbag x3
In terms of props we also had to purchase a light from amazon which would replicate the look of the desk light found in the original scene as well as being flexible to being adjusted in order to match different shot compositions. We had also our crew supply shirts and ties for respective actors as well as paper for the process of interrogation.
Aside from kit, scheduling was also CRITICAL and just as important as many groups were filming at the same time. This ended up being a close call as the only time we ended up getting kit that was far enough in advance to leave plenty time for editing conflicted with the premiere of another group project we unfortunately had to miss.
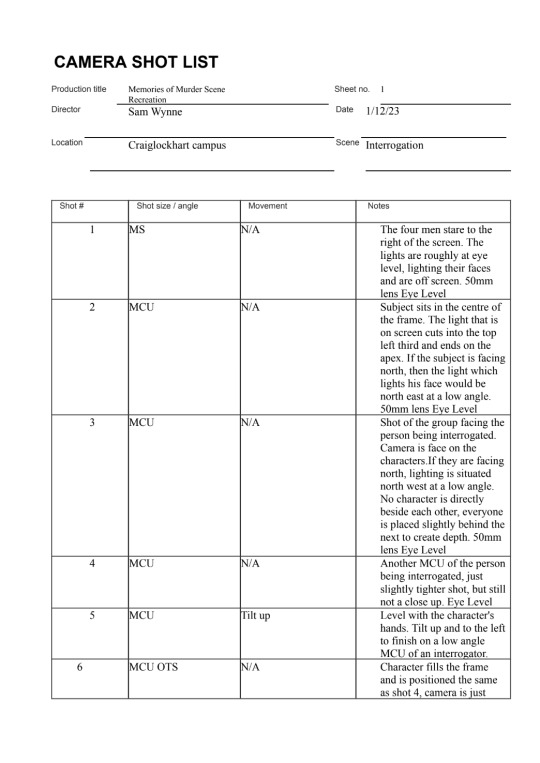
Next we took still frames from each shot in order to plan out lighting:


From there we planned our shotlist:

Along with this we decided on Crew Roles:
Sam Wynne: Director
Jack Burns: Producer, Actor, Runner
Jake Rae: Director of Photography
Jacob Doig: Lighting, Camera Assistant
Rushil Deepak: Production Design, Sound
And our actors:
Harry Batkin: Park Hyeon-Gyu
Daniel Lee: Seo Tae-Yoon
Cameron Mcintyre: Park Doo-Man
Jack Burns: Shin Dong-Chul
Euan Hunt: Cho Yong-koo
Our chosen filming date the 4th of December 2023.
Filming
While the location of the scene might not seem complex there was lots of shots and respective lighting to match each.
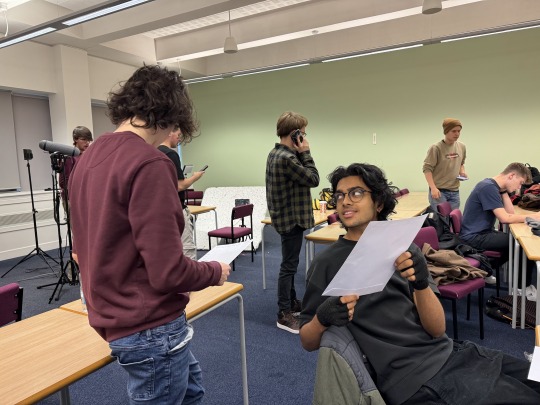
Figuring out framing with the crew/ Practicing lines with actors
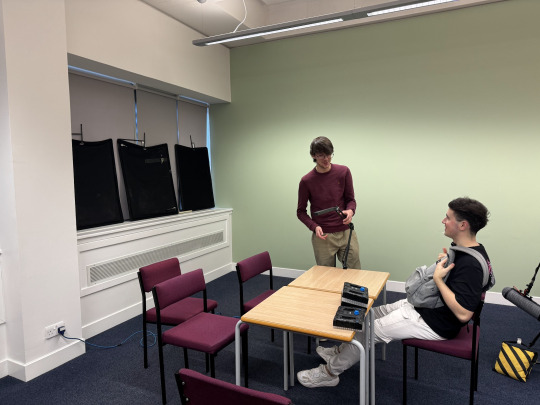
We experimented with different angles and setups in the classroom we had booked for the day, and settled on using the corner of the room, which was conveniently near lots of sockets (Useful for our luck of batteries dying).
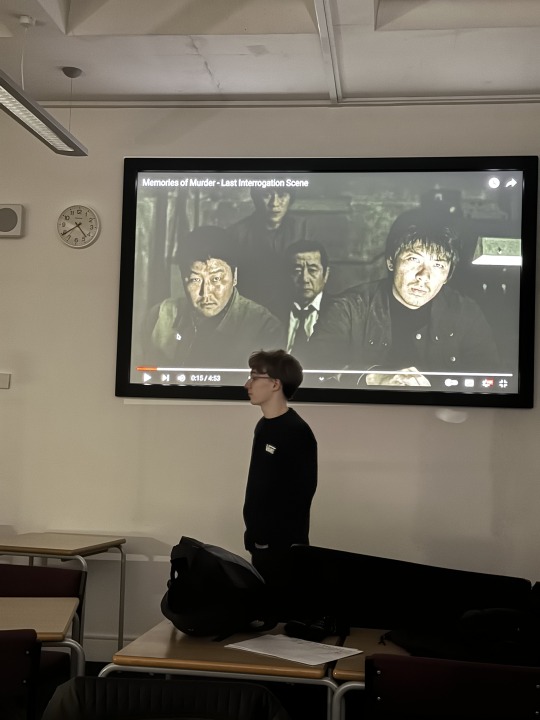
The classroom booking and the orientation of set placement actually worked out in our favour as we had full view of the room's projector, on which we displayed the original scene allowing both actors and the crew to get a feel for each respective shot as it came and went.

This initial shot we filmed first was actually quite simple compared to the others as we only had one character to worry about, along with just having to light his face, as opposed to later shots with characters blocking part of the framing.
Post Production
I helmed the post production of this project, inheriting the audio and video files onto my macbook. I then edited the film in premiere pro.
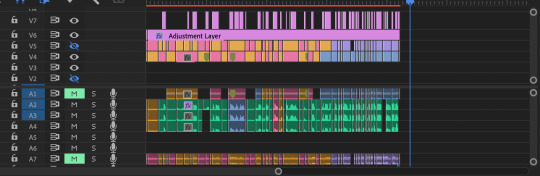
FInished Timeline
I attempted to organise individual cuts by colour coding different takes and angles, as the scene ended up being pretty complex to put together.

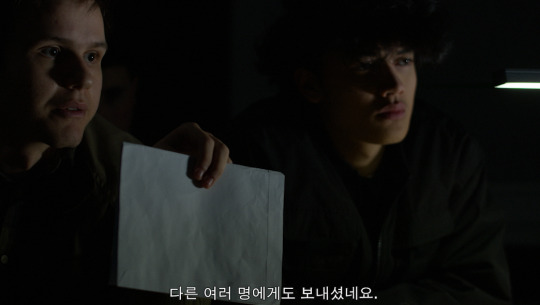
While not integral to recreating the scene, I thought a nice touch in the post production process would be the inclusion of Korean subtitles, paying homage to original language of the film.

Colour Match Feature
I used premiere pro's colour match feature to try and make some small lighting adjustments based on the original scenes. Admittedly, I don't have much experience with colour correction so I didn't go too in depth past this stage. However, this definitely something I want to learn over the winter break..
0 notes
Text
Why Novanti is So Inactive, and Other News
Hey everyone! I’m not sure if you even remember this channel at this point, but Novanti is still around. In fact, I’m planning on releasing our first big video of 2023 in just one or two weeks from now! But, where were we?
Simply put, all of us have been quite busy with… quite a few things, school being one of them. And it gets tiring, too. I know you’ve heard this many times, so to cut to the chase, none of us in Team Novanti have had time to do stuff on the channel, as much as we’d like to. Nor is Novanti anywhere near the top of any of our priorities.
Watch the video below, or keep reading:
youtube
In the past, I tried to hold myself to a weekly upload schedule on Novanti. That was easier when my videos were mostly gameplay with not much scripted commentary, and whatever videos were scripted were much simpler than the average Novanti video nowadays. Unfortunately, due to the amount of research, planning, and editing that goes into today’s Novanti videos, I’m going to completely ditch the idea of an upload schedule for Novanti. Novanti is not the only channel I run anymore; in fact, I run two others, but I put much less effort into those than I do into Novanti, and honestly, I have a lot more fun just screwing around with my videos and sharing things I think are funny or that I just want to share. I try to run Novanti by the same ethos, but I think I’m just… artificially holding my standards too high for Novanti.
My last video made in Premiere Pro, which was my 1,000 subscriber special, was probably my best work of video editing I’ve done. But not only do I not even use Premiere Pro anymore, I don’t think doing this same style is… productive. Videos on serious and important topics don’t mesh well with the style I’ve built up doing videos on Geometry Dash. So, I’m going to start anew with how I edit Novanti videos, with a style that fits my new content better.
To be honest, recording my voice is the hardest part. For those of you who’ve seen my long-unlisted cancel culture video, my voiceover was… utterly terrible. Way too fast for many people to understand, not to mention me getting caught on a few words. Fun fact, that’s actually how I normally talk. In all honesty, it takes me quite some effort to talk slowly enough for everyone to understand me. It’s even harder when reading scripts. This is the biggest factor in why I rarely ever upload. Not because of how I edit, not because of creating the scripts, but creating a voice over of them. Mostly because of problems with how I speak that are almost entirely out of my control, and I’m not even beginning to talk about voice dysphoria, nor will I. That’ll be for a future video. All I’m going to say is, if I start to sound different in the future, know that it’s for the better, but don’t expect any changes to my voice for at least a few months.
Now, for some other updates. If you haven’t heard yet, we have a Tumblr now! teamnovanti.tumblr.com, it’s in the description. We’ll be posting channel updates to Tumblr, just as we will resume doing on Twitter, but Tumblr’s lack of a word count gives us another opportunity. We will be posting full video transcripts to Tumblr, so that our content can become more accessible to those who may have a hard time hearing us. Full captions will also be on our videos, as always. If you have any better suggestions as to where we should put our video transcripts, let us know.
As stated in the beginning, I’m hoping to upload my first big video of 2023 in just a week or two, that video being the Inclusive Language introduction video. I’m going to talk about gender-neutral language, pronouns, and more in it, and I plan on adding more videos to a potential series about inclusive language, though my actual plans may vary.
That’s all for now. See you soon, hopefully, and happy new year!
1 note
·
View note
Text
Elf Recreation
For our final project we recreated the spaghetti scene from the film Elf.
youtube
I was the editor for this project which I found quite challenging as my experience with editing is very limited.
We had many issues before filming. One being that we were unable to book equipment due to maintenance so had to postpone our filming. The equipment we then received wasn't the same equipment we had been trained in and our boom mic seemed damaged. We were unable to get the right sound recorder or any lenses other than a zoom lens.
The person who was going to lend us an elf costume was no longer able to. I had to buy one online last minute as all the costume shops didn't have it. We also had to move location for filming as we could no longer use Jamie's house. When we arrived to the new location (Sean's kitchen), Maria set up props while I cleaned the kitchen as best as I could before the shoot. We also had to change actor for Walter.
During filming, we came across more issues. For Walter's scene, the day we filmed was very miserable and we had to end early due to the rain. For Buddy's scene, I was responsible for the clapperboard and directing Harry where I could. I brought some of my plants to help aid the set. We noticed that the camera reflection was visible in the oven's door so I decided to try moving a table (with Sean's help) to cover it. This actually became a helpful emergency cabinet. However, something we forgot to consider was the spaghetti getting too cold and therefore becoming solid. We tried our best to mix the spaghetti before each take. Also, we realised it would be difficult to make sure all the food stays in the same position so that we don't experience continuity errors in editing.
We were also aware that we would be pushed for time due to the sun as the sun currently sets around 3:30pm.
During editing, I was handed the sd cards and worked on our film in the Jack Kilby Centre. Jamie helped with sound since I had never used premiere pro before but tried my best to learn it. Unfortunately, I was unable to try and fix the colour grading as I didn't know how and also was worried I would ruin the images. A lot of our sound files were too quiet due to the sound recorder and boom mic and when we tried to fix this in post it magnified a high pitch drone. Also we were lacking video footage that could be used as many had boom mics visible in them.
Overall, our weaknesses are that the colour grading is off for the scene we were trying to recreate. I believe our framing of Buddy's scene is also quite different. Isla decided the chairs were distracting so we didn't use them for Buddy's part. Walter's scene has distractions of people walking or lack of cars. I would have wanted to film this on Prince's street instead and film Buddy's scene somewhere closer to the original setup. Our strength is the ability to overcome all these challenges and still create a film that is fairly decent.
0 notes
Text
Denoise in premiere

Denoise in premiere how to#
Denoise in premiere movie#
Denoise in premiere software#
Denoise in premiere download#
It's also easier to apply through masks when you do it in premeire (so specific areas of a frame get filtered) harder to do in avisynth. This is harder to do with a frameserver setup, easier to do if you have a denoiser right in premiere (e.g. When to do it? It's usually best to do it as you are color correcting because otherwise you don't know how much to denoise or what areas to denoise. People often dither and add back fine noise or use grain Overdenosing can be just as bad - when you overdenoise 8bit video, often you will reveal banding along gradients. Dave actually stacks this with the Waves NS1. This can be a little more effective at cleaning up the actual noise in the background.
Denoise in premiere software#
Meaning the software can analyze the clip, figure out the background noise, and then more accurately remove just the noise from the clip. In the Effects Panel, were going to go down to Video Effects, select Noise & Grain, and select Median. Under Advanced Adjustments, select Reduce Noise and drag-and-drop it to your media file in the. This effect is also available in the Quick view window. Import your media file to Premiere Elements and drag-and-drop it to the timeline. It's usually very bad with low light DV footage This allows you to actually profile the sound. Use reduce noise effect to improve quality. Add another effect in the effects panel - DeReverb. In the first effects panel segment add ‘DeNoise’ and then select the level of DeNoising you’d like to apply to your audio using the slider in the DeNoise FX editor. The most common example - When you boost shadow areas, noise will often be revealed. After selecting the clip go to Select the DeNoiser effect and then drag and drop it onto the clip you wish to remove the. In the audio track mixer panel, click on the small triangle pointing to the right to pop-out the effects panel. Noise affects the limits to which you can push or adjust footage in color grading. Does the noise affect color correction in Premiere ? Yes it does.
Denoise in premiere movie#
I don't know when it is best to denoise the clips: before importing them in Premiere Pro, of after I export the movie with debugmode framesever, using denoise filters in avisynth. Some clips have alot of noise because they were recorded in low light. After that, I export the movie with debugmode frameserver, and I use avisynth and x264 to encode them to H.264. After I import the dv clips in premiere, I edit them, I correct their tonality, and I remove their color cast.
Denoise in premiere how to#
Instructional videos, and example videos, that help you learn how to get the most of each plug-in's robust features.I'm working with PAL DV video in Premiere Pro CS3. Unlike many other products, DE:Noise uses smart spatial and temporal filtering to reduce noise while preserving details. Porter’s “The Great Train Robbery” Creative Commons Source.View Complete Gallery DE:Noise Features Free Denoiser Plugin For Premiere ProĭE:Noise handles spurious frame-to-frame defects ranging from fine digital/electronic noise to blotchy spots like dirt on film.Īddresses problems of low-light shoots, excessive film grain, CG renders with ray-tracing sampling artifacts, film scan artifacts, snow, drop-outs and can even handle a flash frame here and there. Video provided by Marco SonettiGreat Train Robbery (excerpt)ĭust and other artifacts reduced with DE:Noise. The source was a very deteriorated 35mm news reel: Cinegiornale FS “il Settebello”. DE:Noise used in Blackmagic Design Resolve to remove film dust. See what DE:Noise can do for you!DE:Noise Film Dust Exampleĭownload mcafee uninstaller for mac. For example, when the user would like to handle the low frequency range while Recovery is at maximum and Split Freq modifies too high of a range. Denoiser Low needs specific settings to function properly.
Denoise in premiere download#
Turbotax canada 2017 download mac.ĭenoiser Low/High: Filters the noise from the low/high frequency range set by Split Freq.
Free Noise Reduction Plugin For Premiere ProĭE:Noise uses frame-to-frame motion tracking to reduce noise and other artifacts.
Reduces noise using novel feature-sensitive spatial filtering along with time-based optical flow methods! Free Denoiser Plugin For Premiere By apidmetme1988 Follow | Public
0 notes
Text
Adobe premiere pro 2021 ultimate course

ADOBE PREMIERE PRO 2021 ULTIMATE COURSE HOW TO
ADOBE PREMIERE PRO 2021 ULTIMATE COURSE FULL
ADOBE PREMIERE PRO 2021 ULTIMATE COURSE PRO
You can also download Adobe Speech to Text for Premiere Pro.
ADOBE PREMIERE PRO 2021 ULTIMATE COURSE PRO
This course is the most comprehensive beginner editing course where, by the end of the course, you’ll feel confident editing your own amazing video projects.freeload Adobe Premiere Pro CC 2022 Pre-Activated Offline Installer for Windows is the leading video editing software for film, TV, and the web. My ambition with this course is to take 5 years of my video editing knowledge and experience, and put it in an easy-to-follow course so you can learn in 1 week what has taken the last 5 years to learn. If I can do it, I am confident that you can do it too. Trust me, as I review my stats it sounds crazy to me too! I never expected in a million years to be in my current position with these achievements. Fast forward to February 2021, I have ġ0,000+ YouTube subscribers with over 7.12 million minutes watchedĢ66,000+ students in my online video courses In 2016, I had zero video editing experience, no laptop, no students, and no YouTube channel.
ADOBE PREMIERE PRO 2021 ULTIMATE COURSE FULL
I’m a self-taught video editor and full time vlogger that started off like you! What downloads are included in this course?Īll project files (to follow along with me)Ĥ Cinematic Film LUTS (including the famous “M31” LUT) Sourcing no-copyright professional background music You’ll also learn some cool effects to make your videos awesome, such as Īdding Film Grain for a Vintage Film LookĬreating Rolling End Credits (Like a Movie!)įixing Shaky Footage using Warp StabilisationĮditing Super Smooth Slow Motion (using Optical Flow)Ĭreate An Awesome Strobe Effect (2 Methods!) How to Export High Quality Instagram & YouTube Videos How to Create Instagram Videos (Portrait, Square, Stories, IGTV) Setting the Perfect Audio Levels and Audio MixingĮditing Montages, Full Screen Transitions, and Lower Thirds The Basics of Editing to Music Beats (2 Methods)Īpplying Cinematic Colour Correction and GradingĪdding Titles, Transitions, B-Roll, and Sound Effects The Fundamentals of Editing (Creating New Sequences, Simple Transitions, etc) You’ll create a travel montage and a talking head video (all exercise files supplied)
ADOBE PREMIERE PRO 2021 ULTIMATE COURSE HOW TO
I’ve edited all of my videos with Adobe Premiere Pro so I’ll be teaching you how to edit stunning videos for YouTube (and other platforms) in Adobe Premiere Pro without all of the unnecessary complexity that you’ll find in other courses. I wish I had this course when I first started, it would have saved me years of pain and suffering! Adobe Premiere Pro seemed so complicated and the learning curve was painful.Īs a self-taught video editor with 5+ years experience exclusively with Adobe Premiere Pro, I am proud to say that I am truly happy with the quality of the videos I am producing for YouTube. If you’ve taken a quick look at Adobe Premiere Pro and are completely overwhelmed by the features and have no clue how to start editing your first video, you have come to the right course.įor the first few months of my editing journey, I battled the same problems you have and I felt like I’d never figure it out. This course is a one-stop-shop that has everything you need to become a confident editor inside Premiere Pro. If you have never edited a video before and want to learn while you are stuck at home, join over 206,000 students (in all platforms) in one of the largest and most popular video editing courses for beginner’s on Skillshare! Stuck at home or quarantine and want to learn how to make videos to grow your online business or personal brand? * UPDATED 1ST FEBRUARY 2021 – INCLUDES LATEST SOFTWARE UPDATES *
0 notes
Text
Almost finished
Things are really starting to wrap up.
This week I brought the (mostly) edited film to class to show my teacher and my group. Everyone really loved how it’s come out.
My teacher said he liked the pace in the middle of the film, where the chase/walking scene is, and said I should try to edit the rest of the film to include jump cuts like that. I spent most of the class working on that. He gave me a great tip, telling me to make a duplicate file of the film and edit on that so theres not as much pressure around ruining the file, which worked great.
He also pointed out an issue with some of the script. We said 1940 when we should have said 1840. We were going to have to re film it with the correct date, but I figured out a way to use left over film and make it so we only had to redo the audio (and avoided needing costumes + to set up filming, which would have taken a long time). I was pretty happy that my Premier Pro skills have increased to the point where I know how to do that stuff, and my teacher seemed pretty impressed too.
The other members of my group have been working on the script and it looks pretty good so far.
We haven’t worked on sound design much yet as no one in the group is very interested in music. Our teacher did show us some tips for garage band which was pretty cool. Other members of the group are in charge of sound design, so I’ll leave it up to them to decide which direction to head in. I think we may be working on it next week in class.
I did have some issues transferring files across devices. The film I received from one person was really low quality and didn't match the higher quality clips from the start, so I will have to re edit those. We did end up figuring out a way to transfer the higher quality parts pretty easily which was good. It is a bit annoying to have to redo them, but now I know for next time to be firm about which platform is used for handling files.
I’m still really happy with how well the film is coming along and how productive everyones been so far this term. Next week is our last class and we should get everything wrapped up then!
0 notes
Text
Blog #5: ‘Putting the Film Together’ CIND1004 c3398767
After gathering all our resources and materials, it will enable us to completely create and edit our film into the final product we wanted. As we started editing, we realised that we needed to gather more recourses for our film, which was a soundtrack, sound effects and filters.
SOUNDTRACK:
Searching for a royalty free soundtrack to match the genre of our film and scenes from our film is something our group has still been exploring. Ideally, we envision a soundtrack that is lighthearted but not too dramatically “happy”, only for the reasons for allowing the soundtracks to have room for a suspenseful build up. This suspenseful build up is supposed to represent the tense emotions between the characters, and the anxiety girl 1 is feeling regarding loosing all her stuff. Ideally I want to aim for a quiet yet suspenseful track to connect with the audience and allow them to interpret the provided recourses in the film, which is the visual filming and the quiet yet dramatic soundtrack. The lighthearted soundtrack is to represent the peaceful setting of the beach, and the “calming and fun” association of hanging out with a friend at the beach. Some websites I’ve been looking at consist of:
https://artlist.io/?utm_source=google&utm_medium=cpc&utm_campaign=13681196598&utm_content=132218487259&utm_term=free%20royalty%20free%20music%20downloads&keyword=free%20royalty%20free%20music%20downloads&ad=573772407961&matchtype=e&device=c&gclid=CjwKCAjwkMeUBhBuEiwA4hpqEF9f5C2n5WMGzruMTQ0RKe00rxCe4Tc_WclkY5zhIOqQqIJFbRQ9VRoCM2QQAvD_BwE
And
https://www.epidemicsound.com/?_us=adwords&_usx=12639476111_royalty%20free%20soundtracks&utm_source=google&utm_medium=paidsearch&utm_campaign=12639476111&utm_term=royalty%20free%20soundtracks&gclid=CjwKCAjwkMeUBhBuEiwA4hpqEPZA0MgBreqe0kzERrPpUcRPwRkixLJ005ZDCWqUqbnh5gLKpyIN_xoCSdQQAvD_BwE
SOUND EFFECTS:
We wanted to use as much organic and diegetic sounds as much as we could so we could have more authentic sound effects. During our filming process, we used our phones and recorded our dialog during the exact moments we were being filmed. The actors used Voice Memos on their phones and held it close to them but without it being noticed by the camera. With this, we will be able to use strong voice lines within the film, along with authentic sound effects for the film.
EDITING:
For the editing, I have been cutting scenes in order to tell the plot/story in a more coherent format for the audience. I also wanted to include a LUT for an over effect for our film. “LUT stands for “look-up table.” A LUT is a tool that lets filmmakers, editors, and colorists save particular color grades as a template”

This is the beginning of editing our film using Premiere Pro
0 notes
Text
Week 12: Postproduction Begins. The Final Blog.
Welcome back to CreativeCollaborationsUpdates! We’re extremely happy that you guys keep wanting to return to stay up to date with how our filmmaking process is going. This week we entered into our postproduction editing, however, what kind of film making process would it be if a few hiccups weren’t to occur.
On Monday night before class, sound designer, Lochie let us know that he unfortunately has COVID and won’t be able to make class, and Alyssa, our art director was also sick and unable to attend. However, Kendall, Astrid and I did not let this get in the way of slowing us down, after all, we only have a few weeks left...
On Tuesday in class, us three girls got together and discussed with Claire what we would like to achieve by the end of the class. We decided that after we upload our clips to a safe location, such as OneDrive, we will then we able to import them into adobe and begin the very early stages of editing. We did have a minor hiccup when importing and locating the footage on Premier Pro, however, classmate Rachael, came to the rescue and helped us troubleshoot.
Our goal within these two hours was to cut our very lengthy eight minutes of raw footage down to three minutes max, that of which we successfully did. It definitely took some hard decision’s when deciding what footage to cut and how it would impact the storyline, however, I am confident we made the correct choices. During this process, Kendall also had to edit the monologue voice over within our script (for me to recorded by next week), to fit in with the required cast number changes, after our actors could not make it last week.
(Example timeline snapshot of editing, not our film)

Whilst Astrid is our official editor, we all concluded it would be easier if we all helped and worked on it together, allowing for clear communication and collaboration of ideas about where we want our film to end up. Kendall, Astrid, and I all collaborated for our class time and made a clear timeline of where we are at in terms of end result.
Hereafter, within our class time, we cut down the film and established that we are on track and in control, and that next week is for Lochie’s sound editing and adding in Alyssa’s animated title sequence and end credits. During this time, I also expressed how throughout the week I went back and looked at the movie poster Lochie had sent and realised that he was just sending a reference photo he had found for inspiration and had not actually created that himself. However, this miscommunication did not affect too much, because as producer, I just messaged the group chat and let both Lochie and Alyssa know where we are at, and what needs to be completed ready for next week’s class. As art director, Alyssa enthusiastically agreed that she would be alright to get the movie poster, title sequence and end credits done for next week. Lochie too seemed excited for the sound design next week.
All is well and on track, with each team member on the same page. Thanks for coming along guys, hopefully by next week we have a completed film, with only a few refinements to go over!! Cant wait until film festival!
Taylah GrayC3399124
Tutorial Class- Tuesday 11-1pm, Claire Pasvolsky.
0 notes
Text
CIND1004 Weekly Blog #4
This week was arguably my favourite week yet!
Monday
On Monday, Tate, Cam and myself all hopped onto a zoom call to write a rough copy of the script.
Cam and I completed it that night, so that Tate was able to draw up the story board!
We also went on a trip to shindigs, Bunnings and Coles to grab everything that we needed to start our filming!
Tuesday
We touched base on everything such as approving the fake arm, testing lighting and viewing Tate’s incredibly realistic storyboard!
We then headed to Fort Bunkertrench to run through the script at our actual set to ensure that everything would work how we imagined.
Wednesday
On Wednesday, Cameron and I went to Tate’s house to make our first batch of fake blood. It was mostly successful, but we definitely needed to make it a bit more red, so I took the ingredients home to make another batch with more red food colouring.

Thursday- FILMING
On Thursday at 7am, we all met up at Fort Bunkertrench to get the ball rolling on our filming! We got 90% of the shots we needed inside the fort down.
Reflection
This week was super productive! The group is incredibly easy to work with, which has made the process extremely enjoyable! Everyone is very willing to do a lot for the film, like getting up at the crack of dawn to squeeze in some filming.
Personally, I felt this was my most useful week yet! I had always known that my role wouldn’t come into play until later, but I still felt like I wasn’t doing enough to help out my fellow fishies! So, being able to film and work on what the shots were looking like was great for me!
I feel that the lighting may have been too harsh in some shots, considering it’s supposed to appear mostly dark aside from flashlights! To figure this out, I will review it with the group and potentially reshoot or take it to an editing software to make it a little softer.

My Role
I will start constructing the film as best I can using the clips that we captured inside the trench in Premiere Pro! Doing this, I will be working closely with Ned, the sound designer to figure out what visual clips should overlap with what audio clips! And I will also working with Tate, our art director to ensure that the movie poster and video match nicely!
We will also need to find another day, preferably at night when we can capture some of the evening/night scenes.
Overall, this week was super fun and I can’t wait to continue!
1 note
·
View note
Photo

Premiere Pro Video
This is a showcase of the work done behind the scenes of the final video made in premiere pro. All the initial video clips were added and cropped in the V1 section so the video ran through nicely. Audio in A1 was kept and cropped down to add a VoiceOver that specific parts of the video of the model speaking to add a hint of documentary style to the video. I intended for more which is what I would improve on next time. Audio in A2 was backing music to the whole video, I picked a relaxed song and used Audio Gain to adjust the sound lower in the sections the model was speaking. I added other video clips into V2 and lowered the opacity to create a view of two videos at ones overlapping each other, I loved this outcome. I also added typography on V2, V3 and V4 to give a little bit of context to what the aim of the video is trying to tell the viewer without giving too much away, this to me goes hand in hand with the publication and fits really well together. Speed/Duration was also edited on specific clips too slow and speed them up, some were also reversed to play backward. Finally Fuji visual effects have been applied across the whole video to change the overall colour and stylise the video further.
0 notes
Text
Forget Me Not - Post Production - FN2
Edit
Learning to use Avid was a rather arduous process given that I have only worked on premiere pro before which has been far more user friendly, however, after two drop in sessions with Sam I feel as though I have gotten the hang of the software and can use it capably with some level of familiarity.
Although as you can see, the timeline for the film isn't exactly complex.
The biggest issue I ran into with the edit was our lack of adequate coverage for the majority of the film. For about a full minute the only two shots of coverage we had was a mid shot as our master shot, neither of which were framed particularly well, leaving me in a rather tricky spot.
While we did have some footage to use in cutaways, the dialogue never breaks for long enough for them to be used without it seeming very jarring. So to break things up at least a little bit I added in a small intro of two close ups hoping to add some level of emotion to the film before the viewer is trapped watching the mid shot for what feels like an eternity.
I was advised against this intro by Demelza in a feedback session but decided to go against this specific suggestion as I felt the film needed something (anything) to break up the long shot.
Sound
The sound edit also had some bumps in the process. This is in large part due to how late I had started the edit due to personal issues which had prevented me from beginning the process. By the time the edit was done I knew I needed help in starting the sound edit as I was not at all familiar with pro tools; nor any sound design software for that matter.
Our producer, Sophie, had kindly signed me up for a back to back pro tools session in the Screen Academy during the last week of classes before the Easter Holidays so that I could learn the basics of the software and then use what I had learned once the edit had been fully finished, however, disaster struck and I tested positive on a lateral flow test and had to self isolate until I could pass on a PCR, forcing me to miss the last drop in.
I now had to do the sound edit without any real experience in pro tools and was nervous to start completely blind, but very kindly, Jacob Turner, who is also on the course offered to assist me in getting started, teaching me the basics and how to get by.

Eventually, through much trial and error, I had done something with the sound which the director was happy with, adding some ambience to the dialogue which was coming across as a little dry (especially with no cuts for a section). As well as this I tried to add some audio which may hint at the ending as we had failed to do so visually despite some in our groups best efforts.
However, I was not aware that I should have been playing the sound through the computers speakers rather than the headphones which I had been using and so after I had exported the film and had no time left to make any changes I realised my mistake in how quiet the film had come out. Through headphones it still sounds fine but during the crit session all of my added audio was inaudible and the dialogue was far too quiet.
This was a simple mistake which I wish I had known to fix before I had exported everything. Ultimately, this experience has taught me many valuable lessons in editing which I know I will take with me throughout the rest of this course
0 notes
Text
AX2002 - University - Dimensions - Voice Over, Lip-sync, Portal and final touches
In my phase 4 post, I concluded saying that although most of my animation production plan was complete, we were still waiting for our voice over/ dialogue, and I needed clarification for my portal design. Consider this post as a bonus phase of sorts as I discuss the voice over process and portal process for my part of the Dimensions project.
The Voice Over and Lip sync
We were very fortunate enough to have a member of the acting course come in and do the voice over for our Witch character. For my scenes I mostly needed sounds as I felt having too much dialogue in my scenes would break the flow/ dynamic of scene between the Witch and the hand character. Although I was not able to be present for the entire recording process, I was present for my lines which was good when I tried to explain what I was looking for from the voice actress and in the end, I was very happy with what I got.
When it comes to the lip syncing for the voice over, I researched key mouth positions from my show inspiration for the Witch being the Disney show “Phineas & Ferb”, as well as referencing past work and lessons for key mouth positions. Thanks to this research, I was able to identify which mouth positions would work best for my character and animated them with only a small handful of errors with the inbetweening each frame, but I was able to get these issues fixed for the final piece.


The Portal
Before animating the portal, I felt that I needed clarification for what I needed to do for the portal, as from looking at other people’s work, some portal where differently shaped to the original, some had particle effects, and some didn’t and more. From asking around the class it appears that it did not matter whether the portal was an oval or a tear through reality, it also did not seem to matter if you added particle effects or not, the key aspect that had to remain the same was the white spiral in the middle.
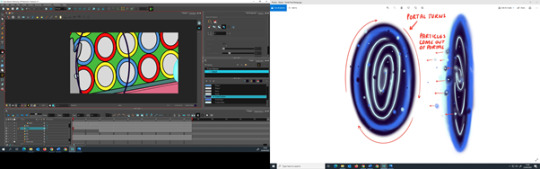
With this knowledge in mind and being conscious of my remaining time, I decided to make my portal an oval with colours within it. When animating the spiral, I was having difficulty animating it as the spiral would become larger than the portal and protrude out of it looking uneven. Fortunately for me one of my classmates was able to help me with this issue and explained to me how to keep the spiral within the portal, I took notes and then tried this myself. It appears that it is much easier to animate the portal and spiral straight on then once finished then modify the shape of the portal. I was also interested by the fact that he animated the first portal in threes as two’s felt too quick and anything above three frames appeared sloppy. I took these lessons applied it too my other portal scenes (except for the first scene as I felt the portal appearing and disappearing was enough).

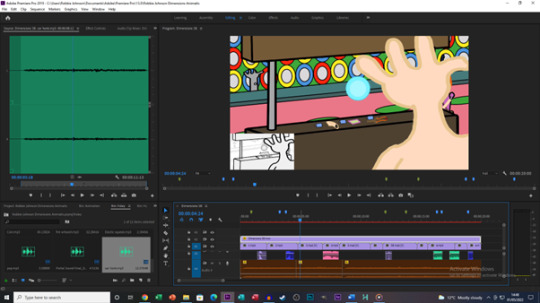
Editing it all together
With the portal now animated, this meant that the animation was complete, now all that was left to do was place my animation within premier pro and export it as an MP4. From the animatic phase of development, I felt happy with the majority of the Foley used for my scene, with only a few changes being made to the audio, so I used mostly the same audio from my original animatic.
I began by moving the animatic timeline above where I was placing my new animated scenes, I then shrunk down the animatic version of my scene and placed it in the bottom left corner of the screen, this was so I could make sure my timings where still in line and that no scene was longer or shorter than they were originally. Once lining up all the footage and audio, I added the new portal sound effect we had to use for the portal and this sound effect caused issues to begin with. The main issue in particular was when looping the clip there would be a harsh popping sound where the audio would loop, I tried speeding up and slowing down the speed of the audio to fix this issue, but the audio would become a higher or lower pitch becoming too different from the original sound. To fix this issue, I would have the loop intertwine between each other across two audio trach and using the pen tool, I would make the beginning and end of each track mute to minimalize the popping sound from being heard. In the end the pop is not completely gone but is greatly reduced from what it once was, I then added some more background ambiance to the scene and thus the project was now complete.


0 notes
Last Seen Blogs