#Basic Structure of a Fancy Yarn
Text
I have been thinking about the costuming in Willow a lot, and yes this is for fanfiction reasons but it's also just for fun. As background, my non-fandom hobbies are mostly textile based: I sew garments and teach sewing classes, I'm an experienced knitter and handspinner and I've started to dabble in wool processing from fleece and four-shaft weaving.
So once I get into a Textile Puzzle Hole I can go pretty deep, and this is a fun and important part of understanding the worldbuilding for me.
Because they're doing a thing with Willow that - I actually really enjoy. It's not "classic fantasy" in the sense that it's not period-appropriate or of a specific era that we'd recognize. They're also clearly trying to call back to the 80s roots of the original film with some of the design choices; mostly the elements of armor and clothing that they're pulling from traditional martial arts clothing and the existence of Fun Fantasy Denim.
A lot of my thoughts aren't necessarily about critique, but more about trying to put together a cohesive rubric for myself as to what the costuming aesthetic is. Because it's not "anything goes," it's got a specific vibe and a clear voice and I want to "get it" more for my own writing and for my own understanding.
I think the two rules that I've drilled down so far are:
Textiles As Artisan Material (all-handmade, no fantasy spandex)
Function Over Form
1. Textiles As Artisan Material
So to get into this a little, I want to get into the idea of how textiles are made because for me I'm In Deep and know a lot about the raw material to cloth to garment process but the average person does not. (I will say, I'm excepting the Cuirass from all of this - we know metatextually that it's a 3d printed stretch fabric bodysuit; it's also magic so it doesn't count.)
So, the average person is used to textile production that is predicated on post-industrial-revolution technology. Meaning:
power-driven machines for weaving and spinning
computer technology available in spinning and weaving machinery to allow for easy production of highly complex cloth structures and patterning
overabundance and artificially low costs of raw materials
When you are thinking of fabric (and I'd include cloth and leather here but not metal armor) as a skilled artisan material, understanding the reasoning for, for instance, Jade having one shirt for the entire series involves understanding what steps are involved. Then, we can understand how many human beings are involved in fabric and therefore garment production and also how many people need to get paid along the way. A piece of cloth entirely handmade for a garment would involve:
a producer to grow the textile fiber (cotton, flax, wool, hide for leather)
skilled artisans to process the fiber (washing, preparing for spinning which could include combing/carding wool, retting flax, etc, leather tanning)
skilled artisans to add dye. This can be done at the stage of prepared fiber, finished thread/yarn, or finished cloth. In a real-world/modern context, this would have significant impact on the cost of cloth. Certain colours (reds, purples) are much harder to dye true than others or require more expensive dyestuff.
skilled spinners to turn the fiber into fine threads for weaving - depending on the fineness needed for the specific weave of the cloth this could be weeks to months of work. Thinner threads will take more time but have more drape and be less stiff as a cloth, so you'd need thin threads for next-to-skin garments like undershirts, and for fine fabrics in things like dresses or fancy formalware
weavers to weave the threads into cloth. Again, the timing here would depend on the type of thread being used but it would also depend on whether or not there are any woven-in embellishments as components of the cloth. Basic cloth in plain weave would take time but not a lot of extra skill; twills or patterning require more time and weaving skill.
embroiderers to add any embellishments either to the base cloth or to the finished garment
tailors and seamstresses to make garments to measure, which would involve cutting any pieces out of the finished cloth and turning it into a garment the correct size for the wearer. If we are assuming that the mechanical sewing machine has not been invented, then garments would be sewn by hand.
handsewing a correctly finished garment involves more than just tacking the pieces together; seam finishes so that the cloth doesn't unravel often require going over the same seam line one or more times. The labour hours in this step cannot be overstated.
metalworkers or other craftspeople to make fastenings and finishings: buttons, toggles, grommets on lacing that weren't handsewn, etc.
leather garments would be made by a separate type of textile worker, since leatherwork requires different tools and a different skillset to successfully construct garments.
So for a basic garment we're looking at needing to pay six separate types of skilled artisans for their work, up to six or seven if it's a garment with elaborate fittings and/or finishing such as buttons or metal fasteners.
The textile economy is relevant here because it is going to translate directly into style. Cutting fabric into patterned shapes leaves waste; this is fine if you're using mass-produced fabric that you can easily afford to replace but if cloth is the 10/10 most precious thing in your garment, you're going to try to cut it into as low-waste a design as possible. It might also lead to less fussy fitting, so that garments are adjustable and can be used by a person for much longer.
It also translates into textile types. Prior to the advent of mechanical knitting machines, any knit (stretch) fabrics would be hand knit. If you have ever tried knitting yourself, you understand that knitting with thin thread takes more time, and therefore more labour hours.
What this means for clothing in-universe on Willow is:
almost entirely woven fabrics, with the exception of handknitting (see: Elora’s scarf-shawl)
this likely does translate into undergarments; I've been looking at regency and late-Victorian era examples to get my head around. The modern bra and panty set is heavily heavily dependent on not just machine knit fabric but also a TON of petroleum-based synthetic textiles that cannot be produced without modern post-industrial means.
fastened using items that can be handmade! Buttons, toggles, clasps, ties or belts for the most part, with the occasional Fantasy Rivet or Fantasy Grommet.
precious! so precious! Expensive to produce and also worth caring for; we see some examples of visible mending in-show and that would have been the standard for everyone with the exception of Kit and Airk.
2. Function Over Form
So this is maybe something that I only think about because I sew, but the modern eye is really used to equating and understanding "woven" fabrics and "stretch woven" fabrics as equivalent. Jeans are the easiest example to think about: they're made with denim, but in things like skinny jeans that denim is usually blended with some kind of spandex. Typical woven fabric doesn't stretch in either direction in a meaningful way; stretch-woven fabrics do so because of the synthetic textile content.
So a lot of the design choices that we see in the show really have to take into account that those textiles won't stretch with movement, and that the wearers need to be able to swordfight:
larger, baggier shirts with cuffs or vests rather than more fitted shirts, to allow for full movement at the elbow and shoulder
trousers that have a bit of extra wearing ease at the hip and thigh, so that when the wearer sits or squats there is room for the change in their body shape with these positions
there are a couple of GREAT leather jackets (Kit's in the early season especially), but if you look closely there's actually a grommet-and-lacing system to attach the sleeve head to the body, so that the shoulder still moves. So clever!
Anyway I have been having a lot of fun thinking about this and deconstructing the garments further. Thinking more about the costuming helps me find the worldbuilding details that make it easy for me to write, and I’d love to chat about this lots and lots! I do have some screenshot receipts for this; I didn’t include them because I mostly just wanted to write and not do ~graphic design today.
#grouchy aunt j's fantasy textile opinions#willow: medium powerful magic once adjusted for inflation#willow 2022#fibre arts are the best arts
67 notes
·
View notes
Note
So is there, like, a limit to what *kind* of stitches you can take out with a seam ripper? When I try to mend something, usually one of two things happens--either I try to yank a big snarl through the fabric, tear it, and have a new place to fix, which I usually do by just sewing the edges of the hole *to* the snarl since it's already there; OR if I'm being especially painstaking I will manage to catch the huge snarls *before* pulling them through, and then I pass the next few stitches through the snarl to hold it together and down and keep all the loops from unraveling. In either case, while I can usually manage to keep the outside of the garment looking reasonably clean the inside doesn't so much have seams as it has keloids--basically a big running knot of stitches looped back on each other, that I just keep doubling back on and stabbing until the needle won't go through it anymore because that's the only way I know to secure it.
Am I just stuck with them? Or if I ever learned to sew properly, would I be able to unpick those mends and redo them? (Or, more likely, get an actual seamstress to redo them?)
(If it matters--most of the garments I've tried to mend by actually sewing are jersey knit; woven fabrics I usually just use those iron-on patches on the inside.)
Oh boy JERSEY. It's a lovely spoilt brat devil of a fabric. I love it so but it's very prone to problems. I myself have absolutely done the overlapping row-on-row of raddled fabric bunched into a seam. I'm going to go backwards, starting with the assumption that holes will happen, before talking about unpicking methods that might prevent the formation of holes to begin with.
Because I mean, sometimes it is all such a pain in the ass that I just sew a new seam further into the fabric and cut the old seam off with scissors, if that won't mess up the thing I'm repairing. Alas, it often will mess it up, and then getting fancy is required.
The simplest answer is to get a stretchy fusible interfacing that will work like an iron-on patch. Your search terms here are "knit fusible interfacing" and "weft fusible interfacing"; you can buy it off the bolt at fabric stores. I use it when my t-shirts get random little holes in the fabric and I want to prevent them from getting any larger--I just cut a little circle of interfacing and iron it onto the back of the fabric. You could cut pieces big enough to cover your keloid areas, iron them down, and then sew through the interfacing with more confidence.
It is possible to darn knit garments, using thread to catch the loops that have been dropped and create a bridge of new stitches that hold it all together. People absolutely do darn T-shirts and fine fabrics like jersey; I personally only do it for knitted items that are extremely precious to me and have large yarn and a big gauge, because I find it a pain in the ass. There's traditional darning where you catch the loops at the perimeter of the hole, then create a woven web of threads over the gap, and Swiss darning, where you duplicate the knitted structure.
A lot of the problems with knit fabric originate with the needles used to sew them. Ordinary sharp needles have the unfortunate habit of piercing and breaking the threads of the fabric they're sewing, and those broken threads can begin to unravel and create holes. If the thing you're unpicking was originally sewn with sharp needles, you might be SOL and have to accept the holes as inevitable. Avoiding this problem requires ball point needles, whose tips have been carefully blunted so they merely push threads aside as they move through fabric. This is way more likely to be a problem with sewing machines, since they punch down with more force than handsewists generally use to push the needle through the fabric, but, you might benefit by doing your hand-mending with ballpoints.
So, with unpicking, one major secret is serger or overlock stitches. These are made by machines that use three or four threads all at once to completely encase the seam in thread. They're used a lot in modern sewing because they're quick, easy, and make garments machine-washable. Hoowever, if you want to unpick the seam, you might find yourself thinking, "Where do I start?"
There is a secret to it. Here's a tutorial on the process, and here's another. Once you know which threads to focus on, the whole process gets much easier.
Which finally brings us around to unpicking seams, full stop.
The biggest problem with unpicking seams in knit fabrics is the extreme likelihood that you will not just catch the thread of the seam, but the thread of the fabric itself. In that case, your best bet is actually to turn the item out to its "good" or "right" side, pull the seam gently apart until the stitches are visible, and carefully pick them out from there. Here's a tutorial. This works with seams made by serger, sewing machine, or by hand. You just have to be wary of cutting the fabric itself when you're coming in to cut the stitch.
Whew! I don't know about you, but now I don't feel like sewing again for a week. (Lies. I will sew again after lunch.) This is as much as I think is useful. If you have more specific questions, I think I'd need to see photographs of the thing to give any more helpful answers.
50 notes
·
View notes
Text
Different Types of Fancy Yarns and Their Uses
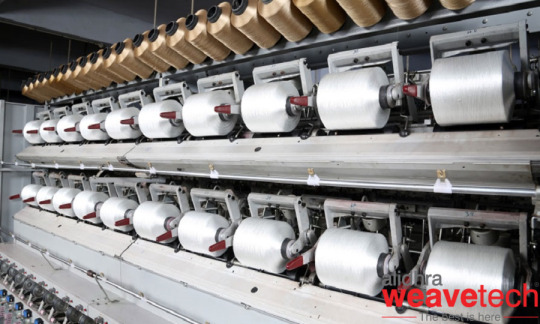
What are fancy yarns?
Fancy yarns are yarns that have been processed or manipulated in some way to create a unique texture or appearance. They can be made from a variety of materials, including wool, cotton, and synthetic fibres, and can be produced using a variety of techniques, such as twisting, texturizing, or boucle. Some examples of fancy yarns include boucle, chenille, eyelash, and boucle yarns. They are usually used in making decorative and textured fabrics like scarfs, shawls and other accessories. Textile yarns are the basic building blocks of fabrics. They are used in fabric design and production to create different textures, colours, and thicknesses. The term "fancy yarns" refers to yarns that have been designed for their aesthetic appearance rather than their performance. They may have variations in colour or texture, or include metallic components to create unique effects. Fancy yarns are used to create decorative and novelty fabrics, while "fancy doubled yarns" refers to yarns that are created by combining multiple yarns or fibres to create unique effects. Get in touch with Alidhra Weavetech as we provide the most energy efficient twisting and weaving solution in India.
Properties of fancy yarns?
There is potential for research to discover the physical properties of different types of yarn and how they are affected by the machinery and structures used to produce them. These properties, such as strength, wear resistance, flexibility, and suitability for specific manufacturing or dyeing processes, are of interest to commercial users of fancy yarns. Other areas of research may include the effect of production rate on yarn behaviour, the potential for lycra to improve stretch properties, and the impact of different production methods on yarn handling. It is important for users to select a yarn produced in a way that best suits their intended processing.
Different types of fancy yarns are described in the below section:
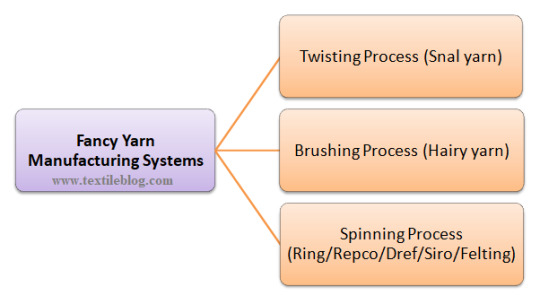
Spiral yarns: Spiral yarn is a type of yarn that is twisted in a spiral pattern, rather than the more common S-twist or Z-twist. This creates a unique texture and visual effect, and can also make the yarn more durable. It is often used in creating unique and artistic knitting or crochet projects. This is achieved by plying two single yarns of different thickness and twist level together, with one yarn being fed at a slightly faster rate than the other. This results in the shorter yarn forming the core of the spiral while the longer yarn creates the spirals around it.
Gimp yarn: It has been identified that both the plying technique and the hollow spindle process can be used to create gimp wavy yarn. In the plying technique, multiple yarns are twisted together to create a new yarn with a distinct texture and pattern. In the hollow spindle process, a ribbon is drafted and then buckled into a wavy shape using a hollow spindle. Both methods result in a unique yarn with a wavy texture, but the hollow spindle process is specifically used to create this type of yarn. If you are looking to learn more about textile manufacturer machineries, then you must visit our website or learn our blogs as we have added too much useful information in our blogs.
Loop yarns: Loop yarns are a type of yarn that have loops or tufts of fibre along their length. These loops can be made of the same material as the yarn itself or of a different material. These yarns are used in the production of textiles such as velvet, velour, and terry cloth. They can also be used for decorative purposes in knitting and crochet projects. Correct, the type of fibres, level of twist applied, and percentage of overfeed employed at the profile stage are all important considerations when working with loop yarns. The type of fibres can affect the strength and softness of the yarn, the level of twist can affect the yarn's elasticity and durability, and the percentage of overfeed can affect the yarn's thickness and overall appearance.
SNARL Yarns: SNARL yarns are a brand of yarns. It stands for "Slightly Nubby and Rough Luxe" yarns, which refers to the texture of the yarns that are offered by this brand. They are known for their unique texture and colour. SNARL yarns are often used for knitting and crocheting projects, such as scarfs, shawls, and blankets. They can also be used to create textured fabrics for clothing and other items.
Knob yarns: Knob yarns are yarns that have small, raised areas or "knobs" along their length. These knobs can be created by using thicker sections of yarn, knots, or by twisting or braiding different sections of yarn together. Knob yarns can add texture and interest to knitting or crochet projects, and can be used in a variety of different types of projects such as scarves, blankets, or bags.
Weavetech offers the best Yarn Weaving Machine in India for different kinds of yarns. Therefore, if you are looking for the best textile machinery manufacturer in India, then don’t look further and get in touch with Weavetech today.
1 note
·
View note
Text
Louis Vuitton Kleine Damentaschen Aus Leder Günstig Kaufen
Press the packaged quilt binding open, leaving the two sice folds intact. This purse sample is an easy rectangle, no patterns are needed. When I'm looking lor a dressy handbag, I want it to be dressy. https://phoenet.tw/wallet-purse-replica.html Set aside until you make the flap to be embellished. То fasten on the other finish of the clasp, slide a crimp bead onto every end of the wire. About 1 in from the edge of the foot, draw a short line to oin the 2 parallel traces. A determination have to be made concerning a basic theme in your embellishment plan.
If the interior of the unique bag is elegant and strong cotton lining, its fake different should have the same whether it is of fine quality. However, as a sensible buyer, do examine the print of lining print as well as the model’s emblem print, which ought to look clean. Otherwise, poor high quality might come in your hands. The bags normally have a clear appearance around the backside’s seams, which is a plus level.
If you are going to substitute a unique yarn for the one specified in a project, make sure to match the fiber content material or the end end result may be quite totally different to the original. You searched for Louis Vuitton Duplicate Bags. Place the sage flat braid along the sting of the flap and looped fringe. Make this purse your favourite mixtures of colors. Use coloured embroidery floss to blanket sew round each of the hearts. Take the two pocket pieces reduce from lining fabric, right sides together, sew across prime, turn and press. Follow measurements for pocket placement and stitching strains as shown.
Whatever the objective, the search for just the proper pieces and elements, just the best blending of colour and shade, simply the right texture and contact, ought to he approached with a way of journey. I even love your back aspect with its surprising surprises.
Created to satisfy a French Champagne producer’s dream to lastly carry a bag that could transport 5 bottles of wine suddenly, it now carries each it-lady’s goals. Designed to combine a structured exterior with a roomy, well-organized interior, this Louis Vuitton bag is good for business, and is an absolute favorite amongst many it-ladies. Named after the Parisian avenue, Louis Vuitton’s Montaigne bag is currently out there in three sizes, specifically GM, MM, and BB, and is available in Monogram Canvas and Monogram Empreinte. Available in several sizes, Louis Vuitton’s Speedy bag might be the home’s hottest bag. Originally designed in the Thirties, it's one of former inventive director Louis Vuitton’s greatest successes, usually exceeding in gross sales the style house’s latest fashions. Does the leather-based straps are likely to age like the true LV?
I want a emblem that represents the character and magnificence of South Louisiana, however is up to date. Perhaps one thing like silhouette of St. Louis Cathedral or the Cabildo within the French Quarter. Minimalist and complicated, the Chain Louise is the Louis Vuitton bag everyone wants when attending an ultra-fancy occasion, particularly when donning an equally elegant sliver slip gown. When channeled with an informal pair of denims and a shirt, it's excellent for the daily life, too. Designed to impress and assist ladies be extra comfortable, Louis Vuitton’s Noé bag debuted in the early Thirties, confirming the home’s forerunning visions.
wikipedia wallets This is because not solely did I get the bag at a cheap price however I additionally obtained the same look and feel like the unique one. When you are on a tight budget for getting a branded LV bag, its fake different is maybe the most effective alternative to contemplate. Today, it's among the top baggage I have in my most sought-after assortment. I was so proud of the brought replica such that I decided to share the identical online. We pride ourselves on the genuine feel and appear of our Louis Vuitton, Hermes, GUCCI, Prada purses. Carrying a Louis Vuitton purse replica is now not a topic of being belittled. This is because of good-high quality replicas being out there via totally different industrial mediums, making them fully accessible.
Perhaps this is a very nitpicky con, but it’s simply something I want was barely completely different. Although I am extraordinarily satisfied with my bag, there was one small con I think are worth mentioning, simply so you're completely aware of my buying expertise. You searched for Louis Vuitton Duplicate Purses. Keep in thoughts that all merchandise displayed on this web site are solely replicas. Rub just sufficient to carry the fibers together; they don't must be absolutely felted at this stage. On second felt circle, put pinback hinges via little slits in the felt. If you could have chosen a jewellery disk, glue in lace with the same strong glue.
As a outcome, it becomes exhausting to discover a noticeable flaw. However, a good-quality copy may have a facet sew that's in line with that of the unique. It will even have the same form on the edges. It is extremely clever to peep contained in the bag and on the bag’s bottom. This is where you can easily expertise the end result of lazy fake bag sellers. Good quality won't ever have a lazy outcome. Lazy distributors normally think that patrons is not going to see minimize corners on areas that are thought to be less important like the interior.
0 notes
Text
Fancy Yarn: Types, Properties, Manufacturing Process and Application
Fancy Yarn: Types, Properties, Manufacturing Process and Application
#fancyyarn #fancyyarns #noveltyyarn #yarneffect #typesoffancyyarn #snarlyarn #loopyarn
What is Fancy Yarn?
The term ‘fancy yarns’ may be taken to cover all fancy and novelty effects, while ‘fancy doubled yarns’ covers yarn and fiber effects. Color effects and effects based on metallic components are also available. While some are important for the embellishment of plain fabrics, many are used with great success as components in ‘fancy fabrics’ or as design elements within an…
View On WordPress
#Basic Principle of Fancy Yarn#Basic Structure of a Fancy Yarn#Future Trends in Fancy Yarns#Market Potential of Fancy Yarns
0 notes
Text
Atlas geography & culture
// Another bunch of headcanons, while I can’t finish up the politics one. I might post more about culture separately, but if I don’t post it, it’ll get stuck in my drafts-

As we all know Atlas is pretty cold and snowy kingdom in the north, but they do have springs and summers, just a bit shorter and colder than rest of the world.
Mantle and Atlas city are about 80-90% of what the kingdom is, but there are a few small villages to the west, located near the volcanos, where it is warmer and the soil is good for farming. There are also hot springs, quite popular among various travelers. Most of the population and urban structures grew within the Mantle due to closest and easiest access to enormous dust resources, which provided both for living and fending off the Grimm. Later it grew to be the capital and vast majority of the kingdom.
Along with the hot springs, quite popular are saunas, which aren’t fancy stuff only for the rich ones. It is rather a common feature in any lived space in Solitas, just like common baths warmed with either volcanic or dust power. Like baskets for fire that are both past and emergency warming system in most streets in the city. Many ways to warm up are very much needed, as the snow tends to turn into very cold rain there, melted with general temperature pollution, especially in early winter and spring.
In the Solitas, most travelling is possible thanks to outposts, set in strategically best spots. These are stocked with some basic and long term supplies like canned food, wood and coal for warming the place, few beds and blankets. Some are newer, military outposts, some are old, small wooden huts. It’s common decency to restock the outposts later if used, but ever since modern military was formed, regular patrols go over the routes and visit outposts to supply them, check for repairs, search for lost travelers, fend of Grimms etc.
Long before the technological boom, Mantle had already developed unique ways of using dust, especially fire dust, which is crucial for survival in Solitas. One of the cultural elements are decorative sweaters that somehow became quite popular in the rest of the world around the time of celebrating winter solstice. The stories of old claim that women weaved magic into the yarn, singing spells and enchanting the warmth within the clothes. The truth is - combs used for weaving were encrusted with fire dust, which left some particles inside the yarn, making the final piece of clothing warmer to wear. It was a common superstition that gods willed only women to perform this magic, as the yarn tended to catch on fire if it wasn’t treated with enough subtlety. Along with technology the sweaters and other clothes with dust particles could be mass produced in the factories, but the handmade products are obviously much more valuable.
#hc::Ironwood#I love sweaters and it shows#I also still have a dream of traveling north in winter and it shows
9 notes
·
View notes
Text
All About Knitted Hats
Quarantine has sparked plenty of new at-home hobbies. Maybe you picked up a paintbrush and tapped into your inner artist. Or, you might have transformed your kitchen into a bakery. For some, perfecting their knitting and crocheting skills even led to a business — which is why you're likely seeing the knit hat trend unexpectedly taking off on Instagram.
For Delsy Gouw, founder of Brooklyn-based label Its Memorial day, crocheting started out as a fun activity. "[It] originally started as an online Depop vintage shop [in 2019] but when Covid hit, I wasn’t able to source any goods," she tells TZR. "I also lost my job and found myself with a lot of time on my hands." Gouw picked up the old hobby of hers and began making items for friends, and then her friends' friends were requesting pieces, too. She then began crafting knit hats because she believed the demand was there. "I started with bags but when I posted them so many of my friends and followers asked when or if I’d be open to making hats and taking customs for hats," Gouw tells TZR. While trends typically fade away and come back later on, Gouw hopes this style will stay long-term. "[I] can’t speak for knitting, but the way crochet is done is truly so intricate, unique, and is made to last," she explains. "Crochet can only be done by hand so I think there is something special about having an accessory that is unique and handmade." Fans of Gouw's emerging brand include influencers like Reese Blutstein, Jo Rosenthal, and Ella Emhoff.
Who knows when the first person decided to put something over their head to keep it warm, but knitters know that knitted hats for women are some of the most fun and easy things to knit.
When they’re worked in the round there is little in the way of shaping, except when you get to the crown.
Most hats are worked from the bottom up, with stitches cast-on and worked in a snug stitch pattern such as ribbing, or in stockinette for a rolled bring hat, using a smaller size needle than is used for the head portion of the hat.
In many hat patterns, the hat is worked straight for the desired length of the crown, then nearly all of the stitches are evenly decreased over the course of just a few rounds.
The yarn is cut, the tail threaded through the remaining stitches, pulled tight, and fastened off to the inside of the hat.
The hat can be topped with a pom pom, i-cord, tassel, or whatever embellishment strikes your fancy.
A great book for learning to make hats is Ann Budd’s Handy Book of Patterns, from which some of the material on this page is excerpted. There are chapters on basic hats as well as the type of hats called “tams.”
There are several types of hats, but the most popular knitted hats for men are beanie-type caps, tams (sometimes called “berets”), slouch hats, earflap hats, and tuques.
Beanies: These hats can be super simple or dressed up with a lace or cable patterns. In cooler climates, they’re wonderful gifts for knitters to make.
Tams/Berets: There are so many different stitch patterns to use in this style. Tams and berets can be plain stockinette or intricate Fair Isle. This style of hat is really flattering on just about every face shape, too.
Earflap Hats: These hats are popular in cold climates. They’re great for keeping ears warm and they’re fun to knit. The knitters of Peru specialize in these hats, as shown in the photo at right.
Often a knitted hats for children will have a finished size that is smaller than the average adult head. That’s because hats meant to fit closely at the brim need a bit of negative ease to help them fit snugly and keep them on the head.
The amount of negative ease refers to the difference between the finished size of the object and the size of body part on which it will be worn. A hat that measures 19″ (48.5 cm) around and is worn on a 22″ (56 cm) head has 3″ (7.5 cm) of negative ease.
A beret-type hat might have negative ease at the brim, but a few inches of positive ease in the body of the hat. The extra fabric is what creates its loose, flowing shape, while the tighter brim keeps it fitted to the head.
Hats are a natural for circular knitting (or knitting in the round). This project for circular-knit adult hats offers three brim styles: hemmed, ribbed, and rolled stockinette. Whichever brim you choose, the directions call for shaping the top. Work this hat in plain stockinette stitch in a colorful or fashion yarn, or customize it by working the colorwork pattern included here. But don’t feel tied to those two options — use this hat as a canvas to express yourself.
If you knit the hat on one 16-inch circular needle, you’ll need to switch to double-pointed needles (or one of the other methods) at some point during the crown decreases because the stitches will no longer reach comfortably around the needle. It is easiest to knit hats using the magic-loop method with one long circular needle.
Choose a size
Determine the circumference you want for the hat. Most hats should be knit with negative ease (. Measure around the widest part of the intended wearer’s head and subtract 1⁄2 to 1-1⁄2 inches from that measurement to calculate the hat circumference.
A hemmed brim is not as stretchy as a rolled or ribbed brim, so it’s best not to include too much negative ease when using this hem.
Choose yarn and determine the gauge
Yarn for adult hats can run the gamut from practical to frivolous and fun. If you want a warm winter hat, for example, choose a yarn that is warm and durable, and knit it at a tighter gauge than recommended on the ball band. This results in a denser fabric that better retains heat. If, on the other hand, you are creating a fun accessory, you might choose a fashion yarn that adds a little flair. Because this hat is such a simple shape, it’s a great way to show off variegated or self-striping yarns.
To keep cool but stay warm during winter, you can’t skimp on great outerwear or outfit-making boots. The same goes for cold-weather accessories too: Because for the majority of the season, coats, boots, and, in this case, winter hats do most of the talking when it comes to bundling up while keeping things stylish. In order to break free from your standard winter-outfit formulas—and to keep your looks from looking like, well, everybody else—consider accessorizing functionally and fashionably this season. Here, find four headwear trends not to be missed, and shop 24 of the best winter hats, inspired by the most stylish women on the streets, from New York to Paris.
Buckets and Beyond
After runway debuts at Fendi and Loewe, the winter-ready hand knitted hat took over the streets last February—and this season the ’90s trend has continued to gain momentum. From shaggy faux furs to fuzzy angoras, from shearling to sherpa styles, the winter bucket hat is one of the cutest and coziest accessories of the season.
The ribbed-knit beanie has earned its place as a winter style staple for everyone from downtown urbanites to alpine skiers. New Yorkers might prefer sleek styles in a neutral color palette like black and speckled gray. Meanwhile, a pop of color would bring the perfect amount of joyous street-style-inspired Scandi chic to any drab winter look. And for those who wish to channel a bit of après-ski flair in their daily commute, look no further than one with a floppy, fluffy pom-pom.
The trapper hat is no longer just for the rugged outdoorsman or Elmer Fudd. Not convinced? The trapper has been deemed stylish enough for even the Parisians—in fact a black faux-fur version was spotted on the streets topping off a geometric-print coat, leather pants, and blue ankle booties for the ultimate in warmth and style. Et voilà! Not to mention everyone from classic winter-weather brands to It labels are backing the trapper trend—Heurueh, Kule, and R13 to name just a few. You heard it here first: The trapper is the ultimate winter hat for women this season.
On the tiny Peruvian island of Taquile, a man's worth isn't measured in his ability to hunt or fish, but in his ability to knit.
Alejandro Flores Huatta was born on the 1,300-person island, which is located on the Peruvian side of Lake Titicaca, a three-hour boat ride from the nearest city of Puno. The 67-year-old learned how to knit the iconic chullo (a tall, floppy Andean hat) as a child, with his older brother and grandfather teaching him by using the thorns of a cactus as knitting needles.
"Most of the people learn by looking, watching. Because I don't have a father, my older brother [and grandfather] taught me to knit. So by watching, I learned little by little," he said, speaking through a Quechua translator.
Taquile is famous for its textiles and clothing, and while women weave and tend to the sheep that provide the wool, men are the ones who exclusively produce the island's knitting cap for baby. The chullos are seen as culturally significant, playing a key role in the island's social structure and allowing men to show their creativity while also displaying their marital status, dreams and aspirations – some men even use it to show their mood. It's a tradition that islanders are working hard to preserve.
Residents were relatively cut off from the mainland until the 1950s, and the island's isolation has helped to keep its heritage and way of life intact. Locals abide by the Inca code of "Ama sua, ama llulla, ama qhilla", (Quechua for, "Do not steal, do not lie, do not be lazy"). Taquileans are farmers traditionally; the six island communities take turns to rotate crops of potato, corn, beans and barley in terraces on the mountainsides. They raise sheep, guinea pigs, chickens and pigs on the land and fish in the lake. Tourism kicked off in the 1970s, giving locals a source of income with tens of thousands of visitors drawn to the island annually to tour the villages and surrounding lake. Visitors typically stay with locals in humble, family-run accommodations; lend a hand-harvesting crops; try local specialties like fried trout and potatoes with rice, beans and mint tea; and purchase the island's famous handmade textiles.
Hats reveal men's marital status, dreams and aspirations
In 2005, Taquile's textile art was deemed so valuable that Unesco deemed it an Intangible Cultural Heritage of Humanity. Alejandro is one of the seven men on the island recognised as a Master of Textiles, along with the island's president, Juan Quispe Huatta.
The tradition has been around for the better part of 500 years, with roots in the ancient civilisations of the Inca, Pukara and Colla peoples. The Inca in particular, used their headdresses in a similar way to the Taquilean chullo, to display the specific insignia of their particular province – but that’s where the similarities end. The Taquilean chullo and the Inca headdresses look vastly different. The elders of the island tell of the chullo design arriving with the Spanish conquest in 1535, and Alejandro's grandfather passed on stories of the early conquerors wearing similar hats that were white with ear covers, "but not the same patterns or symbols," Alejandro said.
2 notes
·
View notes
Text
Beginner’s Guide to Crochet Lace - Part 1B of who the fuck knows: Choosing Thread (so you can choose a pattern)
I’ve talked about this a lot in bits throughout my [#myth and pancake make underpinnings] posts but I’m going to get into more detail here.
When you google crochet lace, you’re going to get a lot of hits for this stuff:

It’s what crochet doilies and curtains are made out of, and it’s your basic, easily worked, traditional thread. Excellent choice for practice because it’ll get you used to using thin thread and a tiny hook.
But there are so many more (better) options that will better suit your needs. What exactly are your options?
Lace-weight yarn - exactly what it says on the tin. It’s a very fine yarn that is typically used for knitted lace. Can be very affordable or extremely expensive, depending on the fiber-content. Also known as cobweb or superfine. The sizing for lace-weight yarn is the most complicated and least consistent across brands, because a yarn that is 50 wraps per inch and one that is only 30 wraps (much thicker) will both be consider lace-weight. You’ll have lots of color and texture options, however.
Crochet thread (or crochet cotton, as I often call it, but there are some linen ones, I believe) - that’s the Aunt Lydia’s stuff. Comes in a range of sizes, but smaller weights are hard to find and only come in boring colors for the most part. Very consistent sizing, small numbers being the thickest, big numbers being thinner. 20-30 are the thinnest sizes you’ll be able to find easily, and probably only in white and off-whites (ecru or cream).
Pearl cotton - this is a type of embroidery thread that is very shiny and sturdy like a crochet thread but has a more noticeable twisted texture. Not really an issue at the size you’ll be using, and comes in a wide range of colors, because it’s usually used for embroidery. Also follows an inverse sizing scale, like crochet cotton, but it’s a different scale. Not many brands, but DMC has a pretty decent range of colors and is carried by Jo-Ann.
Embroidery floss - FRAGILE. It is loosely twisted to give it “spread” when doing embroidery, but this means it lacks density and strength. A hard pull will break the thread and it is prone to fraying. It only comes in short lengths, too. The one major advantage is the enormous range of colors and the affordability of cotton floss. No sizing scale, floss is floss. You can customize by increasing/decreasing the number of strands you use. If you insist on floss, I recommend a minimum of two strands.
Silk buttonhole twist or topstitching thread - comes on cards or spools, literally impossible to find in higher yardages, and expensive as all hell. As thick as thinner crochet cottons. You physically can make lace out of this and it would probably be very nice, but you literally just can’t buy enough of the stuff to make anything substantial.
Machine embroidery thread - I will talk about silk sewing thread later, here I want to focus on “art silk,” which is a fancy marketing name for artificial silk. This is going to be either polyester or rayon. I’ll talk more about the properties of various fibers later. Very shiny, inexpensive, comes in a few different weights (I haven’t tried these yet because I can’t get thicker weights locally). Sizing is also inverse but AGAIN VERY DIFFERENT from both crochet cotton and pearl cotton.
Machine sewing thread - polyester, cotton, and silk (also nylon but you’re probably not going to make lace out of nylon). Many sizes, from stupidly small and not usable for crochet, to as thick as the thinner crochet cottons. Uses the same sizing system as machine embroidery thread, but the actual thickness depends on fiber content. A 30wt cotton and 30wt silk are not the same. You can double up thread for thickness and sturdiness.
Turkish lace thread - almost always polyester, comes in very bright colors, super shiny. I have no idea where to reliably buy it and I’m morally opposed to using plastic whenever avoidable, but I’d be remiss not to mention it, because the stuff is literally designed for lace crochet.
OKAY. SO. Time to talk about FIBER CONTENT.
You got a lot of options if you use yarn, but honestly most of those options are not tiny-crochet friendly. Anything with wool in it, while soft and pretty, is going to be a BASTARD. Wool likes to catch onto itself, and unlike cotton does not come mercerized to prevent little fuzzies. Do not use wool for crochet lace unless you enjoy crying. Just don’t. Like, I’m using the most fiddly, tiny, bastard thread and I’m telling you wool is a terrible idea.
So what does that leave?
Rayon/viscose/“bamboo cotton” - not cotton at all! It’s reconsituted cellulose, which is fancy speak for plant stuff getting broken down into sludge using chemicals and then formed back into clean cellulose filament using more chemicals. It’s beautiful, can be matte or shiny as hell, and is often used for “art silk” aka artificial silk (the other most common fiber for art silk is polyester. blech). This is what @longsightmyth refers to as “slippery beautiful bastard rayon thread.” In machine embroidery thread, it is tightly twisted and less prone to catching on your hook, but is so fucking slippery. As yarn...good luck.
Cotton - actual cotton. We’re all familiar with this. It’s a sturdy, strong fiber, and easily the most beginner-friendly. It stays on your hook and is less likely to shift around or twist up weirdly while you work with it. Easy to find, cheap, lots of options. Also, you’ll notice a lot of threads say they’re “mercerized.” Mercerization is a process by which stray fuzzies are burnt off of the thread to leave it super smooth and shiny. I recommend size 20-30 crochet cotton for lace with some stiffness to it, or a 12wt sewing thread for something more flexible. You can go down as small as 30-40wt for extra-fine lace. Size 12 pearl cotton is also gorgeous and creates a compact lace with lots of structure.
Silk - the most expensive option, but worth the cost for a few reasons. This shit is strong. It’s smooth and shiny and is the least prone to fraying of all the fibers I’ve listed. Silk is... also weird. It’s not stretchy, per se, but silk sewing thread has a slight elasticity to it that cotton does not, making it incredibly fiddly as a single strand. The same smoothness that makes it beautiful makes it prone to slipping, but makes it a dream to work with doubled up. It also makes it much softer against the skin than cotton, but sturdy when using a heavier weight. Silk yarn is heavy and drapey and comes in many, many colors but will also gut your wallet. Silk machine embroidery thread is probably similar to sewing thread in terms of how it behaves but is shinier, and therefore slippery-er.
Polyester - fuck polyester.
BUT WHAT ABOUT SIZING?
Look. There’s a lot of sizing guides out there that explain what exactly each type of thread uses. They’re not helpful if you want to know how the different systems compare, and especially not if you’re trying to figure out if a non-crochet thread will look nice crocheted.
So here is a sizing guide of various common, easy to acquire threads relative to each other and how they look worked into a pattern.
From thickest to thinnest:
Size 10 crochet cotton
16wt silk buttonhole twist (not patterned bc I don’t have enough for a motif)
12wt cotton topstitching thread
Size 12 pearl cotton
30wt silk sewing thread, 2-strand
30wt silk sewing thread, 1 strand
30wt rayon machine embroidery thread
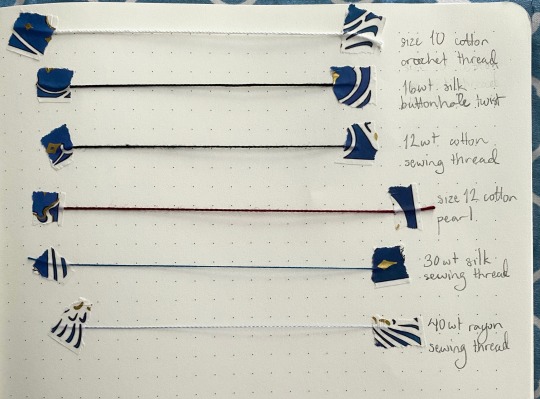
Notice what a massive fucking difference the size of the thread makes! Size 10 crochet thread is orders of magnitude larger than any of the other options! Two strands of rayon works up to approxiamately the same size as 2 strands of silk, but it’s stiffer.
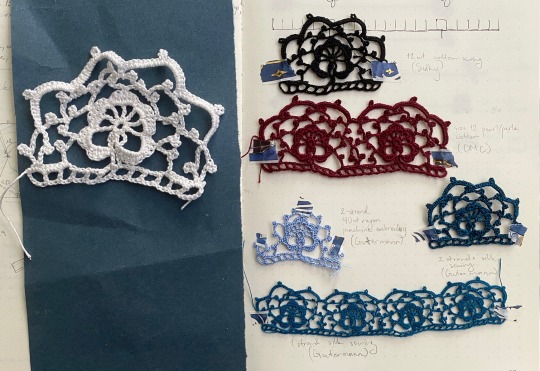
Choose your threads according to the pattern and purpose, and vice versa! I’m doing a tiny lace edging on a delicate undergarment, so I want a super delicate lace to go with my super delicate cotton. If you’re trimming a jacket collar or dress bodice a size 12 pearl cotton or doubled silk would make more sense.
#this had been sitting in my drafts FOREVER but here it is#pancake talks lacemaking#pancake talks textiles
31 notes
·
View notes
Text

anyway, i’ve been knitting all day bc sometimes i do that bc i like making myself nice things out of the too much yarn i own, but right now...i wanna talk about the avengers. specifically, i wanna talk about the 616 avengers and how they’re structured.
spoiler: they don’t really have much of one. they’re not a para-military organization. they’re not like...the brightly colored public arm of shield. it’s not like that. their pecking order is super loose and there’s some seniority clauses here and there (like founding member privilege), but overall...when you join the avengers it’s not like joining the military, okay, you have your own life still. if you have a civilian job, home, responsibilities, none of those change. you get your identicard, you get your clearance for wherever the avengers are calling home, you’re welcome to pop in and out of their hq at will, but you’re not...it’s not like you’re signing your life away, and you don’t suddenly work for shield now.
let me tell you something about 616 shield: they don’t exist at all anymore. secondarily, when they did, they were shady as shit. and when steve rogers or someone like him with champion status is on an avengers team, they don’t get to say diddly fuck all about what the avengers get up to. the avengers? are not shield. not connected to shield. don’t have to listen to shield. and have, in fact, worked directly opposite from shield when shield has been shitty.
like it’s a whole thing in the new avengers run and watching steve and then tony shut their shit down is glorious to witness.
basically what i’m saying: you’ve got your chairman, who runs the weekly meetings (you do have to at least show up at the weekly meetings). you’ve got your field leader - usually steve if he’s on the team, and i mean he’s a genius tactician of course you want him leading you in the field - and someone who handles the press and money flow - usually tony, because it’s usually his money, he provides pr through his foundation which also covers money. and that’s...about as fancy as it gets. you show up. you punch the bad guy. you help with clean up. you give a press statement. you go home. you’re not required to do anything but the right thing, either as part of the team or in your own life. they are a non-profit. not a military branch. you live your life and show up when the fights are too big for the usual first responders.
that’s it. that’s all. there’s a poker night. a movie night. you can live there if you want, you can collect a paycheck if you want. otherwise being an avenger is less intrusive into your lives than you’d think.
#runtime //: ( avengers )#constant //: ( about )#// it's how you know mcu avengers are very ults inspired#// because they are so closely tied to shield#// original flavor tho?#// haha no#// steve and tony both have told shield to get fucked#// in almost those words#// so many times#// and anyway being an avenger is like#// being part of a club almost#// a club that can get you killed#// and where you punch things#// but it's not like#// signing over your life#// to some shady organization#// it's just#// hooking up with a group of like-minded people#// to help save the world
5 notes
·
View notes
Text
Crossings – New Exclusive Cable Collection
Crossings is our newest cable collection, and I really think we had the opportunity to collaborate with some wonderful designers and put together some smashing patterns. These cable collections are regularly the most popular books and patterns that we produce, and Crossings is in good company with Celtic Journey, Woodsmoke, and Windward. If you’ve been wanting to take advantage of the Book Sale, then it’s a great time to get this new collection for 40% off.
For this year’s cable collection, we decided to focus more on historical cables. This means that we were looking not only for traditional motifs and stitches, but also traditional construction. Because of that, many of these sweaters are seamed. Seamless sweaters seem to be all the rage these days, so I thought I’d take the opportunity to explore why seaming can, in fact, be desirable. Seaming comes with three main advantages over a seamless construction: easier sizing, portability and manageability, and most of all stability. Let’s look at some of the sweaters in Crossings that really illustrate these advantages.
Seamed Sweaters
Clarsach Pullover, Turfside Sweater, and Inis Aran
The Clarsach Pullover has the traditional textured stitches at the sides of the body and underside of the arms. This keeps simpler stitches in areas prone to wear, so you don’t spend all your time working fancy cables only to have them pill from friction. This also emphasizes a key benefit to pieced sweaters: sizing. The simple textured stitch provides an easy way to add or take away stitches without interfering with a complicated or large scale pattern. Sure, you can do this in a seamless sweater, but piecing means you can more easily add stitches exactly where you need them. Add a few extra stitches in the front to accommodate an ample bosom, add to the back to fit particularly broad shoulders, or adjust the sleeves for differently sized arms. When you work seamlessly, adding these stitches in one place affects your knitting in other places, requiring careful planning and execution. It’s much easier to get a customized fit with pieces.
The Turfside Sweater is a special case for seaming because it’s the only pattern in this collection that calls for a yarn with alpaca. This emphasizes another major benefit of seaming: stability. Even a wool-blended alpaca like City Tweed doesn’t have the memory and resilience that a 100% wool yarn does. While this translates into incredible softness and enviable drape, it also means growing and stretching. All knitting stretches, but alpaca is just more prone to distorting out of shape than wool. Seams act as linear anchors for your knitting. Any one piece can stretch, but seams create a stable framework that limits how much any piece can distort. Seams help any sweaters, even wool, keep their size and shape, but that’s especially important for alpaca.
The Inis Aran calls for a full 6 inches of positive ease! It’s meant to have a relaxed and casual look, which also translates into a looser garment with a lot of yarn. The largest size will weigh almost 3 pounds! This highlights the next benefit of pieced sweaters: manageability. With seamless sweaters, at some point you are going to have basically the whole sweater hanging off of your needles. Imagine what it would be like to wrangle 3 pounds of yarn in your lap while keeping your stitches even. It also becomes much less portable. All sweaters at some point become “home only” projects, but seamless sweaters reach that point much more quickly. Only the working piece of a seamed garment needs to be carried around, leaving you with just finishing and perhaps a collar to work when the entire project is together.
McKenna Cardigan
When it comes to seams, cardigans are a special case, and the McKenna Cardigan is no different. The key advantages to piecing apply double to a cardigan. If you think of a sweater like a building, then the foundation is actually at the shoulders, with the sides being the walls. Pullovers are essentially tubes, so the sides are attached to each other back and front and have at least some inherent stability, even without seams. A cardigan side’s are only attached one way, so the shape and hang is always going to be more important than it is for a pullover. And it’s especially important for cardigans without buttons to keep everything in place. A cardigan without seams relies almost entirely on the structure of the yarn itself. Seams stiffen and support the walls of your sweater, ensuring your cardigan stays the same size and shape, helping it to lay, hang, and drape correctly.
Seamless Sweaters
Riverfall Pullover
All of that is not to say that seams are absolutely essential. Ultimately what really matters is the design, and nowhere is that more apparent than in the Riverfall Pullover. Full Disclosure: this pattern is made by one of my favorite designers, so I am utterly incapable of an unbiased opinion. Luise’s cables are always stunning. This pattern also contains one clever technique that mitigates some of the problems with a seamless construction: the 3 needle-bind off shoulders. This solid bind off closely imitates a seam at the top of the shoulder, providing stability where it’s most needed and making a good foundation for the rest of the sweater.
Retro Pullover and Lucky Gansey
Two of the other seamless sweaters in the collection, the Lucky Gansey and the Retro Pullover, also have a clever solution to the seaming conundrum: the saddle shoulder. There are many ways of making a saddle shoulder, and both of these sweaters opt for one of the more stable options: picking up stitches. While not as stable as a seam, an edge does have more structure than the middle of your knitting. (Have you ever had to frog an oddly shaped project because your edge was too tight? I know I have.) Picking up stitches from an edge puts a light anchor line in the middle of your fabric, like a false seam. Because of the unique construction of the saddle shoulder, this puts two of these faux seams at each shoulder. Compare that to, say, a raglan sleeve without seams or picked up edges, and you can see how such a saddle shoulder will provide a much more stable foundation.
(Hint: If you hate picking up stitches (like me), then consider getting real familiar with seaming.)
Not Sweaters
Tuckamore Wrap, Lundy Wrap, and Inis Meain
What I’ve been largely ignoring for most of this post is probably what you are all focusing on anyway: the cables. That’s really what we do these collections for: intricate, exquisite, amazing cables. Frankly, I think the cable work stands on its own, and that’s particularly apparent in the handful of non-sweaters in the collection. The Tuckamore Wrap has a more traditional set up, with a statement panel of tightly interwoven cable braids and borders of moss stitch-embedded diamond cables, while the Lundy Wrap has some more complicated weaving cables nestled against each other with a moss stitch border that somehow emphasizes the sinuous cabling while still allowing for a straight edge. If you really want to work on your cable stitches, I suggest one of these wraps, since you don’t have to worry about construction or seaming or anything but getting your cables right.
—
If you enjoyed any of our previous cable collections, you’re sure to love Crossings. And these wonderful sweaters are the perfect excuse to learn to love seams too. You can get the entire collection as a print book or eBook, or you can buy each pattern individually as a downloadable pdf. (Also remember that all books are currently on sale, so you can get a print copy of Crossings 40% off for just $17.99, less than $2 per pattern, if you order before February 13th.)
The post Crossings – New Exclusive Cable Collection appeared first on KnitPicks Staff Knitting Blog.
from KnitPicks Staff Knitting Blog http://bit.ly/2FHFgtq
via IFTTT
2 notes
·
View notes
Text
Buy Yarn in India
Buy Yarn in India Fancy yarns are made with a distinctive irregular profile which is different from basic single and folded yarns. This profile enhances the visual and textural properties of the fabric. are the raw materials for weaving, fabrics with different weaving tightness, different fabric surface representation, and different printing and dyeing requirements have different demands on yarn structure. Generally speaking, there is no absolute good or bad yarn.
0 notes
Text
yarn in delhi
yarn in delhi are the raw materials for weaving, fabrics with different weaving tightness, different fabric surface representation, and different printing and dyeing requirements have different demands on yarn structure. Generally speaking, there is no absolute good or bad yarn. Fancy yarns are made with a distinctive irregular profile which is different from basic single and folded yarns. This profile enhances the visual and textural properties of the fabric. Adding more twist to your yarn causes it to tighten up, making it slightly stronger and less susceptible to pilling, and also making the stitches easier to work and less likely to split. Reducing the twist in a yarn makes the fibers and plies separate and it is more difficult to work without splitting the yarn.
0 notes
Link
Because these are both React apps that have been created with create-react-app, their file structure is mostly identical, with the exception of a redux folder inside of the Redux app. Let’s take a look at the file structure now: React on the left. Redux on the right.Now given that these two apps achieve the exact same thing, you might be wondering why Redux requires so many additional files, and what purpose they serve. The first thing you will notice is the large amount of initial boilerplate code needed in order to get Redux set up for your app. This is, in large part and the mental model it applies — Redux also has its roots in functional programming but let’s save this rabbit hole for another occasion. Anyway, this additional code can really pay off when building larger applications that have lots of data flowing in and out from various components, APIs etc. So it may seem like overkill for this simple To Do app at first, but just stick with us as we’re not trying to encourage you to use Redux for simple apps, but rather we’re using this on a simple app in order to make Redux a little easier to pick up and understand. Before we deep dive into the code, let’s push ahead and explain Redux a little more first.Redux handles the flow of data through three key principles: 1. StoresAlso known as a single source of truth, a store is basically just an object that you initialise with some state, then whenever we want to update it, we overwrite the store with a new version of it. You may already be using these same principles in your React applications anyway, as it is generally considered a best practice to recreate state rather than mutating it. To further clarify the difference here, if we had an array and we wanted to push a new item into it, we wouldn’t update our store by pushing a new item into the array, but rather we would overwrite the store with an updated version of it. 2. ReducersSo our store gets updated through something known as a reducer. These basically are the mechanisms by which we send our new versions of state. That may not make much sense just yet, so let’s elaborate a little. Let’s say we have our store object and it has an array that looks like this: list: [{‘id: 1, text: ‘clean the house’}]. If we had a function that adds new items into our array, our reducer will explain to our store how the new version of our store will look. So in the case of our list array, we would likely grab the contents of our list, spread it into a new list array through the ... syntax, along with the new item we want to add. Therefore, our reducer for adding new items may look something like this: list: [...list, newItem]. This is also what we mean here when we discussed how we create new copies of our state for the store, rather than pushing new items into existing parts of it. 3. ActionsNow in order for our reducers to know what new data to put into our state, they have access to a payload. This payload is sent to our reducer through something known as an action. An action is typically accessible within the components in our app — via props — just like any function we create. Because these actions are in our components, we can pass them parameters — these become the payloads. So with that in mind,We can think of Redux in the following way: Our app has access to actions. These actions carry data (or a payload as it generally tends to be called) from our app. Actions have a type that it shares with a Reducer. Whenever the action type gets triggered, it picks up the payload and tells our store how it should now look — by which we generally mean how should our data object look now that it has been updated. There are other parts to this Redux mental model, such as action creators and action types, among others — but these additional elements are not required for our To Do app.The Redux setup here may be a good starting point for you and you might decide to deviate from this as you begin to get more comfortable with Redux. With that in mind, although I initially stated that the Redux docs can be a bit overwhelming, reviewing all of the different approaches taken should be viewed as a source of inspiration when it comes to creating your own setup. Adding Redux to a React app.So we can create our React app in the same way that we would with Create React App. Afterwards, use yarn or npm to install the following two packages: redux and react-redux and then you are good to go! There is also a dev dependency called redux-devtools-extension which can be very helpful when it comes to ensuring that your Redux app is working in the way that you want it to. It is, however, optional, so don’t feel like you have to install it if you don’t want to. We mentioned all of the boilerplate earlier. Let’s explain what it all does.We will start this by looking at the root file of our app, which is main.js main.jsHere we have five imports. The first two are for React, so we won’t bother discussing them, and the fifth import is simply our App component. The third and fourth imports are what we will focus on. The third import, Provider is basically a gateway into our Redux store (the thing we spoke about earlier). There is actually a bit more to how this works, as we need to pick which components we want to have access to our store, but we’ll discuss how that works a little later. As you will see, we wrap our component with a component. One thing you will also notice from the screenshot above is that our Provider takes a store prop, which we pass in our store variable. You will see that our fourth import, configureStore is actually a function that we have imported, and then returned the output of it to our store variable, as such: const store = configureStore();. Now this configureStore basically, as you may have guessed, is our store configuration. This includes the initial state we want to pass in. This is a file that we actually create ourselves, and we will review this in more detail later. So in short, our main.js file imports our store and wraps our root App component with it, thus providing access to it. Unfortunately there is more boilerplate required, so let’s move one step up and look at the additional code in our root App component: So we have another file with five imports. The first is React, the fourth is a React component and the fifth is a css file, so let’s not bother discussing those any further. Remember how I said that there was a bit more to how we provide our components with access to our store? Well this is where our second import, connect comes into play. If you look at the bottom of the screenshot above, you will see that rather than exporting our App component, we export connect, which is basically a curried function. A curried function is basically a function that returns another function. What connect is doing here is basically taking the contents of mapStateToProps and mapDispatchToProps — both of which we will discuss shortly — then takes our App component and adds the contents of mapStateToProps and mapDispatchToProps to it, then finally returns our App component with the new functionality added. So that’s that, but what is the contents of those mapStateToProps and mapDispatchToProps things? Well, mapStateToProps takes the state from our store and passes it down as a prop for our connectedApp component. In this case, we give it the key of list as it followed the naming convention we gave it inside of our store (more on that later). We didn’t need to follow this convention though and could have called it whatever we wanted to — either way, list is what we will be referring to in our app whenever we want to access that particular part of state. Now you will see that mapStateToProps is a function that takes state as a parameter. In this case, state is basically our store object (more on that later). But for your reference, if we were to put a console.log('store', store) inside of mapStateToProps like so: This is what the output would be: So with that in mind, we are basically just accessing certain parts of our store and we are attaching those parts to our App through props — in this case, we can see from the console that our state is an object called appReducer, which contains a list array inside of it. Therefore, we attach it to our App component by our mapStateToProps function returning an object with a key of list and a value of state.appReducer.list. This can all seem a bit foreign and verbose at first but hopefully that has helped to break down what is going on here. So what about mapDispatchToProps? Well that takes us to the third import in our App.js file, which is appActions. This is another file that we create, which we will dive into later. For now, just know that mapDispatchToProps is a plain object that takes the actions we will create and passes them into our connected App component as props. In Redux terms, Dispatch refers to the dispatching of an action, which is basically a fancy way of saying that we are executing a function. So mapDispatchToProps is kind of like saying mapFunctionsToProps, or mapActionsToProps. However, the React docs refer to this as mapDispatchToProps, so we will stick to that naming convention here. One thing I wanted to note here is that in a typical larger React application, our mapStateToProps function might have lots of different key/value pairs inside of the object that gets returned. This could also be coming from various different reducers for the store in your Redux app, as you can have access points for your store if required. The same also applies to mapDispatchToProps, in the sense that while our simple To Do app only has one file that looks after our actions — appActions — a larger app may have several files that look after actions specific to certain parts of your app. Your mapDispatchToProps file may pull in actions from various places and then pass them all down as props to your App component. Again, it’s really up to you how you choose to compose your application. So we’ve looked at the main chunks of boilerplate that spill out from Redux into our root files, let’s now take a look at what is going on inside of our Redux folder, before finally taking a look at how we pull this all together inside of our React subcomponents (by this I mean anything that isn’t the root App.js component). The Redux folderThere is a lot to unpack here. Before we start, let’s take another look at the file structure of our app: We will tackle this in the same order as the files appear in the screenshot above: Actionsactions/appActions.jsSo if we remember from earlier, our appActions file is the file we imported into our App.js file. This contains the functions that carry the data (also known as payload) from our app. In the case of our To Do app, we need three pieces of functionality: Ability to hold input dataAbility to add itemsAbility to delete itemsNow the first functionality — ability to hold input data — is actually going to be handled locally inside of our ToDo component. We could have opted to handle this ‘the Redux way’, but I wanted to demonstrate that not everything has to be handled through Redux if — in your opinion — it doesn’t make sense to do so. In this case, I wanted to simply handle input data at the component level, whilst maintaining the actual To Do list with Redux at a central level. So let’s move onto the two other functionalities required: adding and deleting items. These functions simply take a payload. For adding new To Do items, it is likely that the payload we need to pass is the new To Do item. Therefore, our function ends up looking like this: appActions.jsWe see here that the function takes a parameter that I have opted to call todo and returns an object that has a type and a payload. We assign the value of the todo param to the payload key. Now as you may have noticed from the screenshot above, the types here are actually variables that have been imported from our actionTypes folder — but more on action types in a moment. We also have our redux_delete function which takes an id as its payload, in order for our accompanying reducer to know which To Do item to remove. Finally, we have an appActions object which takes our redux_add and redux_delete functions as key and values. This could have also been written as: const appActions = { redux_add: redux_add, redux_delete: redux_delete };If that would have made more sense to you. I’d also like to know that all of the naming used here, such as appActions and the prefixing of our functions with redux_ is not a requirement, it was simply my own naming convention. Action TypesactionTypes/index.jsNow you may recall from earlier that I mentioned that there is a way that our reducers and actions know how to interact with one another — this is through the use of types. Our reducers will also access these same action types. As you can see, these are simply variables that have a name that matches the string it is being assigned to. This part isn’t entirely necessary and you could avoid creating this file and pattern altogether if you wish. We do this, however, as a Redux best practice because it provides a central place for all of our action types which reduces the number of places we have to go to update these if we ever need to. And given that our reducers will also be using these, we can be confident that the names are always correct as we are always pulling them in from one place. Speaking of reducers… ReducersThere’s two parts here: our appReducer, and our rootReducer. In larger apps, you may have lots of different reducers. These will all then get pulled into your rootReducer. In our case, we could have just handled this with one reducer, given the small size of our app. However, I’ve opted to keep two here as you’ll likely operate in this fashion. Oh, and the names here were my convention — you can call your reducers whatever you want. Let’s take a look at our appReducer. reducers/appReducer.jsThe first thing we see is that we’re importing the same action types that we have been using for our actions. The next bit is our initialState variable which is our state. This is what we will be using to initialise our store with so that we have some initial state to begin with. You may choose in your own projects to have an empty object if you do not need any initial state to begin with — again, it’s down to whatever works for your project. The next bit is our appReducer function that takes two parameters: the first is a state param which is the state we want to begin with. In our case, we use default parameters to default the first parameter to our initialState object. This stops us from having to pass anything in further down the line. The second param is our action. Now this appReducer function gets triggered every time one of the functions from our appActions.js file is triggered — we will later see how these are triggered, but for now just know that the functions ultimately end up inside of our ToDo.js file. Anyway, so each time one of these functions get triggered, our appReducer runs through a series of switch statements to find the one that matches the action.type that was passed in. To get an idea of what the data looks like that gets triggered, let’s console.log out our action, as such: Now in our app, let’s say that we create a new To Do item by typing “take out the trash” in our input field and pressing the + button. When we do this, we see the following in the console: Now besides the payload, we can see that our action has a type of "ADD_ITEM". This matches up with the ADD_ITEM variable that our switch statement has as one of its cases: As there is a match, it executes this, which basically tells our store how its new state should be. In this case, we are telling our store that the state should now equal a list array which contains the previous contents of the list array, along with the new payload we passed in, which if we take another look at what was logged to the console: Now remember, the action carries the payload — this part is handled by the actions we saw in appActions.js. Our reducers pick up actions and handle them based on whichever action.type matches. Let’s now take a look at our rootReducer: reducers/index.jsThe first import we have is combineReducers. This is a Redux helper function which basically gathers all of your various reducers and turns them into an object which can then be passed to our createStore function in our store, which we will take a look at in a moment. The second import is our appReducer file that we created and discussed earlier. As mentioned earlier, we didn’t really need this step as our app is fairly simple, but I’ve decided to keep this in for learning purposes. StoreLet’s take a look as our configureStore.js file: store/configureStore.jsThe first import here is createStore which holds the complete state of your app. You can only have one store. You can have many reducers that have their own initialState though. It’s key to understand the difference here though which is basically that you can have many reducers that provide some form of state, but you can only have one store that pulls in all of the data from your reducers. The second import here is our rootReducer, which we have covered earlier. You will see that create a simple function called configureStore that returns our createStore import as a function that takes in our rootReducer as its only parameter. Again, this is something we could have skipped and simply created out store within our root index.js file. Instead, I have kept this here as there is a lot of configuration you may find yourself doing for your store. This can range from setting up middleware to enabling additional Redux dev tools. It’s quite typical for this to occur, but as it would have been overkill to go into all of this now, I’ve removed anything from configureStore that wasn’t required for this app. Okay, so we now have everything set up in our Redux folder, and we’ve hooked up Redux to our index.js file and our root App.js component. Now what? Triggering Redux functions in our appWe’re on the home stretch now. We’ve set everything up and our connected components have access to our store — via mapStateToProps and our actions via mapDispatchToProps— as props. We access these props just like we normally would in React, but for reference: ToDo.jsThese three props are the same ones we passed in: the list contains our state, while redux_add and redux_delete are our add and delete functions. We then just use these where we need to. In our case, I have maintained the same functions that I used in our vanilla React app, with the exception of instead of updating state locally with some sort of setList() function from a useState hook, we call our redux_add or redux_delete functions with the required payloads. Let’s take a look: Adding itemsDeleting itemsLet’s take our deleteItem function and step back through each step that leads to the update of state in our app. redux_delete takes the ID from the To Do item that we want to remove. If we take a look at our appActions.js file, we see that the ID we passed in becomes the value of our payload: appActions.jsWe then see in our appReducer.js file that whenever the DELETE_ITEM type is hit in our switch statement, it returns a new copy of our state that has the ID from the payload filtered out of it: appReducer.jsAs our new state is updated, the UI in our app updates. And that’s Redux!We’ve looked at how to add Redux to a React project, how to configure a store, how to create actions that carry data, and how to create reducers that update our store. We’ve also looked at our how to connect our app up to Redux in order to enable access to all of our components. I hope you have found this useful and have gained a better understanding of how an app might look with Redux. But wait, where is the app that just used React? I thought this was a comparison piece?This article is really a beginner’s guide to Redux to demonstrate how you would go about adding Redux into an existing React app. The existing React app in question was already reviewed here: I created the exact same app created in React and Vue. Here are the differences. Github links to both apps:React ToDo: https://github.com/sunil-sandhu/react-todo-2019 Redux ToDo: https://github.com/sunil-sandhu/redux-todo-2019 If you’re interested in forking the styles used in this article and want to make your own equivalent piece, please feel free to do so! 👍 Wondering where the Redux and Vuex comparison is?We’re on it!
0 notes
Text
Fancy Yarn: Classification, Advantages, Disadvantages and Uses
Fancy Yarn: Classification, Merits, Demerits and Uses
#fancyyarn #classificationoffancyyarn #fancyyarns #usesoffancyyarn
Fancy Yarn: Classification, Advantages, Disadvantages and Uses
Mohammad Mahbubur Rahman (Maya)
AGM, M.Hossain Cotton Spinning Mills Ltd.
Email: [email protected]
What is Fancy Yarn?
Textile yarns are the basic elements of fabrics. For fabric design and production, yarns are mainly considered in terms of their colors, structures and material properties. Fancy yarn, sometimes known as novelty yarn…

View On WordPress
0 notes
Photo


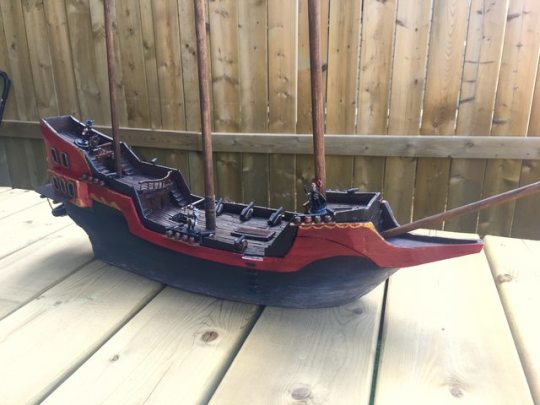
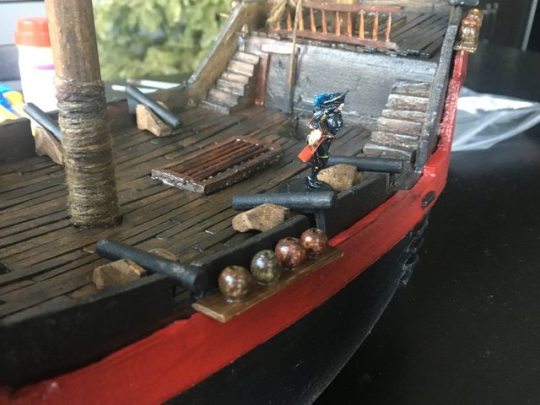
I wanted to build a foam pirate ship for my 5e D&D campaign but I couldn't find any resources, so I figured it out for myself. The deck has magnets in it to function as a grid. So... here’s a shitty guide (WITH PICTURES) if you want to build one, too.
If you have done this before or have other resources, link them for others who want to try their hand at it (and so I can see). If you have suggestions on how things could be done faster or better, feel free to leave suggestions for future generations. And for me in case I ever build another one. This was my first time doing anything remotely terrain-y or set-piece-y, so I really can't give very good advice. But I couldn't quite find anything that matched what I wanted to build, so I figured this would be worth posting.
The benefits of building a foam boat instead of just buying a model ship or something come down to:
a) scale: built it to 1 inch = 5 feet so your minis look good and any other props or grids you have work seamlessly.
b) customizability: include the exact things you want in the game. God forbid if your players trash the ship in the game you can alter the model for a shipwreck or something (@ my players: fucking don't, please).
c) accessibility: don't include anything you don't want, so the deck is uncluttered and there are no sails or rigging to try to reach around. Also the flat bottom means it doesn't need a stand. The foam construction makes it lightweight.
d) magnets: make everything stick to the deck. The actual reason I built this boat. I love the magnets and they were a good choice.
The cons are:
a) it's annoying and takes a long time (not too hard, just tedious).
b) it's a bit fragile, especially the details and small bits.
c) all your minis need an extra base for the magnets. Or I guess you could maybe stick the magnets into existing bases. I'm not an expert or anything.
This is gonna be the shittiest tutorial you've ever read so prepare yourself.
Actual guide:
1: step one is to draw out the boat. Scale is pretty key. Keep in mind that minis can't really fit on anything that's not a full square, so alter the proportions to maximize playable area. I altered the layout as I went to get rid of awkward spaces. Research galleons and frigates. I focused around 17-18th century but the coolest ships come after that. Make a boat that you love with however much realism you prefer.
2: get yourself supplies. You need:
polystyrene foam, about six pieces 10 inches by 24 inches apiece. I got a 96" sheet and used about half of it.
wood glue
paintbrushes, pens, pencils, scissors, utility knives with lots of spare blades, hot glue gun
drywall mud or something similar
wooden dowels, rods, skewers, toothpicks
popsicle sticks in a couple sizes
grid paper for templates
push pins to hold templates
yarn or string that looks like rope
sandpaper
beads (optional, see detail shots)
fridge magnets for embedding into the deck and attaching to the minis
clay to make a figurehead (not pictured) or a Barbie or something
3: trace out the cross sections (floorplans) onto the foam pieces by pinning grid paper to the foam, and cut them out. The curved deck makes this a real pain, because the floor plans don't perfectly map to the foam pieces. The decks are curved but the foam pieces are not. There's a bit of mental gymnastics in this part but you basically cut each foam piece to its widest dimension, then taper, trim and curve it to fit the profile you want after the basic shape is established. I cut everything out just slightly too large so I could trim and adjust it without losing usable space. After you have the top-down profiles correct, start tackling the side-view, which is the deck profile itself. In that picture just about everything is done but the main deck (fore- and aftdeck are nice and curved but the lowest deck is still flat). Pin it in place with toothpicks and glue it together with wood glue overnight. Leave weight on it. Let it dry for like 12+ hours for sure. I messed with it early and popped the aftcastle off, which was extremely annoying.
4: pick it up as one big solid piece and use a knife to slice away inconsistencies and match up the foam pieces better. Then sand it, mud it, let it dry and sand it again. I used lots of mud on the front edge because my cut-out pieces didn't quite match up. Fill up any weird cracks or miscuts that have developed. You can actually get away with adding quite a bit of mass this way. This is the final shaping of the basic form of the boat. Get a bit excited. Up to this point it's a lot of work for basically a big foam block that looks sort of like a boat. But take your time because you can't un-fuck the symmetry later.
5: paint the main deck, then trace a grid out and install one magnet per space. A drill or something would probably do wonders here. I just used a knife and some wood glue. Make sure every magnet has the same side up, and make sure they are pretty flush with the deck. I made bases for the minis out of foam and installed magnets in the bottom similarly. If you're fancy maybe little wooden or metal bases would be cool. Don't put any of the magnets the wrong way -- all the minis are supposed to be attracted to the boat deck so they don't slide around, fall over or get jostled.
6: cut a bunch of floorboards and paint and install them. Take popsicle sticks, slice off the rounded ends, and split them lengthwise with a knife. Paint roughly with one layer of brown to preserve some of the natural wood grain. Then cut them to various sizes -- whatever you think is right. Half of mine were 2", the rest were 1" or 3". Keep scale in mind. If you make them too wide, it'll kill the look. To fit the planks to the curve of the deck, just gently bend them with your fingers. Spread a layer of wood glue on the deck in sections and use your drawn-on gridlines as guides as you place plank by plank. A pattern would be clever. I just stuck whatever fit on. Go around any features like stairs, grates and masts. I left about an eighth of an inch around the perimeter for the railing/barrier later. Make stairs and stick them into the deck, and carve exterior stairs out of foam and glue them in place. Keep that eighth-inch perimeter in mind as you shape the stairs and place them.
7: base coat the rest of the thing. Don't actually put the masts in here because you'll be fighting with them for the rest of the build.
8: add a thin, 3/4-inch barrier around the perimeter and a prow structure. I traced the deck profile roughly onto paper, drew the barrier, cut it out of the paper, tested it on the ship and adjusted as necessary before transferring it to foam and cutting it out. Be really careful with the thickness. Don't slice it in half or break it. Cut cannon-crenelations out as well as the space where the plank goes. I stuck it down by sticking toothpicks straight down through it into the bare deck. This was probably a mistake. It's not sturdy or precise. I added some hot glue here (for the first time in the build) to fill in little cracks and adhere it better. You're on your own for the prow -- make it out of foam in two halves and glue it on. Good luck. If you look at reference you can make a way cooler one than me.
9: make windows, deck rails, a wheel, cannons, grates, swivel guns, and a border that covers the seam between the deck and perimeter railing. The window-frames are each a single piece of foam sliced thinly and wood-glued into position. If you know how, you could make them out of wood. Deck rails are square foam rails top and bottom, joined by toothpick posts. The wheel is foam with toothpicks stuck into it. The cannons are thin wooden dowels with carved foam bases glued together. Adding wheels to the bases would be cool but fragile and tedious. One of the grates is a foam border with toothpick cross-parts and the other one has a wooden frame made from popsicle sticks. Do whatever you prefer. Swivel guns are little foam tubes with toothpicks that attach them to the railing. This allows them to swivel. You could probably make them out of skewers or something instead of foam. The border (red part along the side) helps hide sloppiness between the hull and barrier, and adds some complexity to the shape. You could make it much thinner than I did if you have a steady hand or a wire foam cutter. Or more patience with sandpaper. Real ships have super cool features like this, so use reference and add whatever you can get away with, I guess. This is probably a better time to add the masts. Sharpen them and jam them in or bore holes and glue them.
10: add painted details, "rigging", nets and ropes, as well as anything else you want. I have a longboat hanging off the back of the ship, but you could also place it in the middle of the main deck. The rigging I added is composed of popsicle stick planks stuck to the side of the ship, with painted wooden beads glued onto that. It's not even nearly accurate, but I think it gives the rough impression of the pulleys that are on real boats. I used gold paint for detailing which I definitely recommend. Netting would be cool but I couldn't find a non-intrusive way to add any. Of course oars, buckets, crates, sacks, lanterns and all sorts of other props will look neat. I opted not to add those in order to keep things simple, as we'd just be taking them off or getting annoyed with them during combat. I made a balcony off the back out of popsicle sticks and stuck/glued it on. It's out of scale, but large enough for characters to stand on. Put little ladder boards onto the side of the ship and anywhere else you want them. Up a mast would be cool. Doorframes and square window-frames can be made with planks like the deck. I decided against any sorts of crow's nests or cross-masts to keep things simple and easy to see/reach around. I think more delicately sculpted embellishments would look very cool added on, but could not figure out a decent way to make them. Printing them out on thick paper, cutting them out and glueing those on might do the trick.
That's the whole guide. I would have done a better one but I forgot to take pictures. Feel free to ask questions and I'll do my best to answer.
#my art#crafts#diy#props#pirate ship#ship#boat#polystyrene#foam#d&d#dungeons and dragons#dnd#dungeon master#dm#game master#gm#game#game props#artists on tumblr#step by step#guide#how to#magnets
9 notes
·
View notes
Text
Fancy Yarn Market Trends, Challenges, Opportunities, and Drivers 2019-2023
[17 july 2019] Fancy Yarn includes Chenille Yarn, Gimp Yarn, Loop Yarn, Knop Yarn, Slub Yarn and other types. In the context of China-US trade war and global economic volatility and uncertainty, it will have a big influence on this market. Fancy Yarn Report by Material, Application, and Geography - Global Forecast to 2023 is a professional and comprehensive research report on the world's major regional market conditions, focusing on the main regions (North America, Europe and Asia-Pacific) and the main countries (United States, Germany, United Kingdom, Japan, South Korea and China).
In this report, the global Fancy Yarn market is valued at USD XX million in 2019 and is projected to reach USD XX million by the end of 2023, growing at a CAGR of XX% during the period 2019 to 2023.
The report firstly introduced the Fancy Yarn basics: definitions, classifications, applications and market overview; product specifications; manufacturing processes; cost structures, raw materials and so on. Then it analyzed the world's main region market conditions, including the product price, profit, capacity, production, supply, demand and market growth rate and forecast etc. In the end, the report introduced new project SWOT analysis, investment feasibility analysis, and investment return analysis.
Get Free Sample Copy of this Report at: https://www.radiantinsights.com/research/global-fancy-yarn-market-research-report-2019-2023/request-sample
The major players profiled in this report include:
• Huayi Yarn
• Fan Xuan Yang
• Tiantianrun
• AA GLOBAL
• Changzhou Elite
• Consinee
• Damodar
• Monticolor
• Lanificio Dell'olivo
• Lane Mondial
• Adriafil
• Muradim
• Nord Ciniglia
The end users/applications and product categories analysis:
On the basis of product, this report displays the sales volume, revenue (Million USD), product price, market share and growth rate of each type, primarily split into:
• Chenille Yarn
• Gimp Yarn
• Loop Yarn
• Knop Yarn
• Slub Yarn
On the basis on the end users/applications, this report focuses on the status and outlook for major applications/end users, sales volume, market share and growth rate of Fancy Yarn for each application, including:
• Garment Industry
• Garment Accessory
• Carpet
Check out Full Report with TOC at: https://www.radiantinsights.com/research/global-fancy-yarn-market-research-report-2019-2023
0 notes
Last Seen Blogs

maskonna
"Meat on Your Plate is Blood on Your Hands"

neckywecky
Untitled

gainersandmen
Hot Gainers And Such

threemoverctweb
Three Movers
fiftyshadesofmetal
Tab's Transformers Dump