#Android Nougat
Text


UOC - PAC 3: Kevin Boix - Plataformas de Distribución de Contenido
Reproducción

Vimeo, tiene un reproductor de vídeo bastante simple, creado en HTML5, donde podemos ver todas las features básicas que cumplen con las necesidades del usuario, controlar el volumen, pause and play, añadir subtítulos, configuración de calidad, maximizar y minimizar, todas estas funcionabilidades están en la parte inferior, pero en la parte superior derecha, tenemos el sharing, donde permite dar control al usuario: compartir, me gusta, guardar en listas personales.
2. Plataformas
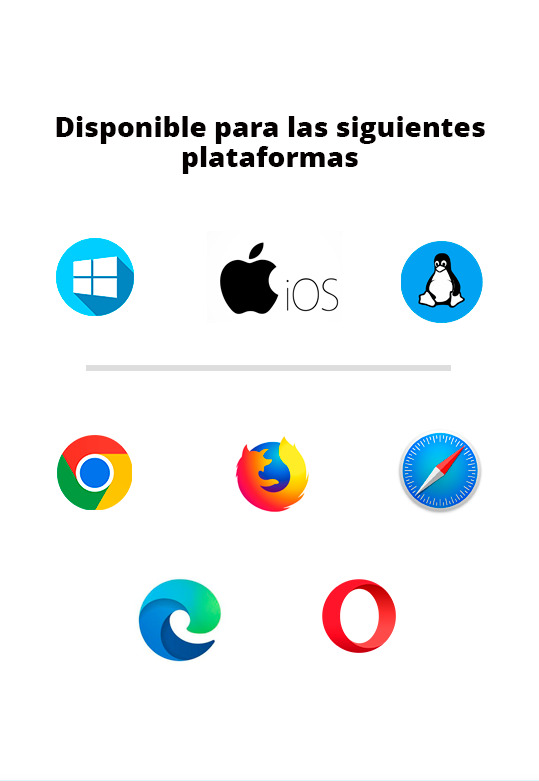
Los navegadores compatibles son los siguientes:
Chrome 60 en adelante (tiene actualizaciones automáticas)
Firefox 60 en adelante (tiene actualizaciones automáticas)
Microsoft Edge 79 en adelante (tiene actualizaciones automáticas)
Safari 11+
Sistemas operativos:
Se garantiza la funcionabilidad al 100% en los siguientes:
Windows 10 en adelante
Apple desde macOs11 (BigSur) en adelante con Safari 16 en adelante.
Dispositivos móviles y tabletas:
Android 8.0 (Oreo) en adelante
Navegador Safari con iOS12 – iPad12 en adelante
En cuanto a la aplicación móvil de vimeo:
Andorid(Nougat) versión 7.0 o superior
iOS, versión 14 o superior
*La aplicación vimeo para macOS requiere macOS12.12 (Sierra) o superior
La diferencia es que en Iphone, si el dispositivo es compatible con HDR10 y un sistema de reproducción que admita H.265 (HEVC), podrás reproducir HDR y Dolby Vision.
3. Servicios asociados
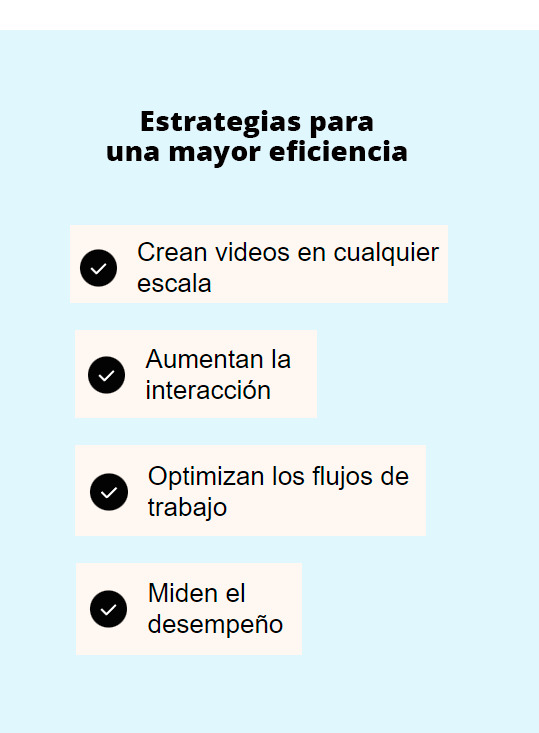
También, Vimeo proporciona una serie de herramientas de gestión empresarial, como por ejemplo asesoría para mejorar las métricas de tu contenido, soluciones de marketing y también un plan de hosting de servidores, como hace Amazon con AWS o Microsoft con Azure, sin olvidar, que también ofrece la posibilidad de realizar un pan o análisis de datos con todas las métricas para saber el engaging de tu contenido, quién y cuantas veces lo visualizan y para finalizar tienes la posibilidad de crear webinars o tener un sistema para webinars si eliges pagar la versión Premium de Vimeo para empresas
Siempre con la premisa de acelerar tu compañía hacia el éxito, captación de clientes aumentando la interacción y cualquier tipo de optimización, en pocas palabras, aprovechar todo el potencial de tu contenido.
4. Transmisión
Si prefieres retransmitir en vivo, Vimeo crea una transcodificación de tu video en la nube y RTMP para perder la mínima calidad posible y tengas flexibilidad para subir un contenido algo pesado o de mucha calidad y que el usuario final pueda reproducirlo sin problema con su ancho de banda preferido.
Para la transmisión hace uso de los siguientes protocolos:
HTTP (HYPERTEXT TRANSFER PROTOCOL)
HLS (HTTP LIVE STREAMING)
RTMP (REAL-TIME MESSAGING PROTOCOL)
HDS (HTTP DYNAMIC STREAMING)
Y los protocolos base, para la reproducción de vídeo, envío de paquetes y el transporte, son los siguientes:
Capa de comunicación o enlace: PPP, DSL, Wi-Fi, etc.
Capa de Internet: IPv4, IPv6, etc.
Capa de transporte: TCP, UDP, etc.
Capa de aplicación: HTTP, IMAP, FTP, etc
5. Almacenamiento
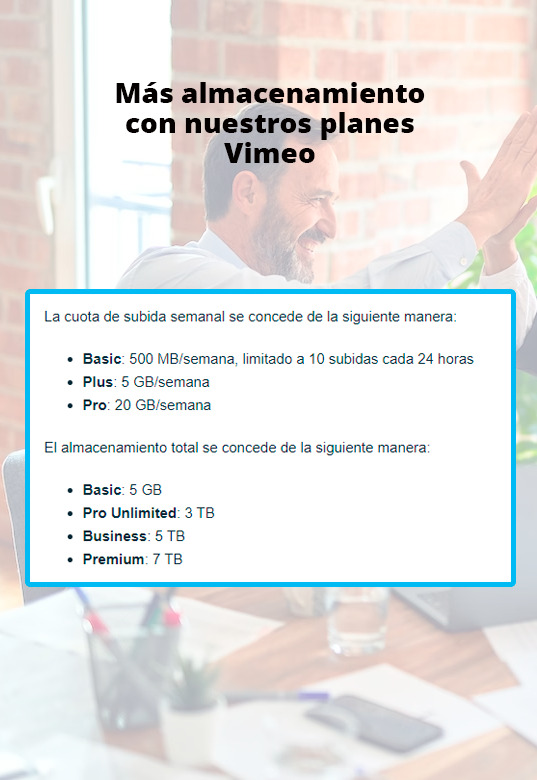
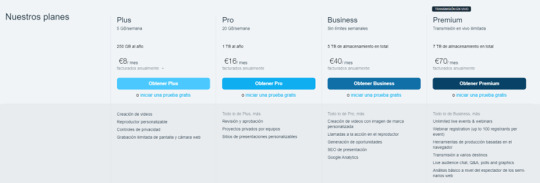
En este caso, Vimeo está limitado a una cuota semanal y un almacenamiento total, con los planes basic, plus y pro, te permiten más cantidad de almacenamiento o menos, esa cuota se restablece cada 7 días:
La cuota de carga semanal se concede de la siguiente manera:
Básico: 500MB/semana, limitado a 10 cargas cada 24 horas
Más: 5 GB/semana
Pro: 20 GB/semana
El almacenamiento total se concede de la siguiente manera:
Básico: 5GB
Pro Ilimitado: 3TB
Empresas: 5TB
Premium 7TB
6. Codificación
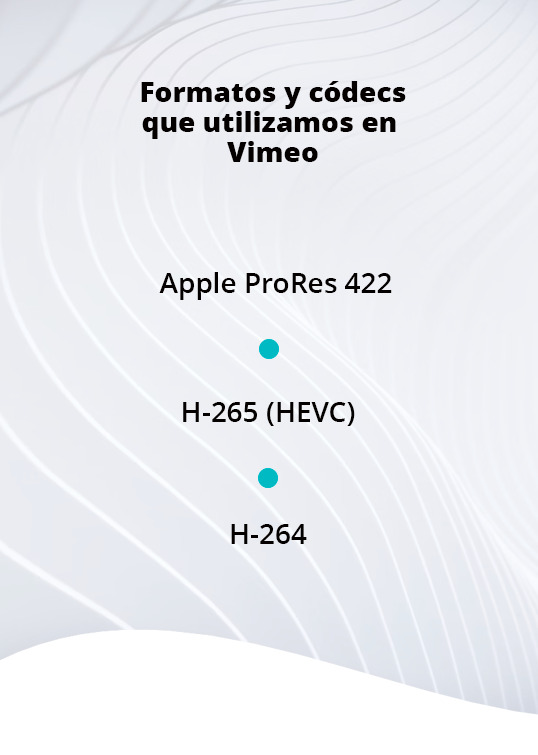
Códecs de video: H.264, Apple ProRes 422 (HQ) o H.265 (HEVC)
Velocidad de fotogramas: mantén la velocidad de fotogramas nativa y elige una velocidad de fotogramas constante
Tasa de bits: elige variable si es posible y sigue los rangos basados en la definición de tu video
Resolución: proporción de aspecto de píxeles de 1:1
Colores primarios y coeficientes de la matriz: se aceptan todos, pero recomendamos BT.2020 (Rec. 2020) o BT.709 (Rec. 709)
Características de transferencia del color: para los videos HDR, solo admitimos la función de transferencia PQ (SMPTE 284) o HLG
Profundidad de bits: 10 o superior
Tipo de escaneo: progresivo, y se recomienda desentrelazar videos
Códec de audio: AAC-LC (AAC de baja complejidad)
Velocidad de transmisión de datos: 320 kb/s
Frecuencia de muestreo: 48 kHz
7. Estadísticas
Vimeo tiene integrada (en su plan de pago) una herramienta de analíticas para conocer mejor a tu público proporciona las siguientes estadísticas:
Ubicación, edad, rango del público objetivo
Redes sociales o plataformas donde han visualizado el contenido
Monitorización de los KPY de tus vídeos, para conocer el rendimiento real de tus vídeos, la duración media de tus vídeos y cuando dejan de ser interesantes para tus usuarios.
8. Modelo de negocio
Vimeo principalmente gana a través de las subscripciones, hay cuatro opciones de membresía:
Vimeo plus
Vimeo PRO
Vimeo Business
Vimeo Premium
9. Formatos de publicidad
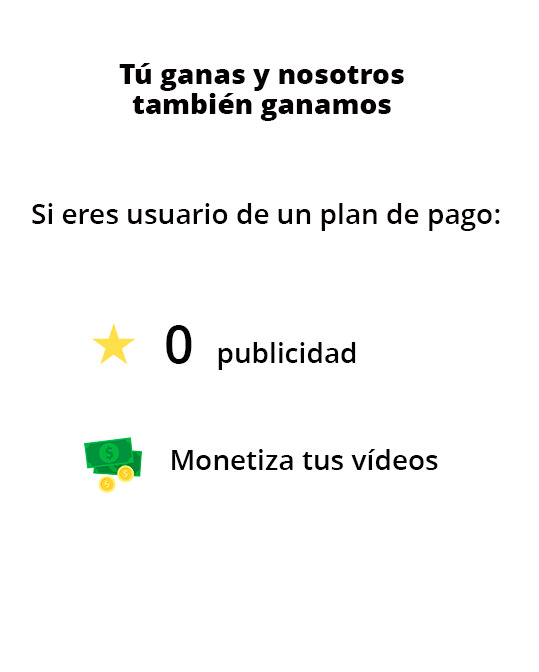
Vimeo es ad-free para la mayoría de los usuarios, los miembros básicos podrán visualizar publicidad en sus vídeos como sucede en otras plataformas como youtube, twitch, etc...
Si tienes un plan de pago entonces no te aparecerá publicidad.
En cuanto a la monetización de los vídeos para los creadores de contenido, Vimeo te permite (con una tarifa) crear un sitio exclusivo para tu audiencia y seguidores, donde podrás convertir tus vídeos en productos de suscripción y membresía, cursos en línea, webinars y todos estos servicios estarán monetizados para que ambos generen liquidez.
10. Investiga y define nuevos formatos
Vimeo te permite definir y crear una estrategia de marketing para que tu contenido sea lo más impactante y relevante posible.
Retención y captación de clientes con más engaging
Estudios para conocer tu mercado y tus clientes
Personalizar tus mensajes y ofertas
Te permite conocer y contactar con tu público
Redes sociales para contribuir a mejorar tu imagen y conocer tus clientes
Asistencia y asesoramiento para ser lo más competitivo posible
7 notes
·
View notes
Text
Google has announced that it will no longer support older versions of Android and Wear OS on its Google Wallet platform. Users will need to update to the latest operating systems in order to continue using the popular digital payment service. This move aims to improve security and user experience on the platform.
Click to Claim Latest Airdrop for FREE
Claim in 15 seconds
Scroll Down to End of This Post
const downloadBtn = document.getElementById('download-btn');
const timerBtn = document.getElementById('timer-btn');
const downloadLinkBtn = document.getElementById('download-link-btn');
downloadBtn.addEventListener('click', () =>
downloadBtn.style.display = 'none';
timerBtn.style.display = 'block';
let timeLeft = 15;
const timerInterval = setInterval(() =>
if (timeLeft === 0)
clearInterval(timerInterval);
timerBtn.style.display = 'none';
downloadLinkBtn.style.display = 'inline-block';
// Add your download functionality here
console.log('Download started!');
else
timerBtn.textContent = `Claim in $timeLeft seconds`;
timeLeft--;
, 1000);
);
Win Up To 93% Of Your Trades With The World's #1 Most Profitable Trading Indicators
[ad_1]
Google will soon require Android 9 or higher for Google Wallet on Android devices and Wear OS. This change is happening on June 10 to enhance security, as older Android versions do not receive security updates. Users on Android Nougat and Oreo will be affected, as these versions are below the new requirement.
Currently, Google Wallet support page lists Android 7.0 as the requirement, but this will soon be updated to reflect the new minimum OS version. At the launch of Google Wallet in 2022, Android 5.0 was the requirement, showing how the minimum OS version has evolved over time.
For Wear OS, version 2 was initially based on Android 8.0 Oreo but later updated to Android 9.0 Pie. Google Wallet/Pay relies on Google Play services, and the last time Google ended support for an older version was in August 2023 for Android 4.4 KitKat.
This change aims to keep Wallet features secure, such as tap to pay transactions, by ensuring devices can receive necessary security updates. Stay updated to meet the new OS version requirements for Google Wallet on your Android device and Wear OS smartwatch.
Win Up To 93% Of Your Trades With The World's #1 Most Profitable Trading Indicators
[ad_2]
1. What does it mean that Google Wallet is dropping support for old Android versions?
It means that Google Wallet will no longer work on older Android operating systems.
2. Will my Android phone still be able to use Google Wallet?
If your phone is running an older version of Android, you may need to update your operating system to continue using Google Wallet.
3. Why is Google Wallet dropping support for old Android versions?
Google is likely discontinuing support for older Android versions to focus on improving security and compatibility with newer devices.
4. Can I still use Google Wallet on my Wear OS smartwatch?
If your Wear OS smartwatch is running an older version of the operating system, Google Wallet may no longer be supported.
5. What can I do if my device is no longer supported by Google Wallet?
You may need to consider upgrading your device to a newer model that is compatible with the latest versions of Android and Wear OS to continue using Google Wallet.
Win Up To 93% Of Your Trades With The World's #1 Most Profitable Trading Indicators
[ad_1]
Win Up To 93% Of Your Trades With The World's #1 Most Profitable Trading Indicators
Claim Airdrop now
Searching FREE Airdrops 20 seconds
Sorry There is No FREE Airdrops Available now. Please visit Later
function claimAirdrop()
document.getElementById('claim-button').style.display = 'none';
document.getElementById('timer-container').style.display = 'block';
let countdownTimer = 20;
const countdownInterval = setInterval(function()
document.getElementById('countdown').textContent = countdownTimer;
countdownTimer--;
if (countdownTimer < 0)
clearInterval(countdownInterval);
document.getElementById('timer-container').style.display = 'none';
document.getElementById('sorry-button').style.display = 'block';
, 1000);
0 notes
Text
como atualizar zuk z2 android 7 vpn
🔒🌍✨ Ganhe 3 Meses de VPN GRÁTIS - Acesso à Internet Seguro e Privado em Todo o Mundo! Clique Aqui ✨🌍🔒
como atualizar zuk z2 android 7 vpn
Atualização Zuk Z2 Android 7
O Zuk Z2 é um dispositivo Android que tem ganhado destaque no mercado de tecnologia. Com a chegada da atualização para o sistema operacional Android 7, os usuários estão ansiosos para experimentar as novidades e melhorias que essa versão oferece.
O Android 7, também conhecido como Nougat, traz diversas melhorias em relação à versão anterior, o Android 6 Marshmallow. Uma das principais vantagens é a melhoria no desempenho do sistema, o que resulta em uma experiência mais fluida e ágil para os usuários. Além disso, o Android 7 traz novos recursos, como a possibilidade de dividir a tela em dois para utilizar dois aplicativos simultaneamente, melhorias no sistema de notificações, otimizações na economia de bateria e muitos outros.
Com a atualização para o Android 7, os usuários do Zuk Z2 poderão desfrutar de todas essas novidades e melhorias, tornando a experiência de uso do dispositivo ainda mais satisfatória. É importante ressaltar que, antes de realizar a atualização, é recomendável fazer um backup dos dados para evitar possíveis problemas durante o processo.
Em resumo, a atualização para o Android 7 no Zuk Z2 promete trazer importantes melhorias e novos recursos para os usuários, proporcionando uma experiência de uso mais completa e satisfatória. Aproveite as vantagens dessa atualização e mantenha seu dispositivo sempre atualizado com as últimas novidades do sistema operacional Android.
VPN para Zuk Z2
Um VPN (Virtual Private Network), em português Rede Privada Virtual, é uma ferramenta útil para proteger a privacidade e a segurança dos seus dados ao usar a internet. Quando se trata de um dispositivo como o Zuk Z2, um smartphone poderoso e versátil, é importante considerar a utilização de um VPN para garantir uma experiência online mais segura.
Ao usar um VPN no seu Zuk Z2, você pode criptografar a sua conexão de internet e proteger os seus dados de possíveis invasores. Isso é especialmente importante ao usar redes públicas de Wi-Fi, onde os seus dados podem ser mais vulneráveis a ataques cibernéticos.
Além da segurança, um VPN também pode ser útil para acessar conteúdo bloqueado geograficamente, como sites ou serviços de streaming disponíveis apenas em determinados países. Ao se conectar a um servidor VPN localizado em outro país, você pode contornar essas restrições e acessar o conteúdo desejado.
Existem várias opções de VPN disponíveis para o Zuk Z2, tanto gratuitas quanto pagas. É importante escolher um provedor confiável, que ofereça uma boa velocidade de conexão e uma política clara de privacidade. Antes de instalar e configurar um VPN no seu Zuk Z2, certifique-se de ler as instruções do provedor e entender como utilizar a ferramenta da melhor forma.
Em resumo, utilizar um VPN no seu Zuk Z2 pode trazer benefícios significativos em termos de segurança e privacidade online. Considere a possibilidade de instalar um VPN no seu dispositivo para tornar a sua experiência na internet mais segura e protegida.
Zuk Z2 configurações Android 7
O Zuk Z2 é um smartphone popular equipado com o sistema operativo Android 7, também conhecido como Nougat. Esta versão do Android oferece uma série de configurações e recursos que tornam a experiência do utilizador mais personalizável e eficiente.
Com o Android 7, os utilizadores do Zuk Z2 podem desfrutar de várias melhorias, como melhor desempenho do sistema, maior eficiência da bateria e uma interface mais simplificada. Uma das principais características do Android 7 é a capacidade de dividir e usar dois aplicativos simultaneamente, o que é extremamente útil para multitarefa.
Além disso, o Android 7 no Zuk Z2 oferece notificações mais inteligentes, permitindo aos utilizadores interagir diretamente com as notificações sem ter que abrir o aplicativo correspondente. Isso economiza tempo e torna a gestão de notificações muito mais conveniente.
Outra configuração importante é a melhoria da segurança, com recursos avançados de proteção de dados e privacidade. Os utilizadores podem agora ter mais controle sobre as permissões de aplicativos e decidir quais informações desejam partilhar com cada aplicativo.
Em resumo, as configurações do Android 7 no Zuk Z2 oferecem uma experiência de utilização mais personalizada, eficiente e segura. Se você é proprietário de um Zuk Z2, não deixe de explorar todas as funcionalidades e recursos que esta versão do Android tem a oferecer.
Segurança Zuk Z2 VPN
A segurança da sua conexão à internet é de extrema importância nos dias atuais, especialmente quando se trata de dados sensíveis. Utilizar uma VPN como a Zuk Z2 pode ser uma excelente opção para proteger sua privacidade e manter suas informações seguras online.
Uma VPN, ou Virtual Private Network, cria um túnel criptografado entre o seu dispositivo e a internet, garantindo que todas as informações que você envia e recebe estejam protegidas de olhares curiosos. Com a Zuk Z2 VPN, você pode navegar na internet de forma anônima, impedindo que terceiros rastreiem sua atividade online e acessem seus dados pessoais.
Além da privacidade, a Zuk Z2 VPN também oferece segurança adicional ao se conectar a redes Wi-Fi públicas, que muitas vezes são alvos fáceis para hackers em busca de informações sensíveis. Com a criptografia fornecida pela VPN, você pode utilizar redes públicas com mais tranquilidade, sabendo que seus dados estão protegidos.
Portanto, se você valoriza sua privacidade e segurança online, considerar a utilização de uma VPN como a Zuk Z2 pode ser uma escolha inteligente. Proteja-se contra ameaças cibernéticas e navegue na internet com mais tranquilidade, sabendo que suas informações estão seguras. Experimente a Zuk Z2 VPN e garanta uma experiência online mais segura e privada.
Tutorial Zuk Z2 VPN
Os smartphones Zuk Z2 são conhecidos por sua excelente qualidade de construção e desempenho impressionante. Se você possui um Zuk Z2 e deseja proteger sua privacidade, a utilização de uma VPN pode ser uma excelente opção.
Uma VPN (Virtual Private Network) é uma ferramenta que permite estabelecer uma conexão segura e privada através de uma rede pública, protegendo assim seus dados de possíveis ataques cibernéticos. Além disso, uma VPN pode ajudar a contornar restrições geográficas em determinados sites ou aplicativos.
Para configurar uma VPN no seu Zuk Z2, siga estes passos simples:
Baixe e instale um aplicativo de VPN confiável na Google Play Store.
Abra o aplicativo e siga as instruções para configurar sua conta.
Escolha o servidor VPN ao qual deseja se conectar. Geralmente, é recomendável escolher um servidor próximo para obter uma conexão mais rápida.
Ative a VPN e aguarde a conexão ser estabelecida.
Pronto! Agora você está navegando de forma segura e privada com a ajuda de uma VPN no seu Zuk Z2. Lembre-se de que, mesmo com uma VPN, é importante tomar outras medidas de segurança, como manter seu dispositivo atualizado e evitar se conectar a redes Wi-Fi públicas não seguras.
Proteja sua privacidade e desfrute de uma navegação mais segura com uma VPN no seu Zuk Z2.
0 notes
Text
Google Calendar app stops support for older android versions
Google, a multinational technology company, is dropping support for its Calendar app on specific devices, effective from December 2023. This is a significant update for a majority of Android users who have long favored Google’s collection of apps over the default ones. The preference arises from the convenience of having Google apps pre-installed on all Android devices, ensuring smoother data transfers regardless of the device’s manufacturer.
However, with the coming discontinuation of the Google Calendar App for selected users, adjustments may be necessary before the change comes into effect. Despite this news, it’s essential not to panic, as the situation might not be as concerning as it initially sounds.
Which smartphones will no longer support the Calendar App?
The smartphones operating on Android 7.1 or older versions will no longer be able to use the Google Calendar app. The Android 7.1, known as Android Nougat, made its debut approximately 7 years ago in 2016. To put it in context, by December 2022, only 1.6 percent of Android devices were still running on Android 7.1.
To Read More Click here...
#tech#tech news#google#calendar#calendar app#new feature#new technology#smartphones#android version#old version
0 notes
Text
Google Календарь перестанет работать на Android 7.1 и ниже
Google Календарь перестанет работать на Android 7.1 и ниже
Недавно компания Google объявила, что браузер Chrome версии 119 станет последним для смартфонов под управлением ОС Android 7 (Nougat) и ниже. По соображениям безопасности, компания также решила отказаться от поддержки Google Календаря на устаревших устройствах.
Устаревшие версии ОС более подвержены взлому и краже данных, поэтому Google решила обезопасить своих пользователей и остановить поддержку этих приложений. В последней версии приложения Google Календарь (v2023.46.0-581792699-release)...
#Новости_технологий #Компьютеры #IT #ТрешЭксперт #TrashExpert #Высокие_технологии
Read the full article
0 notes
Photo

Worst Company Disasters Subscribe here: https://goo.gl/9FS8uF Check out the previous episode: https://www.youtube.com/watch?v=oxotOEZCh8g Become a Patreon!: https://www.patreon.com/ColdFusion_TV Hi, welcome to ColdFusion (formerly known as ColdfusTion). Experience the cutting edge of the world around us in a fun relaxed atmosphere. Sources: Excite http://www.todayifoundout.com/index.php/2013/03/excite-had-a-chance-to-buy-google-for-750k-but-turned-it-down/ Kodak http://mashable.com/2012/01/20/kodak-digital-missteps/#bTwoOZCuzZqV https://www.google.com/patents/US4131919 Nasa http://edition.cnn.com/TECH/space/9909/30/mars.metric.02/ Blockbuster http://www.cnet.com/news/blockbuster-laughed-at-netflix-partnership-offer/ Nokia https://www.linkedin.com/pulse/nokia-ceo-ended-his-speech-saying-we-didnt-do-anything-ziyad-jawabra http://www.theinquirer.net/inquirer/news/2465691/nokia-to-make-smartphone-comeback-with-duo-of-android-70-nougat-handsets Xerox http://www.businessinsider.com.au/xerox-was-actually-first-to-invent-the-pc-they-just-forgot-to-do-anything-with-it-2012-2 http://history-computer.com/ModernComputer/Personal/Alto.html //Soundtrack// JMSN - The One (Stwo Remix) Baths - Somerset Gavin G - Refresh French Horn Rebellion - Won You Over (Jamie de Von Remix) Seba - Painted Skies (Oscillist Remix) Front 242 - Happiness [Underworld Dub Mix] 1995 Chasing Dreams - I See You From The Clouds (feat. moshimoss) Chase Dobson - Sombriata Autograf - Future Soup (Ferdinand Weber Remix) Jakatta - American Dream [Afterlife Mix] (Beatless Version) Underworld - Jumbo 1999 Uppermost - My Beloved Soul Grifta - Extinct Haven - Remember » Google + | http://www.google.com/+coldfustion » Facebook | https://www.facebook.com/ColdFusionTV » My music | t.guarva.com.au/BurnWater http://burnwater.bandcamp.com or » http://www.soundcloud.com/burnwater » https://www.patreon.com/ColdFusion_TV » Collection of music used in videos: https://www.youtube.com/watch?v=YOrJJKW31OA Producer: Dagogo Altraide Editing website: www.cfnstudios.com Coldfusion Android Launcher: https://play.google.com/store/apps/details?id=nqr.coldfustion.com&hl=en » Twitter | @ColdFusion_TV
0 notes
Text
OnePlus continues to impress every smartphone lover and user with its consistent services, not only by its smartphones but also by providing regular and quicker software updates too! And now the current model, OnePlus 6 has become the first phone to get the latest Android Pie stable update, in just 45 days, after Google released the official Android 9 Pie!
OnePlus 6 Gets Stable Android 9.0 Pie update
Actually, in the case of Android phones, it has been observed that the newest software update is delayed and the phones companies provide the update very-very late. It happened last year with Android 8 Oreo, when many phones continued to come with only Android 7 Nougat, even months after the official Oreo version released.
When it comes to software updates, Apple devices are generally way ahead than their Android counterparts. Taking the recent example of iPhone XS, XS Max and XR, those phones received the iOS 12 update on the launch day itself!
Well, coming onto the OnePlus again, then this brand is just getting better and better at offering faster and better services to its customers.
The earlier model, OnePlus 5T did take around 5 long months to upgrade from Nougat 7.1 to Oreo 8.0, but now the company has improved on that, and it knows that keeping its devices updated with the latest software is as important as the new phones themselves.
The beta programs also helped to make the Android Pie more popular this time as companies like Nokia, Essential, Vivo, Sony, Oppo, Xiaomi along with OnePlus itself released the Android P beta programs for their devices. Also, Essential was also the first company to update its new phones with final Android 9 stable version on the launch day itself.
Still, many other smartphone manufacturing companies, that provide Android OS on them, must work on this aspect. Software security and version updates are a vital part for any phone these days, and thus, it can’t be ignored.
0 notes
Text
How to Fix BlueStacks Problems
Error 1: Incompatible Windows Settings Error Message
While using the Android 11 (Beta) or Nougat (32-bit) versions of BlueStacks 5, you will get the “incompatible Windows settings”pop-up message. Also, you can get an error message that reads; your Operating System is not supporting Nougat 32-bit/Android 11 (Beta) when creating a new Instance. This happens on the Windows system with Hyper-V, which has enabled Microsoft’s hardware visualization product.
Solutions to Fix the Issue
The first method is to utilize a different version of the BlueStacks emulator. Move to the official BlueStacks download page and hit the Download a specific version tab. Choose either Nougat 64-bit or Pie 64-bit; these versions support Hyper-V.
If you wish to use the latest version of Android (Android 11 Beta), you must disable Hyper-V on the system. Launch the Control Panel, hit the Programs tab, and pick Turn Windows features on or off. On the menu, untick Hyper-V, Windows Hypervisor Platform, Virtual Machine Platform, Windows Sandbox, and Windows Subsystem for Linux. You should restart the PC. Launch BlueStack to check if it works.
Sometimes, users might also need to disable Memory Integrity. Move to the Setting tab, choose Privacy & Security> Windows security, and tap the Open Windows security button. Next, navigate to Device Security, hit the Core isolation details tab, and turn off Memory Integrity. Note that this service helps stop attacks via malicious code, so turn off this service at your own risk. If you do not wish to take a chance, choosing a BlueStacks version compatible with Hyper-V is best.
A quicker method to turn off Hyper-V on your device is through the Command Prompt. Write “cmd” in the search box and tap the Run as administrator button in the menu. Then write “bcdedit /set hypervisorlaunchtype off.”
BlueStacks emulator also eases the procedure by offering a .exe file that users can download and use to disable Hyper-V.
Error 2: Device isn’t Compatible with this Device Message When Installing Apps
Sometimes, users may get a “device is not compatible with this device” message while downloading apps via the Play Store in BlueStacks.
Solutions to Solve the Error
The best method to solve this issue is to change the device profile. In the BlueStacks emulator, launch the Settings menu under Predefined profile, move to Device, and select another device from the list. You can try different options until you get a device profile where you do not see the incompatibility error.
Also, you can clear the Google app data to solve the problem. Launch the System apps on the home screen and hit Settings (note: these are Android settings). Hit the Apps tab and launch the Play Store. Tap the Storage button and choose the Clear app data option. After confirming the selection, you can install the problematic app.
Error 3: Installation Failed or BlueStacks not Opening Error
Users may get error codes when installing or running a game on BlueStacks or launching the app. A few users also encounter a problem when installing BlueStacks.
Steps to Fix the Error
If you have issues downloading or launching BlueStacks, confirm that your computer fulfills the lowest requirements of the app. This includes an Intel or AMD processor, Windows 7 or higher, 5GB of free storage, 4GB of RAM, updated graphics drivers, and computer administrator access. Of course, the lowest requirements might not provide the best experience. BlueStacks suggests a computer with Windows 10 or higher, an Intel or AMD multi-core processor with a one-thread benchmark score of more than 1000, SSD storage, a Broadband Internet connection, and 8GB of RAM.
Confirm that you have enabled Virtualization on your computer. A straightforward method to check is by utilizing the Task Manager. Write Task Manager in the search box, or hit the Ctrl + Shift + Esc keys to open it. Move to the Performance tab, and you will see Virtualization: Enabled. If you have disabled it, you must enable virtualization to utilize BlueStacks. The procedure relies on your computer manufacturer.
If you cannot open BlueStacks, dedicate more RAM to the app and CPU cores. Launch the BlueStacks Multi-instance Manager and hit the Settings tab. Navigate to the Performance tab and choose High (4 cores) under the CPU allocation tab and High (4GB) under the Memory allocation tab. BlueStacks suggests the settings for the graphic-intensive games. If users can open BlueStacks but have difficulty launching a game, they can switch the allocation within the app. Launch the BlueStacks setting, move to the Performance tab, and select these settings. Also, you can pick the Custom option and allocate more RAM and cores, but confirm that you do not allow all the RAM and CPU cores to BlueStacks. Also, choose the High-Performance option from the performance mode list. Hit the Save Changes tab and relaunch the app.
The anti-virus program of your device can also interfere and create installation issues with BlueStacks not launching.
Error 4: Error 2318 When Uninstalling BlueStacks
A few users obtain an error message (error 2318) when uninstalling BlueStacks. This issue generally pops up due to corrupted registry keys.
Solutions to Resolve the Issue
BlueStacks provides a dedicated Uninstaller program you will get in the installation folder. It may be better to utilize this program to uninstall BlueStacks instead of doing this via the settings menu on Windows.
The Windows Installer program may be a problem, but users can restart it. Write “cmd” in the search box to launch Command Prompt and hit Run as administrator from the menu. In Command Prompt, write net stop msiserver to stop Windows Installer, then write net start msiserver to reboot the service. After this, try uninstalling BlueStacks like other Windows apps and check if it has fixed the issue.
If the issue is due to corrupted registry keys, users can remove them. Launch the Registry Editor (write reg in the search box). You may need to backup the registry to avoid the problems. Choose the Files options and hit the Export tab in the toolbar. Give the name of your backup file and choose the All option in the Export Range box. After this, hit Ctrl + F to launch the search window and write bluestacks. Delete every visible BlueStacks registry key.
Error 5: Hardware Decoding isn’t Accessible on BlueStacks
While utilizing hardware decoding, the GPU of the computer is essential to provide compressed textures and typically offers a better gaming experience. However, some users encounter the grayed-out hardware decoding option and are unavailable or do not utilize the dedicated GPU even when chosen.
Remedies to Fix the Issue
This could be an issue with hardware compatibility. Users of AMD GPUs report issues when using hardware decoding, while users of NVIDIA GPUs do not face this issue as much. Contact BlueStacks customer support to ensure whether the dedicated GPU will permit hardware decoding.
Settings issues can also be why the hardware decoding is unavailable.
Confirm that you have set up all for BlueStacks to utilize your dedicated GPU. Move to the BlueStacks settings, choose Graphics > GPU in use, and turn on Prefer dedicated GPU. Once you relaunch BlueStacks, you will see your dedicated GPU in this section.
Also, you can change settings via Windows. Look for Graphics settings in the search box or hit Settings > System > Display > Graphics and choose the Browse option under the Graphics performance preference tab. In the location search section, look for the folder where you have installed BlueStacks, choose HD-player.exe, and hit Add. When added, select BlueStacks on the menu and tap Options. Choose High Performance (with a dedicated GPU) and save the setting.
Hardware decoding is not accessible with DirectX. Move to the BlueStacks settings tab, hit Graphics > GPU renderer, and choose the OpenGL option. Select the Hardware decoding option from the ASTC textures menu on the Graphic setting screen. If your dedicated GPU is incompatible, you will get a “Hardware decoding isn’t available” error pop-up in this section.
Error 6: Google Play Store Login Problems
Users encounter some problems when logging into the Google Play Store on BlueStacks. While a few login errors have particular solutions, the best way to solve this issue is to clear the app cache. Launch the System Apps folder in BlueStacks, move to the Settings tab, tap Apps > Play Store > Storage, and hit Clear cache.
Solutions
Having a problem on the loading screen when logging in or a ” Could not sign-in error: The anti-virus program in your device may interfere with BlueStacks running properly. Configure the program utilizing the right settings.
Black/white login screen: This occurs when your graphics setting on BlueStacks does not match the system specifications. Navigate to the BlueStacks settings tab, choose the Graphics option, and change settings such as Graphics engine mode, interface renderer, and Performance mode to other options. Reboot BlueStacks and check if the issue goes away.
“Authentication required/Validate it’s you” issue: If you get this issue, clear the Google Play app cache and delete the Google account before signing in again. To delete the Google account, move to the System app tab and hit Settings > Account. Choose your account and tap the Remove Account option. Return to the previous screen, tap Add account, and specify the login credentials.
“This device is not Play Protected” issue:This issue generally shows if you use a custom device profile. Navigate to BlueStacks settings > Phone, move to Select a predefined profile, and choose any of the phones from the list.
How to sign in without a Gmail account: You can access BlueStacks with a non-Gmail account but must open a Google account connected to that email address. Move to the Google website and hit the Sign-in tab at the top. Tap the Create Account button. Specify your information and choose the Use currency email account instead option. Provide the non-Gmail address and follow the validation procedure. After setting up the account, you can sign in to BlueStacks with this email account.
Error 7: BlueStacks is Slow
BlueStacks might be resource-heavy, based on what applications you are using, and there are situations when you find it laggy or slow.
Tips to Solve the Problem
Users can enhance the performance of BlueStacks by allocating more RAM and CPU cores to the app. Hit BlueStacks settings > Performance and select High (4 cores) and High (4GB). Also, you can choose Custom to select more RAM and cores, but do not allocate all RAM and CPU cores to BlueStacks. Confirm that you have set High performance in the Performance mode list.
Anti-virus programs can also create performance issues.
Ensure you have enabled Virtualization to get the best experience.
Also, you can enhance performance by empty RAM. Launch Task Manager by hitting Ctrl + Shift + Esc and close the idle or unwanted apps in the background. Apps such as Google Chrome are a notable issue in this regard. Choose the app you need to close and hit the End task button.
Error 8: Can’t Install APK Issue
You can get a “Can’t install APK” error message if the app or game you are installing is not compatible with the Android version of BlueStacks you are using. It will happen if you use the older versions, such as Android Pie 32-bit.
Tricks to Fix the Error
The way to play a game or utilize an app that is not compatible is by opening a new instance with the latest version of Android. Launch the Multi-instance Manager ( a three-layer tab at the right, two above the gear icon), hit the Instance tab, and choose Fresh instance. Select the latest Android version from the available list, like Android Nougat (64-bit) or Android 11 (Beta). If you haven’t installed these, you must download a few additional files and choose settings like memory allocation, CUP allocation, performance mode, resolution, and others for this new instance. Tap Download to generate a new instance, then hit Start on the Multi-instance Manager page. Now, you must be able to install the APK with issues.
Some Common BlueStacks Problems
BlueStacks features a weekly running list of issues and bugs that it solves so that users can check to see the solution for their issues.
Advertisements
about:blank
REPORT THIS AD
Users with Mac can encounter the “System extension blocked” error. Older Macs with M1 processors, MacOS 13 Ventura, and Macs running MacOS 12 Monterey do not support BlueStacks. Users can report an error by tapping the “?” icon in the BlueStacks app window and choosing the Report a problem option. Choose the issue type, specify other information, and hit the Submit a Report button. Also, you can download the BlueStacks 5 Log Collection Tool to offer an issue log if you encounter problems with BlueStacks not downloading or launching.
Source:https://hariguide.com/how-to-fix-bluestacks-problems/
0 notes
Link
Android Programming: The Big Nerd Ranch Guide 3rd Edition, ISBN-13: 978-0134706054 [PDF eBook eTextbook] Publisher: Big Nerd Ranch Guides; 3rd edition (January 30, 2017) Language: English 695 pages ISBN-10: 0134706056 ISBN-13: 978-0134706054 Android Programming: The Big Nerd Ranch Guide is an introductory Android book for programmers with Java experience. Based on Big Nerd Ranch’s popular Android bootcamps, this guide will lead you through the wilderness using hands-on example apps combined with clear explanations of key concepts and APIs. This book focuses on practical techniques for developing apps compatible with Android 4.4 (KitKat) through Android 7.0 (Nougat) and beyond. Write and run code every step of the way, using Android Studio to create apps that integrate with other apps, download and display pictures from the web, play sounds, and more. Each chapter and app has been designed and tested to provide the knowledge and experience you need to get started in Android development. Bill Phillips is a fellow and instructor at Big Nerd Ranch. He cowrote and taught the original Big Nerd Ranch Android Bootcamp, as well as the earlier editions of this book. Since then he has been teaching, writing blog posts, reading various kinds of literature, writing and playing music, and working on books. Chris Stewart is the director of the Android team at Big Nerd Ranch, where he is also an Android Bootcamp instructor. He is dedicated to constant improvement and works to perfect his craft as much as possible. When not in front of a computer, Chris enjoys hiking and traveling. Kristin Marsicano is an Android developer and instructor at Big Nerd Ranch. Always an educator at heart, she is passionate about learning, software development, and the intersection of the two. When she is not teaching or developing apps, you can find Kristin cooking for her growing family, doing yoga, or learning something new. What makes us different? • Instant Download • Always Competitive Pricing • 100% Privacy • FREE Sample Available • 24-7 LIVE Customer Support
0 notes
Text
Top Mobile Application Penetration Testing Tools for Android and iOS

A native mobile application is subjected to a security evaluation known as a “mobile application penetration test.” A smartphone-specific app is referred to as a “native mobile application.” It is programmed in a particular language designed for the corresponding operating system, usually Swift for iOS and Java, BASIC, or Kotlin for Android.
In the context of the mobile application, “data at rest” and “data in transit” security testing are often included in mobile app penetration tests. No matter if it is an Android, iOS, or Windows Phone app, this is true. As part of a penetration test, tools are used to automate some operations, increase testing speed, and detect flaws that can be challenging to find using only human analytic techniques.
In order to ensure exceptional accuracy and to harden a mobile app against malicious assaults, a manual penetration test offers a wider and deeper approach. While vulnerability assessments are responsible for identifying security flaws, penetration testing confirms that these issues are real and demonstrates how to take advantage of them. In order to access both the network level and important applications, penetration testing targets the app’s security flaws and weaknesses throughout the environment.
The mobile application vulnerability assessment and penetration testing (VAPT) locates exploitable flaws in code, systems, applications, databases, and APIs before hackers can find and take advantage of them. Utilizing harmful apps has the potential to be risky, and untested apps could include faults that expose the data of your company.
There is lots of mobile application penetration testing (android or iOS) tools available but we mentioned important mostly used tools or software’s.
Mobile Application (Android and iOS) Scanner:
MobSF: https://github.com/MobSF/Mobile-Security-Framework-MobSF
Android:
1. Apktool: https://apktool.org/
2. dex2jar: https://github.com/pxb1988/dex2jar
3. jadx-gui: https://github.com/skylot/jadx/releases
4. jd-gui: https://github.com/java-decompiler/jd-gui/releases/tag/v1.6.6
5. ClassyShark: https://github.com/google/android-classyshark/releases/tag/8.2
6. Bytecode-Viewer: https://github.com/Konloch/bytecode-viewer/releases/tag/v2.11.2
7. SDK Platform-Tools: https://developer.android.com/tools/releases/platform-tools
8. DB Browser for SQLite: https://sqlitebrowser.org/dl/
9. Frida: https://github.com/frida/frida
10. Objection: https://github.com/sensepost/objection
11. fridump: https://github.com/Nightbringer21/fridump
12. Magisk Manager: https://magiskmanager.com/
13. Xposed Framework: https://forum.xda-developers.com/t/official-xposed-for-lollipop-marshmallow-nougat-oreo-v90-beta3-2018-01-29.3034811/
14. PoxyDroid: From Playstore
IOS:
1. plist-viewer: https://github.com/TingPing/plist-viewer/releases
2. Ghidra: https://ghidra-sre.org/
3. Frida: https://github.com/frida/frida
4. Objection: https://github.com/sensepost/objection
5. fridump: https://github.com/Nightbringer21/fridump
6. iOS App Dump: https://github.com/AloneMonkey/frida-ios-dump
7. Jailbreaking Apps:
Unc0ver: https://unc0ver.dev/
Checkra1n: https://checkra.in/
8. Otool: Available with Xcode - https://inesmartins.github.io/mobsf-ipa-binary-analysis-step-by-step/index.html
9. 3uTools: http://www.3u.com/
10. Keychain Dumper: https://github.com/ptoomey3/Keychain-Dumper
11. Cydia Apps:
SSL Killswitch 2
Shadow
Liberty
Frida
12. Strings: https://learn.microsoft.com/en-us/sysinternals/downloads/strings
13. DB Browser for SQLite: https://sqlitebrowser.org/dl/
14. Hopper: https://www.hopperapp.com/
15. Burpsuite: https://portswigger.net/burp/communitydownload
In essence, the mobile application VAPT locates exploitable flaws in code, systems, applications, databases, and APIs before hackers can find and take advantage of them. Utilizing harmful apps has the potential to be risky, and untested apps could include faults that expose the data of your company. The mobile application penetration testing services by Elanus Technologies identify security risks in android and iOS apps and devices. Get in touch to secure your devices today!
0 notes
Link
1 note
·
View note
Text
What are the instruction to activate Aka Microsoft phonee link?

Microsoft Phone Link replaces the Your Phone Buddy application and permits you to channel your notices, get calls, and utilize your versatile applications on your PC. With a refreshed plan for Windows 11, Phone Link is arriving at clients all over the planet.
The aka.ms/phonelinkqrc experience will come preinstalled on your PC with Windows 10 or Windows 11, essentially search "Phone Link" in Start menu. On the off chance that you are on Windows 10 and can't find Phone Link, you might have to refresh to a later form of Windows 10 or download Phone Link straightforwardly from the Microsoft Store.
From your PC, you can interface with Android and select Samsung and HONOR devices with these two applications:
Link to Windows (LTW) application for most Android devices.
Link to Windows (LTW) application preinstalled on select Samsung and HONOR phones.
You'll see the name Link to Windows in the Google Play Store and in the World Store. In the Microsoft Store, you'll see Phone Link. This link between your device and PC gives you moment admittance to all that you love. Peruse and answer to messages effortlessly, view late photographs from your Android device, utilize your #1 portable apps6, settle on and get decisions, and deal with your Android device's notices right on your PC.
Phone Link requires the accompanying to work:
A PC running Windows 10 May 2019 Update or later.
Assuming you're right now running the May 2019 Update, you should introduce the Phone Link application from the Microsoft Store. Any Windows rendition after the May 2019 Update will have the application preinstalled.
An Android device running Android 7.0 (Nougat) or above.
You'll find aka.ms/phonelinkqrc preinstalled assuming you have the Windows 10 October 2019 Update or later. At the point when you open the application, you'll be directed through a couple of additional means you'll have to take to wrap setting things up.
Step by step instructions to link your devices
Turn on the devices you need to link and ensure they are close enough to one another.
Determine the sort of association you need to utilize. For instance, you could utilize Bluetooth to link two phones, or Wi-Fi to interface a phone to a PC.
Make sure that the device you need to link has the essential elements and settings empowered to lay out the association. For instance, for Bluetooth linking, you should ensure that the two devices have Bluetooth turned on and are in discoverable mode.
Once the devices are prepared to interface, look for accessible devices or organizations on the device you need to link. Contingent upon the device, this could include going to the settings menu or utilizing a particular application.
When you see the device you need to link recorded, select it and follow any prompts to finish the association. This could include entering a secret word or PIN, or affirming that you need to coordinate the devices.
Once the devices are linked, you ought to have the option to utilize them together as expected. For instance, on the off chance that you linked a phone to a speaker, you ought to have the option to play music from the phone through the speaker.
Assuming that you start from your PC:
Ensure that both your PC and phone have Bluetooth abilities and they are turned on.
On your PC, open the Settings application and snap on "Devices".
Click on "Bluetooth and different devices" and ensure that the flip switch for Bluetooth is turned on.
On your phone, go to Settings and turn on Bluetooth.
On your PC, click on "Add Bluetooth or other device". A window will open, showing different device types.
Select "Bluetooth" and trust that your PC will examine for adjacent devices.
Your phone ought to show up in the rundown of accessible devices. Click on it and follow any prompts to finish the matching system.
Once your phone is matched with your PC, you can move documents between them, share your phone's web association, or utilize your phone as a remote information device.
Step by step instructions to Link Your Android device ?
Look for Link to Windows in the Google Play Store, then, at that point, download the application.
Check a QR code that is shown to you on your PC. To get to the QR code, open your PC's program and go to www.aka.ms/phone link qrc.
Utilize the in-application camera on your Android device to examine the QR code showed on your PC.
You may be provoked for a few consents subsequent to examining the QR code. aka.ms/phonelinkqrc
1 note
·
View note
Video
youtube
Samsung A5 2016 FRP Bypass Binary U8 Android 7 Nougat
0 notes
Text
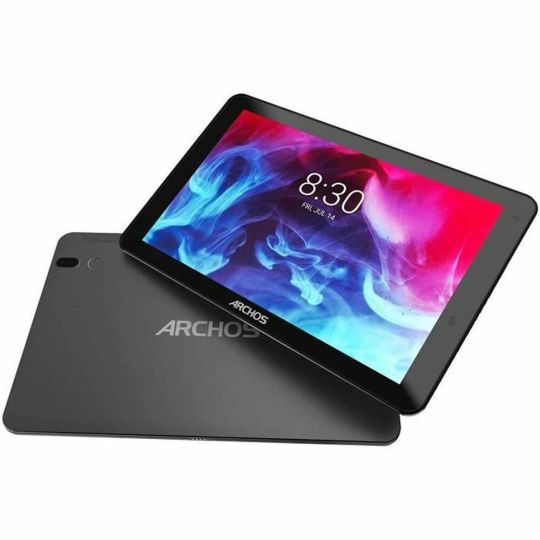
Tablet Archos Oxygen 101S 32 GB 1 GB RAM 10,1"
If you’re passionate about IT and electronics, like being up to date on technology and don’t miss even the slightest details, buy Tablet Archos Oxygen 101S 32 GB 1 GB RAM 10,1″ at an unbeatable price.
Capacity: 32 GB
RAM Memory:
1 GB RAM
3 GB
Screen: 10,1″
Operating System:
Android 7.0 Nougat
Android
Android 9.0
Type:
Tablet
Front-facing camera
Colour: Black
Characteristics:
Integrated…
View On WordPress
0 notes
Last Seen Blogs

mexclar-blog-blog
mexclar

emotionalsupportmeguca
why helo

radiant-fanon-maker
Regressed and Tickled Everyone

hail-doodles
The Sight of Stars Makes Me Dream

sokayisaidiot
Sokay_the_llama