#8. the blocked off & looks a bit like scissors. positioned to cut right at the neck
Text
Secret in His Eyes

Spinoff of Sins of the Father
Genre: Mafia Au
Pairing: Luhan x Reader
Summary: A vacation exploring China’s famous city was supposed to be relaxing. When you witness a horrifying murder, you instead find yourself in police custody, unable to run. Trying to stay alive, you meet Luhan, and you believe you can trust him. You never imagined that he might be the one you should be running from.
Part: Prologue I 1 I 2 I 3 I 4 I 5 I 6 I 7 I 8 I 9 I 10 I 11 I 12 I Final
**
Your hearing came back first. Dull, unintelligible shouts came from seemingly every direction. Around you, but you couldn’t find their sources. Slowly, you peeled open your eyes. You tried to move your body in order to escape the heavy object weighing you down, but even the slightest quiver of your muscles was painful, causing you to groan and hiss. That led to a chain reaction of your lungs needing air, breathing in the dust that clouded the room and sending you into a coughing fit that you couldn’t stop.
Destruction surrounded you. The once elegant office was now covered in chaos, bits of paper and fluff floating through the air, parts of the ceiling now lying on the floor and the bookshelf that once stood tall behind the desk was splintered beyond recognition. The heavy weight that stopped you from sitting up was Luhan. He was half laying on top of you, unconscious and unmoving with an arm draped protectively over your waist. His eyes were closed and no amount of jostling from you would make them open.
“Lu! Lu!”
The shouts came through clearer now, mixed up and cut off from coughs of their own.
“Help!” you croaked out, your vocal cords barely putting in enough effort to push out the single syllable.
Through the clouds of dust, you managed to see two tall figures carefully making their way around the debris. When they finally reached the two of you, one of them hissed in their mother language, but you’d been here long enough to recognize the derogatory word. As your vision cleared, you recognized your saviors as the two other bosses who’d been in on the ploy against you. But that betrayal was the last thing on your mind.
“Luhan,” you whispered, turning to him once again. While he still hadn’t regain consciousness, you could finally tell that he was breathing, the only good sign you could see. With careful fingers, you took hold of his wrist and slid out from underneath him. That’s when you saw it.
Sticking out of his side was a piece of wood about the length of your forearm, splintered and ugly around the edges. A red liquid stain growing by the second surrounded the area where the wood pierced the cloth and into Luhan’s torso. Hands shaking you reached out to him, not sure of what you could possibly do, but you needed to save him. He couldn’t die on you. Not like this.
“Don’t touch him!” the brown-haired one – Kris, you were sure – snarled at you, causing you to flinch back. Over his shoulder, he yelled, “YIXING! YIXING!”
The rustling you heard behind you gave you hope that the doctor wasn’t far, but you didn’t dare take your eyes off the man in front of you, afraid that he might fade away if you did. By the sound of it, Yixing had indeed arrived and was talking to the others quickly. It was all static in your heart, drowned out by your erratic heartbeat. A pair of hands landed on your shoulders that forced you to tear your eyes away from Luhan.
Yixing’s kind, but worried gaze stared down at you pitifully. “(y/n), I need you to move so I can see him.”
You nodded, pushing yourself up to your feet and shuffling back to give Yixing room. With an eerie calmness, he checked Luhan’s pulse, timing it against his watch. “We need to get him to the surgery room.” He kept the language to one that you could understand perhaps to keep you from going hysterical. Admittedly, you were on the precipice, just waiting for the one thing that would send you over the edge.
The two others carefully but hurriedly picked Luhan up, making sure not to cause him too much pain or add to the damage as they carried him out of the crumbling room. You were hot on their heels, refusing to be left behind. If they told you to go away, that might be the catalyst that caused you to erupt.
By a miracle, the surgery room was only a few doors down the hall. You hardly had time to take in the fact that this mansion had a fully stocked emergency room before you were pulled back into the scene at hand. As soon as Luhan was lying face down on the metal slab, Yixing cut away at the button down to expose the wound and get a better look at the fight he had ahead. A gasp escaped your lips causing everyone to look at you. Tao marched up to you and started pushing on your shoulders towards the door.
“Get out,” he ordered. “You don’t need to see this. We’ll tell you-”
“No, Tao.” Yixing turned back to Luhan after ceasing the struggle. His back blocked your view of whatever he was doing to save Luhan, but you were more than okay with the barrier. You didn’t want to see what he had to do, you just wanted him to do it. “I need an extra set of hands. I can’t do this on my own.”
Wait, what?
“She doesn’t have any medical training,” Tao argued.
Yixing didn’t take his concentration away from his patient as he said, “I still need her. I can’t do this on my own.”
You shook your head. “Yixing, I ca-”
He whirled on you. “Do you want him to die?”
“I-” No. Of course you didn’t.
Despite the betrayal and the hurt he caused. Despite the lies and games. Despite it all… you still cared. Those strange feelings that had been bubbling up inside over the past few weeks didn’t magically go away. You weren’t sure they ever would.
So, with that conclusion, you ripped out of Tao’s grasp and ran to Yixing, following his orders as he had you hook Luhan up to the machines that would monitor his vitals while the doctor worked on removing the wood safely. Somewhere behind you, Tao cursed and stormed out of the room, slamming the door behind him.
You weren’t sure how much time was going by. Beads of sweat dotted Yixing’s forehead. Whenever the droplets started sliding down his temples, you wiped them away so he didn’t have to before he ordered your hands back to their positions. Suddenly blood leaked out from between the splinter and skin. Yixing didn’t seem as worried as you felt. Luhan whimpered, tugging at your heart and making you want to comfort him in some way, but you couldn’t leave Yixing alone.
Suddenly, screams erupted in the hallway causing you to jump. The door burst open and Tao shoved a woman inside. She was dressed in standard scrubs with a white lab coat hanging over them, a badge swinging from the pocket on her left breast.
The mafia members and the doctors started a shouting match, words flying so fast that even if you knew the language you wouldn’t be able to decipher who was saying what. Finally, Yixing threw up his hands and stalked back over to the surgical table where you were still waiting. Tao planted himself against the only escape route and Kris walked over to the few chairs that were located in the room. A groan from Luhan pulled your attention back on him.
“Yixing?” you asked worriedly.
“He’ll be alright,” he reassured you. “I just wish we’d had time to give him something to ease the pain.”
A pair of foreign hands settled over yours. Confused, you looked to see the female doctor’s trained on you with a steely expression.
“Please, move,” she asked with a heavy accent. You nodded, obeying immediately. She took your spot without any additional words. Now you felt useless, but thankful that someone with actual training was there to assist Yixing. Luhan’s chances of surviving were greater with the additional help, right?
“(y/n)?”
You blinked, unbelieving at first that Luhan had just spoken your name.
“(y/n),” Yixing whispered. “Take his hand. Maybe it’ll help with the pain.”
You looked back and forth between the two before finally giving in, sliding your hand into Luhan’s. Immediately, his grip tightened around your fingers and he let out a sigh in content that relaxed the tense muscles in his brow and mouth. The sound of metal scraping against tile wreaked havoc on your ears. Something hit the back of your knees. You barely caught Kris walking back to the others chairs before he collapsed down, rubbing his eyes with his fingers. He’d brought you a chair to sit in? Why?
Deciding it was best not to voice the question out loud, you sat down and scooted closer to Luhan, still holding tight to his hand.
The surgery took hours. Your eyelids grew heavy at times, but you shook the tiredness away. As long as Yixing was working you’d stay awake. You needed to know the outcome as soon as the end was reached.
Finally, you heard the snip of scissors and a heavy sigh.
“We can move him to his bed now,” Yixing informed the room. Tao pushed off the door, grabbed the woman and started dragging her out of the room.
“Where are you taking her?” you asked frantically. He wouldn’t really harm someone who just saved his friend… would he?
“Calm down,” Tao growled. “I’m just going to put her someone secure for the time being. I’m not going to kill her.”
The woman rolled her eyes, but didn’t fight much as Tao escorted her out of the room. He came back a few minutes later and helped Kris and Yixing lift Luhan onto a gurney.
“(y/n), will you help roll the IV?” Yixing pointed to the metal pole and clear bag that you’d hooked up to Luhan at the start of all this. Nodding, you pushed the IV along, careful not to get too far behind and accidentally remove it from Luhan’s arm as they guided the gurney out of the room and down the hall. You weren’t surprised at all when they came to a stop outside the bedroom that Luhan had insisted wasn’t his. It was just another reminder that he’d lied to you about who he was. That didn’t stop you, however, from watching them with anxious eyes as they moved Luhan over to the bed.
As soon as he was settled, you turned around and left. Now that he was out of the woods and starting his journey to heal, you needed space. You needed to be able to think clearly without having pity for him. But that ache in your heart didn’t go away the more distance you put between the two of you. In fact, it became worse. That didn’t still didn’t stop you, however, and you kept going until you reached your room.
When the door clicked shut, you collapsed onto the bed, burying your face into the pillow to make the images of Luhan, hurt and unmoving, out of your head. No matter how many times you thought it over, there was one thing you couldn’t get past: if Luhan hadn’t been standing where he was, that wooden stick would have hit your stomach, making you the one on the operating table... or even killing you. Intentional or not, he saved your life.
The tears couldn’t be stopped as they flooded your eyes and spilled over onto your cheeks. So you let them come, continuing on until you fell asleep.
**
“(y/n)?”
You groaned, shoving your face deeper into the pillow. Whoever was disturbing the only peace you’d been able to find within the last twenty-four hours was about to regret it.
“(y/n), please wake up. I need to make sure that you’re okay.”
As much as you wanted to, you couldn’t really find it in you to hit Yixing when he was pleading with you like this.
Releasing a sigh, you pushed yourself up to your palms while looking at the good doctor. “I’m fine,” you insisted.
“You survived a bombing,” he frowned. “You’re anything but fine.”
You rolled your eyes, but sat up completely so he could see all of you. “Look all you like, but I’m okay. Maybe a few scrapes, but nothing hurts anymore.” That was partially a lie. Your muscles were sore, but what could he do about that? You just needed rest. “You should be worrying over Luhan.”
“He’s resting right now,” Yixing said. “He’ll be fine in a week or so.” Narrowing his eyes, he studied your face. “Are you sure nothing hurts or feels broken or badly bruised?”
You shook your head. “No. I promise.”
Nothing but your heart, that is.
“Okay. Then I’ll leave you to sleep. I’ll bring you something to eat in a little bit.”
“Thank you.” You watched until he was out of your room and then you turned over to drift away once again.
**
You didn’t leave your room for the better part of six days. The thought of checking on Luhan crossed your mind, but you couldn’t do it. You didn’t even know what to say to him if he happened to be awake when you arrived. Besides, Yixing kept you updated and he seemed to be healing on schedule.
The pleas Luhan was giving you before the bomb went off echoed in your head, hauntingly and teasingly. No matter how hard you fought to shove them away, they always made their way back.
He swore that what he told you before, when he was still Lin, was the truth, but what if that was just another ploy to get you to stay, to be on his side? How could you trust anything he had to say?
Knock, knock.
“Come in,” you called out softly. You knew it would be Yixing. He’d been kind enough to bring food to you a few times a day so you didn’t have to leave these walls. It was odd how he just seemed to know that you needed the isolation, to be away from everything, without you ever having to voice it.
Wearing that same small smile he did every time, Yixing quietly came into your room, shutting the door behind him and settling in the chair by your bed. The tray today housed a clear broth soup with scallions and mushrooms and buttered bread on the side. However, there were two bowls this time. Yixing picked one up himself, sipping from the spoon that was settled in the liquid. Apparently, he was joining you for lunch this time.
“Thank you,” you told him before picking up your own bowl. You were starving, ready to fill your stomach with the food in front of you.
“I hope you enjoy it.”
You smiled at him. “I always enjoy the food you make.”
His cheeks bloomed just the tiniest bit of blush. “That’s very kind of you, (y/n). Though, I’m sure-”
Bang!
The door slammed opened, causing you jump and spill some of the hot soup onto your lap. Tao stood in the doorway, face twisted into a look of annoyance.
Lowering your spoon and rolling your eyes, you groaned, “What do you want?”
“Luhan wants to see you.”
You scoffed. “Well, too bad. I’m eating.”
“I don’t recall asking,” Tao threatened. You kept your mouth shut, pretending that he hadn’t said anything.
“(y/n), you should see him,” Yixing urged.
The spoon fell from your hand just as you were lifting it back up to your lips. You stared at the doctor. How could he insist on something like this? You thought he was on your side. But apparently the pain you were going through wasn’t enough to dislodge years of loyalty. Now you felt cornered with no way out.
As you were obviously outnumbered, you set the food to the side and slid off the bed. Tao turned on his heels and left the bedroom, not bothering to look back to see if you were following him. He knew you were there.
The door to Luhan’s bedroom was opened when you arrived. After stepping inside, Tao shut the door behind you, effectively keeping you from running back to the safety of your room.
“(y/n).”
You didn’t want to lift your eyes to the bed, but you knew that you had to at least acknowledge him or else you’d never be let out of here. “Luhan.”
He flinched when you spoke, whether it was the sound of his real name leaving your lips or the still healing wound on his side, you didn’t know. He lifted his hand, beckoning you over. “Come here.”
“I’m fine here, thank you.”
“Okay, then.” Grunting, Luhan flicked the covers off himself and started to get out of bed.
“Don’t do that!” you protested. But it was too late. The idiot was already up on his feet and walking towards you. He was no longer plugged into an IV, free to move about no matter how painful it was for him.
Luhan stared at you with eyes that were pleading for you to not run away. He kept his distance for now, but you had a feeling it wouldn’t stay like that for long. “(y/n), I need you to listen to me. I know I lied about my name, who I am, everything in that regard, but I’m not the bad guy they’ve painted me to be.”
“Not the bad guy?” you scoffed, a sad attempt to fight back the tears that were swelling in your eyes. “So you’re telling me that you’ve never killed anyone or threatened them or broken the law? Because what that’s a bad guy is, Luhan. Can you look me in the eye and tell me you haven’t done any of those things?”
“You didn’t care that Lin had,” he fought back.
You looked off to the side, arms crossed tightly over your chest in an effort to keep yourself together. “I hate you,” you growled through gritted teeth.
“Do you? Do you really?”
Yes.
No.
You wanted to. You wanted to throw everything you could get your hands on at him and scream and tell him to get out of your life for good. But you couldn’t. Because it would hurt you more than it would ever hurt him. What a selfish thing to think, even though it was true. You looked at him and you saw the man who took you outside of these walls and shared a simple warm meal with you in that little restaurant, showing the side of him that others didn’t get to see. You saw the one who’d helped you feel calm in this chaotic environment. You saw the person who’d kept you safe from the ones who tried to hurt you, even though they wanted him in the first place. He was the one who smiled at you, who told you – even if it was a fleeting promise – that he wanted to take you away from all of this. He was the one who had taken your heart piece by tiny piece until you realized that half of it was gone already.
But was he that same person? Was the name really the only thing that had changed? You didn’t know. And perhaps that was what really scared you. Lin was gone now, out of existence. Did that mean the person behind the name was gone as well?
“How can I trust you?” you whispered as you shifted your gaze down to the floor in front of you.
“I’ll prove it to you.”
You snapped your head up. “What’s the point?”
Luhan frowned. “The point? What do you mean what’s the point? I want you trust me, that’s what. I want you to know that I’m still the same person.”
“But what’s the point of wanting me to trust you?” you said. “You’re the one in charge. You can keep me here as long as you want. How I feel shouldn’t really matter.”
He shook his head, his eyes glistening. “I won’t.”
You blinked. He couldn’t mean…. “Won’t what?”
“I won’t keep you here.” Risking it all, Luhan strode up to you until the two of you were nearly nose to nose. “I’ll let you go. Once I find out who murdered my man in that alley, I’ll put you on a first class seat back home myself. That bomb that got past my security shows that not even here is safe for you. And that’s all I want: for you to be safe. So, I’ll do it. I’ll make you safe and get you home. Just give me time.” Taking another risk, he reached out with his right hand and cupped your cheek, making you look at him. “All I ask is one favor in return.”
Of course. Nothing ever comes free with a mafia man. “What do you want?”
“Let me kiss you. Just once.”
#exo#exo mafia au#exo mafia!au#luhan x reader#luhan#lu han#exo gang au#exo gang!au#exo series#kris wu#wu yifan#zhang yixing#lay#huang zitao#z.tao#tao#Secret in His Eyes
223 notes
·
View notes
Photo


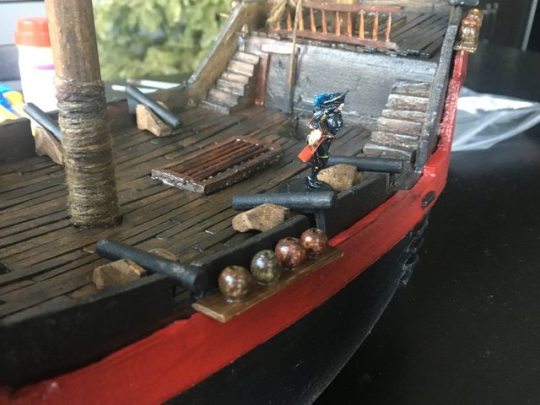
I wanted to build a foam pirate ship for my 5e D&D campaign but I couldn't find any resources, so I figured it out for myself. The deck has magnets in it to function as a grid. So... here’s a shitty guide (WITH PICTURES) if you want to build one, too.
If you have done this before or have other resources, link them for others who want to try their hand at it (and so I can see). If you have suggestions on how things could be done faster or better, feel free to leave suggestions for future generations. And for me in case I ever build another one. This was my first time doing anything remotely terrain-y or set-piece-y, so I really can't give very good advice. But I couldn't quite find anything that matched what I wanted to build, so I figured this would be worth posting.
The benefits of building a foam boat instead of just buying a model ship or something come down to:
a) scale: built it to 1 inch = 5 feet so your minis look good and any other props or grids you have work seamlessly.
b) customizability: include the exact things you want in the game. God forbid if your players trash the ship in the game you can alter the model for a shipwreck or something (@ my players: fucking don't, please).
c) accessibility: don't include anything you don't want, so the deck is uncluttered and there are no sails or rigging to try to reach around. Also the flat bottom means it doesn't need a stand. The foam construction makes it lightweight.
d) magnets: make everything stick to the deck. The actual reason I built this boat. I love the magnets and they were a good choice.
The cons are:
a) it's annoying and takes a long time (not too hard, just tedious).
b) it's a bit fragile, especially the details and small bits.
c) all your minis need an extra base for the magnets. Or I guess you could maybe stick the magnets into existing bases. I'm not an expert or anything.
This is gonna be the shittiest tutorial you've ever read so prepare yourself.
Actual guide:
1: step one is to draw out the boat. Scale is pretty key. Keep in mind that minis can't really fit on anything that's not a full square, so alter the proportions to maximize playable area. I altered the layout as I went to get rid of awkward spaces. Research galleons and frigates. I focused around 17-18th century but the coolest ships come after that. Make a boat that you love with however much realism you prefer.
2: get yourself supplies. You need:
polystyrene foam, about six pieces 10 inches by 24 inches apiece. I got a 96" sheet and used about half of it.
wood glue
paintbrushes, pens, pencils, scissors, utility knives with lots of spare blades, hot glue gun
drywall mud or something similar
wooden dowels, rods, skewers, toothpicks
popsicle sticks in a couple sizes
grid paper for templates
push pins to hold templates
yarn or string that looks like rope
sandpaper
beads (optional, see detail shots)
fridge magnets for embedding into the deck and attaching to the minis
clay to make a figurehead (not pictured) or a Barbie or something
3: trace out the cross sections (floorplans) onto the foam pieces by pinning grid paper to the foam, and cut them out. The curved deck makes this a real pain, because the floor plans don't perfectly map to the foam pieces. The decks are curved but the foam pieces are not. There's a bit of mental gymnastics in this part but you basically cut each foam piece to its widest dimension, then taper, trim and curve it to fit the profile you want after the basic shape is established. I cut everything out just slightly too large so I could trim and adjust it without losing usable space. After you have the top-down profiles correct, start tackling the side-view, which is the deck profile itself. In that picture just about everything is done but the main deck (fore- and aftdeck are nice and curved but the lowest deck is still flat). Pin it in place with toothpicks and glue it together with wood glue overnight. Leave weight on it. Let it dry for like 12+ hours for sure. I messed with it early and popped the aftcastle off, which was extremely annoying.
4: pick it up as one big solid piece and use a knife to slice away inconsistencies and match up the foam pieces better. Then sand it, mud it, let it dry and sand it again. I used lots of mud on the front edge because my cut-out pieces didn't quite match up. Fill up any weird cracks or miscuts that have developed. You can actually get away with adding quite a bit of mass this way. This is the final shaping of the basic form of the boat. Get a bit excited. Up to this point it's a lot of work for basically a big foam block that looks sort of like a boat. But take your time because you can't un-fuck the symmetry later.
5: paint the main deck, then trace a grid out and install one magnet per space. A drill or something would probably do wonders here. I just used a knife and some wood glue. Make sure every magnet has the same side up, and make sure they are pretty flush with the deck. I made bases for the minis out of foam and installed magnets in the bottom similarly. If you're fancy maybe little wooden or metal bases would be cool. Don't put any of the magnets the wrong way -- all the minis are supposed to be attracted to the boat deck so they don't slide around, fall over or get jostled.
6: cut a bunch of floorboards and paint and install them. Take popsicle sticks, slice off the rounded ends, and split them lengthwise with a knife. Paint roughly with one layer of brown to preserve some of the natural wood grain. Then cut them to various sizes -- whatever you think is right. Half of mine were 2", the rest were 1" or 3". Keep scale in mind. If you make them too wide, it'll kill the look. To fit the planks to the curve of the deck, just gently bend them with your fingers. Spread a layer of wood glue on the deck in sections and use your drawn-on gridlines as guides as you place plank by plank. A pattern would be clever. I just stuck whatever fit on. Go around any features like stairs, grates and masts. I left about an eighth of an inch around the perimeter for the railing/barrier later. Make stairs and stick them into the deck, and carve exterior stairs out of foam and glue them in place. Keep that eighth-inch perimeter in mind as you shape the stairs and place them.
7: base coat the rest of the thing. Don't actually put the masts in here because you'll be fighting with them for the rest of the build.
8: add a thin, 3/4-inch barrier around the perimeter and a prow structure. I traced the deck profile roughly onto paper, drew the barrier, cut it out of the paper, tested it on the ship and adjusted as necessary before transferring it to foam and cutting it out. Be really careful with the thickness. Don't slice it in half or break it. Cut cannon-crenelations out as well as the space where the plank goes. I stuck it down by sticking toothpicks straight down through it into the bare deck. This was probably a mistake. It's not sturdy or precise. I added some hot glue here (for the first time in the build) to fill in little cracks and adhere it better. You're on your own for the prow -- make it out of foam in two halves and glue it on. Good luck. If you look at reference you can make a way cooler one than me.
9: make windows, deck rails, a wheel, cannons, grates, swivel guns, and a border that covers the seam between the deck and perimeter railing. The window-frames are each a single piece of foam sliced thinly and wood-glued into position. If you know how, you could make them out of wood. Deck rails are square foam rails top and bottom, joined by toothpick posts. The wheel is foam with toothpicks stuck into it. The cannons are thin wooden dowels with carved foam bases glued together. Adding wheels to the bases would be cool but fragile and tedious. One of the grates is a foam border with toothpick cross-parts and the other one has a wooden frame made from popsicle sticks. Do whatever you prefer. Swivel guns are little foam tubes with toothpicks that attach them to the railing. This allows them to swivel. You could probably make them out of skewers or something instead of foam. The border (red part along the side) helps hide sloppiness between the hull and barrier, and adds some complexity to the shape. You could make it much thinner than I did if you have a steady hand or a wire foam cutter. Or more patience with sandpaper. Real ships have super cool features like this, so use reference and add whatever you can get away with, I guess. This is probably a better time to add the masts. Sharpen them and jam them in or bore holes and glue them.
10: add painted details, "rigging", nets and ropes, as well as anything else you want. I have a longboat hanging off the back of the ship, but you could also place it in the middle of the main deck. The rigging I added is composed of popsicle stick planks stuck to the side of the ship, with painted wooden beads glued onto that. It's not even nearly accurate, but I think it gives the rough impression of the pulleys that are on real boats. I used gold paint for detailing which I definitely recommend. Netting would be cool but I couldn't find a non-intrusive way to add any. Of course oars, buckets, crates, sacks, lanterns and all sorts of other props will look neat. I opted not to add those in order to keep things simple, as we'd just be taking them off or getting annoyed with them during combat. I made a balcony off the back out of popsicle sticks and stuck/glued it on. It's out of scale, but large enough for characters to stand on. Put little ladder boards onto the side of the ship and anywhere else you want them. Up a mast would be cool. Doorframes and square window-frames can be made with planks like the deck. I decided against any sorts of crow's nests or cross-masts to keep things simple and easy to see/reach around. I think more delicately sculpted embellishments would look very cool added on, but could not figure out a decent way to make them. Printing them out on thick paper, cutting them out and glueing those on might do the trick.
That's the whole guide. I would have done a better one but I forgot to take pictures. Feel free to ask questions and I'll do my best to answer.
#my art#crafts#diy#props#pirate ship#ship#boat#polystyrene#foam#d&d#dungeons and dragons#dnd#dungeon master#dm#game master#gm#game#game props#artists on tumblr#step by step#guide#how to#magnets
9 notes
·
View notes
Text
Pie Squared's Easy-As-Pie Apple Slab Pie-Famous Fridays
Next Tuesday is Pi Day-you know, the one that celebrates the uniqueness of the number 3.12, but that we bloggers use as an excuse to share new pie recipes? So it’s kind of “infinitely” perfect that for Famous Fridays today, I get to tell you all about one of my favorite new cookbook finds, Pie Squared : Irresistibly Easy Sweet & Savory Slab Pies by Cathy Barrow and this terrific twist on traditional apple pie. Honestly, after getting to know this book, you won’t think about baking pies the same way ever again!
Do you know about slab pies? If perfect, flaky homemade pie crust is something you dream about but haven’t quite perfected yet or have maybe found too intimidating to even attempt, a slab pie is your answer. Not only do you get more crust per bite than you would with a traditional round pie, but making a slab pie is so much less fussy and labor intensive. Basically a slab pie is just what it sounds like—a slab of pie, in other words, a pie baked in a sheet pan rather than in a pie plate. No need to roll out a perfectly round crust and crimp it just so, which takes a lot of the pressure off. I’ve been baking pies for years and years now with varying degrees of crust success and I have to say that with these slab pies, I’ve had 100% stress-free dough experiences.
That’s because Cathy gives you foolproof recipes with very specific and user friendly techniques which seem labor intensive and persnickety but which once you get the hang of, are actually fairly routine and easy and are what will allow you to turn out perfect pie after perfect pie. More on that below.
And there are all sorts of crust variations in the book, like cream cheese, olive oil, hash brown, and chocolate— even recipes for super simple press-in kinds. No matter what kind of crust experience you’re looking for, I guarantee you that it’s in here. The book is also filled with gorgeous, mouth-watering photos and loads of recipes for both sweet and savory slab pies. Some are more traditional, like this apple one I’m sharing today and others more off the beaten path like Sour Cream Peach Melba Slab Pie, Good Morning Cream Cheese Danish Slab Pie with Jam, Spinach, Gorgonzola and Walnut Slab Pie, Loaded Baked Potato Pie with a Caramelized Onion Crust and Pan-Roasted Mushroom and Kale Slab Pie (will share this one next week—it’s pretty stellar) to name a few. if pie baking is something you love to do or want to learn how to do, I can’t recommend this book highly enough!
But before I go on and on and get you even more excited, there’s one essential item you need (and a couple more that will make this whole experience a lot easier.) Pretty much all of the recipes in the book call for a quarter sheet pan. If you already have one, great! I didn’t, so I ordered this one from Amazon (you can see it in the picture above, nesting in the larger half-sheet). It costs less than $15 and had worked out very well.
It’s also really useful to have a metal bench scraper. I’ve had mine for years but you can buy one for under $10 and it’s one of those kitchen gadgets that doesn’t take up a lot of space and that you’ll really use, especially if you get majorly into pie baking, which you just might after getting your hands on this book! It’s also great to have a baking stone, though you could totally use an upside-down rimmed baking sheet.
Last 2 items: a food processor and painter’s or masking tape. Whew!
And now finally, onto this wonderful apple slab pie. We’re going to go through it step by step, which I do in the recipe below, but I thought it’d be handy to kind of see it in action too. If you don’t want (need) the tutorial, you can just skip down to the actual recipe below—no hard feelings, I promise!
First off, you’re going to freeze your cubed butter for 20 minutes. Don’t skip this step because keeping the dough cold is what will eventually allow the pastry to be light and flaky. When that butter’s nice and frosty, you mix up the dough ingredients in the food processor. You can do it by hand (and I’ve included instructions for that in the recipe too) but it is so much easier to do it this way, so beg, borrow or steal one if you have to!! Ha ha!
Again, I want to emphasize not to handle the dough with your hands too much or overprocess it. You want it to almost form a ball but still be a little shaggy looking with some crumbs that don’t totally adhere to the ball. When the dough looks ready, you are going to turn it out onto two pieces of crisscrossed, floured plastic wrap and fold up the wrap over it. Then you’re going to use that bench scraper to push the dough (through the plastic) into a 6x4-inch block, pounding it 3-4 times per side with the rolling pin in the process on both sides to remove any bubbles and make it more compact. Now, you let that dough block rest in the fridge for at least 4 hours and better yet, overnight.
Before you’re ready to begin the rolling out process, you are going to set up your board, using the painter’s (or masking) tape to make an 11 x 15-inch rectangle. I know this may seem like an annoying extra step but it makes it so easy to roll the dough out to the correct size and will actually wind up saving you time in the long run.
Once the dough has warmed up for about 10 minutes, you cut it into two slightly unequal pieces and…you’re ready to roll, literally.
Once the dough is rolled out, you simply transfer it to the 1/4 sheet pan and gently press it in. Then you repeat the process for the top crust, place it on a floured baking sheet and let both doughs chill while you make the filling.
Into a large bowl, you place a thin cotton towel and a box grater and grate the apples directly into the towel. Then, you use the towel to wring out as much liquid from the apples as possible. This helps to keep the pie crust from getting soggy.
After you’ve put together the rest of the filling, you transfer it to the bottom crust in the pan, use a scissor to cut off some of the dough overhang and dot the filling all over with some cold cubed butter.
Now you position the top crust on the filling, tuck the bottom crust up and over the edges and use a fork to decoratively crimp the edges.
We’re in the home stretch now! One more short chilling stint, some heavy cream brushed across the surface of the pie, a few sprinkles of sugar and steam-venting slashes and…
You are ready to bake!! Yippee!
Your kitchen is going to smell fantastic! And what emerges from the oven is going to make you feel fantastic and taste even more fantastic!
Light, flaky, buttery pastry dough with the sweet crunch of sugar and a thin layer of, cinnamon-apple filling that cuts like a dream. Neat, perfect, squares that will feed a crowd, definitely more than the 8 that a traditional pie does and so much easier to transport too.
It’s terrific as is—kind of reminds me of the best pop tart you can imagine. Of course, I wouldn’t say no to square with a scoop of vanilla ice cream either! YUM!
Okey dokey, guys, long, long post—you must be exhausted reading! Hopefully not too much to attempt this lovely pie—it would make a fun weekend project. So on that note, I’m wrapping things up here. Treat yourself to a copy of Pie Squared, bake up a slab pie and have a yummy, safe and warm weekend.
Pie Squared’s Easy-As-Pie Apple Slab Pie- Famous Fridays
Makes 12-16 servings
It is helpful to have a food processor for this. It is also helpful to have a bench scraper and a baking stone but not absolutely necessary.
Prep Time for Crust: 10 minutes, plus 20 minutes pre-freezing for butter and at least 4 hours chilling time for dough; Prep Time for Filling: 20 minutes; Assembly Time: 15 minutes, plus 20 minutes chilling time; Bake Time: About 45 minutes
Ingredients
For the Crust
2 1/2 cups plus 2 tablespoons unbleached, all-purpose flour (325 grams), plus extra for shaping and rolling out dough
16 tablespoons (225 grams) unsalted butter, cubed and frozen for 20 minutes
1/4 teaspoon kosher salt
1/2 cup (120ml) ice water
For the Filling
2 pounds apples, (I used 5 large Granny Smith), peeled
1/3 cup packed (75 grams) light brown sugar
2 tablespoons unbleached, all-purpose flour
1 tablespoon freshly squeezed lemon juice
3/4 teaspoon cinnamon
1/4 teaspoon kosher salt
2 tablespoons cold unsalted butter, cut into little cubes
1 tablespoon heavy cream or whole milk
At least 2 tablespoons sanding or coarse sugar (you could also use regular sugar as well)
The Recipe
1. To make the crust: place the flour, butter and salt in the bowl of a food processor fitted with the metal steel blade and pulse for 15 times until the butter is in small, pea-like pieces and coated with the flour. Pour in all of the ice water and pulse until the mixture almost forms a ball. You still want it to be a bit shaggy. If you over mix it, it’ll be tough. If you don’t have a food processor, you can mix the dough by hand. If so, freeze the sticks of butter and then grate them using the largest holds on the box grater right into the flour mixture. Working quickly, use your hands to combine the ingredients until the grated butter pieces are coated in flour. Pour in the water and and use your hands to sort of toss and fold the dough together into a shaggy cohesive ball.
2. Take 2 large pieces of plastic wrap and lay them criss-crossed on the counter so that they form a large “X”. Take a little bit of flour and scatter it in the center. Turn the dough out right into the center of the X, scraping the food processor clean and fold the plastic wrap over the shaggy ball and any stray crumbs. You want to avoid touching the dough with your hands as that warms the fats and cuts down on the pastry’s flakiness. Use a bench scraper or a firm spatula to push the dough into a 6 by 4-inch block that will look like a compact piece of dough not a crumbly block but you will still see pieces of butter throughout. (It helps if you use a ruler to measure—will make the rolling out later a snap). Now use a rolling pin to gently press across the surface of the dough to remove any bubbles. Flip the dough over and repeat on the other side. Place in the fridge to rest for at least 4 hours and preferably overnight.
3. Before you are ready to roll out the dough, set up your rolling surface—it can be a board or your clean counter as long as it’s cold. Use painter’s or masking tape to make an 11x15-inch rectangle. Remove the dough for about 10 minutes before you roll out—you don’t want it to get too warm. Generously dust the rolling surface with flour. Remove the plastic wrap and cut the dough into 2 pieces, one a little larger than the other—this will be the top crust.
4. Working quickly, smack the dough 3 times with the rolling pin. Now flip it over and do the same to the other side. This helps to compress the fats. Now flour your rolling pin and roll out the dough from the center outward, angling to the sides, working to fill the shaped space. Every so often slide the bench scraper underneath the dough to keep it from sticking to the board and turning the dough to get it to fill the space evenly. If it shrinks back when you roll it, don’t pull it—just be patient and keep rolling—it will fill the space eventually. Once it’s rolled to size, gently fold it over in half and carefully place it in the 1/4 sheet pan. Gently press the dough into the corners using the sides of your hand, not your fingers which might poke holes. Place the pan into the fridge while you roll out the top crust.
5. Roll out the top crust using the same technique, but only to about 10x14-inches. Place a piece of parchment paper on a baking sheet and sprinkle with flour. Transfer the dough to the sheet and refrigerate as well.
6. If you have one, place a baking stone on the center rack of the oven. If not, use an inverted rimmed baking sheet. Turn the oven to 400ºF and let preheat with the baking stone. Meanwhile make the filling.
7. To make the filling: Line a large bowl with a thin clean, cotton kitchen towel or a double layer of cheesecloth. Place a box grater in the bowl and grate the apples, down to the core, right into the towel lined bowl. Discard the cores. Gather up the ends of the towels and twist, wringing as much juice as you can out of the grated apples. This will keep the pie from being soggy. Pour the juice into a glass and set aside. Dry the bowl out with paper towels and return the apples to the bowl. Add in the brown sugar, flour, lemon juice, cinnamon and salt and mix well.
8. Remove the bottom crust from the fridge and turn the filling into it, spreading it evenly across the surface. Dot the filling with the cold cubed butter evenly. Use a scissor to trim the dough to about 1/2-inch over the edge of the pan. Remove the top crust from the fridge, place it on top of the filling and tuck the bottom crust edge over the top crust. Use the tines of a fork to crimp the edges decoratively. Place the pie in the fridge for 20 minutes.
9. Remove from the fridge and brush the surface of the pie with the heavy cream. Sprinkle all over with the sugar. Make one or two slashes in the pie crust to allow the steam to vent and place the pie on the baking stone. Let cook for about 45 minutes, until the crust is deeply golden brown and the filling is bubbly. Let sit for about 10 minutes to make for neater slices. Serve as is or with a scoop of ice cream.
Enjoy!
Note: Recipe adapted from Pie Squared by Cathy Barrow. The original recipe calls for 1/2 teaspoon each of ground ginger and nutmeg in the filling—I omitted these and upped the cinnamon a bit instead. Also, the recipe tells you to grate the apples, peel and all which I did but I think I would peel the apples next time before grating them.
#Flour#Butter#Kosher Salt#Ice Water#Apples#Light Brown Sugar#Lemon Juice#Cinnamon#Heavy Cream#Demerara Sugar
0 notes
Text
Joe’s Solar Eclipse Blog (Part 2): Don’t trust the long range cloud forecasts (yet) (MON-8/14)
Just a friendly reminder that I wouldn’t put a lot of credence in the 5,6, or 7 day clouds forecasts quite yet. Again as I mentioned in the Part 1 of the Solar Eclipse Blogs on Saturday there is little skill in forecasting the extent of clouds covering our neck of the woods from so far out. Model data could show one thing…but reality will be something else as we head towards the weekend and confidence increases in what could happen. The right set-up and we’re good…but weird things are happening this month it seems and high clouds are always a concern amongst other possibilities. Overall though I remain optimistic because during this time of the year…we’re supposed to have a sun/scattered cloud weather set-up…and hopefully the clouds will be “scattered” enough.
Part 2 of the continuing blogs on the eclipse will answer some additional questions for you…including the main one.
Will I be able to see it? I did a FB Live on Sunday night talking about this and there were soooo many of you who didn’t know for sure. I showed a ton of graphics…but there is a web site that is easy to use to see IF you get “totality” (excellent) or a partial eclipse (cool but not “once in a lifetime). Click on this link for a google map application from NASA. You can click on the map and place a marker where you are going to be that day (8/21). This will answer all your location issues. Pay particular attention to the Downtown KC vicinity and notice how “totality” cuts through the city. You REALLY want to be a bit farther north than south on this one. Get between those BLUE lines!
So about those glasses? YES you need them…and there’s a problem. A LOT of you purchased them from Amazon but now we’re hearing that emails are going out with warnings about the quality of said glasses. I don’t know what to tell you aside from the fact that you need to make sure they are ISO labeled with specific notation (ISO 12312-2:2015)I believe. I on’t know a lot about this but it’s an issue for sure. Please google check this information out…I don’t want any situations because of what you bought. Here is more information from a new link.
Do I ever take them off? YES…ONLY DURING TOTALITY! IF you don’t get totality…they stay on the WHOLE TIME. Then right after totality…put them back on.
Are there other ways of watching the eclipse indirectly and safely? YES…by creating a “pinhole” viewer. Here is a VERY SIMPLE process of making one…via timeanddate.com…
DIY: Simple Card Projector
The simplest and quickest way to safely project the Sun is with a projector made from only 2 pieces of card or paper.
You Need:
2 pieces of stiff white cardboard, e.g. 2 paper plates
alternatively, 2 sheets of plain white paper
a thumbtack, a sharp pin, or a needle
What to Do:
To make a quick version of the pinhole projector, take a sheet of paper and make a tiny hole in the middle of it using a pin or a thumbtack. Make sure that the hole is round and smooth.
With your back towards the Sun, hold 1 piece of paper above your shoulder allowing the Sun to shine on the paper.
The 2nd sheet of paper will act as a screen. Hold it at a distance, and you will see an inverted image of the Sun projected on the paper screen through the pinhole.
To make the image of the Sun larger, hold the screen paper further away from the paper with the pinhole.
5) But I want to make something more sturdy since the kids will be using it. No problem…then you “step up” to a box projector. This a a bit more of a process though…again via timeanddate.com
Projector Using a Box
This type of pinhole projector works on the same principle as a basic pinhole projector. However, the box makes this projector much sturdier and easier to set on a surface. And it only requires a few extra items to construct.
You Need:
a long cardboard box or tube
scissors
duct tape
aluminum foil
a pin or a thumbtack
a sharp knife or paper cutter
a sheet of white paper
What to Do:
Cut a rectangular hole at the end of the box. You can tape 2 boxes together to make a long box. The longer the box, the larger the projected image.
Using the scissors, cut out a piece of the aluminum foil slightly larger than the rectangular hole. Make sure the foil is completely flat and not crinkled.
Tape the foil over the rectangular hole in the box.
Use the pin to poke a tiny hole in the center of the foil.
Tape the sheet of paper on the inside of the other end of the box.
Stand with your back toward the Sun. Place the box over your head with the pinhole towards the Sun. Adjust your position until you see a small projection, a reversed image, of the eclipsed Sun on the paper inside the box.
6) What are Bailey’s Beads? This is actually pretty cool to witness…again ONLY during totality can this be seen. It occurs because the moon has hills and valleys on it’s surface. As the moon blocks the sun…the light of the sun goes through the various valleys and around the mountain peaks and can be seen from earth. They almost look like sparkling diamonds.
This is just another reason why YOU HAVE TO EXPERIENCE TOTALITY!!!!!!! You miss out on all this stuff IF you “only” get a partial eclipse. 99.8% coverage is partial! You have to be where it’s 100% covered!!!!!
7) Can I photograph this? YES you can BUT…be careful that a) you don’t ruin your cell phone camera (use a filter) and b) that you don’t stare at the sun (w/o glasses) to make sure your phone is shooting this correctly. There is a lot of information in this article for photographers…I’m not very good with that stuff…but IF you are…here you go!
8) Do I need to be away from the city to see this and away from the lights? This is coming up more and more…NO! As long as you’re in the path of TOTALITY…you’re good to go. Don’t worry about the lights…this is a daytime thing. I think some are confusing this with night-time events…for example the northern lights and/or meteors.
9) I’m hearing things about weird shadows or something crazy? YES this is true they’re called “shadow bands” and they apparently do look sort of “weird”. Here is more information from NASA about that phenomena…
What are “shadow bands?”
These are among the most ephemeral phenomena that observers see during the few minutes before and after a total solar eclipse. They appear as a multitude of faint rapidly moving bands that can be seen by placing a white sheet of paper several feet square on the ground. They look like ripples of sunshine at the bottom of a swimming pool, and their visibility varies from eclipse to eclipse. 19th century observers interpreted them as interference fringes caused by some kind of diffraction phenomenon. The Sun, however, is hardly a “point source” and the patterns are more random than you might expect from diffraction effects.
The simplest explanation is that they arise from atmospheric turbulence. When light rays pass through eddies in the atmosphere, they are refracted. Unresolved distant sources simply “twinkle,” but for nearby large objects, the incoming light can be split into interfering bundles that recombine on the ground to give mottled patterns of light and dark bands, or portions of bands. Near totality, the image of the Sun is only a thin crescent a few arc seconds wide, which is about the same size as the atmospheric eddies as seen from the ground. Bands are produced because the Sun’s image is longer in one direction than another. The bands move, not at the rate you would expect for the eclipse, but at a speed determined by the motion of the atmospheric eddies.
10) How fast do they travel? FAST…over 1000 mph and in some cases close to 1700 mph!
OK that will do it for this edition!
Joe
from FOX 4 Kansas City WDAF-TV | News, Weather, Sports http://fox4kc.com/2017/08/14/joes-solar-eclipse-blog-part-2-dont-trust-the-long-range-cloud-forecasts-yet-mon-814/
from Kansas City Happenings https://kansascityhappenings.wordpress.com/2017/08/14/joes-solar-eclipse-blog-part-2-dont-trust-the-long-range-cloud-forecasts-yet-mon-814/
0 notes
Text
DIY Faux Capiz Shell Pendant Light Chandelier
Nothing says summertime like shells, and this (faux) capiz shell chandelier is so summery and fresh. Plus, it's very easy to DIY in an afternoon, which means plenty of time to hit the pool, the neighborhood barbeque, or the hammock with your favorite book.
Even though these shells are nothing more than laminated rice paper, they certainly give off the feel of translucent capiz shells, whether the light is turned on or off.
And, as with any DIY project, you can customize this to fit your space, as bit or as small as you want it, and as sparsely or as thickly shelled as you like. Enjoy!
Materials Needed:
Wire grating, cut to size
Laminated rice paper (example uses four laminated 15x23 sheets)
One or two paper punches in the size/shape you like (example uses 1.5 circle punch)
Sewing machine & white thread
Hot glue& hot glue gun
Aluminum foil & wax paper (optional)
Begin with some wire grating for the top of your chandelier light.
Cut it down to the size you want with tin snips. (Note: If you want a circular shell pendant, you might consider using grating with a smaller grid, or find something that's already round.)
Trim any sharp wire ends, then flatten out your grid. You can spray paint this white (or whatever the color of your ceiling is) if you want for a more invisible grid once the pendant light is installed.
Now it's time to create your faux capiz shells. You need laminated rice paper and a circle paper punch or two. (Note: Rice paper is sold near the calligraphy things at a craft store. This example uses a 15 roll, cut into 23 lengths and taken to an office supply store to be laminated.) Trim the lamination up to the edge of the rice paper.
Use your paper punch to punch circles along the edge of your rice paper. I took this photo to show this step
but really the punching effort looked more like this. It's not easy on your palm, but if your circle punch is sharp, it'll be better.
Work your way all around the perimeter of your laminate rice paper, keeping the punches as close together as you can without letting them overlap.
Use scissors to trim off the circle shadows, then repeat the process on the now-smaller perimeter.
Empty your punch periodically (every 5-10 punches) so it doesn't get jammed up.
Keep going until (a) your hand falls off, or (b) you run out of laminated rice paper. No guarantees on which of those will come first.
You may or may not find your circles starting to have fuzzy edges and be harder to punch after a while. This is because laminated rice paper isn't the same as regular craft paper; it's much harder for these punches to muscle through.
If you start to notice this, take some aluminum foil and fold it over two, three, or even four times. Flatten it perfectly.
Run this folded-and-flattened aluminum foil through your hole punch a bunch of times.
This is to help sharpen the blade. As you can see, I did this a number of times.
If you find your punch sticking, pull out some wax paper and fold it over.
Flatten the wax paper, and punch through it a few times. (Note: I would recommend doing this aluminum step from the beginning; after each perimeter of your laminated rice paper, I would punch three or four aluminum circles to keep the blade sharp. I made the mistake of going too long without sharpening it at all, and the blade on my circle punch became too dulled that I just couldn't sharpen it after that.)
With your bucket full of punched shells, it's time to start sewing together our strands. Pull out about 8 of lag thread on your machine.
Set your first shell down with the back arc directly below your needle. Lower your pressure foot, and sew straight down the center. Slide another shell along with it as you sew so that when you reach the edge of your first shell, the second shell is right there to take the seam.
I found it easiest to sew two strands at a time. So, for the outer capiz shell strands, I wanted each strand to have six shells, which means that (after the initial 6-8 of lag thread) I would sew 12 shells together with no gaps.
After the 12th shell, I lifted the pressure foot and pulled the final shell away from the machine to create another 8 lag thread.
Holding the final shell away from the machine at that 8 distance (roughly), I then placed the first shell of my next 12-shell strip under the needle, lowered the pressure foot, and began sewing the next strand of shells.
After three or so strands are sewn, cut the 8 lag thread (between the strands) in half to separate the strands. Lay these out straight and flat so the shells don't get tangled.
Then cut the thread between the two middle shells (in this case, between shells #6 and #7). You will now have two strands of six shells. Each strand should have enough lag thread on one end of each strand to tie the strand to your wire grating.
Carefully tie a strand onto the outer rim of your wire grating with a square knot. Don't pull too tightly, or the thread could rip; you want your shell just loose enough to dangle freely right below the wire grating.
Continue working your way along the outer rim of your wire grating.
It's helpful if you have enough room to be able to let the strands lie flat out to the sides, so they don't get tangled and so you can tell exactly where you are in the tying process.
Trim off excess lag thread after tying, to about 1/4.
Work all the way around your wire grating perimeter.
At this point, you can hold it up to check fulness. Remember that you'll have several layers, but you can get a feel for how thick the faux capiz shell look will be. Feel free to add more strands (especially on this outer layer) if it feels skimpy.
Once you've completed the perimeter to your satisfaction, hot glue the very top of each square knot so it maintains both the knot and the position on the wire.
Before beginning on the second and third tiers, I found it helpful to balance my wire grating on a couple of blocks, which were on top of a box, so that the strands could drape over the sides.
This also allowed me to thread the strand down through the wire grating before tying it, which kept the strands out of my working way and also away from getting tangled with others. (Note: In this example, the second tier had 8-shell strands.)
After the second tier, go ahead and hold up the pendant at this point to check on capiz shell density. Once it's to your satisfaction, move on to the third tier.
The third tier used 11-shell strands. You can increase the drama of your faux capiz shell chandelier by increasing this center section significantly; I wanted less drama and more charm in this particular pendant light, so I kept the center length more moderate.
I continued to sew the strands together in a back-to-back fashion (with lag thread, then shells for strand A, then shells for strand B, then lag thread). Each double-strand was cut in half.
After your third (or whatever number is your final) tier, you should be able to hold it up and really get a sense of the shell fulness. If for whatever reason you find a section less full than you'd like, simply sew some more strands and tie them on in that section. It doesn't have to be precise! I added an extra 6-shell strand on all four outer corners for this very reason.
With your shells all stranded, tied, and glued in place, it's now time to prepare to mount your fixture. Begin by using tin snips to cut out the center wires, whichever wires (or sections of wire) that aren't being used.
You can see here the now-empty center of the fixture, to allow for the exposed bulb hanging from the ceiling.
Screw at least four eye hooks into your ceiling at whatever points you feel would best support your fixture. Keep in mind that this pendant light probably looks more substantial (weight-wise) than it actually is. It's very light, so you don't need a million hooks for weight. Just for stability, really.
The hooks don't need to be on the outer tier, either. They certainly can be, but they can also be on the second or third tiers as well. Whatever works for your space.
Go ahead and hang it up, making sure it's stable and even. Viola!
A new, deceptively simple, and ultra-feminine DIY chandelier light!
I like this method of sewing the laminated rice paper together because it allows the shells to dangle freely, even spinning and swaying with the slightest breeze, just like real capizshells might.
The sewing method also is surprisingly invisible. That is, you might worry that the sewing lines down the center of each shell would be obvious and off-putting.
In reality, when the light is all assembled, and the strands are all together, the sewing is hardly noticeable, if at all.
Here's a view of the light from directly below. Even though it won't really be seen (much), I still recommend using a pretty Edison-style light bulb if you can. Because the bulb is completely exposed from directly underneath the pendant light.
This photo doesn't do the fixture justice when it's lit. The shadowing is just beautiful. Very romantic and sweet at the same time.
I hope you enjoy creating your own DIY faux capiz shell chandelier light. Even more, I hope you love the end result.
Happy DIYing.
You're reading DIY Faux Capiz Shell Pendant Light Chandelier , originally posted on Homedit. If you enjoyed this post, be sure to follow Homedit onTwitter,FacebookandPinterest.
0 notes
Last Seen Blogs

butnowitstoolate
you brought a fire to a world so cold

animatingforlovers
Animating for lovers

blacksmokebarbarians
where there is love, we must live on

tassymach
MEOW

affixfilmsadvertisingagency
Advertising Agency