#3d printing perth
Link
#3d printing online quote#direct 3d printing#3d printing service australia#3d printing melbourne#3d printing quote#3d printing service#3d printing service sydney#3d printing service melbourne#3d printing perth
0 notes
Text
#b2bmarketplace#b2bservices#ecommerce#b2bbusiness#qralink#sublimation printing perth#packging#offsetprinting#supply#3d printing#buying#seller
0 notes
Text
L2 Certification Attempt
After obtaining my L1 attempt, I had originally planned to fly for an L2 attempt on the same rocket. However, I attended a VRA club night where a swap meet was being held and ended up with a Rocketry Warehouse (now Madcow) Broken Arrow 54. Sometimes a great deal is a great deal.

This was a pretty big step up from the cardboard and plywood construction I was used to, being entirely filament-wound fibreglass. Its large diameter/length ratio combined with its small split fins also made it intimidating. This kit is also intended only for dual-deploy, which is something I had never done before. I decided it was a good opportunity to challenge myself.
Build
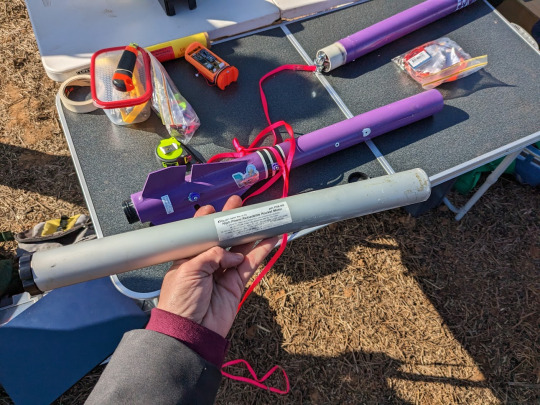
The kit was pretty bare-bones, meaning I had to source a retainer and much of the hardware for it. I ordered a 38mm Aeropack retainer, and then I began the build.

The process was relatively simple, with through-the-wall fins like all my previous builds. However, this time they did not fit into divots in the centering rings, so I 3D printed a fin jig to hold them in place while the epoxy cured.
Speaking of epoxy, I moved away from the 5-minute Araldite I had used for previous builds in favour of a more serious adhesive. I used JB Weld for anything motor-adjacent because of its thermal tolerance, and Epiglue for all other structural attachments and fin fillets. This was recommended to me by a friend in Perth who flies truly ridiculous rockets and has used it on flights of up to Mach 2. It is also available from a local marine supplier, meaning I didn't have to pay through my nose to get hold of Rocketpoxy or West Systems. I was very pleased with how nicely it went on and how strong it was.
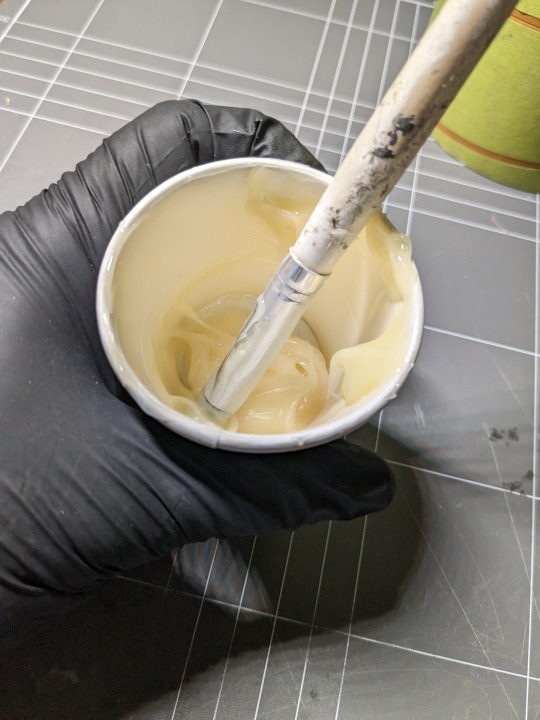
By this time I'd also nailed down my epoxy application and filleting methods - I use cheap silicone sculpting and grouting tools which can simply be cleaned with acetone after I'm done. For filleting, I also found that mixing the epoxy in a ziploc bag and piping it on like icing worked a treat.
My work gets cleaner with every set of fillets I lay down. These ones don't look fantastic, and the split fins were something I had never dealt with before, but that didn't matter for reasons that became apparent shortly after the epoxy had set.
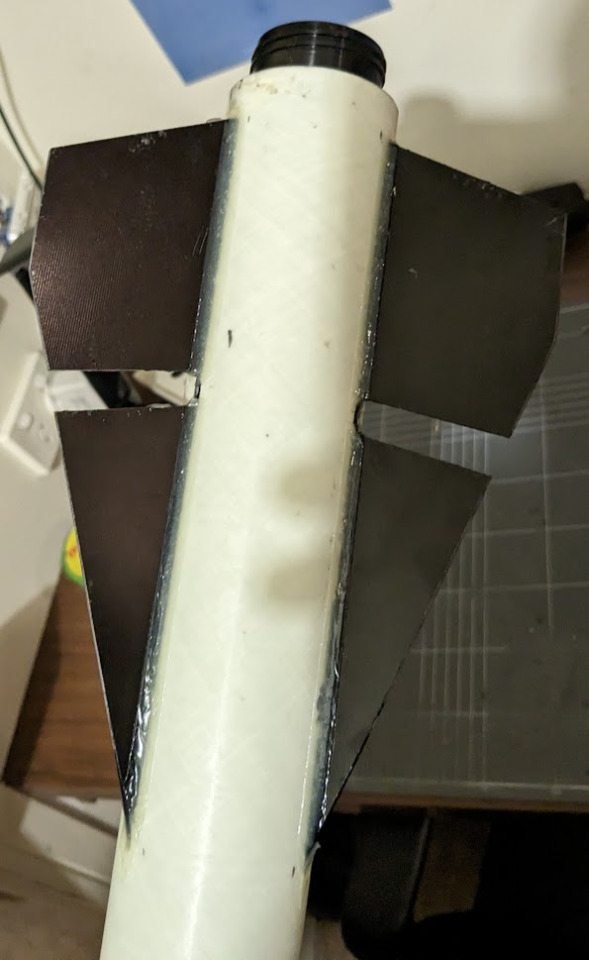
The morning after I applied these fillets, I got up to continue working on the rocket when I noticed that something had shifted overnight. The motor mount tube was somehow at an angle, as shown in the image above. I know I installed it perfectly level, but I didn't secure it while it set so I think it slipped as it cured. In my defense, I was quite sick and not firing on all cylinders when I had completed all the work up until now, but the realisation of what I'd managed to do was pretty disappointing and a bit of a knock to my confidence. Some measurements and a bit of trig suggested that the offset was only a degree or two, but the image suggests otherwise. I consulted some friends who are far more experienced flyers than I, and the consensus was a mix between 'send it' and Do Not Fly That Rocket, with more in favour of flying it than not. I looked at my OpenRocket sim for stability characteristics, and read some old Rocketry Forum posts about this model, all which pointed to it being rather squirrelly. In hindsight, I feel like I made the right decision, as I just couldn't ignore my gut feeling. I decided to rip it apart and rebuild it completely.
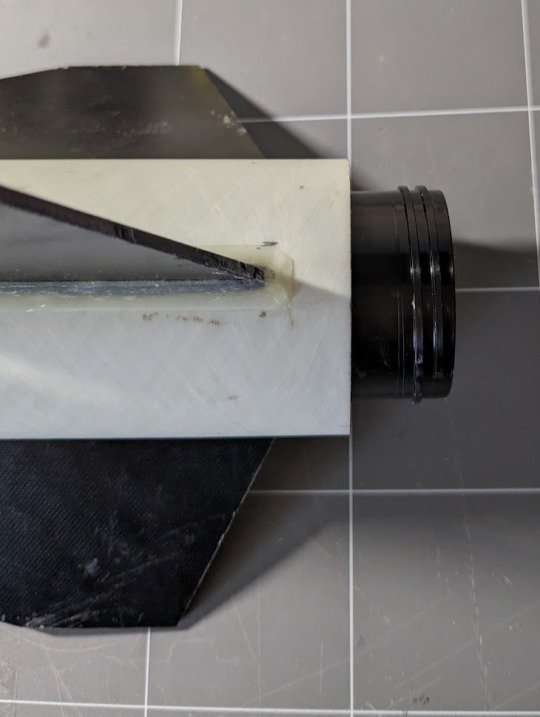
I did not take photos during this phase due to being completely covered with fibreglass dust, but I ended up using a diamond Dremel cutting wheel to first cut the fin can off, then cleanly slice the fins out of the body. I cannibalised a small section of the avionics bay tube to use as a coupler to reattach the aft section. I was then able to epoxy the whole thing back together, sand it all down, and it looked no different - apart from the motor mount being at the correct angle of zero degrees. I re-filleted the fins with a larger radius than before, as I wasn't happy with how they looked initially. I was very pleased with this effort, and confident to a) present this rocket to an RSO and b) fly it safely.
I also took the opportunity during this rebuild to modify the rocket to be motor-eject capable, by removing the bulkhead to which the recovery harnessing would be attached. I cut a small divot in the forward centering ring and attached a looped piece of kevlar around the motor tube before reinstalling it. This 'leash' provides the anchor point for a longer recovery harness to be attached to. I am very glad I did this, as not long after I was informed that my university club possessed a grand total of two (2) grams of black powder. Traditional dual-deploy would no longer be an option. More on that later.
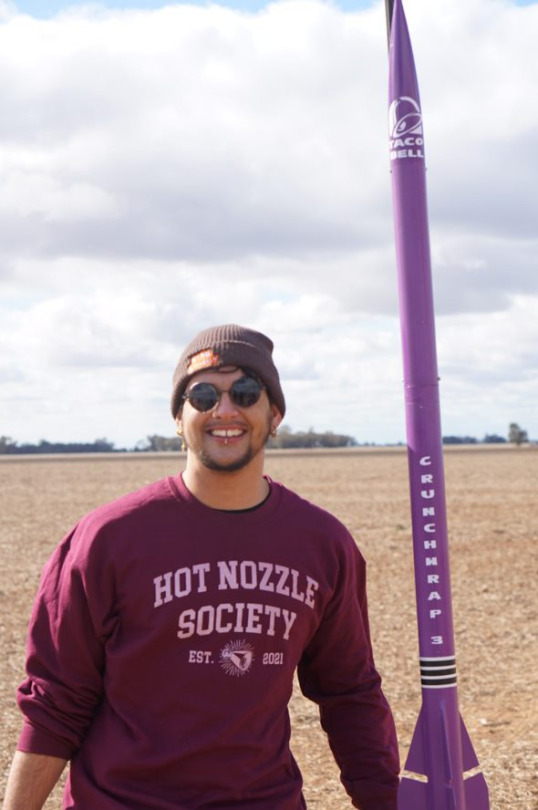
To finish off the construction, I 3D printed rail guides from ABS and bolted them to the body, with a bit of JB Weld in there for good measure. I drilled pressure relief holes in the forward and aft sections of the body, and another in the avionics bay for altimeter readings. I then drilled a more smaller holes and installed screws to pin the nosecone to the forward section, and the forward section to the avionics bay. Since the flight would no longer be traditional dual-deploy, the rocket would not need to separate at these points. Finally, I gave it a purple paintjob and the name of CRUNCHWRAP 3.
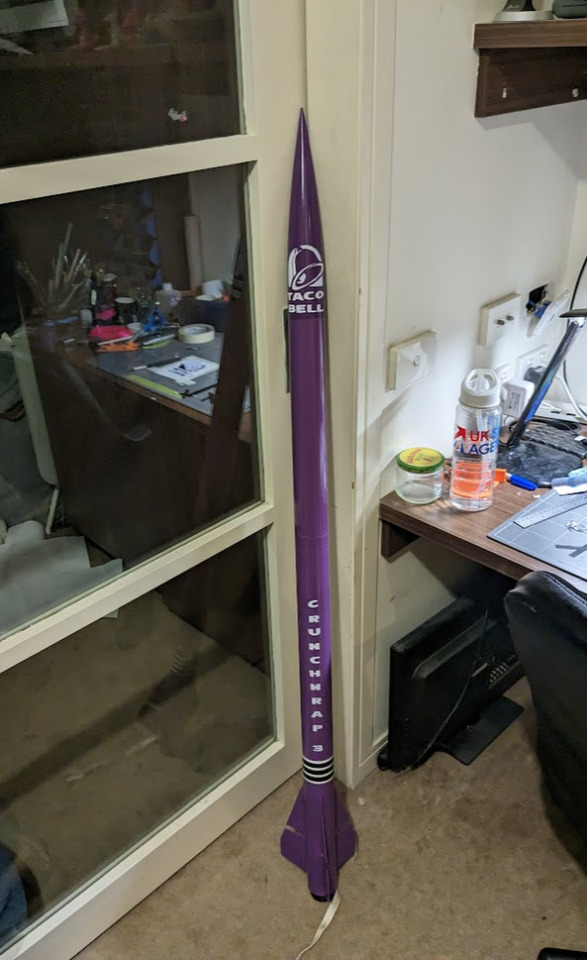
At some point, Taco Bell might see these and send me a cease and desist. I am going to keep building and flying them until they do.
Recovery
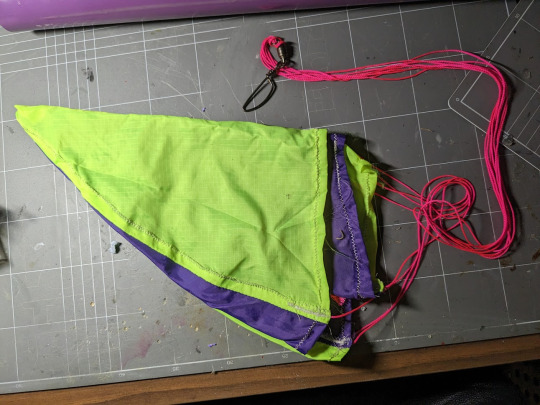
With a proper dual-deploy ejection now out of the question, I turned to my backup plan. My team calls it the 'poor-man's dual deploy', even though it's arguably actually more expensive than using black powder. This involves deploying a drogue with the motor charge, then using a JollyLogic chute release device to deploy the main at whatever altitude you have chosen. There is a substantial risk of the harnessing becoming tangled using this method, but I didn't really have a choice. I used a 4.5m nylon shock cord, tied to the anchored kevlar leash. I divided the cord into thirds, tying a loop at each third. I attached the drogue to the forward-most loop, and the main to the aft loop. Both chutes were on quick links and swivels to reduce the risk of tangling as much as possible. Each of these chutes were wrapped in their own nomex protector, and then placed in the aft section of the rocket with their harness. I used a 36' (91-ish cm) main chute from Loc Precision, and a 40cm 4-gore drogue which I sewed using Scott Bryce's fantastic Spherical Parachute Pattern Generator.

Avionics
Although it ended up not being needed, I decided to send the flight computer I got hold of along for the ride. I thought it would be cool to get an altitude reading to compare with the simulated apogee. A buddy of mine in the US was getting rid of a few bits and pieces, so I bought his RRC2+ off him with the intent of flying it for my L2 attempt. First, though, it needed somewhere to live.
I found the supplied parts for the av-bay were a little lacking, so I added some modifications - the main one being drilled holes for two threaded rods to pass through. I used two for redundancy, since the idea of a single rod made me a little uneasy. I used wingnuts on these so I could fasten them nice and tight without the need for a spanner. It was also missing enough eye bolts, so I grabbed some from Bunnings.
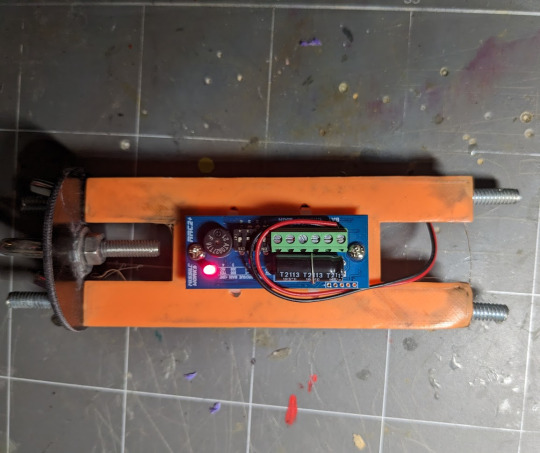
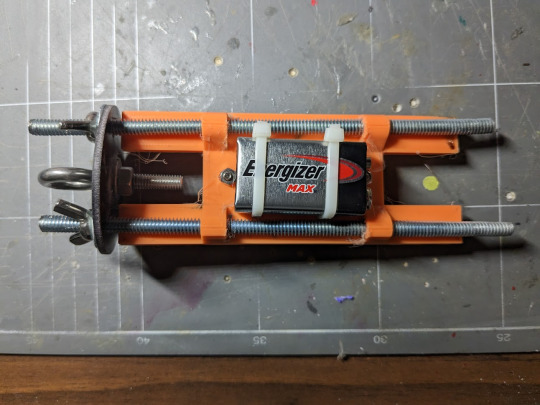
I then designed and 3D printed a sled to fit onto the threaded rods and provide a mount for the battery and the flight computer. A very simple setup. The sled looks objectively awful since the printer was having a bit of a sook at the time, but the actual functionality was not affected and it serves its purpose just fine.
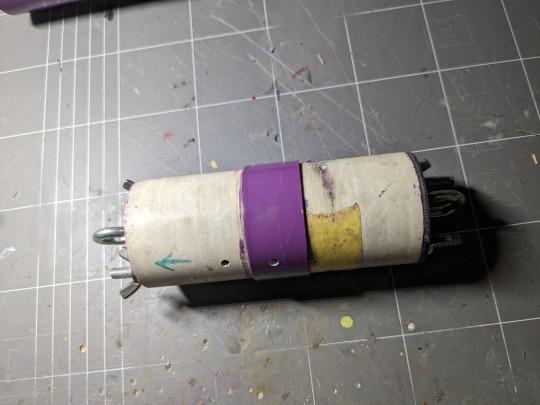
Motor
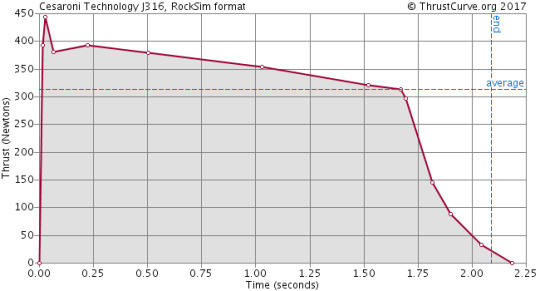
With an unbelievably limited amount of motors available in Australia at the time of writing, I had to work with what I could get hold of. I was lucky enough to snag was a CTI J-316 (pink!!) through my university team, which is a 38mm 5 grain reloadable motor with an adjustable delay of up to 17 seconds. Unfortunately, we didn't have a 5-grain case so I made do with a 6-grain case and a spacer. I only became aware of that the night before the launch, so I had to very quickly revise my recovery packing technique to account for the now limited real estate inside the body.
It provided an average thrust of roughly 316N, with a max of 450N, over a burn time of about 2.1sec, for a total impulse of roughly 650Ns. A pretty tame J motor, but still far more powerful than anything I'd ever flown before.
Simulation
After carefully weighing every single component of the rocket and entering them into OpenRocket, I simulated the flight on the motor above. The entire vehicle weighed 2.7kg, with a length of 1.41m. It was simulated to hit Mach 0.77, and fly to an apogee of 5191ft.
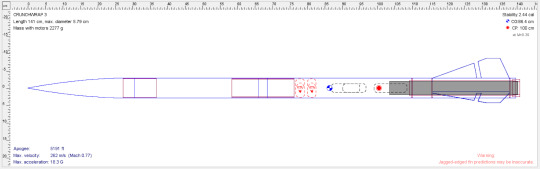
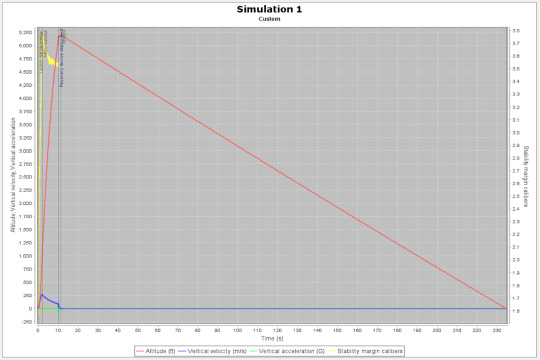
Theoretically, the centre of pressure and centre of gravity would be 0.86m and 1m respectively from the tip of the nose cone. This would give a stability calibre of 2.44 at Mach 0.3 - however, this rocket is quite a bit faster than that. Also, the 'rule of thumb' which says a rocket's CG should be roughly 1.5 body diameters in front of the CP is not as helpful on rockets with a length/diameter ratio of over 10, such as this one (which is 24). Here, the CG should be roughly 10% of the overall length in front of the CP, which it was, almost (9.6%). The stability calibre off the rod was predicted to be only a little over 1.5 (6%), but given that it would be going 31m/s I was confident this would be fine as long as it didn't launch into a strong wind gust. At motor burnout, stability would be up near 3.8 (15%), which I was happy with.
I set the motor delay to the full 17 seconds for the simulations, as anything shorter would have the recovery devices deployed before apogee. This would a) cut the flight short and more importantly b) place a huge amount of strain on the harnessing and chutes due to a very high deployment speed. With the full delay, deployment would be at 11.3m/s, which the harness and drogue could handle easily. Ground hit was simulated to be a brisk but not destructive 6.8m/s.
As an aside, OpenRocket includes a little disclaimer about 'jagged edge fin predictions may not be accurate'. I bore this in mind through the whole process, but based on others I'd seen fly and forum posts I'd read online, I was comfortable with what I was doing.
Flight
L2 certifications require passing a written exam with two sections - technical knowledge and the Tripoli safety code. I had already passed the exam (100%, don't mind if I do) at a previous date, so all I had to do was install my motor, altimeter, and recovery gear. I didn't even have to drill out a delay. After a quick field CG test and a visit to the RSO tent, I was ready to rack up.
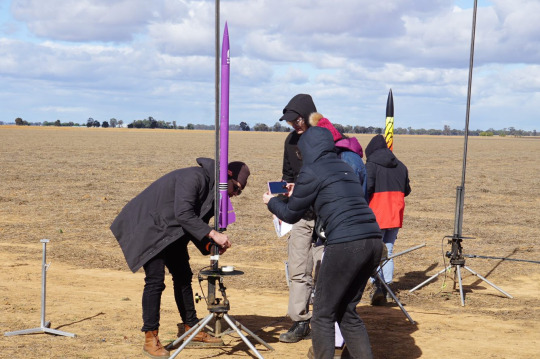
A few new recruits to our team came out to the launch day, so I enjoyed an opportunity to show them how to set up for flight, install an igniter, and test for continuity.
After a small delay to clear the range and ensure the skies were clear overhead, the LCO hit the button.
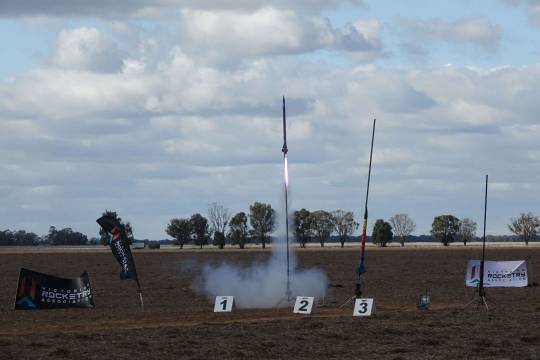
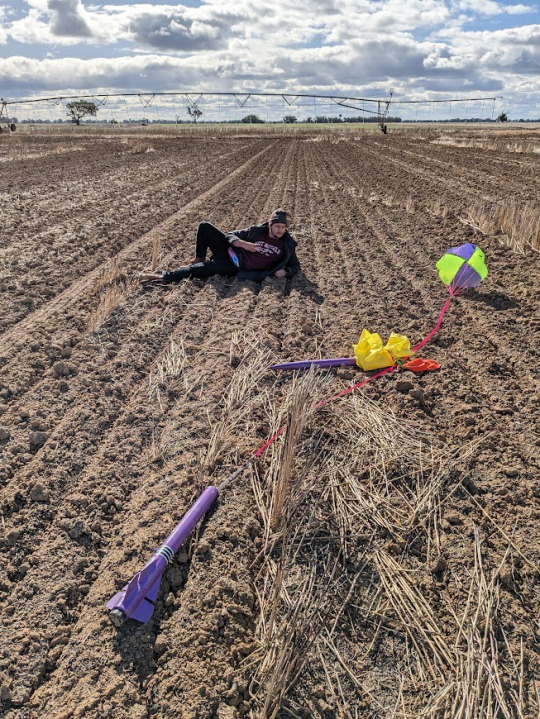
The rocket flew straight and fast on a frankly gorgeous purple flame, and almost instantly got high enough that we struggled to keep a visual on it. A puff of smoke indicated the ejection charge had blown, and then I was able to see the fluoro yellow gores of the drogue as it opened. The rocket began to drift slowly as it came down, as there was a fairly stiff breeze blowing at the time. I had programmed my chute release to 500ft, and it performed as intended. The main chute deployed and thankfully none of the recovery gear got tangled. I watched it gently descend, albeit with a decent drift going on, and set itself down in a field about 800m away. After a gentle stroll (read: powerwalk to warm up, it was freezing), we arrived at the rocket. It had been dragged a little and the chute had become tangled on the ground, but all was intact. One quick pitstop at the RSO tent later, I had my L2!
Upon reflection....
Things to improve
Use a much smaller drogue. The one I flew was about twice as big as it needed to be, and it was far too windy for such a chute. I simply didn't have a smaller one, although making one would have only taken about an hour.
I didn't get any useful readings from my altimeter. I don't believe I set it up properly, so I need to make sure I learn to do that and fly it as a passenger on at least one more flight before I use it as a deployment computer. I am disappointed that I couldn't get a figure to compare with the simulation.
Use a proper stand to rest the rocket on, perfectly horizontally, during construction. This would have avoided the whole debacle of the motor mount slipping and me consequentially having to rip it apart and rebuild.
Things that went well:
Being absolutely prepared and packing my car the night before, and bringing spares of most components, made launch prep a breeze
That was the first flight of my homemade drogue, and upon inspection afterwards there was no damage. I can now be confident that others of the same design and similar construction that I have planned for bigger rockets will perform in a similar way.
The recovery technique worked as intended, with no tangling. This is probably not a viable option for rockets going any higher, but it's nice to have in the back pocket for projects of this scale if black powder and/or avionics access might be an issue
I am also extremely relieved that this certification only took me one shot, rather than the three that my L1 took. I think it reflects well on my progress.
Next:
Fly it again with proper dual deploy, if I can get my hands on some black powder
Scratch build of a rocket of similar scale
...... L3?
2 notes
·
View notes
Text
Website: https://www.artistsarahrowan.com/
Address: Greater Sydney Area, Australia
Sarah Rowan is an artist and thought-leader who empowers individuals and organisations to ignite a better future through creativity. As one of Australia’s top Speed Painters, she has lived and breathed the dynamic process of transformation for over 20 years, turning blank walls and cavasses into thought-provoking pieces of art, with limited time and often in front of a live audience. Merging her artistic talent with her passion for public speaking, Sarah has reimagined the role of the artist, pushing the boundaries of a studio-based pursuit into a trail-blazing performance genre that challenges the limitations of time and space.
After graduating from Converse College in 2003 with a BFA in Studio Art, Sarah started an art business in Greenville, South Carolina, USA before moving to Sydney to expand her horizons. It was here that she used the process of creative futurism to overcome depression, challenge chronic illness and create a new future for herself and her family. No longer shackled by societal norms, she has stepped into the full power of her truth personally and professionally.
Sarah’s strong emotional storytelling, along with her ability to paint fast and think fast has captivated hundreds of clients like Google, ANZ, AMP, Hewlett Packard, Beam Suntory, Mi9, The Salvation Army and the Business Chamber of NSW. She has inspired audiences to embrace their own creativity which she believes is a ""birthright to all” and to date has painted at over 400 events raising over $200,000 for charity.
Business Email: [email protected]
Facebook: https://www.facebook.com/ArtistSarahRowan/
Instagram: https://www.instagram.com/artistsarahrowan/
YouTube: https://www.youtube.com/c/ArtistSarahRowan
LinkedIn: https://www.linkedin.com/in/artistsarahrowan/
Twitter: https://twitter.com/sarahrowanart
Keywords:
art commissions
graffiti artist
live wedding painting
live wedding
commission art
wedding painting
graffiti artist for hire
custom painting
art commission
graffiti artist sydney
graffiti mural artist sydney
graffiti artist hire
graffiti artist for hire sydney
graffiti artist brisbane
graffiti artist for hire melbourne
graffiti artist australia
graffiti artist perth
professional graffiti artist
commission family painting
live wedding painter
live wedding painter melbourne
professional graffiti artist for hire
hire graffiti artist
graffiti artist to hire
brisbane graffiti artist
australian graffiti artist
commercial graffiti artist
graffiti artist hire melbourne
custom art
live wedding painter gold coast
live wedding painter sydney
local graffiti artist
graffiti artist gold coast
famous graffiti artist
graffiti artist wanted
custom wall art
commission a painting
commissioned art
artist commissions
custom art prints
live painting wedding
wedding painter
live wedding painter brisbane
wedding painter sydney
wedding painter melbourne
melbourne graffiti artist
commission painting
art commission prices
commissions art
paint wedding ceremony
the wedding painting
what are art commissions
turpentine tree wedding
custom painting australia
live wedding painting sydney
3d graffiti artist
aboriginal graffiti artist
custom dog art australia
custom canvas art
custom couple art
portrait painting commission
miniature commission painting australia
miniature painting commission
oil painting commission
dog painting commission
commission painting australia
commission oil painting portrait
commission a painting from a photo
public art commission
pet art commission
pet commission art
art commission contract
wedding live painter
live wedding portrait painting
live wedding painting tiktok
live wedding painting adelaide
live wedding painting cost
live painting
how to get art commissions
wedding photo painting
live wedding painting melbourne
drawing commissions
how to start art commissions
live wedding painting perth
wedding paintings
custom art commission
wedding artist
wedding portrait painting
live wedding sydney
wedding painter brisbane
live wedding painting australia
custom paintings australia
live wedding painter san diego
live painter wedding cost
cost of live wedding painter
how much are live wedding painters
average cost of live wedding painter
live wedding painter australia
live wedding painter nz
live wedding painters
live painting of wedding
live event painting wedding
live artist painting wedding los angeles
live wedding paintings
#how much do live wedding painters cost#live wedding painting prices#live painting at wedding#how much does a live wedding painting cost#wedding painting live#live wedding painting uk#live painting wedding cost#renaissance painting commission#pet painting commissions#painting commission#oil painting portrait commission#oil painting portrait commission prices#commissioned pet portrait painting#commission pet painting#commissions painting#commission watercolor painting#commissioned painting#commission for painting#commission miniature painting prices#commission canvas painting#commission a portrait painting#commission an artist to paint#commission art painting#live wedding painters uk#live painter wedding#live wedding painter scotland#best live wedding painters#live wedding painter italy#live wedding painter victoria#live wedding painter india
2 notes
·
View notes
Text
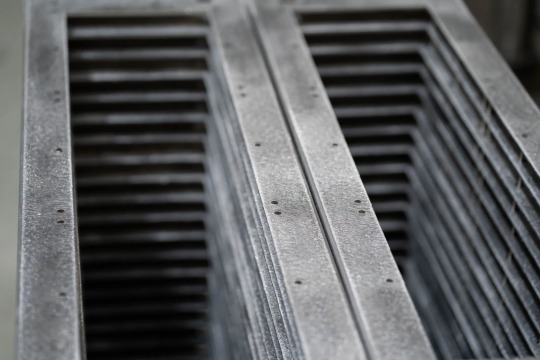
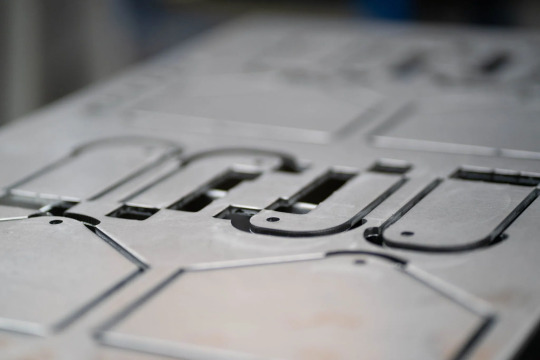
Taking Advantage of Innovations in Aluminium Fabrication

Innovation is the cornerstone of progress in any industry, and aluminium fabrication is no exception. In Perth's bustling industries, the applications of aluminium fabrication are expanding rapidly, driven by technological advancements and a growing demand for lightweight, durable, and sustainable materials.
From aerospace to construction, automotive to electronics, aluminium fabrication plays a pivotal role in shaping modern solutions. This article explores the latest innovations in aluminium fabrication and how businesses in Australia, particularly in Perth, can leverage these advancements to their advantage.
Innovations in Aluminium Fabrication
Before delving into the innovations, let's first understand what aluminium fabrication entails. Aluminium fabrication involves the manipulation of aluminium materials into desired shapes and forms through various processes such as cutting, bending, welding, and assembling.
Aluminium is favoured for its remarkable properties - it is lightweight, corrosion-resistant, strong, and highly conductive, making it suitable for a wide range of applications across diverse industries.
Advanced Machining Techniques
With advancements in CNC (Computer Numerical Control) machining technology, precision and efficiency in aluminium fabrication have reached unprecedented levels. CNC machines enable intricate designs and complex shapes to be achieved with utmost accuracy, reducing production time and minimising material wastage.
Perth-based fabrication companies are increasingly investing in state-of-the-art CNC machining equipment to meet the demands of modern industries.
Additive Manufacturing
Additive manufacturing, commonly known as 3D printing, has revolutionised the fabrication landscape. This technology allows for the layer-by-layer deposition of aluminium powder or wire, enabling the creation of complex geometries that would be difficult or impossible to achieve using traditional methods.
In Perth, businesses are exploring the potential of additive manufacturing in prototyping, custom part production, and even in the development of lightweight components for aerospace and automotive applications.
Composite Materials Integration
Aluminium composites, such as aluminium-lithium alloys, offer enhanced strength-to-weight ratios compared to traditional aluminium alloys. By integrating these composite materials into fabrication processes, manufacturers can produce lighter yet structurally robust components.
Perth's aerospace and marine industries are particularly interested in these innovations, as they seek to improve fuel efficiency and performance while reducing overall weight.
Surface Treatment Technologies
Surface treatment technologies, including anodizing, powder coating, and chemical etching, play a crucial role in enhancing the aesthetics, durability, and corrosion resistance of aluminium components.
Innovations in surface treatment processes have led to the development of eco-friendly and cost-effective solutions that comply with stringent environmental regulations. Perth's architectural firms and construction companies are leveraging these advancements to create visually appealing and long-lasting aluminium structures.
Digital Design and Simulation
Digital design tools and simulation software have become indispensable in the field of aluminium fabrication. These tools allow engineers and designers to visualise concepts, optimise designs, and simulate manufacturing processes before physical production begins.
By embracing digital design and simulation, Perth-based companies can streamline their product development cycles, minimise errors, and ultimately deliver superior-quality aluminium products to their clients.
Applications of Innovations in Perth's Industries
With all of those details laid out, let’s take a look at some industries where aluminium fabrication innovations truly shine:
Aerospace
In Perth's burgeoning aerospace sector, innovations in aluminium fabrication are driving the development of lightweight aircraft components, including fuselage panels, wing structures, and interior fittings.
Advanced machining techniques and additive manufacturing technologies enable aerospace manufacturers to achieve significant weight savings without compromising on strength or performance, thereby enhancing fuel efficiency and operational capabilities.
Construction
The construction industry in Perth is witnessing a surge in the use of aluminium fabrication for architectural cladding, curtain walls, roofing systems, and structural components.
The integration of composite materials and advanced surface treatments ensures durability, weather resistance, and aesthetic appeal in architectural designs. Furthermore, digital design tools facilitate the customization of aluminium profiles to suit the unique requirements of each construction project.
Automotive
In the automotive sector, aluminium fabrication innovations are driving the production of lightweight body panels, chassis components, and engine parts. The use of aluminium alloys and composites reduces vehicle weight, leading to improved fuel efficiency and lower emissions. Additive manufacturing technologies enable the rapid prototyping and customization of automotive parts, facilitating innovation and agility in product development.
Electronics
The electronics industry relies on aluminium fabrication for the production of heat sinks, enclosures, and components for electronic devices. With the miniaturisation trend in electronic design, precision and reliability are paramount.
Advanced machining techniques and surface treatment technologies ensure tight tolerances, efficient heat dissipation, and protection against environmental factors such as moisture and electromagnetic interference.
Conclusion
Innovations in aluminium fabrication are reshaping industries across Perth, offering unprecedented opportunities for businesses to enhance product performance, efficiency, and sustainability. From advanced machining techniques to additive manufacturing, and composite materials integration to digital design tools, the possibilities are endless.
By embracing these innovations and leveraging the expertise of Perth's fabrication professionals, businesses can stay ahead of the curve and thrive in today's competitive market landscape. As the demand for lightweight, durable, and sustainable solutions continues to grow, aluminium fabrication will undoubtedly remain at the forefront of innovation in Australia and beyond.
#custom aluminium#aluminium products#aluminium fabrication#aluminium#custom aluminium wa#aluminium extrusions#aluminium services
0 notes
Text
Capturing the Miracle: Exploring the Beauty of Fetal Fotos
Introduction:
The journey of pregnancy is a miraculous and transformative experience, marked by the anticipation of welcoming a new life into the world. Amidst the modern advancements in technology, the concept of capturing the earliest moments of this journey has given rise to the art of "Fetal Fotos." In this article, we delve into the world of prenatal photography, exploring the significance, techniques, and emotional impact of freezing these precious moments in time.
The Essence of Fetal Fotos:
Fetal Fotos, short for fetal photography, is the art of capturing images of the unborn child during various stages of pregnancy. This specialized form of photography provides expectant parents with a visual window into the womb, allowing them to witness the growth and development of their baby before the much-anticipated arrival.
The Technology Behind the Magic:
Advancements in medical imaging technology have paved the way for the development of 3D and 4D ultrasound technology, which forms the backbone of Pregnancy Ultrasound Perth. Unlike traditional 2D ultrasounds, these techniques provide intricate, lifelike images of the fetus, showcasing details such as facial features, tiny fingers, and even expressions. This technological leap has transformed the prenatal experience for parents, offering a more intimate connection with their unborn child.
Significance and Emotional Impact:
Fetal Fotos go beyond being a mere visual record; they serve as a powerful emotional and bonding experience for expectant parents. Seeing their baby's face, movements, and expressions in utero creates a profound connection, fostering a sense of intimacy and love. Many parents describe the experience of viewing Fetal Fotos as a magical and emotional journey that deepens their connection with their unborn child.
When to Capture the Magic:
Fetal Fotos are typically captured during specific windows of pregnancy. While traditional 2D ultrasounds are performed as routine medical checks, 3D and 4D imaging sessions are often scheduled around the mid-pregnancy mark (around 18-24 weeks) when the baby's facial features become more defined. This timing allows parents to witness the baby's development while still experiencing the excitement of the surprise that comes with childbirth.
Creating Lasting Memories:
4d baby scan perth offer parents the opportunity to create lasting memories even before the baby is born. Many studios and medical facilities offer the option to have these images printed or digitally preserved, allowing parents to share the excitement with family and friends. These precious photos often become cherished keepsakes, serving as a tangible reminder of the incredible journey to parenthood.
Professional vs. DIY:
While many medical facilities offer Fetal Fotos during routine ultrasounds, some parents opt for professional studios that specialize in prenatal photography. These studios provide a more relaxed setting, often allowing for longer sessions and a more personalized experience. DIY options, such as at-home ultrasound devices, also exist, although caution and adherence to safety guidelines are essential.
Navigating Ethical Considerations:
As with any emerging technology, the use of Fetal Fotos raises ethical considerations. The choice to pursue prenatal photography is deeply personal, and respecting the privacy and well-being of both the unborn child and the parents is paramount. Ensuring that these images are obtained and shared in a responsible and consensual manner is crucial.
Conclusion:
Fetal Fotos open a visual portal into the enchanting world of pregnancy, offering expectant parents an intimate glimpse of the miraculous journey unfolding within the womb. As technology continues to advance, the art of capturing these precious moments becomes more accessible and emotionally resonant. Whether through routine medical ultrasounds or professional studio sessions, 3d Ultrasound Perth serve as a testament to the joy, wonder, and profound connection that come with bringing new life into the world.
Source Url : - https://sites.google.com/view/ohheybabycom65455/home
0 notes
Text
The Rise of Vapes in Perth: A Closer Look at Disposable Vapes
In recent years, vapes in Perth have seen a significant rise in popularity, reflecting a global trend towards vaping. Among the diverse range of vaping products, disposable vapes have garnered particular attention for their convenience and user-friendly nature.
0 notes
Text
3d Printing Providers

We’re proudly offering companies and solutions to a variety of business sectors, together with Education, Prototype and Rapid Manufacturing, Architecture, Art, and Jewellery. We goal to offer reasonably priced, durable, and environment-friendly providers across. With the help of robust plastic 3d printing applied sciences, we will meet the specifications set by the customers. Trusting our expertise in delivering cost-effective industrial 3D printing providers, many firms have partnered with us through the years for his or her projects. Other than that, the short manufacturing of grips, jigs, and fixtures can be accomplished on a frequent foundation. This permits automakers to make instruments and objects without spending a staggering amount of money - 3D Printing in Tissue Engineering.
It is the most costly technique of the three and produces the very best quality of parts. If you need functional prototypes or print your mannequin in small batches, SLS 3D printing will best match your wants. Plastic would be the main material used in the case of the FDM approach. You can access a broad range of thermoplastic supplies with FDM, and parts produced via this methodology are cheap, simple to post-process, and versatile in their applications - 3D printing in medical industry.
This is a major consideration to make as 3D printing’s fundamental advantage is being in a position to create whilst producing the least attainable waste. Most modern 3D Printers have an excessive energy score, so when it comes to vitality consumption, it isn’t as demanding as virtually all counter-part manufacturing tools. Users are able to choose and produce the objects they want after they receive the merchandise will depend on how quickly they can provoke a print rather than having to wait for a product to arrive in the mail. Tap into the convenience of having our Perth-based engineers produce the 3D drawings and machine information that you just want. Alternatively, we can work with you to assist in designing for manufacturability.
We can present prototyping companies in a variety of supplies and 3D printing applied sciences, in addition to 3D printing consultancy to determine the best expertise and supplies on your software. Additive manufacturing (3D printing) has revolutionized the world of industry and manufacturing. Traditional machining is efficient for plenty of purposes, however, when it comes to intricacy and complexity, additive manufacturing technologies are highly preferable. Whether you may be looking for components to add to current buildings, integral supports or customized instruments, 3D printing is the way of the lengthy run. For more information, please visit our site https://www.novaproduct.com/
0 notes
Text
Scotland's Stone of Destiny gives up tantalizing details under new scans
Ahead of the May 6 coronation of King Charles III, scientists in Scotland have discovered “previously unrecorded markings” that might be Roman numerals on the Stone of the Block centerpiece of royal succession in Britain. The news comes in a recent release by Historic Environment Scotland (HES), the charitable organization that oversees hundreds of Scottish buildings and monuments as well as documents and photographs. The group created a new digital 3D model allowing it to be viewed from different perspectives and in more detail than ever before. Among the discoveries were previously unrecorded markings “which have the appearance of Roman numerals.” Scientists better look at tooling marks from the original working and at the repair was stolen from Westminster Abbey in 1950 by several Scottish university students. The scan was also used to create an exact-scale 3D printed replica of the preparation for placing it in the coronation chair to be used in King Charles’ coronation ceremony. Historically, the Stone of Destiny, also known as the Stone of Scone or, in Scots Gaelic, “clach-na-cinneamhain,” was used by the Scottish and was kept in Scone Abbey near Perth, Scotland. But in 1296, the invading forces of Edward I seized it and took it to London. Edward then commissioned the construction of a coronation chair — still in use today — with a shelf to hold the roughly 150 kg slab. Westminster Abbey until, in 1950, Scottish students stole it, accidentally breaking it in two while trying to Scotland. It was recovered the following April, and in 1996 — 700 years after its seizure by Edward I — it was returned to the understanding that it would travel back to Westminster for future coronations. The last major investigative work on the new scans, including X-ray fluorescence analysis, found traces of copper alloy on the top surface that coincides with a dark stain near its center, suggesting that a bronze or brass object has been in contact with or placed at the time in its history. Microscopic traces of gypsum plaster were also found, infilling pores in the sandstone at various places, which scientists think could be the remnants of a plaster cast that was taken sometime in the past.
0 notes
Photo
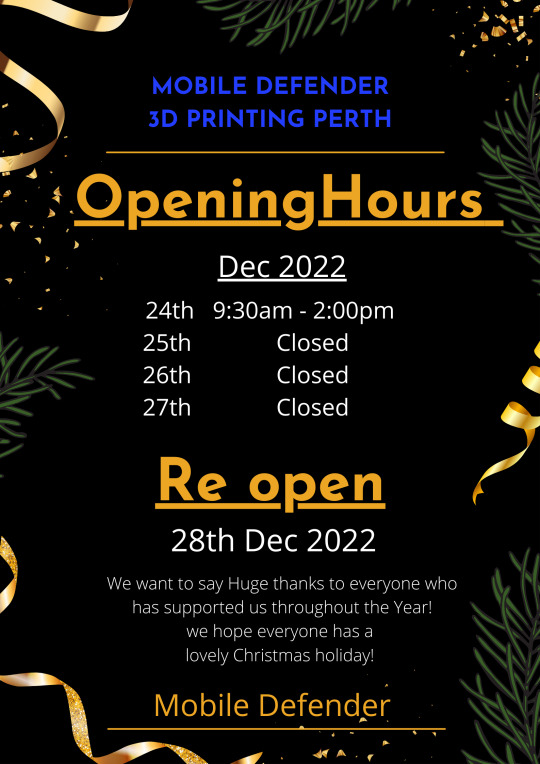
Mobile defender and 3D printing Perth wish our customers receive one blessing after another this coming year. Merry Christmas! Opening hours on 24th Dec 9.30-2.00pm. 25th- 27th closed, reopen on 28th Dec 2022 9.30am. #mobiledefender #iphonerepair #3dprintingperth #3dprinter
0 notes
Text
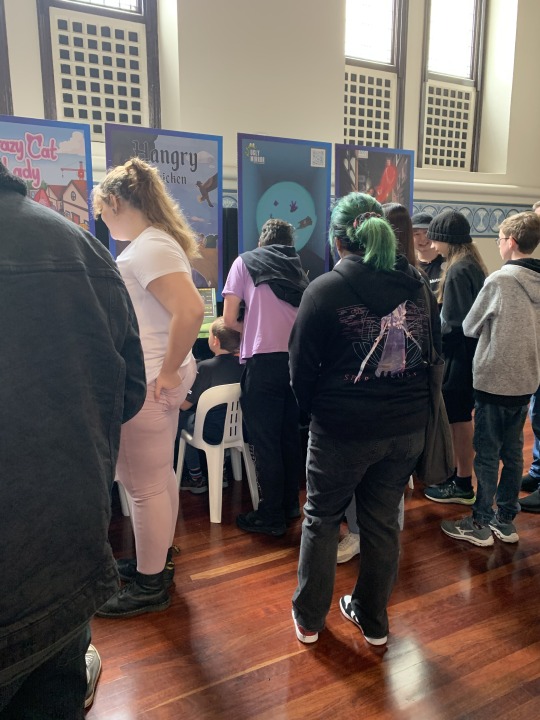
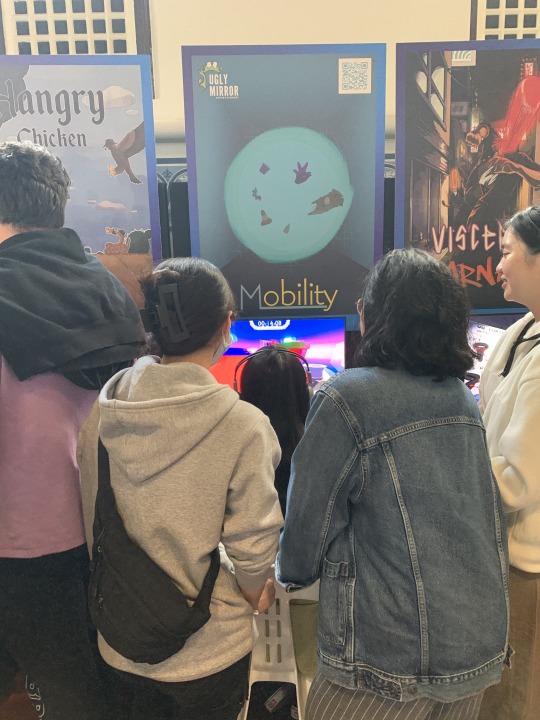
PGF
So we got to show off our game, Mobility, at the Perth games festival. It was great to have it next to games from real game studios and have people be equally interested in ours. There weren’t as many people there as there had been past years but they also scheduled PGF the same day as an anime convention that was a 16 minute walk away on the other side of the city. I walked past almost ten Genshin impact cosplayers on my walk there from the train station, 3 guesses where they were off to.
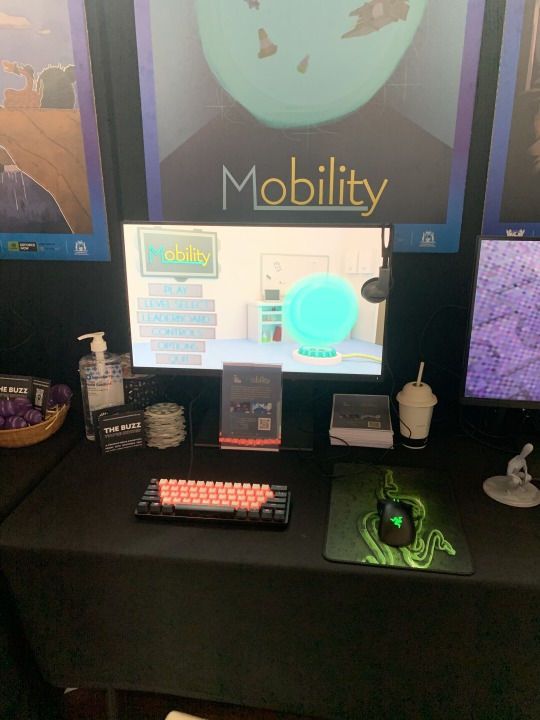
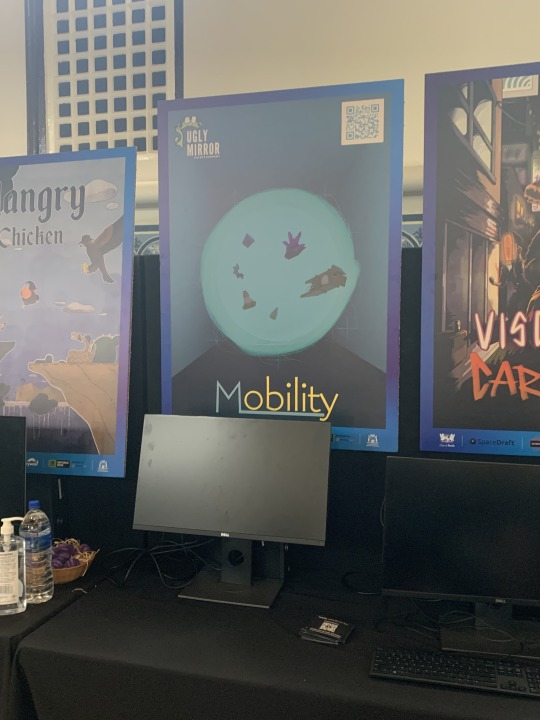
The reduced number of attendees though made it less nerve wracking for me which was better for my first time exhibiting something at a show. Mobility was very well received though so I can’t be upset at the turn out. We actually had to set attempt limits since people wanted to get better scores but the line was getting too long. I also got to keep the poster afterwards!
Our co-producer and marketing lead, Taj, handled assembling handouts for visitors of our table. He 3D printed the bounce pads from the game (Which I modelled), printed out the flyers, stickers, QR codes and put different logo stickers on lollipops.
As said before though we were told to expect 5000 people across the day and not even 500 turned up. So we had so much stuff left over. So we all took some of the stuff ourselves and took the rest to the student showcase that was a week after PGF. I have photos from that too; it shows the bounce pads better. There was way too much stuff made, but better too much than too little I guess.
0 notes
Link
#3d printing online quote#direct 3d printing#3d printing service australia#3d printing melbourne#3d printing quote#3d printing service#3d printing service sydney#3d printing service melbourne#3d printing perth
0 notes
Text
Office & Reception signage Perth - WA Signs
Reception, office & showroom signs. Showcase your brand with illuminated graphics, 3D printing, wallpaper, digital signage or plaques. Every sign for your office expertly manufactured and installed. Huge range to choose from. Contact us for your best price.
Visit https://wasigns.com.au/services/reception-signage/
0 notes
Text
What You Need to Know About T Shirt Screen Printing
You're interested in learning how to screen print T-shirts and you've found this article helpful. Read on to learn about the process, types of inks, conversions, and more! You'll be well on your way to becoming a professional screen printer! You'll also be able to apply different inks to different surfaces. Read on to find out how to apply them in the best way.
Process
The process of screen printing involves placing a layer of high-density gel on top of a T-shirt. The gel coats the T-shirt, allowing the screen-printed design to have a 3D appearance. Compared to other methods of screen printing, gel screen printing is environmentally friendly, durable, and versatile. This process can also produce multiple colors. Crackle finish screen printing is achieved by breaking up the ink after it has dried, leaving a cracked appearance.
Next, the screen needs to be prepared. It should be covered in duct tape to prevent seepage of the ink during printing. Duct tape should overlap the edges of the screen to prevent leakage of the ink. Once the screen is covered, the printing process can begin. The design will be transferred to the T-shirt. The process of screen printing can be tedious, but is a necessary step in the production process of T-shirt apparel.
The process of T Shirt Printing Perth is relatively fast and cheap, but can be challenging for those who aren't accustomed to it. Screen-printed shirts are able to retain the design for a long time, so this is a great method for printing large quantities of t-shirts. The drawback of screen printing is that it takes time to prepare the screens and print one T-shirt, while a DTG printer may be more efficient in small quantities. Furthermore, the process is not recommended for designs that require varying colors, shadows, or other intricate details.
When choosing a T-shirt printing method, it's important to consider the materials and the type of ink. Ink used in screen printing is thicker and durable than any other kind of ink. It can be printed on almost any fabric. But if you are printing on dark colored t-shirts, spot color screen printing is a better option. Spot color screen printing is best for company logos and one or two colors, as it doesn't require gradients and can produce a solid color.
Inks
Choosing the right inks for T shirt screen printing is vital. There are several reasons why you should use water-based inks, and they all have their advantages. Water-based inks can be left on the screen longer, and they don't clog the mesh. If you're printing on super-soft t-shirts, water-based inks are the best choice.
Water-based inks have the advantage of being absorbed into the fabric, but they can take longer to dry. If the shirt is especially humid, you might need to use a heat source to speed up the drying time. Water-based inks also give a semi-transparent finish. Water-based inks can be used to match colors to custom designs. These types of inks are more affordable than water-based inks, but they require a higher level of training to use properly.
Choosing the right inks for screen printing depends on your company's requirements. If you want to create a custom graphic, water-based inks will give you a superior result. Water-based inks are best for fabrics that contain more than 50% cotton. However, they don't work as well on polyester. So, you'll need to test the inks thoroughly on your t-shirts before making a purchase.
When selecting inks for your T-shirt screen printing, you need to consider the type of fabric. A cotton fabric will absorb ink, while a polyester shirt won't. Water-based screen-printing inks are a great option for most textiles, but silicone inks are expensive and should only be used in shops with scientific capabilities. Ink prices are dependent on the state of the ink supply and are subject to change.
Ink density
There are two types of ink density for screen printing on T-shirts. The first is called high-density printing. This type is most effective when the design has to be read from a distance. It also creates a layered look. High-density printing is becoming increasingly popular among t-shirt manufacturers, as it allows brands to stand out and leave a lasting impression. However, if you don't know which is right for your design, there are some basic things that you need to know.
Plastisol ink is the most popular type of ink in the garment printing industry. This type of ink does not dry in the screen, and is opaque on dark-colored garments. It also has good adhesion to most fabrics. The main disadvantage of using Plastisol is that it does not have a long shelf life, so it is not as durable as water-based inks.
Ink density for T Shirt screen printing differs according to the type of fabric. If the fabric is made of cotton, high-density inks will be better suited for the job. Water-based inks require lower ink density than plastisol’s, but this type of ink can give a glossy finish. T-shirt screen printing can also be done with either low or high mesh density.
Water-based inks can be used to print on tri-blend t-shirts, but they are not ideal for this type of material. Water-based inks can give you an overall clean and vibrant look, but they can't match shadows and highlights. High-density inks are best for big corporate events, promotional t-shirts, and team uniforms. But high-density inks are not the best choice for a vibrant, detailed look.
Ink conversion
When screen printing on a T-Shirt, you should make sure you choose the right type of ink. Because screen printing uses a single color, it is not suitable for complex designs and images. You may want to use negative space to simulate a second color print. A common mistake with screen printing is to use gradients in the design. Instead, use solid colors. Color gradients, shading, and photograph-like images are not possible with screen printing inks.
Plastisol ink is one of the most common types of screen-printing ink. This has been used for decades and until recently was the primary ink for screen printing. Its main advantages include being more user-friendly and accurate with Pantone colors. However, it has a limited shelf life and is difficult to mix. Because of its viscosity, water-based ink has a lower shelf life and requires adjustments in the screen-printing shop. Water-based ink is not compatible with screen printers Perth made for other applications.
Photochromic inks are the latest technology in screen printing. They work like the traditional screen-printing inks, but change color when exposed to UV light. Usually, the coolers are the same, but some companies use two or more coolers in a single design. In addition to screen printing, photochromic inks also offer special effects, like glitter, suede, and metallic. Using this technology, you can produce T-shirts with a glittery finish.
To use the correct ink, you must first prepare a screen for screen printing. A good way to do this is to buy stencil paper from an art store. You can also cut it yourself using a craft knife. Before using it on the T-shirt, test it first on a scrap piece of paper. If the result is good, you can print the same image on a different shirt. You can also test the stencil by using a small scrap.
Design options
When designing a T Shirt, you have many design options. If you plan to screen print a large quantity of shirts, you can also choose stencil printing. Screen printing inks are monochromatic in nature, and can only be applied to one color per screen. However, if your design is very complex, stencil printing is the best option for you. For this reason, it's a good choice for a large order.
Before committing to a design, think about the size of the t-shirt. Make sure your sketch is accurate for the size of your t-shirt, and that the design is proportionate for each shirt size. Also, consider the size of the canvas, as different t-shirts will require different screen sizes. You'll have to pay more if you want to screen print a larger or smaller shirt, so you should choose carefully.
Screen printing is the most popular method of printing a t-shirt, and is known for producing vivid designs in large volumes. Screen-printed fabric is treated to keep the design and colors for a long time. Screen-printed t-shirts are usually one to three colors, and can be as detailed as a photograph. Screen-printed shirts are known to be very durable and look unique. These shirts can also be personalized with any text or other image.
Screen-printed t-shirts are the gold standard of t-shirt printing, but the costs and time involved are significant. Screen-printed t-shirts can be expensive, and you should only choose this option when the quantity of shirts is high. You'll have to create original screens for each color, and this process is best suited for orders over 20. A screen is an expensive investment, so check out your design options first.
0 notes
Text
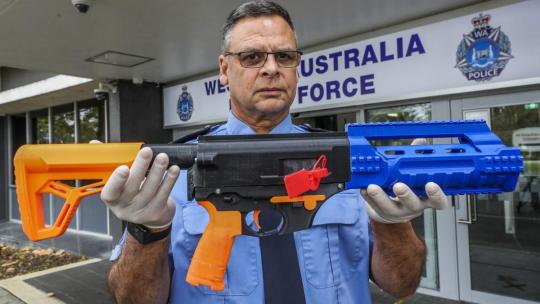
Editorial: The scary new front in our war on guns
Editorial: The scary new front in our war on guns
WA has reached a worrying new front in the fight against crime. Police revealed on Monday they had seized a 3D-printed semi-automatic rifle at a property in the Perth suburb of Bayswater.
View On WordPress
0 notes
Text
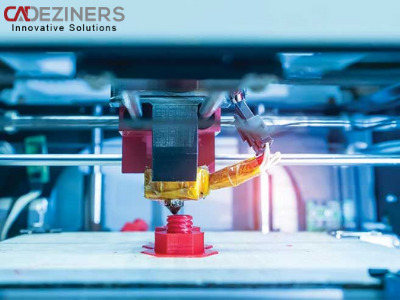
Sydney 3d Printing Company, CadDeziners offering the finest quality Printing Services in different sectors like Automotive, Mining, Marine, Manufacturing, Architectural, Signage. Call now!
https://www.3dprintings.com.au/3d-printing-sydney/
#3d printing perth#3d printing melbourne#3d printing brisbane#3d printing sydney#3d printing australia#metal 3d printing
3 notes
·
View notes
Last Seen Blogs