#2SC
Video
youtube
Käärijä - Cha Cha Cha (DJVI Remix)
#käärijä#eurovision song contest#eurovision#eurovision 2023#esc 2023#2sc#esc23#suomi#finland#video#*
23 notes
·
View notes
Text

manufactuer #factory
hydraulichose #rubberhose
📞 Phone/Whatsapp:+86-15297607201
💌 Email: [email protected]
💻Website: www.bailihose.com
wa.me/8615297607201
#16 years experience.#2sc#16/r17#1sc#1sn#hydraulic hose manufacturers#hydraulic hose#hydraulic#hydraulic hoses
0 notes
Text
Ladies and gents, voici le plus bas niveau de médiocrité qu'une personne peut toucher: La belle-mère de mon copain essaie de nous faire rompre. J'aimerais rigoler, mais ça en arrive à du "je vole la culotte en dentelle de la mamie pour la mettre dans le panier de linge sale de mon beau-fils pour que sa copine pense qu'il la trompe".
J'aimerais rigoler.
#l'audace de cette femme#la première fois que j'ai dormi chez eux pendant que mon copain était en sortie avec des amis elle m'a dit 2sc après qu'il soit parti:#“ça va tu t'inquiète pas ? Tu connais pas ses amis en plus. A ta place je m'inquiéterais d'avec qui il est. Et de ce qu'il fait.”#“il a un passif tu sais”#bah vous aussi madame#et surtout qu'il a un passif de dragueur mais PAS de tromper ses copines#bref#déjà qu'elle fait des blagues à longueur de temps sur le fait que mon copain pourrait me tromper#et même qu'il “devrait”#:))))#mais tg quoi en fait#ON SE DIRAIT EN MATERNELLE MADAME WTF
5 notes
·
View notes
Text
I'm reading Fruit Basket again and Ayame is my fav.
2 notes
·
View notes
Text

Azoxy 2SC Select for Superior Azoxystrobin Plant Protection
Elevate plant protection with azoxy 2sc Select, featuring potent azoxystrobin. Our superior formula ensures robust defense against diseases, promoting healthy growth. Trust in excellence with OurProSolutions!
0 notes
Text
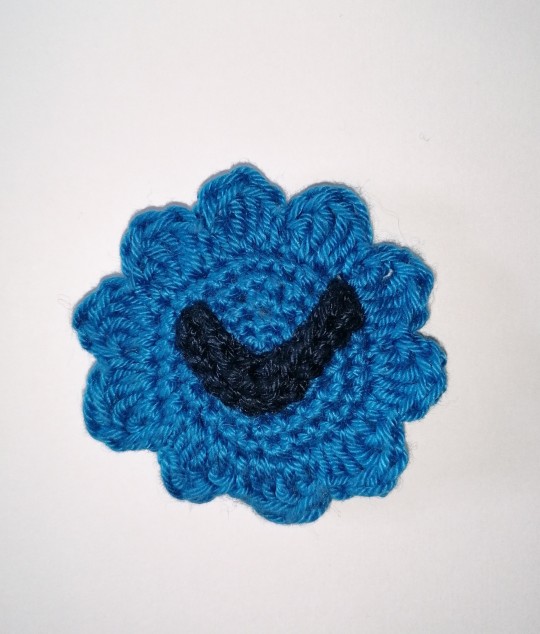
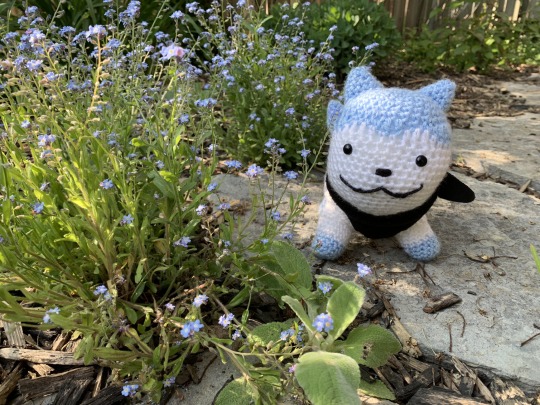
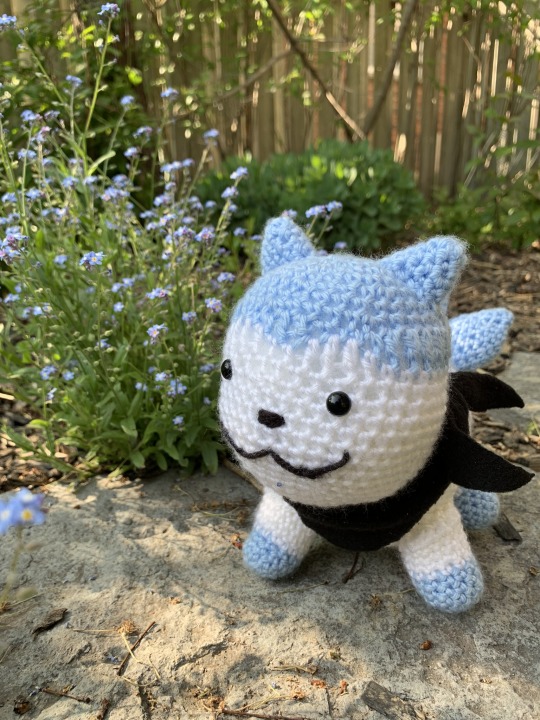
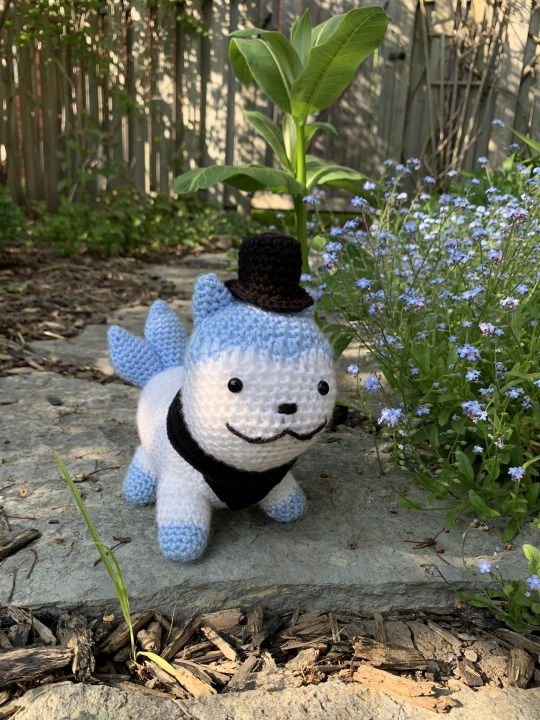
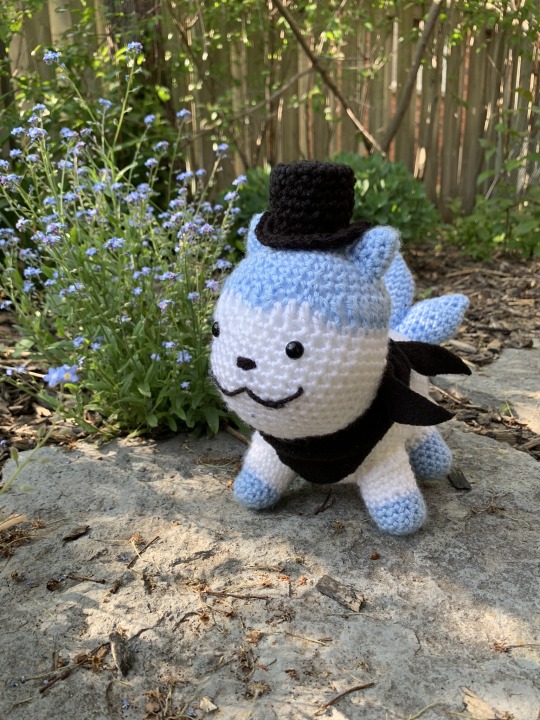
Crocheted Important Blue Internet Checkmark. Because why the fuck not.
(Pattern under the cut)
Please note that this hasn't been tested, and I have very little experience writing down patterns. If you have problems or questions I'll try my best to help!
Yarn: I'm using mercerized cotton from my stash. The lighter blue is Lana Grossa Cotone, the darker a tiny leftover with the tag long since lost, but similar. Whatever material/weight of yarn you have laying around is fine though.
Hook: 2.5mm for me, but again, whatever you have and works with your yarn.
Instructions (ch = chain, sc = single crochet, dc = double crochet, tr = treble crochet, sl = slip stitch, sl tog = slip stitches together (insert hook in stitch, pull loop through, insert hook in next stitch while leaving 1st loop on hook, pull loop through stitch & through the loop still on the hook)
Base:
co 3 in a magic loop (3)
2sc in every stitch (6)
2sc in every stitch (12)
(sc, 2sc) x 6 (18)
(sc, sc, 2sc) x 6 (24)
(sc, sc, sc, 2sc) x 6 (30)
((dc, tr) in same stitch, (tr, dc) in same stitch, sc) x 9, (dc, tr) in same stitch, (tr, dc) in same stitch, slip last stitch. Break yarn & pull through
Check (you can just embroider this on, however, I suck at embroidery):
ch13, turn
sc in every stitch, ch1, turn
sl 2, sl 3 tog, sl 3 tog, sl 4, break yarn
sew check onto the base
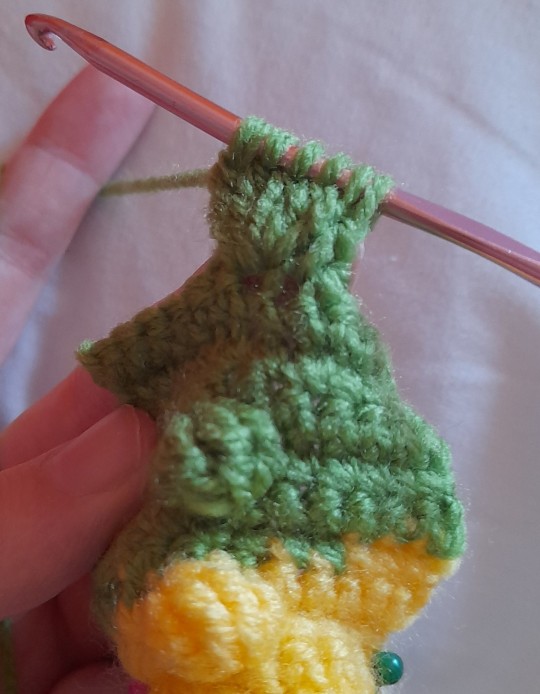
sl 3 tog: People seem to have trouble w this, which is on me for not explaining it well. Here's what I did w pictures:
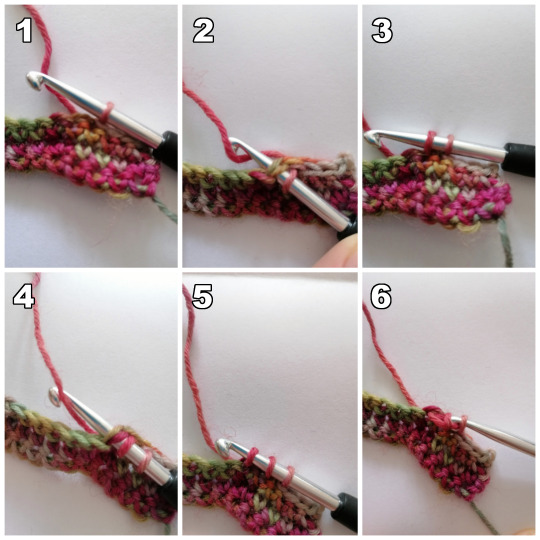
Start here
Insert hook in next stitch
Pull loop through, leave it on the hook
Insert hook in next stitch
Pull loop through, leave it on the hook. Hook now has 3 loops.
Pull the 3rd loop through the other 2
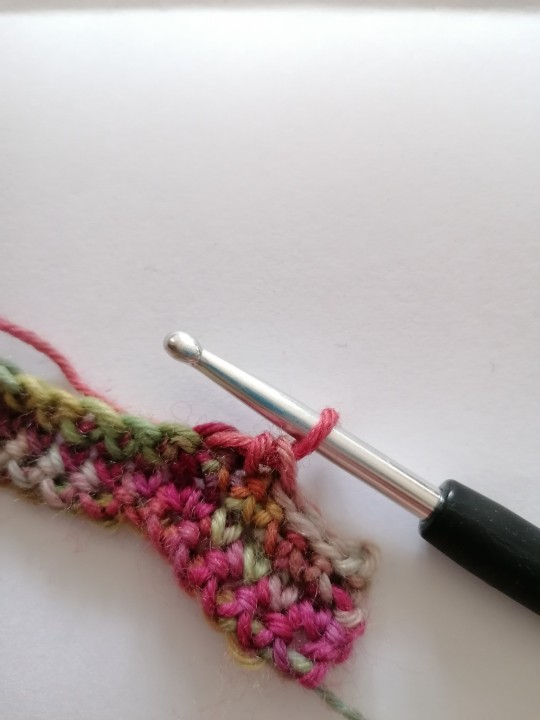
This is the finished stitch; basically, decrease 2 stitches 2x to create an angle.
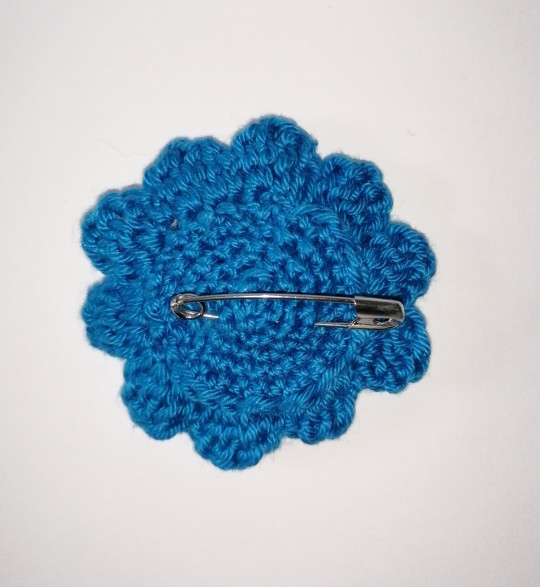
Back (optional):
Repeat steps 1-6 of the base
fiddle in a safety pin like so:
3. sew it on the back of the base
4. Realize that despite your copious amount of Internet Clout, people still expect you to "pay taxes" and "make cars that don't explode". But at least you can ban the haters now!
#important blue internet checkmark#this is free for all. you're welcome. or sorry I did this#crafts#look what i made
5K notes
·
View notes
Text

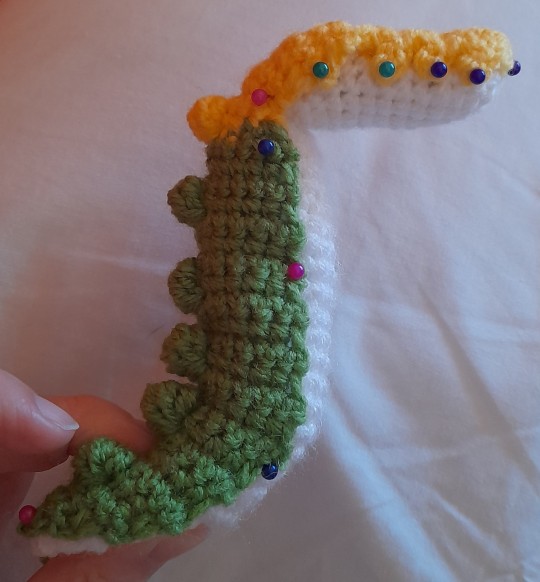
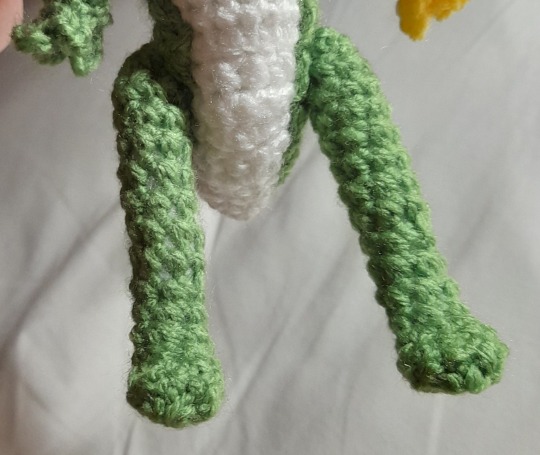
Invader zim crochet pattern
IMPORTANT INFO (PLEASE READ BEFORE YOU GO ON TO THE PATTERN):
THIS PATTERN IS WRITTEN IN U.S. TERMINOLOGY
PLEASE DO NOT SELL MY PATTERN ON ETSY, RAVELRY, OR ANY STORE OF THE LIKE, BUT YOU CAN REPOST IT AS LONG AS YOU LINK IT TO MY BLOG (millys-craft-corner) OR TIKTOK/YOUTUBE (fiestywyvern) FEEL FREE TO SELL ANY FINISHED PRODUCTS. Be sure to link me if you post your Zims as I’d love to see them.
Zim stands at about 5 inches tall or 12.7 cm, not including antennae
Techniques used
Sc
Inc
Dec
Triple dec
Triple inc
Magic ring
Chain
Basic embroidery and sew techniques
Not so well known techniques used
Triple inc- an increase with 3 stitches in one stitch instead of 2
Triple dec- a decrease going across 3 stitches instead of 2
Materials
3.5 mm crochet hook
size 3 or light worsted or light yarn weight in these colors light green, black, deep ruby red, light grey, and light pink
aluminum wire in size 14 or pipe cleaners
black embroidery thread
a medium sized sewing needle
tapestry needle
pliers if you’re using wire
hot glue
light pink felt
stuffing
Head and torso (make 1)- start with green
R1: 4sc in mr (4)
R2: triple inc around (12)
R3: 1 sc, (triple inc, 2sc)x3, triple inc, 1sc (20)
R4: 2sc, (triple inc, 4sc)x3, triple inc, 2sc (24)
R5: 3sc, (triple inc, 6sc)x3, triple inc, 3sc (36)
R6: 4sc, (triple inc, 8sc)x3, triple inc, 4sc (44)
R7: blo
R7-16: sc around (10 rounds) (44)
R17: blo- 4sc, (triple dec, 8 sc)x3, triple dec, 4sc (36)
R18: 3sc, (triple dec, 6sc)x3, triple dec, 3sc (28)
R19: 2sc, (triple dec, 4sc)x3, triple dec, 2sc (20)
R20: sc, (triple dec, 2sc)x3, triple dec, sc (12)
R21: dec around (charge to light pink at the end) (6)
R22: inc around (charge to red at the end) (12)
R23: sc around (12)
R24: inc, sc around (18)
R25-30: sc around (6 rounds) (18)
R31: blo- dec, sc around (12)
R32: dec around (6)
F/o, leave a long tail and 3 embroider stripes, using black yarn, so they cut the torso into thirds
Use the tail to close up piece
Shoulder pads (make 2)- light pink
R1: ch 5 and sc down from the 2nd chain from the hook, ch 1 and turn (4)
R2: 2 dec, ch 1 and turn (2)
R3: dec
F/o and leave a long tail for sewing
Arms (make 2)- start with black
R1: 3sc in mr (3)
R2: sc around (3)
R3: inc around (6)
R4: sc around (6)
R5: dec around (3)
R6: sc around (change to pink at the end) (3)
R7-10: sc around (4 rounds) (3)
F/o leave a long tail for sewing and embroider stripes using sewing needle and black thread
Legs (make 2)- black
R1: 4sc in mr (4)
R2: inc around (8)
R3-7: sc around (5 rounds) (8)
F/o and leave a long tail for sewing
Feet (make 2)- black
R1: 3sc in mr (3)
R2: sc, inc, sc (4)
R3: sc, inc, 2sc inc (6)
R4: 2sc, inc, 2sc, inc (8)
F/o leave a long tail for sewing
Pak (make 1)- light grey
R1: 4sc in mr (4)
R2: inc, sc (6)
R3: 2inc, sc, inc, 2sc (9)
R4: 2sc, 4inc, 2sc, slst (13)
R5-6: sc around (2 rounds) (13)
F/o leave a long tail for sewing
Big pak spot (make 1)- light pink
R1: 4sc in mr (4) Sl st into 1st stitch
f/o and leave a long tail for sewing
Small pak spot (make 2)- light pink
R1: 3sc in mr (3) sl st into 1st stitch
F/o and leave a long tail for sewing
Eyes (make 2)- red
R1: 6sc in mr (6)
R2: inc around (12)
R3: 4sc, 2inc, 4sc, 2inc (16)
R4-5: sc around (2 rounds) (16)
Antennae (make 2)- black
R1: 3 sc in mr (3)
R2-19: sc around (18 rounds) (3)
Assembly
Sew arms to shoulder pads
Sew bottom of feet to the sides of the legs so they create an “L” shape
Sew pak spots to the pak
Sew pak to body
Sew arms to body
Sew legs to body
Sew eyes to the lower left and lower right sides of the head
Cut out eyeshine out of light pink felt and hot glue it or sew it to the eyes
Cut 2 pieces of 5 inches of pipe cleaner/wire and fold in an inch on both sides so it’s 3 inches long. Insert them into each the antennae and sew antennae towards the back of the head. Fold back 1/4 of the antenna so it creates a right angle.
Congrats you just finished your irken invader, now go take over the earth!


235 notes
·
View notes
Text
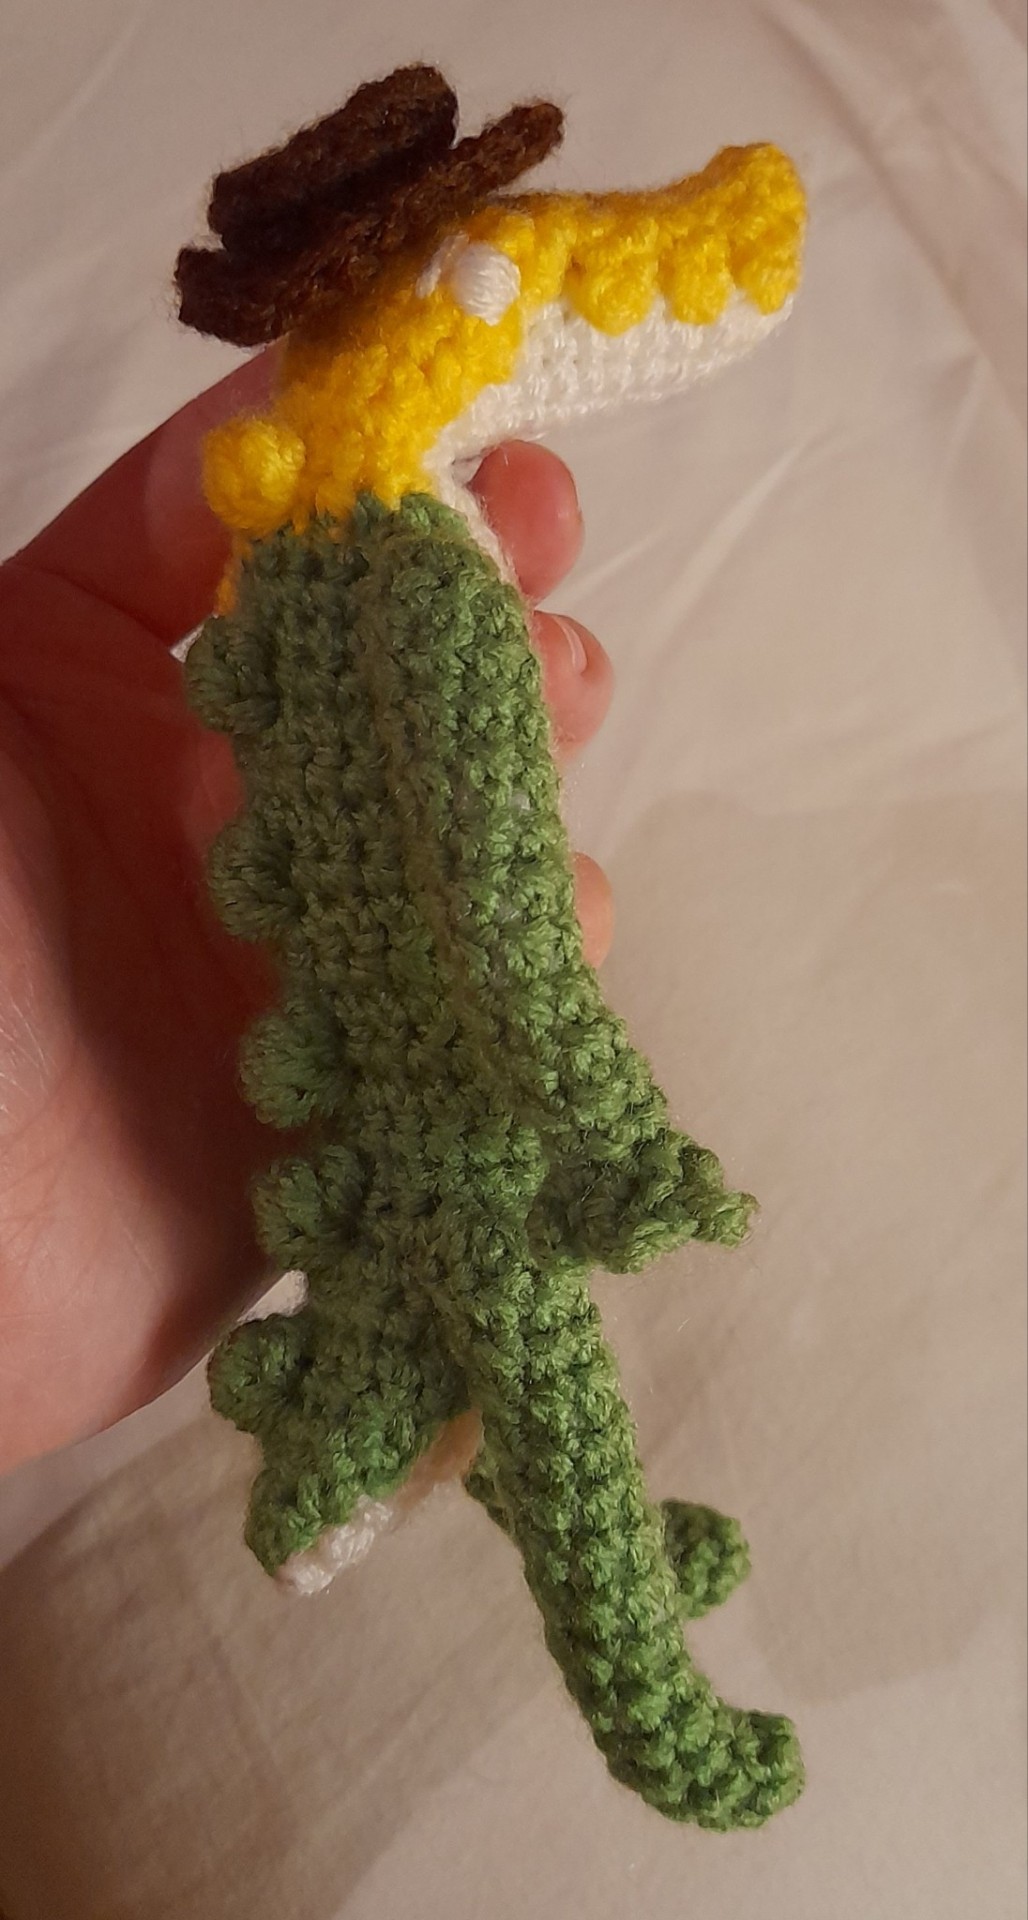
Gummigoo free crochet pattern
FREE pattern at my Ravelry link and under the cut! Pattern includes photo references.
My boy is done! I started making myself a Gummigoo right after seeing episode 2 of The Amazing Digital Circus. While I was making it I realised that you guys might want one too. This doll and this pattern weren't nearly as tough to make as I thought they would be, and I really enjoyed making them.
PDF now edited to remove typo and add another couple of photos.
Pattern and photos under cut!
You need:
(less than) 50g/150m of the following colours of yarn: white, yellow, green, brown
3.5mm hook
Stuffing
Pins
Scissors
Special stitches used:
Picot: chain 3, then slip stitch into the back loop of the first chain.
Bobble: Yarn over. Pull up a loop, yarn over and pull through two, do 4 more times until you have 6 loops on the hook. Yarn over and pull through all six. Pull stitch a little tight.
Triple bobble (regular bobble stitch but twice as tall): Yarn over twice. Pull up a loop, yarn over and pull through two, yarn over and pull through two again, do 4 more times until you have 6 loops on the hook. Yarn over and pull through all six. Pull stitch a little tight.
Double decrease (a decrease over 3 stitches): Pull up a loop through each of 3 stitches, yarn over and pull through all three.
HEAD (white)
1. 6sc into a magic ring [6]
2. 6 inc [12]
3. sc around [12]
4. 2sc, 2 dec, 6sc [10]
5. 2sc, 2inc, 6sc [12]
6-8. sc around (3 rounds) [12]
9. (2sc, inc) x2, 6sc [14]
See special stitches for how to do a bobble stitch -- it's five double crochets to create one stitch.
10. 4sc, bobble stitch, 2sc, bobble stitch, 6sc [14]
11. 4sc, bobble stitch, 2sc, bobble stitch, 6sc [14]
12. 1sc, dec, 6sc, dec, 3sc [12]
13. (2sc, dec) x3 [9]
Stuff.
14. 1sc, dec) x3 [6]
Cut a tail long enough to sew with. Thread the yarn through the front loops of each remaining stitch and pull to cinch the hole shut. Leave the tail out until needed for sewing.
BODY (white)
1. 6sc into a magic ring
2. 6 inc [12]
3. (5sc, inc) x2 [14]
4-5. sc around (2 rounds) [14]
6. (6sc, inc) x2 [16]
7. (7sc, inc) x2 [18]
8-10. sc around (3 rounds) [18]
Stuff as you go. It's hard to stuff long pieces at last minute.
11. (7sc, dec) x2 [16]
12. sc around [16]
13. (6sc, dec) x2 [14]
14. sc around [14]
15. (5sc, dec) x2 [12]
16. sc around [16]
17. (5sc, inc) x2 [14]
18. sc around [14]
19. 1sc, 4dec, 1sc, 4inc [14]
20. 1sc, 4hdc, 9sc [14]
21. 1sc, 4hdc, 9sc [14]
22. 1sc, 2dec, 9sc [12]
23. 4hdc, 8sc [12]
24. 2dec, 8sc [10]
25. Dec, 8sc [9]
Finish stuffing.
26. (1sc, dec) x3 [6]
Cut the yarn, cinch the hole shit and hide the end.
Connect the head to the body at the very back of the bottom of the head. It should face forwards levelly with the torso erect (90°). The head and neck should connect smoothly at the back to the body.
OVERLAY (yellow and green)
Start in yellow.
1. 6sc into a magic ring [6]
2. 2sc, inc, 2sc. Leave last stitch unworked. Picot (chain 3 and slip stitch into the back loop of the first chain) and turn. [6]
3. 6sc. Picot and turn. [6]
4. 4sc, inc. Leave last stitch unworked. Picot and turn. [6]
5. 4sc, inc. Leave last stitch unworked. Picot and turn. [6]
6. 2sc, inc, 1sc, inc. Leave last stitch unworked. Picot and turn. [7]
7. 3sc, inc, 1sc, inc. Leave last stitch unworked. Picot and turn. [8]
8. 3sc, inc, 2sc, inc. Leave last stitch unworked. Chain (not picot!) and turn. [9]
9. 4sc, inc, 2sc, inc. Leave last stitch unworked. Chain and turn. [10]
10. 4sc, inc, 4sc, inc. Chain and turn. [12]
11. 10sc, dec. Chain and turn. [11]
12. 9sc, dec. Chain and turn. [10]
13. 4sc, dec, 4sc. Chain and turn. [9]
14. 9sc. Chain and turn. [9]
15. 9sc. Chain and turn. [9]
The next row will start colour changing to green. Always hide yarn on the wrong side of the work. There will also be a triple bobble (same as a bobble stitch but with triples -- see special stitches).
Bobbles aren't exactly sharp, but neither are gummy spikes tbh.
16. (Right side is facing you, hide yarn at back:) Inc, 3sc, triple bobble stitch, 2sc, change to green, sc, inc. Chain and turn. [11]
Careful not to skip stitches. Bobbles like to squish the stitches at the side of them and this makes them easy to skip while you're crocheting.
17. (Wrong side is facing you, hide yarn at front:) Inc, 5sc, change to yellow, 4sc, inc. Chain and turn. [13]
18. 3sc, change to green, 10sc. Chain and turn. [13]
13sc in green. Chain and turn. [13]
There will be no more yellow stitches. Leave enough yellow tail to stitch the yellow part on and cut the yarn.
19. 6sc, triple bobble, 6sc. Chain and turn. [13]
Again, careful not to skip stitches around bobbles. Count the stitches at the end of the row following a bobble.
20-22. 13sc (3 rows) [13]
23. 6sc, triple bobble, 6sc. Chain and turn. [13]
24-26. 13sc (3 rows) [13]
27. 6sc, triple bobble, 6sc. Chain and turn. [13]
28-30. 13sc (3 rows) [13]
31. Dec, 4sc, triple bobble, 4sc, dec. Chain and turn. [11]
32-34. 11sc (3 rows) [11]
35. Dec, 3sc, triple bobble, 3sc, dec. Chain and turn. [9]
36. Dec, 5sc, dec. Chain and turn. [7]
37. Dec, 3sc, dec. Chain and turn. [5]
38. Dec, 1sc, dec. Chain and turn. [3]
39. Double decrease (decrease over 3 stitches). Chain 1.
Pull enough yarn through the chain to stitch the green parts down and cut the yarn.
Pin the overlay in place. It should go from just over the tip of the snout to the very tip of the tail, and should fit snuggly and symmetrically. Remember to shape the angles -- the snout should face forwards, the tail should face backwards, the torso should be upright.
Pin the teeth individually if you have enough pins. This ensures the spaces between are visible when connected. The teeth may be uneven/asymmetrical on opposite sides of the mouth due to the way the picots stagger, but just make sure they're pinned and sewn okay and they'll look even.
Note the shape -- it'll need to be bent like this when you fit the overlay on or it'll scrunch when bent later.
Sew! You don't have to go into every row, sewing every other stitch of the body should connect it okay with no glaring gaps. Make sure to sew with the correct colour of yarn tail.
Embroider on a couple of white eyes underneath the eyebrow ridges, with small eyebrows in white.
The eyes are embroidered on with an eyebrow each.
ARMS (one yellow, one green)
Start with a magic ring and leave enough of a tail to attach the end. Leave this end hanging outside the arm.
1. 7sc into a magic ring [7]
2-6. sc around (5 rounds) [7]
7. 2sc, dec, 3sc [6]
8-14. sc around (7 rounds) [6]
Stuff.
15. sc, (picot, sc in the next stitch) x4, slip stitch into the last stitch. Cut the yarn and cinch the palm shut, not too tightly. Hide the end inside.
The green arm is sewn on the higher-green shoulder and the yellow arm on the yellower side. Make sure the biggest finger gap is facing inwards to the body, this is like the wrist.
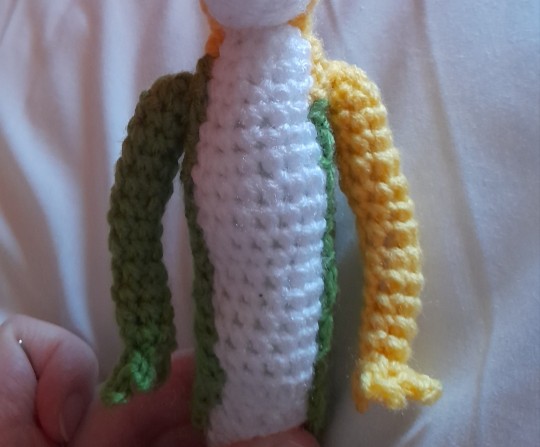
Leave a gap for the neck and match the arms to the shoulders. You'll find that the arms and fingers are a little bit posable.
LEGS (x2 in green)
Start with a magic ring and leave enough of a tail to attach the end. Leave this end hanging outside the leg.
1. 7sc into a magic ring [7]
2-9. sc around (8 rounds) [7]
10. 2sc, dec, 3sc [6]
11-13. sc around (3 rounds) [6]
14. 4inc, 2sc [10]
15. dec, 4sc, 2dec [7]
Stuff.
Cut yarn and cinch hole shut.
The legs should be connected at the hips with the legs pointing straight down and should connect closely at the top of the leg to make the hips look smoothly attached.
The hips are not at the lowest point of the body, they're where the lower curve begins to happen when the torso is straight upright and the tail points backwards.
HAT (brown)
1. 8sc into a magic ring [8]
2. (2sc, 2inc) x2 [12]
3. 3sc, 2inc, 4sc, 2inc, 1sc [16]
4. In the back loops only, 4sc, dec, 6sc, dec, 2sc [14]
5-6. In both loops, 14sc (2 rounds) [14]
7. In the front loops only, (1sc, inc) x7 [21]
8. In both loops, 5sc, hdc, 2dc in 1, 2dc in 1, hdc, 7sc, hdc, 2hdc in 1, hdc, 2sc [24]
Slip stitch and finish off.
The wider part of the brim with the dcs is the front of the hat. Attach the hat by either tying a string under the chin, or by sewing a couple of inner rim stitches to the head to keep it in place.
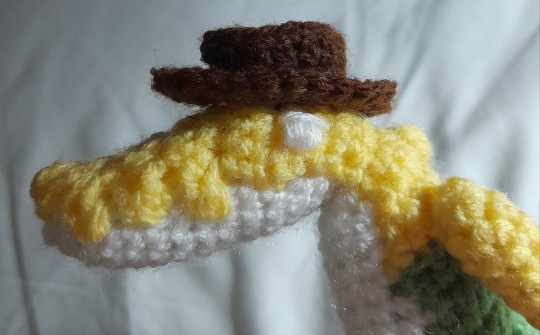
Sewn in place by two stitches at opposite sides of the inner edge. Yeehaw.
Hat connected by its straps: non-canonical but cute.
And that's it! Gummigoo is done.
I love my lil guy. Hope nothing bad happens to him when I show my friend Caine
#crochet#free crochet pattern#amigurumi#gummigoo#tadc#the amazing digital circus#gumigoo#gummygoo#tadc episode 2#tadc ep 2#tadc gummigoo
71 notes
·
View notes
Text
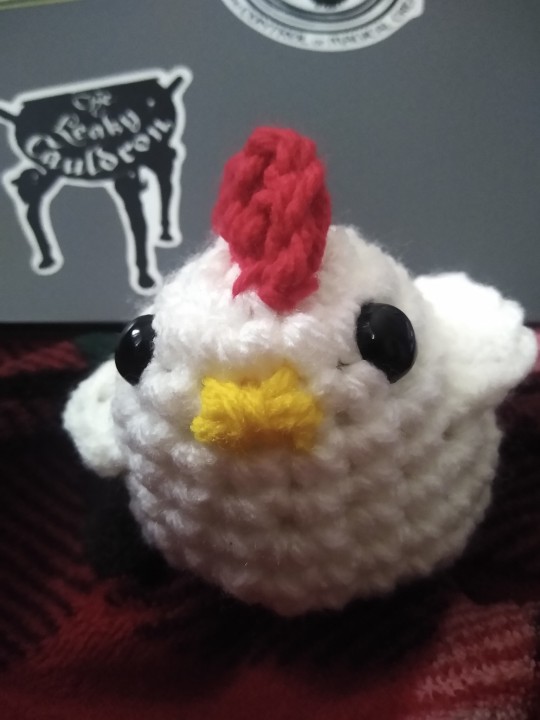
Chicken pattern.
R1- 6sc in mr (6), R2- 6inc (12), R3- inc sc x 6 (18), R4- 18sc (18), R5- 18sc (18), R6- 18sc (18), R7- inc 2sc x 6 (24), R8- 1sc' inc' 2sc x 3' 14sc (27) R9- 5sc' 2inc' 20sc (29) R10- 1sc' Dec' 2sc x 7 (22) R11- 1sc' Dec' sc x 7 (15) R12- 8dec.
WINGS: R1- ch6 R2- 1sc' 1hdc' 1dc' 1hdc' 1sc. Terms: ch= chain. Hdc= half-double crochet. Dc= double crochet. sc= single crochet. Mr= magic ring. Inc= increase. Dec= decrease.
109 notes
·
View notes
Text
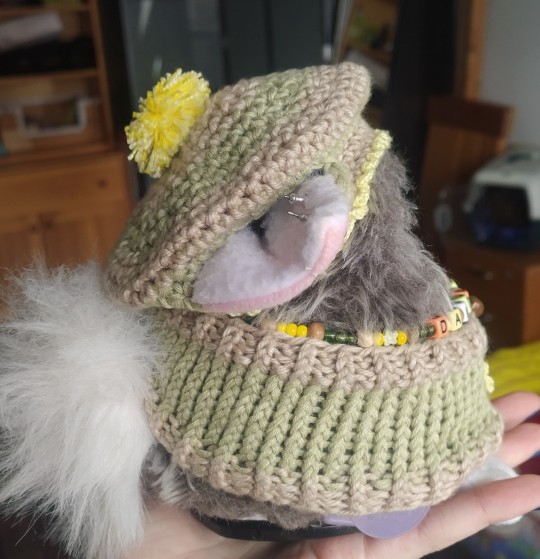
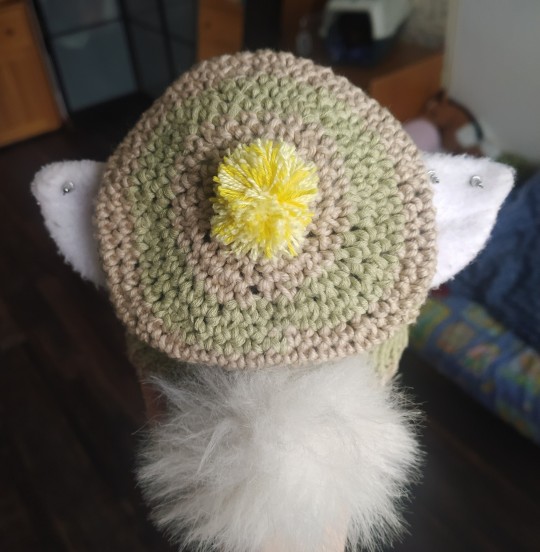
~ furby beret - crochet pattern ~

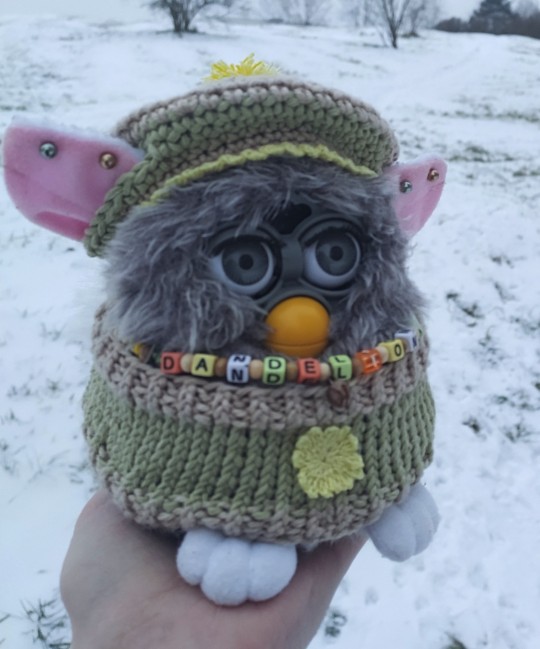
I´m new to actually writing patterns up for others to use, so please tell me if there is anything that´s hard to understand or if you find any mistakes. Also, if you do make your furb a beret, please send me a pic or tag me in your post, I would love to see what you make!
ꕀꕀꕀꕀꕀꕀꕀꕀꕀꕀꕀꕀꕀꕀꕀꕀꕀꕀꕀꕀꕀꕀꕀꕀꕀꕀ
Gauge: 10st X 5 rows -- 6,5 cm X 2,5 cm (I used a 3, 5 mm hook)
Finished size (fits a 1998 furby): total diameter - 11cm, head hole diameter - 9 cm
Abbreviations
sc - single crocet
ss - slip stitch
inc - increase (two into one)
dc - invisible decrease (go through only the fron loops of two stitches, sc as one)
[] - nuber of stitches in the row
() - repeat sequence
ꕀꕀꕀꕀꕀꕀꕀꕀꕀꕀꕀꕀꕀꕀꕀꕀꕀꕀꕀꕀꕀꕀꕀꕀꕀꕀ
Main hat - stripes not included, I changed color every 3 rows
R1 - chain 50, ss into first stitch [50]
R2, R3 - sc all aroud [50]
R4 - 10sc, (chain 9, ss into 10th stitch from hook), 14sc, (chain 9, ss into 10th stitch from hook), sc rest of the round [50]
R5 - sc all around [50]
R6 - (9sc, inc)x5 [55]
R7 - sc all around [55]
R8 - (7sc, dc)x6, sc [49]
R9 - (3sc, dc, 3sc)x6, sc [43]
R10 - (5sc, dc)x6, sc [37]
R11 - (2sc, dc, 2sc)x6, sc [31]
R12 - (3sc, dc)x6, sc [25]
R13 - (2sc, dc)x6, sc [19]
R14 - (sc, dc)x6, sc [13]
R15 - 6dc, sc [7], bind off and leave a longer tail
Take your taill and your needle and "pick up" the remaining 7 stitches (just whip stitch around), pull on the tail to close the hole
Weave in your tails
Pompom - please look up a separate pompom-making tutorial, i suck at making pompoms. After you make one, just use the same thread you used to tie the pompom together to sew in to the beret on top
The trim - entirely optional, I used a crochet thread and a 2mm hook
(ss, 5sc, ss) into each [50]
ꕀꕀꕀꕀꕀꕀꕀꕀꕀꕀꕀꕀꕀꕀꕀꕀꕀꕀꕀꕀꕀꕀꕀꕀꕀꕀ
Decorating ideas
different trims! just look up "crochet trims" and find one you like
more stripes! crazier stripes! center-out stripes!
replace the pompom with someting else - a flower, or a bow maybe?
crochet emroidery
add some lace or a ribbon
#my furbs#furby resources#furby 1998#furby#furblr#furby fashion#furby community#crochet pattern#allfurby#safefurby
508 notes
·
View notes
Text
Mini Sea Slug Pattern
I hope this is followable, It's not complicated but I don't know how to word things

You can make this with bigger yarn and hook but for micro ones I used one strand of dmc embroidery floss and a no.14 (0.50mm) crochet hook
Top
1.) Ch10
2.) On one side of the chains, sc in each stitch except last (8), in last stitch double inc (make 3sc in same stitch), then sc in the other side of the chains till last stitch (7), inc in last stitch
3.) [Place stitch marker to mark beginning of round] inc, 7sc, inc, sc, inc, 7sc, inc, sc
4.) Sc, inc, 7sc, inc, 3sc, inc, 7sc, inc, 2sc
5.) Sc in every stitch
6.) Sc in every stitch, slst, cut yarn and pull thru
Bottom
1.) Ch10
2.) On one side of the chains, sc in each stitch except last (8), in last stitch double inc (make 3sc in same stitch), then sc in the other side of the chains till last stitch (7), inc in last stitch
3.) [Place stitch marker to mark beginning of round] inc, 7sc, inc, sc, inc, 7sc, inc, sc
4.) Sc, inc, 7sc, inc, 3sc, inc, 7sc, inc, 2sc, slst, cut yarn and pull thru
Stalks x2
1.) Ch4
2.) Slst into second ch and across, ch one, cut and pull yarn thru
3.) Use ends to sew into place on slug top
Gills
1.) Ch6, slst into first stitch
2.) Ch4, slst stitch back down and into ch you made other ch from, slst into next ch
3.) Repeat step 2.) 5 more times, cut yarn and pull thru, use ends to sew onto slug top
Foot
1.) Line up top and bottom, (working on both loops of top stitches, and only front loop of bottom stitches) starting from stitch at top of the head, [sc, inc]* around (remember to stuff before finishing round)
2.) [2sc, hdc inc]* repeat around, slst, cut yarn and pull thru
Weave ends
@cinnamolmorten @mothmads here ya go <3 feel free to message me if somethings confusing (this goes for anyone)
475 notes
·
View notes
Text

manufactuer #factory
hydraulichose #rubberhose
📞 Phone/Whatsapp:+86-15297607201
💌 Email: [email protected]
💻Website: www.bailihose.com
wa.me/8615297607201
0 notes
Note
Pattern for the cute foxy?????? Please?????
Of course!
Abbreviations-
- sc: Single Crochet
- mc: Magic Circle
-Inc: Increase
-Dec: Decrease
-st: stitch
Crochet Pattern Red Fox
Head
Start with orange
R1: 6sc in MC (6)
R2: (6inc) x 6 (12)
R3: (1sc, 1inc) x 6 (18)
R4: (2sc, 1inc) x 6 (24)
R5: (3sc, 1inc) x 6 (30)
R6-R9: 30sc
R10: 6inc, 24sc (36)
Turn to white
R11: 4inc, (3 sc in 1st) x 3, 3inc (42)
R12-R13 42sc
R15: (5sc, 1dec) x 6 (36)
R16: (4sc, 1dec) x6 (30)
R17: (3sc, 1dec) x 6 (24)
R18: (2sc, 1dec) x 6 (18)
Stuff
Attach eyes between R8-R9, 4sc apart
Add nose between R11-12
R19: (1sc, 1dec) x 6 (12)
R20: (6dec) x 6 (6)
Close
Ears make 2
Use black yarn
R1: 6sc in mc (6)
R2: (6inc) x 6 (12)
R3: (3sc, 1inc) x 6 (18)
R4-R6: 15sc
I’m gonna be honest I did not plan out sewing the ears on I just placed them where it looked right.
Body
Use orange yarn
R1: 6sc in mc
R2: (6inc) x6 (12)
R3: (1sc, 1inc) x6 (18)
R4: (2sc, 1inc) x6 (24)
R5: (3sc, 1inc) x 6 (30)
R6-R9: 30sc
R10: (3sc, 1dec) x 6 (24)
R11: (2sc, 1inc) x 6 (18)
R12-R13: 18sc
Stuff and leave a tail for sewing the head and body together
Tail
Start with white yarn
R1: 6sc in mc (6)
R2: (6inc) x6 (12)
R3: (3sc, 1inc) x 6 (15)
R4: (4sc, 1inc) x 6 (18)
R5: (5sc, 1inc) x6 (21)
R6: (6sc, 1inc) x6 (24)
R7: (7sc, 1inc) x6 (27)
R8: (8sc,1inc) x6 (30)
Turn to orange
R9-R11: 30sc
R12: (8sc,1dec) x6 (27)
R13: (7sc,1dec) x6 (24)
R14: (6sc, 1dec) x6 (21)
R15: (5sc, 1dec) x6 (18)
R16: (4sc, 1dec) x6 (15)
Stuff
Leave a long tail for sewing to body
Legs make 2
Start with black yarn
R1: 6sc in mc
R2: (6inc) x6 (12)
R3-R5: 12sc
Turn to orange
R6: (6dec) x6 (6)
Lightly stuff
Leave a tail for sewing to body
Arms make 2
Start with black yarn
R1: 6sc in mc
R2:(6inc) x6 (12)
R3-R4: 12sc
Turn to orange
R5: 12sc
Lightly stuff
Fold in half and sc across
Leave a tail for sewing to body
And you have your own fox!! If you use my pattern and post it online please tag me I would love to see it!
But also for credit reasons
115 notes
·
View notes
Photo


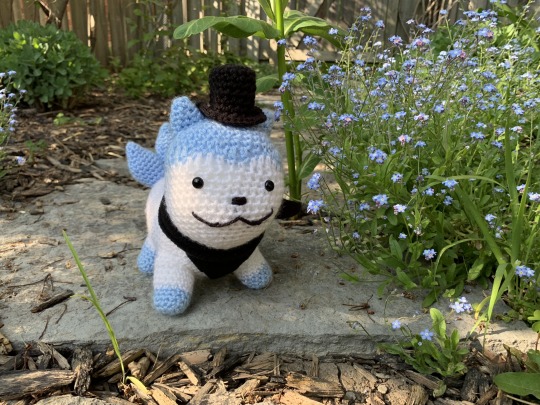
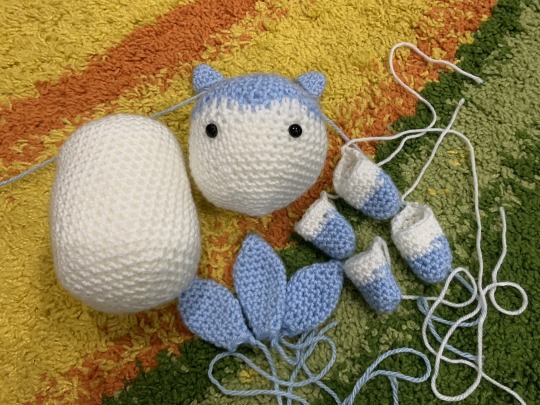
Sommie from Fire Emblem Engage!
I made the pattern myself. See under the cut
HEAD
using blue
round 1 - magic circle 6st
round 2 - 2sc in each (12)
round 3 - (2sc in first st , sc)* repeat (18)
round 4 - (2sc in first st, sc, sc)* repeat (24)
round 5 - sc in each (24)
round 6 - (2sc in first st, sc in next 3 st)* repeat (30)
round 7 - sc in each (30)
round 8 - (2sc, sc in next 4 st)* repeat (36)
round 9 - ch 1, dc in next 4st, sc, slst, slst, sc, dc, dc, sc, slst, slst, sc, dc in next 9st, tc, tc, dc, slst, slst, dc, tc, tc, dc in next 5 (36)
switch to white
round 10 - sc in next 4st, hdc, dc, dc, hdc, sc, sc, hdc, dc, dc, hdc, sc in next 9st, slst slst, hdc, dc, dc, hdc, slst, slst, sc in next 5 (36)
round 11 - sc in each (36)
round 12 - (2sc, sc in the next 5 st)* repeat (42)
round 13, 14, 15 - sc in each (42)
round 16 - (sctog, sc in next 5 st)* repeat (36)
round 17 - sc in each (36)
round 18 - (sctog, sc in next 4 st)* repeat (30)
round 19 - sc in each (30)
round 20 - (sctog, sc in next 3 st)* repeat (24)
round 21 - (sctog, sc in next 2 st)* repeat (18)
** stuff head, put in eyes if using plastic eyes **
round 22 - (sctog, sc)* repeat (12)
round 23 - (sctog)* repeat (6)
bind off, tuck in ends
EARS (make 2 in blue)
round 1 - magic circle 4st
round 2 - (2sc in first, sc)* repeat (6)
round 3 - (2sc in first, sc, sc)* repeat (8)
round 4 - (2sc in first, sc, sc, sc)* repeat (10)
round 5 - sc in each (10)
bind off, leave tail for attaching to head
BODY (in white)
round 1 - magic circle 6st
round 2 - 2sc in each (12)
round 3 - (2sc, sc)* repeat (18)
round 4 - (2sc, sc, sc)* repeat (24)
round 5 - (2sc, sc in next 5 st)* repeat (28)
round 6 - (2sc, sc in next 6 st)* repeat (32)
round 7 - (2sc, sc in next 7 st)* repeat (36)
round 8 - (2sc, sc in next 8 st)* repeat (40)
round 9 - sc in each (40)
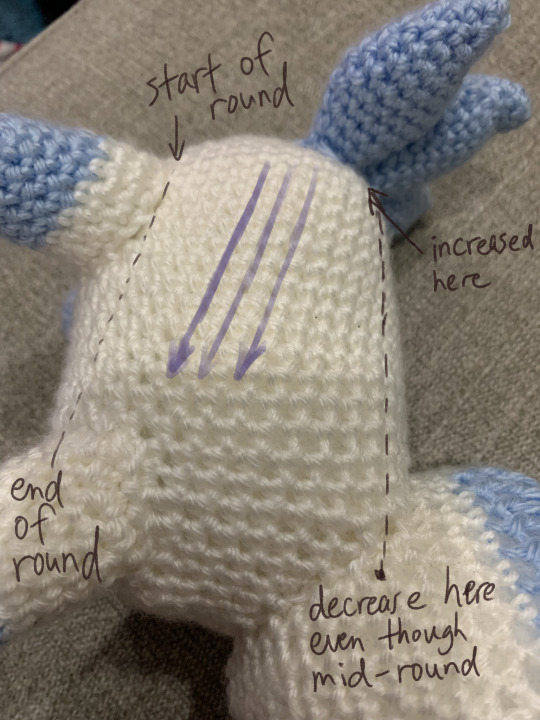
repeat round 9 until his body is long enough (I think I did 16 rounds), then decrease the same way 4sts at a time [see note1]
ie: (sctog, sc in next 8st)* repeat (36)
(sctog, sc in next 7st)* repeat (32)
[.....]
untill you're down to 24 sts, stuff, then decreasing 6 sts at a time (18, 12, 6). bind off, tuck in tail
[note1: if you crochet in the round like I do, then each round is actually going to go up diagonally. Since increasing by 4 makes it kind of square, if you start decreasing after doing full rounds, it won't line up. So instead of doing a full round on the last round, start decreasing when it matches where you've increased. See image below (I also forgot to take it before I sewed everything together, sorry)]
FEET (make 4)
start with blue
round 1 - magic circle 6st
round 2 - 2sc in each (12)
round 3-5 sc in each (12)
round 6 - switch to white, sc in each (12)
round 7 - (2sc, sc, sc, sc)* repeat (15)
round 8-9 sc in each (15)
TAIL (in blue)
Large spike, make 1
round 1 - magic circle 4st
round 2 - (2sc, sc)* repeat (6)
round 3 - (2sc, sc, sc)* repeat (8)
round 4 - (2sc, sc in next 3 st)* repeat (10)
round 5 - (2sc, sc in next 4 st)* repeat (12)
round 6 - (2sc, sc in next 5 st)* repeat (14)
round 7-9 - sc in each (14)
round 10 - (sctog, sc in next 5)* repeat (12)
round 11 - sc in each (12)
round 12 - (sctog, sc in next 4)* repeat (10)
round 13 - sc in each (10)
round 14 - (sctog, sc in next 3)* repeat (8)
round 15 - sc in each (8)
round 16 - (sctog, sc in next 2)* repeat (6)
Small spikes, make 2
Same as the Large spike, up until round 10
round 11 - (sctog, sc in next 4)* repeat (10)
round 12 - (sctog, sc in next 3)* repeat (8)
round 13 - (sctog, sc in next 2)* repeat (6)
-----------
Now time to assemble everything. I've lightly stuffed the ears, tails spikes, and the legs to make them more full-looking and structurally sound (for the legs). I also sewed the tail spikes together before sewing the whole thing onto the body.
With black, sew on a nose (or you could use plastic nose if you have some), and a face. Don't forget to sew on an X on the butt!
For the bandana, I just used a piece of spare fleece. You can crochet it if you want, basically just make a long triangle, then tie it to his neck.
I also made him a top hat. It's pretty simple:
TOP HAT (in black)
round 1 - magic circle 6st
round 2 - 2sc in each (12)
round 3 - (2sc, sc)* repeat (18)
round 4 - (2sc, sc, sc)* repeat (24)
round 5-12 - sc in each (24)
round 13 - 2sc in each (48)
bind off, tuck in ends. Shape the hat by pushing in the sides and flip up the brim, then apply watered-down glue or mod podge to make it stiff and hold the shape.
156 notes
·
View notes
Text
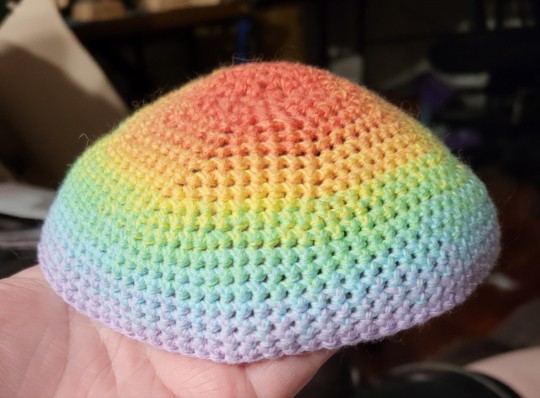
Someone asked for my kippah pattern.
The pattern is so basic. What makes this kippah so pretty is the yarn.
https://hobbii.com/sultan-deluxe, color way Martian Pink. I do the first 3 rounds in the red and then each successive round is one step in the long gradient
Pattern under the cut
Magic circle, ch1, 8 sc into the circle, slst to join, ch1
2sc in each stitch around, sl st to join, ch1
1sc in first stitch, 2sc in next stitch, repeat around, sl st to join, ch1
Continue, adding one sc per round, to round 11: sc in first 10 stitches, 2sc in next st, repeat around, sl st to join, ch1
Round 12: sc in each stitch around, sl st to join, ch1.
Repeat chain 12 until you have the size you want. Tie off and weave in ends.
73 notes
·
View notes
Text

My printer finally died for real (actually it conked out mid-project last month...) and it was too hot to use the sewing machine. So I used that as an excuse to try out Amigurumi for the first time. I can make Rex with most of these colors, too, so that's also an option down the line ig.
Crochet's scary imo compared to sewing because there's math and runes and counting but I managed to make a tiny weird thingy out of yarn so I'm happy with that. ^_^
My pattern for reference (why is the formatting scuffed). I don't recommend making this. I just don't want to lose it.
Magolor Amigurumi v1
Colors:Blue Brown Yellow White Purple Tan
ch = chain
sl st = slip stitch
sc = single crochet
mc = magic circle
inc = increase
Body
work in round
Blue & Brown
mc 6 (6)
6(inc) (12)
4(2sc, inc) (16)
4(3sc, inc) (20)
4(4sc, inc) (24)
4(5sc, inc) (28)
bind off.
Brown
same as above, but with additional round of sc at the end.
Sew halves together and stuff.
Hood
Blue
work in round
1-4. same as body
sc, 2(4sc, inc) sc, ch1 and turn
sc 16, ch 1, turn
sc 16 then continue sc the inner bit of the hood. 3 inc
in the corners from steps 4-5.
bind off
Ears (make 2)
White & Blue
work in round
mc 3 (3)
3(inc) (6)
3(sc,inc) (9) change to blue at the end
sc (9)
3(2sc,inc) (12)
sc 12 and bind off w/ a tail.
Body detail
Purple & Yellow
work flat
mc 6, switch to yellow, ch 1, turn(7)
2.6(sc, make a 3ch picot, inc)(12)
bind off
Hood detail
Yellow
ch 19
5(sc 3, 3ch picot)sc 3
bind off
Cape
White and Yellow
1.ch 17
2-5. sc 16, switch to yellow, ch1
sc 16 and bind off
Belt
White and Blue
ch 29
sc 28
sc 28 and sl st ends together to make a tube & bind off
with blue, sc9 on middle loops on the belt.
Hand (make 2)
Tan
1.ch 5
2,3. sc 4 ch 1
sc 3 ch 1 & bind off
do it again but instead of binding off, attach other half
with a sl st in outer loops. Stuff & bind off w/ a tail.
Eyes (make 2)
Yellow
1.ch 2 and bind off w/ short tail.
Attach all the bits.
Sew on a buckle, embroider ear loops with 2 strands of yellow yarn.
26 notes
·
View notes
Last Seen Blogs


00000000000000000000017
Horatio's notes

kurogabae
Profound Thoughts About Lesbianism

alluajays-blog
Allu Ajay

saiddikenson
Said Díkenson