#/etc/fstab
Link
看看網頁版全文 ⇨ Linux開機時略過掛載失敗的外接裝置 / Skip Disconnected Devices on Boot in Linux https://blog.pulipuli.info/2023/07/skip-disconnected-devices-on-boot-in-linux.html 要記得在/etc/fstab的掛載參數加上nofail。 ---- # 掛載設定 / fstab https://linux.vbird.org/linux_basic/centos7/0230filesystem.php#fstab。 要在Linux掛載儲存裝置的話,除了在開機之後再用mount手動指令掛載之外,比較正式的寫法是在 /etc/fstab 檔案裡面設定儲存裝置,這樣就能在開機時自動掛載。 /etc/fstab的設定相當複雜,可以參考鳥哥的介紹。 大家比較常注意的是以下幾點:。 - 掛載的裝置:用路徑表示,通常是/dev/開頭。 - 掛載點:實際上可以存取的資料夾,一樣用路徑表示。 - 檔案系統:通常是ext4。 然而,後面的掛載參數還有更多設定值得關注。 # nofail https://bobcares.com/blog/nfs-fstab-nofail/。 其中一項值得關注的參數叫做「nofail」。 他的意思是,Linux會在開機的流程中嘗試掛載該裝置。 但如果該裝置無法掛載,那Linux會略過它,繼續完成後面的開機裝置。 nofail通常用在連線狀態可能不穩的設備上。 例如:。 - 用網路連接的裝置:NFS - 用USB連接的外接裝置:隨身碟、隨身硬碟。 - 透過讀卡機的讀取的裝置:電腦上的Micro SD記憶卡。 如果你的Linux會連接以上裝置的話,那可能你也需要加上nofail喔。 https://unix.stackexchange.com/questions/589434/emergency-mode-error-on-startup。 如果沒有nofail,而儲存裝置在開機時又無法連線的話,通常Linux會卡在開機程序中,出現類似上圖的提示,讓你可以用維護模式進入指令列。 進入指令列之後,可以試著在 /etc/fstab 加入 nofail 參數,接著再 reboot 看看。 下次開機可能就會成功。 # 設定例子 / Example 以下是在 /etc/fstab 加上nofail掛載的例子:。 [Code...] 它的意思是: - /dev/sda3 : 掛載的設備。這是SATA設備 (/dev/sd) 之中的第一個設備 (a) 之中的第一個磁碟分區 (3) 。 ---- 繼續閱讀 ⇨ Linux開機時略過掛載失敗的外接裝置 / Skip Disconnected Devices on Boot in Linux https://blog.pulipuli.info/2023/07/skip-disconnected-devices-on-boot-in-linux.html
1 note
·
View note
Text
Me when I brick my linux install
(I switched a week ago and was actually going really well up until now)
There go my plans for the evening ig
8 notes
·
View notes
Text
4 notes
·
View notes
Text
Just spent a whole fucking hour trying to fix Linux not booting, apparently removing "auto" from fstab for my secondary drive, with no boot files on it, mind you, broke everything. Thankfully I can just fuckin [cd /etc/] and [nano fstab] and that fixed everything.
Could've literally just done that in the first place but oh fucking well I'm a dumbass.
[Q]: Why the fuck did you do that dumbass?
[A]: I can't use my 1TB Hard Drive as a second Steam game library because it apparently doesn't have execute perms. Tried that and it didn't work.
2 notes
·
View notes
Text
Hello, in this tutorial, you will learn how to increase the memory of your VPS (Linux virtual machine) or your WordPress site. You can add a swap file for VM instance to increase memory. If you want to know to get free VPS, check the VPS and Mining Playlist of the channel.
Open the terminal of your VPS or WordPress VM instances using an SSH connection.
To see available Memory and swap file size, use this command. You can see there is no swap file.
free -m
Create a swap file and allocate space. I’ve used 1024 MB but you can take more.
sudo dd if=/dev/zero of=/mnt/swap.0 bs=1024 count=1048576
Next use this line to mount it.
sudo mkswap /mnt/swap.0
Switch to root account to activate the swap.
sudo su
Use this to activate it.
echo "/mnt/swap.0 swap swap defaults 0 0" >> /etc/fstab
Next use this command.
swapon /mnt/swap.0
check if it’s created successfully.
sudo swapon -s
Check again the created main and swap size for memory. The swap file is created successfully.
free -m
If you want to know how to remove added swap virtual memory, check this article below.
https://www.minextuts.com/question/how-to-remove-delete-swap-virtual-memory-in-linux/
0 notes
Text
figured out mounting my network storage (maybe it's a NAS?) by making some modifications to /etc/fstab
now i just need to setup automatic backups of my wip projects folder to storj to *extra* ensure the projects i'm working on are never lost. the other stuff is fine simply being stored on two devices in different locations of my house. at least until i can calculate how much it'd cost to permanently store that on storj and/or somewhere else non-local
i don't 3D print often enough, so every time i do, i have to spend a lot of time re-learning. this time i wanted to avoid windows entirely (rather than use anycubic's kobra software) and discovered OrcaSlicer. seems awesome, but my first print is still in-progress so we'll see how it turns out. also apparently ABS is hard to work with, so i should get something else to try out
i think i'll go sketch some t-shirt designs now, while watching my 3D printer and hoping my object doesn't warp and slide off the bed
1 note
·
View note
Text
Set Swap in Linux
Without swap, when your system's physical memory (RAM) is fully utilized, it can lead to performance issues and potentially cause processes to be killed due to lack of memory.
To address this issue, you can follow these steps to create and enable swap on your Ubuntu system:
Create a Swap File:
You can create a swap file to use as virtual memory. Choose an appropriate size for the swap file based on your system's memory requirements. For example, to create a 4GB swap file:
sudo fallocate -l 4G /swapfile
Set Permissions on the Swap File:
Adjust the permissions of the swap file to only allow root to read and write to it:
sudo chmod 600 /swapfile
Set Up Swap Area:
Set up the swap area using the mkswap command:
sudo mkswap /swapfile
Enable Swap:
Enable the swap file:
sudo swapon /swapfile
Make Swap Permanent:
To make the swap file permanent across reboots, add an entry for it in the /etc/fstab file:
echo '/swapfile none swap sw 0 0' | sudo tee -a /etc/fstab
Verify Swap:
Check that swap is now enabled and being used:
free -h
You should see the swap space listed along with its size and usage.
By following these steps, you can create and enable swap on your Ubuntu system, which will help improve performance and prevent memory exhaustion issues. Adjust the size of the swap file according to your system's requirements and available disk space.
0 notes
Text
Linux Kernel and Device Management
Linux Academy, Linux Kernel and Device Management are critical aspects of operating system administration. Here's a brief overview in 250 words:
Linux Kernel:
Definition: The Linux kernel is the core component of the Linux operating system, responsible for managing hardware resources, providing essential services, and serving as an intermediary between hardware and user-level processes.
Kernel Modules: The kernel can load and unload modules dynamically, allowing for on-the-fly hardware support and extending kernel functionality.
Kernel Configuration: Kernel parameters can be adjusted through configuration files (e.g., /etc/sysctl.conf) to optimize performance, security, and resource allocation.
Compiling the Kernel: Advanced users can compile a custom kernel to include specific features or drivers, but it requires expertise and caution.
Kernel Logs: The dmesg command and log files in /var/log (e.g., /var/log/messages or /var/log/syslog) provide kernel-related information and error messages.
Device Management:
Device Files: Devices in Linux are represented as files in the /dev directory. For example, hard drives are typically /dev/sdX, with partitions as /dev/sdXY.
Device Drivers: Drivers are kernel modules or built-in components responsible for interfacing with hardware devices. Most devices are supported by default, but some may require additional drivers.
udev: The udev subsystem manages device events and dynamically creates or removes device files. Custom rules can be defined in /etc/udev/rules.d/ for specific device management.
Device Configuration: Configuration files in /etc or /etc/modprobe.d/ allow fine-tuning of device driver parameters.
Device Discovery: The lspci and lsusb commands list PCI and USB devices, respectively, aiding in device identification.
Mounting and Unmounting: Filesystems on storage devices are mounted using the mount command and unmounted using umount. The /etc/fstab file specifies permanent mount points.
Device Monitoring: Tools like smartctl monitor the health of hard drives, while sensors provides temperature and voltage readings for hardware sensors.
Effectively managing the Linux kernel and devices is essential for system stability, performance optimization, and ensuring compatibility with various hardware components. It requires a combination of kernel tuning, device configuration, and monitoring to maintain a reliable Linux system.
0 notes
Text
0 notes
Text
CORRIGINDO PROBLEMAS DE DISCOS NO UBUNTU COM O COMANDO FSCK
O comando fsck no Linux é na verdade um “wrapper” que serve para chamar outros comandos que são variações dele(do próprio fsck) para vários tipos de sistemas de arquivos.
Dependendo do sistema de arquivos, o fsck invoca sua variação apropriada para lidar com este sistema de arquivos.
para o sistema de arquivo xfs o fsck invocará o fsck.xfs que está no diretório /usr/sbin/;
Já para o sistema de arquivo fat o fsck invocará o fsck.fat, e assim por diante:
/usr/sbin/fsck.cramfs
/usr/sbin/fsck.ext2
/usr/sbin/fsck.ext3
/usr/sbin/fsck.ext4
/usr/sbin/fsck.fat
/usr/sbin/fsck.minix
/usr/sbin/fsck.msdos -> fsck.fat
/usr/sbin/fsck.vfat -> fsck.fat
/usr/sbin/fsck.xfs
e também outras variações:
/usr/sbin/dosfsck -> fsck.fat
/usr/sbin/e2fsck
O objetivo do fsck é checar e corrigir a existência de erros no sistema de arquivos.
Por padrão, o fsck assume o sistema de arquivos ext2 e, após fazer uma checagem no disco, pergunta ao usuário se ele deseja fazer as correções necessárias.
Como parâmetro de identificação do disco a ser verificado o comando fsck aceitará:
um nome de dispositivo (ex.: /dev/hdc1, /dev/sdb2),
um ponto de montagem (ex: /, /usr, /home),
um Label (ex.: LABEL=root) ou
uma UUID (ex.: UUID=8868abf6-88c5-4a83-98b8-bfc24057f7bd ).
O UUID é o número identificador do disco, este número é único e específico deste disco.
As opções frequentemente usadas para o comando fsck são:
-A: Faz a checagem de todos os discos especificados no arquivo /etc/fstab;
-t: Especifica o tipo de sistema de arquivos que deverá ser checado;
-c: Faz checagem de setores defeituosos (bad blocks);
-f: Força a checagem do sistema de arquivos mesmo que este pareça íntegro;
-p: Repara automaticamente o sistema de arquivos;
-y: Executa o fsck de modo não interativo, não fazendo nenhuma pergunta ao usuário;
Ainda podemos usar opções específicas para os sistemas de arquivos ext2, ext3 e ext4:
-b: Superbloco Especifica qual superbloco o fsck irá trabalhar;
Um superbloco é uma área especial no disco com informações importantes dos parâmetros do sistema de arquivos e o seu estado atual.
Geralmente o superbloco é copiado em diversas áreas no disco como backup.
É muito importante frizar que o disco esteja desmontado para que o comando fsck seja executado:
Para evitar desastres o comando retornará mensagem de erro se for executado para um disco que ainda esteja montado:
Ex.:
# fsck /dev/xvdb1
/dev/xvdb1 is in use.
Uma vez desmontado o sistema de arquivos, se o disco não tiver nenhum problema teremos:
# fsck.ext4 /dev/xvdb1
e2fsck 1.42.9 (28-Dec-2013)
/dev/xvdb1: clean, 41436/524288 files, 374905/2096891 blocks
Dependendo do tamanho e dos inúmeros reparos que a partição necessita, o processo do fsck pode demorar horas.
Para verificar a partição do sistema raiz há duas opções:
Reiniciar o sistema usando um live boot Linux para através dele, pelo comando fsck verificar esta partição raiz; ou
Usar o comando “touch /forcefsck” para criar o arquivo forcefsck no diretório raiz de seu disco, o arquivo forcefsck não é nenhum comando adicional,
Mas sim um marcador que informará ao sistema que no próximo boot, antes da carga total do sistema Linux ele deverá realizar uma verificação
de sua partição raiz no boot do sistema.
Comando e2fsck
O comando e2fsck é usado para checar os sistemas de arquivos ext2, ext3 e ext4.
Ele é a versão do fsck para os sistemas de arquivos baseados no sistema de arquivos ext.
As opções do comando e2fsck são comuns ao fsck, já que é o próprio e2fsck que será invocado
pelo fsck quando se tratar de partições do tipo ext2, ext3 e ext4.
Exemplo:
$ sudo fsck.ext4 /dev/xvdb1
e2fsck 1.42.9 (28-Dec-2013)
/dev/xvdb1: clean, 41436/524288 files, 374905/2096891 blocks
1 note
·
View note
Text
virtualbox centos winxpのfileと共有化
#centos,#linux,#virtualbox
virtualbox centosでwinxpのfileと共有化するには、
以下を実行
virtualboxの
デバイスー共有フォルダで
プラスをクリック
cドライブを選択し、永続化をチェック(Cドライブを選択すると既定名はC_DRIVE)
mkdirで共有するフォルダを作成
(どこでもどんな名前でもよい。下記例は/home/xxx/winxp)
rootに接続し
gedit起動
/etc/fstab
を開き、最後に以下を追加
C_DRIVE /home/xxx/winxp/ vboxsf rw 0 0
その後再起動
View On WordPress
0 notes
Text
no hd in commander no iso to usb and with wine doesn see the usb when using rufus
How To Solve Disk Mount Error in Ubuntu
ByAbhishek Prakash Updated onNovember 9, 2019
2 Comments
Reading Time: 2 minutes
I have several partition on the hard disk of my laptop. Some of them are NTFS and some Ext4. I prefer to auto-mount all the partitions at startup. It saves me trouble and time. I prefer to auto-mount the partition by editing the fstab. This was the first time I was trying to automount an Ext4 partition by editing the fstab. But it gave me the following error when I tried to mount the partition:
When I tried to mount the partition via GUI, it gave me the following error:
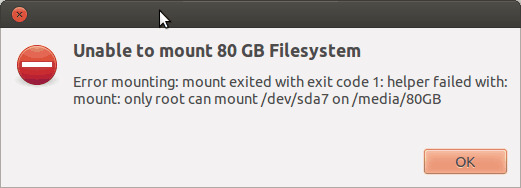
dmesg | tail command showed me the following result:
[ 2123.530257] [] ? ieee80211_scan_rx+0x190/0x190 [mac80211]
[ 2123.530264] [] worker_thread+0x124/0x2d0
[ 2123.530270] [<c1075280>] ? manage_workers.isra.27+0x110/0x110
[ 2123.530278] [] kthread+0x6d/0x80
[ 2123.530285] [<c1079130>] ? flush_kthread_worker+0x80/0x80
[ 2123.530292] [<c15acd7e>] kernel_thread_helper+0x6/0x10
[ 2123.530297] —[ end trace befde56ba3820bed ]—
[ 2675.446643] EXT4-fs (sda7): mounted filesystem with ordered data mode. Opts: (null)
[ 4831.528024] EXT4-fs (sda7): Unrecognized mount option “uid=1000” or missing value
[ 5441.695588] EXT4-fs (sda7): Unrecognized mount option “uid=1000” or missing value
Fixing disk mount error
The problematic part was pointed by dmesg. It had trouble with uid=1000. Actually I had edited the /etc/fstab file to include the following line to auto-mount the Ext4 partition:UUID=f920adf0-6038-4145-8214-4e1b79ca2d9b /media/80GB ext4 defaults,uid=1000 0 0
I changed it with the line given below to remove the troublesome “uid=1000”:UUID=f920adf0-6018-4145-8314-4e1b79ca2d6b /media/80GB ext4 defaults 0 0
The automount of the partition worked fine afterwards. Cheers :)
0 notes
Text
crear una copia de tu partición home
Por lo general, lo que hacía, era copiar todo el contenido de la carpeta de usuario en "/home/marco" a otro disco duro. Pero siempre existían archivos temporales u otros que no se podían copiar, tenía que darle omitir, o en el proceso transferencia daba error.
Para hacer una copia, tiene que estar desmontada la partición. Abra el archivo "fstab" con el editor de texto -como root- y comente la línea con un "#" adelante, guarde, luego reinicie el sistema.
pluma /etc/fstab
# UUID=df47ebb6-44b8-46b8-b8e1-715b24fbbf2b /home ext4 defaults 0 0
Si su partición "home" está en el directorio raíz, todo instalado en la misma partición, simplemente, puede hacer la copia, arrancando otro distribución de Linux en un dispositivo USB/DVD.
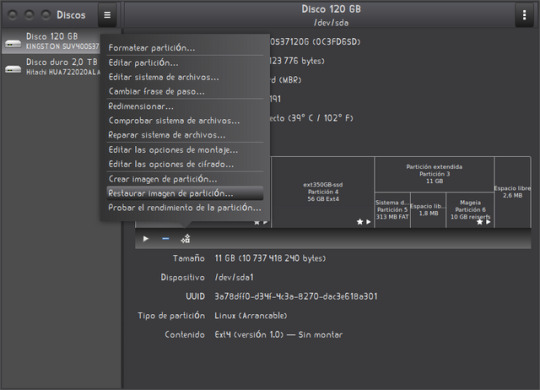
FINALMENTE, solo es cuestión de abrir el programa "Discos", en una terminal escribir "gnome-disks" y darle "enter-Intro".
Seleccionar el disco y la partición > ícono rueditas > Crear imagen > poner nombre y escoger dónde guardar > Empezar a crear-poner contraseña de root para confirmar
0 notes
Text
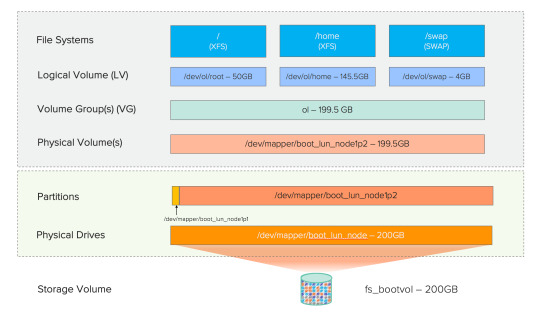
Remove Unused Logical Volume(lvm) from Linux
Remove Unused Logical Volume(lvm) from Linux
1. Un-mount the desired lvm mount point:
[root@hostname ~]# umount /mount_point
i.e.
[root@hostname ~]# umount /u02
Here /u02 is the unwanted mount point that will no longer be needed in my case.
2. Remove the mount point entry from /etc/fstab file:
[root@hostname ~]# vim /etc/fstab
UUID=bbc37d9d-f553-486b-81e9-c2cae03e434a /u02 xfs defaults 0 0
In my case, I need to remove the above…
View On WordPress
0 notes
Last Seen Blogs

saschabrittner
Sascha Brittner

cupidork
stupid cupid!

insanecaledonianbitch
Michelle Gomez appreciation life

x33crabtree
Fuck the distance, I love you.

nancyschilbe
The Eyes That Save Us