
survisinc
Survis
Survis is a free online database that can help you find the best web service professionals near you. Get full access to thousands of our professionals and free guides and tutorials written by our experts.WordpressOfficial Site
9 posts
Don't wanna be here? Send us removal request.
Last Seen Blogs

im-dehydrated05
✨Still-Dehydrated✨

umikaze365
women

bobastar
VENUS

sosexyalmostevil
Princess Pastel

hugglepugg
Hello!
Text
How to Build & Manage Your Brand’s Online Reputation
Your brand’s online reputation matters.
It can be what makes or breaks your business. But crafting and managing your online reputation doesn’t need to be an impossible task.
Taking control of how the world views your business requires a deliberate strategy. In this post we’ll review a range of tactics to help you do just that.
Defining Your Brand Voice
A big part of your online reputation will be influenced by how you communicate with your customers and audience.
Your first step should be to define the overall tone, or ‘brand voice’, you’ll use when speaking to them.
The voice you choose to use will be influenced by the type of product or service you’re offering. For example, a business selling life insurance is going to speak to its audience in a different tone than one selling halloween costumes.
However, to develop your own individual voice, you’ll need to spend some time researching your target customers. Based on the language they use offline and online (in social media, forums, emails), craft a voice that reflects their communication style while also staying true to the personality you want your brand to showcase.
A handy trick when defining your voice is to use descriptive adjectives of what it should and should not be.
Witty and smart BUT NOT sarcastic
Excited and energetic BUT NOT crazy
Empathetic and caring BUT NOT clingy
Fun and lighthearted BUT NOT irresponsible
Create a Brand Guidelines Document
If you’ve got a team of employees who in some form or another interact with your customers, it’s important that they’re all well versed with your brand’s characteristics.
An easy way to do this is to create a document that’ll be used as a guide by anyone who represents your brand. This way you can make sure your team members are always on message.
Your guidelines don’t need to be a 100 page document, in fact they shouldn’t be as that’s a sure fire way to make sure no one reads them. Instead keep them simple and straight to the point.
With a set of brand guidelines for your team to follow, you’ll be able to maintain a consistent approach to how your brand is perceived wherever you have a presence.
Make Sure Your Website Does the Heavy Lifting

Your website is often going to be the first place your potential customers go when researching your business and you’ll want to make a strong first impression.
Visitors to your website will make instant judgments based on the visual aesthetic so it’s important it looks clean and professional. This includes considering everything from the design and colour; the layout and use of white space; and your choice of pictures and graphics.
Customers will be put off by large blocks of text so make sure you edit your copy down to the most important information. Research shows that people tend to scan rather than read online. (1) Adjust for this by putting extra effort into the copy you use for headlines and call-to-actions.
Finally, make sure to optimise your entire site for your business name and not just for product or service names or related keywords.
You want to make sure that you show up at the top of the results page for any search on your company name. To do this you can’t just rely on your URL and homepage alone, you’ll want other pages to feature your company’s name prominently as well.
Showcase Your Brand’s Personality Through Your Blog
You probably already know that having a company blog is a great way to increase your visibility in search engines. Just as important is the role it plays in establishing your brand as an industry leader in the eyes of your customers.
If you think about your brand as your company’s personality, your blog posts are one of the ways you’ll express that personality and share it across the web. You can publish articles on things your company is doing (PR), your opinions on industry related topics (thought leadership) or just general how-to guides that offer readers valuable information (demonstrate expertise).
Not sure what to write about to begin with?
Get in touch with your customer service team or anyone in your business who deals directly with customers and get a list of questions they’re regularly asked. Turn your answers to each of those questions into a blog post.
Connect With Your Target Audience on Social Media

One of the most effective ways to build your brand’s reputation with your audience is by engaging them directly on social media.
This doesn’t mean you need to be active on every platform, in fact doing so will probably be a bad idea unless you have the resources required. Instead, pick 2 or 3 platforms based on where your target audience is most likely to be, or already are, and concentrate your efforts there.
That said, it’s a good idea to at least claim your real estate (sign up an account with your brand name) on every major platform, even if you’re not going to be fully active on them.
While you may not plan on being active immediately, it could be something you’ll want to in the future. It’d be pretty annoying if down the line you went to sign up and someone else had already laid claim to your brand name (it happens).
Also, it’s always possible some of your customers will be active on a platform you’re not focusing on. By having an account set up, should they ‘tag’ you in a post, you’ll receive notifications immediately so you can respond if necessary. This is particularly important if your brand is being spoken about in a negative way as you’ll want to get in front of that as early as possible (more on responding to negative reviews below).
Whichever social networks you do choose to be active on, make sure you’re consistent in your branding across the different profiles. Stick to similar color schemes, logos, profile names and pictures. You’ll also want to keep your messaging consistent and on brand (your brand guidelines will come in pretty handy here).
For the social networks you do choose to be active on, make sure you’re actually engaging with your audience and not just sharing content in a one-way stream.
Brands that get the most success on social media do so by having meaningful conversations with their audience, building up relationships rather than just advertising to them.
By approaching social media as an interactive two-way forum, you’ll be able to build up a strong following of brand advocates who’ll go out of their way to support you and even, if necessary, defend you against negative reviews.
One last thing, brand advocates don’t just have to be your customers and online audience, quite often your employees can be a great resource for supporting your brand on their own social media accounts.
Recommended social media management tools to manage multiple accounts from one place:
Buffer
Hootsuite
Sprout Social
(Find out more about social media marketing from our previous post)
Be Proactive About Getting Customer Reviews

It’s established in business literature that word-of-mouth marketing and recommendations from personal connections are incredibly powerful motivations for purchasing.
That same principle also extends to online reviews. Research shows that 88% of consumers trust online reviews as much as personal recommendations. (2)
The best way to get positive reviews? Well the obvious first step is to make sure you deliver a service or product that deserves them. But that on its own often isn’t enough. You need to follow up by actively asking people for reviews.
You can ask for reviews directly on your website, by putting a call to action in your email signature or even just having your customer service reps outright ask happy customers to leave you a review online.
It’s also important that you direct customers where to leave a review. For example, if you’re in an industry that is covered by one of the many online review sites (TripAdvisor, Yelp, etc.), politely ask happy customers to leave you a review there.
The point is, you want the reviews to be where your customers will see them.
Customer reviews aren’t the only testimonials you can use. Does your business work with suppliers or other partner companies? Why not ask them for a review about working with you? Basically, any testimonial that you can get that makes you sound good without you having to say so, is worth its weight in gold.
How to Deal With Negative Reviews & Comments
Regardless of how great you are at what you do, you can’t please everyone. Expecting 100% customer satisfaction is pretty much impossible.
It’s only natural you’ll get negative reviews and comments. In the long run the best way to tackle negative feedback is by making sure you have a lot more positive comments that say the opposite, essentially proving the negative feedback to be incorrect, or an anomaly.
However, there will be times where it’s important you actively respond to certain negative comments.
Negative reviews or feedback where the complaint is constructive and valid should always be responded to, in a polite, friendly and professional manner. Doing so shows readers that you actually value your customer’s opinions and therefore your relationship with them.
On the other hand, for complaints that aren’t valid and are obviously unjust or insulting, you may be better off ignoring them as it’s likely anyone reading it is going to see that it’s not a fair review.
Deciding on which negative comments to reply to is best decided on a case by case basis and usually takes a little bit of practice to get right.
Regardless, whenever you do decide to reply to negative comments, there are a couple of best practices you should keep in mind.
Don’t reply in the heat of the moment. Your business is something close to your heart and even the calmest person is going to have a hard time not taking criticism personally. Make sure you give it some breathing space before you sit down to respond.
Always try and put yourself in the reviewer shoes to better understand what it is they’re complaining about. People won’t always leave accurate comments, particularly if they’re angry when they post them. It could be that they’re complaining about one thing, but are actually upset about something else. Take the time to invite them to contact you in private so you can have a conversation to get to the heart of the matter.
Once you’ve been able to determine exactly what went wrong, it’s important you take whatever steps are necessary to put things right and let them know that you’re doing so.
Use Internet Monitoring Tools to Receive Alerts

Speaking of negative reviews, not all customers will comment on your brand in a way that you get notified directly. It’s possible some will criticise your service on social media without ‘tagging’ you. Others may publish their own articles on a blog or even worse a media publication.
In order to make sure you’re not ambushed by these types of reviews, it’s a good idea to make use of the different types of monitoring tools that are available online.
Draw up a list of keywords and phrases that include your company’s name, your own name and names of employees, your website URL and the names of your products or services.
Enter these keywords into the different tools and if anything gets published online with those phrases, you’ll be notified allowing you to see what people are saying about you.
(These tools are also a great way to see what people are saying about your competition which you can use to poach their customers - but that’s for another post.)
Popular online monitoring tools:
Google Alerts
Social Mention
Meltwater
Rankur
Building and Managing a Positive Online Brand Reputation Takes Time & Effort
Following the strategies set out in this article will set you on your way to building up your brand’s online reputation.
But it isn’t just a one time thing, you need to be making a constant effort to stay on top of it. Make sure you incorporate these strategies into your long term business strategy and in time you’ll have the kind of reputation that keeps customers coming through your door.
from Survis Posts https://survis.com/posts/how-to-build-manage-your-brand-s-online-reputation
0 notes
Text
How to Easily Set Up an E-commerce Website in Wordpress
In todays world it’s hard to imagine someone who is unaware of the wonders of E-commerce. Believe it or not but the concept of buying and selling via the Internet has been around for over 40 years now! In recent times however it has gained quite a lot of traction and international acceptability. With the dot com bubble and mainstreaming of internet, companies like Amazon and E-Bay became popular. Then online payments like PayPal added the icing to the cake.
Earlier on owning an E-commerce site was only attributed with large-scale companies but with the amazing new advancements in technologies now anyone can setup their online store and start selling within minutes.
Today we take a peek at one of these routes.
Role of WordPress in E-commerce
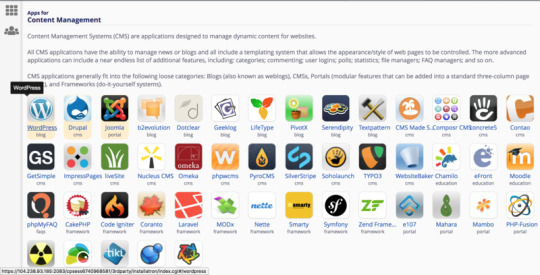
For the uninitiated, Wordpress is a popular CMS (Content Management System) that allows users to easily launch their websites with little or absolutely no coding at all!
Millions of websites are powered by WordPress. WordPress developers are working continuously to develop new plugins and themes from all over the world. The community stats of WordPress are simply astounding.
Wordpress has many different e commerce plugins also, each with their pros and cons. These include WooCommerce, Easy Digital Downloads, Shopify, Memberpress and Shopp among others.
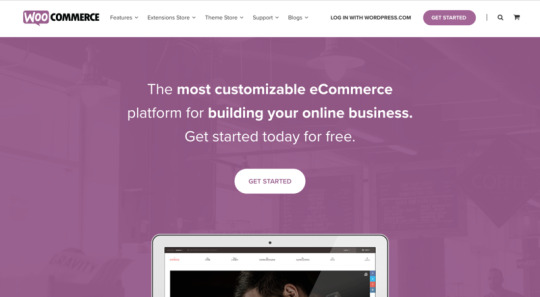
The one which we will use today is the most popular WordPress E-commerce plugin: WooCommerce. It offers maximum control, flexibility and a ton of features.
WooCommerce is undoubtedly the world’s most trusted E-commerce solution that gives storeowners and developers endless features to effectively sell their products.
Today we bring this amazing tool right within your reach.
Step 1: Getting your domain and Hosting
Firstly you need to register your domain name and purchase a hosting account. You can choose from any of the top domain registrars. These include Namecheap, Bluehost, HostGator, GoDaddy, Dreamhost and Name.com. (If you're unfamiliar with the process, check out our step by step domain registration guide here) Some of these registrars also provide hosting services. In fact, Bluehost offers a free domain name with their hosting. Some WordPress specific hosting services are also available in the market like WP-Engine. You can make your choice according to the best-suited pricing plan. These are optimized and provide a better experience when using WordPress. Though you should keep in mind the associated costs when making this decision.
Step 2: Installing WordPress
Once you have registered your domain and have access to your hosting, it’s time to setup WordPress. Nearly every hosting account provides a built-in WordPress Installer. Using the automated installer in your hosting account you can simply install WordPress in a few clicks.
Select WordPress to open the installer. This installer is the most convenient way to get started with WordPress. Alternately you can download WordPress from its official site also.
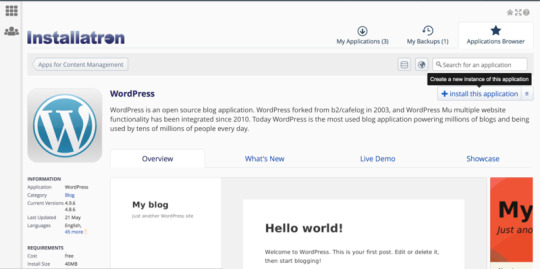
Click on Install application and enter the domain/subdomain, which you want to use.

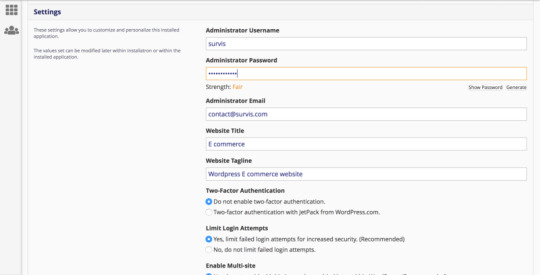
Now just type your preferred Username and Password and click to start the installation.
The setup will install the necessary files within a few minutes. Once done you can access the WordPress admin panel at the link:
www.yourdomainname.com/wp-admin
Simply type in the Username and Password that you selected and login to view the admin panel.
Step 3: Choosing Your Theme
Here you have the flexibility to choose a theme of your liking. You can pick a premium theme or any free theme. There are hundreds of different options to choose from. Just keep in mind that some themes are specially optimized for use with WooCommerce and we highly recommend that you use such a theme.
For this example we will use the Storefront theme. It is a widely used free of cost theme and is recommended by WooCommerce itself.
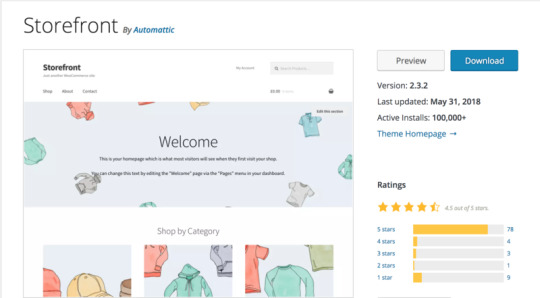
With over 100,000 active installs Storefront is a greatly loved theme. Storefront also offers a variety of different child themes that can be purchased. These child themes are pre-set for a certain type of store. These include themes for Bookshops, Pet shops, Home stores, Pharmacies, Toyshops and Boutiques.
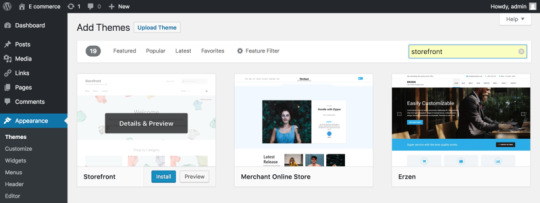
To get going with Storefront simply start by logging into the WordPress admin panel.
In the admin panel, go to: Appearance > Themes.
Click Add New and search Storefront.
Now install the theme by clicking Install and then click on Activate.
Step 4: Installing WooCommerce
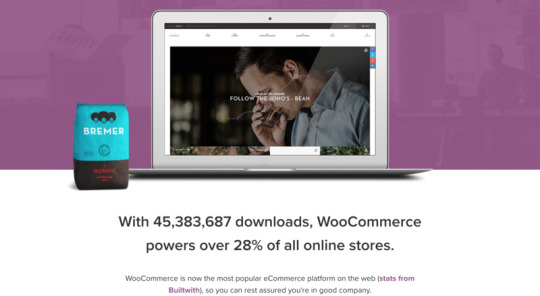
According to recent stats, WooCommerce powers over 42% of all online stores!
With over 5000 plugins and more than 1100 themes that support WooCommerce it is undoubtedly a widely used platform. As per estimates its popularity will keep on increasing in 2018 and beyond.
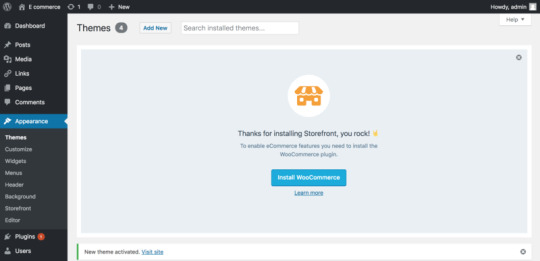
Okay so once Storefront is activated, you will get an automatic notification prompting you to install WooCommerce. Simply click on Install and then click Activate.
Alternatively you can go to:
Dashboard > Plugins > Add New > Search Plugins
Search WooCommerce and then click on Install and Activate.
Upon activation you will be taken to the WooCommerce Setup Wizard shown in the image below. Simply enter your relevant details and proceed.
This onboarding wizard is a great intro into the capabilities of WooCommerce. It provides all the basic settings in six simple steps. Although you can change these settings later on but it is recommended that you take a few minutes to go through this fairly simple process.
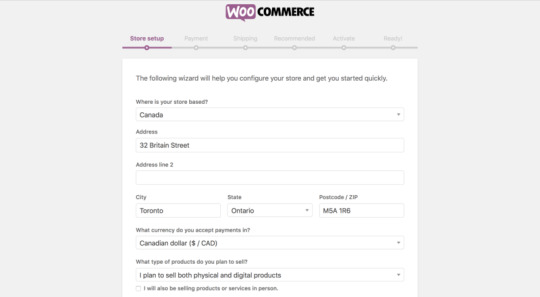
Here you can setup your Payment options including Stripe, PayPal and even offline payments depending on the nature of your business. We would recommend going with PayPal for online payments.
In the next steps you can setup your shipping recommendations and proceed. Adding to the list of wonderful features WooCommerce also has a built-in tax module that you can easily activate in this wizard.
Once completed, you are all setup to create your first product and start selling!
Step 5: Customizing and Adding Products
Congratulations, your setup is complete. You can now customize and even use Storefront’s pre-existing template and sample products by going to:
Dashboard > Appearance > Customize
Using the template of sample products you can get an idea of how different products will appear on your store. You can preview the changes as you make them or view them on your domain.
The Products page (Dashboard > Products) gives you complete control over managing your products. You can add new products, import, export lists or edit and remove existing products.
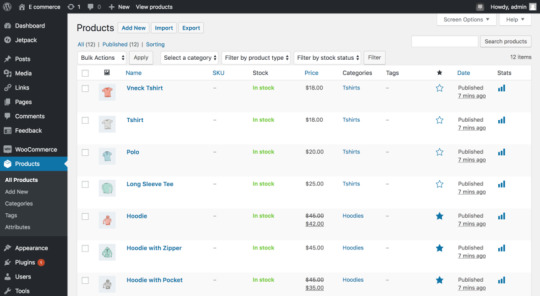
Using the WooCommerce tab you can also access multiple other options. All other options are simply and extension of adding a product. Here you can explore different things about your digital store like Orders, Coupons, Reports, Settings and System Status.
There are a host of different features and settings to play around with. The easy to use interface and world famous customizing power of WordPress makes this whole process seamless and enjoyable. Once you get comfortable with the settings you can tweak your store to your exact liking and preference.
WooCommerce Extensions:
WooCommerce offers a plethora of different features and settings. You can play around with the customizations and tweak it according to your need. Once your store starts to grow, you can also make use of various extensions offered by WooCommerce that help you scale and manage your business. These extensions are purchased on annual subscription.
Recommended Plugins for the best experience:
You can step up your game a notch with these custom picked plugins. In our experience these plugins coupled with the awesomeness of WooCommerce make a pretty potent combination.
Yoast WooCommerce SEO Plugin: This one specifically caters to the needs of an online store. This can prove to be a decent investment if you are looking to promote your products.
W3 Total Cache: This helps speed up your site, increase website performance and improve the overall user experience.
Contact Form 7: This is the standard when it comes to creating a form that allows your visitors to reach you directly.
Updraft Plus: Backs up all your site data including your products
Wordfence: Security plugin that provides a variety of different ways to keep your site secure.
Once activated you will clearly feel the difference. These plugins can prove to be great addition to your arsenal and help increase the output of your business.
Conclusion:
All-in-all WooCommerce is a great platform to sell your products. You can setup your store and start selling in no time. Generally, creating an e-commerce website is a time consuming task and demands continuous work. Utilizing the power and flexibility of WooCommerce you can not only effectively manage your store but also do great business.
Check out our article on how to speed up and optimize wordpress here
from Survis Posts https://survis.com/posts/how-to-easily-set-up-an-e-commerce-website-in-wordpress
0 notes
Text
How to Pick the Perfect Domain Name for Your Website
You, as a business owner or a blogger, make your internet presence via your website. It helps online visitors in getting to know you and your brand.
The website that you develop can only be accessed by entering a specific URL on the browser. Within this URL comes the most important part – your domain name.
If you think your website’s domain name is just an address and it’s nothing more than that then you my friend are mistaken!
Picking the perfect domain name plays a vital role in making your website successful. You cannot expect to come up with the best and most suitable domain name within a matter of seconds. This process is time-consuming as well as tricky.
Luckily, we are here to help you out and give you 10 tips for choosing a spot-on name for your website.
Your Domain Name = Your Brand
In order to be successful in the long-run, you need to develop a brand. Whether it’s your business or your personal blog, branding is that one tool which will take you from bottom to top.
Your domain name should reflect who you are as a brand. It is basically the first impression of your brand and who doesn’t want to make a good first impression?
For instance, if your blog is about your travel adventures, then this should be highlighted in your domain name. Nomadicmatt.com, for example, is an amazing travel blog which talks about the adventures of Matt.
How can you make your domain name more brandable? It’s easy! Think out of the box. Avoid generic names that don’t stand out. Your name should sound more credible as well as professional.
Go for a Simple and Concise Name
Selecting a simple and short domain name for your website can do wonders for your business/blog. A simple name is not only easy to type but easy to remember as well.
Did you know that the top most popular websites on the internet have the shortest domain names? In today’s fast-pace world, internet users do not have time to type lengthy and confusing website names.
When the domain name gets too long, it becomes confusing and looks like spam. On the other hand, if it is too short or uses an abbreviation, there is a chance that your visitors will be unable to understand it.
The key here is to have a balance when it comes to picking the length of your domain name. As a rule of thumb, try going for less than 17 characters.
Hyphens and Numbers are a Big NO NO!
Unless your brand name has number, the addition of hyphens and numbers to your domain name are considered as a bad move.
For instance, number 9 is a vital part of the brand 9gag and therefore it needs to appear in their domain name as well. On the other hand, if Forbes added number 1 in its domain name then that would have been a major turn off.
Hyphens generally tend to confuse online users. Any name that flows naturally and isn’t too complicated is what you should be looking for.
A good example is mcdonalds.com. This domain name is way better than other substandard options like “mcdonalds-burger-chips.com” or “mcdonalds-fastfood.com”.
Go for an Easy to Pronounce Name
At times you need to spell your website to your customers and clients over the phone. The perfect domain name is easy to pronounce and memorize as well.
Don’t go for something which is too hard to figure out. Share your domain name with your close friends. Look at how they react to it and note down their responses.
A misspell domain name means that a large amount of your potential visitors is lost. It frustrates them and leads to a loss of interest as well. You definitely don’t want your customers to spend hours on Google while searching for the right spelling.
Also, don’t go for invented words like Kare Korner or Pix2Brix. If you own a daycare or a photo editing website, chances are that very few people will be able to spell your funky name.
Don’t forget to Add Keywords
It’s always a good idea to add keywords to your domain name. This helps in improving the rank of your website on search engines.
Remember, whenever someone is looking for relevant information on search engines they take help from keywords. For a better ranking on search engines, keywords have become a necessity.
However, stuffing your domain name with many keywords is not a good idea. It does not look professional and is usually ignored by online users.
For example, take a look at goodreads.com versus findbooksreadreviews.com. Which one would you click? The term “reads” in our first web address is used as a keyword.
Look for Synonyms
As the internet is hosting millions of websites, there is a chance that your perfect domain name is already taken. Don’t sweat too much about it!
You can look for synonyms that best describe your business/blog. Thesaurus.com comes in handy while searching for suitable synonyms.
For example, lookfantastic.com is a beauty website that sells makeup and skincare products. The two words “Look” and “Fantastic” point out about the niche of the website and targets online users who want to look fantastic!
Give Domain Name Generators a Try
Sometimes it gets difficult to choose the most relevant name for your business/blog. Don’t worry! This isn���t a dead-end for your website.
Domain Name Generators might sound gimmicky but they are one of the most useful tools when it comes to picking the perfect domain name.
There are hundreds of domain name generators out there. These are user-friendly websites which generate suitable names according to your added keywords.
You can either pick one of the names suggested or use all of the names as ideas in order to come up with your own name.
Popular domain name generators include leandomainsearch.com, namemesh.com and nameboy.com.

Make Sure You Don’t Violate Any Trademarks
Don’t get yourself in trouble by picking domain names that are trademarked. Ideally, your domain name should be unique. There are two issues with selecting a domain name which is not distinctive.
One, similar domain names can lead to trademark infringement. Even though you might not be planning to do such a thing there are a lot of chances that such a scenario arises. Such an infringement can result in you getting sued as well as your domain name forcefully taken from you.
Second, search engines are unable to differentiate between your website and the site which has a similar domain name. The search result, then, provides many irrelevant links.
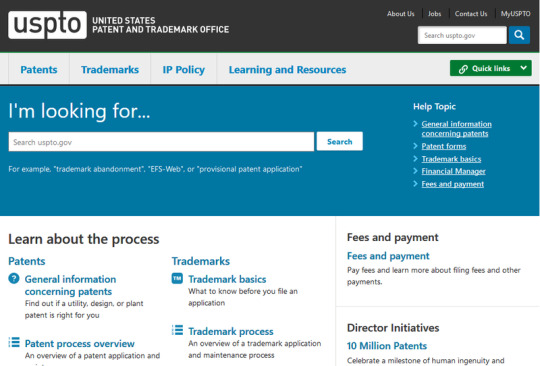
In order to avoid violation of any trademarks, you should do your homework. Put your domain name in search engines and look for any similar domain names. Visit US Patent and Trademark Office for further information.
Dot Com is Your Best friend
There is a wide array of extensions available on the internet. Many of them have their specific uses. .biz is used by businesses; .info is mostly used for informational websites and others.
There are country specific extensions as well. So, for instance, if you own a bakery in Toronto, Canada, you might want to add .ca extension to your domain name. This will help both the search engines and online users to know that your bakery is located in Canada. Such extensions are great for businesses that want to target a certain market.
In terms of Extension, .com is your best friend. It is by far the most used as well as the most popular extension on the internet.
Being the oldest and most famous, you might have a hard time finding a website with the .com extension. You can select other recognized extensions like .net, .co and .org.
We would advise you to stay away from funky and shady extensions like .cheap, .club and .space. Also avoid using .biz as it is considered spam by many users and is known to rank very low in search engines.
Register Fast
You don’t want to waste your time, once you are 100% sure about a certain domain name. These things sell out real fast and so you need to act fast.
While registering your domain name it is important to look for a reliable domain registrar. Namecheap is a world famous and a trustworthy registrar.
Don’t let any registration company to handle this important step. Do all the registering process yourself. After registering, make sure that you take the necessary steps to keep your domain name safe and secure.
This concludes our guide to picking the perfect domain name for your website. We hope that our tips were helpful and informative.
The key here is to think out of the box and be creative. There is no set method for choosing the best name. It is a time-consuming process which is definitely worthwhile in the end!
Remember, you want to make an amazing and long-lasting impression on your clients with your perfect domain name!
If you're looking for step by step instructions on how to register a domain name, check out our domain name registration guide
from Survis Posts https://survis.com/posts/how-to-pick-the-perfect-domain-name-for-your-website
0 notes
Text
Working with Freelancers 2018: Forging a Win-Win Relationship
According to some estimates, the number of Freelancers1 (or “Independent workers” as they are also called) in the U.S. has ballooned from 30.1 million to 40.9 million between 2011 and 2017. That’s an increase of over 35% in just 6 years…and the trend continues to grow. And the freelancing phenomena isn’t just restricted to the U.S. or Canada – it’s global. A research report shows that, between 2004 and 2013, Europe’s2 dependence on Freelancers has grown at an even faster rate – 45% - than the U.S.
From Auto CAD designs of prototype drones, to recipe books, business plans and web designing, Freelancers are being used to do it all. And it’s not just mom-and-pop shops and Small and Medium Enterprises (SMEs) that are using Freelance talent. Large multinationals and Blue-Chip giants are increasingly embracing freelancing talent.
The “Gig economy” is encouraging businesses, both small and large, looking to source talented individuals, to increasingly turn to Freelancers to staff their teams. However, it takes a certain kind of discipline, as an “employer”, to work with Freelancers. If you are new to the world of using Freelancers, here’s what you should know to forge a win-win freelancing partnership.
TIP: Don’t look at Freelancers as “just contractors”. Instead, to really have a fruitful, long-term relationship, structure your relationship as a partnership rather than an employment contract
Why Freelancers
Why? Because they offer the ideal balance between not wanting to ramp-up full-time headcount, while finding people with just the right skills. According to one research report3 , the ranks of Freelancers in the U.S. workforce is growing 3-times faster than the “regular” workforce.
Here’s why you might want to consider supplementing your existing team with talented Freelancers:
They are relatively easy to find – if you know where to look
Most Freelancers come “pre-loaded” with the skills you need – that cuts down on your training costs
Many Freelancers bring a diverse set of other experiences (because they may have worked with your competitors or other organizations in your industry) – which further enhances the value they’ll add to your team
Since they aren’t full-time employees, it’s a great way to reduce your costs – you’ll save on HR costs like benefits and overtime
Freelancers usually come with all the tools, technologies and equipment needed to do the job – you won’t need to provide any of that, like you would for most full-time resources
It’s also a great way to manage your own margins – Freelancing contracts usually are fixed-cost undertakings. You know exactly how much it will cost you BEFORE you start a project
The best of breed Freelancers are self-managed professionals – which means you don’t have to spend inordinate amounts of time managing/micro-managing them
The best thing about using Freelancers is that you don’t need to replace your existing workforce with contractors. Instead, the best practice model is to supplement/augment full-time work forces with Freelancers, to ensure companies continue to “refresh” the skills and knowledge of their in-house teams.
TIP: To find out if Freelancers are a good idea for your business, start out by working on a few non-business-critical projects first. Once you’re comfortable with the idea of using them, you can expand your portfolio of freelancer-aided projects
Being a Great Client
If you care to do a web search, you’ll likely find dozens (if not hundreds) of articles on how to be a great Freelancer, or how to find clients as a Freelancer. However, there’s scant material on what it takes to be a good client to a Freelancer.
As a business owner, you can easily go out and hire a Freelancer (we’ll tell you where to find them later in this post). But you’ll add even more value to your relationships if you can effectively manage your Freelancer relationships to produce that win-win outcome you (and your Freelancing partners) are looking for.
The following tips are meant to help business owners, who plan to use Freelancers, become better clients:
a) Starting the search: If you are new to working with Freelancers, you’re probably wondering: Where do I start? Well, start by going where Freelancers congregate – online! Your best bet would be to start your search at freelancing platforms like UpWork.Com, Freelancer.com or TextBroker.Com. Here are some things to watch out for when choosing where to find Freelancers:
Look for a platform that’s been around for more than a year or two
Make sure they offer freelancing services in line with what you need – hourly, fixed-rate or hybrid of the two
Check out the platform to ensure they offer trustworthy payment modes – secure banking, credible 3rd-party transfers (PayPal)
Find out if they offer Escrow payments to safeguard you against “fly by night” Freelancers
Make sure the site rates and ranks their Freelancers, so you can choose the best-of-best amongst them
TIP: It might be a good idea to work with more than one freelancing platform. Be mindful though that many Freelancers are also members of multiple platforms. You need to consider that when putting out Job Descriptions on multiple sites
b) Making your needs known: You really can’t be a good client if you don’t tell your Freelancer what it is that you need them to do for you. The Job Description is the vehicle through which you achieve that. To make sure your needs are known, ensure you cover the following:
WHO: Be as specific as you can about the skills and experience you want in the Freelancer you are looking to hire
WHAT: Provide a detailed description of job that you want performed. If the task is environment-specific (Policies and Procedures manual for the Health Care industry; Web development supporting CSS3; Macros for Excel 2016, ECMAScript 2017), make sure you spell that out in your Job Description
HOW: Deliverables must be provided to you in a certain form, so you need to convey that. If it’s a Microsoft Word 2010+ document you are expecting – say so. If you also want a PDF and Txt format, make that known
WHY: Many prospective employers of freelance talent think that the “Why” is unimportant. Not true! Sometimes, if you mention why you need a particular task done, and what you intend to use the deliverable for, you’ll be surprised at how much “free advice” a Freelancer can give you about alternate solutions. Some of that feedback can not only be creative, but it might even be a cheaper alternate to what you are proposing
TIP: To find the best Freelancers and attract high-quality responses to your Job Ads, keep your postings short and succinct. Most platforms allow you to provide backup documentation that contains the details of your requirements
c) Workflow: Since most Freelancers will work remotely, it is good practice (at least initially) to enforce a specific work flow. For instance:
If this is a project to produce some technical documentation, you may first wish to validate if they understood what you require of them. You could therefore insist upon a workflow as follows: Bullet-points before outlines; Outlines before Drafts; Drafts before final
Most Freelancers are open to redoing work that the client feels requires some improvement. However, it’s always good practice to establish the number of edits/revisions expected at the outset
You also need to discuss how you wish references and attributions dealt with. In most instances, Freelancers will include references to their research in a way that they do with other clients – only to be told such form isn’t acceptable. A good client will however spell that out in advance: End Notes or Footnotes. In-text links, or links as comments etc.
If your freelancer-provided deliverables include images and graphics, you need to spell out what types of graphics are acceptable (Freeware? Creative Commons Images? Self Created?). A good client will also provide guidelines on graphics use: Format (JPEG, PNG, BMP etc.), Resolution, and location in the deliverable
Rules around document sharing, file naming and common folders (on cloud or shared drives) should also be agreed in advance
Once your relationship is cemented, many of these workflow restrictions may be relaxed. By then, hopefully, your Freelancers will know exactly how you work, and will be finely attuned to delivering to your expectations.
d) Managing expectations: Clients often “assume” that their relationship with the Freelancer is temporary and contractual in nature. However, many longer-term Freelance relationships evolve into more permanent employment opportunities. A good client leaves no doubt what his/her expectations about the working relationship are.
Make sure prospective applicants know exactly what they are getting into – an hourly or fixed-fee contract, with specific deliverables. There should be no confusion about them being part-time or short-term employees – if that’s not what your expectations are. You might have to deal with too many legal challenges if that misconception arises!
TIP: If you plan on making regular/extended use of Freelancers, it might be a good idea to let them know what you expect in terms of commitments from them – Days per week? Hours per day? Number of deliverables per month?
e) Laying down the rules: Make sure you specify timelines, quality parameters, consequences for plagiarism and copyright infringements.
If you plan on using online plagiarism checkers (CopyScape, quetext, Plagiarisma), make sure they know about it, and know which tools they need to build their content to satisfy
Not all content validation tools work to the same set of rules. Make sure you lay down the law about what score is acceptable, and what is unacceptable (90%, 100%, 10 errors/flags per 10,000 words)
If you use SEO scoring tools, like those available at Moz or Yoast, to check for content – make sure they know about it upfront
A good client never ambushes his/her Freelance partners with rules and tools after the fact. Making everyone aware of the rules in advance, ensures that Freelancers don’t unnecessarily spend (unpaid) time and effort re-tooling their deliverables. It also ensures that clients get high-quality deliverables the first time!
TIP: Specifying the rules of the game in advance might result in some “push back” from Freelancers used to working in certain ways. However, it helps them understand what you will be looking for at the outset. That’s a key ingredient for a win-win relationship
f) Communication protocols: Good clients don’t just assume a Freelancer will communicate in line with “what’s expected”. What your version of reasonable communication might be, could be vastly different from what the Freelancer practices with his/her other clients.
Make Freelancers understand how you wish to communicate (email, text, Skype, phone calls, Messenger etc.)
Let them know when they should be available (Pacific Time, Eastern Standard, Mountain Time, GMT), and for what duration
Don’t provide ambiguous response time guidelines – be very clear: Don’t say “at your earliest”, say instead “Within the next 4 hours”
Half the challenges of working with freelancing professionals come from lack of/poor communication. To be a good client, you must ensure you have flexible, but clearly defined, communication protocols in place.
g) Penalties: To be a good client, you have to empathize with your Freelancer – making allowances for occasional errors and omissions. However, if you intend to penalize a Freelancer for any mistakes or lapses, you need to make sure they understand the exact nature of such penalties:
Deducting payment from the agreed-upon fee
Withholding payment for longer duration, until the errors/omissions have been addressed
Demanding future rate discounts, on follow-up assignments, for less than expected quality delivered
If penalties are brought up subsequent to a deliverable being provided, Freelancers are apt to believe that you, as their client, are trying to short-change them. A good client will never want to leave that impression.
TIP: Beware – if you haven’t discussed penalties in advance, and try to withhold payment in the absence of such discussions, Freelancers could initiate arbitration procedures (which some platforms provide for) to recover amounts withheld
h) Payment terms: One of the biggest points of contention, between client and freelancers, is payment. Being a good client often means paying what the Freelancer is worth. However, “worth” is often subjective, and could get lost in the muddle of negotiations. As a good client:
Make sure the rate is clearly defined
Be sure everyone understands which currency payment is being proposed (US dollar Vs Canadian dollar, or Euros, Bitcoin Vs eWallet)
Ensure the terms of the engagement, hourly, deliverable-based, installment-based, are understood
Clearly outline payment schedules
Agree to payment modes that are accessible to the Freelancer (PayPal Vs Paydirekt; or Direct bank transfers Vs Monegram)
Clarify who will pay money transfer/payment platform fees
TIP: A word of caution: Many freelancing platforms do not allow/encourage payments being made or received outside of their forums (they usually receive a fee from Freelancers, Clients and Financial institutions). A good client will never encourage/force Freelancers to break the rules.
i) Feedback and references: Every Freelancer that you end up working with, covets one thing: Great references and feedback from clients. And they will do everything possible to ensure you, as their client, provide them such feedback. It is therefore in your best interest to use that “craving” to your advantage.
Make sure upfront, that Freelancers know exactly what your standards of “client satisfaction” are, so that they can strive throughout the engagement to meet (or even exceed!) them. It would be unfair to grade/rate Freelancers after-the-fact, if they don’t know what the grading scheme is at the outset of a project.
Conversely, a good client will be mindful of the overall impression he/she leaves with the Freelancer. Some freelancing platforms also provide freelancers the opportunity to rate their client. If you wish to remain a client in good standing on that platform, it is therefore in your interest to make sure you receive good feedback and references from your freelancers.
j) Collaboration tools: Even though you may be working through a freelancing platform, that doesn’t mean that you’ll have all the tools built-in to coordinate, cooperate and manage your Freelancers. You might more effectively empower your freelancing team by using other 3rd-party (mostly FREE) collaboration tools, including:
Skype – for voice and video calls, group meetings, chat sessions
Google’s G-Suite – to collaborate on creating document, spreadsheet and presentations, as well as building central repositories (cloud-drives) for project deliverables
Dropbox – for storing, sharing and exchanging documents, videos and other large-format digital files
Scribblar – to brainstorm (whiteboard-style) with a geographically dispersed team
Trello – to manage multi-team task lists and assign individual tasks to a team of Freelancers
TIP: Before you offer to use any of these tools, it’s important to check if the freelancing platform you are using has any rules against such usage. Some platforms have native features in place, and they may penalize their users for making use of 3rd-party tools.
Most importantly though, as part of being a great client, you should check with the Freelancer if he/she is comfortable using such tools. Many freelancers do not like to download tools, or to share personal details required when installing many of the tools mentioned.
Making Freelancing Work
As someone considering working with them, these few tips will hopefully put you on the path to forging win-win relationships with Freelancers. It all comes down to you realizing the need to create value (for yourself) through them. And to do that, you need to empower them with everything they need to succeed.
According to a recent survey4 , Freelancers know exactly what it is that they are looking for in a “good” client. They want someone that:
Values their work (97% respondents)
Allows them freedom to control how they work (95%); and
Allows them to control their schedule (94%)
If you keep the guidelines provided in this blog in mind, you too could become a client-of-choice for all Freelancers you work with.
[1] https://www.forbes.com/sites/elainepofeldt/2018/02/24/why-big-company-freelancing-may-soon-get-a-lot-easier/2/#719a820f613e
[2] https://magazine.startus.cc/freelancers-startups-changing-workforce/
[3] http://spendmatters.com/2018/03/29/enterprises-and-their-freelancers-what-does-upworks-recent-study-tell-us/
[4] https://www.forbes.com/sites/elainepofeldt/2018/02/24/why-big-company-freelancing-may-soon-get-a-lot-easier/2/#719a820f613e
from Survis Posts https://survis.com/posts/working-with-freelancers-2018-forging-a-win-win-relationship
0 notes
Text
Thinking Outside the Dieline: Package Design for Businesses
In a perfect world, you’d like to hire a freelance or full-time graphic designer to handle your package design. But perhaps you don’t have the time to vet and onboard a designer, or perhaps, the budget is an issue. This article will serve as a startup guide to package design if you don’t have the ability or capacity to hire a professional graphic designer.
You can expect to understand the best software to use for package design, and some basic best practices for creating a quality finished good. In addition to this the article covers some tips for staying on brand, and creative digital mockups of your package.
Software Choices for Package Design
Software in the design world is a big deal. Programs offered by Adobe (the Creative Cloud), are powerful and loaded with features not typically available on other software options. But what programs are best for package design?
You may think that Photoshop is the best for this. You may also be drawn to it because it’s the cheapest single software plan offered by Adobe. Unfortunately, Photoshop is not an ideal software for things like logo design and package design. If you aren’t going to hire a designer, you need to at least put your best foot forward when it comes to software.
The ideal choice for package design software is Adobe illustrator, with Affinity Designer being in second place (first place if you are on an extreme budget, as Affinity is not a monthly subscription). Both of those software options are vector-based and can export to the same file formats (.ai .pdf .eps .svg).
Photoshop isn’t a great option for final package design because it is raster based, so the graphics can’t be scaled larger than their original size.
Vector, Raster and Resolution
I’ve just thrown around a few key words that may have you scratching your head. I’m going to go over how vector, raster and resolution work. Once you understand that, it will make more sense as to why I said Photoshop doesn’t work for package design.
Vector-based artwork is very powerful in the fact that it can be scaled infinitely without getting pixelated or losing quality. This is because vector artwork relies on key points called anchor points. It fills in colors based on the location of these key points. What that means is if you have 2 points 10 inches apart, and you have the fill color as black, it will fill everywhere between those two points with black. If you then move one of the points 10 feet away from the other point, it will still fill the distance between the two points with black without losing any quality.
Raster-based artwork (Photoshop is a raster based program. You can’t create vector artwork in Photoshop) uses little dots called pixels to fill an area with your image. Let’s imagine you have a 1 inch by 1 inch image. Inside of that image there are 100 of these tiny pixels. In a 1 inch (squared) space, you have 100 of those pixels, all crammed in and nice and small. So small that you can’t see where one pixel ends and another begins. But what happens if we Take that same image and make in 10 inches. Now those pixels have to stretch to 10 times their size to fill the area you specified. This creates the grainy or low-resolution image.

Resolution is locked, in a manner of speaking. The ideal resolution is 300 DPI (dots per inch, or PPI for pixels per inch. This is the same thing). Notice how on the right, the image is grainy, and pixelated? I took that half of the photo and blew it up to illustrate the effect of scaling an object beyond 300 DPI. The further you go beyond that point, the worse, and more apparent the issue becomes.
If you take an image that is 5 inches by 5 inches and 300 DPI, you can use it on your package artwork at 5 inch size without worrying about image quality. However, if you stretch that image to 10 inches (double it in size), that same 300 DPI image now becomes 150 DPI. The DPI measurement is just telling you how many pixels or dots are stuffed into a square inch. In the same example, shrinking that 5 inch image down to 2.5 inches (half the size) would make the image 600 DPI. This DPI will always be tied to the image and resolution can’t be added to a photo or image.
So What is Photoshop Good For?
Nothing! Just kidding. Like I said earlier, all Adobe programs are loaded with high end features, and Photoshop is no exception. Photoshop is great for creating raster-based images to use on your package design.
You should be using photoshop to edit photos for the use on your package design file. Some examples of this are color correction, removing the backgrounds and adding special effects.
Understanding Your Dieline, and Bleed Area
So you have illustrator and you have the dieline from your packaging supplier (the vendor printing your boxes or packages). Let’s open that up in Illustrator and see how that looks, and go over some basics.

The pink lines represent where the machine will cut the stock into the flat shape of the box. In this example above, the dashed pink lines are clearly folds, however, most dielines use cyan (light blue) colored fold lines. The crossed areas are locations for glue.
If you are having a hard time visualizing how the final product will look, you can make a personal sample of it relatively easily. First, print out two copies. Write a number or letter for each panel. On the second copy, do the same thing with the same letters in the same location.
Next, actually fold one up and tape or glue it together. This will tell you what panels on the dieline go where on the finished box. Also take note of the orientation your markers take. Some of them may now display upside down, so your artwork will need to be upside down in those areas to appear right side up. For example, the top-left-most panel in the dieline above would be an area where the artwork should be upside down.
The next thing to account for is the bleed. The bleed is extra area where designers put color to correct for the printer being slightly misaligned. For this reason, try to keep important information 0.125 inches away from the side of the dieline. To put bleeds on a dieline like this, simply extend any colors or images that touch the dieline beyond the pink line by another 0.125 inches.

In the image above, notice how the dark gray and pink texture goes slightly beyond the dieline. This is what it will look like if you’ve designed for your bleed area properly.
Understanding Illustrator’s Tools
The best thing you can do to understand Illustrator’s tools better is to practice. You can also look at online tutorials or more inspiration and understanding of how the software works. You should be well versed in the following tools & features before taking on a serious package design project for yourself:
● Layers
● Swatches / Color Selection
● Pen Tool
● Fill vs Stroke
● Character / Paragraph
● Clipping Masks
● Links
This only scratches the surface, but taking the time to learn about those tools and panels will give you a good jumping off point.
Color Spaces & Printing
When you get your dieline from the printer, you should also find out how they like their files. Also find out if they do spot colors. You will need this information when designing your packaging.
Typically, there are a few options available to you:
1 Color
2 Color
3 Color
CMYK
CMYK + Spot Colors
One, 2 and 3 color are for when you are only working with that many single Pantone colors. Any use of CYMK color mixing or an image, would require CMYK Printing. CMYK represents the 4 colors of ink that go into printers. All colors that come out of the printer are a mix of cyan, magenta, yellow, and black.
Pantone colors are a special mix of inks to create a specific color. These print separate from CMYK. If your logo has PMS 265C, you would want to load that into your artwork’s swatches panel.
In some cases you will use Pantone colors as well as CMYK printing to create big multi-color jobs (could be CMYK plus 3 or 4 Pantone colors for 7 or 8 total colors). This sounds exciting, but keep the cost in mind. The more colors you’re printing, the higher the cost.
Staying on Brand When Designing Your Own Packaging
Once you have your design software down, it’s time to look at the fundamentals. Staying on brand being the most important. This is especially true if you already have a few products on the market.
The best, and easiest way to do this is take a previously created package design form your brand, and copy the elements (logo, writing, textures etc.) over to your new dieline. Then, place the pasted elements to the same areas where they were previously, and finally resize and retype the new copy to match your new product.
You likely won’t reuse the same imagery, but try to pay attention to the target audience and overall feel of the images between products. Do they feel like the same brand?
If you don’t have previously designed packages: You’re not off the hook. It just means your job got harder. What you create now needs to set the bar for future designs. Try to emulate the look and feel of your logo, and convey the message of your mission statement through your package.
To ensure quality, create 3 different looks for your design. Then take it around to your team and get good feedback. Then, take a VERY hard look yourself and make sure you’re happy with the design. Work that was done by an ameteur usually looks like that. It’s your job to push yourself beyond your limits when designing your own packaging artwork. Go through at least 2 or three rounds of this. You will eventually get to a point where your package looks professional and ready for the market.
Creating Digital Mock-ups
Now that you have your package designed. I’ll show you how to create a digital mockup in photoshop.
Step 1: Save your design as a PDF, and open that PDF in Photoshop.
Step 2: Create a new Document (so you should have 2 windows open. Your design and a blank document).
Step 3: In your opened PDF, take the selection tool and select one panel of your box.

Step 4: Copy that panel over to your blank document. Next, use the distort tool (Edit menu > Transform > Distort). This will let you alter the perspective of your layer.

Step 5: Repeat steps 3 and 4 for each panel until no more panels would be visible in an actual photo.
Perspective tip: Typically vertical lines should stay perfectly straight. Your box can look deformed if you have leaning vertical lines.
Ultimately, choosing to do package design yourself over hiring a professional designer is your call. I recommend hiring a professional designer to help give your brand an amazing head start, and generally speaking their work will be higher quality than what a non-designer could produce. Just like how a sales manager would be a lot better at acquiring new store opportunities than a designer.
from Survis Posts https://survis.com/posts/thinking-outside-the-dieline-package-design-for-businesses
0 notes
Text
How to Get Repeat Customers in Ecommerce
It’s said that a satisfied customer is often a repeat customer. Use these 9 strategies to not only keep your customers satisfied, but also to keep them returning back for more…!
eCommerce retailers have bad news and good news to contend with out there. The hardest part of any eCommerce store is to convince a first-time customer to click that “Buy Now” button. That’s because you (as an online seller) are an unknown to the first-time buyer. Despite the fact that you might already have an impressive list of satisfied customers, that first-time buyer isn’t one of them – and that gives her/him pause to think: Should I buy from this store, or…?
Strategies for Repeating Success
Now for the good news: The easiest part of selling online is selling to returning customers! That’s because they know and trust you, and because they see value in doing business with you. So, the question is: How do you build that trust and continue to get your first-time customers coming back for more?

Here are nine strategies to help you do precisely that:
1) Cultivate loyalty
The most effective way to spur customer loyalty is to cultivate it. eCommerce store owners can do this by starting a loyalty program that rewards a customer (e.g. first-time buyer) with special privileges that make them feel…well, “special”.
For instance, you could have a “special” aisle in your store to say something like “First-time buyers…”, that might offer special promos for first-time buyers who might register and fill out a form with their contact details. Shoppers that take the time to register and provide such (often personal) details will more than likely have a pre-disposition to return to buy from you again – the next time they want the same/similar product.
2) Reward loyalty
Another eCommerce strategy, to entice shoppers to keep coming back for more, is to reward them for every return-purchase they make. You could offer them redeemable points, returning-customer discounts, or even a chance to enter a monthly draw and win a prize.
The trick here is to make sure your first-time-customer loyalty rewards aren’t better than those offered to returning customers. Otherwise, why would anyone buy from you more than once?
3) Appreciate loyalty
As an eCommerce store owner, you might think that customers (including repeat buyers) already know you appreciate their business – you are wrong! It’s a very competitive eCommerce landscape out there, and any sliver of edge you might enjoy over your competitors, could help you “close the deal”.
One way to keep your customers returning to your store, is to send our “Thank You” notes upon the completion of every sale. It’s human nature to love being appreciated, and that simple gesture of being thanked for shopping at your store will make customers think twice before shopping elsewhere.
In thanking them, make sure you include special “Thank You” promos (e.g. Free Shipping) that they can take advantage of when they make their next purchase.
4) Make buying easy
Some first-time buyers would love to sign-up and create an account on your eCommerce site, so they can keep coming back for more. But often, they are discouraged by the arduous registration process. One strategy to overcome that hesitation is to give first-time customers the opportunity (option) to automatically create a log-in profile (using data already provided from this first sale) to use when they come back.
Another equally popular strategy is to enable shoppers to use their social media profiles, like Facebook, Twitter, Google+ or LinkedIn, to log-in on your eCommerce shop. This gives customers flexibility to jump right in and buy something from you, even as they are interacting with friends and family and – maybe – chatting with a social contact about your products/services.
Making it quick and easy to create an account, and then simplifying the process of logging-into that account, will increase the chances that they will return.
Check out our previous post on must have shopify plugins for ideas
5) Make it worth coming back…soon!
Researchers confirm that online shoppers have a tendency to validate their online shopping habits. Once customers have bought and paid for a purchase at one store, they will usually surf, browse and check out the competition – just to validate if the store they made their purchase from offered them value for money. This usually happens within 30-days of making their purchase.
As an eCommerce retailer therefore, you need to make it worth your shopper’s while to come back for more – within 30-days or less! So, how could you do that? One proven strategy is to offer then time-sensitive promos that they can only take advantage of within, say, the next 30-days or so.
6) Help change their minds
Some first-time customers (and even many repeats!) might go through the product/service selection process. They might add items they like to their carts. They may even get as far as the “Pay Now” button…but then they abandon their carts!
When customers abandon shopping carts, make sure you go back to them and offer “amazing savings” on items they abandoned. Since they already showed “intent to buy”, by filling up their carts with specific items, it will take you less effort to help change their minds and convert them, than say, selling to a brand-new prospect.
7) Use up-selling as a basis for repeat sales
While the offer to come back within 30-days might attract some customers, it might not be enough to convince many first-timers to re-visit your store. One strategy to change their mind into doing so is to use up-selling. The basis of any up-selling strategy is that, customers who buy a certain product/service are more likely to be in the market shortly, to also purchase a complementary or add-on product or service.
So, for instance, if someone buys a Stylus for a Microsoft SurfacePro Tablet device, it is a given that they (or someone they know) own a Microsoft SurfacePro Tablet device. So, why not try and convince them to buy other SurfacePro accessories – like headphones or a stand or carrying case?
Usually, if a customer is made aware that if they buy the said accessories within, say, 15-days of their last purchase, they could qualify for an additional 2% discount – it may just persuade them into stepping back into your store.
A word of caution about up-selling though: Don’t try and up-sell to the point that it feels as though you are harassing or stalking your customer. If your up-selling campaign leaves customers with that impression, chances are that they will never return – even though your eCommerce store carries the best products at the best price!
8) Build communities around your brand
The search for over 90% of purchases these days starts with online research – though not at the seller’s site. Whether it’s a product or service that your eCommerce store offers, chances are that your customer (first-time or repeat) checks online first, to make sure they (continue to) get the best deal possible. One strategy that eCommerce shop owners can use to assure customers and prospects that this is, in fact, the case is to create User Communities.
Building User Communities on reputed social networks, and then promoting them, is the best way to influence consumer choice. You could hire professional companies to do this – but more often than not, just publishing customer satisfaction testimonials, or promoting new products or promos, should be sufficient to tempt customers from returning frequently.
9) Don’t forget online marketing and PR
Any eCommerce store owner who still believes in the old adage: Build it and they will come! – is sadly out of date in their selling philosophy. In order to continually drum-up repeat business, your existing customers must constantly be reminded that your store is still around, and still offers them great value for money.
While not every eCommerce store owner can hire professional marketers, you should certainly consider running the occasional Google AdWords or AdSense marketing campaign. Also, it wouldn’t hurt to publish the occasional Press Release about your store and your brand, serving as a reminder to your customer base that you are still open for business.
Check out our past post on SEO strategies that work
Your Customer and Your Brand
Building loyalty to your brand isn’t solely about offering the lowest price. It isn’t about offering frequent deals or building a great customer loyalty program either. Creating a culture of generating repeat purchases is much more involved than that.
In order to use all of the customer repeat-business strategies that we discussed, effectively, you need to first understand your customer’s profile. Everything else then flows from there. For instance, some customers are wary about re-visiting a store that charged them 10% more than a competitor – even with a 5% discount voucher offered for a revisit! If you are selling to cost-conscious clients (like students or low-income families), then you need to make sure your repeat-customer strategies line-up with their (customer’s) profile.
Another pre-requisite to getting repeat business, is offering the right product/service in the first place. If, for example, your products are of an inferior quality, repeat customers are not likely to buy from you – EVER – again, even at a 50% discounted price!
Also, don’t forget that fresh products breed repeat business. Take the time to continually scour the marketplace for new and exciting spins on your existing product lines – and then tell your customers (Email messages, Social Media alerts, Text notifications) how great the new line-up is. That will definitely draw old customers into the store to check out your new offerings.
And finally, many customers will just prefer to step in again for another purchase, simply because you offer better customer service – compared to a competitor that offers unbelievably discounted prices. Exceptional customer service will draw back satisfied clients like bees drawn to honey – guaranteed!
from Survis Posts https://survis.com/posts/how-to-get-repeat-customers-in-ecommerce
0 notes
Text
7 Must Have Shopify Plugins 2018
Use these 7 Shopify plugins and Apps to supercharge your storefront, enhance your customer’s shopping experience, step-up customer/visitor engagement, and seamlessly increase online sales revenue
With over 600,000+ merchants in 175 countries using Shopify, it (Shopify) has become one of the most powerful eCommerce platforms available – especially for Small to Medium Enterprises (SMEs). You get everything you need integrated into a single dynamic platform – web storefront, marketing tools, secure payment processing and expedited shipments.
But, if you are one of those 600,000+ Shopify merchants, you are always on the lookout for ways to enhance and supercharge your storefront. While native tools provide you a lot of functionality to enable you to run your business pretty effectively, there are addons and plugins out there that let you significantly extend those features.
Let’s take a look at seven such tools that no Shopify storefront owner should live without in 2018 and beyond!
Shopify Plugins and Addons
Before we do a deep-dive review of our seven Shopify plugins, I’d like to clarify that this isn’t a ranking of these Apps. Each of them serves a niche requirement for online merchants and, therefore, they are not mutually exclusive – you can use any or all of them together. The choice is yours.
More importantly though, it helps to underscore the fact that ALL of these are 3rd-party tools – not native Shopify widgets. However – and this is a huge deal – they are ALL available through the Shopify App Store, and they have ALL been verified by Shopify. Shopify won’t list a plugin or App on its App Store if it’s not verified by them.
With that out of the way, lets take a look at our 7 must have 2018 Shopify plugins.
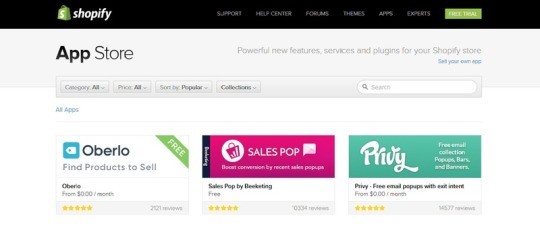
1. Oberlo – Easy Marketplace searching Tool
Oberlo: If you are new to Shopify, or even if you are new to the idea of even creating a Storefront, then the first question on your mind will likely be: Once I get my Shopify account, what products should I sell? And of course, once you determine WHAT you want to sell, you’re likely going to know: WHERE can I find them?
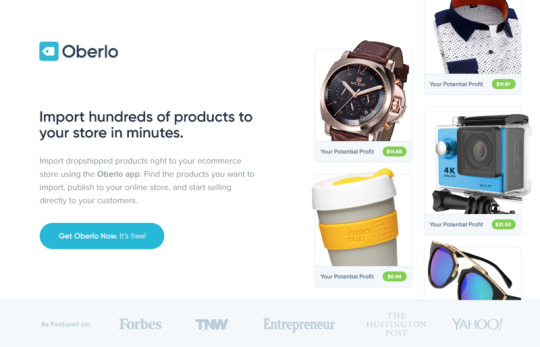
Well, while others are combing the depths of the internet to look for the right product or service to offer on their Shopify storefronts – an exercise that consume hours or even days on end! – you can use Oberlo to get what you need in a matter of minutes! This FREE Shopify plugin searches millions of potential online opportunities for you, and then presents them to you so you can decide whether they are the right ones to add to your Storefront.
Your Storefront can literally start offering hundreds of products by directly importing them into your website. The products will be drop-shipped directly to your customers, so you’ll never need to deal with shipping or logistical nightmares. Best of all, you never have to worry about updating product prices – EVER! – because Oberlo takes care of all those administrative details for you!
2. Sumo - Free Exit-Intent Popups, Email Marketing Tools, and More
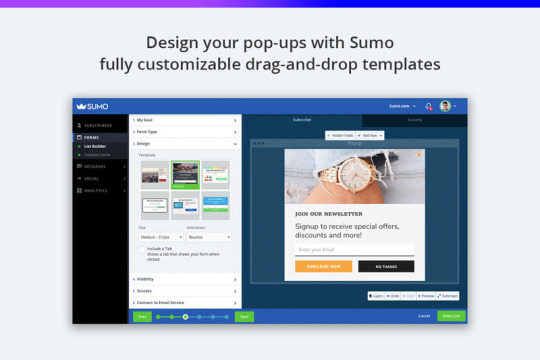
Sumo: Selling starts when you connect with visitors and prospects. If you lack that connection, you will never be able to convert protects into paying customers – It’s that simple! And the majority of storefront owners build that “connection” through emails. Email lists are like gold mines – the more contacts you have on your list, the more opportunity you have to target your sales effort…and Sumo is there to help you in that endeavor.
This plugin offers free exit-intent popups, an integrated Email List-builder, Share buttons, Google Analytics integration, Live chat and much more. It also helps you grow and monetize your email list based on email information provided by your visitors. Sumo, with its suite of other integrated features, can be a powerful ally to convert casual visitors to paying customers.
Sumo’s integration with popular email and marketing ad platforms, like SendGrid, MailChimp and Hubspot, means you can now seamlessly leverage your email lists to run highly concentrated marketing campaigns from lists compiled via your Storefront.
3. One Click Social Login
One-Click Social Login: One of the biggest selling features that any Storefront owner can hope for, is to make it easy for visitors, prospects and returning customers to step inside the store and make a purchase. The easier and more seamless this experience is, the greater is the likelihood that sales will grow. With hundreds of users frequenting social media platforms daily, wouldn’t it be great to have a way to use those platforms to funnel sales to your store? Well…now there is!
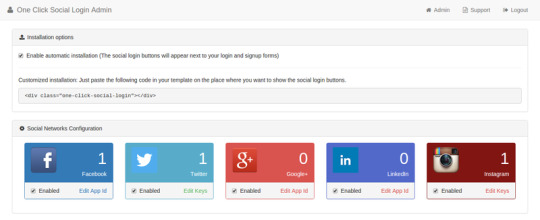
One Click Social Login is a 3rd party Shopify plugin that you can use to get the power of other popular social media sites, like Twitter, FB, LinkedIn, Instagram, Amazon, Google+ and many others, to help drive customers/visitors to your site.
Once installed, it makes it easier for prospects to sign-up to your storefront using their existing social profiles. Installation options include the automatic install or, for the somewhat technically oriented, the tool allows you to copy/paste a snippet of code to activate the App in your Storefront.
4. Free Shipping Bar by Hextom
Free Shipping Bar: This 3rd-party App offers free shipping to customers on your Shopify storefront to help garner even higher sales per checkout. Customize your free shipping offers based on parameters you can define – value, or geo-targeting (US, Canada etc.). It’s highly responsive design provides a consistent look/feel to your Storefront, regardless of which device – Tablet, Phone, Desktop – it is being viewed on.
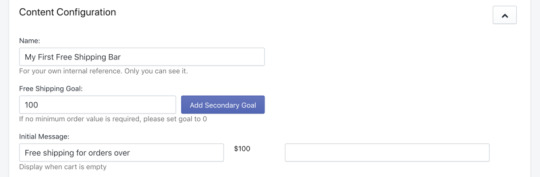
The cool thing about this add-on is that it offers Storefront owners a brand-neutral way to integrate all of these features onto their site. Developers of the Shipping Bar App do not display their brand on the tool, so it integrates neatly into your own store’s design and themes.
5. SMAR7 Bundle Upsell
Bundle Upsell: Long-time merchants will tell you that the best way to make customers buy more, is to demonstrate the value that additional products/services have on the ones they are already buying. That’s called upselling, and Bundle Upsell does that beautifully!
It helps relate specific products purchased, to others that customers could bundle as an offer and save. It’s a neat tool to help you upsell to clients based on what their shopping cart looks like. You can leverage other integrated features, like Rewards, Discounts, Free Shipping and other incentives to quickly upsell and “seal the deal”.
6. Sticky Buy Button
Sticky Buy Button: As a Storefront owner, you probably take great pride in every aspect of your site. However, without a doubt, your “Buy Button” has got to be your pride and joy – because that’s the one most important feature that turns casual visitors into paying customers. Shouldn’t you make sure that it is always available to your visitors, especially to help encourage impulse buys?
The Sticky Buy Button does just that – it always enables visitors to buy, without needing to navigate away from wherever they are on your storefront. By virtue of its “stickiness”, it ensures that customers aren’t distracted away from a buy decision by needing to go to a dedicated “buy now” page. The “buy” button will always follow your visitors, regardless of where they are on a page…always eager to place the order and seal the deal!
7. Kit
Kit: With so much power vested in Social media platforms today, it would be unthinkable for marketers to ignore them as a captive source of new sales opportunities. But organizing and managing social marketing ad campaigns required a lot of skill – and time! Unfortunately, not every Shopify storefront owner has much of either of those! Enter Kit – an integrated Swiss Army Knife of features that helps you set up and manage targeted Facebook and Instagram ad campaigns.
Promote back-in-stock items, enhance personalized communications with your visitors and customers, engage with prospects that showed an interest but haven’t yet made a purchase, and create powerful and meaningful reports of your marketing and sales activity. You’ll also be able to effortlessly retarget ads to prospects and customers to whom you’ve made previous sales pitches – just to make sure they haven’t forgotten about your product or service.
Expanding The Shopify Experience
Shopify plugins are a great way to, not only build a better Storefront but also to help give your customers and visitors a much better shopping experience than they would enjoy without these seven Apps. They can expand your Storefront’s capabilities by providing better Admin features, and they can even help increase your conversion rates – something that will greatly improve your bottom line.
Of course, you may choose to expand your Shopify storefront’s capacity by using private Apps and plugins that leverage Shopify’s own APIs. But you must take into account that such plugins, if they aren’t listed on Shopify’s App Store, are unverified by your storefront platform provider.
from Survis Posts https://survis.com/posts/7-must-have-shopify-plugins-2018
0 notes
Text
Top 5 Trends of Artificial Intelligence (AI) in the Workplace
There’s no avoiding artificial intelligence. From devices like Alexa in many homes, to mobile apps and and marketing – AI already has a place in everyone’s daily life. And business is no exception, as AI is already being used to make better decisions and utilize data. Here are a few AI trends you should be aware of for your business.
1) Artificial Intelligence Takes on Big Data
Businesses are starting to make decisions by studying excessive data from a wide range of sources. Because of this, algorithms and real-time methods have been used to break down this data and help businesses use it quickly.
AI helps in this space by breaking down the data to create predictive analytics. Then, artificial intelligence goes a step deeper, and uses machine learning and deep learning to improve the predictive analytics. This will allow businesses to give their customers the precise experience they’ve been looking for.
2) Voice Assistants
If someone argues that AI is being exaggerated, ask them how familiar they are with Alexa and similar devices. These are the most common examples of AI.
And now, they’re making their way into the workforce. Digital assistants that can make use of voice commands are slowly going to become commonplace in the office – as they’ve already become commonplace in the home. For example, nearly half of the mobile applications on the market can process voice commands. It is only a matter of time before business applications can do the same. Business will be able to improve as employees can have more complex interactions with the applications they use the most and the data that’s most useful.
3) Reshaping Mobile App Development
Because AI can process data in more complex ways than ever before, the mobile app development space will undergo a complete transformation.
Mobile users are seeking a custom, personalized experience – and many companies are able to provide it for them. This means the remaining businesses must make use of AI to provide a personalized experience on their mobile application in order to stay competitive.
To reach this goal, the role of the mobile app developer will change. This used to be a job of coding applications to conduct specific functions. Now, a mobile app developer will work with AI so that it can process data, improve organically, and learn from users. AI will reshape the way businesses approach applications, and the hiring of those who will work on these applications.
4) Automation via Robotics
There’s a process called Robotic Process Automation. What it does is make use of AI to complete repetitive tasks at huge volumes. This can be anything from a simple business transaction, to processing and presenting data.
Using this system saves a business both time and money. This is because Robotic Process Automation can complete the assigned task quicker than any employee, and more accurately. In order to stay competitive, businesses will have to implement this system and use the money that is freed up to invest in other business strategies.
5) AI Will Actually Create New Jobs
When people hear about AI in the workplace, they immediately translate this into robots replacing humans and taking over the job market.
On the other hand, AI will actually create new jobs. Not only does it put computer scientists in high demand, but it requires new positions in order to run the AI. These positions include engineers, accountants, retail analysts, and more. People will be needed to train others on how to use AI. People will be needed to prepare and organize the data for the AI to process.
So, the problem is not that AI will wipe out jobs. It will create new jobs, and organizations will face the challenge of finding candidates who can take on these responsibilities.
It’s no secret that AI is going to continue to build its presence in the workplace – just as it has in the home. While the consumer sees things like Alexa and mobile applications that accept voice commands as normal, they will soon see this type of technology as normal in the office, too. This will reshape the role of developers, and create new positions that companies will have to fill. While this will be a big challenge for businesses to take on, the potential rewards are limitless.
from Survis Posts https://survis.com/posts/top-5-trends-of-artificial-intelligence-ai-in-the-workplace
0 notes
Text
Different Types of Web Marketing
Marketing yourself online these days, either individually or as a business, is critical to success. In this day and age of digital communication however, it’s often common to see so many acronyms and short forms evolve almost on a daily basis. When it comes to the types of digital marketing options available, we’re faced with the same challenge. Sometimes, it’s hard to keep the who’s who and what’s what straight!
The Alphabet Soup Demystified
When you are communicating online, it’s hard to keep track of tech-talk – especially if you’re new to the world of digital marketing. When someone texts you about SMM – are they talking Super Mario Maker (Nintendo video game), or do they mean Social Media Marketing? And if you are into sales, does SMM mean Sales and Marketing Management?

When building your online marketing strategy however, context is everything. The “A”s and the “B”s in various acronyms could mean different things, depending on the digital marketing context you are talking about. So, lets try and demystify this alphabet soup for you in the context of some of the types of digital marketing options available.
Back to the Basics
For the novice, wishing to make an informed decision about internet marketing strategies, at a very basic level, digital marketing isn’t about the marketing of digital goods and services (although it very well could be!). Rather, it is the use of digital technologies and strategies to facilitate any type of marketing activity. The results that you are aiming for will of course depend upon:
The type of products and services you wish to market (while Tanks and submarines aren’t particularly suited for mas digital marketing, Electronic items, Runners and Yoga Pants certainly are!)
Whom you want to reach out to (your target audience)
How that audience uses digital technologies today (cellphones, laptops, desktops)
The time horizon over which you expect to achieve results (1 week, a year)
The extent of your marketing budget (some types of digital marketing are cheap, others are expensive)
The types of online marketing strategies that you employ in your marketing campaign will then depend upon these major constraints.
In order to understand which digital tools you should deploy, as part of your marketing strategy, it’s important that you understand what types of digital marketing approaches are available out there, so you can match strategy with tools appropriately. And that’s where most novice digital marketeers (and some veterans too!) step on a minefield of acronyms and abbreviations.
In the following section, we’ll demystify that alphabet soup for you, so you can hopefully understand what types of online marketing options are available to you, and which ones will best meet the objectives you’ve set out for your marketing efforts. As you go through each of these digital marketing options however, you should always keep in mind the various constraints we outlined earlier. They will be your guiding principles in choosing one (or a combination) over the other types of digital marketing.
Digital Marketing Types
Generally speaking, there are a handful of abbreviations for digital marketing that you should be aware of. Out of those few core approaches, digital marketing professionals create various other types of hybrid digital marketing strategies. When you are talking to, or negotiating with, digital marketing service providers, it is important for you to understand “digital marketing speak”, so you can make informed decisions. For instance, these days you hear a lot about things that go “viral”. Well, there now is a specialized digital marketing strategy, which uses various types of digital marketing alternates, which revolve around making things “go viral”. It’s a strategy known as Viral Marketing, and it uses a hybrid of several online marketing approaches. We’ll cover some of them in greater detail shortly.
Your Choices – What’s on The Menu?
So, without further ado, lets do a deep dive into the various forms of digital marketing. Be warned though – you’ll be exposed to many acronyms and abbreviations.
But don’t worry – we’ll break it all down for you:
1. SOCIAL MEDIA MARKETING (SMM)
In the old days, you’d base your marketing strategies upon surveys or polls conducted through third-parties. Many online marketers still do that, but now there’s a better way. They use social media, such as Facebook, Instagram and Twitter to take their message directly to the client.
Social Media Marketing (SSM) if one of the types of digital marketing that’s rapidly being used by large companies and small start-ups alike. It’s growing popularity is partly due to the fact that it puts businesses directly in touch with consumers. But the other reason that SSM is gaining in popularity is because of cost. Its low cost means many more businesses can adopt it and unleash the power of their social networking platforms to market themselves.
2. SEARCH ENGINE OPTIMIZATION (SEO)
To understand SEO, just think of your browser’s home page. As soon as you go to MSN.Com or Google’s home page, you’re flooded with popular or trending news stories or items of interest. Well, SEO aims to do just that: It takes your message to various search engine result pages (SERPs) and displays it prominently, ahead of your competitors, so surfers and would-be customers get to view them quickly.

The science of SEO is complex, and based on algorithms (called Bots, Crawlers and Spiders) and processes that parse the contents of websites and social media platforms, to rank and rate them for relevance. These types of digital marketing approaches therefore depend on making sure your content includes a lot of “food” – called Keywords, Tags, and Meta Data - for search engine Crawlers and Bots. If the hungry algorithms are satisfied with your content, they’ll rank your online presence higher up in search engine queries – which is a great marketing opportunity!
3. CONTENT MARKETING (CM)
Remember we talked about “hybrids” earlier? Well, one of the types of digital marketing hybrids is called content marketing. This strategy depends on high-quality, SEO-rich content, that you then serve across a number of online platforms – including websites, social media sites, Blogs and other digital presences.
With good content in hand, CM-specialists then use different destinations, including those owned by you as well as owned and operated by others, to host that content. Some of this content goes to paid destinations, while others are hosted/posted in reciprocal arrangements (you post mine, I’ll host yours!). The result: Well-created content, widely distributed and marketed, casts a wide net and creates a continuous pipeline of potential clients.
4. VIRAL MARKETING (VM)
We talked a little bit about VM earlier. Essentially, it is the art (some call it a science!) of taking some digital content, and marketing it in a way that it becomes the “talk of the digital world!”. Content could be a funny video, a thoughtful photograph, a passionate essay, or a mind-blowing piece of animation. It doesn’t matter what your content is created from, as long as it stirs a lot of online interest.
Next, VM uses various types of digital marketing strategies to push out that viral message, and link it to your brand or message. That could be done on YouTube, through Twitter, on your Facebook page, or through Instagram or Pinterest. With your message attached to that content, the more people like what they see, the more they share it with their own network of contacts, and the more viral it gets. VM is really that simple (and effective)!
5. PAY PER CLICK MARKETING (PPC)
Unlike SEO-enabled links, which rise to the top of any SERP because of their popularity and relevance to the searchers’ query, PPC marketing actually pays search engines to display your links or advertisements in prominent places on their pages.

If you are rolling out a short-term promotion of your goods and services, sponsored links and paid advertisements are a great way to be “up front, and top and center” on SERPs. Once that period is over, and you stop paying for your PPC campaign, your content will no longer appear “in your face” of searchers and casual surfers.
The duration of your marketing blitz, and the extent of your budget will dictate whether PPC is for you.
6. AFFILIATE MARKETING (AM)
To understand what Affiliate Marketing is, all you need to do is walk into any local franchise of a popular brand (Tim Hortons, Canadian Tire) and see how it works. AM is similar (though not identical!). These types of digital marketing strategies identify a host of “affiliate” platforms – websites, social media networks, Blogs – and recruit them to spread the word about what you are offering.
In effect, what you are doing is tapping into the popularity of your “affiliates”, so that you can convert some of their clients (or website traffic) into your own clients. There is an up-side and a down-side to AM. Firstly, you need to be diligent about selecting the proper affiliates, because if they aren’t honest and credible operators themselves, your brand could be irreparably harmed.
Also, AM means you have to split your revenue with your affiliates. The more prospects your affiliates convert into paid sales, the less revenue you get to keep.
However, the up-side to marketing through affiliates makes it one of the more popular types of digital marketing strategies around. Firstly, you don’t have to spend much of your own time, effort and money on marketing (although it is advisable that you continue to do so!). In the hope of increasing their own revenues, your affiliates will invest time and capital in marketing activities on your behalf.
In addition, since they have already built sizeable followings, you have a captive audience to target the marketing of your goods and services towards. And that’s a key advantage of using someone else’s contact list to sell yourself!
7. INFLUENCER MARKETING (IM)
One of the “indirect” types of digital marketing that’s gaining traction today, is called Influencer Marketing. Like affiliate marketing discussed earlier, IM is a marketing strategy that relies upon the popularity of others, to market your own products and services.
Here’s how it works:
You search and find individuals, groups or businesses that are well-respected within your niche. Then, you enter into an arrangement with them, whereby they promote and endorse your business, brand or marketing message.
Remember, because of the “authority” they hold within the niche, people they reach out to are more likely to get “influenced” and get converted when they hear your message. As an indirect marketing tool, AM often uses celebrities or other individuals (groups or entities) to influence prospective buyers to become paying clients. As in the case of affiliates however, credibility is of utmost importance!
8) ONLINE MARKETING (AKA: WEB MARKETING)
As alluded to earlier, some types of digital marketing strategies involve multiple strategies rolled into a single approach. Online marketing is one such hybrid marketing tool that involves a broad array of internet marketing initiatives.
Just as individuals in the old days marketed themselves using the Yellow Pages, Newspaper advertisements, door-to-door Flyer deliveries, Classified ads in community newspapers, Television spots – so too online marketing uses a myriad of digital marketing strategies to get the message out.

From marketing on specialized websites, to listings on niche online directories, to getting paid and reciprocal links from/to other online platforms from/to your website, this type of strategy takes a shotgun approach to marketing. You could write Guest Posts to promote yourself; buy paid links on search engines; write and publish content on niche sites, or launch a Press Release every time you roll out a new product or service, or have something newsworthy to report.
And there…now you know Who’s Who, and What’s What about digital marketing. As you can see, the types of digital marketing strategies are as broad and diverse as the products and services you are trying to market. Some of them can be launched on your own, others might need professional inputs. And still others need partners (affiliates) to pull them off successfully.
Happy Marketing!
And now, for the BIG questions:
Are some of these better than others?
Should you avoid some and embrace others?
Which one is the best for you?
Unfortunately, the best answer to all of these questions is a rather vague (and politically correct!): It depends!
When it comes to online marketing, there’s no one-size fits all approach. Which types of digital marketing strategies you adopt will depend on many factors, including on your marketing objectives. While PPC might work for your competitor, your business may be better suited for SMM. To choose which one is ideal for you, go “Back to the Basics” above, and review the five constraints we provided. Keep those in mind when deciding what types of digital marketing you should adopt. And happy marketing to you all!
from Survis Posts https://survis.com/posts/different-types-of-web-marketing
0 notes