regardingroyai
Regarding Royai
Reflections regarding Roy Mustang and Riza Hawkeye of Hiromu Arakawa’s Fullmetal Alchemist. Also, occasional collages.
90 posts
Last active 3 hours ago
Don't wanna be here? Send us removal request.
Last Seen Blogs

sacredroadkill
May 23rd was a Wednesday

hopefulcherryblossomwizard
Untitled
graf-monte-christo
Der Graf von Monte Christo

sentientdannydevitocutout
Angel Taking The Form As A Sentinet Danny Devito

blackedboutinela
BLACKED x BoutineLA
Note
Thank you again, @aicasey, for your delightful ask! :D
My long answer is under the cut.
Many years ago, I bought a box of blank greeting cards and some decorative paper and started making small collages to put on the cards. I didn’t really know what I was doing, so I came up with simple designs, such as little nature scenes with suns and flowers and mountains. I made up my method by trying various things and finding out what worked for me.
In 2018, I started watching anime. The first anime that I watched were Studio Ghibli films. I loved the films, and I wanted to make a collage of the studio’s mascot, Totoro, who was my favorite character.
Totoro, of course, fit right in with a nature scene, but I hadn’t made a collage of a character before. I wanted to keep my rendition fairly close to Hayao Miyazaki’s character design, because I thought that this would be a fun way for me to explore that design in another medium and to pay tribute to the character’s original creator.
I looked at my growing collection of Ghibli merchandise and selected an artwork of Totoro by Miyazaki. Using that artwork as a pattern, I cut decorative paper into shapes and assembled the shapes into a collage.
In 2019, I found out about Fullmetal Alchemist, watched the anime adaptations, and read the manga. I loved the Fullmetal Alchemist universe, and I wanted to join the online fandom.
I started this Tumblr blog that year, on Fullmetal Alchemist Day. I soon saw a post about an upcoming holiday gift exchange in the fandom. I sent the gift exchange blog an ask describing my collages, mentioning that my most recent collage was of an anime character, and wondering if a scan of a collage of someone’s favorite Fullmetal Alchemist character would be acceptable as a gift for the exchange. One of the moderators, Mod Flour (@flourchildwrites), thoughtfully answered my ask and invited me to send a picture of my last collage. I had already given away that collage, so I decided to make a collage of one of my favorite Fullmetal Alchemist characters.
I wanted to keep my rendition fairly close to Hiromu Arakawa’s character design, because I now knew from my previous experience that this would be a fun way for me to explore that design in another medium and to pay tribute to the character’s original creator.
I looked through The Complete Art of Fullmetal Alchemist, which I had bought by then, and I selected an artwork of Riza Hawkeye by Arakawa. Using that artwork as a pattern, I cut origami paper and card stock into shapes and assembled the shapes into a collage.
I scanned the collage of Riza and sent the scan to all of the gift exchange moderators, Mod Flour, Mod Tas (https://archiveofourown.org/users/ruikosakuragi/pseuds/Tasia), and Mod Waddi (@waddiwitch). Their replies were so kind and encouraging, and they even asked if they could share the collage on their blog, which made me feel so welcome!
They shared the collage at https://fmasecretsanta2020.tumblr.com/post/189691492722/behold-the-first-gift-of-our-holiday-season, and their post inspired me to make a collage of another one of my favorite Fullmetal Alchemist characters as a companion piece.
I looked through the art book again and selected an artwork featuring Roy Mustang. After making the collage of Roy, I posted it at https://regardingroyai.tumblr.com/post/189737723752/roy-mustang-of-hiromu-arakawas-fullmetal.
For the gift exchange itself, I made a collage of Edward Elric for @pinceauarcenciel. I based the portrait of Edward on artwork from Chapter 61 of the manga, and I based the background on a frame from the first anime adaptation’s second opening. My choice of background was intended to personalize the gift collage by alluding to the giftee’s username, because the second opening theme is by L’Arc-en-Ciel, and the frame that I selected contains a rainbow. I used art tissue for the rainbow and clouds in the background to make them look translucent. I used twenty colors for this gift collage, which is the highest number of colors that I have used for any one collage. I posted this gift collage at https://regardingroyai.tumblr.com/post/189841968462/salut-pinceauarcenciel-je-suis-ton.
For the gift exchange the following year, I made a collage of Roy and Riza for @areyousanta. The previous year, I had been their giftee, and they had made a wonderful gift artwork for me. That artwork was holiday themed and humorous. I wanted to make a gift collage for them that would be holiday themed and humorous too. I had in mind particular facial expressions, poses, and outfits, which I based on assorted elements from about two dozen artworks by Arakawa, about half of which were from the art book and half from the manga. For Roy’s gloved hand, I photographed my hand with a similar glove on and used the photo as my pattern. For the candle and the heart-shaped flame, I improvised. For the caption, I pored through speech bubbles in the manga to find the letters that I wanted, and I cut black origami paper into shapes to match the manga typeface. When I put everything together, it all somehow coalesced into just what I had envisioned. My choice of background was intended to personalize the gift collage by incorporating the giftee’s favorite color, because their blog mentions that a grey-blue sky color is their favorite. I posted this gift collage at https://regardingroyai.tumblr.com/post/638182418669584384/may-the-season-spark-joy-hello-areyousanta-i.
It really brightened my holidays to be able to give my gift collages to other Fullmetal Alchemist fans and to receive lovely gift artworks and kind and encouraging notes from other Fullmetal Alchemist fans as well!
I have also made collages for other occasions relating to Fullmetal Alchemist, such as Arakawa’s birthday, Fullmetal Alchemist Day, International Fullmetal Alchemist Tumbleweed Appreciation Day, Riza’s Day, Royai Day, and Roy’s Day.
People’s responses to my collages have continued to be so kind and encouraging! It brings me so much joy to see the likes and reblogs and to read the replies, comments, and tags!
I am so happy to have found out that I enjoy making collages relating to Fullmetal Alchemist and that people enjoy seeing my collages!
As I have continued to make my collages, I have continued to develop my method, including by testing out and adopting new materials and tools. For instance, I have worked with a variety of papers, including amate paper, art tissue, card stock, lokta paper, metallic art paper, origami paper, papyrus, and washi paper. I have changed the types of adhesive and the brands of craft knife and cutting mat that I use. I have bought a light box and a rolling trimmer. I have used my phone to make scans and to take photos, and the photos have tended to turn out better than the scans, so now I just take photos.
The method that I will describe here is the one that I have been developing during the past few years. I will illustrate this description with images of steps in my process of making a new collage of Roy Mustang in honor of Roy’s Day (June 1).
When I make a collage, I start by choosing who or what will appear in it. Then I select artwork or other images featuring anyone or anything that I want the collage to depict. For a Fullmetal Alchemist collage, I usually select an artwork from the art book or from the manga.
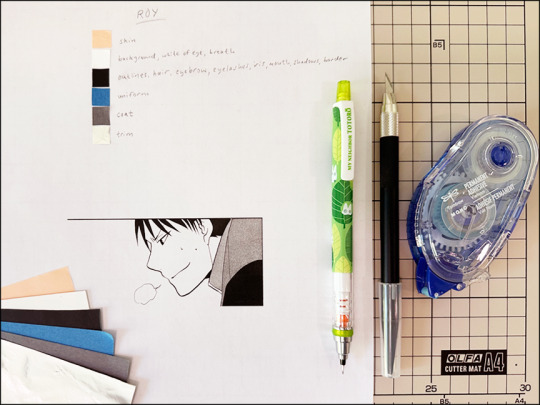
Since there was a solar eclipse this spring, it seemed fitting to base this new collage on a manga panel from a scene set on the Promised Day. I chose a panel from Chapter 101.
After I have selected artwork, I usually take a photo of it in the art book or in some edition of the manga.
My Fullmetal Alchemist manga collection began with the Complete Box Set published by VIZ Media and now also includes the Fullmetal Edition published by VIZ and the kanzenban published by Square Enix. I especially like how the artwork looks in the kanzenban, so when I am making a collage based on a manga panel, I usually take a photo of that panel in the kanzenban.
That is what I did for my new collage of Roy.
After I take the photo, I increase its contrast so that I can see its details more clearly and so that I can’t see any images that may have bled through from the other side of the page.
Then I choose a size for the collage, and I adjust the scale of the photo so that it will print at that size. My smallest collages are smaller than playing cards, and my largest are similar in size to sheets of letter paper.
I wanted my new collage of Roy to be about the about the same size as the manga panel in the kanzenban. The print size of the photo was nearly five times larger than that, so I adjusted the scale to 19% before printing.
Next, I print out the photo several times, and I use one of the printouts of the photo to make a color chart.
To make the chart, I start by choosing the papers that I will use for the collage. I have made one black-and-white collage, but on average, I use about seven or eight colors when making a collage.
If I am basing the collage on color artwork, I look for papers in colors that resemble the colors that Arakawa used in the artwork. If I am basing the collage on black-and-white artwork, I usually refer to color artworks in the art book, in the Fullmetal Edition, or in the kanzenban to see what colors Arakawa has used for the people, animals, and things that I want to depict, then I look for papers in colors that resemble those colors.
For instance, in color artworks in the art book, in the Fullmetal Edition, and in the kanzenban, Arakawa has used red for Black Hayate’s collar and green for Riza’s clipboard, so I looked for papers in those colors to use when depicting those items in my collages.
Although the covers and spines of the art book and the Fullmetal Edition volumes, as well as the dust jacket of one kanzenban volume, are adorned with shiny metallic text and symbols, I haven’t seen any metallic ink or foil used in Arakawa’s artworks themselves. So I am not sure whether some items depicted in her artworks, such as the Amestrian State Military uniforms’ buttons, pins, and trim, Roy’s military decorations, and Riza’s earrings, are metallic. But those items are rendered in similar ways to some other items depicted in her artworks, such as Edward’s automail, Alphonse’s armor, and the State Alchemists’ watches, which are all definitely metallic. So in many of my collages, I have chosen to use silver metallic papers for the military uniforms’ pins and trim and for Roy’s military decorations, and to use gold metallic papers for the uniforms’ buttons and for Riza’s earrings. I like how metallic papers reflect light, so I like to include those shiny papers in my collages.
After I have chosen the papers that I will use for the collage, I cut a small square from a corner of each of them, arrange the small squares into a column, and use adhesive to affix the column of squares to a blank space on the printout of the photo. Above the column of squares, I usually list any character depicted in the photo. Next to the column of squares, I list where in the collage I will use the respective colors.
The following image shows the color chart that I made for my new collage of Roy.
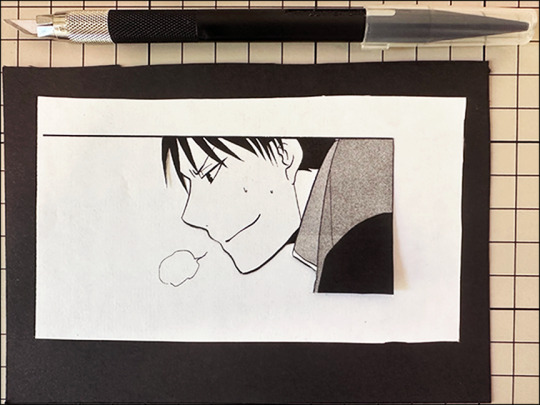
After making the color chart, I start to cut the papers into shapes, using the other printouts of the photo as patterns.
When I am working with opaque paper, I place the pattern on top of the paper and cut the paper into shapes on a cutting mat.
The following image shows how I cut opaque paper for my new collage.
When I am working with translucent paper, I place the paper on top of the pattern and cut the paper into shapes on a sheet of white card stock on the surface of a light box. The white card stock makes the light softer and protects the surface of the light box from scratches.
The following image shows how I cut translucent paper for my new collage.

When I am making a portrait of a character, I usually start by cutting black card stock into a silhouette of the character. This silhouette will perform several functions. It will provide a firm base for the smaller paper shapes that I will place on top of it. It will help me know where to place those smaller shapes, and it will also provide some outlines around and between them, as well as some other details, such as seams and shadows. And it will consolidate those smaller shapes into one larger shape that will be easier to place on the collage’s background.
The following image shows the silhouette that I made of Roy.
Next, I cut translucent paper into the shape of the character’s head. I usually use origami paper in a color similar to the character’s skin tone. When I made my collage of Edward, I layered two different colors of origami paper to try to match his skin tone.
For any details that are in black ink in the original artwork, I usually use black origami paper, because it looks dark enough and sharp enough to seem visually similar to black ink.
I usually start with the character’s eyes, because they are so important to the facial expression, and I want to give myself plenty of time to do this delicate detail work slowly and carefully. Then I continue with the character’s mouth, nose, and ears.
When I am ready to assemble the paper shapes that will form these features, I put a printout on the light box and put the paper shape of the character’s head on the printout. Then, with the printout as a placement guide, I use adhesive to affix the paper shapes for the eyes, mouth, nose, and ears to the paper shape for the head.
The following image shows the paper shapes for Roy’s head, eye, nose, and mouth on a printout on the light box. The printout is the same one that I used as a pattern for the silhouette.

The left side of the following image shows the paper shapes for Roy’s ear right side up.
The right side of the following image shows the same shapes upside down with adhesive applied to their reverse sides.

After I have added the features to the character’s head, I work on other elements that will be included in the character’s portrait, such as the character’s hair, neck, hands, and outfit, and any items that the character is holding.
When I want to add details to any translucent paper shapes, I usually use the same method as I did to add the features to the character’s head.
When I want to add details to any opaque paper shapes, I usually use the silhouette, which can visually fill in those details.
For example, for my new collage, I cut two opaque paper shapes to form the highlighted areas of Roy’s coat. Later, when I affixed the two opaque paper shapes to the silhouette, its black card stock visually filled in the seam between them and also the shadowed area below them.
When I have made all of the paper shapes that will be included in the character’s portrait, I arrange the paper shapes similarly to how they will appear in the portrait.
The following image shows the paper shapes for Roy’s portrait arranged in such a way.

Next, I use adhesive to affix the paper shapes to the silhouette.
The following image shows the paper shapes affixed to the silhouette of Roy.

Next, I make the background for the collage. I use the rolling trimmer to cut a background with a neat rectangular shape, and I use adhesive to affix the portrait to the background.
Then I make any borders that will be added. I use the rolling trimmer to cut borders with consistent thicknesses, and I use adhesive to affix the borders to the collage.
The manga panel of Roy has two borders, so I put two borders on the collage.
The following image shows the portrait of Roy affixed to the background of the collage, with borders affixed to the upmost edge and the rightmost edge of the collage.

After I have put together the collage, I take a photo of it and write a photo caption, an image description, and any other text that I want to share. Then I create a photo post on Tumblr, upload the photo, add the text, and save the post as a draft, usually sometime before the date when I want to post the collage. That way, the collage will be all set to post when that date arrives.
I am so grateful for the encouragement and inspiration that I have received here on Tumblr, including from this ask, which I have really enjoyed answering!
I hope that what I have shared in this answer may be of some interest or use to you and others, and I would welcome any more questions that anyone may have. <3
Hello!
First of all, thank you for the insightful content you spread on Tumblr! I also find it super interesting that you make collages :D If you don't mind, could you please share more about the process, how you choose what to make, etc. I'd love to learn more.
Thank you! <3
Hello!
Many thanks to you for your lovely ask and your kind words! You’re welcome! I’m so happy and honored that you find my content insightful and my collages interesting, and I’d love to share more about making the collages! :D
I generally choose what to make based on fandom events, dates related to Fullmetal Alchemist, and my favorite manga panels and other artwork by Hiromu Arakawa. For instance, I’m planning to make a new collage of Roy Mustang in honor of Roy’s Day (June 1), and I’ve selected a particular panel of Roy from Chapter 101 of the manga.
You’ve inspired me to start making this new collage early and to document the process with photos and descriptions in order to post an illustrated and detailed follow-up answer to your ask. My collages tend to take a week or two to make, so I expect to post that follow-up answer within the next couple of weeks.
Thanks again! <3
#ask#aicasey#hiromu arakawa#fullmetal alchemist#roy mustang#fullmetal alchemist manga#collage#images described in alt text
18 notes
·
View notes
Note
@aicasey I’ve made the collage, taken the photos, and started writing the follow-up answer, and I’m feeling inspired to write more than I had planned! I now expect to post the follow-up answer next weekend. Thank you for your patience! <3
Hello!
First of all, thank you for the insightful content you spread on Tumblr! I also find it super interesting that you make collages :D If you don't mind, could you please share more about the process, how you choose what to make, etc. I'd love to learn more.
Thank you! <3
Hello!
Many thanks to you for your lovely ask and your kind words! You’re welcome! I’m so happy and honored that you find my content insightful and my collages interesting, and I’d love to share more about making the collages! :D
I generally choose what to make based on fandom events, dates related to Fullmetal Alchemist, and my favorite manga panels and other artwork by Hiromu Arakawa. For instance, I’m planning to make a new collage of Roy Mustang in honor of Roy’s Day (June 1), and I’ve selected a particular panel of Roy from Chapter 101 of the manga.
You’ve inspired me to start making this new collage early and to document the process with photos and descriptions in order to post an illustrated and detailed follow-up answer to your ask. My collages tend to take a week or two to make, so I expect to post that follow-up answer within the next couple of weeks.
Thanks again! <3
18 notes
·
View notes
Note
You’re so welcome! Thank you so much for your sweet and encouraging comments! I’m looking forward to sharing how I put together a collage and to making my next works, and I hope that you’ll enjoy my upcoming posts! <3
Hello!
First of all, thank you for the insightful content you spread on Tumblr! I also find it super interesting that you make collages :D If you don't mind, could you please share more about the process, how you choose what to make, etc. I'd love to learn more.
Thank you! <3
Hello!
Many thanks to you for your lovely ask and your kind words! You’re welcome! I’m so happy and honored that you find my content insightful and my collages interesting, and I’d love to share more about making the collages! :D
I generally choose what to make based on fandom events, dates related to Fullmetal Alchemist, and my favorite manga panels and other artwork by Hiromu Arakawa. For instance, I’m planning to make a new collage of Roy Mustang in honor of Roy’s Day (June 1), and I’ve selected a particular panel of Roy from Chapter 101 of the manga.
You’ve inspired me to start making this new collage early and to document the process with photos and descriptions in order to post an illustrated and detailed follow-up answer to your ask. My collages tend to take a week or two to make, so I expect to post that follow-up answer within the next couple of weeks.
Thanks again! <3
18 notes
·
View notes
Note
Hello!
First of all, thank you for the insightful content you spread on Tumblr! I also find it super interesting that you make collages :D If you don't mind, could you please share more about the process, how you choose what to make, etc. I'd love to learn more.
Thank you! <3
Hello!
Many thanks to you for your lovely ask and your kind words! You’re welcome! I’m so happy and honored that you find my content insightful and my collages interesting, and I’d love to share more about making the collages! :D
I generally choose what to make based on fandom events, dates related to Fullmetal Alchemist, and my favorite manga panels and other artwork by Hiromu Arakawa. For instance, I’m planning to make a new collage of Roy Mustang in honor of Roy’s Day (June 1), and I’ve selected a particular panel of Roy from Chapter 101 of the manga.
You’ve inspired me to start making this new collage early and to document the process with photos and descriptions in order to post an illustrated and detailed follow-up answer to your ask. My collages tend to take a week or two to make, so I expect to post that follow-up answer within the next couple of weeks.
Thanks again! <3
18 notes
·
View notes
Text
“To Protect”
Reflections regarding Roy Mustang and Riza Hawkeye (and Edward Elric and Winry Rockbell as well) | Spoilers | Chapters 24 and 58 of Hiromu Arakawa’s Fullmetal Alchemist manga
In Chapter 24, Winry asks Riza why she is in the military. And Riza answers, “Because there’s someone I need to protect.”
In Chapter 58, Edward confides in Riza about his concern for Winry. And Riza advises Ed, “You have to protect her.” Then she asks him, “You love Winry, don’t you?”
When these quotes are viewed together, they seem to indicate that Riza equates protection with love, and they seem to highlight Riza’s feelings for Roy as well as to highlight Ed’s feelings for Winry.
#hiromu arakawa#fullmetal alchemist#royai#roy mustang#riza hawkeye#edward elric#winry rockbell#fullmetal alchemist manga#fullmetal alchemist spoilers
26 notes
·
View notes
Text
Checking In
Reflections regarding Roy Mustang and Riza Hawkeye (and Edward Elric and Winry Rockbell as well) | Spoilers | Chapters 56 and 72 of Hiromu Arakawa’s Fullmetal Alchemist manga
I am always very moved when the manga draws parallels between Roy and Riza’s relationship and Edward and Winry’s relationship.
For example, Chapter 56 shows Edward calling Winry from a phone booth and checking in on her. By this point in the story, Winry is basically a hostage of the homunculi, although she isn’t yet aware of that. At first, Winry seems to brush off Ed’s concern for her, but then she thanks him for the call.
And similarly, Chapter 72 shows Roy calling Riza from a phone booth and checking in on her. By this point in the story, Riza is basically a hostage of the homunculi, and she is already well aware of that. At first, Riza seems to brush off Roy’s concern for her, but then she thanks him for the call.
#hiromu arakawa#fullmetal alchemist#royai#roy mustang#riza hawkeye#edward elric#winry rockbell#fullmetal alchemist manga#fullmetal alchemist spoilers
16 notes
·
View notes
Text
Shields
Reflections regarding Roy Mustang and Riza Hawkeye (and Edward Elric and Winry Rockbell as well) | Spoilers | Chapters 7 and 47 of Hiromu Arakawa’s Fullmetal Alchemist manga
Early in Chapter 7, Riza shields Roy from Scar. Later in the same chapter, Riza wraps her jacket around Edward’s shoulders.
Early in Chapter 47, Edward shields Winry from Scar. Later in the same chapter, Ed wraps his coat around Winry’s shoulders.
#hiromu arakawa#fullmetal alchemist#royai#roy mustang#riza hawkeye#edward elric#winry rockbell#fullmetal alchemist manga#fullmetal alchemist spoilers
13 notes
·
View notes
Photo
It’s that time of year again!
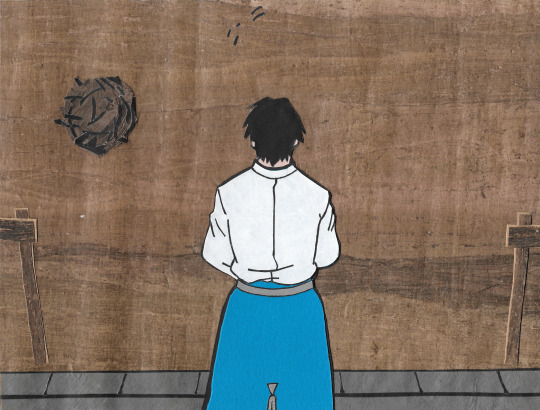
Happy International Fullmetal Alchemist Tumbleweed Appreciation Day to International Fullmetal Alchemist Tumblr!
[Image description: A collage made from cut papyrus, card stock, origami paper, lokta paper, and amate paper. The collage is based on a frame from Episode 37 of the Fullmetal Alchemist (2003) anime. It shows Roy Mustang wearing his uniform without the jacket, standing with his back to the viewer, and facing a dirt lot as a tumbleweed blows by. End image description.]
#international fullmetal alchemist tumbleweed appreciation day#december 18#fullmetal alchemist#roy mustang#and a tumbleweed#collage#image described
93 notes
·
View notes
Text
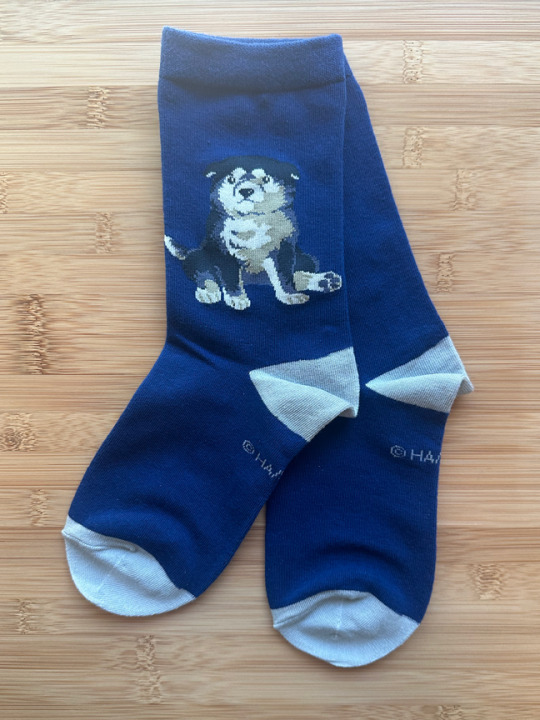
Black Hayate socks
These socks are even cuter than I thought they would be!
[Image description: A pair of socks from the Fullmetal Alchemist x Graniph collaboration. The socks feature artwork of Black Hayate as a puppy. The artwork is similar to the first panel of Hiromu Arakawa’s side story “Dog of the Military?” from Volume 4 of her Fullmetal Alchemist manga. The soles of the socks say “© HA/.” End image description.]
#hiromu arakawa#fullmetal alchemist#fullmetal alchemist manga#black hayate#socks#graniph#image described
22 notes
·
View notes
Text
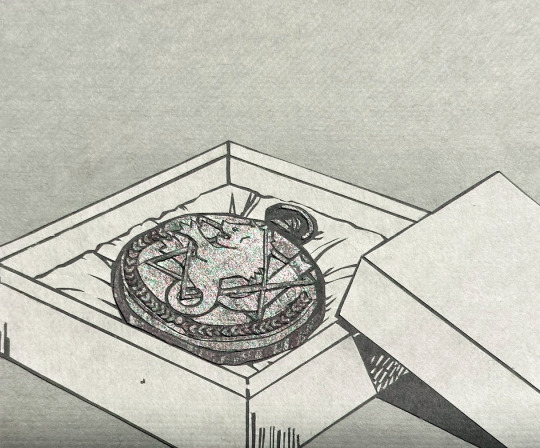
The Fullmetal Alchemist
This collage depicts Edward Elric’s silver watch and is based on a panel in Chapter 24 of Hiromu Arakawa’s Fullmetal Alchemist manga.
I made this collage from cut lokta paper and washi paper to commemorate Fullmetal Alchemist Day.
[Image description: A collage made from cut paper. It shows Edward Elric’s silver watch in an open box. End image description.]
#hiromu arakawa#fullmetal alchemist#fullmetal alchemist manga#fullmetal alchemist day#october 3#collage#image described
29 notes
·
View notes
Photo
Forming a Team: Riza Hawkeye Edition
This collage of cut card stock and origami paper is based on a panel from a flashback scene in Chapter 61 of Hiromu Arakawa’s Fullmetal Alchemist manga. The scene features a conversation between a younger Roy Mustang and a younger Riza Hawkeye, during which Roy offers Riza a position in his new unit, and she accepts.
I made this collage with love in honor of Riza’s Day. ♥️
[Image description: A collage made from cut paper. It is a portrait of Riza Hawkeye. Riza is in profile and in uniform. She is younger, and her hair is shorter, than during the main part of the story. She has a serious expression on her face. End image description.]
#hiromu arakawa#fullmetal alchemist#riza hawkeye#fullmetal alchemist manga#riza’s day#september 1#collage#image described
10 notes
·
View notes
Text
Tagged by the wonderful @waddiwitch — many thanks to you :)
list 10 songs with 10 names in the titles that i like, and then tag 10 people.
In keeping with this blog’s general content, I am listing musical pieces from Akira Senju’s original soundtrack for Fullmetal Alchemist: Brotherhood. The names in the titles include a code name and some place names.
The pieces are listed here in order of their appearance on the soundtrack. Although there are only 10 pieces in this list, I like the whole soundtrack, and I enjoy listening to it while making collages.
Main Theme ~The Fullmetal Alchemist~
Nightfall in Central City
Spiral of Truth
Far East Suite
Trisha’s Lullaby
Mount Briggs ~Overture~
Xing Symphony ~Overture~
Daylight in Amestris
The Land of Ishvala
Resembool’s Lullaby
Tagging the wonderful @flourchildwrites, @pinceauarcenciel, @areyousanta, @prettywitchiusaka, @lastwagontrainhopper, @harcidian, @lonepiper5758, @musing-and-music, @scienceoftheidiot, and @aicasey — if you would enjoy listing and tagging :)
11 notes
·
View notes
Text
I love your comments and tags, @aicasey, @musing-and-music, and @dairogo! Many thanks to you! <3
Wonderful comments and tags quoted under the cut. Some spoilers.
From @aicasey:
100%
I'll add that, the only time Roy gets upset with Riza and legit scolds her is right after the battle with Lust. "Never give up the will to live!!!" he yells at her.
And the thing that makes Roy give up on his rampage against Envy in the tunnel is when Riza admits that she has no intention of living on after he's gone.
All in all, it's also a very similar message that he conveys to the Elric brothers the first time they meet. The idea that they can either wallow in self-pity, or seize opportunities and move forward, i.e. live on.
#team mustang <3
From @musing-and-music:
#it's a constant order they've been given and they give their everything to respect it #they know roy cares for them and they do the same for him #roy mustang #riza hawkeye #kain fuery #vato falman #team mustang #royai #hiromu arakawa #fma manga
From @dairogo:
When Roy and Riza looked at the innocent lives they took in the war they really did say, "our lives are not our own anymore - we are beholden to those we killed."
#I love how the whole team takes this on
“Live”
Reflections regarding Roy Mustang and Riza Hawkeye (and all of the other members of the Mustang Unit as well) | Spoilers | Multiple chapters—including Chapters 61, 78, 87, 97, and 101—of Hiromu Arakawa’s Fullmetal Alchemist manga
From the time that he forms the Mustang Unit to the Promised Day, Roy has a consistent core message for the team.
When Roy first assembles the unit, he says, “No matter what happens, stubbornly cling to your will to survive. Live and help to change this country.”
When Riza requests his orders for the unit members who meet him in the underground on the Promised Day, Roy responds with “Don’t die! That is all!”
And Roy’s team appears to take his consistent core message to heart.
While under fire in the Fotset trenches, Fuery declares, “I’m gonna survive!! I’m gonna survive no matter what!!”
While standing up to a sword-wielding Wrath at Central City Headquarters, Falman muses, “I’m sorry, Colonel Mustang…but I…I think I’ve reached the end of my road...”
After her neck is cut near Father’s lair, Riza promises Roy, “I won’t die…I’ve been given orders…not to die.”
And fortunately, the whole team survives.
49 notes
·
View notes
Text
“Live”
Reflections regarding Roy Mustang and Riza Hawkeye (and all of the other members of the Mustang Unit as well) | Spoilers | Multiple chapters—including Chapters 61, 78, 87, 97, and 101—of Hiromu Arakawa’s Fullmetal Alchemist manga
From the time that he forms the Mustang Unit to the Promised Day, Roy has a consistent core message for the team.
When Roy first assembles the unit, he says, “No matter what happens, stubbornly cling to your will to survive. Live and help to change this country.”
When Riza requests his orders for the unit members who meet him in the underground on the Promised Day, Roy responds with “Don’t die! That is all!”
And Roy’s team appears to take his consistent core message to heart.
While under fire in the Fotset trenches, Fuery declares, “I’m gonna survive!! I’m gonna survive no matter what!!”
While standing up to a sword-wielding Wrath at Central City Headquarters, Falman muses, “I’m sorry, Colonel Mustang…but I…I think I’ve reached the end of my road...”
After her neck is cut near Father’s lair, Riza promises Roy, “I won’t die…I’ve been given orders…not to die.”
And fortunately, the whole team survives.
#hiromu arakawa#fullmetal alchemist#royai#roy mustang#riza hawkeye#kain fuery#vato falman#fullmetal alchemist manga#fullmetal alchemist spoilers
49 notes
·
View notes
Photo
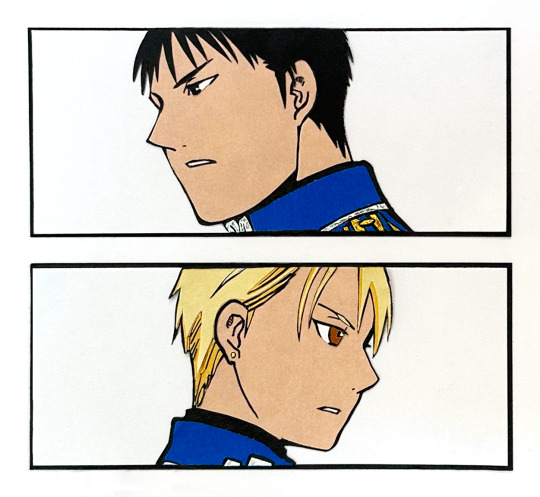
Forming a Team: Royai Edition
This collage of cut card stock and origami paper is based on two panels from a flashback scene in Chapter 61 of Hiromu Arakawa’s Fullmetal Alchemist manga. The scene features a conversation between a younger Roy Mustang and a younger Riza Hawkeye, during which Roy offers Riza a position in his new unit, and she accepts.
I made this collage with love in celebration of Royai Day. ♥️♥️
[Image description: A collage made from cut paper. The collage has two panels arranged vertically. The first panel contains a portrait of Roy Mustang. The second panel contains a portrait of Riza Hawkeye. Roy and Riza are in profile and in uniform. They are younger, and their hair is shorter, than during the main part of the story. They have serious expressions on their faces. End image description.]
#hiromu arakawa#fullmetal alchemist#roy mustang#riza hawkeye#royai#fullmetal alchemist manga#royai day#june 11#collage#image described
83 notes
·
View notes
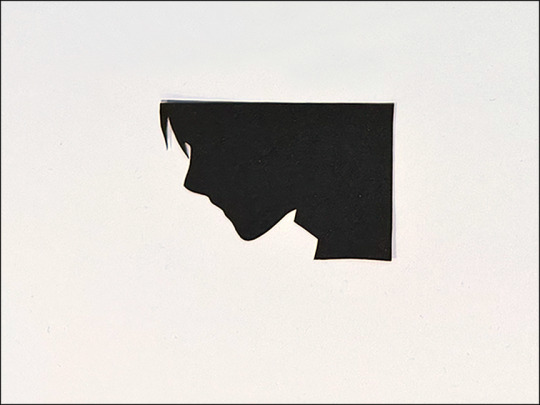
Photo
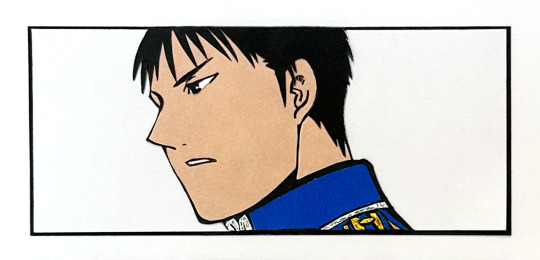
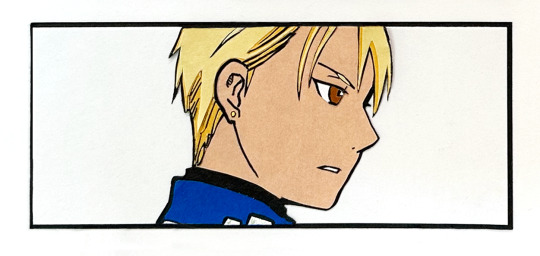
Forming a Team: Roy Mustang Edition
This collage of cut card stock and origami paper is based on a panel from a flashback scene in Chapter 61 of Hiromu Arakawa’s Fullmetal Alchemist manga. The scene features a conversation between a younger Roy Mustang and a younger Riza Hawkeye, during which Roy offers Riza a position in his new unit, and she accepts.
I made this collage with love in honor of Roy’s Day. ♥️
[Image description: A collage made from cut paper. It is a portrait of Roy Mustang. Roy is in profile and in uniform. He is younger, and his hair is shorter, than during the main part of the story. He has a serious expression on his face. End image description.]
#hiromu arakawa#fullmetal alchemist#roy mustang#fullmetal alchemist manga#roy’s day#june 1#collage#image described
18 notes
·
View notes
Photo

Happy birthday to Hiromu Arakawa!
[Image description: A collage made from cut washi paper. The collage is based on a self-portrait of Hiromu Arakawa, in which she depicts herself as a bespectacled cow. End image description.]
#hiromu arakawa#fullmetal alchemist#fullmetal alchemist manga#happy birthday#may 8#collage#image described
77 notes
·
View notes