Last Seen Blogs

quadrantmodelquotes
Quadrant Model Quotes from 2013 Lectures
starlightandfeathers
[incomprehensible noises]

mpo11slotgacor
MPO11 MIX PARLAY

feelsofhiraeth
heaven sent.
feelsofhiraeth
heaven sent.
Photo

Pumpkin Carving with a Dremel
Carving pumpkins with a Dremel rotary tool is a great way to add dimension and depth to a classic fall favorite, the jack-o’-lantern.
Shop Lowe's
Shop Lowe's
What You’ll Need
Materials: Pumpkin, Stencil, Pencil, Knife, Rotary Tool, Paint Brush, Tape
Step 1
Cut a circle around the stem of the pumpkin with a sharp kitchen knife.
Step 2
Remove the seeds.
Step 3
Choose a 2-tone image with clean, black and white shapes (or draw your own). You can download the image we used here, or check out other Halloween-themed options here.
Step 4
Turn your image over and shade the back with a pencil. This will help it transfer onto the pumpkin.
Step 5
Now tape your image onto the pumpkin, and use your pencil to trace the outlines of the design. Be sure to trace with a light force so your image is fully imprinted.
Step 6
Once you’ve traced the entire image, it’s time to remove the paper and start carving.
Step 7
Use a knife to cut out the dark shapes of the image, completely removing them from the pumpkin.
Step 8
Next use a rotary tool (set on slow) to etch the light areas of the design. Start by carving the outlines of your shapes. Then etch inside them to remove the outer layer, revealing the lighter color beneath.
Step 9
Things might get messy, so keep a paint brush nearby to wipe away any debris.
Step 10
Sit back and enjoy your masterpiece.
#article#lowes#diy#carving#pumpkin#scarescrew#jack-o-lantern#halloween#dremel#rotarytool#scary#stencil#fall#harvest#deck
16 notes
·
View notes
Photo
CEMENT SIDE TABLE
Materials
3 x 1 ¼ thick wooden dowels
Gray High Strength Ready-To-Use Concrete Mix
5 gallon bucket
Drill and mixing arm attachment
Hammer Zip ties
Paint
Shop Lowe's
Materials
3 x 1 ¼ thick wooden dowels
Gray High Strength Ready-To-Use Concrete Mix
5 gallon bucket
Drill and mixing arm attachment
Hammer Zip ties
Paint
Shop Lowe's
STEP 1
Cut three, 18” long pieces of 1 ¼” thick wooden dowels.
STEP 2
Add 3” of ready to mix concrete to 5 gallon bucket. This will be approximately 20 cups of the mix. When mixing concrete, don’t forget to protect your skin and eyes by wearing long pants, long waterproof gloves and splash resistant goggles. If conditions are windy, add a respirator to your safety precautions.
STEP 3
Add 5 cups of water and mix to cookie dough consistency using a drill and mixing arm attachment.
STEP 4
Shake bucket and tap with a hammer to release air bubbles.
STEP 5
Measure 2” from the dowels end and attach zip ties. Arrange dowels in pyramid formation. Insert each piece 2” into the concrete at a 68 degree angle. Let the zip tie lean on the edge of the bucket.
STEP 6
Wait 20 hours for cement to harden and dry, bend bucket to loosen and shake bucket upside down in order to remove.
STEP 7
Dip bottom half of each leg in a bright colored paint. Wait to dry.
STEP 8
Sand to smooth the concrete. Put beside your favorite chair and enjoy.
*Note: this table is not intended for sitting. If children under 12 are in the household, avoid use. To further secure, consider anchoring the table to the floor.
17 notes
·
View notes
Photo
HOW TO MAKE A TEEPEE
Materials
6’ rope
Plasti-Dip
Paint
Small bucket
Four 7' dowels
6’x9’ drop cloth
4 Screws
4 Washers
Stencils (if desired)
Shop Lowe's
Materials
6’ rope
Plasti-Dip
Paint
Small bucket
Four 7' dowels
6’x9’ drop cloth
4 Screws
4 Washers
Stencils (if desired)
Shop Lowe's
STEP 1
Cut 6’ of rope and dip the ends into Plasti-Dip to prevent them from fraying.
STEP 2
Fill a small bucket with 5” of colored paint. Take four 7’ dowels and dip one end of each dowel into the bucket. Wait to dry.
STEP 3
Drill all 4 dowels, 8” from the painted end.
STEP 4
String rope through the first pole and tie a knot to hold in place.
STEP 5
Arrange all 4 dowels together.
STEP 6
String the rope through the rest of the dowels and then wrap the rope around several times, leaving enough to tie a knot at the end.
STEP 7
Arrange the dowels into a teepee shape. Open a 6’x 9’ drop cloth horizontally & find the middle. Drape it from the back of the teepee & secure canvas at the top of each dowel with one screw and washer.
STEP 8
Continue to drape fabric around the sides, tuck excess at the floor under, and keep it tight & uniform where your poles meet. Adjust your poles slightly if needed, then use a screw on each side to secure the fabric. Stitch the opening with thick thread. Decorate with paint and stencils as desired.
16 notes
·
View notes
Video
instagram
Flooring Refresh
Flooring Refresh
Tools and Materials: Pry bar, wooden block, broom, level, chalk line, Shaw wood-look vinyl plank flooring, utility knife, L square, self leveler, tapping block.
***Note: This project lays vinyl plank flooring over an existing vinyl floor. This shouldn’t be done if there is already more than one vinyl floor installed. See here for more details.
Step 1
At least 48 hours prior to installation, place the new vinyl plank flooring in the room for acclimation.
Step 2
Prep your subfloor so that it’s clean, dry and level within 3/16” change per 10 feet. Apply a self-leveler if you have any low spots. DO NOT sand existing vinyl floor because it may contain asbestos.
Step 3
Now it’s time to plan the floor. Mark the center of each wall and snap lines between them with a chalk line. Get directions here.
Step 4
Measure from the center to the starting wall, subtracting 5/16” at the perimeter to create an expansion gap. Mark this distance at each end of the wall, then snap a chalk line between these two marks to get a straight line against the wall.
Step 5
Calculate the width of the last row. If it will be less than 1/3 of a plank, cut about 1/3 of the plank off the first row for even starting and finishing rows.
Step 6
It’s time to lay the first row. Score and cut the tongue off the first row of vinyl planks using a utility knife. Set the first plank in place on the starting line with the cut side toward the wall, maintaining the expansion gap.
***Tip: Mix planks from different boxes to blend the dye lots and patterns for a more uniform appearance.
Step 7
Hold the next plank at a slight angle against the previous plank's end and fold down to click it into place. Repeat until you get to the last piece.
***Tip: The end piece must be at least 6 inches long. If it’s not, cut a bit off the first plank and slide the row.
Step 8
Cut the last piece to fit with a utility knife and snap the plank. You can use excess cut pieces to start rows if they’re at least 6 inches long.
Step 9
Now, move to the second row. Insert the tongue of the first piece into the groove of the previous row's first plank and rotate down to click together. Remember the plank joints must be staggered at least 6 inches. Measure and cut your first piece accordingly.
Step 10
For the next piece, connect the short end first and then the long end. You should feel it lock. Continue the installation row by row, making sure to stagger the joints by 6 inches and maintain the expansion gap.
***Tip: To get under doorjambs, slightly bend the planks into place and use a pull bar or tapping block to lock the joint if necessary.
13 notes
·
View notes
Video
instagram
Wall Mounted Shoe Rack
Wall Mounted Shoe Rack
Tools and Materials: Molding for interior use, sanding block, paint, a paintbrush, cordless drill, countersink bit, dry wall anchors, screws, tape measure, level, Phillips screwdriver, bumpers.
Step 1
First decide how many rows of molding you would like and how long you want them to be. Then use your saw to cut the molding to the correct length. For this project, we’ll make four 40” long rows.
*Tip: Make sure to buy molding with a lip on the top for your heels to fit into. See an example here.
Step 2
Next, use the brush to paint them the color of your choice. Let the paint dry thoroughly.
Step 3
Now use your drill and countersink bit to drill two holes in the molding, five inches from each end. Drill an additional hole in the center of the molding for added support. This is where you will attach the molding to the wall.
Step 4
Use your tape measure and level to position where you want the moldings to hang. Use a pencil to mark where the screw holes align with the wall. Then drill your dry anchors into the wall over the pencil markings.
Step 5
Place the molding over the holes and secure them to the wall with screws. Repeat for the rest of the rows.
Step 6
Add bumpers to the top of the molding where you want to place your shoes to prevent them from slipping. Next, choose your favorite pairs of shoes to display and hang them over the molding.
11 notes
·
View notes
Video
instagram
Copper Pipe End Table
Copper Pipe End Table
Tools and Materials: 20 feet of copper pipe (½”), 4 pipe straps (½”), 8 copper caps (½”), 18 copper tee fittings (½”), tape measure, pipe cutter, rubber sledge hammer, cordless drill, ½” screws, Phillips screwdriver, 16” wide wood board, sanding block, paint/stain of your choice, paintbrush, latex gloves, felt pads.
Step 1
Cut your first 10’ pipe to the below lengths with your pipe cutter.
5 @ 15”
6 @ 1”
2 @ 3 ½ “
2 @ 10”
2 @ 6”
Step 2
Cut your remaining 10’ of pipe to the below lengths with your pipe cutter:
12 @ 7 ¾”
2 @ 1 ⅞”
2 @ 2 ¾"
2 @ 2 ⅝"
Step 3
Start by assembling the three “H” shaped shelf supports. Take two 7 ¾” pipes and attach a tee fitting in the middle of them. Repeat this with two more 7 ¾” pipes. Lay them flat and attach a 15” pipe through the open joint of the tee fitting. Do this twice more.
Step 4
Attach the front bottom legs to one shelf support. Take a 6” pipe, attach a tee fitting
on one end and a cap on the other. Attach the middle of the tee fitting to one edge of
the H shape. Repeat on the adjacent side.
Step 5
Now build the back legs. Take one of your 2 ¾” pipes and attach a cap onto one end and a tee fitting onto the other. Next, attach a 2 ⅝" another tee fitting on the opposite end. Repeat this step.
Step 6
Attach the two back legs to the other side of the H. Make sure that the middle of the tee fitting’s open ends are faced towards each other. Attach a 15” support beam into the tee fittings.
Step 7
The base of your table is complete, and it’s time to move on to the middle section. Take four 10” pieces and attached them to the tops of the four open tee fittings. Take a 10” pipe and insert it into the side joint of a tee fitting.
Step 8
Now assemble the two back top pieces. Place cap on a 1” pipe and attach a tee fitting onto the other end. Place another 1” pipe into the other side of the tee fitting, followed by another tee fitting on the other end. Finally, place a 1 ⅞" followed by another tee fitting. Repeat this one more time. Now, place the end with the tee fitting onto your 10” pipe, and repeat this on the adjacent side.
Step 9
Next assemble the two front top pieces. Place a cap onto a 1” pipe and attach tee fitting to the other end. Place a 3 ½” pipe onto the other side of the tee fitting, followed by another tee fitting on the other end. Repeat this one more time.
Step 10
Take your second “H” shaped shelf support and insert it into the lower open tee fittings. Then insert a 15” support beam across the back.
Step 11
Take your last “H” shaped shelf support and fit into the final open tee fittings. Next, hammer the top cap of your table on all four legs.
Step 12
Cut your wood boards to 16” x 16”. Sand and paint the boards the style of your choice. Let the paint dry thoroughly, then secure them to the upper and lower center pipes using two H straps on the underside of each board.
* Tip: Place felt pads on the bottom of the table to prevent scratching the floor.
12 notes
·
View notes
Video
instagram
Outdoor Grill Station
Outdoor Grill Station
Tools and Materials: Wood (see cut list for specs), Miter saw, power drill, 1/8” and 3/16” twist drill bits, Phillips screwdriver, 1-1/4” deck screws, 2” deck screws, staple gun (with 3/8” staples), tape measure, pencil, pneumatic staple gun, random orbital sander, 41x30” lattice, paint (Blue Patchwork by HGTV HOME™ by Sherwin-Williams®), S-hooks.
Step 1:
Cut your wood to the following specs:
2X6:
2 @ 63.75" (back vertical stretchers / back legs)
2 @ 33" (front legs)
2X4:
4 @ 39.5" (horizontal runners)
6 @ 13.5" (vertical stretchers)
1X6:
4 @ 30" (back lattice frame and front trim)
2 @ 19.75" (front lattice horizontal runner)
2 @ 41" (front lattice vertical stretcher)
18 @ 16.5" (top and bottom shelf slats and side trim)
1X4:
1 @ 41" (top cap)
See a diagram of a similar project here.
Step 2:
Start by assembling the top and bottom shelf structures. Drill 3/16" countersunk holes through each 2x4 runner (front and back) 3/4" from each end. Connect your horizontal runners with your vertical stretcher at a 90° angle using 2" screws.
Step 3:
Attach the slats to the top and bottom shelf structure. Drill countersunk holes 3/4" from the ends of each slat. Glue seven slats to the top of each shelf frame, and secure using your 1-1/4" screws, leaving a small space between each slat (1/8", or about the width of one of your screws).
Step 4:
Now it's time to assemble the lattice frame. Using your front lattice frame boards, create a rectangle on a flat surface. Lay your lattice on top of the frame so the edges are flush with the sides, and the attach with a staple gun.
Step 5:
Flip the lattice structure over and align the edges of the back runners with the front runners. Drill 3/16" countersunk holes through the back runners. Drive 1-1/14" screws into the frame, sandwiching the lattice between them.
Step 6:
Lay the back legs on the assembly to complete the back frame of the lattice. Drill 3/16" countersunk holes through the legs, and drive 2" deck screws into the front runners and stretchers.
Step 7:
Position the cap on top of the back assembly, making sure it's flush to the back of the frame and hangs over the front about 1/2". Drill countersunk holes through the cap and drive 1-1/4" deck screws into the back legs and front runner.
Step 8:
Flip the assembly on to its back. Lay the top shelf structure perpendicular and flush to the bottom of the lattice frame. Align the bottom shelf structure parallel to the top shelf structure about 3" from the bottom of the back legs. To secure each shelf, drill 3/16" countersunk holes through the rear legs and drive 2" deck screws into the rear of the top and bottom shelf structures.
Step 9:
Attach the front and side trim to each shelf structure by drilling countersunk holes through the sides of the trim. Then secure the trim by driving 1-14” deck screws into the side of the shelf structures. Position the front legs on the front of the grill station and align them with the top slats. Drill countersunk holes through the top and bottom shelf structures from the inside, and drive 2” deck screws into the legs (without going through the front).
Step 10:
Finally, inspect your bench for any rough edges and smoothen with sandpaper and a sanding block. Then use the paint or stain of your choice.
Step 11:
Hang utensils on your lattice using S-hooks, and then fire up the pit and get grilling.
11 notes
·
View notes
Video
instagram
Honeycomb Shelves
Honeycomb Shelves
Tools and Materials: Miter saw, 1x6 wood, wood glue, strap clamps, clamps, brad nailer, brad nails, random orbital sander, stud finder, level, L brackets, pencil, cordless drill,
drill bits, screws, small and large paint brush, paint
(HGTV HOME™ Sherwin-Williams® Vintage Finds Color Collection).
Step 1:
If you want to pair your shelves with a honeycomb pattern, see how to paint the design here.
*Note: Be sure to match the orientation of your wall design with your shelves so the bottoms are flat.
Step 2:
To begin making the sides, set your miter saw at a 30° angle. Cut one end of your board, then flip it over and cut the other end. Make sure to measure your cuts from the long end of the 30° angle so that they're 10" per side (to form 20" wide shelves.) Also ensure your second cut is angled away from your first cut. You'll need six sides for each shelf.
Step 3:
After cutting the sides, it's time to put them together. On a flat surface, apply wood glue to each joint then secure the with your brad nail gun. To ensure seamless assembly, you'll want to create two halves for each shelf, three sides each. Then join the halves together to form a hexagon.
Step 4:
Help the wood glue set with a strap clamp to keep the hexagon structure tight. Let it sit according to your wood glue's instructions.
Step 5:
Next give them a light sanding to smooth out the front and soften the joints. This is a good time to paint or stain them if you want a more stylized look.
Step 6:
Now it's time to hang them on your wall. Figure out where you want them to hang, and then lightly mark with a pencil. Pre-drill and fasten your brackets to the shelf with 1/2" screws. Be sure not to drill too deep; about half an inch
will do.
Step 7:
Place your shelves against the wall, and make sure they're level. Then secure the shelf brackets to the wall.
Step 8:
Use a small brush to paint the brackets the same color as the wall and shelves. Now all that's left is to fill them in with your favorite knick-knacks.
10 notes
·
View notes
Video
vine
Use coffee filters to keep soil where it belongs — in your flowerpots.
15 notes
·
View notes
Video
instagram
Tin Can Lanterns
Tin Can Lanterns
Tools and Materials: Tin cans, paper, a pencil, scissors, masking tape, hooks, a cordless power drill, drill bits,
globe lights.
Step 1:
Start by cutting paper to fit around the outside of your
cans. This is where you'll draw your design. You can freehand a pattern or choose from a template. If you
decide to freehand, make sure holes are at least a diameter's length apart.
*Tip: Graph paper helps keep patterns consistent.
Step 2:
Now tape your paper onto your cans. Drill your holes through the paper into the can, following the pattern you created.
Step 3:
Next drill a hole into the bottom of the can where you will insert the light. Pre-drill with a 1/4" drill bit, then use a step bit to reach 9/16 of an inch.
Step 4:
Unscrew the bulb from your globe light and place it into the can, where you'll connect its socket through the top. Make sure to use a glove so you don't cut your hand on the inverted metal. Also, make sure the lights are unplugged when you attach the bulbs.
*Tip: Make sure your bulbs are under seven watts to avoid overheating the cans.
Step 5:
Screw the bulb into the socket through the inside of
the can.
Step 6:
Drill where you want the lanterns to hang and screw your hooks into the holes.
Step 7:
All that's left is to string the lights through the hooks and sit back and enjoy your illuminated space.
20 notes
·
View notes
Video
instagram
Patio Cooler Table
Patio Cooler Table
Tools and Materials: Wood (Spruce – see cut list for specs), wood glue, wood filler, wood screws (1-1/4”), wood screws (2-1/2”), plastic planter box, clamps, power drill, 1/8” counter bore drill bit, 1-1/2” hole saw bit, T-square, pencil, random orbital sander, stain/sealant/paint, (6) 1 ½ x 1 ½ L bracket, 36” planter box, cabinet handle (optional with cooler lid board).
Step 1:
Cut your spruce to the following specs:
1X8:
2 @ 44" (horizontal outer long skirt)
2 @ 16.25" (vertical side short skirt)
2 @ 48" (outer top boards)
2 @ 6" (middle top boards)
1 @ 33.5" (optional cooler lid)
1X6:
2 @ 36.25" (horizontal box frame)
2 @ 7.25" (vertical box frame)
1X3:
5 @ 7.25" (under box supports)
2 @ 16" (tabletop bottom braces)
2x2
4 @ 16" (legs)
Step 2:
Sand all of your boards with your random orbital sander.
Step 3:
Arrange all of the top boards face down, creating a rectangular frame. Secure them with wood glue. You can include the center lid piece to help with framing but do not glue it.
Step 4:
Next make the frame that will house your planter box.
First counter bore holes into each end of your frame boards. Attach the vertical and horizontal frame boards together using wood glue before securing them with 1-1/4" screws. Center this structure so that it frames your center lid piece (or center gap), but do not yet attach to the table top. Place your two bottom braces outside and flush to each end of the box frame. These should run horizontally across the bottom of all three table top boards. Then secure these braces to the table top with 1-1/4" screws.
Step 5:
Next, using a pencil and counter bore bit, counter bore and mark off five even spaced holes on both long sides of the box frame. The cross holes should line up to screw the bottom supports together, and should be near the bottom
of the planter box frame. Remember, your structure is currently upside down, so the "bottom" of the planter box is the part closest to you. Using 1-1/4" screws, attach the five box support boards to the box frame. Add wood glue for extra support.
Step 6:
Now it's time to secure the support box with metal brackets. Use your framing square to make sure your
box is square to the tabletop.
Step 7:
Next line up the legs and the outer long skirt. Attach the outer long skirt by first applying wood glue to the backside and screwing it together through the inside using 1-1/4" screws. Then attach the outer short skirt. Using four L brackets, fasten the skirt to the tabletop to secure.
Step 8:
Attach the legs by adding wood glue and using four 1-1/4" wood screws in each corner. Start with the two holes closest to the corner then move outwards to attach the second set of screws.
Step 9:
Lightly sand the boards and apply an exterior stain/sealer of your choice using this guide.
Step 10:
Place planter box into the opening of your table.
Tip:
If you'd like a center lid for when you're not using your cooler, remove the planter box and place your lid board on top. Be sure to attach a cabinet handle to easily remove.
15 notes
·
View notes
Video
instagram
Vertical Veggie Garden
Vertical Veggie Garden
Tools and Materials: Cedar boards (see cut list for specs), compound miter saw, power drill, wood screws, hammer, nails, chalk paint, paintbrush, chalk, soil, seeds or plants, wood glue, a pneumatic nail gun, 18 gauge brad nails, screen wire.
Step 1:
Cut all of your cedar to the following specs using your miter saw.
2x4
4 @ 6' (garden posts)
16 @ 14.75" cut at 45° (brackets/triangular support boards)
1x8
16 @ 26" (planter box front and back sides)
16 @ 10" (planter box sides)
1x10
8 @ 26" (planter box bottoms)
1x3
8 @ 12" with ends tapered at 45° angles (wooden stakes)
Step 2:
Start by laying your garden posts on the ground and attaching your triangular support boards to them. These will hold your planter boxes. First, pre drill holes into the triangular support boards. You'll need two holes drilled vertically for each triangular support board (four holes per planter box). Then drill screws through your holes to attach the supports.
Step 3:
Next attach the four garden posts to your fence. Secure the boards to your posts with brad nails and a pneumatic nail gun. Make sure the posts are 28" apart, measuring from the center of each post.
Step 4:
Now it’s time to assemble your planter boxes. Use wood glue to attach your boards at a 90° angle. Secure with your pneumatic nail gun. Be sure to drill 1/2" holes on the bottom of your boxes for draining, then line the inside with screen wire. Repeat for all eight boxes.
Step 5:
Place your planter boxes on top of the triangular supports. Use your drill and screws to secure them to the supports and posts.
Step 6:
Now it's time to label your wooden stakes. Brush chalk paint onto them and let dry before labeling with chalk.
Step 7:
Next fill your boxes with a mix of soil and compost. Add your preferred seeds or plants. Be sure to follow directions on your seed packet for depth and spacing. Then place each box on a pair of support boards. Drill into each corner of the box to attach to support boards.
Step 8:
Finally, stick your chalk labels in the soil and enjoy your DIY veggie garden.
24 notes
·
View notes
Photo
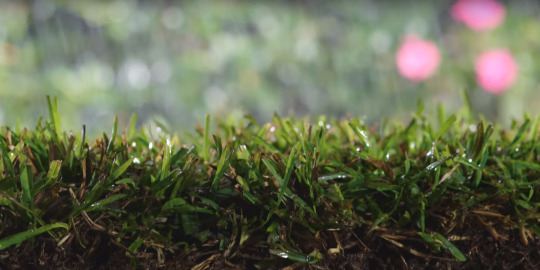
3 Invaluable Weed-Fighting Tips
Follow these simple steps to win against weeds this season.
Shop Lowe's
Shop Lowe's
youtube
6 notes
·
View notes
Video
vine
Keep squirrels away from your spring vegetable garden with a dash of cayenne pepper.
7 notes
·
View notes
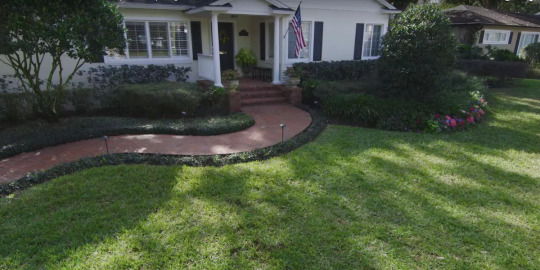
Photo
3 Ways to Wake Up Your Sleeping Lawn
Help your yard out of hibernation with these quick steps
Shop Lowe's
Shop Lowe's
youtube
8 notes
·
View notes
Video
instagram
Urban Succulent Wall Garden
Urban Succulent Wall Garden
Materials: Water-resistant redwood or cedar 1x3s, Chop saw or hand saw, Wood screws, Drill, Steel hardware cloth, Staple gun, Hammer, Nails, Succulents, Soil, and Hooks
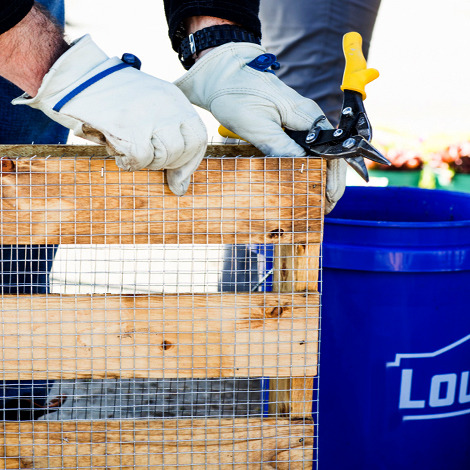
Step 1
Create a shadow box. Use naturally water-resistant redwood or cedar 1x3s and screw into place. Then staple ½” steel hardware cloth to the edge.
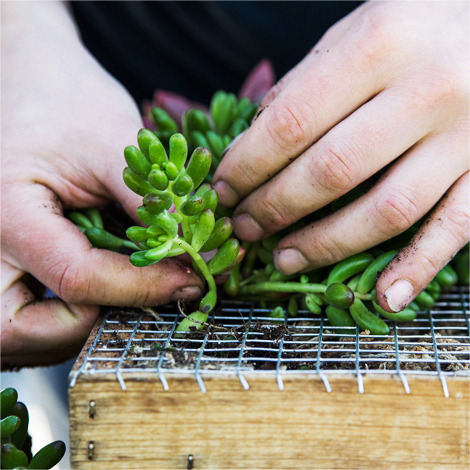
Step 2
Nail ¼” plywood backing to the back of the shadow box. Add soil and plant succulents into desired pattern and allow time for them to take root. One to two weeks.
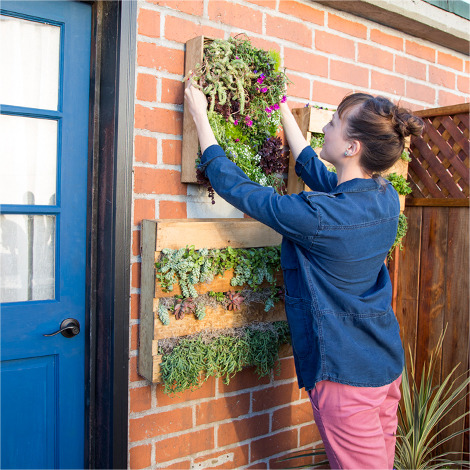
Step 3
Hang it on a wall with sturdy hooks – it will be heavy! Water once a month, dependent on type of plants.
4K notes
·
View notes