
kaerhio
KaeRhio's Corner
I am food 😐 | Daydreaming Writer | Occasional Arty | Quiet FFXIV player
164 posts
Don't wanna be here? Send us removal request.
Last Seen Blogs

abigator123
Bitch N’ Cheese

ampulkaa
ампулка

kaoward
Kaoward

cyberdelusionphilosopher-blog
Insurance

agata-info
AGATA Website


Photo
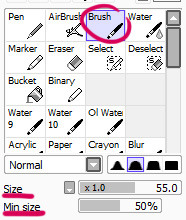


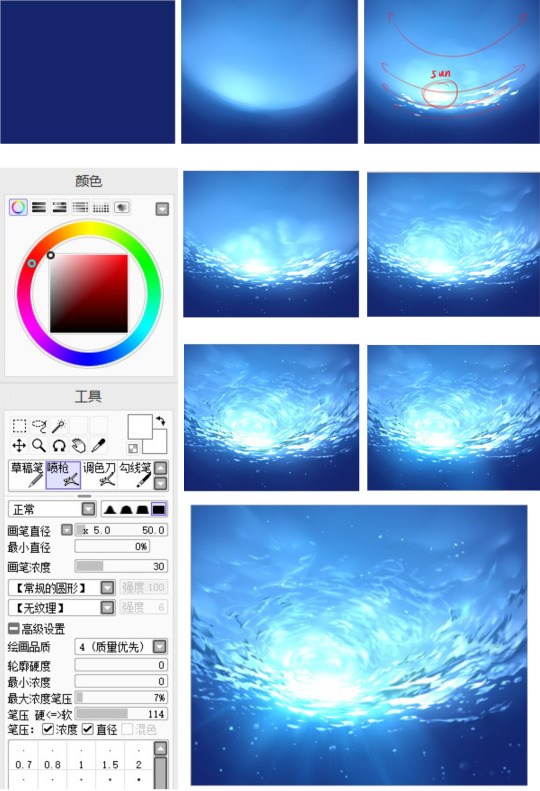
Here are my brush settings in Paint Tool SAI, since some people have been asking.
It’s nothing fancy, really. I use the same old default brush and change 2-3 settings according to what I’m doing (painting details or wanting to cover a big space with blending colors). I basically do everything with this brush - from sketching to coloring.
Sometimes I change to the Round Flat 1 brush (it’s on the dropdown list where it says “none”), mostly when I paint fur, but nothing else.
I play a lot with color blending, it’s usually between 12 and 45%.
2K notes
·
View notes
Photo
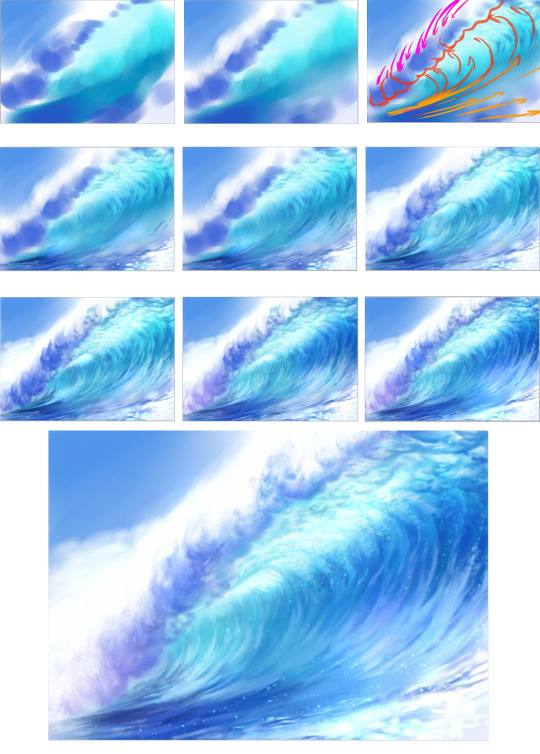
i did a thing for beginers and me personally ‘cause I have a mind like a golden fish ( ´_ゝ`)
2K notes
·
View notes
Photo
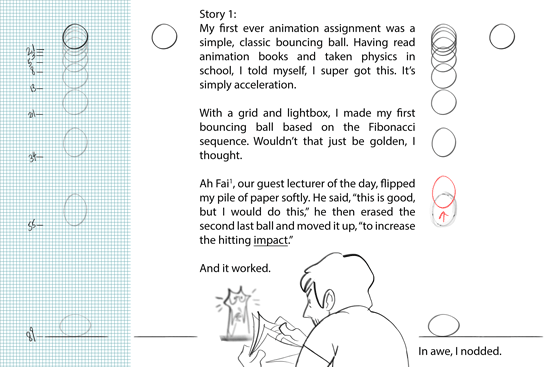


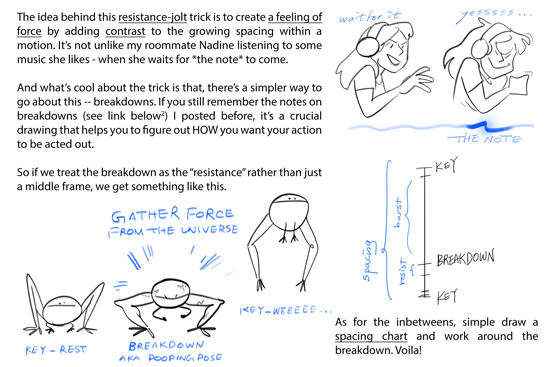
1. Ah Fai was a chief animator for McDull’s animated features. He’s super cool. Ultimate senpai.
2. Previous post on breakdowns right here
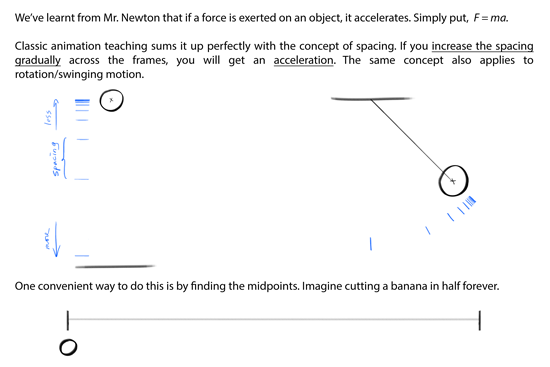
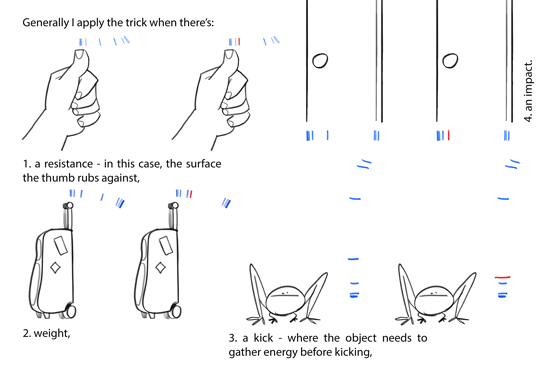
Some thoughts on acceleration and force
I presented this in the order of how I slowly understood the trick of delivering force - first an abstract concept of impact taught by Ah Fai, then a more complicated discovery on the acceleration pattern, last back to a more abstract concept of breakdowns.
Like I’ve previously stressed, 2D animation is everything but one single approach. There’s no one rule that rules them all, but interchangeable ideas with math, or physics, or music, etc. There’s no “perfect” animation either, but what is perceived as organic and dynamic. E.g., using the Fibonacci numbers to animate didn’t bring me a perfect animation! On the other hand, a tiny change in the pattern could already make the feeling of force so much more powerful.
Not so much of a tutorial than a personal experience. I hope you find this interesting hahaha
156K notes
·
View notes
Photo


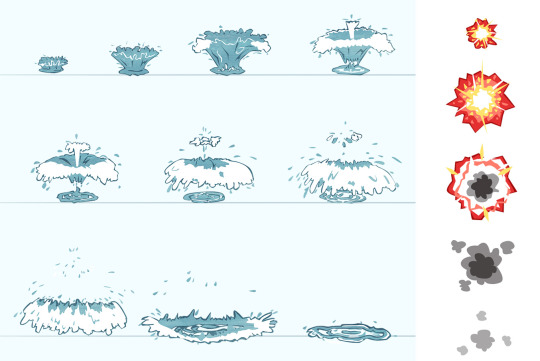


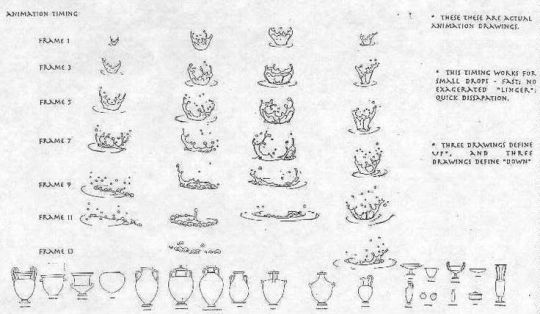
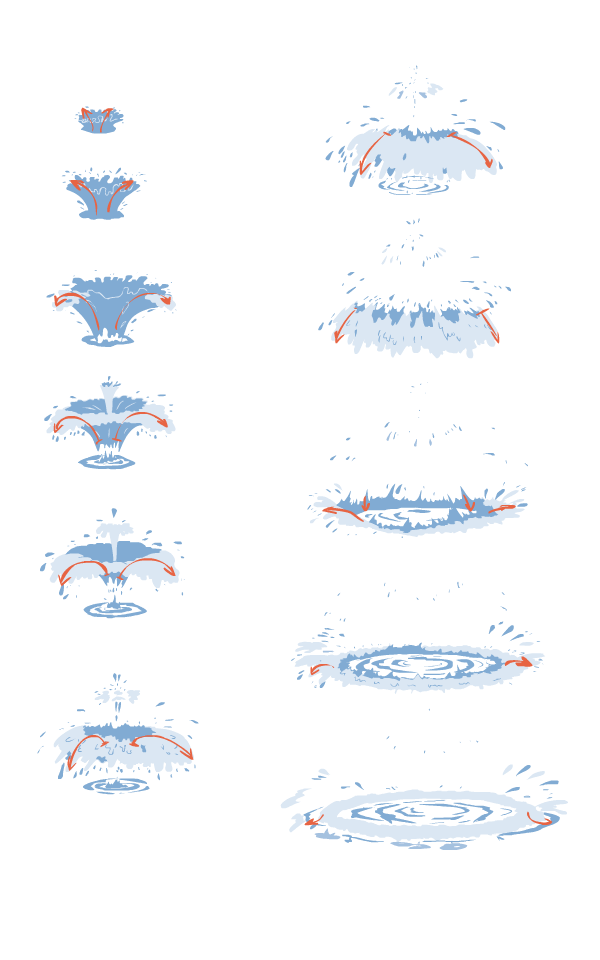

Water Splash Tutorial
Top Image
Row 2
Row 3
Row 4: Left, Right
Row 5
Row 6
Bottom Row: Left, Right
Video References
Video: One, Two, Three, Four, Five, Six, Seven, Eight, Nine, Ten, Eleven, Twelve, Thirteen, Fourteen.
Video Lessons
Lesson: One, Two, Three, Four.
26K notes
·
View notes
Photo


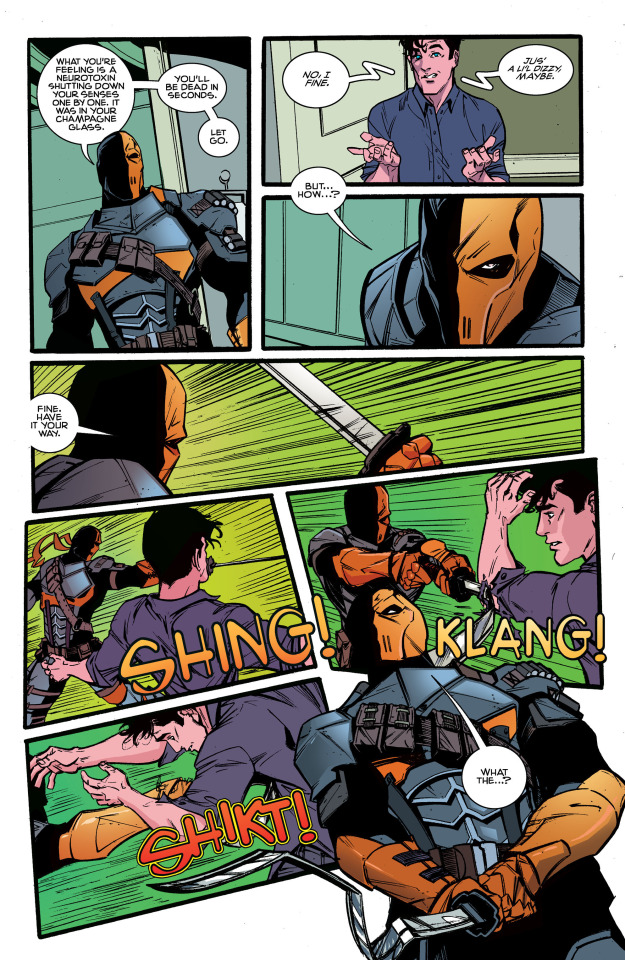
That one time Slade thought Clark Kent was Bruce Wayne and slipped him a Neurotoxin Mickey only to get his ass kicked anyway.
This comic is great!
[Superman: American Alien #3]
74K notes
·
View notes
Photo
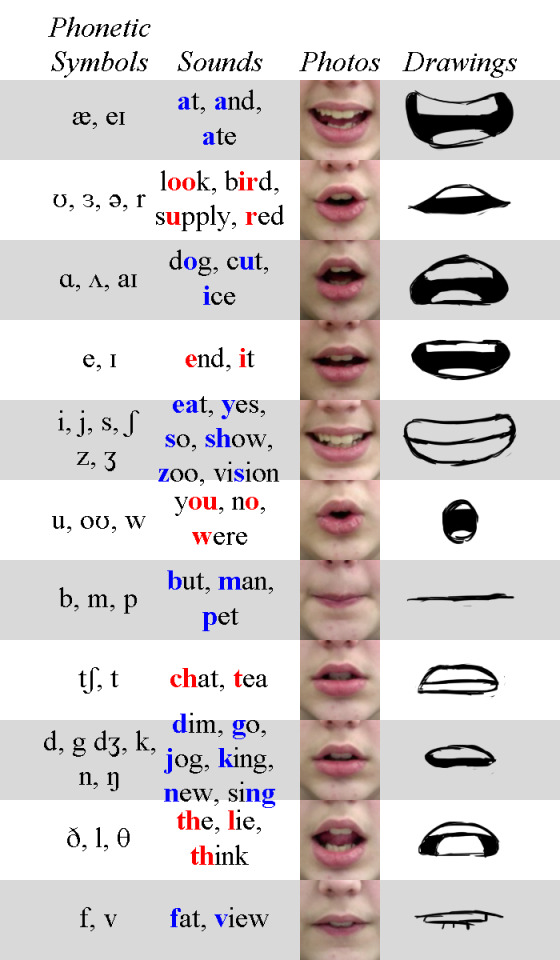
Phoneme Chart by TheEndIsNearUs
357K notes
·
View notes
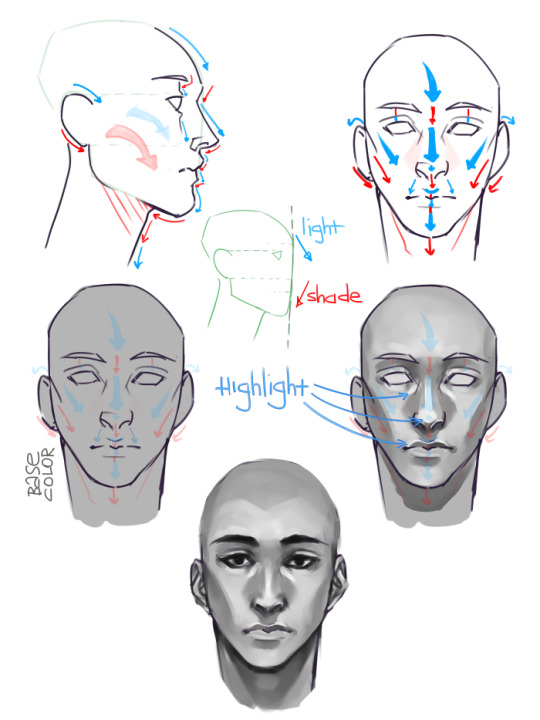
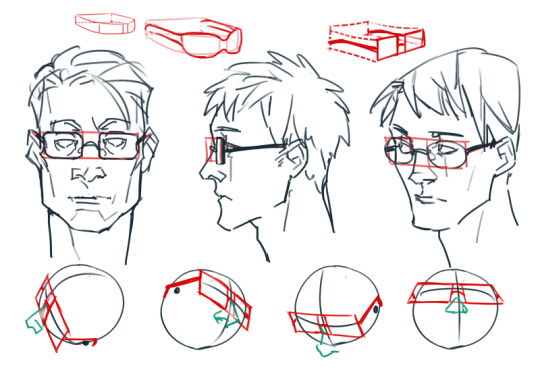
Photo
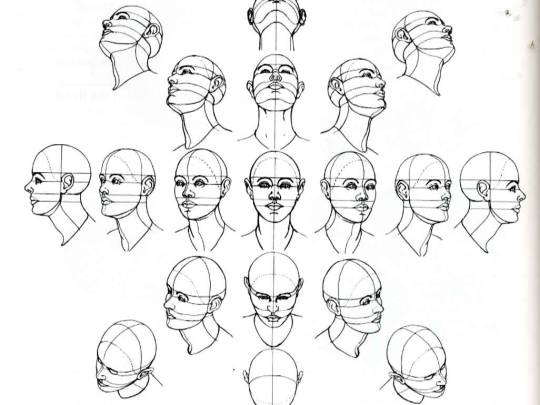
The head, at various angles, in perspective.
30K notes
·
View notes
Photo
one more from the same cool guy C:
2K notes
·
View notes
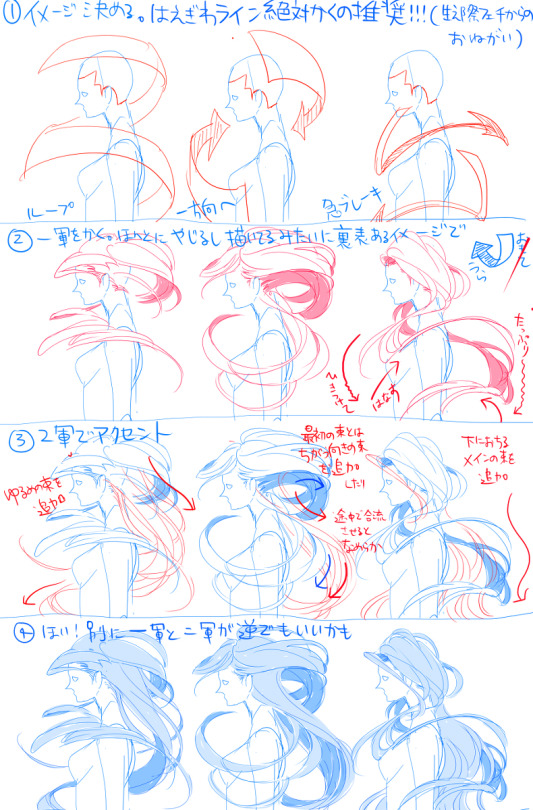
Photo
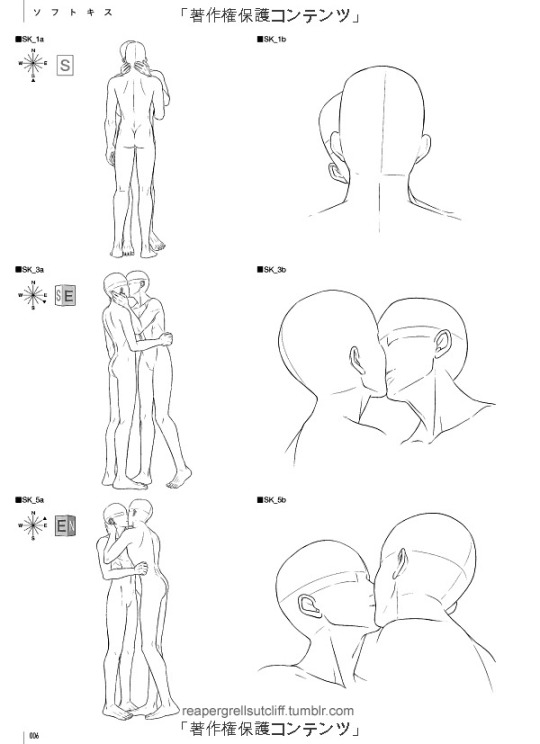

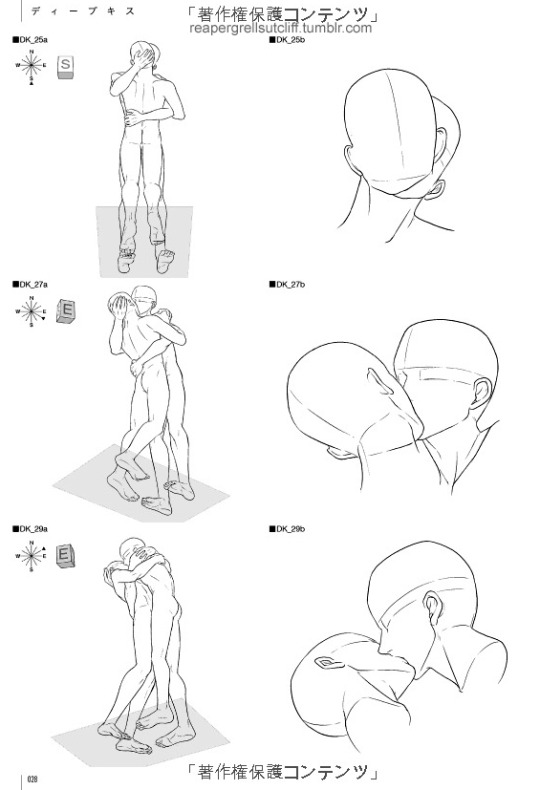

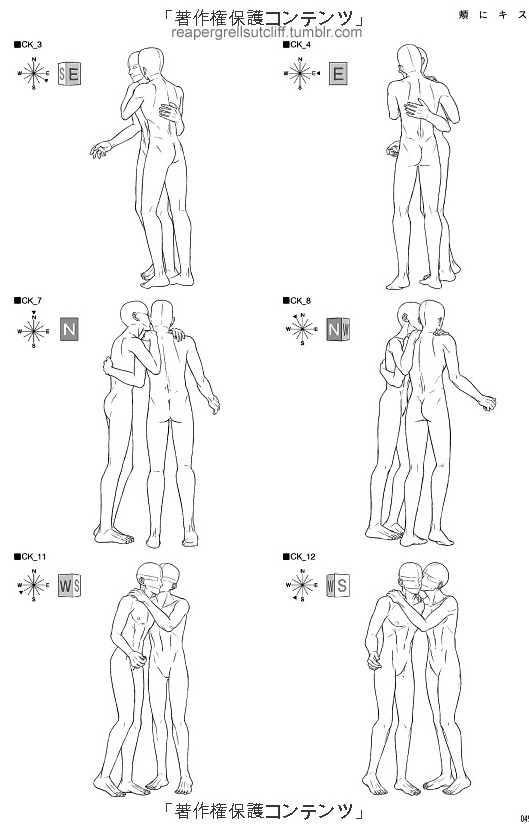
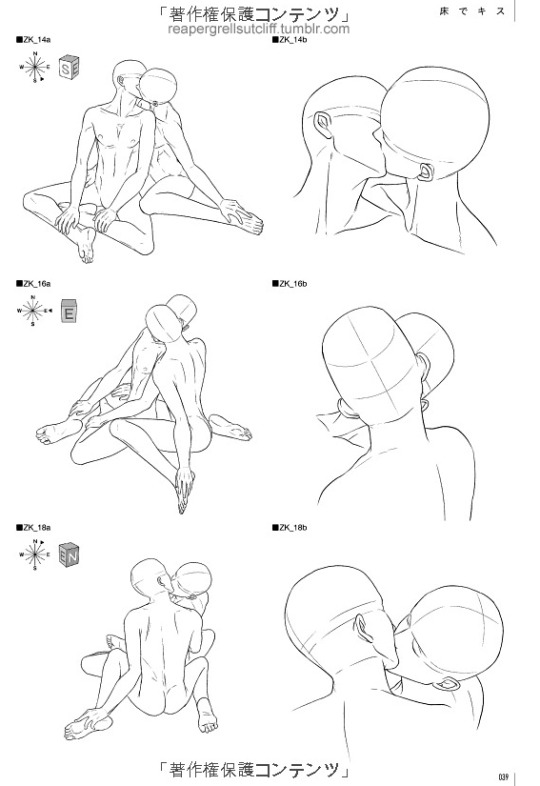

‘Kiss Scene rough sketches - Drawing for Boys Love (Yaoi)’ (Part 2 of 3)
A 103 page book/CD rom with male/male kissing scenes, from many different angles, for artist drawing references.
Other art references like this can be found here:
Kiss Scene - Drawing for Boys Love (Yaoi) (Part 1 of 3)
Kiss Scene - Drawing for Boys Love (Yaoi) (Part 3 of 3)
Love Scene - Drawing for Boys Love (Yaoi)
Mangaka Boy Love Pose Collection: Love Scene 2 (Part 1 of 2)
Mangaka Boy Love Pose Collection: Love Scene 2 (Part 2 of 2)
Mangaka Boy Love Pose Collection: Love Scene 3’ (Part 1 of 2)
Mangaka Boy Love Pose Collection: Love Scene 3’ (Part 2 of 2)
Mangaka Boy Love Pose Collection: Love Scene 3’ (Part 3 of 3)
58K notes
·
View notes
Photo
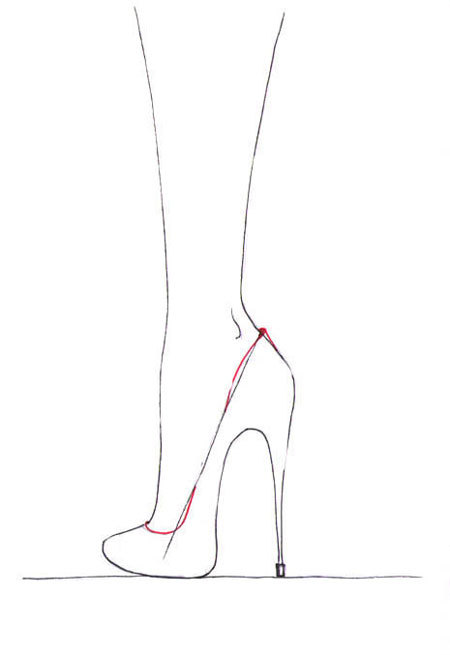
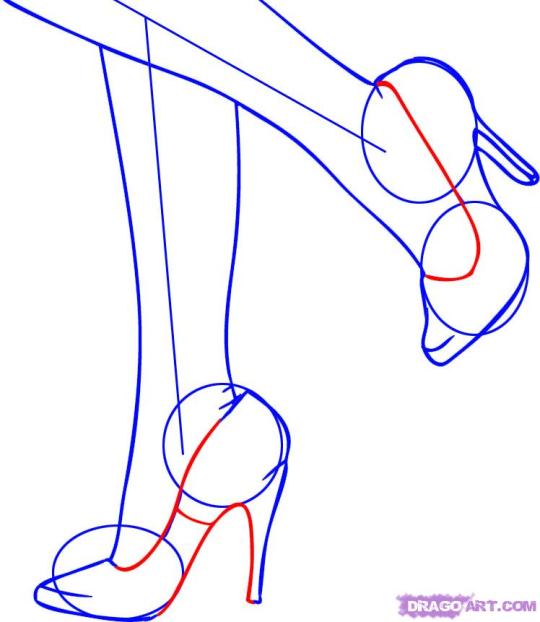

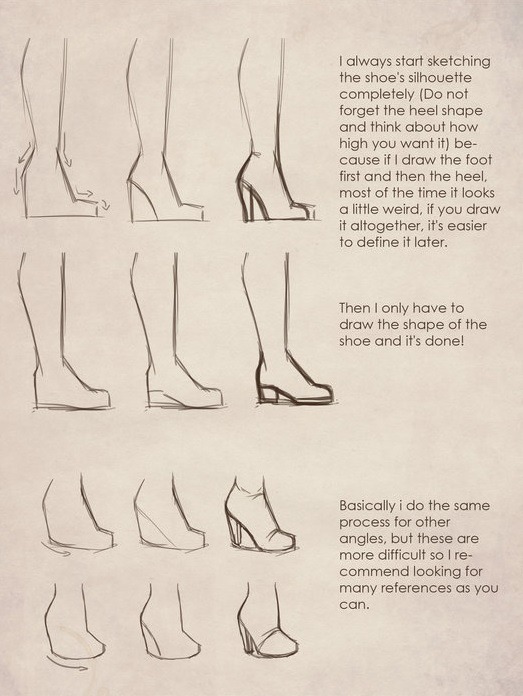


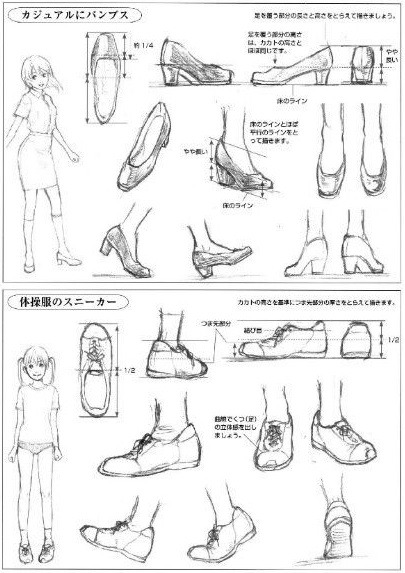

High Heels
Row 1: Left Right
Row 2
Row 3: Left, Right
Row 4: (Source Unknown)
Row 5
Row 6
54K notes
·
View notes
Note
Just curious on how you approach composition and perspective. I feel as if sometimes I think too hard, not really about what to draw but how to draw it and make it look interesting. The comic panels you have been doing are amazing. Any tips/references on improving my knowledge of composition and perspective? What do you think about as you lay your pencil on the drawing paper? what goes through your mind?
*STANDARD DISCLAIMER* I’m not handing down life lessons or trying to assert that there’s a ‘correct way’ to draw. I’m just trying to make perspective more approachable for thems that want to tackle it.
Okay. Let’s do this.
1. Understand what perspective is and what it’s for. Stay away from rulers while you get comfortable.
Everyone struggles with perspective because 1. it’s not well or widely taught and 2. artists tend to see linear perspective as a set of rules rather than a set of tools.
Linear perspective is a TOOL we use to create and depict SPACE. That’s it. That’s all it is. Your goal is not to draw in ‘accurate linear perspective.’ Stay away from the ruler and precision for as long as you can. Your goal is to create the illusion of three-dimensional space on a two-dimensional surface. Perspective is just a tool to help you construct and correct that space.
2. Know in your bones that you can ONLY learn to draw in perspective through physical practice. There is no other way.
Grab some paper and draw with me. If you match me drawing for drawing you will be more fluent in linear perspective and spatial drawing by the end of this post. Unfortunately if you don’t, you won’t be.
3. Sketch around in rough perspective. NO RULERS.

So let’s make some simple space. let’s start with a two dimensional surface…
K. We have a flat, 2D surface. Let’s create some depth by putting a vanishing point in the middle, and having parallel lines converge towards it. Make a gridded plane inside that space.

Good. Let’s make that space meaningful by adding a dude and a road or something. (Again, parallel ‘depth lines’ will converge into the vanishing point along the horizon)

And now we have the rough illusion of some space. I didn’t use any rulers, and it’s not perfectly accurate, but we got our depth from that vanishing point right in the middle of the page. And since we have a little dude in there, we’ve got human scale, which allows us to gauge the size of the space we’ve created. Gives it meaning.

You need people or cars or some recognizable, human-scale THING in there as a frame of reference or your space won’t mean much to your viewer. Watch. We can make that same basic space a whole lot bigger like this:
Same vanishing point in the same place, completely different scale, and a totally different feeling of space. Cool, right?
3. Sketch around in rough perspective MORE. STAY LOOSE.
See what sort of spaces and feelings you can create with vanishing points and gridded planes on a post-it or something. Super small, super rough. Feel it out. Pick a vanishing point or lay out a grid in perspective, and MAKE SOME SPACE. Do it. Draw, I don’t know, a lady and her dog in a desert. I’ll do it, too.

Good job. LOOK AT YOU creating the illusion of space! This is how you’ll thumbnail and plan anything you want to draw in space. All of my drawings start this way. I think about how I want the viewer to feel and then play around with space and composition until I find something that works.
Once you have a sketch you like, and space that you feel, THEN you can take out the ruler and make it more accurate and convincing.
4. Draw environments from life.
I cannot stress this enough. Draw the world around you, try to draw the shapes and angles as you see them, and you will ‘get’ how and why perspective is used. Use something permanent so that you’ll move fast and commit. I usually use black prismacolor pencil.
You’ll learn or reinforce something with every drawing. I learned a lot about multiple vanishing points from this drawing:

Learned from the receding, winding space I tired to draw here:

Layered, interior spaces:

You get the idea.
Life drawing will also help you develop your own shorthand and language for depicting textures, materials, details, natural and architectural features, etc. Do it. Do it all the time. Go to pretty or interesting places just to draw them.
Take a second and just draw a quick sketch of whatever room you’re in.
5. Perspective in formal Illustration: apply what you’ve learned.
1. I always start with research. For this particular location I looked at Angkor Wat.
2. Once I had enough reference, I did a bunch of little thumbnail sketches with a very loose sense of space and picked the one I liked best.
3. Scanned the thumbnail and drew a little more clearly over it. Worked out the rough space before using formal perspective.

4. Reinforced the space with formal perspective. I dropped in pre-made vanishing points over my drawing. If I were drawing in real media here’s where I’d get out the ruler to sketch in some accurate space.
5. Drew the damn thing. Because I do my research, draw from life, and am comfortable drawing in perspective, I can wing it. I just sort of ‘build’ the ruins freehand in the space I’ve established, keeping it more or less accurate, experimenting and playing with details along the way. I erase a lot, too, both in PS and when drawing in pencil. Keeps it fun for me.
And that’s what I know about composition and perspective. If you want more formal instruction on perspective and it’s uses, you can use John Buscema’s How to Draw Comics the Marvel Way. Or If you want to get really intense about it, Andrew Loomis can help you.
-Jake Wyatt
42K notes
·
View notes
Photo

Figure Dump 02 by SylwiaPakulska
1K notes
·
View notes
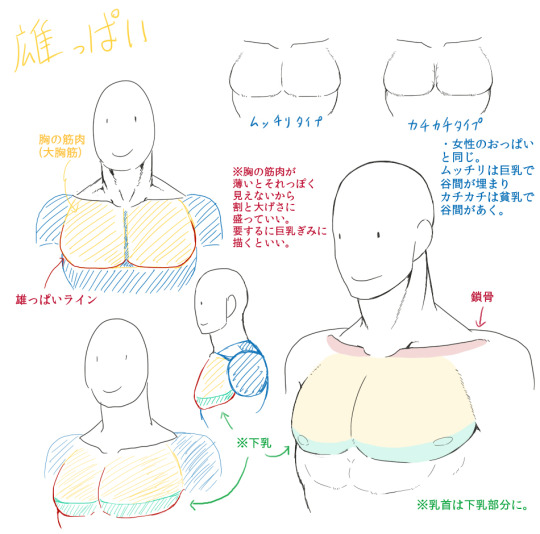
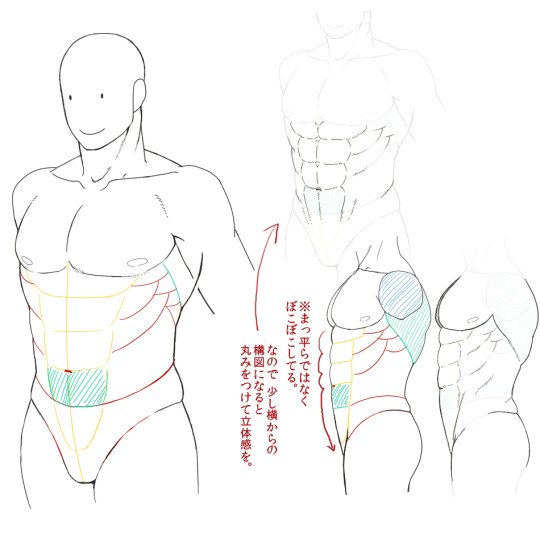
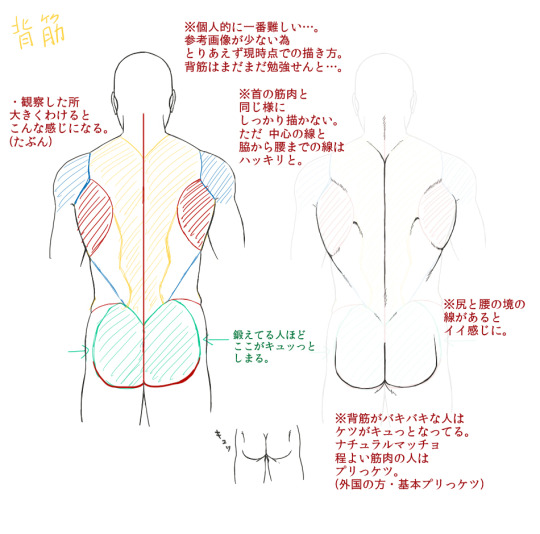
Photo


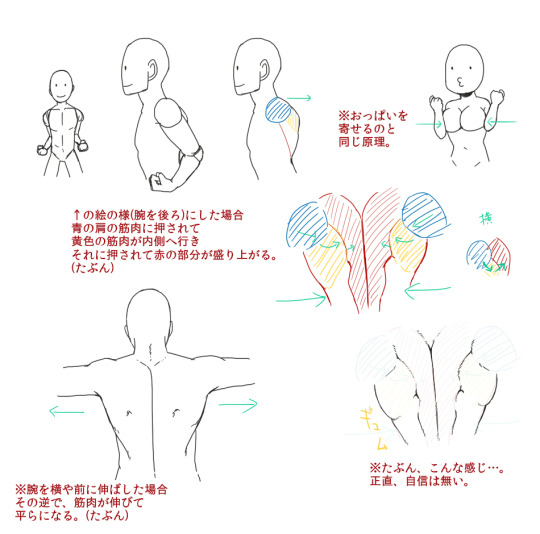
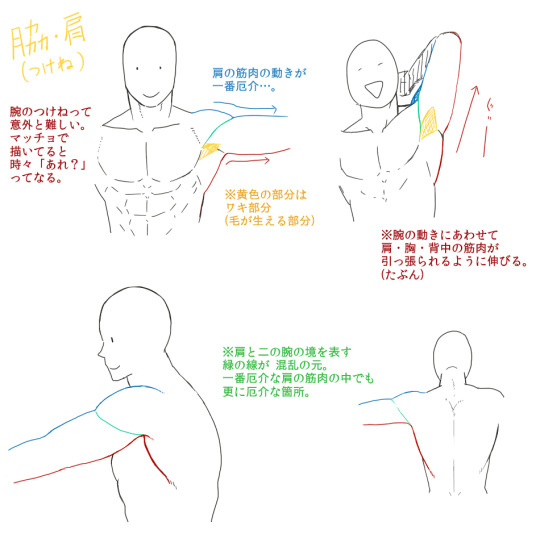
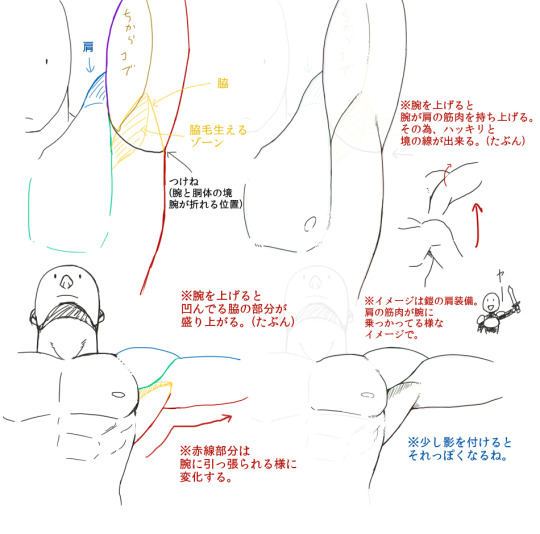
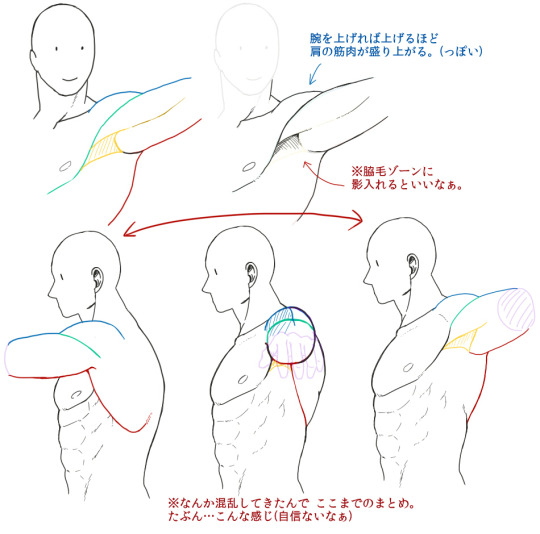
sorry for any grammar mistakes
long time without a tutorial… I tried to explain my general process of working here, hope someone will find it useful :)
193K notes
·
View notes


Photo
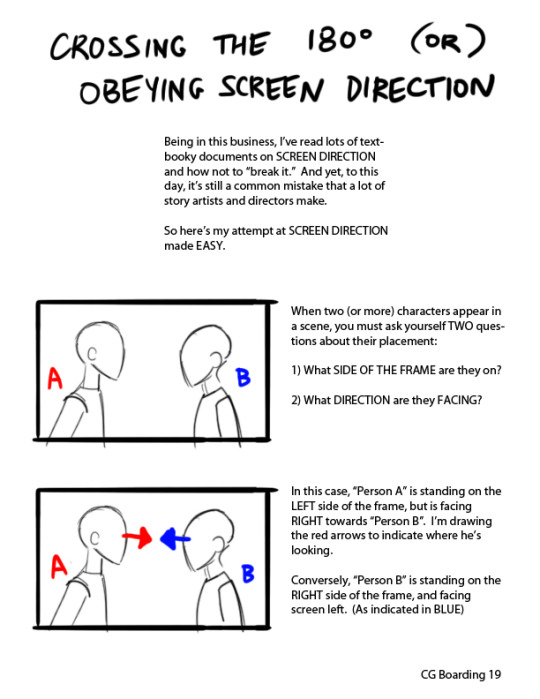

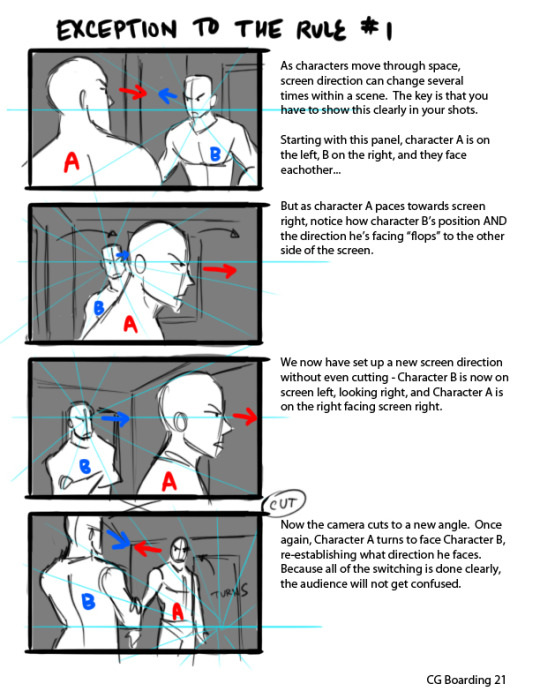
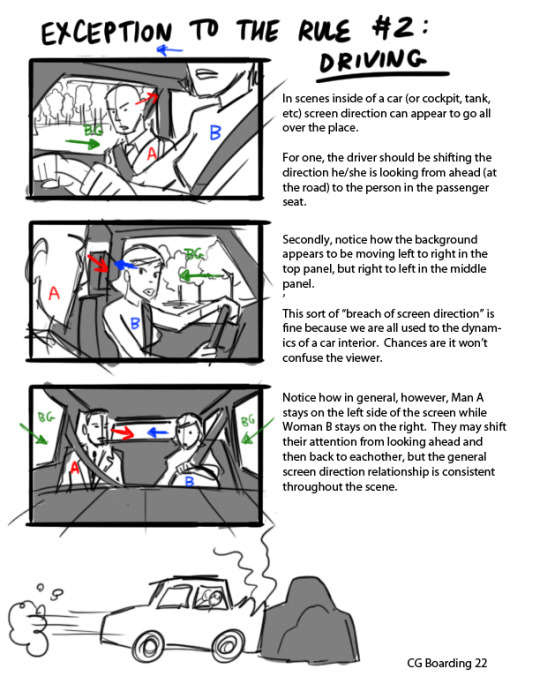
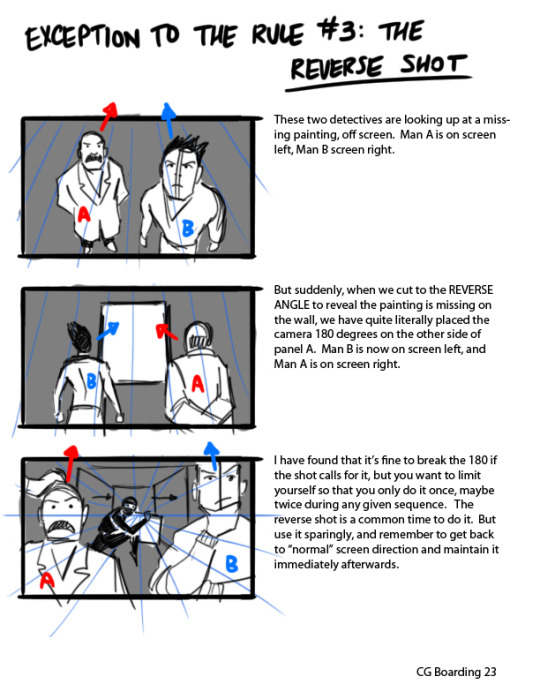
Hey kids! If you’re a filmmaker, animator, or storyboard artist and you don’t know what screen direction is, you might want to read this.
For the record, there are always exceptions to the rule in filmmaking, which is why I pointed out 3 examples here.
I’ve also found that comic books tend to NOT take screen direction as seriously as film does, but I’m still on the fence if this is wise or not. My favorite comics pay close attention to screen direction so as to not confuse the reader.
Good luck!
128K notes
·
View notes
Photo
Can someone shoot me with this? I should get back to drawing ;_;
Preferably a character I actually know of though LOL

Emoji Challenge Vr. 2.
88K notes
·
View notes