
heliotropepajamas-books
Heliotrope Pajamas Books
I’m trying my hand at fanbinding so I need a place to share my books.
8 posts
Last active 4 hours ago
Don't wanna be here? Send us removal request.
Last Seen Blogs

starstruckmusclekoala
All Kinds of Muscle

mgeni-c
CharleneMge

0sami0
Anyways I Love A Good Meme

lostdtime
celestial

hi-i-am-your-nightmare
Ronnie
Note
hello I heard you mention bookbinding resources in response to my tags and I wanted to ask if u know of any beginner ones for someone who has never tried it before? 👀
HIIIII YES I DO!!!!!
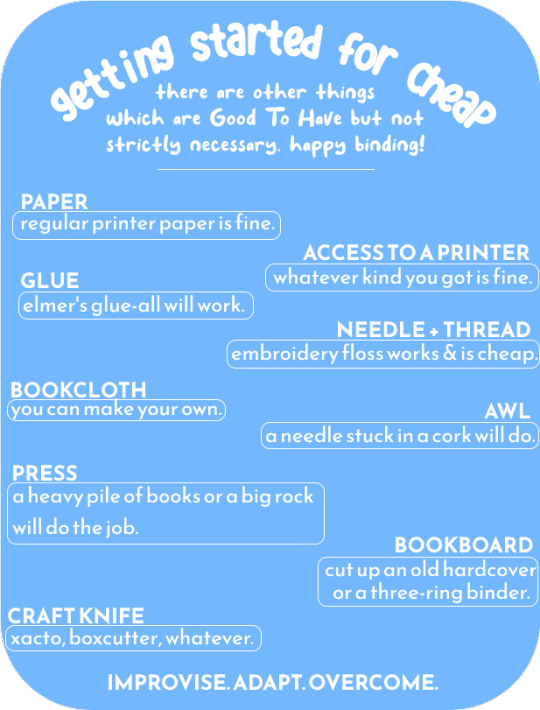
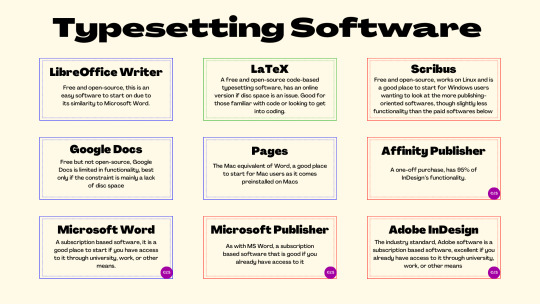
Here’s a fun infographic the renegade server made for cheap materials!! And here’s a fun infographic on what programs are available for typesetting!
Here is the doc that can get you started on bookbinding with step by step instructions,
And here is a link to the renegade hub! Come join the discord server for more tips and resources!
https://renegadepublishing.carrd.co
If you go to the tumblr page, @renegadeguild, you can see a collection of other peoples binds. Lately they’ve been reblogging peoples first binds to new binders not get overwhelmed or intimidated!
I really hope this helps, feel free to send another ask if you have more questions, I love helping new people get into bookbinding :D
22 notes
·
View notes
Text
Publications on Fanbinding
I just updated the research masterpost with this but for good measure: these are articles I have published on fanbinding (it’s been a busy year, as you can see!) There's been a surge of interest in academic work on fanbinding in the past few months, in part due to the Fan Studies Network of North America's recent conference and the collaborations between scholars there, so I thought I'd gather my work in one place for everyone's convenience.
Thanks to @renegadepublishing for always supporting the work of aca-fans and being so generous with their thoughts and practice.
“Binding fan fiction and reexamining book production models.” Transformative Works and Culture (March 2022).
w/ Kim Kennedy, “Reframing Monetization: Compensatory Practices and Generating a Hybrid Economy in Fanbinding Commissions.” Humanities (May 2022).
w/ Kim Kennedy, “Fanbinding and a Community-Generated Information Environment.” Proceedings from the Document Academy (August 2022).
78 notes
·
View notes
Text


Edge colouring with acrylic paint
I was asked to go over my process for painting edges and I wanted to do a new one so I could take good pictures of the process. Alas, I don't have the time to do that at the moment so a quick write up with already existing pictures it is
These pictures only show the colouring of the top edge. Traditionally it's either the top edge or all edges that get coloured/decorated. Colouring the front edge of a rounded book comes with another set of challenges that I will not address here. (On the upside, colouring a straight front edge is just the same.)
The basic procedure is always the same though.
First up the book is set in a press. Trimming helps to get a more even surface and will help reducing the time one spends on sanding.
Prepping the bookblock
I prep the bookblock and use some sturdy and not voluminous paper to cushion the bookblock between boards. A bonus on this is, the cushioning can adapt to the shape of the bookblock. As visible the pictures, these are from colouring the edge of book with shoulders (which means it has not only been rounded but also backed). By cushioning the bookblock I can protect the shoulders from being squashed by the boards when I apply pressure. The cushioning paper should also be larger than the book itself. Otherwise the pressure from clamping the edge tight can cause a smaller cushioning to leave marks on the bookblock.
(btw paper from high gloss magazines is perfect, because it's very dense and will not be compressed/ reduce pressure on the bookblock)
Putting the book in the press
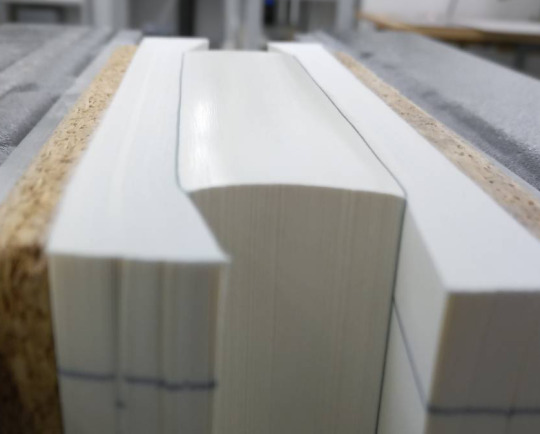
For this you need a press that allows to have one side of the book (the one you're working on) point upwards.
The paper is level with the edge, but the boards are a bit recessed (no more than 5mm). This is done to keep pressure on the bookblock without having to sand the boards at the same time. Also thinner bookblocks can quickly get sanded at an angle which is a) an aesthetic issue and b) causes trouble when taking the measurements for the case.
When the book sits tightly in the press (here the go to is, give it as much as you have! you want those pages so tight no water is seeping in and causes bleed! Sometimes paper quality is lacking though and it can't be avoided.)
Sanding the edge
Sanding is, in my experience, the one of the crucial parts of edge colouring. A smooth edge will lead to an even result and removes one possible cause for flaking (there are more though).
Even my trimmed books usually have a mark from the blade when trimming and to get an even looking result those need to go.
I sand in different grits, starting with a 120 sandpaper wrapped around a block of cork or another tool for holding the paper. I go no lower than than to avoid getting even deeper groves than there still are. Then I follow up with 180, 240 and 320 paper. Usually that's enough to get a glossy sheen on the edge. (different book but you can see that gloss and the part I still had to go over in the pictures below)

Once they have that sheen...
DO NOT TOUCH THE EDGE!
I know it's hard. The temptation to just run the fingers over them great. They look so smooth and shiny. Almost silken to the touch... and they are... but I repeat YOU MUST NOT TOUCH!
The oils on your skin can interfere with a good result. Especially water based colours may not stick as well to the areas touched as others, glues and foils do not adhere as well, stuff like that.
Applying colour
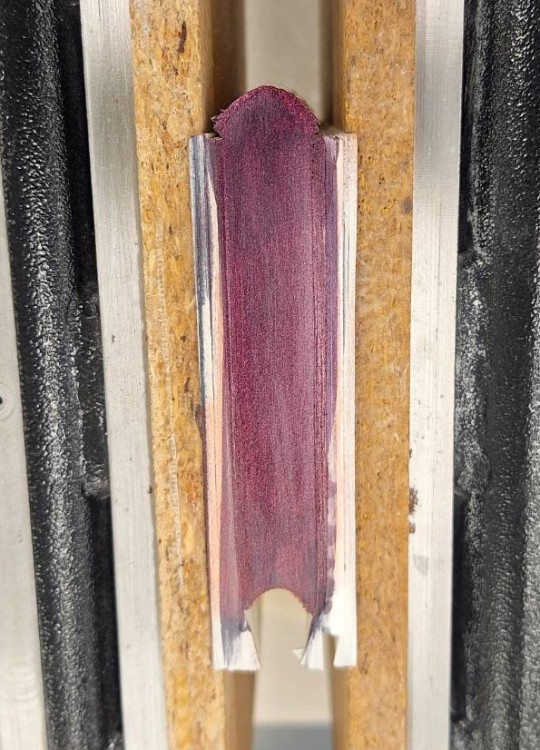
When the book is in the press it's not removed or
pressure reduced before the edge decoration is done. For the colour shift acrylic paints it's essential to get a dark foundation. Otherwise the colour will not show!
I've done this with ink.
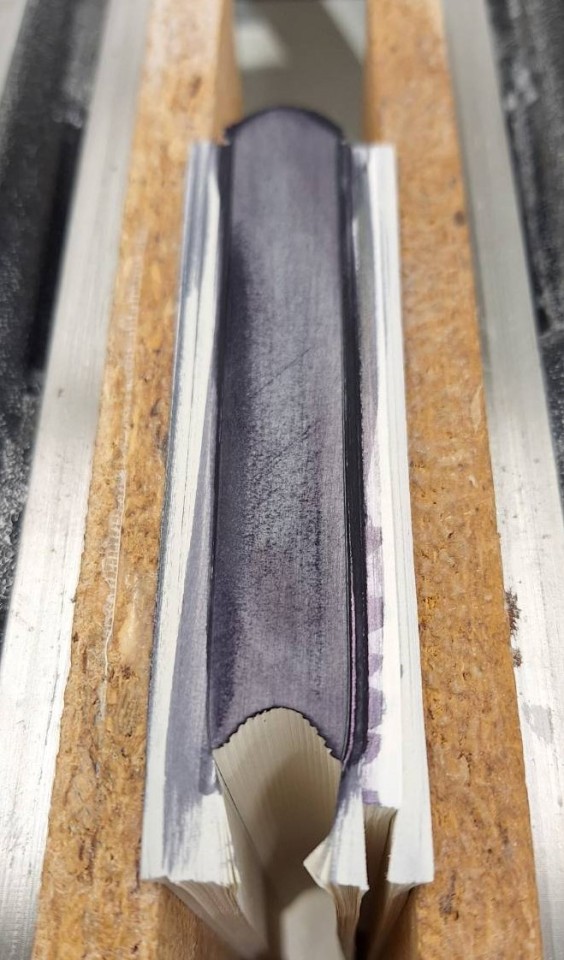
(This was really rushed and not neat at all, don't aim for a look like that! All the darker parts show where I did not have a smooth surface yet. Even the cutting marks from trimming are till visible.)
In my experience working with acrylic paints is more forgiving to laziness when sanding than inks. At least when it comes to even coverage in the end, possible flaking is a different matter.
The colourshift acrylic paint was way more liquid than the ones I'm familiar with, still they needed diluting (a first go with undiluted colour resulted in severe flaking). For the ratio on how to dilute I can't give measurements. I think I ended up with a rather thin colour and did several passes until I was satisfied with the colourshift effect.
No matter what coat is applied I use a soft brush that is wider than the bookblock to cover all at once and avoid to obvious streaks. The direction of brushing is from spine area to the front. I try to get the whole edge covered in 1 motion. To avoid colour seeping down the front edge I lift the brush towards the end so there's less pressure pushing a bit of colour ahead of the brush and spilling down the front edge. (I'm still working on that part, different paints behave differently, but that's the ideal to aim for.)

Now all to do is wait until the colour is completely dry. Which is rather fast with acrylics but takes a bit longer with ink. That step can be speed up a bit with a hairdryer on low heat and from a distance to allow the colour to dry evenly and then the book can be taken out of the press.
I've seen different approaches to separate the edges. Mine is a gentle wave motion. Holding on to the books spine and front and just twisting it and pushing the pages so they move against each other.

If all went well there's a rewarding crackle and no colour flakes off. If colour flakes off, it's back to square one, sanding until all is clean and smooth, colouring, drying and separating (and hoping this time all goes well).
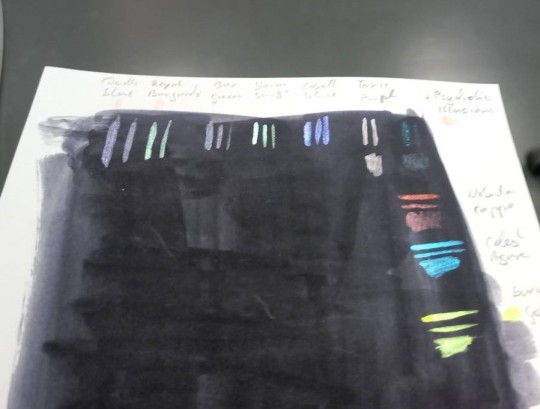
As a reference for the colourshift paints I used, I did a test sheet for the chameleon colours. So here's a dot of the same colour on white paper as the stripes under or next to it on the black and also slightly different angles to show the colourshift (sadly it photographs really bad on flat surfaces)

23 notes
·
View notes
Photo

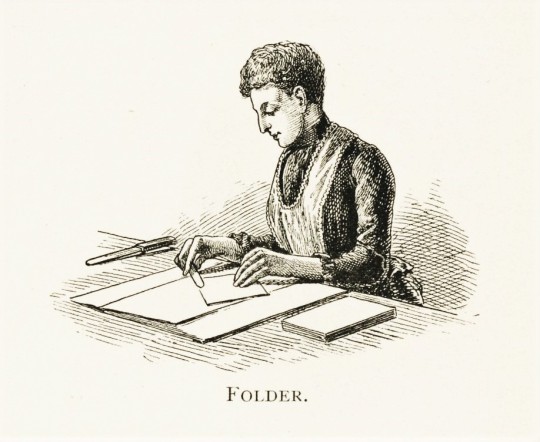


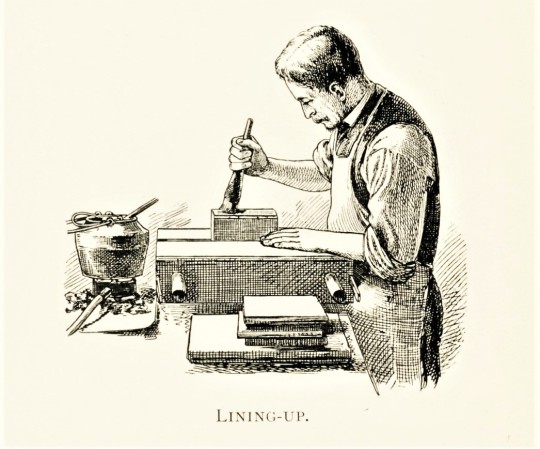


Wood Engraving Wednesday
Here are a few delightful wood engravings from a recent gift showing the various processes that go into binding a book. This little pamphlet is entitled A Short History of Bookbinding and a Glossary of Styles and Terms Used in Binding … .printed in London at the Chiswick Press for the bookbinder Joseph William Zaehnsdorf in 1895.These images were probably printed from metal plates that were made from the original wood engravings. The engravings are not attributed, as was the case for most commercial engravings.
Click or tap on the images to see the definitions for these activities as provided in the booklet’s glossary.
View more posts with wood engravings!
2K notes
·
View notes
Text
This is 4x rarer than most other iterations of the meme, reblog today or wait 4 years.
1K notes
·
View notes
Text
Making a book in five and a half minutes
Well, I forgot to film the folding and the punching so it actually takes a little longer.
This is a quarto, so smaller than my usual (folio-sized) books. It's the author copy of this book (turned out much better this time, I was more cautious with the guillotine.)
I left the audio in because I find it very soothing.
I was a little nervous to make this because what if someone comes in and is like THIS IS WRONG HOW DARE YOU but I am raising my middle finger at imposter syndrome.
682 notes
·
View notes
Text
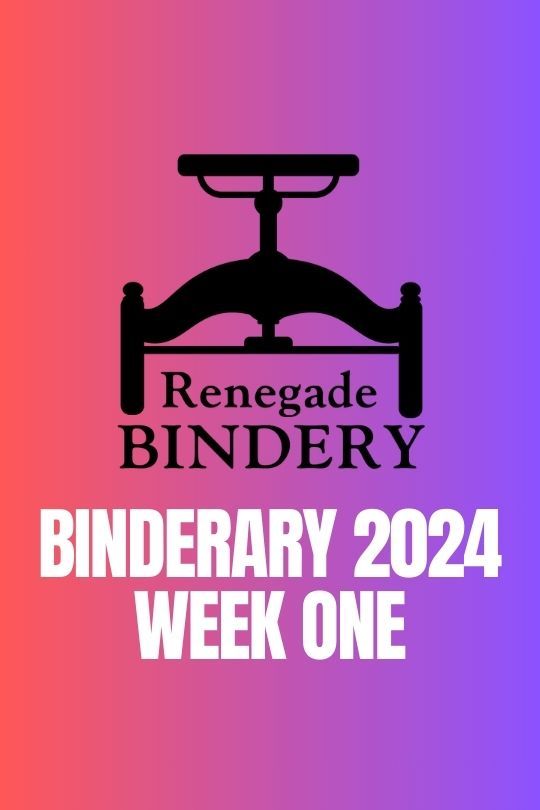
Binderary 2024: Week 1
In the Renegade Bindery Discord Server, we are once again running Binderary during the month of February. Attendance is free, and a link to the 18+ Discord Server can be found on our carrd.
Whether you’re new to the world of bookbinding or an aged veteran, join us for a month of binding fun! This event is all about community & learning, be it trying something new or refining existing skills.
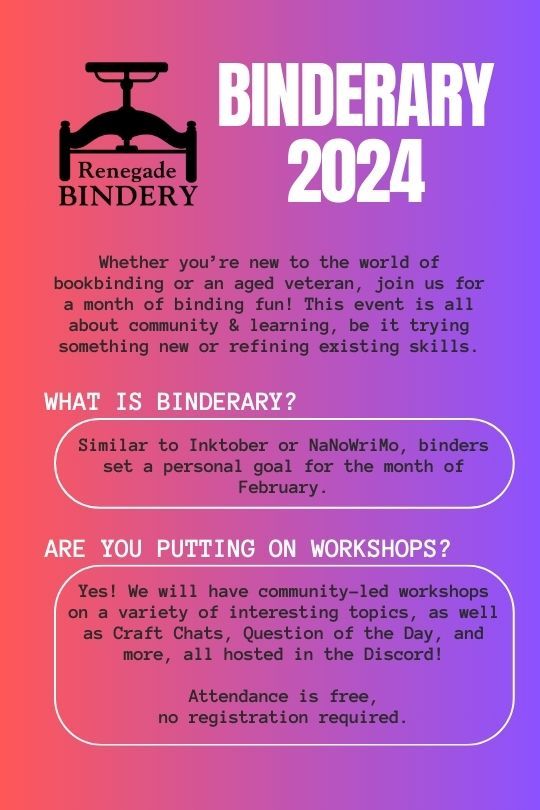
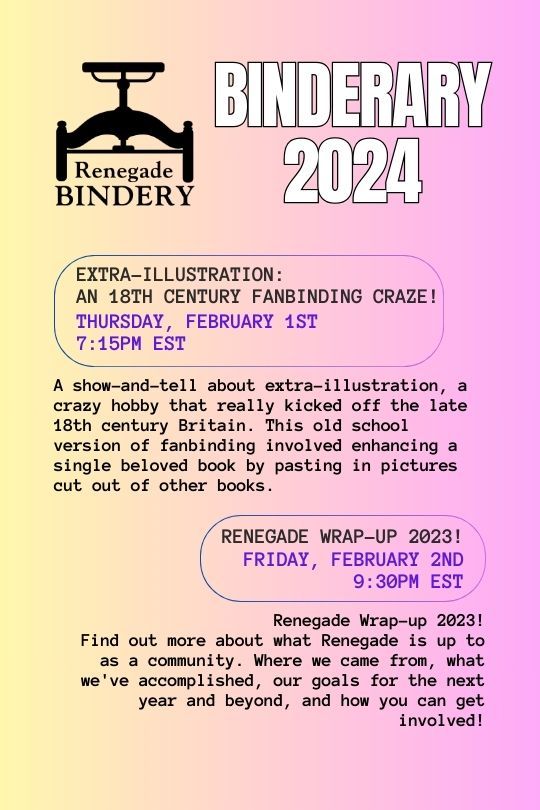

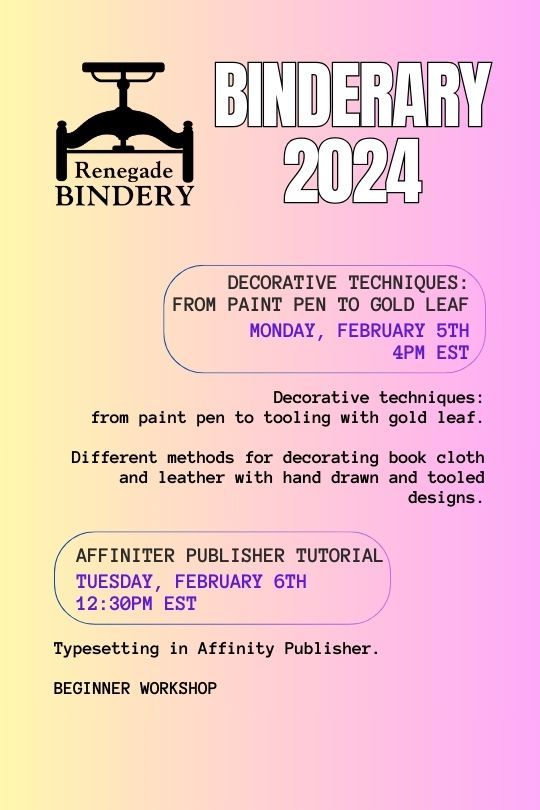

All our workshops are run by members of our fanbinding community, and some of them are even on Tumblr!
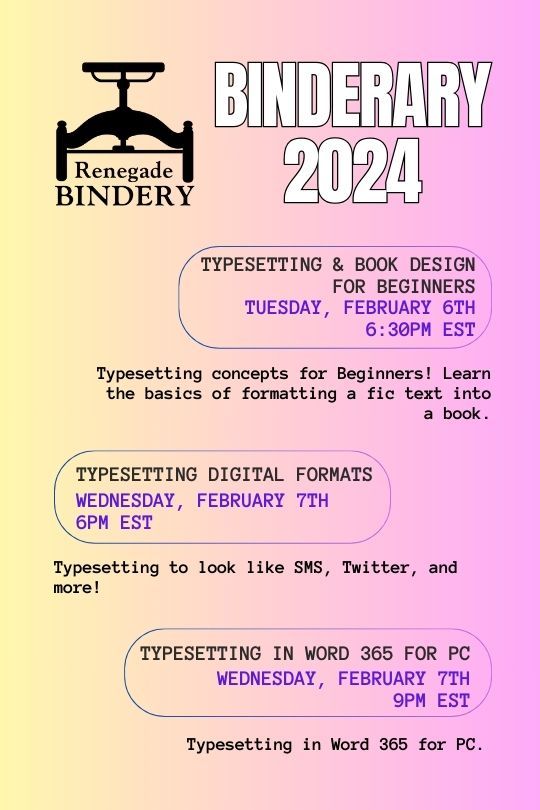
Here's the list of who's running the week 1 workshops:
Renegade Wrap-up 2023!: @robins-egg-bindery, @fanboundbooks, @celestial-sphere-press
Split Board Bindings!: @misanthropiczombie
Decorative techniques: from paint pen to gold leaf.: @blackoakbindery
Affinity publisher tutorial (Beginner Workshop): @kate2kat
Typesetting & Book Design for Beginners: @bearclubbooks
Typesetting Digital Formats: @sayornispress
Typesetting in Word 365 for PC: @no-name-publishing
526 notes
·
View notes
Text
Green Ice - First Fanbinding Project

After having ArmoredSuperHeavy’s How To Make A Book From An AO3 Page instructions open in a tab on my phone for nearly a full year, I decided it was finally time to give it a shot. I started with one of my favorite, comfort-read fics, and while I still have a lot to learn I’m quite pleased with how it turned out for a first try.

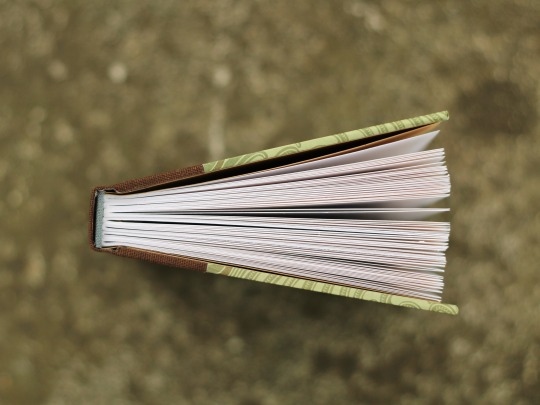

The Fic: Green Ice by Adina ( @figtreeandvine here on tumblr) https://archiveofourown.org/works/255163
This is a cross-over between Bertie Wooster and Lord Peter Wimsey - let’s hear it for tiny fandoms! The story is told from Bertie’s point of view, which the author captures perfectly, and while I can’t give away the twist at the end without major spoilers it is so, so good.
The Binding: This is a quarto size (quarter US letter, so around 4.25 x 5.5 inches or 10.8 x 14 cm) typeset in LibreOffice using Garamond for the body and AR Bonnie for the titles. I learned so much while putting the typeset together! The book itself is made out of scraps scavenged from library discard bins and decorative papers that are probably old enough to get their learner’s permit in several states. Flatback case binding made with a variation on the bradel binding method (the only real difference is heavy card for the spine piece instead of book board)
Since the story is set in the 20s I was going for an older look, and given the title it had to be green.


Things to improve: the print quality could be upped a bit, I need to figure out trimming textblocks, and I had to do a bit of patchwork on the inside of the spine when I was too generous cutting relieving darts. But all in all I am super pleased with how it turned out. Now on to the next project!
#fanbinding#my project#quarto#fanfiction#fanworks#Jeeves and Wooster#Lord Peter Wimsey#renegade bindery
78 notes
·
View notes