gif-making
gif making
here you can find a bunch of gif making tips, tricks, and resources. other gif creators are very welcome to submit their tutorials or send us a link to their tutorial posts so we can reblog it.
11 posts
Don't wanna be here? Send us removal request.
Last Seen Blogs

heyheresathou
heyheresathou
creepy-owl
Owl Creepy

holdfastmotorcycles
School Of Cool -
Hold Fast Motorcycles
cuckhaus
the man, the myth, the delusion
chaospyromancy
the freak factory
Note
Hello, can you tell me where did you download the vapoursynth you are using my version is not working thanks a lot
Hi, here is the link to the one I'm using! It's also linked in our post about vs.
Hope it works! :)
7 notes
·
View notes
Photo
recently a few people have asked how i sharpen my gifs and so i thought i’d put together a little SHARPENING TUTORIAL for anyone who’s interested…
the first thing i’d say is to make sure you’re using the most hq images/screencaps/clips you can find. i know this advice gets thrown around a lot but for good reason! here’s a really good post with more info on where to find the best stuff to use. now on to the tutorial:
we’re using smart filters in this tutorial which means smart objects babyyy
group your layers if you haven’t already and convert the group into a smart object (filter > convert for smart filters)
now duplicate your smart object so you have two identical layers
apply a smart sharpen filter to the bottom layer (filter > sharpen > smart sharpen)
my standard settings:
amount: 500%
radius: 0.2 - 0.5 px (see what looks best!)
remove: lens blur
“more accurate” selected
good work! now if that’s looking a little extreme don’t worry, we’re not done!
apply a gaussian blur filter to your top layer (filter > blur > gaussian blur)
set the slider to 1.0 pixels
finally set the opacity of your blur layer to 25%
and that is it! your layers should now look a little like this:
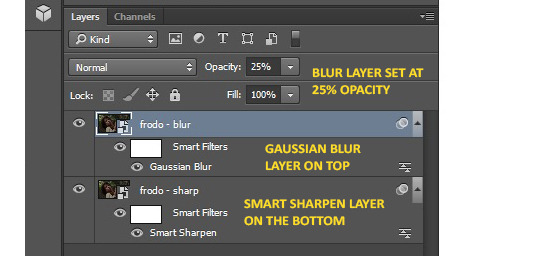
the lovely thing about this is that you can basically keep your filter settings the same for whatever you’re working on and simply play with the opacity of that blur layer should you want to increase/decrease the sharpness!
fingers crossed this all makes sense. if anything wasn’t clear or you have further questions don’t be afraid to ask. happy giffing!!
1K notes
·
View notes
Photo
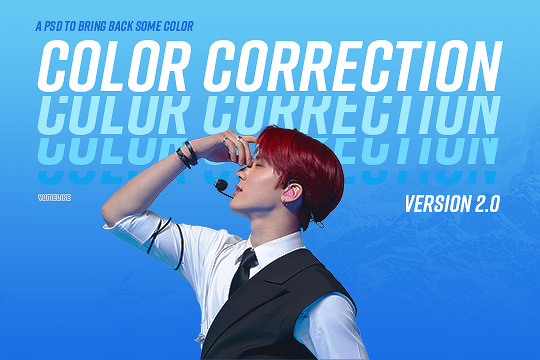
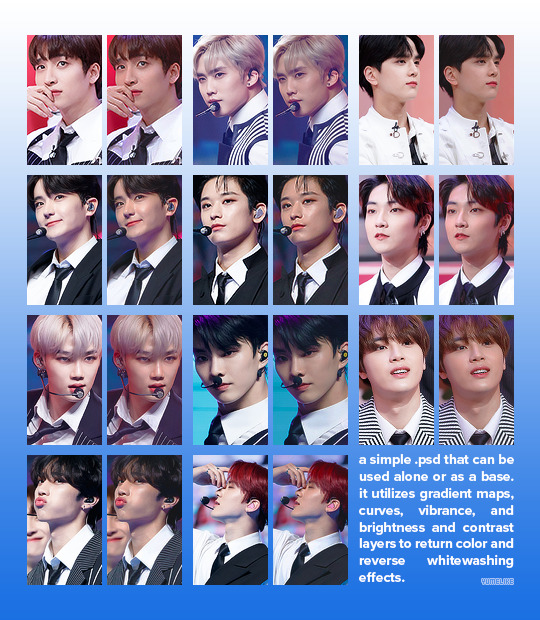
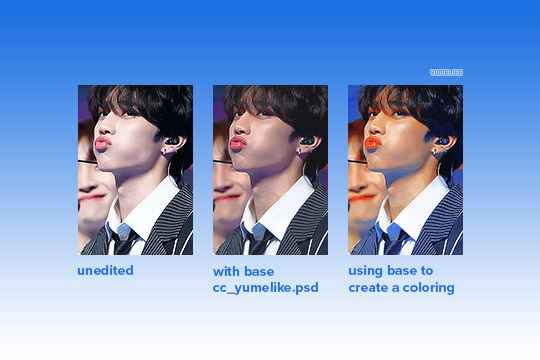
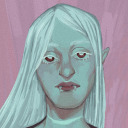
nearly 4 years later and i’m back with another color correction .psd ! this one is by far simpler than the last and easier to build upon. feel free to use as a .psd by itself or as a base psd to build upon (as seen in the last panel)! obviously, if someone asks, credit me but other than that go wild and create beautiful things! ♡ [box]
395 notes
·
View notes
Photo

people wanted a tutorial on how i did this gifset so here you go!^^
required:
- photoshop cc
- basic photoshop skills
- basic gif making skills (not needed if you’re editing a still image)
tutorial under the cut
Keep reading
2K notes
·
View notes
Text
Welcome and Hello!
In this blog, we will try to provide the resources you need with detailed descriptions to make gifs. You can leave the optional steps out and learn the basics first and later when you want to learn more, you can come back and do that.
For those who already know how to make gifs, we are hoping for some exchange! Everyone has different ways of gif making and we’re always interested in learning, and maybe we can give you some tips too. You can also send us submissions or a link to your post, and we will post/reblog it.
If you have questions, problems, or find errors in our posts, contact us anytime!
.
Instructions with links to our original posts:
You will need:
Some kind of computer (there are also mobile apps for gif making, but for now we’re explaining gif making on desktop!)
Photoshop [How to get photoshop]
The video you want to gif from [How to download a video]
Optional!: Vapoursynth [How to use VapourSynth for smoother gifs]
Once you have these, you can start:
Optional!: pre-edit and cut with Vapoursynth [How to use VapourSynth for smoother gifs]
Import video clip to photoshop and setting up for gif [How to import a video file to make gifs]
Optional!: basic editing, add layers with effects and coloring [Basic editing and coloring (example)]
Export your ps file as gif [How to export your gif from PhotoShop]
Extras:
“Palette” gif tutorial
coloring
sparkle effect
39 notes
·
View notes
Text
How to export your gif from Photoshop
Once you imported the video file and edited it to your liking, you can finally save the file as a gif.
Go to File > Export > Save for web or alternatively hit Alt+Shift+Ctrl+S.
This window will open (sorry it’s in German, but it will look pretty much the same in any language):
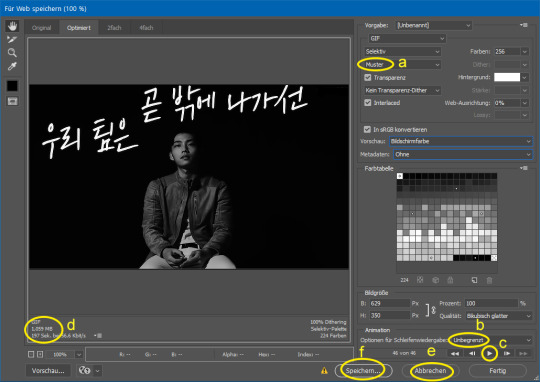
a – you can choose between the options here. The gif will look slightly different depending on what you do – choose whichever you like the best!
b – set it to forever so the gif will keep looping
c – play to see what it will look like
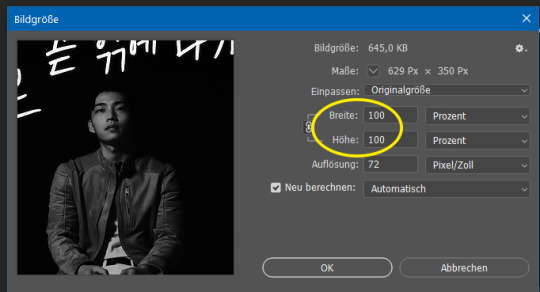
d – here the final file size that your gif will have is shown. Make sure the file isn’t too big. For gifs on tumblr, I try to keep them under 5 MB. If the file is too large (8 or 9 MB or more, I’m not sure), tumblr will not accept it. And sometimes, even though tumblr accepts a large file, it will compress it in an ugly way. So, if the number shown here is too high, press cancel (e) and go make your gif smaller.
Two ways to make your gif smaller: 1) delete some frames/make the gif shorter. I usually have between 40 and 80 frames. 2) make the overall measurements of the “screen” smaller. Go to Image > Image size in the menu (or Alt+Ctrl+I) and reduce the percentage of height and width by a few percent (at equal amounts).
f – when you’re happy with everything, you can finally save the gif and you’re done, congrats!
0 notes
Text
Basic editing and coloring (example)
In this post I will show you my usual basic editing and coloring! I don’t save the files because the ideal editing is different for every gif, but you can still save these layers and apply them to other gifs later, too.
Here is the example gif I will edit for this post: left/bottom is edited, right/top is the original:

Here we go!
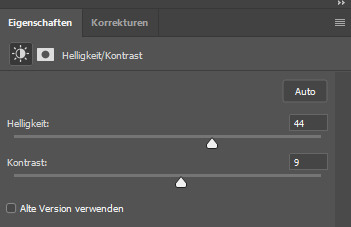
Once you imported the layers as explained in our post here, you can add layers with effects. Be sure to select the last frame and last layer (just by clicking on them). Then go to adjustments and click on the first option, Brightness/Contrast (a).

The properties will open and you can adjust brightness and contrast as much as you like. For my gif, I choose brightness 44 and contrast 9.
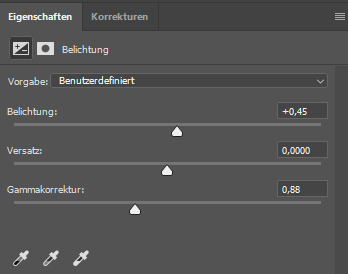
Then go back to adjustments and click on what should be called lighting (b). Properties will open again, and you can adjust the first and third bars to your liking, but the middle one usually doesn’t make it better. So my value for the first bar is +0.45 and for the last one 0.88.
Finally, you click curves (c). It will give you a straight line like in the left screenshot, and we want to lift the left end (makes dark colors/blacks brighter) and lower the right end (makes bright colors/whites darker) like in the screenshot on the right. To do this, you have click at (1) to put little dots. Then you can pull the line in the left corner up a bit by “grabbing” it at (2), and the one in the right corner down.
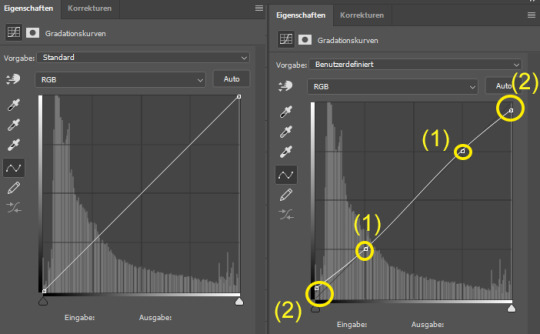
-- Your first impression of the curves might be that it makes your gif colorless/lifeless and more boring, but actually, it will look just fine on tumblr. After all, you already increased the contrast before, so compared to the original video it’s still more colorful. The reason why I do this (when I increase contrast, which I usually do) is because if you have areas that are very dark or have high contrasts, the gif can’t handle it and it will look ugly. It’s hard to explain, but basically this:
The water only appears in a few colors with sharp edges, where there shouldn’t be any, and you can see “pixels” in the transition areas. The “flattened” curve will reduce this effect!
So that’s it! Of course you can try out all the other options in adjustments and play around until you find something that makes your gifs nicer!
1 note
·
View note
Text
How to import a video file to make gifs
Importing a video file to make gifs is quite easy! You simply
open photoshop
go to File > Import > Video frames in layers
choose your video and press open
this window opens:
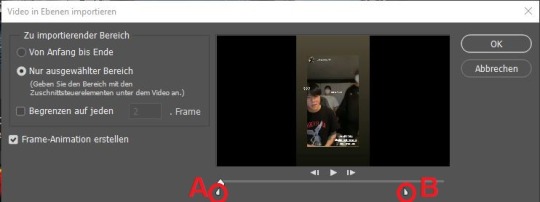
If you cut your video previously with VapourSynth, you only have to press OK.
If you didn't, use A and B to choose from which part to which part you want your gif to go, (make sure not to make it too long) and press OK.
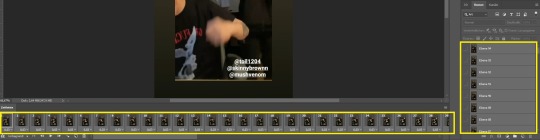
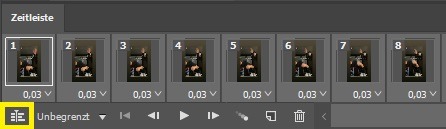
Now your video is imported! To see the frames of your gif, activate the Timeline in the Window menu. If you still have too many frames, you can delete some by selecting them and pressing the bin button below the Timeline (not the delete button on your keyboard!), and doing the same with the corresponding layer (shown in “layers” which should be on the right of your screen).
Some additional, optional tips before you move on to coloring:
In the Timeline, you can see the duration of the frames (here 0.03).

The smaller this number is, the faster your gif will move. With gifs, it usually varies from 0.03 fps (frames per second) to 0.06 or 0.07. The number that is ideal here also depends on the fps in the original video. I usually don’t change the fps that is automatically set when importing, but if you want to make your gif faster or slower:
select all frames by 1) clicking on the first frame, 2) moving the bar all the way to the right until you can see the last frame, 3) press shift, 4) click on the last frame
click on any of the fps (here 0,03) and choose “others”
a window opens where you can change it!

One thing I personally don’t do, but everybody else seems to do, and can sometimes make editing easier:
select all frames as explained above, and also select all layers (on the right side) in the same way
Press Convert in Video time Frame in the bottom left corner of the time frame
and the Timeline should change to look like this:
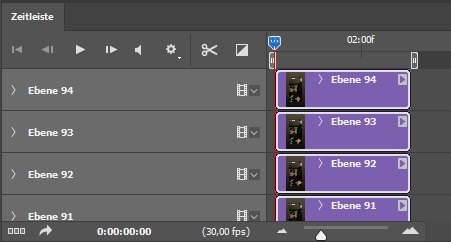
In the menu, go to Filter > Convert for smart filter and your layers will be reduced to one:

2 notes
·
View notes
Text
How to use VapourSynth for smoother gifs
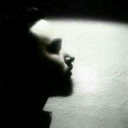
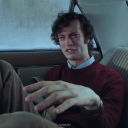
Hi, in this post I will explain how I use VapourSynth! Of course there are many ways to do so, this is only what I do. Feel free to comment and share your thoughts and tips! You can also make gifs without VapourSynth. If it is too much of a bother, you can just leave this out. Here I have two gifs for comparison: they are made exactly the same way, except for the first one I used VS and for the second one I didn’t:
If you watch closely, you can see that his skin is smoother and the outlines of his hair and fingers are sharper in the first one. You will be able to make these effects stronger or less strong!
So here we go!
1. Download VapourSynth from here and unzip the folder.
2. Have the video file that you want to gif from ready. Check this post [link] if you don’t know how to download it.
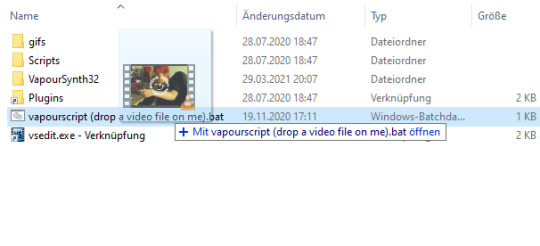
3. Open the Vapoursynth folder and drag & drop the video file onto the file that is named “vapourscript (drop a video file on me).bat”:
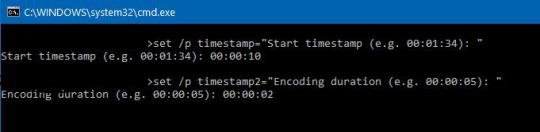
4. Timestamp window. This window will appear. Now you type the timestamp of where the part that you want to gif starts. Mine starts at 00:10 so I type 00:00:10. Then hit enter and type the duration of your clip (mine: 2 seconds -> 00:00:02) and hit enter again.
5. Resizer. The resizer will open in your default browser, as well as the VapourSynth editor. Go to the resizer first. It shows you a preview of what your clip looks like.
You can adjust height and width under “GIF size” so it fits your video (a), and you can make the clip bigger or smaller by adjusting/dragging the sides (b). I usually set mine to 630 * 350 for regular music videos, but if your clip is long, you can make everything smaller to reduce the final gif size, or if you don’t want the whole frame, you can cut out anything you want.
At “Preprocessor”, choose “qtgmc 30 slow” and “inverse_scale”
At “Denoise Filters”, choose KNLM and tick the box next to the KNLM scale
At “Sharpening”, choose FineSharp and tick the box as well
Then you copy all the text from the box on the top right corner (c)

6. VapourSynth Editor. Now you go to the VapourSynth editor. Where it says “#Whatever you copied from the resizer goes here“, you paste the copied code from the Resizer here.
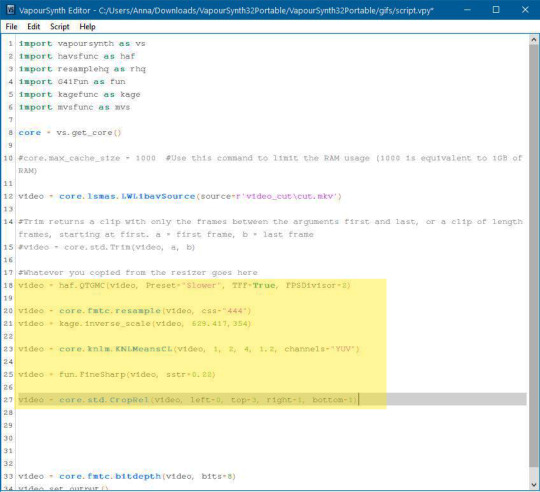
7. Depending on the quality of the original video, you can now make adjustments by smoothing and sharpening the clip. If the video quality is low, you enter higher numbers, and if it is high, lower numbers will do the job. What I usually do for standard 1080p videos is replace the 1.2 with a 2 here:

And the 0.22 with a 0.95 here:

But actually, it’s totally up to you what you think looks best and what you want your style to be like. In the next step we will check how it looks, so you will be able to come back here and change it again.
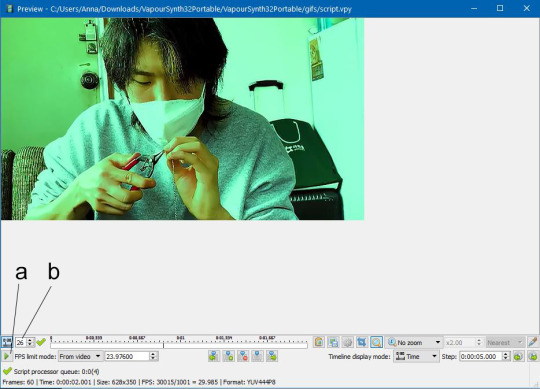
8. VapourSynth Preview. On the menu on top, you now go to Script -> Preview or alternatively press F5. If your computer can take it (mine can’t :D) you can play your clip with the play button (a) and see what it looks like. Or you just go to random frames on the timeline and wait for each one to load. You can now check at what frame the clip you want to gif starts and at what frame it ends in the frame number window (b). (Mine starts at frame 26 and ends at the last frame 59.) Remember the frame numbers.
9. Then you check if the preview looks like you want it. You can close the preview window, change the numbers you typed in the editor before, and check the preview again. When you’re done with that, close the preview window.
10. You go back to the editor and replace the a and b in line 15 with the frame numbers you remembered at step 8. And remove the # at the front of the line.

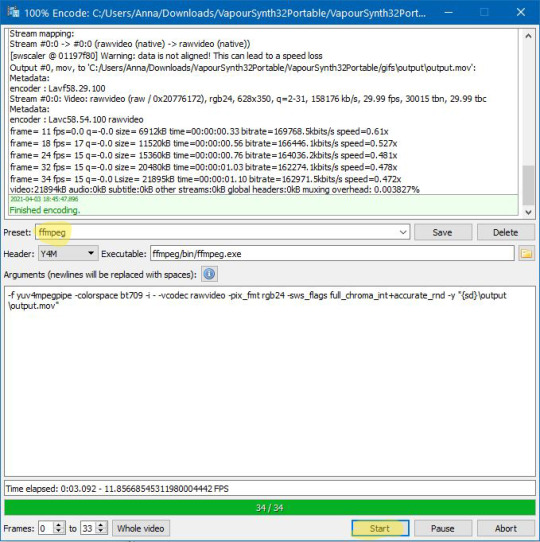
11. Encoding. Now you are almost done! On the menu you go to Script -> Encode Video or you press F8. This window will open. At “Preset”, make sure you have it at “ffmpeg” and the same settings as me. Then you press start and the clip will encode.
12. Lastly, you go to your VS Folder -> gifs -> output and you will find the file output.mov. This is your pre-cut video clip. Now, very important, make sure to rename it before encoding your next clip, or it will be overwritten. Then you can import the clip into Photoshop and go on like it is explained in our other post.

Good luck and have fun! If you have questions, you can always ask us!
33 notes
·
View notes
Text
How to download a video
Here are some links for video downloading.
Some of these downloaders work only for YouTube, some work for other sites too (vlive, Twitch…). They get taken down often, so if one doesn’t work, just try a different one. You can also just google “[website name] 4k video download” or similar keywords.
For gifs, we recommend to always get the highest resolution possible (1080p < 2k < 4k), and you don’t need sound, so you can download the file that is without sound.
Here are some downloading sites where you can download videos directly:
- Copyvid
- y2mate
- savefrom
- converto.io (only for 1080p and lower quality)
And here is 4K Video Downloader, a software for video downloading that you can install:
- 4K Video Downloader
If you know more sites or apps, or have any questions or tips, just contact us!
4 notes
·
View notes
Text
How to get photoshop
For gif making (the way we do it) you need photoshop! There are several ways to get it.
1) Get a subscription at the official shop. It’s about 20 US$ per month, depending on where you live.
If you can’t afford that, there are other options :)
2) Try the link in this post (pc only)
3) Or this post (pc+mac)
The posts usually contain instructions on how to install. If it doesn’t work, try a different one. Good luck!
1 note
·
View note