
dolls-and-crafts
Dolls and Crafts, oh my!
A place for my hobbies, which includes sewing, teddy bear making and dolls.
3 posts
Don't wanna be here? Send us removal request.
Last Seen Blogs

creepypastabookclub
New episodes every other Friday

migrateshop21
Untitled

reaperkat
ReaperKat’s Sketchbox

h-ihihi
invidia
Text
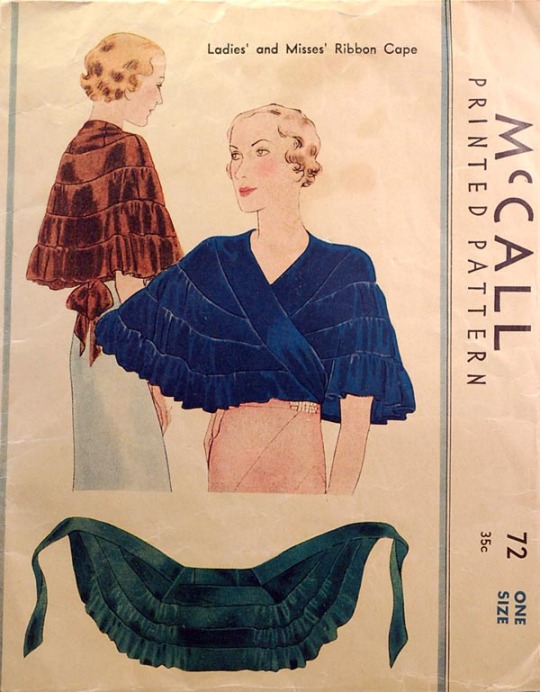
This is my grail garment. A 1930s cape that I stumbled upon on Pinterest and fell in love with. The original image is from wondertrading over on Flickr (check them out! They have oodles pictures of gorgeous vintage pattern).
Unfortunately, I cannot find the pattern itself anywhere.
Solution? Make my own!
I have lots of courage and little skill. Started sewing clothes this summer and I still haven't finished a single one (though to be fair, I only need to hem the two skirts and modify the blouse slightly to be done. Unfortunately I don't want to, so we're doing this instead!)
Step 1: How It's Made:
I have made Barbie clothes from drawings before, so I have a method. Is it the most efficient method? No, but it works for me.
The first step is always to get the best possible picture of the garment and figure out how it's made.
Since this is the only image I could find of this pattern, I need to improve it on my own.
I'm using Paint Tool SAI's linework layer to draw on top of the image with my mouse. The result is this:

The point here is not realism, but simply to make it clear how each layer of ribbon is formed into the cape. The white lines are drawn on top of the more subtle highlights of the original drawing, to help me figure out where I need to ruffle the three bottom layers.
Clearing up the image and removing the original, I end up with this:

(The numbers were added in Paint, since SAI don't have a writing tool.)
We have five layers of ribbon-
Ok, let's stop there. The cape is clearly named "McCall Ladies' and Misses' Ribbon Cape", and while I have absolutely no clue about 1930s fashion, that doesn't look like ribbon to me.
That looks like strips of fabric. Velvet fabric, to be specific.
I will have a different blog post on what material I think this is made from (tl;dr: silk velvet) and what I will use instead (I am poor and not skilled enough to sew silks). Stay tuned for that later.
But let's get back to the "how it's made". At the middle back (where the numbers are on the drawing) the strips of fabric seem to be equally wide, possibly narrowing somewhat where layers 2-5 meet layer 1. I will assume that the layers are equally wide all the way around, since that's easy to do, and it will be obvious in the finished product if I was wrong. It will also be easier to figure out where I should narrow the strips of fabric down, and how much, once I've made the first mock-up. So this is a "mañana" problem, aka. "make a note, but ignore for now".
Also, my method leads to the need for multiple mock-ups. That is because I would rather make it twice than spend days figuring out each step and still be wrong. Cheap cotton fabric is absolutely worth investing in if you follow my "fuck it, good enough" method of sewing.
From the original drawing I can see that the cape goes from the neck and down to about the shoulders, so I measure this area to figure out how wide each ribbon should be.
On me (a short woman with no shoulders) this is about 46 cm.
46 / 5 = 9.2 cm = 9.5 cm
(I'm rounding up to 9.5, because I am not fiddling about with millimetres when I'm making clothes for myself. Half a centimetre is close enough!)
But I can't just add on some seam allowance and start sewing. From the image, it looks like the top layer envelops all the other layers. Doing that will make it a lot easier to sew, and make the finished garment look better.
Therefore layer 1 will be width + width + seam allowance.
Layer 1: 9.5 + 9.5 + 2 = 21 cm
I set the seam allowance to a centimetre at each end, therefore 2, since one centimetre is clearly marked on my sewing machine. You can change this number to whatever you prefer. Main rule: if the fabric is thick or unravels easilly, make it wider, if it's thin or tightly woven you can make it smaller. For clothes to myself, I never go beneath 1 cm, but I am also a beginner.
Layer 2 - 4 are quite simple. Width / 5 + seam allowance.
Layer 2 - 4: 9.5 + 2 = 11.5 cm
Layer 5 is slightly different, since you need to hem the bastard. Hemming with a single centimetre seam allowance is possible (and can make a nice finish), but it's a pain so I won't.
Doubling the seam allowance on the hem makes the total seam allowance 3 cm, and the calculations:
Layer 5: 9.5 + 3 = 12.5 cm.
So now I have the width of each layer. Next step is how long each layer is. Unfortunately, this is something I will have to try on my body to figure out. The top layer will need to be tied in a bow at the back, so cutting that out and finding the right length should be easy-ish.
But I also need to keep an eye on how each layer is sewn.
Because layer 1 and 2 are both given shoulder seams on the drawing, while layer 3, 4 and 5 are all ruffled around the shoulders, but with unruffled backs and sides. That means that layer 3 will be quite a bit longer than the second layer, but how much is impossible to know until I've made the mock-up.
Also? Different fabrics ruffle differently. So if you sew this from a stiffer material, you might need fewer ruffles, while a more drapey fabric will look better with more. Since I'm making my mock-up from woven cotton and my garment from velvet, this will be something I have to keep an eye on when making the actual garment, since velvet and woven cotton drapes and ruffles differently.
So now all I have to do is cut meters upon meters of strips of fabric.
Start a podcast, put on the TV or phone a friend to keep you company, this will take a while to do.
12 notes
·
View notes
Text
I want every single item here, except the tiny dolls (adorable, but *off scale*)
★ x ★ o ★ x ★ o ★ x ★ o ★ x ★ o ★ x ★ o ★ x ★
15K notes
·
View notes
Photo

Penny’s Box Dreamlike Tea Party - The Fields
(my phone camera is a pain at capturing her skin tone, and I’m terrible at editing, sooo... this is the best one of a bad lot :P )
2 notes
·
View notes