
cookie-codes
eboy, king of discord
Discord: Maryam#9206
Master of eboy the bot.
Guides on discord bots, and other relevant coding stuffs.
I'm always open for your questions.
6 posts
Don't wanna be here? Send us removal request.
Last Seen Blogs


cdcolumn09
The Life of Franco 561

jujala
Jujala's Little SFM Porniverse

fromashesweriseuphiddenones
Mentor ibn-La'Ahad

fangirllifeforever
Ranilla Grey-Chase
Text
"inspired" is not equal to "direct copy pasting" please.
EXAMS ARE NOT FOR ME

Hii! how are you guys, it exam on WOP US wishing you all good luck here is a code you can use, its inspired by issies code tysm Issies
Have a good day, KEEP THE CREDITS and good luck!

14 notes
·
View notes
Text
Eboy / Issie Codes Help Server!

Hello there!
If you’re using Eboy Discord Bot (made by @cookie-codes) or Issie Codes and would like updates to either one (you can choose a role!), you can join our Discord Help Server [yes we combined, we’re cool.]
What you can find here:
Updates to Eboy based on whether there are new commands, or deletion of old commands, or it’s actually easier for you to scream at me when Eboy is not working. There will also be days when Eboy is down (one day, because Discord Developers just updated which means one entire day, Eboy will not be up at all) and this will make it easier to let you know
Suggestions on new commands or improvements to current Eboy commands
Updates to new codes from Issie codes as well as to scream at her for HER code help. Issie can’t find your DMs sometimes so we figured it would be better to have it in a server.
DISCLAIMER: We are not a coding server! If it’s some other code help other than Issie’s, please go to the actual code help servers! :D
MORE DISCLAIMER: We have put into place some roles and you can choose which ones you want. Just note that by joining the server and choosing the roles (either eboy or issie), you are allowing us to ping you when there are updates. Don’t worry though, we will only ping like once every 200 years or so. We’re introverts, come on.
https://discord.gg/jy7yx4UrAV
8 notes
·
View notes
Text
How to Host Discord Bots on Heroku for FREE: A Guide
Want to keep your discord bots online 24/7? For free? Heroku is one of the platforms that you can do so, and I am here to teach you how to do it :3 Listen up and listen well!
Basically, Heroku is a cloud platform service that supports many different programming languages.
Step 1: Make sure that you have your codes in a folder. Do you have them? Mine looks like this:
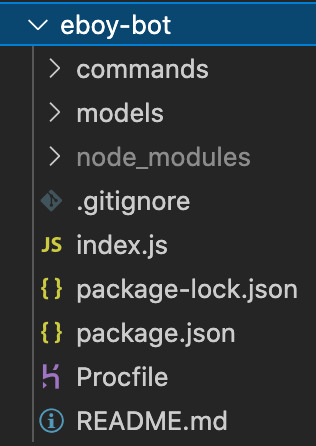
First thing to note: NEVER PUT YOUR TOKEN INTO YOUR FILES. Remember that secret token I told you about in the guide on how to set up your bot? Take it out from your index.js and hold on to it.
Instead, replace it with:
client.login(process.env.token);
Now once you have done that, save your index.js file and create a new file like the one you see there (see that purple looking file in the image above?)
Create a new file and name it "Procfile".
And all you need in that file is:

That's all. Once you've done that, let's move on to step 2!
Step 2: Upload your files onto your Github.
Github is where you usually upload your codes, like a repository. I'm not really going to teach you how to upload, I'm sure there are loads of tutorials out there showing it, BUT if you still need help, you can DM me on Discord or send me an Ask here n.n
MAKE SURE YOU MAKE YOUR REPOSITORY PUBLIC.
Alright then. Time to make a heroku account!
Step 3: Go to the website HERE and sign up for a new account.
It doesn't really matter what you put on that first page. Make sure you're not a robot and click CREATE FREE ACCOUNT.
Step 4: CONFIRM YOUR ACCOUNT. Like, go into the email that you signed up with and click that little link that asks you to confirm it n.n And then, set your password and you're IN. FINALLY.
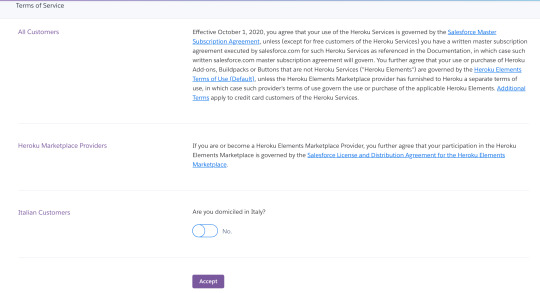
Step 5: Read the terms and conditions. And errr, if you're based in Italy, change that option to YES. Otherwise, click Accept.
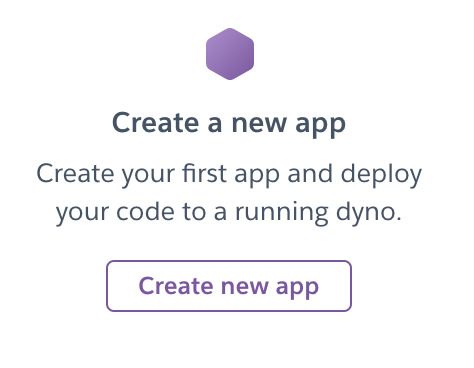
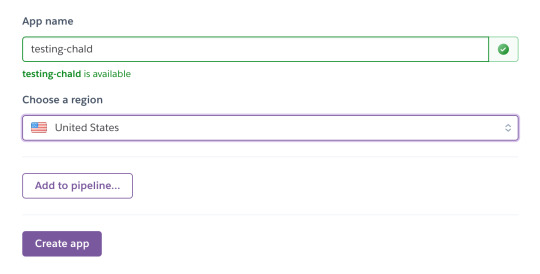
Step 6: Click Create a new app > Find a name for your application and then click Create app.
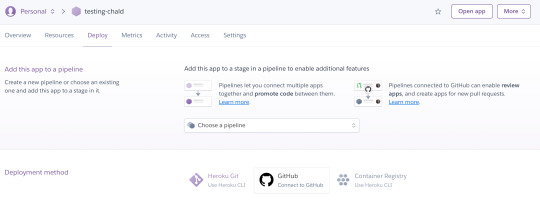
Step 7: Before you do ANYTHING else, go to Deploy > Github and connect your Github repository to the Heroku application.
Step 8: Once you are connected to your Github repository, click on Settings at the top bar of your application and scroll down to Config Vars and click on Reveal Config Vars.
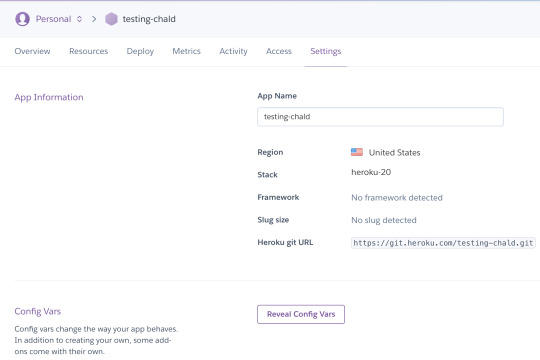
From here, under KEY, type in token and under VALUE, put in your discord secret token.
And then click ADD.

That is where Heroku will take your token from, and into your code. Remember that client.login(process.env.token)? :3
FINALLY the step to give you free Heroku account!
Step 9: Click on Resources from the top tab and you will see this:

Make sure you turn on Worker: node index.js! You can do this by clicking on pencil icon next to it. If you don't see this, you can click on Change Dyno Type > Free account and save.
TADAAAA!
Note: You are only given free 550 hours PER MONTH and if you calculate, that isn't exactly enough if you want to keep your bot running 24/7 in a month. What you can do is connect your credit card or debit card to the account and you will get 450 more hours. So in total that is 1000 hours per month, which is more than enough!
I know what you're thinking: that you might get charged unnecessarily if you connect your card! But nope, you don't get charged AT ALL. I've been using this account for more than a year and I never once was charged for it.
How to connect to your credit/debit card? Go to your account at the top right hand of the website (that little human logo) and click Account Settings. From there, click on Billing and connect your credit/debit card!
BUT IF YOU'RE UNSURE ABOUT CONNECTING, you can just use the 550 hours. Just note that your bot will be down once that 550 hours are up every month n.n
WE'RE NOT DONE YET, it's time to bring your bot to life!
Step 10: Click on Deploy from the top tabs and scroll down until you see Deploy Branch. Click on that, quick quick! :3
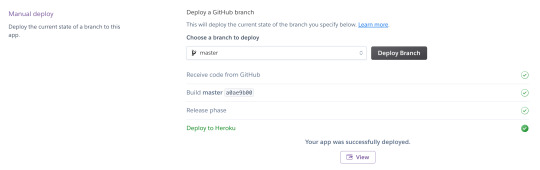
You will see the words saying "Your app was successfully deployed." And tadaaaa, your discord bot is up :3
I hope that was easy to follow and if it's not, you can ask me for more help. DM me on Discord at Maryam#9206 or you can send me an Ask here! :3
HAVE FUN WITH YOUR BOT!
#discord#discord beginner#discord guide#discord bot#discord bot beginner#discord application#discord how to#how to guide#heroku#how to use heroku#how to get free heroku#free heroku#discord 101#heroku 101#coding#javascript#nodejs#coding help
4 notes
·
View notes
Text
How To Download Visual Studio Code and Node JS
If you have not downloaded Visual Studio Code or not know what it is, this is a brief guide on it :3
VISUAL STUDIO CODE: It is a source-code editor, made by Microsoft for Windows, Linux and MacOS. It supports Javascript, HTML, CSS, Java, Python and several other programming languages as well. It’s easy to use and very beginner-friendly (at least to me, it is).
For any platform, you can download your Operating System’s version from: https://code.visualstudio.com/
There is a whole Introduction video that you can watch to understand how Visual Studio Code works: https://code.visualstudio.com/docs/getstarted/introvideos
Node JS
If you’re here because you’re coding a discord bot using Javascript or you’re just coding something using Javascript, Node JS can help you. It is basically a Javascript runtime application.
You can download it from: https://nodejs.org/en/download/
How it works:

1. Create a new file called “hello.js” and fill it up with the code as shown above.
2. Go to your terminal. (For those who might not know, you can click Terminal from the top tab > New Terminal. This will pull up the console for you.
3. Make sure that the directory of your terminal is the place where your hello.js file is at. If not, you can always use ls to list the different folders in that directory and cd to change into that directory as shown below:
My terminal was in the Github folder and I used ls to list all the folders in the Github folder. From there, I can see the cafe-bot folder where my hello.js file is located in. So I used cd cafe-bot to move into that folder.

4. Run node hello.js and you will see “Hello World”, which is what your code was supposed to output.

And there you have it! I hope that was a simple and easy-to-understand explanation on Visual Studio Code and Node JS.
Error You Might Face:
Sometimes when you run node for the first time after installing, you might face this error.

From what I have noticed, this tends to usually happen to Windows users. Unfortunately, since I am using a MacOS, it’s hard for me to screenshot the process. But no fear, we have Codez Jerry who have the perfect solution here: https://www.youtube.com/watch?v=pg4t48BPmh8
Have fun coding! If you have any troubles, do send me a message or just Ask and I will do my best to help and add on to this guide!
#coding#discord bot#discord#javascript#visual studio code#nodejs#node js#coding help#how to code#coding guide#how to install#how to guide
18 notes
·
View notes
Text
How To Set Up Your Own Discord Bot: A Guide [v13 update]
Step 1: Go to https://discord.com/developers/applications
Make sure you are signed in to discord. On the top right hand corner, you will see a button that says New Application. Get to clicking!

Step 2: You will be asked for a name. This could be any name, but preferably the one you want your bot to have. Make sure it has a cool name, like Potato Queen, or Jack the Ripped Bot.
Once you have done that, click Create.

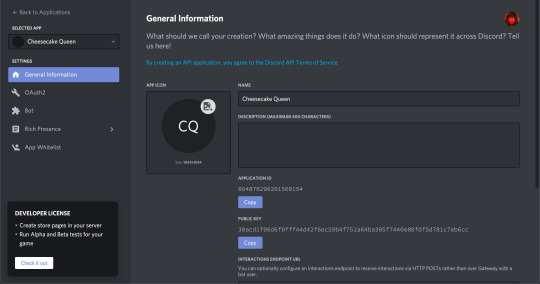
Step 3: You will come to a page that shows all the General Information. But you have not created your bot yet! This is just the application page. You can put in your App Icon, Description and the likes, before clicking on Bot at the side bar.
Step 4: You should reach a page with a button that says Add Bot. Well, what are you waiting for? Go ahead and click it!
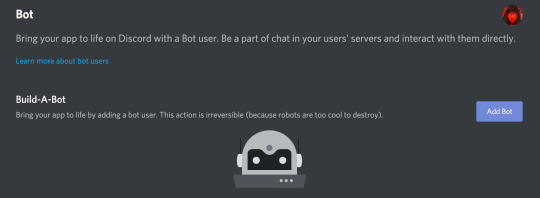
A whole new page will pop up, with information about your new bot. Remember, you can’t destroy a bot, so make sure you’re definitely wanting a bot when you’re doing this.
From here, you can see your bot’s username as well as its profile picture. You can change it if you want.
IMPORTANT: There is also something called Token. YOU SHOULD NEVER SHOW THIS TO ANYONE ELSE. It is the one thing that will bring your bot to life (it basically controls your bot) and if it’s out in the open, it is best to regenerate a new one.
When you scroll down, you will see Authorization Flow. This is where you can choose to make your bot public or private. Making it public means that others can add it to their own servers, without your help. If it’s private, only YOU can add this bot to servers.

Step 5: Invite your bot into your server.
The link to do this should be: https://discord.com/oauth2/authorize?client_id=[clientidhere]&scope=bot&permissions=[permissionnumber]
An example is: https://discord.com/oauth2/authorize?client_id=707835242475421767&scope=bot&permissions=8 [this has admin permissions]
or you can just use: https://discord.com/oauth2/authorize?client_id=707835242475421767&scope=bot
And you’re done! At least with the application part.
NOW WE MOVE ON TO THE CODING PART. [Note: This is in JS because I love JS. Someday I might do a guide for Python too but we will see.]
The basic things you need:
1. Visual Studio Code
2. Node JS
You can see how to download either one from HERE.
Then, you will need to download discord.js.
Create a folder for your discord bot things, and then open up Visual Studio Code.
Create a new file called index.js and this will be your main page, where you get your bot running. The basic codes inside it would be:

TOKEN: Remember that token that I said you can’t tell anyone? Yeah, put it in there like client.login(”IWEUTWEITU”) where that keysmash is your token.
From here, if you’re using Visual Studio Code, just go to your console.
NOTE: If you do not know where to find the console, follow this:
Click Terminal from the top tab > New Terminal. This will pull up the console for you.
Make sure that the directory of your terminal is the place where your index.js file is at. If not, you can always use ls to list the different folders in that directory and cd to change into that directory as shown below:
My terminal was in the Github folder and I used ls to list all the folders in the Github folder. From there, I can see the cafe-bot folder where my hello.js file is located in. So I used cd cafe-bot to move into that folder.

From there, type npm install discord.js
Once you’re done with that, once again, type node index.js.
[Sometimes you might run into errors that let you know that “The term node is not recognized as the name of a cmdlet”. This either means that you have NOT installed Node JS, in which you can go to this post to see how to do it HERE
OR you might have some issues with directories in which you can look at this: https://www.youtube.com/watch?v=pg4t48BPmh8]
You should see “Bot is ready!” and with that, your bot is up!
Go ahead, explore it, enjoy it! You can do it!
#discord bot#discord js#discord.js#js#javascript#discord application#business guides#discord guide#discord beginner#coding#discord
82 notes
·
View notes