Last Seen Blogs

jojo-phase
Going Through My JoJo Phase

li10-22
li10

myceliveme
MYCELIVE

euphoric-somers
Untitled

katsum50
Mostly Happy
Link
1 note
·
View note
Link
#what is#how to#Seller Account#Amazon Seller Account#Seller#Amazon Seller#Buy Sell#Business#Bitclu#Online#Online buisness#online business
0 notes
Link
Want to know whether your business would be successful on Amazon?
✔️ Understand your business type
✔️ Amazon commission charges
✔️ FBA fees before start selling on Amazon?
https://bit.ly/3foLIW0
0 notes
Text
How to create a seller account on Amazon
Once you’ve figured out what you plan on selling on Amazon, you’ll need to go through the Amazon seller registration process, which is really quite simple.
1. Go to https://services.amazon.com
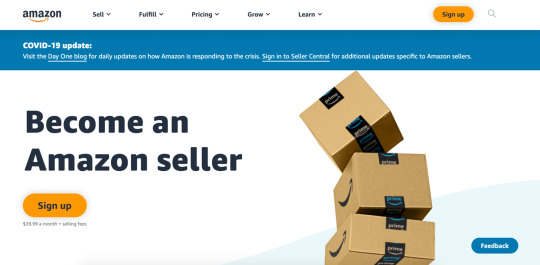
2. Scroll down the page, below the heading “Become an Amazon seller”
On the right side, look for the ‘See Pricing -→’ link (below the ‘Make Money’ header) and click it.
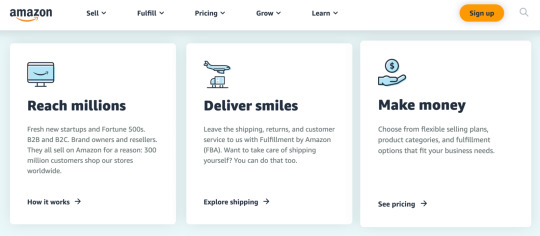
Note: If you click on the orange ‘Sign up’ button, you’ll immediately be taken to the registration page for a professional seller. The ‘See pricing’ link, on the other hand, shows you the difference between the individual and professional accounts, and allows you to choose which registration you want.
3. Choose between and individual or professional seller account
When it comes to Amazon’s seller plans, you have two options: professional and individual.
If you’re going to sell more than 40 products per month, then signing up as a ‘professional’ is your best bet. Even if you’re selling as a hobby and don’t consider yourself to be a professional, this plan will help you save money.
But, if you’re planning to sell on a smaller scale (ie. fewer than 40 units per month), select the individual plan.
4. Enter your email and select ‘Create a New Account’
Once you’ve chosen the seller plan that is right for you, the following window will appear where you’ll be asked to enter in your email address and a password (of your choosing) for your seller account.
When you’re done, click the ‘Next’ button.

This will take you to a second screen asking you to enter in a one-time password (OTP) generated by Amazon, which will be sent to the email address you provided in the previous screen. This is Amazon’s way of verifying the email you entered.

After you’ve added that OTP to its corresponding field, click the ‘Create your Amazon account’ button.
5. Choose your ‘Business location’ and ‘Business type’
The next step in the Amazon seller registration process is to share the following information:
Your business location: This is the country in which your business is located. It’s extremely important that this is accurate, as Amazon will be verifying it (see step 10).
Your business type: You’ll be able to choose your business entity from the following options (most fall into the ‘Privately-owned’ category):
State-owned business
Publicly-owned business
Privately-owned business
Charity
None, I am an individual
Your full name: Make sure you enter your first, middle, and last names.

Then, click the ‘Agree and continue’ button.
6. Enter your personal information
From there, you’ll be asked to provide Amazon with a number of personal details. This includes a form of identification (either your passport number or your driver’s license).
You may also be required to give them your phone number. Again, this is for verification purposes.

When everything has been entered, click on ‘Next’ at the bottom of the screen.
7. Choose your marketplace(s)
Once you’ve completed the ‘Individual Information’ section, check the box below the marketplace(s) — this refers to the location of an Amazon store (eg. Amazon.ca, Amazon.co.uk, etc.) — in which you’d like to sell, and then click ‘next’.

8. Enter your billing information
Another way Amazon is now verifying a potential seller’s identity is to make sure their credit card information is valid.
So, after you’ve chosen your marketplace(s), you’ll be asked to enter in the number and expiration date of one of your credit cards, as well as the name that appears on that card.
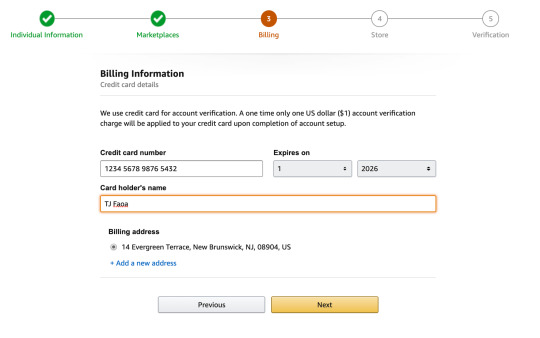
When you’re done, click ‘Next’ at the bottom of the page.
9. Add the information for your product(s) and Amazon store
After you supply your credit card information and it has been validated, you’ll be asked a few questions about your Amazon store and the products you plan to sell.
To move onto the next phase of the Amazon seller registration process, you’ll need to answer the following:
The name of your Amazon store
Whether or not you have UPC codes for your product(s)
If you are the manufacturer and/or brand owner of the product(s) you’re selling
If you have a registered trademark for your product(s)
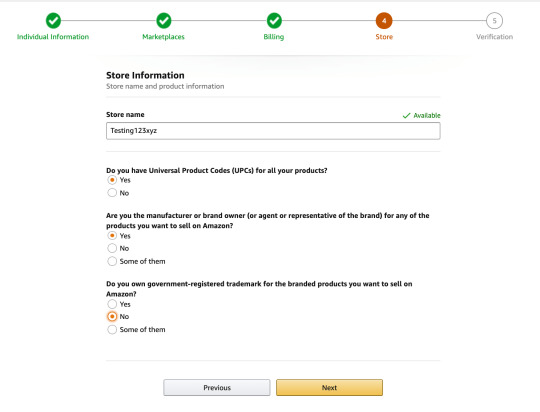
Click the ‘Next’ button after you’ve provided the answers to those questions.
10. Address validation
Lastly, when you’ve completed all of the other steps in the verification process, you’ll be asked to confirm the business address you provided in step six (the ‘Personal Information’ screen).
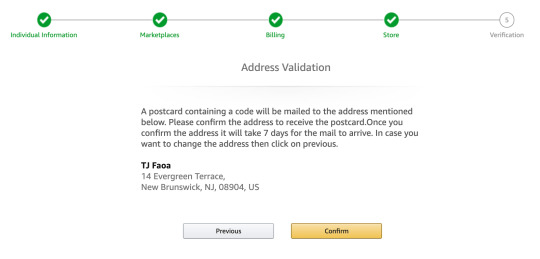
After clicking on the ‘Confirm’ button — if the address displayed is correct, that is — a new screen will appear. It explains that you will receive a postcard at that address, along with a verification code.
Then, when you receive the card, enter the code provided into the ‘Enter code below’ field and click ‘Next’ to finish the verification process.

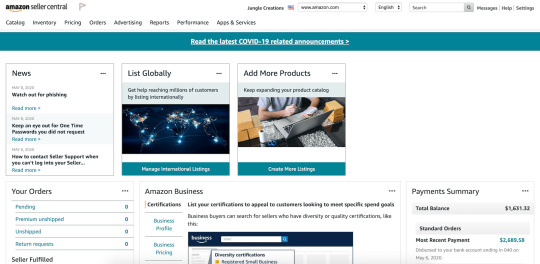
Once you’re verified, you’re in!
To be on the safe side, we recommend setting up 2-step verification on your account (for increased security). But, once your identity and business information has been verified, all you need to do to get started is to log into https://sellercentral.amazon.com.
And this is what your seller account home screen will look like (without any sales yet, of course).
Original Source
0 notes
Text
How to start an Amazon business?

What is great about Amazon is that there is no one way to start an Amazon business. From the business model you choose to the products you decide to sell, there are many ways to succeed on the platform.
However, the steps required to get up and running on Amazon remain the same, regardless of the type of business model and product you choose.
1. First, start by
deciding which business model you want to use
Private Label: Private label is the process of a retailer rebranding/renaming a product that is already being manufactured on their own brand or label.
Wholesale: Wholesaling is the practice of purchasing low-cost or discounted goods in bulk to sell as individual units in a retail marketplace.
Online and/or Retail Arbitrage: Arbitrage is a method of finding low-cost or discount goods in brick-and-mortar retail stores (or on e-commerce sites) to resell them online.
Dropshipping: Dropshipping is a business model where an Amazon seller does not keep their own product inventory, but instead, transfers their customers’ orders directly to the manufacturer or supplier.
Handmade: Amazon’s handmade sellers are people who create their own products to (“by hand”) to sell on the Amazon marketplace. Examples include jewelry, accessories, home decor, and more.
2. After you have landed on a business model, it’s time to decide which
fulfillment method you’ll use
Fulfillment by Amazon (FBA).
Or Fulfillment by Merchant (FBM).
There are pros and cons for both methods, so make sure you look closely at both to determine which one will work best for your business.
3. Next, consider the product(s) you are going to sell
If you have a product (say, you create your own handcrafted items), you may be ready to go, but you should still follow this step to validate that your product will have sufficient demand on Amazon. To help you find products to sell that are high in demand, but low in competition, make sure you use a tool like Bitclu.
4. Once you have found a product, apply to become an Amazon seller
More details on how to complete the Amazon seller registration process in the next Blog.
6. Finally, create your product listing
And once you create your listing, you can grow your Amazon sales from there!
Original Source
2 notes
·
View notes