
bees-and-stuff-to-buzz-about
I beelieve in a thing called love
Just animal and bug stuff. Pls feel free to share that sorta content with me! I'm on iNat, too
https://www.inaturalist.org/observations?place_id=any&user_id=beesnstuff&verifiable=any
1626 posts
Don't wanna be here? Send us removal request.
Last Seen Blogs

19yearoldimmortal
musings of a 19 year old immortal

thatsupernaturalparade
This ain't Macy's, bitch

tired-writer-in-progress
Togo's Writing Blog

officerdeiffel
well, it's demons!

dysautonomiapots
dysautonomiapots
Text
well here’s the thing about birds: sometimes they are pink
24K notes
·
View notes
Text
Keeping the Water in the Ground with Swales
It’s scorching hot and the rains just won’t come. You can use water from your well to keep your plants from dying, but under these conditions the water table could just drop, leaving you high and dry. Then, when the long awaited rain comes, half your topsoil could get washed away in the downpour. So horrible, yet so familiar! Fortunately, there is a really neat technique that makes sure your water will stay on – or rather under – your land, instead of ripping through the surface before flowing away never to be seen again.

image source
The Behavior of Water
It’s a good idea to take a close look at what water does during a heavy rainstorm. True, most of us don’t enjoy running around under the open sky when it’s raining cats and dogs. But it can be very educational to observe the natural flow of water. It always takes the quickest way down (never up). And depending on the flow, which in turn depends on the amount of water and the ground’s inclination, it can even tear its own way through the landscape. If the ground is fairly dry and without much vegetation, you will even see how a small stream can create a gully – growing into veritable canyons – by carrying sediment with it.
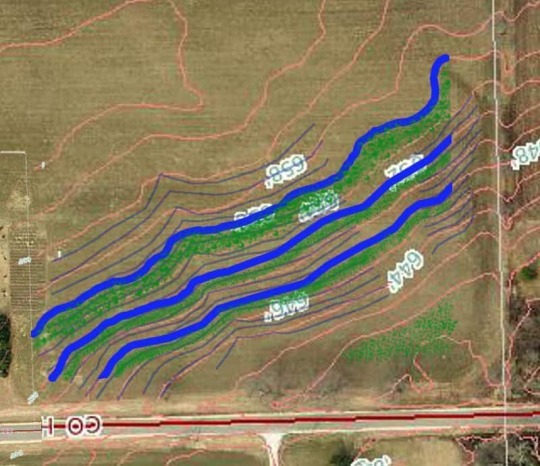
image source
That sediment may be your valuable topsoil! And fairly soon after the rain stops, it will be gone, along with the stream of water. Where did it all go? Just follow the canyon, and you are likely to find it leading away from your land, towards the lower elevations.
But That’s What Water Does. How Can We Counter It?
Admittedly, we will never change the natural behavior of water. What we can do, however, is use it for our purposes. So if it really always goes downhill, let’s give it a place to go: a ditch dug out on the contour line of a hill, which is known as a swale. And that’s all! Since the swale is on contour, meaning that it’s completely horizontal, the water is not going to go anywhere from there until the swale is full (something we must also prepare for). Now that the water lost its momentum, it’s simply going to sit there, and slowly seep downward into the soil. There it won’t have the speed it normally flows with on the surface, so it can’t carry away any soil. Instead it gradually saturates the ground on the hillside below the swale.
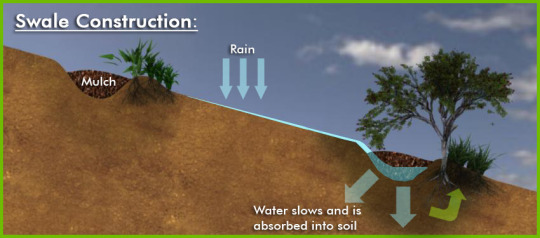
image source
How to Build Swales
It’s really quite simple: First comes the precision work of measuring out the contour line, followed by the grunt work of digging. You may use machines if your topography allows, or do everything by hand, but in either case, exact measurement is the make-or-break aspect of a swale. There are many different methods for this, ranging from the modest (yet effective) A-frame, to the hose level, all the way to the high-tech laser level.

When you are certain that the line is exactly horizontal, you can start digging the trench. Though it can be smaller, I personally like a bigger swale of about 2’ width and depth. That way it can take up more water, and over time it will be gradually filled with soil anyway. What’s most important when digging the swale is to make sure that the bottom remains exactly on contour! The excavated soil we pile up on the side of the ditch that’s sloping downward. This berm is an ideal place to plant trees into to hold the soil together, to help with water saturation and dispersal, as well as to shade the swale to slow down evaporation. In a great design they will also grow something you can eat.
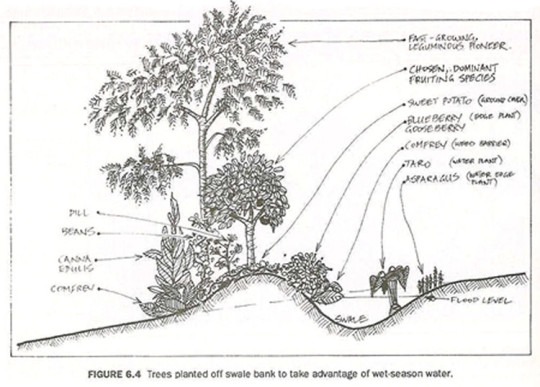
image source
There are a couple of things to look out for: For one thing, the swale should never be placed directly above any buildings (gardens are a much better idea). The best place for them is high up on a hill. Also, make sure the slope doesn’t exceed 15 degrees. Both of these are basic safety measures against slides. It’s also important to make sure the bottom of the swale has a decent water saturation, of at least an inch per hour. Finally, one must prepare for record level rainfall, in other words even the best swale will fill up… and then what? The water needs to go somewhere! So have the overflow channeled into a pond, a dam, or any other feature you have installed for water management.

image source
Okay, so you’ve measured out the contour line, dug a nice big swale, planted trees into the berm, and double-tripple checked that the bottom of your ditch is perfectly level. Great, now you can lean back and wait for the rain! When it comes, get out there again to see how your swale is performing.
Maintenance and Long-Term Effects
After a year or so you can take a look at the swale, preferably when it’s not full of water. You’ll see that it’s not as deep any more as how you dug it. It has filled up with soil: your topsoil! This is your land, that otherwise would have been carried away to your neighbor, or eventually into the ocean, to be lost forever. But here it is, ready to be dug out and used for planting. Of course once again, it’s important to keep the bottom completely leveled.
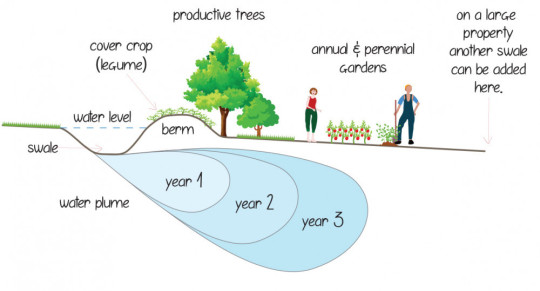
image source
The other effect you are not likely to see immediately, is the water inside, that is under your ground. This is a very gradual process, but the water is going to hang around much longer inside the soil than on the surface. After a while it adds to the water table, and … depending on numerous factors … it will raise it again. There have been many accounts of wells that have been dry for years started having water again, a few years after a swale was built on a nearby hill. But since farming and gardening naturally makes you want to think long-term, this technique will fit right into it.
sources: 1, 2, 3, 4, 5, 6, 7, 8, 9, 10
27 notes
·
View notes
Text
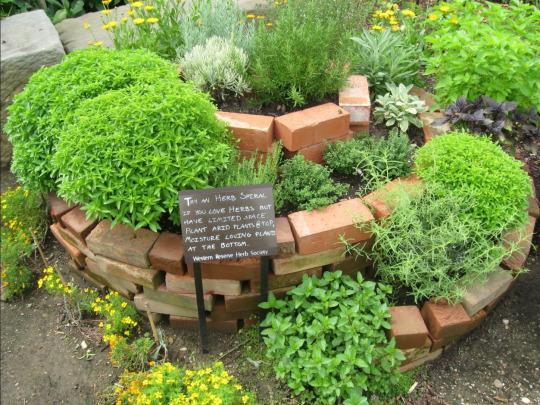
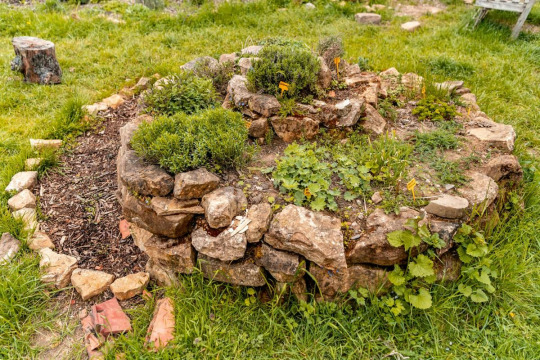
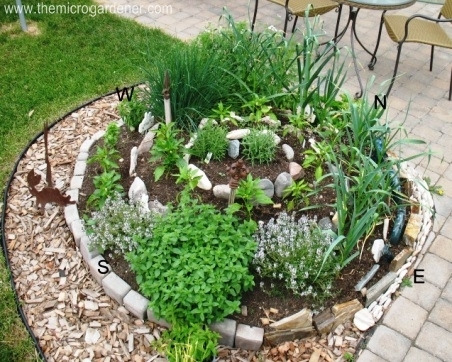
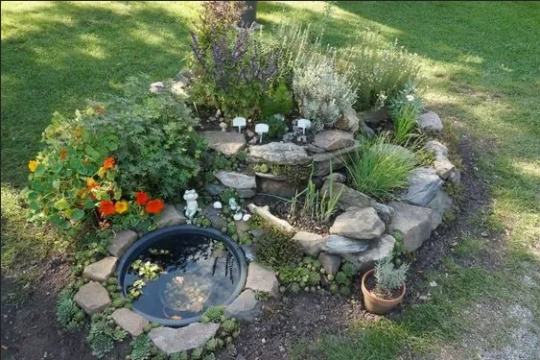
The Permaculture Spiral Garden - A Great Starting Point
There is probably no other structure as popular for illustrating Permaculture in practice as the Herb Spiral. Okay, I guess I could mention the lasagna sheetmulching method or also the cob oven that tends to be the first hands-on project at a typical Permie intro session. But when it comes to showing how landscape design, zones and sectors, stacking functions, and efficient use of space and water come together in one unique structure, the Spiral Garden is unbeatable.
Turning Theory into Practice
In typical Permaculture Designer Certificate courses, but even in brief intro weekends to Permaculture, there tends to be a lot of theoretical discussions. Since the numerous design principles can be applied to any climatic region, from the tropical to the subarctic, and on any scale from the humongous to the tiny, the practical aspects of the ideas can easily get lost. That's where a good hands-on application comes, where the participants get to move around rocks and dirt, while realizing how much it ties in to the concepts they've just discussed. This way the apparent "main purpose" of "building something to grow all your kitchen herbs on", becomes a neat side feature.

Adjust Your Landscape!
The first thing to realize that landscape is welcome to be modified and adjusted to bring out the best in it. Clearly, while it is important to work with what's there already, it doesn't hurt think about mounds and valleys. And before you bring out the excavators for your large-scale farm, it makes sense to start small… say on a circle of 2-5 meters (6-16 feet) diameter. In other words, the Spiral Garden is a hill with a spiral shaped surface, leading down to ground level, or further down into a water hole. It can be made out of rocks, bricks, concrete debris, or anything else you have lying around that can hold your soil.
Design According to Your Scale
Looking around for existing Herb Spirals it's easy to get confused. Some are so big you can actually climb on them (that is, you have to in order to reach what's growing on top). Others are so tiny that you may not even want to step on them. The question is: which size is the right one for you? Since this is something you will have to decide almost daily in Permaculture, it doesn't hurt starting out with this important question.
Organizing Your Spiral Garden
While there are seemingly endless types of Spiral Gardens, there are a few things they all have in common: They all start out with a region on the top, where water is bound to run off right away, leaving the soil relatively dry. This area is also the most exposed to the wind. Keep this in mind when choosing the plants that are going to live here. Ideally, the spiral should start sloping toward the East from here. Delicate plants that benefit greatly from the morning sun will appreciate this region. As the slope continues toward the South and West, it becomes more suitable for sun loving species. Finally, as the spiral reaches the ground level in the shady Northern part, it will be perfect for herbs that prefer less sun, more shade and more water, since the soil tends to be wetter here. (Note: This is for the Northern Hemisphere. In the Southern Hemisphere North and South are reversed.) To make full use of the runoff water, many people add a small pond at the base of the spiral, where additional aquatic plants, such as watercress, can be grown.
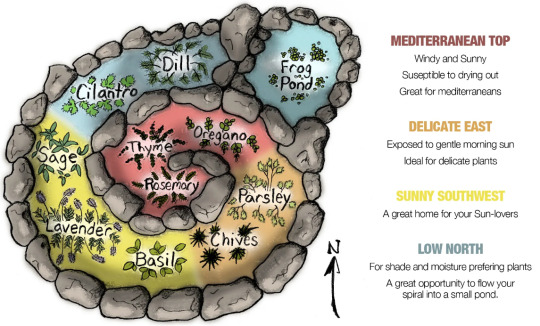
The given illustration offers a good number of herbs for a nicely diverse kitchen. Depending on what else you want in your Herb Spiral, you can add it in the most suitable region. Mint and lemon balm love the cooler, shady part with more water. Lemongrass is great in the sunny area, and tarragon and estragon prefer the dry top of the spiral. Of course, the idea is not limited to kitchen herbs. For maximalists, the same theory can work with a mountain you might want to terraform into a spiral farm. But right now I'd prefer to stay small scale.
Plenty of Benefits (That's Why It's Permaculture)
As explained above, the main purpose of the Spiral Garden is not only to increase your gardening area by making use of the vertical, but also to create diverse climatic conditions, which do make a difference on the smallest scale. But as Permaculture tends to be, there are many other benefits to it. The structure itself offers great habitat for numerous animals, such as frogs, salamanders, lizards, but also pollinating insects, and of course others that may not directly benefit us, but by feeding on others they all add to the stability of our ecosystem. The structure itself will suppress weeds and make use of material that you're not likely to use elsewhere. Finally, depending on the size and location, it will be an ideal place to grow all your kitchen herbs right where you can access them most easily.

Some Things to Keep in Mind
When building the structure, make sure it will contain the soil in a nice trough, slanting slightly inward. That way bits and pieces that fall off will roll towards the center, until contained by the main mound.
Make sure the slope is always nice and gradual, avoiding sudden drops where the water can rush down quickly, eroding the soil.
If you're going to walk on your spiral, include a separate walkway that won't compress good soil. Most importantly, it should be sturdy enough to provide stability and make access safe.
Don't forget that while the structure is important to keep the soil in place, it is the soil that you'll be growing plants in. So it should have a good depth of 20-50 cm (8-20 inches) throughout the entire spiral. This can be the trickiest part!
Apply your own observation to which plants do better in which parts of the spiral. Also, with time you will find many other plants growing in it that you didn't plant. Before removing them, consider how much they actually bother your herbs, and whether their benefits may not outweigh their drawbacks.
Go Out and Build Your Own!
I hope this brief overview got you inspired to go out and try building an Herb Spiral yourself! I would love to hear your experiences with it!
Sources: 1, 2, 3, 4
3K notes
·
View notes
Text
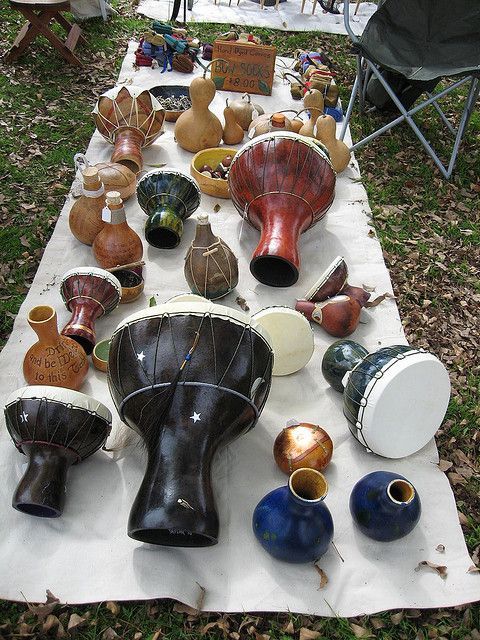
I think it's so adorable that early humans took wild gourds - a tiny fruit that hollows out as it dries, making it float - and decided to make something out of it

they thought the tiny fruit was so good that they bred it for thousands of years, making it larger to form into bowls and cups, and different shapes to become bottles and spoons

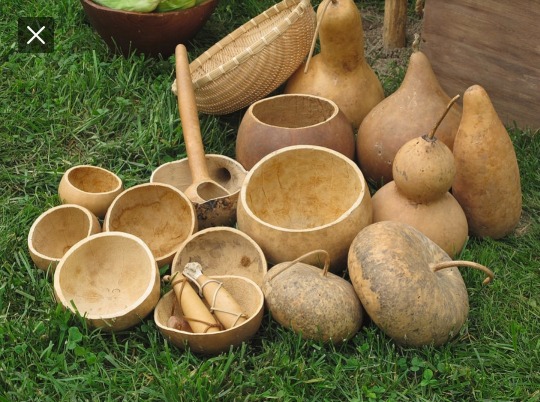
and musical instruments


And then, people took the hollow gourds they farmed, and they turned them into houses for birds. We adapted them into the perfect houses for birds, and now there are specific breeds of birdhouse gourd just for making into birdhouses


And humans dedicated gardening space and time and thousands of years of breeding to make the gourds so absolutely perfect for birds, that there is a species of bird that lives almost exclusively in them

31K notes
·
View notes
Text

Built a greenhouse out of reclaimed windows and scrap wood, took me an embaresing amount of time but it looks good now.
930 notes
·
View notes


Text
Nugget Planthopper 🖤
(pine needle for scale)

449 notes
·
View notes

Text
Tarantula: May I have a coke please
Waitress: All we have is Pepsis is that okay?
*Tarantula sweating nervously*: Y-you have what
25K notes
·
View notes


Text


werewere-kōkako (Entoloma hochstetteri), West Coast, Aotearoa
641 notes
·
View notes
Text

weevil 463
beautiful weevil sculptures by @konaya578 on instagram x
3K notes
·
View notes

Text
23K notes
·
View notes