
Last Seen Blogs


Text
Nail Drill Bit Shapes And Uses Explained
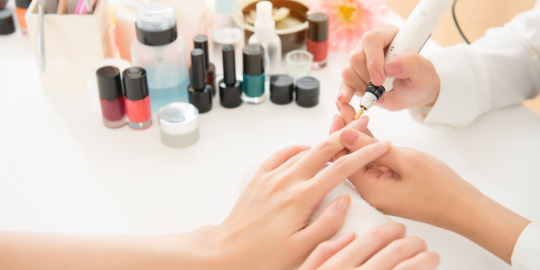
Every nail drill bit you decide to use is crucial when performing a Russian e-File manicure. Every nail technician who is performing a dry machine manicure has their preference of nail drill shape and grit. When you choose a high quality product, not only you, but your clients can feel the difference. Today we'll look at the difference between carbide and diamond and talk about the differences and uses of each.
When starting a dry machine manicure, you can first use a carbide tip to remove the gel polish from the previous manicure. This is obviously different from using acetone to soak the nail polish, which can lead to weakened nails and dry cuticles. We can use shapes including traditional barrel, tapered barrel and other carbide nail tips. In terms of tooth shape, we can choose between single or double cut carbide nail bits to remove nail polish. Single-cut tips have a semi-vertical downward cut to best remove polish in one direction. The double cut carbide has cutouts in both directions for smooth polish removal in both directions. In general, carbide double-cut tapered barrel nail bits are easier to use. The strength of the nail drill bit abrasive determines the speed of polishing during use. Stronger grit will remove polish more quickly. It is important that you do not touch your skin when using carbide nail bit at this point in your manicure, as this nail bit is used to remove cured gel nail polish and can damage your skin. Also, it is important to note that you do not have to remove the base layer of the gel nail polish and can keep it intact for your next manicure. Please know what you are doing or seek professional guidance when using these nail drill bits. Be very careful when using these carbide nail drill bits as they can take away some of the nail pieces.
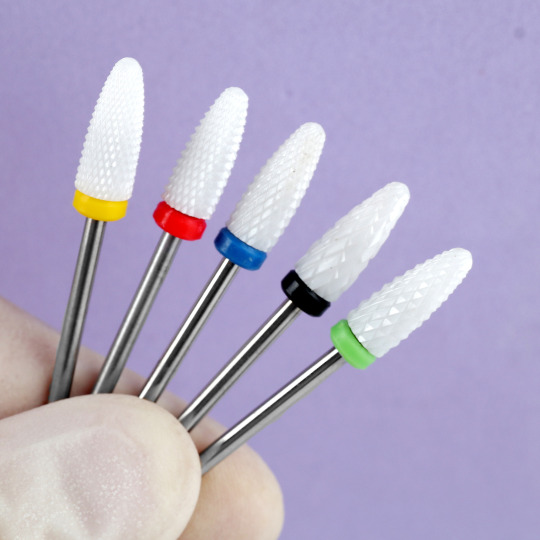
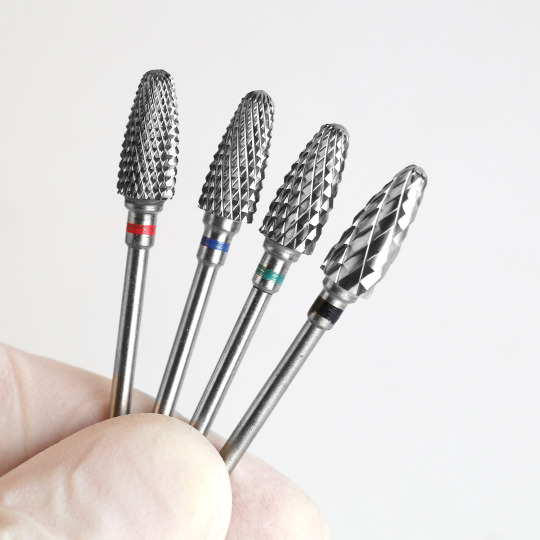
Diamond nail drill bits are specially designed to treat cuticles. They can be used in conjunction with traditional nail tools such as cuticle nippers and scissors, although of course these diamond nail bits may be the only tools used during the nail application. Some of the most common diamond nail drill bit shapes include.
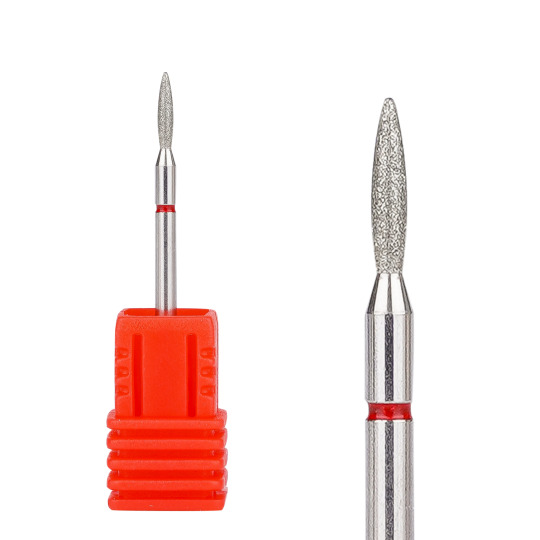
1.flame nail bits
There are two types of flame nail drill bits. One is a traditional slender and narrow flame nail bit and the other is a flame "drop". They all have uses, it really comes down to preference. They are both used to help gently lift the cuticle off the nail plate, making it easier to remove cuticles and apply gel polish. The shape of this nail drill is one of the most popular drills among manicurists and is extremely versatile.
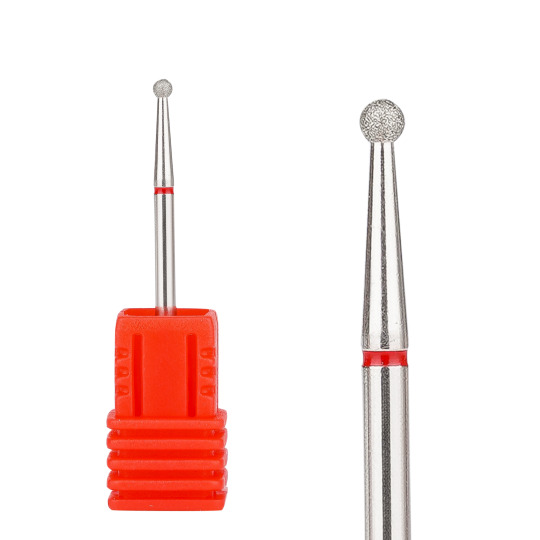
2.Ball nail bits
Ball nail bits are again one of the most popular nail drill bits. The size of these bits is usually measured in millimeters and the size of the working part varies from 1 mm to 6 mm. The larger sizes give the nail technician more working sections to perform the manicure. This ball nail bit is used to remove cuticles after the gel polish has been removed so that the dead cuticle can lift slightly from the back edge of the nail.
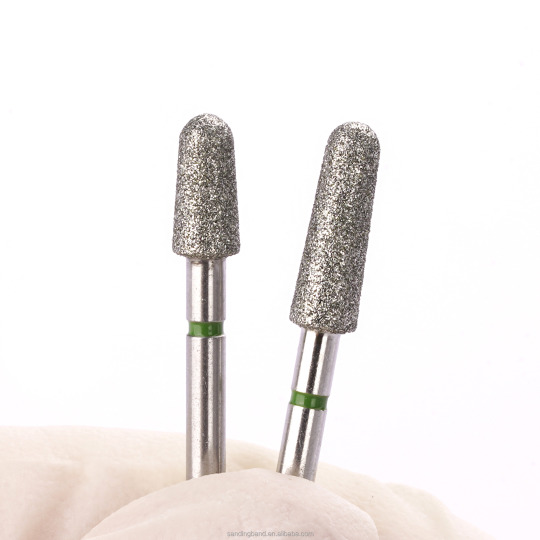
3.Cone nail bits
Cone nail bits vary greatly in size and shape. Smaller cones nail bits are shaped like this one, and there are large cones nail bits like this one. These are also preferred by nail technicians. They are ideal for exfoliating cuticles.
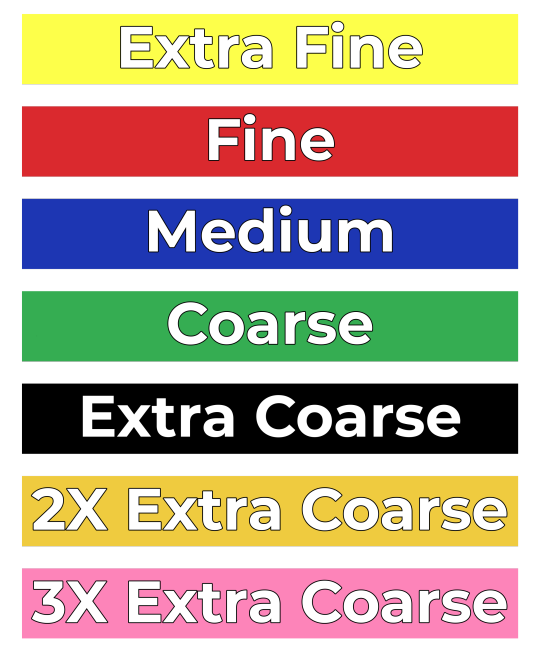
Grit size is very important in nail tools and is specific to different clients. There are three main options when choosing a grit to work with, namely soft, medium and coarse. It is important to know the client's skin sensitivity before working on a manicure. As the grit gets harder, it is easier to remove nail polish or cuticles, but if the wrong grit is used or used improperly, the sensitivity of the skin can become uncomfortable.
It is extremely important to clean the nail drill bits properly between nail art jobs. It stops the spread of any disease or bacteria. Therefore, it is an important step that should not be skipped.
Wuxi Yaqin Trading Co., Ltd. is a trading factory that has been focusing on the production and export of high quality abrasive products. We provide one-stop service from production to delivery, and have professional and rich experience in OEM/ODM service.
At Yaqin, we will always adhere to the philosophy of "honesty, rigor, responsibility and mutual benefit" and keep moving forward to make Yaqin Nail Drill the ideal choice for your large-scale work.
Read the full article
0 notes
Text
Everything You Need to Know about Electric Drill Repair at Home
Maintaining your electric nail drill is just as important as maintaining beautiful nails. Whether you are a nail technician or use your own electric nail drill at home, it is important that you know how to properly maintain it to help you ensure the best performance and efficiency of your equipment. The maintenance of an electric nail drill is not difficult. Today we will share with you some tips and tricks to make it easy and simple for you to maintain your electric nail drill at home as well.
Nail Drill Care Tips
一、Do not
1.There is no need to use lubricant on nail drill bits. Usually, nail drills are manufactured with self-lubricating bearings. Excess oil can generate too much heat, which can wear out the machine and cause overheating.
2.Never soak the front of the handle of a nail drill machine in disinfectant. Doing so can damage the internal motor, causing it to break or malfunction.
3.Do not turn your nail drill in another direction while it is still moving forward. Always turn it off before changing direction to prevent damage.
二、Do
Use muslin, microfiber and soft bristle brushes to remove dust and debris from the small crevices of your equipment. Make sure your nail drill is unplugged when wiping your nail drill machine with a damp cloth.
Hold the device carefully and firmly and do not bend the handle. Get a good grip on the angle at which the nail drill's cord sits.
When you are finished, be sure to remove the nail drill bit from the nail drill.
Carefully ensure that the nail drill machine is installed correctly to avoid loosening the drill rod.
Routine electrician check-ups
One of the most important parts of maintaining your nailer is to have it inspected annually by a professional electrician. While your nail drill machine may look good on the outside, the electrical parts inside may become loose and dust and filed nail chips accumulate in the machine, which can cause it to malfunction and make strange noises. Nailer inspection includes removing the body as well as cleaning the inside. Note: Never wait until a problem occurs before you turn the nail drill over to an electrician for inspection.
How to clean nail drill bits
We need to clean the nail drill bits after every nail art job. Nail chips and dust from nail work can easily accumulate in the crevices of nail bits. If too much accumulates, it may affect its performance. The best way to clean nail drill bits is to use a fine cloth or a small soft bristle brush. You can also use canned air to blow away these small particles after each use. Of course we must also follow disinfection procedures to prevent the spread of bacteria from one customer to another. To do this, the drill must be scrubbed with soapy water or soaked in acetone. Afterwards, use a metal disinfectant, making sure to follow the instructions provided by the nail bit manufacturer. Air dry the drill thoroughly before storing it in a covered, dry place. Remember to unplug the device before cleaning to prevent damage.
Welcome to Wuxi Yaqin Trading Co., Ltd. Yaqin has been focusing on the manufacture and export of high-quality abrasive products. One-stop service from production to delivery, and has professional and rich OEM/ODM service experience.
In Yaqin, we will always adhere to the concept of "integrity, rigor, responsibility, mutual benefit", and keep moving forward, making Yaqin nail drills an ideal choice for your large-scale work.
Read the full article
0 notes
Text
5 Quick Tips for Cleaning Your Nail Art Drill Bits
An important part of an e-file is the nail drill bit. After all, they shape and trim nails. Of course, to maintain the longevity of these tools, it's important to take care of them regularly.
1.Wipe the nail drill bit to remove dust
When using an electric file for manicure, part of the nail polish glue will remain in the teeth of the manicure drill. Therefore, cleaning the nail drill bit after manicure is the best way to prolong the life of nail tools! After each use, wipe the nail drill bits thoroughly with a soft brush or cloth. This will get rid of accumulated dust and prepare you for your next manicure.
2.Clean the nail drill bits with soapy water
An easy way to clean your nail drill bit is to use soapy water. Mix soap and warm water in a bowl and wash the nail drill bit. Also, you can add bleach to the bowl as a disinfectant. This removes dirt and residue from the drill bit.
3.Disinfect nail drill bits with acetone
Another quick way to clean your nail drill bits is to sanitize them with acetone. This substance is a strong disinfectant that kills germs and bacteria quickly. It also dissolves leftover nail products such as acrylics, dip powders, and gel polishes.
It is worth noting that we want to avoid soaking the nail drill bit for too long. It is recommended that the nail drill bit be soaked in a bowl of acetone for five to ten minutes. Because liquids can corrode tools, causing them to rust.
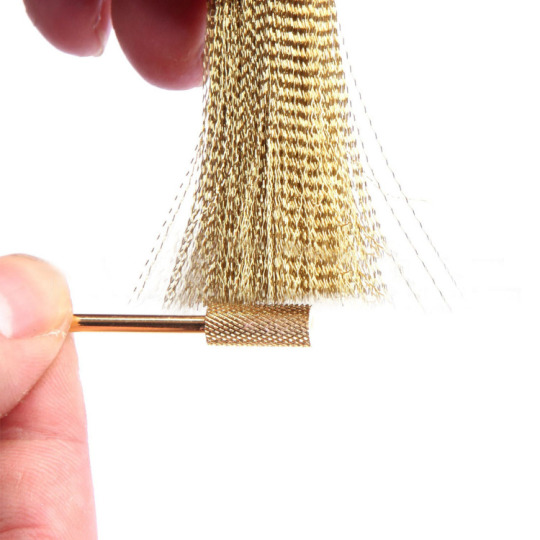
4.Use nail wire brushes for serrated cut grooves
Some nail drill bits have grooves and tiny crevices where dust and grime can collect. Residue is difficult to remove without a dedicated brush. We can use a wire brush to clean the jagged cut grooves and sanitize the crevices.
5.Keep nail drill bits dry
Metal tools can rust over time. Water and moisture can accelerate the rust and corrosion process. After cleaning and sanitizing the nail drill bit, allow it to dry completely before storing. The nail art drill bits can be wiped with a dry cloth before putting them on the towel. When these nail drill bits are completely dry, place them in the designated storage area.
From nail drill bits to sets and kits, Yaqin Wholesale Supply has it all! You can browse our website to find the nail products that suit you.
Wuxi Yaqin Trading Co., Ltd. is a trading factory that has been focusing on the production and export of high quality abrasive products. We provide one-stop service from production to delivery, and have professional and rich experience in OEM/ODM service.
At Yaqin, we will always adhere to the philosophy of "honesty, rigor, responsibility and mutual benefit" and keep moving forward to make Yaqin Nail Drill the ideal choice for your large-scale work.
Read the full article
0 notes
Text
The Full Guide To Nail Drill Bits
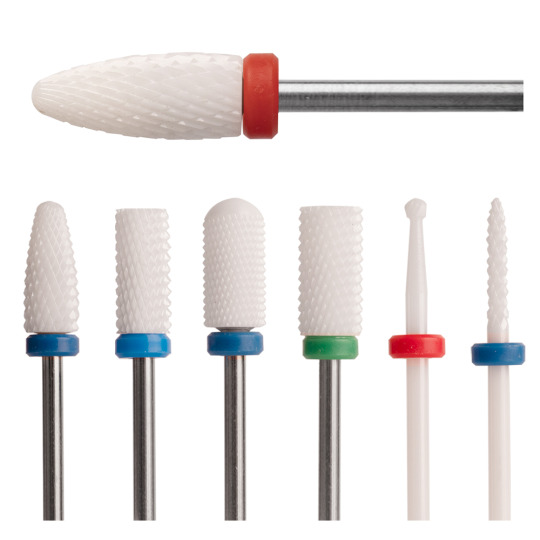
Nail drill bits come in a wide variety of materials, shapes, sizes and grit. Each type of nail drill bit has a different use and purpose. In this section, we will explain the different materials used for nail drill bits. The most common are these four materials: sanding band mandrel/sanding band, Carbide nail drill bits, Ceramic nail drill bits, and Diamond nail drill bits.
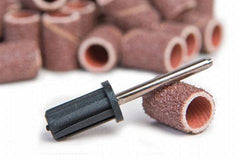
Sanding band mandrel bits are usually made of metal or rubber. You can slip the mandrel top into the sanding band and you good to go. The sanding band cannot be disinfected. This is one of the reasons why sanding bands are disposable paper bits, so you have to replace the sanding band after each client. Sanding band are commonly used for nail surface treatment, gel removal, and pedicure. They have various kinds of coarse sand: coarse sand, medium sand, and fine sand.
Carbide nail drill bits are made of carbide, the hardest material after diamond, strong and durable, not easy to break and deform, high strength, good durability, good cutting performance, they can polish nails quickly and easily. Carbide nail bits have notch-like cutouts in them. These notches are actually the tooth shape of the carbide nail bit. These notches allow the carbide bit to quickly scrape the product off the nail instead of scraping it like a diamond bit would. The size of the checkering is determined by the notches on the bit. Immersion and large recesses give you a coarse checkering. Shallow grooves usually indicate a thinner bit. Carbide nail drill bits are a good tool for advanced users, for most nail machines that use 3/32" bits, and are ideal for removing acrylics. They should not be used on natural nails as this can damage the nail. Carbide nail bits have a long life, but timely cleaning of nail art bits will not only prolong their life, but also keep your nails and those of your clients healthy.
Ceramic nail drill bits are made of ceramic and due to the nature of ceramic tips, they do not heat up like other nail drill bits. They are also very durable. Ceramic nail drill bits also have cutouts, which help scrape products like gel off the nail. Ceramic nail bits also come in different grits such as coarse, medium and fine. Ceramic nail bits can also be cleaned and sterilized.
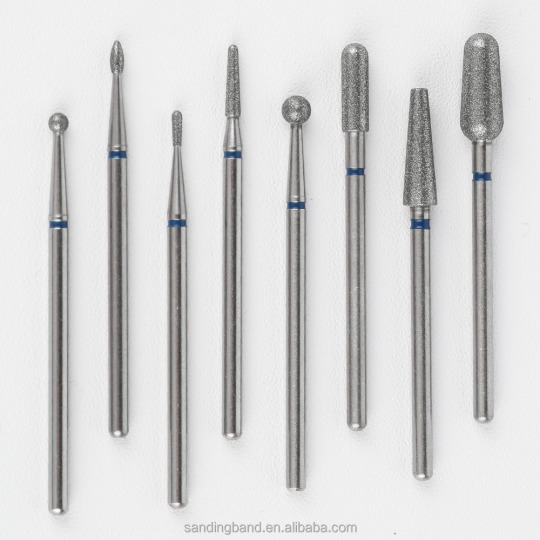
Diamond nail drill bits can be obtained from natural or synthetic tools. They are used to scrape away accumulated product and can open our finger pockets and remove excess dead skin from our fingers. However, they generate more dust and friction, which generates more heat, than the two nail drill bits mentioned above. They do not rust when sterilized. Most cuticle nail bits are made from diamonds.
Welcome to Wuxi Yaqin Trading Co., Ltd. Yaqin has been focusing on the manufacture and export of high-quality abrasive products. One-stop service from production to delivery, and has professional and rich OEM/ODM service experience.
In Yaqin, we will always adhere to the concept of "integrity, rigor, responsibility, mutual benefit", and keep moving forward, making Yaqin nail drills an ideal choice for your large-scale work.
Read the full article
0 notes
Text
The Nail Drill Bit Ultimate Guide
What is a Nail Drill Bit?
A nail drill bit is a rotating nail file that you place on your nail drill to function as an automatic buffing machine. It's a crucial piece to complete your e-file; it won't work correctly without the nail drill bit.
Nail drill bits are used to shave off or remove nail polish off your nails. It comes in a variety of sizes, shapes, and grits. Although you may be surprised at how a small piece of metal can make such a big difference in your nails, you must understand how it works.
Nail drill bits create friction, which helps remove nail polish quickly. Drill bits can remove nail paint 2-4 weeks old, depending on the pace and frequency with which it is used. the 3/32 nail drill bit size is the most excellent option since it's the general size for e-files. Of course, with good care and usage, the nail drill bit can last a long time.
Types of Nail Drill Bits:
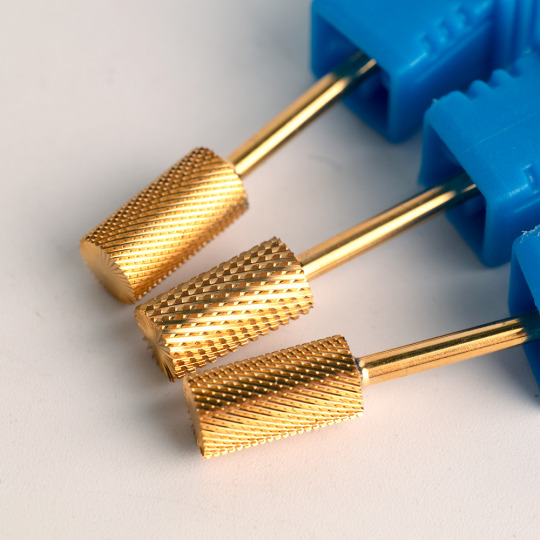
1. THE BARREL BITS
The Barrel bits functions: It polishes nails to have a healthy shine, pushes back circles, and stimulates the growth of the nail.
Edge: Blunt, can-shaped.
Product removal: dip powder, gel, backfill cutting.
Smoothing: surface for top application.
Large Barrel Coarse - It's a traditional barrel with a coarse texture.
Large Barrel Medium - It's a traditional barrel with a Medium texture.
Similar to Fine, it is great for prepping the surface for top application.
The Large Barrel Medium is used for removing lifting areas without damaging them.
Large Barrel Fine - It's a traditional barrel with a Fine texture.
For prepping the surface for top application.
For removing lifting areas without damaging them.
The Large Barrel Fine is used for shortening dip powder, acrylic, and backfill cutting.
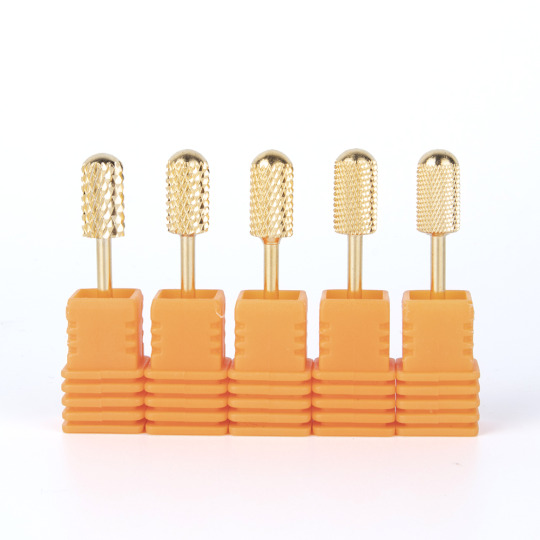
2. THE L SMOOTH TOP BITS
Functions: Protects skin and cuticle areas from damage and provides excellent c-curve contouring.
Edge: Round, can-shaped (L-shaped)
Smoothing: surface for top application.
L Smooth Top Coarse
The Coarse drill bit is stronger than the others. It can be used to remove dip powder, gels, and backfill cutting.
L Smooth Top Fine
For shortening acrylic, dip powder, and backfill cutting.
For removing lifting areas on the nails.
For surface work such as smoothening and prepping for top application.
L Smooth Top Medium
For removing gel nails, dip powder, backfill cutting, and excess products.
Preparing/smoothing the surface for top application.
L Smooth Top XXXC - round top features skin protection, prevents damage to the cuticles, providing a sharp c-curve.
Quickly removes and smoothens surface work, shaping, shortening, and backfill cutting. It's perfect for removing dip nails, gel, and acrylic.
3. THE 5 IN 1 BITS
Functions: It's a multitasking tool that removes gel, acrylic, and powder.
Edge: Rounded, can-shaped.
All in 1: Can clean the cuticle areas, prepare the nail bed, shape and shorten nails, smoothen the surface, and do under nail cleaning.
Features: It has a tapered edge that can protect you from burning and cutting.
Levels of grit:
5 in 1 Fine - The 5 in 1 Fine is the smoothest grit of all.
5 in 1 Medium - The 5 in 1 Medium has a medium level of grit.
5 in 1 Coarse - The 5 in 1 Coarse has the toughest grit of all.

What is your preference, Coarse or Medium?
The answer is based on what will best fit your needs and where you feel most at ease. Coarse is a superior option for speed for more experienced users. For safety, however, it needs skill and precision. We recommend using a Medium or Fine grit with rounded edges for safety for those just starting as a nail tech or training.
For natural nails, we recommend the Fine bit if it's your first time. Professionals typically utilize the Medium or Coarse bit for natural nails because altering them can be time-consuming and inconvenient. More traditional methods, which use three to four distinct drill bits, may be used by nail technicians with years of experience.
What are the best selling nail drill bits?
We highly recommend the 5 in 1 nail drill bit because it is versatile, and while most nail art jobs require a nail drill bit that is flexible and easy to use, the versatile 5 in 1 nail drill bit is designed to fit right in with a large number of nail art sessions.
The 5-in-1 nail drill bit has a tapered edge to prevent your client's hands from getting burned or cut. You can do a lot with this drill, from cleaning to shaping; it's perfect for those who need a multi-tasking nail tool on the go.
Wuxi Yaqin Trading Co., Ltd. is a trading factory that has been focusing on the production and export of high quality abrasive products. We provide one-stop service from production to delivery, and have professional and rich experience in OEM/ODM service.
At Yaqin, we will always adhere to the philosophy of "honesty, rigor, responsibility and mutual benefit" and keep moving forward to make Yaqin Nail Drill the ideal choice for your large-scale work.
Read the full article
0 notes
Text
What is the Best Nail File for Acrylic Nails?
A nail file is a very common and handy tool for nail art work.For removing acrylic nails, gels and how to use a nail file on natural nails, we'll explore this today.
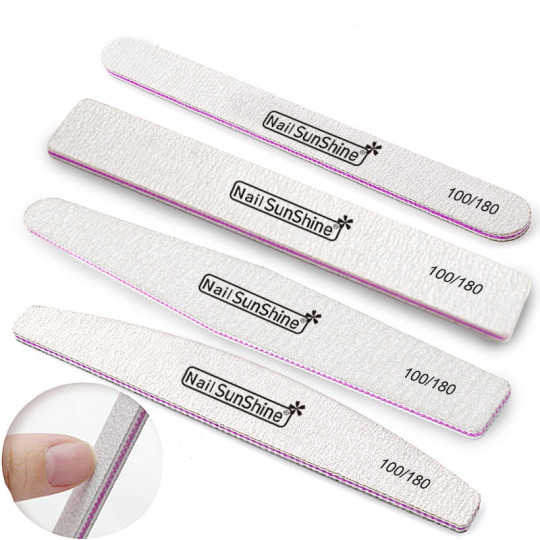
What are the best nail files for acrylic nails?
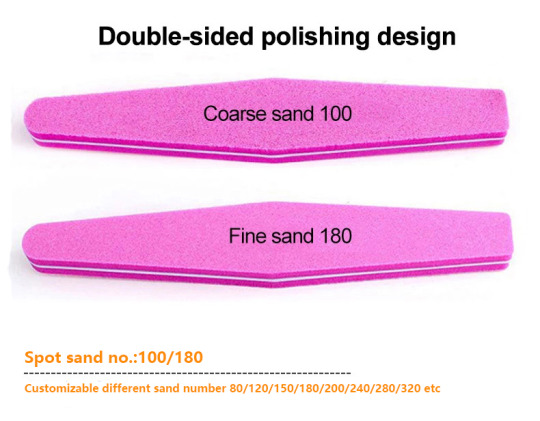
Acrylic nails are harder than gel nails and therefore require more pressure when filing. A 100/180 grit nail file should be sufficient to shape and reduce acrylic nails, the 100 grit side reduces nail length and removes superficial acrylic; a softer 180 grit side can be used to shape natural nails.
What gritty nail file to use to remove gel?
When removing gel nails, you want to make sure you don't use a nail file that is too rough, as too rough a file can damage the natural nails under the gel.
For gel nail removal, a medium-grit 100/180 nail file is usually best. If you're removing soaked gel polish, it's usually best to use a 180-grit nail file to sand off the surface nail paint before you need to use the remover.
After the gel polish is completely removed, you can dab your nails with buffer, if desired. However, be very gentle and be careful not to thin your nails.
What grit file to use on natural nails?
Never use a nail file with a grit greater than 240 on your natural nails - buffers can be rougher as they have a buffer layer for more protection.
A 180 grit nail file should be suitable for shaping natural nails.
Wuxi Yaqin Trading Co., Ltd. is a trading factory that has been focusing on the production and export of high quality abrasive products. We provide one-stop service from production to delivery, and have professional and rich experience in OEM/ODM service.
At Yaqin, we will always adhere to the philosophy of "honesty, rigor, responsibility and mutual benefit" and keep moving forward to make Yaqin Nail Drill the ideal choice for your large-scale work.
Read the full article
0 notes
Text
The Full Aspects to Consider When Choosing Nail Drill Bits
Whether you are planning to remove gel polish, or acrylics, knowing how to choose a suitable nail art drill will help you get started quickly. In the past, you may have always learned that people distinguish nail art drill bits mainly by their shape and material, but the truth is that there are many more aspects to consider when choosing one. You will be surprised how easy it is to create a perfect nail art once you have chosen the right nail art tools. Let's dive right in now!
What is a nail art drill?
A nail art drill has two main parts adjacent to each other, a handle and its head. The shank is inserted into the handle and the head works on the nail. Most nail art drill heads are compatible with the standard handle size of 3/32 inch in diameter and when choosing a nail art drill tool, it is important to make sure it is compatible with that size. Attached to electric nail art drills, they can perform different filing tasks such as polishing natural nails, shaping nails, removing cuticles or calluses from the sides of nails, saving the nail technician's time and effort.
What do you need to consider before getting a manicure?
1. Function
Prepare the cuticle
Whenever you want to start doing a manicure, you will find that the first step is always to prepare your cuticle, this is because it allows your nail bed to look clean and flat to avoid sticking to your nails later.
The Diamond Cuticle Manicure Drill Set, made from high quality, hard wearing carbide, is perfect for removing, cleaning and smoothing out cuticle areas. Provides an easy, quick and safe way to prepare your cuticles, ensuring a perfect start for the following manicure.

The next step is the main application of the nail art drill, i.e. removal, shaping, polishing, etc. Therefore, it can be confusing to choose which nail art drill to use for a satisfying manicure.
The large barrel-style smooth top nail head features a cross-cut design for safe, fast smoothing of contoured gel nail surfaces or nails. The smoother, rounded top protects cuticles and sidewalls from scratches and cuts on contact and is novice friendly.
The ceramic flame tip has good heat dissipation and its top is designed with an oval shape for a more open view and softer gel removal. And they are suitable for people who are allergic to metal.
And of course there is the versatile 5-in-1 professional tungsten carbide nail bit for everyone, designed with a mix of 3 different tooth shapes, you don't even need to change the bit when cleaning your nail, it removes hard gel, base gel and soft gel separately in one go.
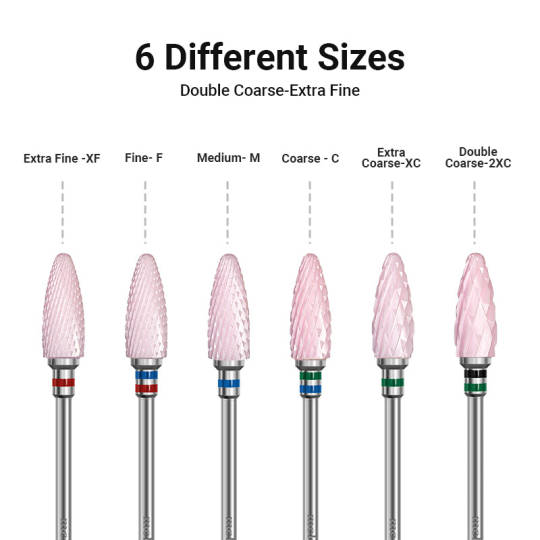
2. Grit
When using an electric nail drill for your manicure, the last thing you want to happen is to find out you've damaged your nail bed! Therefore, the sharpening of the nail art drill bit will be a key factor that you must consider.
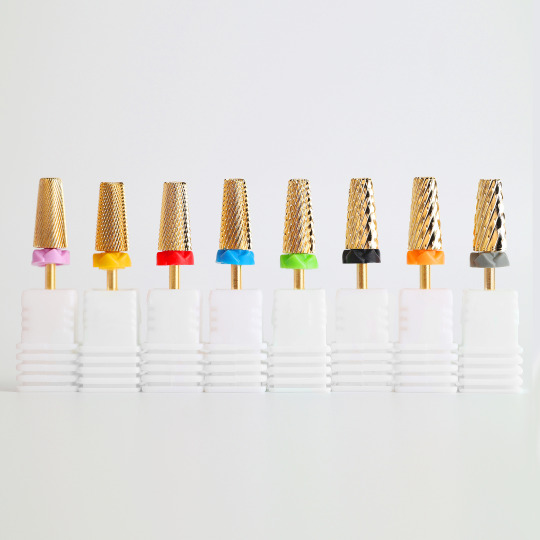
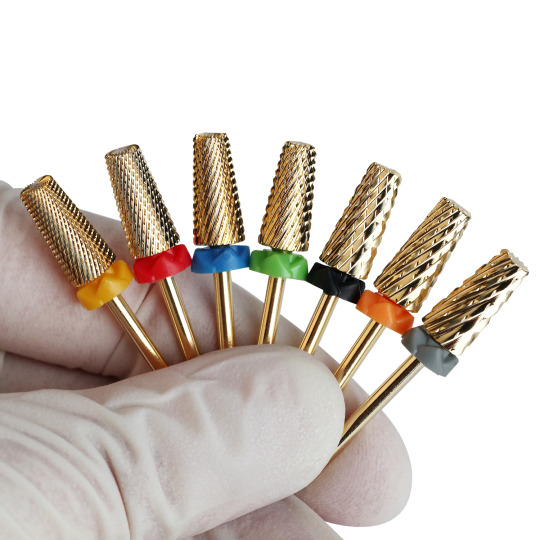
Generally, each nail art drill bit comes with a colored coil, and the grade represented by the coil can be identified by different colors. And it can be divided into three basic levels. Fine, Medium, and Coarse. The coarser the grit, the sharper the nail head. For more experienced users, coarse is the superior choice for speed. However, to be on the safe side, beginners are advised to start with the finest and gradually increase as they become more proficient.
3. Cutting Design
The 5-in-1 straight cut nail bit exhibits a sharp, straight tooth line design for quick nail removal and is suitable for hard gel polish, and experienced nail technicians.
The 5 in 1 cross cut nail bit exhibits a pronounced cross cut tooth line design that allows it to provide more support points to disperse the filing force while working, making it softer than a straight cut, while being slower and more stable in the process. It is recommended that beginners start with the thinnest of these.
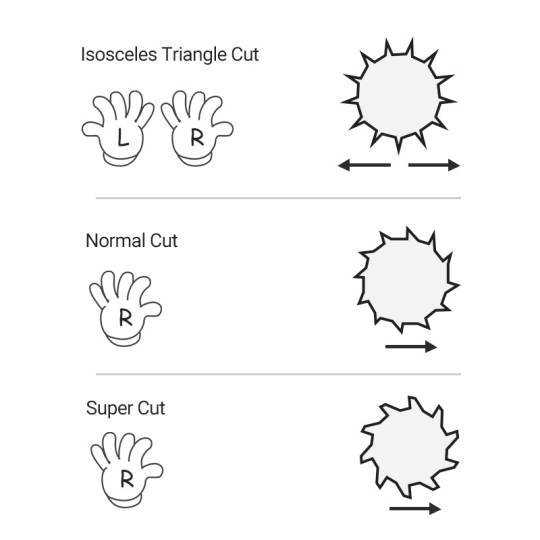
4. Direction of rotation
When actually working with nail drills, you may notice that not all nail drill bits support forward and reverse rotation. This is determined by the shape of the cut of the nail bit.
If it is an isosceles triangle, then obviously the direction of rotation will not affect how well it works, which is why it works for both left-handed and right-handed people. If it is a normal cut nail bit, it will be a triangle that is slightly tilted to one side, so you will get a better polish when it is rotated to the side it is tilted to. There is also a super cutting nail bit that is right-angled trapezoidal and only supports a single direction of rotation, but is more durable, powerful and quite suitable for some hard gel removal.
Some maintenance tips worth knowing
1. Clean them regularly
Regular and proper cleaning of your nail drills is essential to prevent the infection and spread of diseases and bacteria, especially when you use them on your clients' nails. In addition, it keeps your nail heads sharp and in good condition. Ideally, you should clean your nails after each use.
First, brush off any remaining dirt or grime with a brush, soap and water. Next is the disinfection step. Soak them in 75% alcohol or other disinfectant for a few minutes. Finally, take them out to dry and then ideally put them in a special nail drill organizer storage bag to ensure they are not attacked by other chemicals.
Note: Ceramic tips are not suitable for exposure to UV light as it may discolor the ceramic.
2. Keep it dynamic
Natural nails are most susceptible to damage from heat build-up, so remember to always keep your nail drill dynamic rather than applying it repeatedly in one place, otherwise your nails can easily be damaged from over-filing.
3. Replace in time
If you don't replace your nail bits for a long time, it's not hard to notice that they will become duller and duller, making you spend more time and effort to complete the nail filing job. This is not only a huge waste of your time, but it can also cause pain in your wrist. Therefore, replacing nail bits in a timely manner is something we always recommend. Generally speaking, tungsten nail bits need to be replaced every 2 or 3 months, while ceramic nail bits need to be replaced in a much shorter period of time, i.e. they need to be replaced in about 1 month. Of course, it also depends on how often you use them and the type of removal. For frequent use and application of some hard work, then shorter replacement intervals should be considered.
After reading this complete explanation, I believe you should have a full understanding of what a nail bit is and how to use it. When you have the right nail drill bits on hand, the easier your manicure will be, resulting in better results.
Welcome to Wuxi Yaqin Trading Co., Ltd. Yaqin has been focusing on the manufacture and export of high-quality abrasive products. One-stop service from production to delivery, and has professional and rich OEM/ODM service experience.
In Yaqin, we will always adhere to the concept of "integrity, rigor, responsibility, mutual benefit", and keep moving forward, making Yaqin nail drills an ideal choice for your large-scale work.
Read the full article
0 notes
Text
Nail Drill Bits Introduction Guide
Flame-shaped drill bits
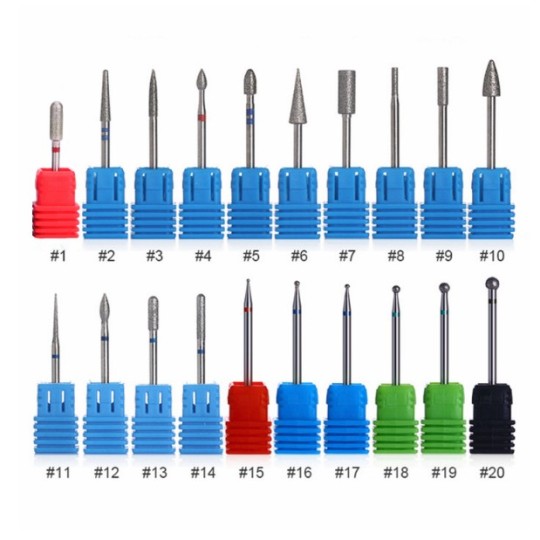
Tapered nail drill bits vary greatly in size and shape. As pictured, the smaller tapered nail art bits go all the way up to large cones like this one. This is also the preference of people who perform nail art. They are ideal for removing cuticles.
Wuxi Yaqin Trading Co., Ltd. is a trading factory that has been focusing on the production and export of high quality abrasive products. We provide one-stop service from production to delivery, and have professional and rich experience in OEM/ODM service.
Read the full article
0 notes
Text
Fastest Way to Remove Gel Polish——Nail Drill
Do you find the whole process takes too long when removing the gel polish? If this happens more than once, it's time to make a change. We've found that using a nail drill is the fastest way to remove gel polish! Next, we'll take you through why this approach works so well.
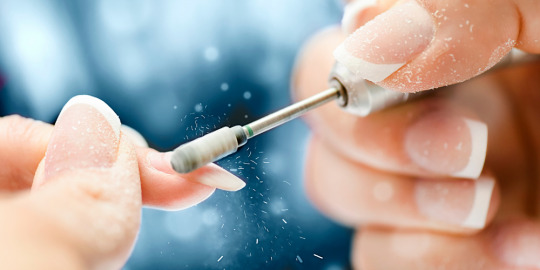
How do nail drills work?
The nail drill is driven by an electric motor, and it works by removing unwanted material from the nails using a rotating nail drill. When used for gel polishing, the bit will quickly break down the gel layer, making it easy to remove.
What are the pros and cons of using a nail drill?
The advantage of using a nail drill is that it is easy to use, fast and does not require any harsh chemicals. Because harsh chemicals may damage the nails.
The downside is that buying nail drill bit can be a bit expensive, and you need to be careful not to get too much acetone on your skin. Another downside is that it can be a little tricky at first, so we recommend practicing with a spare nail or two before trying on real nails.
How to use a nail drill?
To use a nail drill, you first need to attach the nail drill bit to the power tool. Most drill bits are screwed on, but if you have a different type of drill, find out how to use it.
Next, set the power tool to its lowest setting. Hold the nail drill bit at a 45 degree angle against your nail and apply light pressure. Keep the drill moving in a circular motion and continue until the gel polish is removed.
If there is still some gel polish on the nail, we need to repeat the filing and polishing process until they are completely gone.
When you're done, use a nail brush to remove any debris left on your nails, then rinse well with water. Finally, protect your nails with an acetone-free nail polish to keep them looking great!
What are the best ways to protect my nails after removing gel polish?
Once you have removed all of the gel polish from your nails, it is important to take steps to protect them and keep them looking great.
Apply a coat or two of nail polish to prevent your nails from peeling or breaking.
Use cuticle oil to moisturize and soften the skin around the nail bed.
After you have removed all the gel nail polish from your hands, use a lotion that does not contain acetone. This will remove any residue that may have been left behind during the removal process, plus it smells great too!
Welcome to Wuxi Yaqin Trading Co., Ltd. Yaqin has been focusing on the manufacture and export of high-quality abrasive products. One-stop service from production to delivery, and has professional and rich OEM/ODM service experience.
In Yaqin, we will always adhere to the concept of "integrity, rigor, responsibility, mutual benefit", and keep moving forward, making Yaqin nail drills an ideal choice for your large-scale work.
Read the full article
0 notes
Text
Learn how to use an electric nail drill safely and correctly
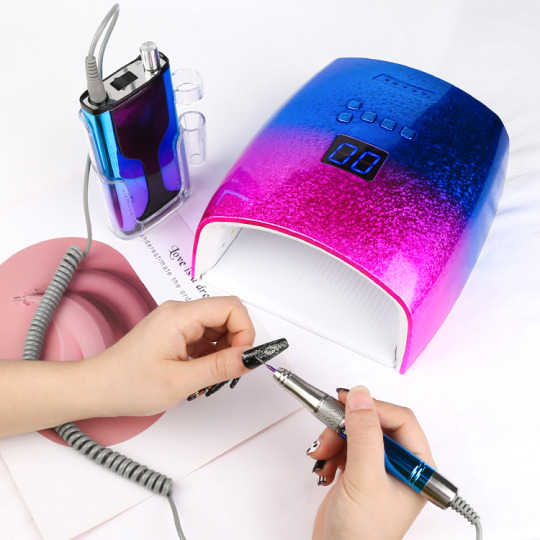
Electric nail drill are high-tech products that can be purchased online, in beauty salons or professional nail shops. While they take some practice to use, they're not difficult to master.
Before using a portable electric nail drill, you need to thoroughly understand how it works, especially if it's your first time using it.
Learning how to operate these high-speed, powerful machines will prevent unnecessary injury to yourself or your nails.
So how to choose an electric nail drill?
Choose a nail drill with little vibration
Most of the time, you'll be using an electric nail drill for an extended period of time. You want to make sure the nail drill runs smoothly without vibration. Vibration can cause nail damage, as the drill may file too far.
When deciding how to choose an electric nail drill for your needs, it's important to consider the type of work you'll be doing and how often you'll use it.
Worth choosing a better quality nail drill
If you're going to use your nail drill on a regular basis, you'll definitely need to look for quality brands, and while they cost a little more, the extra cost will pay off in the long run to have quality brands that will last for years. Cheap tools are not good investments.
The best electric nail file drills can accommodate most standard file sizes, which is something you should be aware of when purchasing. This way, you have stable control over the filing area without having to fit in too big or too small.

Here are some helpful techniques to help you master the basics of electric nail drill technique using a nail file drill safely.
First, use a slow speed for cuticle work. The cuticle is sensitive and thin, and excessive sanding can not only damage the nail bed, but also cause pain. Adjustable setting for custom drilling speed when in use.
Second, backfill uses medium speed. You can speed things up when you file backfill or the concave area of the nail. However, don't go too fast or you may damage your nails.
Then, use a faster speed on the surface of the nail. When filing the nail surface, increase the speed to 15,000 RPM to shape the nail.
In the end, it takes practice and time to find the right combination of gentle pressure to shape your nails professionally, hold the drill correctly, and use the right accessories.
How to Use an Nail Drill Bit - Using an Electric Nail File Drill on Natural Nails
Try extra-fine diamond nail drill bit or silicone nail drill bit to shape natural nails. This is the best way to lightly shape natural nails.
The first step is to slowly and carefully push the cuticle back. Dead skin must be removed before moving on to the rest of the nail.
When using natural nails, keep the drill speed between 2,500 and 6,000 RPM. Any faster method may damage or crack the nail surface. Keep the drill bit flush with your nails as you work.
Hold your drill in a level position, like you would hold a pencil when filing. This allows for minimal movement by using the index finger to control the drilling direction. Move the drill bit from one side of the nail to the other in a slow circular motion.
Then be sure to buffer
This is a rewarding and fun step in the manicure process. Using the right buffer will help keep your nails looking fresh and bright. The skin around the nails appears to be well cared for and improves nail health.
Using buffers is easy. Apply buffing cream to your nails before you start. Apply and massage cuticle oil to keep cuticles soft and healthy.
With a wide range of tools and equipment, you’ll be able to easily create pretty manicures. Invest in specialized range of drill bits and buffer tools. Remember to be safe, learn how to use an electric nail drill safely and practice good hygiene habits. Although it’s hard to resist the urge to dive into your new piece of equipment right away, remember that it’s always better safe than sorry!
Welcome to Wuxi Yaqin Trading Co., Ltd. Yaqin has been focusing on the manufacture and export of high-quality abrasive products. One-stop service from production to delivery, and has professional and rich OEM/ODM service experience.
In Yaqin, we will always adhere to the concept of "integrity, rigor, responsibility, mutual benefit", and keep moving forward, making Yaqin nail drills an ideal choice for your large-scale work.
Read the full article
0 notes
Text
The Complete Guide To Nail Drills: About Materials
Many people still think that electric nail drills are too difficult and only for professionals? It's time to get rid of this idea. Once you learn how to use it, you will definitely say why you didn't use this tool sooner.
When you're ready to learn about nail drill Bits, the various shapes of drill bundles and their exact uses can be confusing.
So to help all beginners, we've made a specific guide for almost all of the most commonly used drills. Let's take a look at them one by one.
What materials are drill bits made of?
Basiclly, all the nail drill bits on the market right now are made of these 3 materials.
Carbide Nail Drill Bits
Carbide bits are made of Tungsten Carbide, which are very hard and long lasting. They are suitable for professional use and perfect for removing polygel and acrylics, cutting the smile line, shaping and refining your acrylics surface. Just remember don’t use coarse carbide bits on natural nails, because they can damage your nails in seconds.
Ceramic Nail Drill Bits
Ceramic bits are made of ceramic, which are also strong as well as gentle. They are very popular among manicurists. Because of the nature of ceramic, they reduces heat when filing. What’s more, they are more soft and less likely to hurt your skin and nails. Ceramic bits are ideal for people who have sensitive skin and thin nail beds.
Diamond Nail Drill Bits
Diamond bits are made of metal and have diamond particles on the surface. Compared with the other two materials, diamond bits are finner and can create more dust and heat when filing. Due to the dense diamond particles, they are mostly used for cuticle removing.
There are various of sizes and grits of bits made in all kinds of materials, divided into fine, medium and coarse grits. A finner bits will be slower than a coarser one, but comes to a smoother result.
Welcome to Wuxi Yaqin Trading Co., Ltd. Yaqin has been focusing on the manufacture and export of high-quality abrasive products. One-stop service from production to delivery, and has professional and rich OEM/ODM service experience.
In Yaqin, we will always adhere to the concept of "integrity, rigor, responsibility, mutual benefit", and keep moving forward, making Yaqin nail drills an ideal choice for your large-scale work.

Read the full article
0 notes
Text
Top 5 Gel Mistakes To Watch Out For
As long as you do DIY manicures at home, many people should find gel manicures difficult.
So we've rounded up a ton of questions about the right way to do gel manicures and troubleshooting, and here's a quick overview of the top 5 mistakes people make when using gel manicures!
1. Water exposure!
Our nails are like real sponges. When our nails are soaked in water, they can absorb about 3 times their own weight in water. When they absorb all the water, they expand in size! Then after about an hour or so, they will shrink back to their normal size. But what happens when you apply a polish or gel to the surface of a water-swelled nail? Although the nail shrinks to its normal state, the gel does not shrink with it, thus loosening the bond between the gel and the nail, and the gel comes off completely!
So if you're going to do your own nails, don't soak your nails in water, even if a nail salon does. We need to wait at least 30 minutes to 1 hour after showering before applying gel on our nails!
2. Not polishing/preparing your nails properly
Gel hates a lot of things, but what it hates the most is the smooth and shiny finish. Gel is like Velcro in a way, it needs something to hold it in place. So you absolutely need to properly and thoroughly wipe off the entire finish on your nails before using the gel! It requires complete sanding of the nail with a nail file, leaving the nail "rough" and completely dull. If you don't do this correctly, the precious gel you just hunched over for a few hours will pop in a week or so. Honestly, this situation is very sad.
Therefore, it is very necessary to prepare a nail file.
3. Not removing all the dead skin on the nails
The cuticle isn't just the curved part of the skin on top of the nail, it's actually the hard-to-see dead skin growing on the actual nail bed! Since it's barely visible, we remove some skin when filing the surface of the nail, but those little cuticles on top can be a little tricky. You can use the rounded edge of the nail file to push the cuticle up while removing the cuticle, or use the cuticle nail drill with an electronic file! A diamond nail drill is a good choice, but be careful to remove it very thoroughly! !
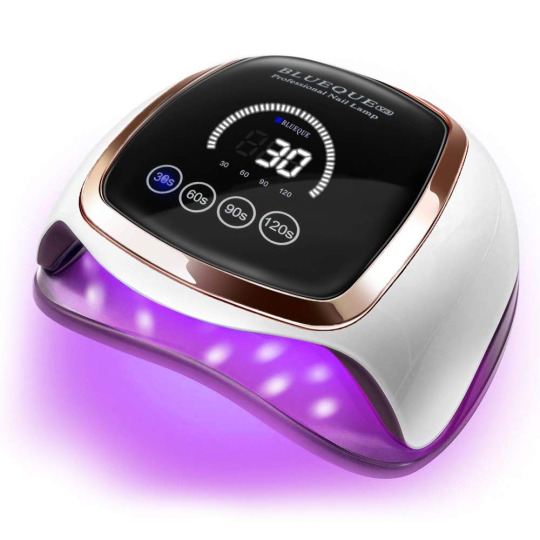
4. Wrong curing light
I've seen this a lot lately where people see a very cheap mini LED/UV curing gel light that seems to fit 1-3 fingers at a time and think this will be their gel light. But unfortunately, these types of lamps don't have the energy needed to fully cure the gel! You have to buy a more powerful light to get the full cure you need, otherwise if your gel isn't fully cured it won't stick to your nails properly!
Welcome to Wuxi Yaqin Trading Co., Ltd. Yaqin has been focusing on the manufacture and export of high-quality abrasive products. One-stop service from production to delivery, and has professional and rich OEM/ODM service experience.
In Yaqin, we will always adhere to the concept of "integrity, rigor, responsibility, mutual benefit", and keep moving forward, making Yaqin nail drills an ideal choice for your large-scale work.
Read the full article
1 note
·
View note
Text
Manual Nail File Guide
The most common manual nail files are made of cardboard and usually have different grits on the sides.
Here are a few common nail files.
Wooden nail files: These are similar to emery boards, but they are made of wood instead of cardboard. They are also available in different whole grains.
Metal nail files: These manual nail files are made of stainless steel and can be a bit rough for natural nails. They are more suitable for manicures.
Sponge Nail Files: These are extra thick pad manual nail files with no paper backing. They are available in a variety of grits and can be sterilized and sanitized.
Choosing the best manual nail file for you depends on your needs.
After talking about the types of nail files, let's talk about the number of nail files. Generally, there are four different sizes of nail files.
Rasp (80-100 grit): For shaping acrylic or gel nail enhancements and filing down thickness and length
These manual nail files have fewer grit particles, so they are very abrasive manual nail files and are not recommended for natural nails.
Medium Grain File (180 grit): For lightly polished dips, acrylic or gel enhancements, and for filling free edges of natural nails
These nail files are less abrasive because they contain more grit particles. But like rasps, they're not recommended for polishing natural nails.
Fine Grain File (240-600 grit): For smoothing and finishing work on dips, acrylics, wraps and gels. They are also great for removing natural oils and invisible cuticles.
These manual nail files are minimally abrasive and soft enough to gently polish the natural nail bed without thinning and causing nail damage.
Ultra-fine grit file (600-2400 grit): Used to create high gloss and manicure effects on natural nails, making the nails look like they've been top-coated
When you put your fingers on these nail files, they are smooth to the touch. They are also used to prepare the surface of your natural nails for polishing, shining, finishing and removing ridges and stains.
Yaqin Nail Drill Bit Factory 13 Years of Production Experience Professional Manufacturer of Nail Drills and Nail Drill Bits, Private Packaging, Best-selling in 50+ Countries, Many Product Styles and Colors, Support ODM/OEM, Can Be Purchased Centrally.
Read the full article
0 notes
Text
The Best Nail Drills for Exfoliating Cuticles
Removing the cuticle is also a problem we often encounter in our daily manicure work. The use of a high-quality nail drill tool can not only save time and effort for our manicure work, but also effectively protect customers' fingers. Today we are going to introduce the best nail drill bits for exfoliating.
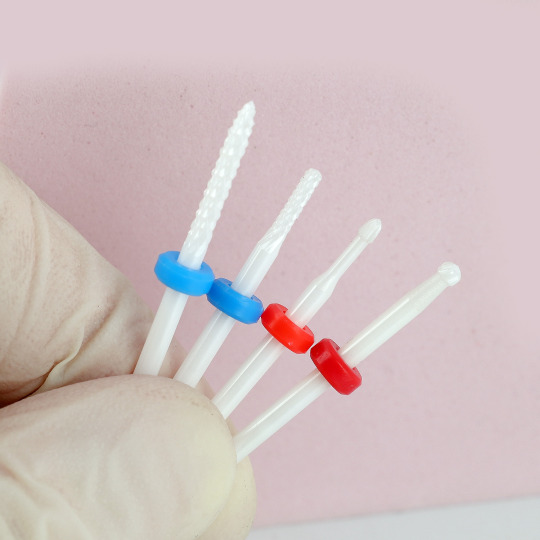
1. The "Russian Flame" Bit
This is a very common and easy to use exfoliating nail drill. It seriously does all the work for you and I can't recommend it enough!
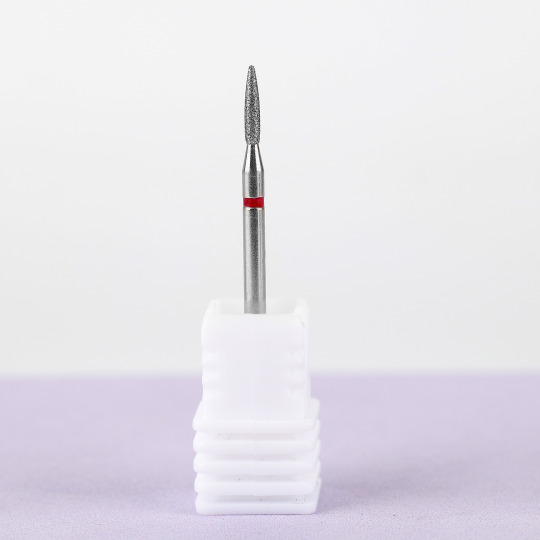
This is a diamond nail bit that is very gentle on natural nails (meaning no teeth, it's more of a sandpaper type grit)
When parallel to the surface of the nail, the tapered shape fits well and gets into dead skin, so there is no risk of any dents or fire rings on the finger.
It removes all the dead skin from your cuticles, so you don't need to worry about what you need to rip from your skin.
The sharp tip is perfect for the finest cuticle work, especially in those hard-to-reach corners.
You can even use it on the skin around your nails to exfoliate dead skin without cutting or hurting your clients.
2.the "Russian nib" cuticle nail drill
I don't use it nearly as often as the Russian flame, but when I do, it's usually when I'm really in a hurry or my clients need to get out sooner than usual.
Its stubby and not-so-sharp nature makes your cuticles work faster than a Russian flame nail drill.
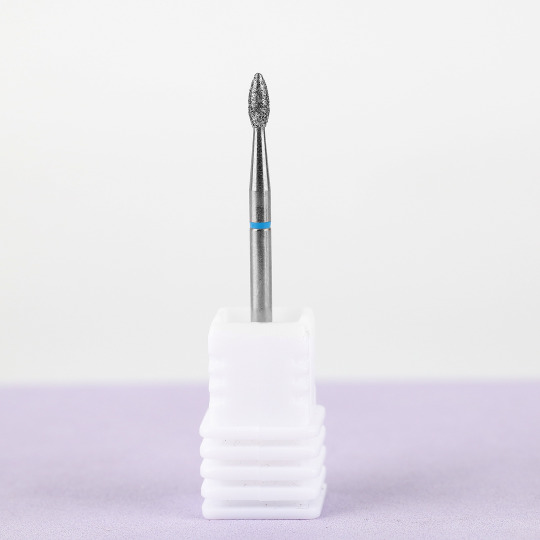
It's a diamond nail drill bit, which again means it's very gentle on natural nails, perfect for beginners! ! !
The rounder, thinner tip is much gentler than the extreme point of the Flame nail drill, which makes your cuticle work so fast because you don't have to worry about going too far and poking your client.
You can also use this nail drill on the skin to help remove dead skin without risking cutting your client!
Welcome to Wuxi Yaqin Trading Co., Ltd. Yaqin has been focusing on the manufacture and export of high-quality abrasive products. One-stop service from production to delivery, and has professional and rich OEM/ODM service experience.
In Yaqin, we will always adhere to the concept of "integrity, rigor, responsibility, mutual benefit", and keep moving forward, making Yaqin nail drills an ideal choice for your large-scale work.
Read the full article
0 notes
Text
Best Nail Drill Bits for Removing Gel Polish etc
Removing nail polish and gel polish is one of the indispensable tasks in manicure work. A handy nail drill tool not only allows the manicurist to achieve twice the result with half the effort, but also protects the customer's hands. So today let's take a look at three different nail drill bits for gel polish removal, plus their pros and cons!
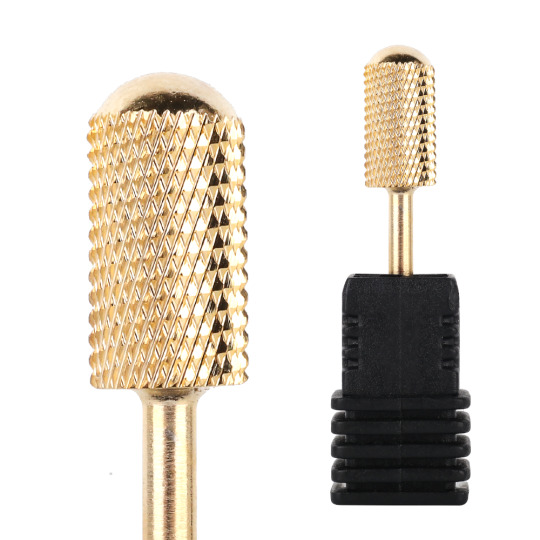
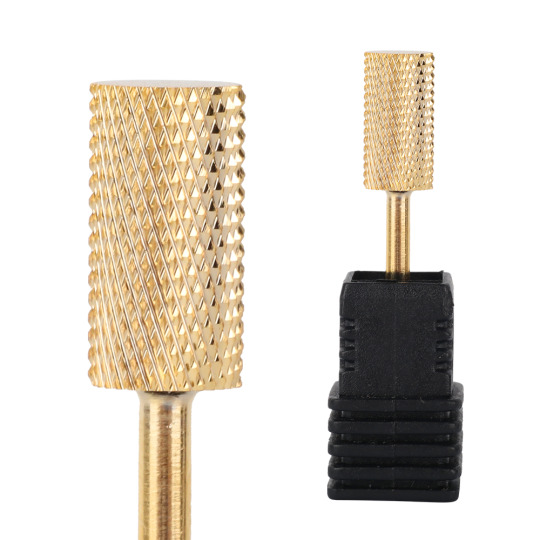
1. This "T-Rex" drill
I know this nail drill sounds intimidating because of its name and "teeth".
But, I promise it's a dream!
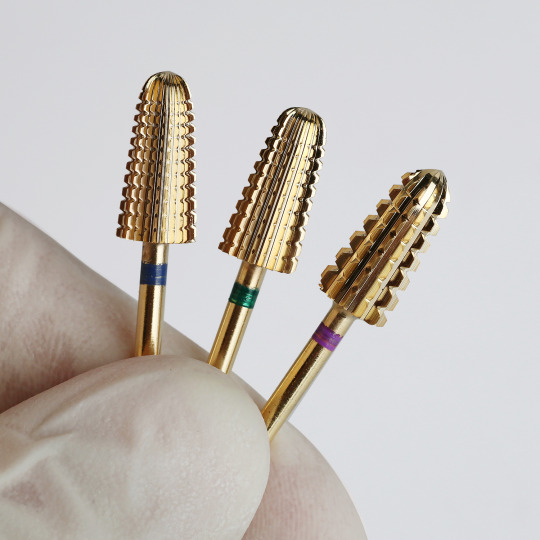
Pros:
This nail drill can be used by both left- and right-handed users.
Its "teeth" provide great strength and efficiency for removing gel polishes (thicker at the bottom), hard gels, gel extensions, and acrylic nails.
Durable! The "teeth" don't wear out as quickly as other carbide barrel nail drills, so you don't need to replace them every two weeks to get longer use. Save you money!
The top of this nail drill is rounded, which will help prevent any cuts around the cuticle.
Cons:
This nail drill is not suitable for beginners as you may damage your natural nails.
If you don't use at least a semi-hard gel to build a primer underneath, and if you're inexperienced with nail drills, you can damage your natural nails when filing the gel polish.
This is a thicker and bulkier nail drill, so it will take some getting used to the cuticle as it is a bit wider.
2. The "flame" bit
Now, this is similar to a T-Rex nail drill. However, the teeth are more compacted inward. This nail drill is also available in thinner and tapered forms.

Pros:
This nail drill is available in both left- and right-handed options.
Gel polish with excellent tapered shape for finer exfoliation of the cuticle area. You can really spread the gel evenly around the cuticle without risking accidental digging. One of my favorite nail drill shapes!
Removal of gel polish (thicker at the bottom), hard gel and acrylic nails have great strength and efficiency due to the "teeth".
The "teeth" don't wear out as quickly as other styles of carbide nail drills, so they last longer and save you the cost of reordering.
The tip of this nail drill is rounded to help prevent cuts to clients.
Cons:
If you don't build a primer underneath, you can damage your natural nails during nail product removal.
There are slightly smaller "teeth" so sometimes I feel like it might wear out faster when removing the gel polish on a daily basis.
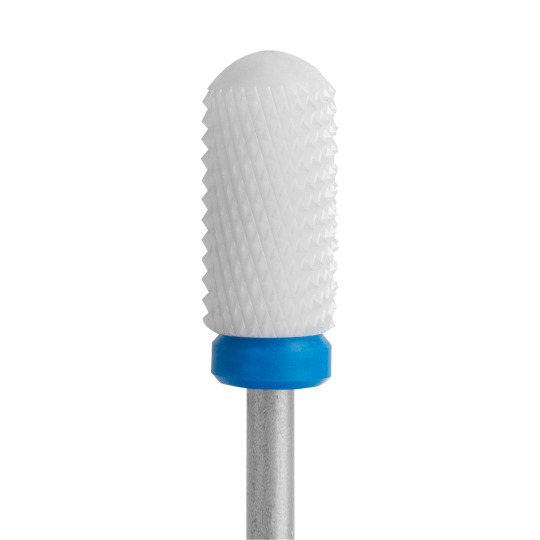
3. Large barrel smooth nail drill
Great for beginners.
Pros:
Available in left and right handed options.
Great for beginner nail art techniques! ! ! The smooth top is very large and prevents any cuticle cuts in case you go too far.
Great for diluting gel extensions and cuticle areas of acrylic nails after application due to the super rounded top and the way the teeth are smoother and smaller.
It's far less damaging to natural nails if you don't have enough foundation or file carelessly.
Great to use if you want to remove gel polish.
Cons:
Not suitable for removing acrylic nails, it is better to use it to remove gel polish or just for refining as the teeth are much smaller.
Yaqin is a professional trading company that has been focusing on the manufacture and export of high-quality abrasive products. Has a complete and strict QC system, covering raw material procurement, production process, product packaging. One-stop service from production to delivery, for various business types of different customers, we have professional and rich experience in OEM/ODM services.
Read the full article
0 notes
Text
Important Features of Nail Drills
In today's society, people always create fashion with colorful clothes and various eye-catching accessories. However, an overlooked one can carry multiple layers of sophistication with just a few tweaks. That's manicure! Now manicure has become an important symbol of contemporary people's display of beauty.
As one of the indispensable tools for professional manicure, nail drill is not only more convenient and quicker to use than traditional nail clippers, but also can accurately complete some finer operations and ensure better nail design, which can be said to be very convenient Affordable. Of course, all of this is based on choosing the right nail drill.
Today's article will take you to understand the important features of nail drills.
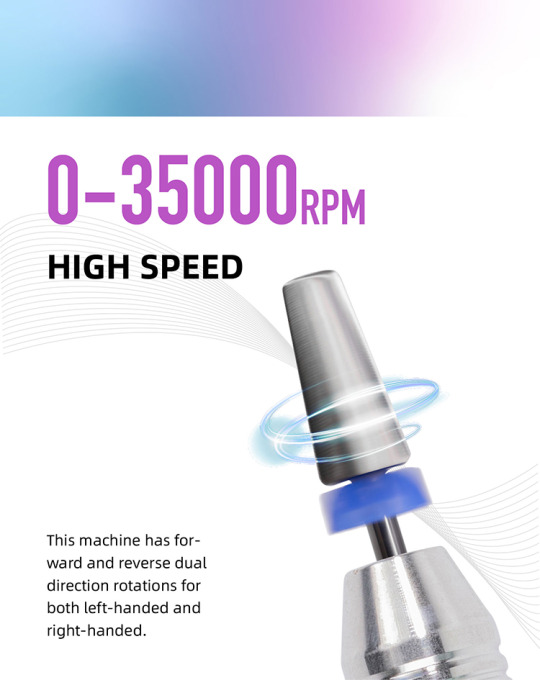
(a)power and speed
When buying a high-quality nail drill, the first thing to consider is how many revolutions per minute (RPM) the nail drill needs, which depends on the actual daily needs and usage. If you are a professional manicurist and need to work on acrylic nails, using a nail drill over 25,000 RPM provides excellent and efficient performance. But for beginners and natural nails or cuticle areas, experts recommend 25,000 RPM, or even around 18,000 RPM.
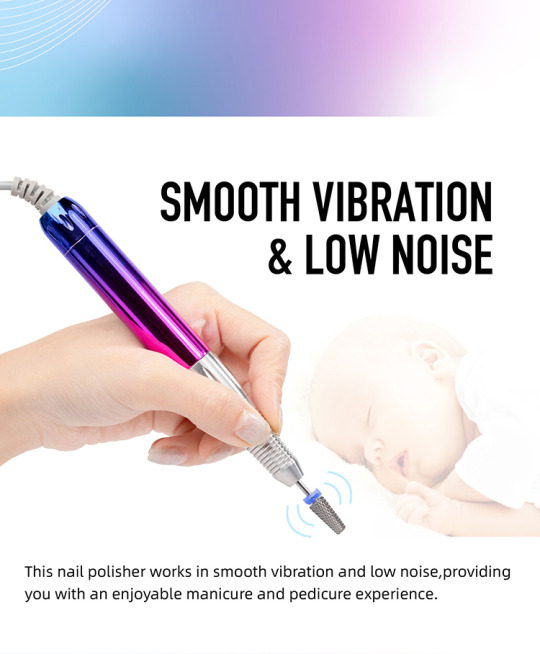
(b)Low noise, low vibration, low heat
In addition to the most basic equipment performance, the functions of the nail drill, such as noise, vibration, and heat generation, are also crucial. Because it will not only affect your experience, the accuracy of nail operation and the life of the electric nail drill, but may even cause damage to your nails. So the perfect nail drill must minimize these shortcomings.
(c)Lightweight Design
The next thing to consider is the weight of the nail rig. Comfortable and easy-to-move lightweight nail drills reduce hand pressure, provide better precision for any user, and are compact enough to provide long-lasting work.
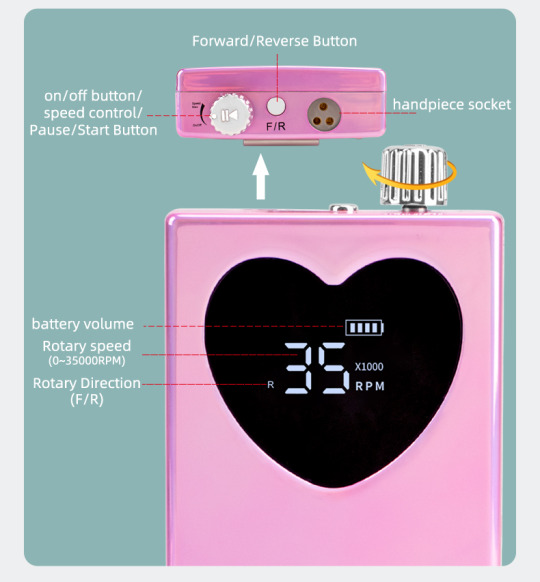
(d)Forward/Reverse
A good nail drill will consider both hands, with forward and reverse patterns. Allows you to get work done in different directions without being affected. These settings also prevent customers from putting their hands in awkward positions to keep customers in the making. More importantly, a good manicure machine should take into account people with different usage habits of left and right hands, and set the rotation direction of the nail drill to an adjustable forward and reverse mode.
Yaqin Nail Drill Bit Factory 13 Years of Production Experience Professional Manufacturer of Nail Drills and Nail Drill Bits, Private Packaging, Best-selling in 50+ Countries, Many Product Styles and Colors, Support ODM/OEM, Can Be Purchased Centrally.
Read the full article
0 notes
Text
Choose The Nail Drill That Suits You According To The Shape
Obviously, nail drill bits can make manicure work more efficient and convenient in grinding, removing and shaping. However, most beginners are often confused about how to choose the right drill,Because nail drill bits come in all shapes and sizes, each shape serves a different purpose.
That's why we've picked out some of the most common drill shapes for you to make your selection easier.
a. Barrel/Cylinder Bits
Barrel bits are great for surface work on nails. You can also use a barrel drill to backfill cuts, shorten and shape nails, and create smile lines. But make sure not to use this nail drill on the cuticle area. It's very sharp and can damage your nails.
b. Tapered Nail Bits
Conical drills can be used not only for cleaning cuticles, side walls, under nails, but also for work on the surface of toenails. attention! It is best not to use this drill to shape your nails.
C. (UNC)/Needle Bits
The name of the bit explains its purpose well. UNC stands for Under Nail Clean. UNC drills are sharp and have a small profile to help access tight spaces such as nails and under sidewalls. Some manicurists even use it to punch holes in certain nail designs.
d. Ball Top Shape Drill
A ball drill is used for hard skin, to clean up hard skin above the nail plate, and also to remove loose cuticles that lift up from the nail plate. Since its shape is not sharp, it is not easy to get hurt during use. But at the same time, its function is relatively limited.
e. Safety Bit
Safety drills are designed for safe cuticle work because they are rounded at the top and come in a variety of shapes. With these bits, you can easily reach the cuticle and sidewall without damaging your nails. They are great for cuticle filler work.
I believe that after reading this article, you already know how to choose the right nail drill for yourself according to the shape of the nail drill. I hope you can all choose the nail drill that suits you!
Yaqin Nail Drill Bit Factory 13 Years of Production Experience Professional Manufacturer of Nail Drills and Nail Drill Bits, Private Packaging, Best-selling in 50+ Countries, Many Product Styles and Colors, Support ODM/OEM, Can Be Purchased Centrally.
Read the full article
0 notes