
Last Seen Blogs

ryuichirou
why not

quee
Untitled

ringingt
Go Ninja Go FAM&TMNT my love

wescastro
𝓰𝓸𝓸𝓭 𝓿𝓲𝓫𝓮𝓼 *

a-branch
A-branch
Text
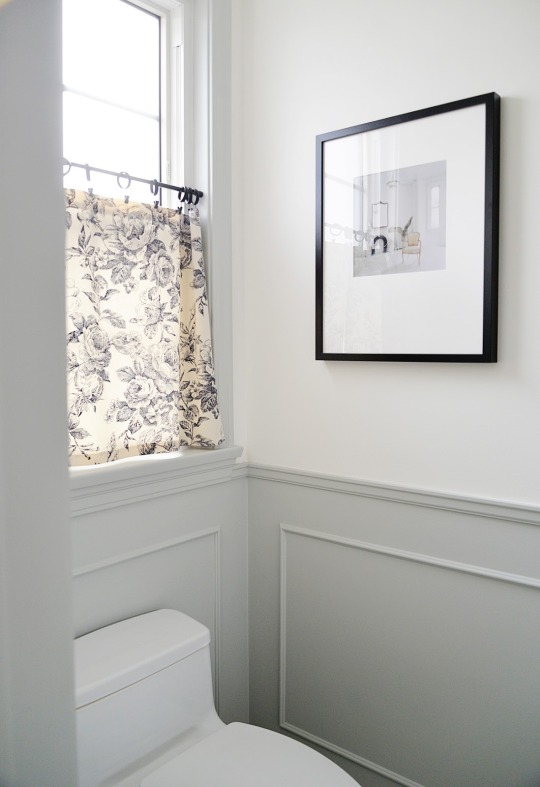
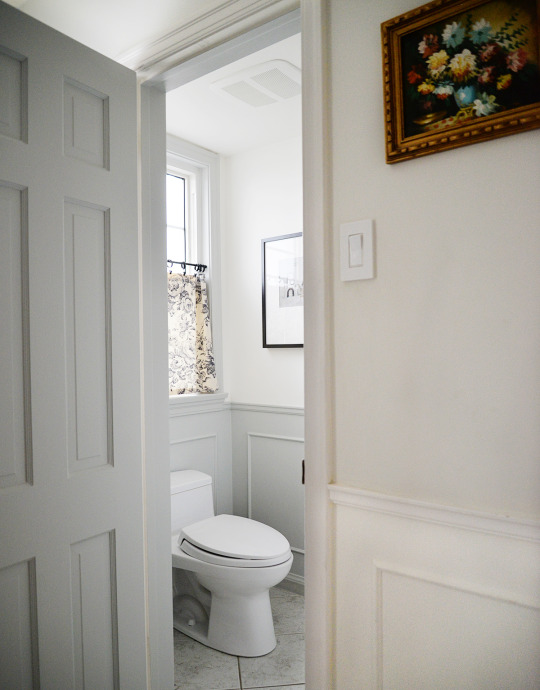
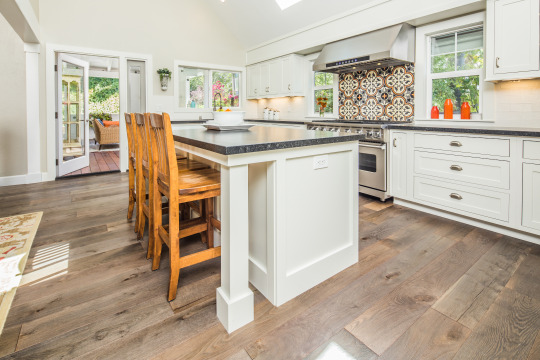
Small Bathroom Design Ideas
When it comes to design, a small bathroom presents an opportunity to have some fun. Consider that you typically only spend a few minutes in a small bathroom or powder room. As long as you get the bathroom layout right and provide all the necessities, you can really go in any direction with your bathroom decor.
We were excited by that idea when we finally decided to tackle our small main floor powder room over holidays. In just over two days, we transformed it from a red and sombre space to one that is pleasant and surprisingly pretty. You can get a whole new look without a costly bathroom renovation. Here's my best tips for a quick budget bathroom remodel and designing a functional small bathroom with style.
*Affiliate links are used in this post

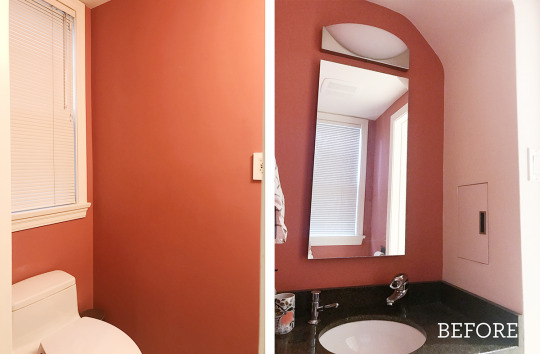
Before I dig into the changes we made in this bathroom remodel, let's take a look at what this bathroom looked like before. We moved into this house two years ago and we hadn't touched this space. Here's a few things that had to be fixed:
the bold red paint that made this room feel dark and small
weird ceiling angles emphasized by the paint treatment
a window with blinds that were constantly closed to provide privacy
modern dated fixtures that didn't fit with the warm and traditional design scheme we had in the rest of the house
no towel holder, art or accessories and a lack of style
So how did we remodel this small bathroom on a budget?

1. Keep Existing Fixtures and Furnishings
The biggest costs in a bathroom renovation are incurred when you make changes to the existing layout and furnishings. Things like moving the toilet or faucet placement, changing the vanity, or making structural changes can significantly increase your budget. In this budget bathroom remodel, we didn't have to make any costly alterations. The toilet worked fine (though it was wobbly and needed to be re-installed) and the vanity and countertop were adequate. The floor tiles really weren't our style but they continued into the connected kitchen so we decided to live with those as well.
2. Use Inexpensive Molding to add Character
One great thing about small bathrooms is that you don't have a lot of square footage to cover. We decided to keep this project at a minimal cost by relying on inexpensive paint and moulding to bring about a dramatic transformation.
To bring character to the space, we decided to continue the wall moulding treatment into the bathroom. The moulding outside the bathroom was installed a few years ago by the previous owners but we were lucky to find trim pieces to replicate the look. We had leftover trim from our living room project that exactly matched the chair rail. We did purchase additional picture moulding which was super inexpensive, about $8 for the entire room, and we kept the existing baseboard.

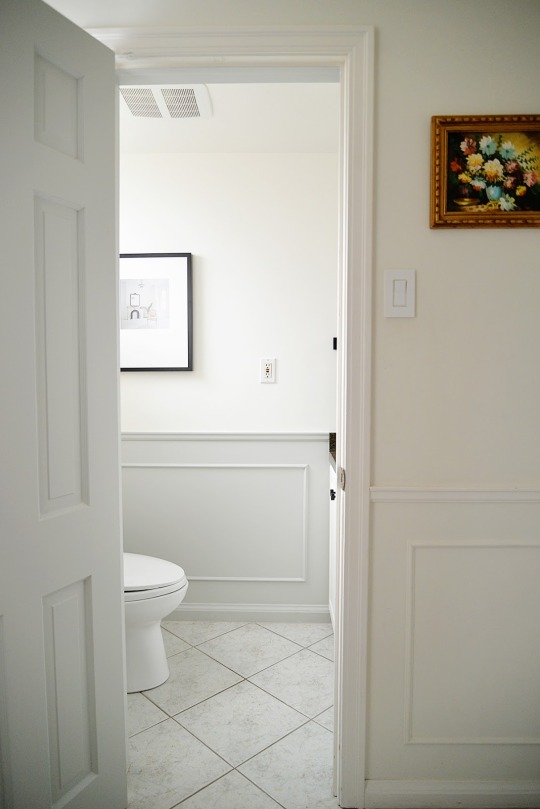
3. Expand Your Space With Paint
How can you make a small bathroom look bigger? All it takes is the right paint colour and a few reflective accessories. By painting the wall above the chair rail and the ceiling the same white paint colour (Simply White by Benjamin Moore), and using a darker colour on the bottom (Stonington Grey by Benjamin Moore), we were to make the room feel taller. Having the ceiling the same colour as the walls also helped to minimize the weird angles. The small door on the right above the vanity is a door into the laundry chute which runs from the floor upstairs to the basement downstairs. It's pretty handy for tossing down dirty tea towels but it creates this strange curved ceiling in the bathroom!
Another space-expanding trick is to use mirrors. This round mirror fills up the area nicely and reflects the sunlight from the window, making the bathroom feel bright and airy. I also like how the round shape plays against the hard edges of the vanity and towel bar and the minimal design doesn't overpower this small room.

4. Be Creative With Your Privacy Options
Privacy is something you need to have in a bathroom but that doesn't mean everything needs to be closed off and dark. Window film is a great option that is not only functional but helps to make your small bathroom feel bigger. We lined the entire window with this window film and I added a simple tension rod, curtain rings with clips, and a cafe curtain I sewed out of scrap fabric to the bottom half of the window. This way, you let in natural light but don't feel exposed when you're in the bathroom.

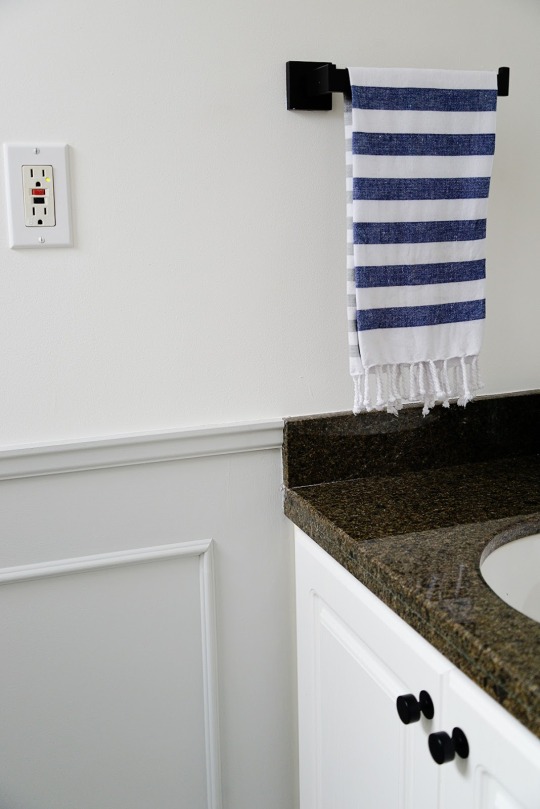
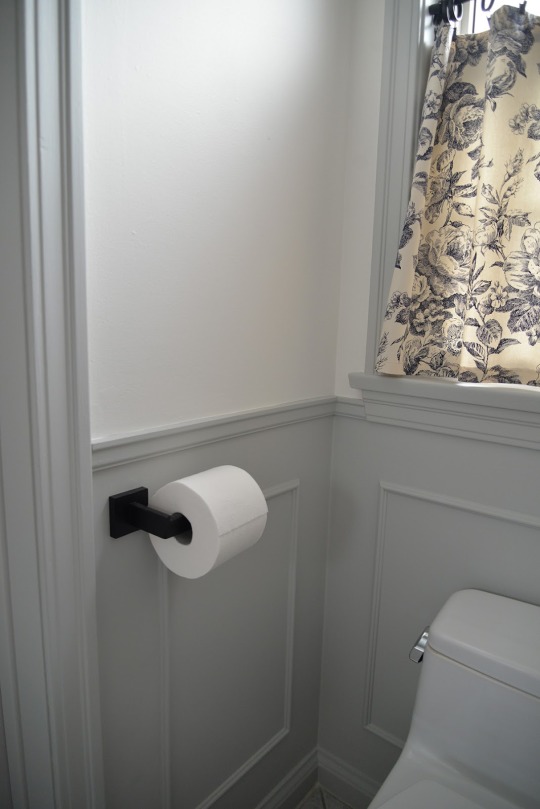
5. Choose Clean Lined Decor Elements
Although the mouldings and trims are very curvy and traditional, I balanced them with more modern and streamlined toilet paper holder, towel rod, and knobs. Their minimal design doesn't draw too much attention or compete with the moulding. Keeping everything in a matte black finishe also helps tie the entire look together.
6. Make a Statement With Light
Light fixtures are one of my favourite ways to bring style and impact to a room. Typically, you might only have one or two light sources in a small bathroom. Make the best use of that opportunity by choosing a light fixture that combines both functionality and design. This Permo Industrial Wall Sconce comes in 5 different colours and was less than $35! With it's mixed brass and metal finish, it packs a lot of style in it's small form. I love the swivel head and the extended arm which allows light to be cast downward in a nice cone shape.

7. Use Art in the Bathroom
It might seem counter-intuitive, but I would encourage you to use a really nice piece of art in your small bathroom. Art can elevate the feel of an entire space, make it feel 'fancier' and, well, less like a bathroom! I've had this modern print for years and was just waiting for the right spot to display it. Who knew it would end up here. I love that it's unexpected and how the art picks up on the black, white, and cream tones found in the room.
I was extremely happy with how quickly this room came together. How long does it take to renovate a small bathroom? It depends on the complexity of changes you are making but this budget bathroom remodel took us only 2.5 days. If you have a small bathroom in need of a makeover, make a few select changes and you and your guests will be sitting pretty in no time!

0 notes
Text
Five Flowers: Gray and Minimal Industrial Store Showcases Delicate Flora
It is always lovely to watch contrasting elements combine to create an interior that is unique and exceptional. This flower store in Dnipropetrovsk, Ukraine is one such beautiful setting which takes you away from the normal image of a flower shop that you have and into a world that is much more stoic, minimal and full of industrial vibe. You would think that moving away from the usual white, pink and plush colorful sections would make it less appealing. On the contrary, the interior of Five Flowers accentuates the beauty of plants and flowers it holds as the backdrop created by Nottdesign allows them to shine through!

Contemporary store in Dnipropetrovsk, Ukraine combines the beauty of flowers with rugged industrial charm


Simplicity takes over inside this light-filled store that sits just a touch below the street level and exposed metallic pipes, concrete walls and an overdose of gray give it a 'contemporary minimal' vibe. Divided into three different sections, the store feels inviting and also sophisticated at the same time. Plats and flowers on display seem like the only elements that give it the much needed 'warmth and natural elegance', making them even more special than usual.
RELATED: Industrial Minimalism at its Efficient Best: Stunning Bathroom with Modular Ease

There is no shortage of natural light inside this Ukrainian store

Track lighting, pendants and natural light combine beautifully inside the store

Cold zone located at the rear section of the store
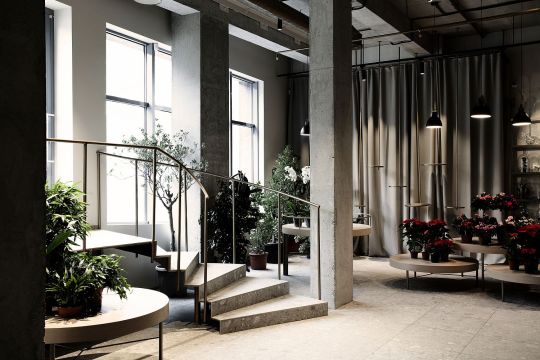
Drapes add another layer of gray to the interior

Gorgeous display of flowers and plants stands out thanks to the minimal backdrop
We also love the use of track lighting and pendants in black throughout; a feature that accentuates the industrial aura of the store. Open shelves in matching black hue and metallic accents complete a setting that charms you almost instantly. Walk in and you will discover nature in a whole new context and in an ironic way, the design of the store tells you why nature is so very important and special for all of us.
RELATED: Organic Elements and Shades of Gray For This Industrial Loft in Toronto

Gray and exposed rugged finishes give the store an industrial appeal

Gray is the color of choice inside the lovely Five Flowers store

Industrial style pendants and lighting fixtures add to the appeal of the interior

Small and simple stairway leads the way into the store

Floor plan of Five Flowers in Dnipropetrovsk
You're reading Five Flowers: Gray and Minimal Industrial Store Showcases Delicate Flora, originally posted on Decoist. If you enjoyed this post, be sure to follow Decoist on Twitter, Facebook and Pinterest.
0 notes
Text
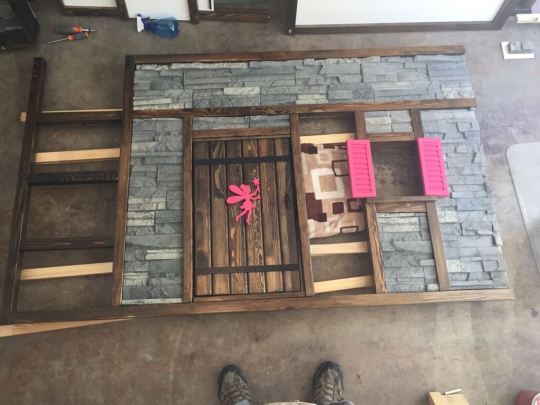
Dad does it! Hacks the most amazing princess castle bed
When my son was 4 years old, my wife and I needed to move him out of his convertible toddler bed to a “big kid bed” so that our daughter could begin to use the former.
He wasn't excited about it, so I offered to build him a new bed that was “the most awesome bed ever”, and the result was a success that made him very happy.
Our daughter is no dummy though … as she approached her fourth birthday, she began asking for her own special “big girl bed”.
And while our son had given us complete “creative control”, our daughter was a little more specific: “a fairy princess castle bed … preferably pink,” she said.

My daughter's first draft of the hack

3D model before construction began
This is the Fairy Princess Castle Bed we built for her:

Watch my YouTube video, including 3D model, time lapse of the assembly, and my daughter's reaction to her Fairy Princess Castle Bed:
youtube
IKEA items used for castle bed:
2 Kura children's beds
1 Kura bed tent
Other materials:
~30' of 2x4s
~80' of 2x2s
~16' of 1x4s
~15' of 1x10s
3' of 1×12
18 2' x 4' white mdf panels
6 2'x4' faux stone panels
~30 ft2 of laminate flooring
~30 ft2 of plywood
~25' of nature-themed moulding
~50' of plain moulding
Strips of hobby wood
4 flat metal bars
22 button magnets
Square dowels of varying thickness
Bundle of cedar siding
Various pieces of hardware
Roll of grey contact paper
Quart of pink paint
Several quarts dark brown (Jacobean) stain
Several quarts of clear lacquer
Quart of black paint
Various fake plants
2 sets of remote-controlled LED strip lights
1 Aukey table light
2 sets of drawer slides
Tools:
Belt sander
Sandpaper (60-220 grit) and sanding block
Rip cut saw
Hack saw
Back cut saw
Miter box
Power drill and various drill bits
Hammer
Various screw drivers
Level
Various paint brushes
Super glue
Construction adhesive (i.e. “Liquid Nails”)
Caulk gun
Hot glue gun
Staple gun
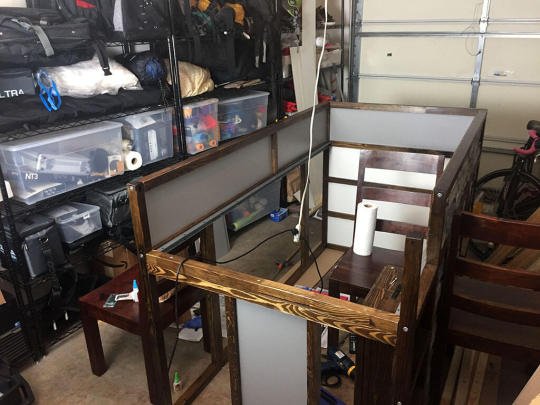
How we put together the Fairy Princess Castle Bed
This hack was so extensive that giving detailed step-by-step instructions would be a book in itself, so here's a concise summary:
The hack consists of 2 major sections (each of which is comprised of a separate Kura bed):
I. “The bed”
1. Use belt sander to strip preexisting lacquer off all Kura parts
2. Stain all wooden Kura parts
3. Cover mdf panels provided with the Kura with grey contact paper on one side.
4. Assemble Kura roughly according to IKEA's conventional directions, but keep each of the 4 walls separate from one another. Only notable exception is to not include the upper rail to the side wall adjacent to the ladder – as this will be where “the bed” joins “the tower”. This will also require 2 2x4s (or alternatively 2 2x2s) to help support the back wall, which otherwise can't be assembled independently of the others.
5. Create frames for the door and window using 2x4s and 2×2 respectively.
Finishing the bed half
Front wall almost finished
6. Construct the door from bed slats taken from the second Kura: Cut off the ends to create the proper height. Attach them together using rectangular dowels nailed to their back sides.

Future door from bed slats
Use hacksaw to cut metal bars to the width of the door, superglue metal button magnets on the front to look like rivets, and paint the bar/magnet pieces black. Once dry, attach to the bed slats.
(Super gluing them didn't hold well – I had better luck with drilling shallow holes into the slats, filling with construction adhesive, and then clamping the bars over them for 24 hours. Be sure to roughen the back side of the bars for maximum adhesion).
Once door finished, attach to the frame via hinges.
Optional: Attached pink wooden fairy to the door using the same drill hole-filled with adhesive approach.
7. Construct window shutters using square dowels and strips of “hobby wood”. Paint pink. Attach to window frame.
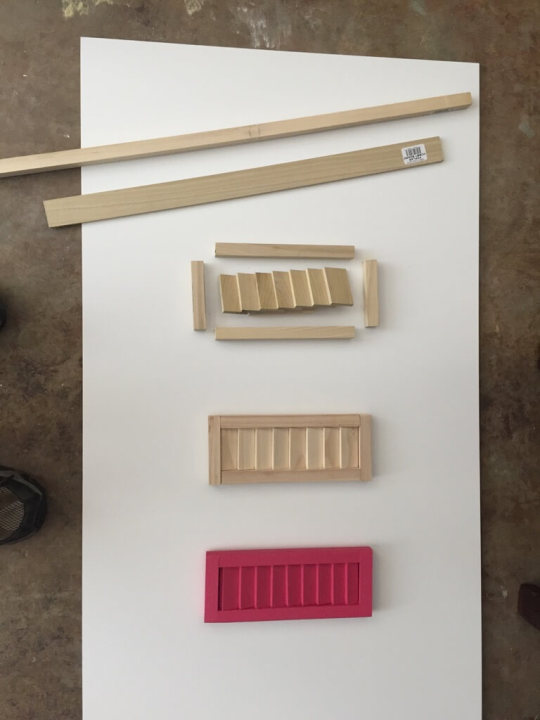
Window shutters in various stages of completion
8. Use white mdf panels for the walls. (The ones I used were actually intended for whiteboards, so were smooth white on one side, and rough/unfinished on the other. The smooth white side replicated dry wall relatively well). Attached walls to the inside of each of the now-assembled Kura wall frames.
9. Cut faux stone panels to fit into the preexisting spaces in the front frame. (I used Wellington light grey panels from fauxpanels.com. Attach to the backside of the mdf panels using construction adhesive.
10. Create an inset for behind the ladder using the same general principles used in steps 8 and 9.
11. Cut, sand, and stain plain moulding to use inside the first floor of “the bed” to cover over seems
II. “The Tower”
This is the more difficult half to hack/construct.
First, the tower consists of part of the second Kura bed tipped on its side (It doesn't include the top rail – which can be used as 2×2's anywhere else in the project).
Also, the tipped Kura may not be structurally sound; I create a platform for the second floor of the tower using 2×4's, 2×2's, and plywood, which stood completely independently of the visible tower.
12. As with “the bed”, strip and stain all wooden Kura parts.
13. Also as with “the bed”, assemble the 4 walls using the 12 main edge pieces to the bed/tower.
14. Create a lower platform using plywood placed on top of spare bed slats. (This will go directly on the actual room's floor when finished)
15. Create the upper platform using 2x4s for the vertical supports, 2x2s for the “beams”, and plywood for the floor. The plywood can be covered on one side with the white mdf panels to make a nice ceiling for the first floor.
16. Use a combination of 2×2's and mdf panels to create a wall that will divide the first floor into 2 halves. The left half will become an alcove for the hide-away bookcase, and the right will become a “secret passage”.

Inside castle bed – secret passage closed

Inside castle bed – secret passage open
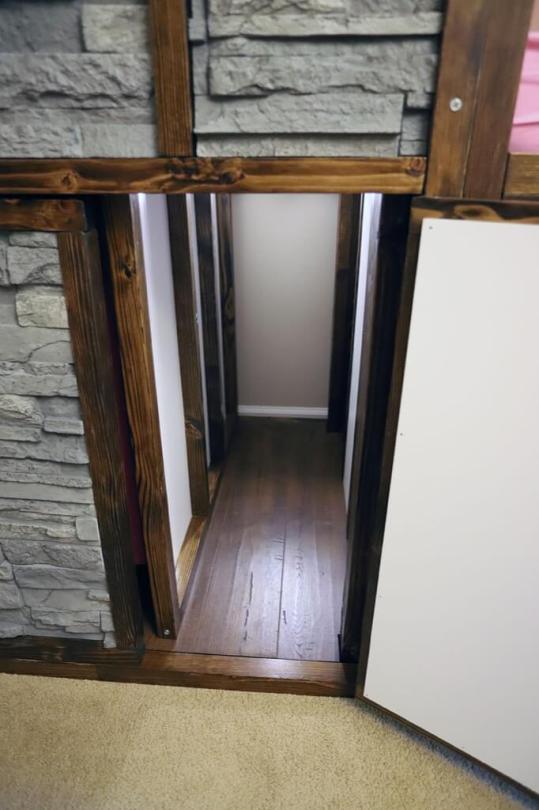
Secret passage exit to outside
17. Create the sliding platform for the bookcase. I used 2 2x4s attached to the lower platform, 2 2x4s attached to a horizontal 1×12 that acted as a shelf, linked together by industrial-strength, full extension drawer slides. (I used 32” drawer slides made by Hettich)

Sliding platform for bookcase
18. Use a combination of 2×4's, 2×2's, mdf panels, and faux stone panels to create the front and side walls in similar fashion to what was done for “the bed”.
This should include swinging doors covered with stone panel that will act like hidden compartments for the bookcase and secret passage.
The back wall of the tower will rest against the wall of the actual room and thus, can be left open as it was for “the bed”.

Backside of tower, almost finished
19. Build door and window shutters as done with “the bed”.
20. Use plain moulding to cover vertical seams inside the tower, and additional moulding around the top (I used nature-themed moulding).
21. Cut wooden laminate flooring to cover both the lower and upper platforms. (You do not need to worry about underlayment for this kind of usage)

Inside of tower without the upper platform

Inside the first floor (i.e. under the mattress)
22. Build a bookcase that will fit in the alcove and on top of the sliding platform built during step 17. (I would have preferred to use an IKEA bookcase – for example, a Bestå or Billy bookcase – but there wasn't one that was the appropriate size).
Paint (or finish) bookcase. I also glued some thin strips of nature-themed moulding to the front to add some character.
III. “The tower roof”
23. The tower roof was the most elaborate and challenging step.

Calculating measurements for the tower roof

Angled wood used as a radial beam for the tower's vaulted ceiling
To begin, create a frame that will firmly attach to the top of the tower and also provide a lip for the roof to sit in.
(This way, the roof will stay on by virtue of its weight alone, and you won't need to worry about separately securing the roof.)

Vaulted ceiling inside tower
The roof is built from 4 triangular shaped mdf panels, joined together by pairs of angled wooden dowels that act as radial beams for a vaulted, pyramid shaped ceiling.
(I lacked the tools to do create those “beams”, so this involved a lot of sanding and revisions.) For the roof, I used cedar siding (which I needed to recut and sand prior to painting pink).
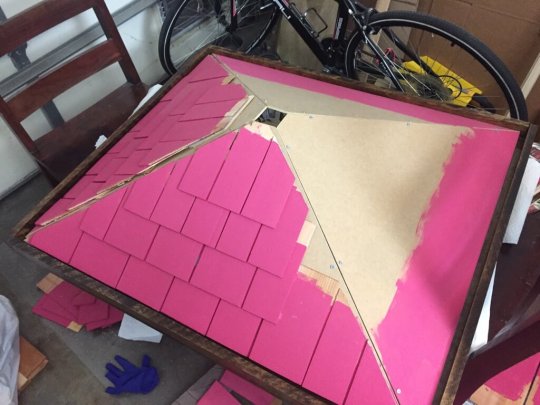
Tower roof, about halfway finished
IV. Assembly of the Castle Bed
By this point, you should have 4-5 different pieces for “the bed” (4 walls +/- separate inset behind the ladder), slats for “the bed”, and ~12 different pieces for “the tower” (4 walls, 2 platforms, 2-4 vertical posts for upper platform, 1 inner vertical wall on first floor, bookcase, roof frame, roof). Time to put them all together. (The main assembly took me ~10 hours, separated across 2 days).
Now install the lights, any miniature furniture (e.g. pillows, kids chair, toy box), and attach fake plants (I literally stapled them to the wood frame).

Parts that will eventually become the exterior light fixture

Finished exterior light
Add mattress and bed tent.
Woohoo – you're finally done!
Our daughter loves her Fairy Princess Castle bed.

How long and how much did the castle bed cost?
Took 10 months and ~400 hours. Total cost was about $2000-2500 US (I didn't keep receipts).
What do you like most about the castle bed?
How much my daughter likes it.
What was the hardest part about the hack?
Getting the hidden bookcase to slide in and out of its alcove with enough ease that my daughter could easily do it herself.
What to pay special attention to?
A Kura bed is not necessarily structurally stable if used on its side. Also, be 100% sure this monstrosity will fit into its destination room before you start!
Looking back, would you have done the castle bed differently?
I would have spent less time on the shingled roof, which is literally not visible without a step stool.
~ by Eric Strong
The post Dad does it! Hacks the most amazing princess castle bed appeared first on IKEA Hackers.
1 note
·
View note
Text
Stylish Patio Updates for the 2019 Spring and Summer Seasons
Does your new year's resolution list include updating your landscaping and patio? If so, you're in luck for 2019! This year there are several creative and visually appealing ways to take a dull patio and make it the best place in your home to relax. If you're already dreaming of sunny spring afternoons lounging outside with a good book, why not get the planning process started as soon as possible? Try these three exciting patio update ideas to make yours even better for any season.

Fire pits are often easily installed and can be custom designed to keep up with the aesthetic of your landscape. If you love spending clear starry evenings on your patio, a fire pit will take your enjoyment to the next level throughout the year.
Enjoy the Outdoors in Your Home
One of the trendiest patio updates for 2018 is installing folding glass doors along the exterior wall leading to the patio. This new entryway will seamlessly fold out for summer entertaining and collapse back into your home for colder months. With this, you will be able to enjoy a stunning view of your patio and outdoor landscaping throughout the year at any time of day. This type of patio update is also exciting for anyone who loves throwing the windows all year long. Instead of only cracking open a window or two, you'll be able to fully enjoy the breeze of any season by opening up numerous glass doors.
Invest in Better Furniture
Patio furniture sometimes has a bad reputation, as so much of it is made from flimsy plastic and only designed to sit outside. However, with the new year there are countless new designs of patio furniture on the market that will seriously upgrade your patio for the upcoming months. Make this part of your home even warmer by investing in outdoor-friendly throw pillows, loveseats, benches, and even side tables. Many of these pieces are now made with weatherproof materials that are more durable throughout the seasons than plastic, and the best patio furniture is furniture that you can leave outside without worry.
Add a Fire Pit
On a perfect summer or fall night, fire pits are the single best way to entertain outdoors under the stars. With a new fire pit, you'll be able to savor the evenings outside and enjoy make s'mores with your guests. Fire pits are often easily installed and can be custom designed to keep up with the aesthetic of your landscape. If you love spending clear starry evenings on your patio, a fire pit will take your enjoyment to the next level throughout the year.
Professional Landscape and Hardscape Design for Your Home
Rhine Landscaping has the tools to make your yard beautiful throughout the year, so trust us with all of your landscaping and poolscaping needs. We have the expertise and knowledge to complete any and all of the landscaping projects on your list. For more information about our services, visit us online or give us a call at (410) 442-2445. For more tips on how to keep your yard and pool looking great year round, follow us on Facebook, Twitter, Google+, LinkedIn, YouTube, and Houzz.
The post Stylish Patio Updates for the 2019 Spring and Summer Seasons appeared first on Rhine Landscaping.
0 notes
Text
Elevate Your Style With These Kitchen Floor Tile Ideas
Image:

We'll warn you now: these kitchen floor tile ideas aren't for the faint of heart.
Tile isn't something you can easily change out, and making a bold commitment isn't for everyone. If you want to create a unique, eye-catching look in your kitchen, though, tile will make a major statement.
Here are 3 ways to go bold with kitchen floor tiles, with real-life examples.
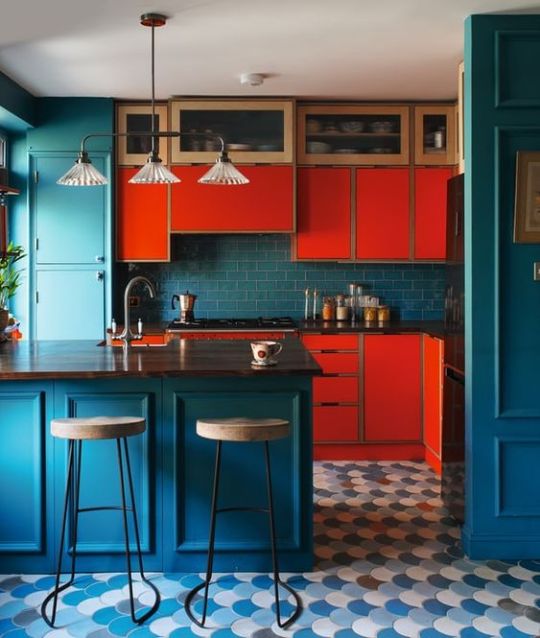
Photo Credit: Theguardian.com
Go Big
Big tile? Big impact. If you go in this direction, however, limit your color choices-- the size already makes a statement, so keep it to larger patterns and a maximum of two colors for a look that's bold without being overwhelming.

Photo Credit: Granadatile.com
If you aren't sure how much of an impact the flooring makes, check out these images-- one with the kitchen flooring in place, another with the floor edited out, so you can truly see how the tile changes the entire feel of the kitchen. Without the bold flooring, these kitchens don't stand out. It's the floor tile that sets them apart.

Photo Credit: Theartofdoingstuff.com
Choose small but powerful
The opposite is true for smaller tiles-- you can go with two or more colors, or choose more intricate kitchen floor tile patterns.
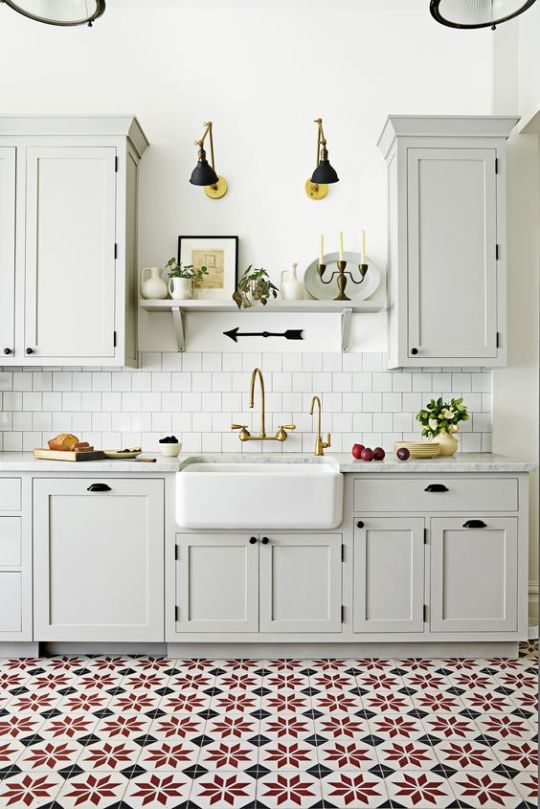
Photo Credit: CountryLiving.com
Get a real feel for the impact of small but mighty floor tile by comparing these images:

Photo Credit: Domino.com
Take inspiration from nature
The natural grooves and wave patterns in natural stone creates a unique texture that can soften the look of your kitchen while still giving it a unique vibe.
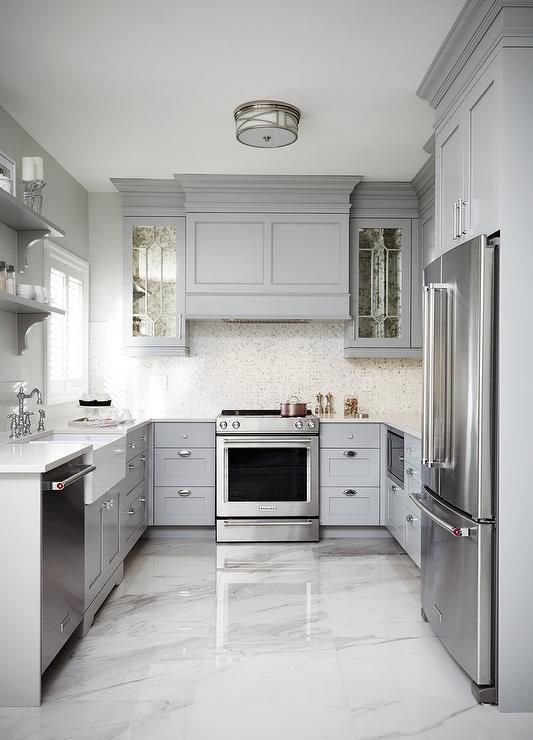
Photo Credit: futuristarchitecture.com
See the difference in the feeling of the space by comparing these images:
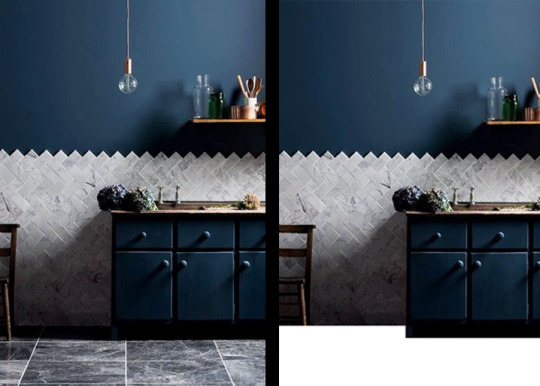
Photo Credit: futuristarchitecture.com
Every detail in a kitchen combines to create the overall impact, but when choosing standout features, many homeowners often overlook the floor. So if you want to go bold, beautiful and unique, explore your flooring options.
Do you have a unique kitchen floor tile pattern? Share it with us over on Facebook!
Category:
Design Trends
0 notes
Text
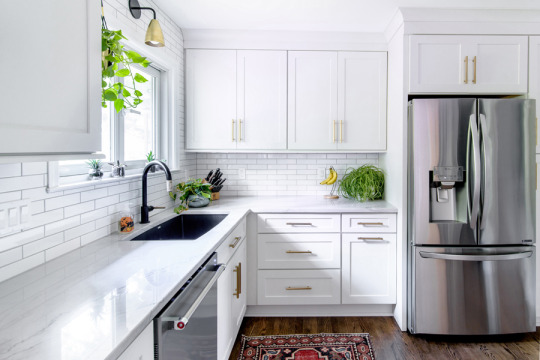
Selecting Countertops for a White Kitchen
A kitchen with white cabinets is timeless statement to make with your home design. It's clean and bright. But how do you select countertops for a white kitchen? We asked CliqStudios kitchen designer, Dyani Elkins for her insight on the role countertops have to play in a white kitchen and for a better understanding into “How do I get the best kitchen design ideas?”.
What comes to mind when you hear about the discussion of how to select countertops for a white kitchen?
DYANI: You would really want your client to determine if they are going for monochromatic or if the cabinets supposed to be white, so that you can then go dramatic. You're either going for real drama or monochromatic. There really isn't an in-between.
Where do you begin with making your selection for countertops?
DYANI: I feel like a lot of people already have a look that they are going for and that they already know what look they're going for. They usually have a pretty good sense. Sometimes they'll do it in reverse where the countertop was selected first to make a statement. They'll go white with their cabinets so that the countertops shine.
I did a kitchen that has this stunningly beautiful soapstone and that was the real star of the kitchen. So, everything else had to play to that. It's about how you want to make your statement. Also, your backsplash is going to make a big impact on that too. If you have a real dramatic backsplash, you may want to go more neutral on your countertops so the tile work is the star. You have to decide what you want your kitchen's focal point to be.
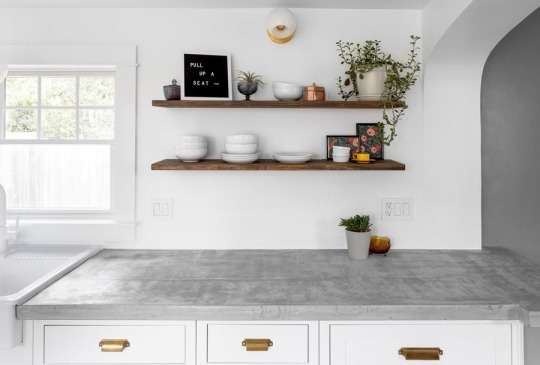
A cost effective and creative option for counters is concrete!
You don't want your design elements to fight each other. You don't want it to be combative and your eyes to go too many places. You have to decide if you want have a dramatic hood or tile, you want to go more neutral with your countertop. If you have a more dramatic countertop then you want to go more neutral. You don't want anything to compete.
Also, if you're going white on white you really have to have that cabinet door or sample with your when you select your countertops. Because the worst thing would be to put in that countertop and then have your whites not match. At CliqStudios we offer three different white finishes: White, Cloud White, and Bright White. You can order two free samples from our website.
In what ways do the theme or style of a kitchen influence the countertops you choose?
DYANI: It's everything. First of all, it's a major price investment and then so much of the square footage is your countertops. So, it's everything. It's a concert with cabinetry and countertops being equal in how important they are.

Contrast. When is best to go bold with your countertops choice and when should you be understated?
DYANI: I think some of it is how long are you plan to stay in the home. If you're thinking about resale then you are probably not going as bold. But if it's your dream home and dream kitchen, then it doesn't matter as long as you're selecting something you're not going to get tired of. I think that's the biggest thing when you make a bold statement with anything. Because it's a major financial investment you don't want to go trendy. Useless money isn't an object for your and you can change it out in five years. But most people are going to live with it for a really long time so you don't want something you're going to get tired of.
We talked previously about other design elements like your hood and backsplash. How do other materials like appliances, flooring, etc… effect making your countertop decision?
DYANI: I think flooring can impact it, especially if you're going for a certain look. Typically, appliances and flooring are more of a neutral and they have less of an impact on that decision than tile and cabinet colors.
Are there any basic tips and tricks homeowners can keep mind when they are going out to look for their countertops and thinking about the connection with their white kitchen?
DYANI: Really think about how you're going to use the space. Because a lot of your countertop selection is going to be based on how you use your kitchen. Different materials respond differently. If this is a beautiful kitchen that is a showcase kitchen and that's it's only function you have a lot more options. If it's going to be used a lot you need a more durable finish. A quartz is going to hold up better to a professional kitchen. If you're a cook, a baker, you have a ton of kids those kinds of surfaces are going to hold up better compared to natural elements like marble. Both marble and granite can also crack. I think the function needs to be thought about before design. Then that leads you naturally into you design once you've made those decisions.
The post Selecting Countertops for a White Kitchen appeared first on CliqStudios.
0 notes
Text
3 Paper Organization Systems for 2019

The following is a guest post about 3 paper organization systems for 2019 from regular contributor, Kristin at The Gold Project.
Happy 2019! Two years ago, I shared a post about my Top 3 Organization Systems for 2017. Guess what? They are still my top 3 organization systems for 2019. So, I am definitely not going to talk about them again in today's post. Make sure you check that post for all of the details about my monthly bill planner, receipt organization, and emergency binder.
In today's post, I am adding three more organization systems that I have implemented and that have stood the test of time. Sometimes, we can try an organization system and it just doesn't work. But, those times when we find the right one, you just know it. I hope you find these three paper organization systems helpful and can use them in your household.
Incoming Paper Organization
I tested out several different systems for papers until I purchased the Kvissle wall magazine rack from Ikea. It was a total game changer for me.
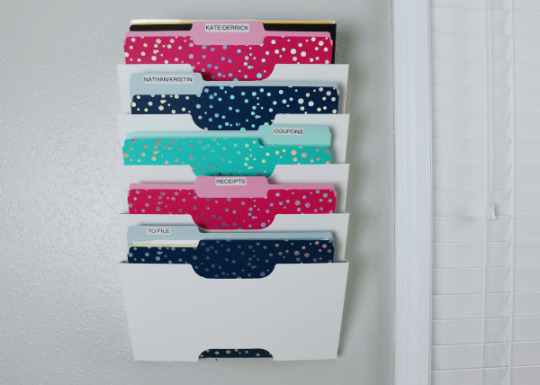
It has five different sections to organize your paperwork. I went to Wal-Mart and purchased a set of file folders for under $2.00 and I labeled each one with the category I needed. The five sections include:
To File – Anything that needs to be placed in a home binder
Receipts – Any receipts that that need to be placed in my receipt accordion file
Coupons – Current coupons
Nathan/Kristin – Anything for me or my husband that needs to be placed in our personal binders
Kate/Derrick – Anything for my two kids that need to be placed in their school binders
I have used this incoming mail system for five years and it has worked perfectly. I was able to eliminate all of the paper piles that once accumulated in my office (see Laura's similar system below).
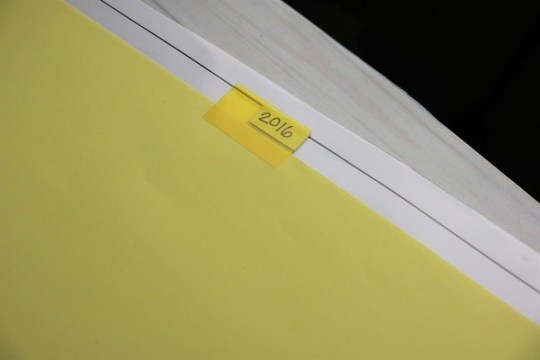
Taxes Binder
Tax time is right around the corner, which means it is time to get those documents ready to turn in to the IRS. For me, it is pretty simple because I have created a dated Taxes Binder where everything from previous tax seasons gets stored.
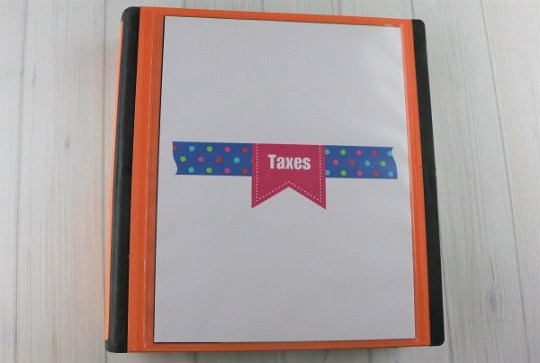

When I put this binder together, I knew it was going to work. I keep 8 years of tax documents in this one binder. When the new tax season arrives and I have new papers to add to the binder, I will shred the oldest forms. Then, I will add a new section with the current year on the tab.
I highly recommend getting a tax system together for your household. Even if the binder system does not work, try something else. It will save you so much time and frustration during tax season.
Greeting Card Organization
This may not be the first thing that pops into your head when you think of top paper organization systems, but it is one that I created several years ago and has never been changed.
When I say greeting cards, I am talking about new greeting cards that have never been given to a recipient. I will admit, I am a person who almost refuses to purchase a greeting card in a store. Why? Because I feel they cost way too much, unless we are talking about some dollar stores. Some of the detailed cards cost over $5.00 for a single card. You can get a meal at some restaurants for that price. And, let's be honest, a lot of greeting cards are not kept by the recipient.
Instead, I like to purchase bulk cards from places like Amazon. You can get beautiful cards for a fraction of the price. Then, I sort and store them until I need them.
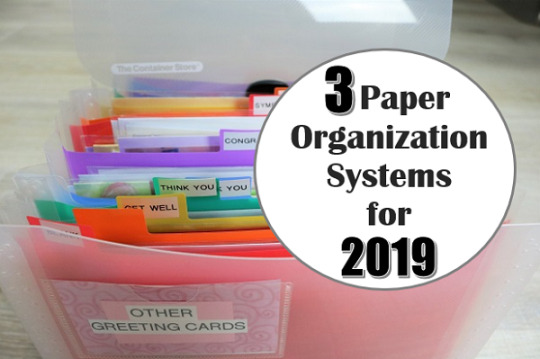
For the organization, I purchased two of the greeting card cases from The Container Store. I labeled the tabs as follows:
Her Birthday
His Birthday
Kids Birthday
Neutral Birthday
Get Well Soon
Thinking of You
Thank You
Congrats
Sympathy
Wedding
New Home

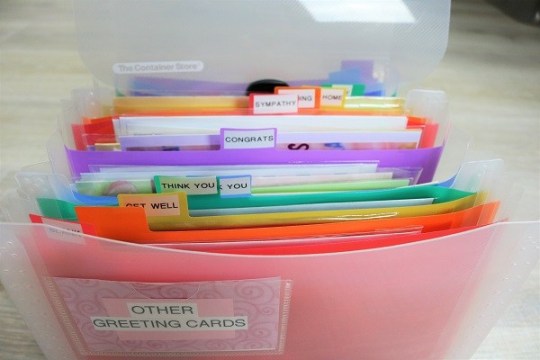
The labels have worked perfectly. I haven't had to change any of them.
What paper organization systems are working great in your household?

My name is Kristin and I am a middle school career education teacher by day and a mommy/wife/blogger by night. I am married to my high school sweetheart and we have two loving children. We recently made a life-changing move to Arkansas, so our new house is always under construction. I get excitement out of finding new creative, functional, and cute ways to organize things! I also enjoy writing and documenting life as it happens. So, I put these loves together and created The Gold Project. With the help of my husband, I am attempting to turn our house into a home. So, check out this special place of mine and take this journey with me!
You may also like:
Create an Organized Command Center

Organized Solutions for Easily Managing Daily School Papers

If you're seeing 3 Paper Organization Systems for 2019 anywhere other than on I'm an Organizing Junkie (or via my email list or a feed reader) it is being used by someone else without my permission. Please let me know, thank you!
0 notes
Text
Tutorials & Tips Link Party 378
Happy New Year friends and welcome to the first Tutorials & Tips Link Party of 2019! If you're new here, a special welcome to you! The Tutorials & Tips Link Party is a place for bloggers in our niche to link up their best tutorials, tips, crafts, room reveals, furniture makeovers, recipes, etc. Each week, […]


0 notes
Text
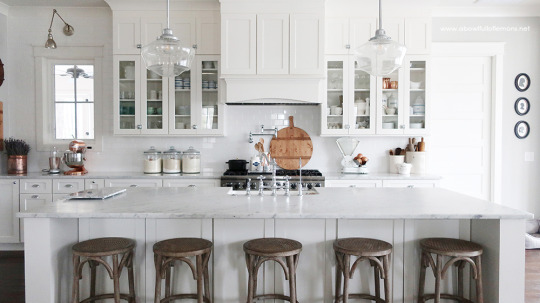
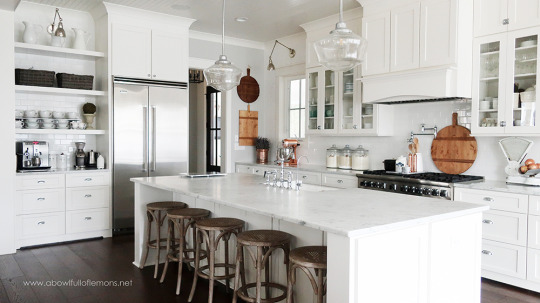
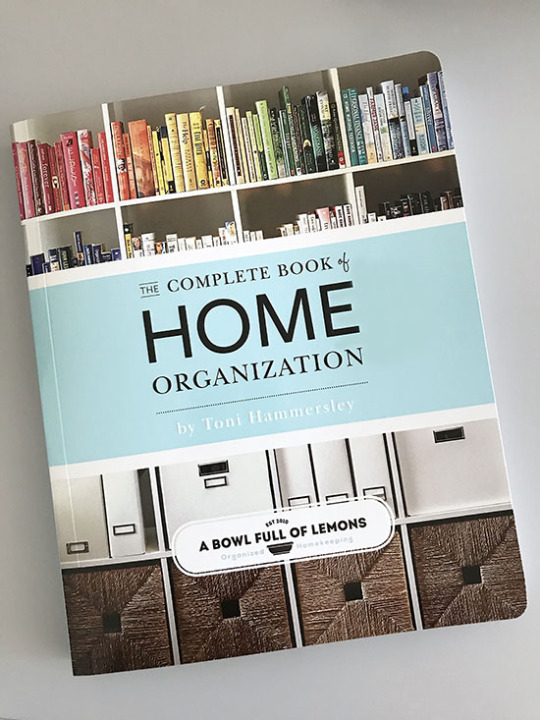
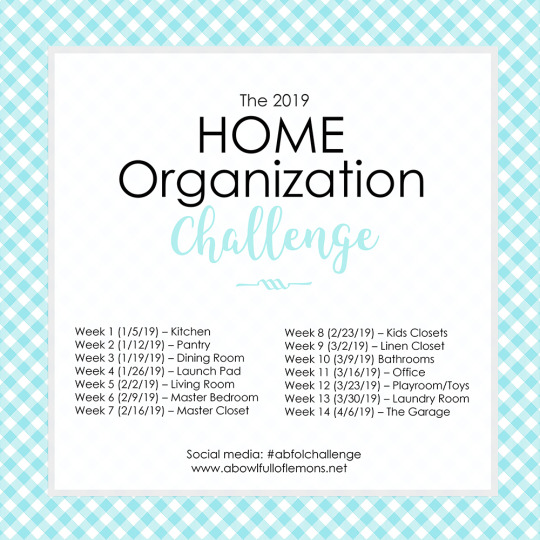
2019 Home Organization Challenge Week 1: The Kitchen
A new year always gives us a fresh new outlook on life. New routines, implementing a healthy lifestyle, and a refresh of our homes are usually at the top of the list. I'm here to show you how to give your home a refresh & a new slate. The best way to accomplish this is by participating in our yearly home organization challenge. This is our 8th year of the challenge and there are thousands of you joining in. Each year, the challenge just gets better and better and so many more of you are now a part of this tradition. If you would like to purchase any of the items featured in this post, check out my favorites shop here.
FIRST TIME PARTICIPANTS: Welcome to our challenge. You are in for a delightful surprise. For those returning, welcome back. Your homes will improve with each year that you participate. I'm so glad you are all taking the steps to a better new year. You won't regret it.
WEEK 1 TASK: We are kicking off the challenge in the kitchen. This is the most used space in the home. Not a day goes by that it doesn't get used, so clearly it will become the most disorganized space at one point or another. If your kitchen organization isn't working anymore or if you don't have zones set up to help you work efficiently, it's time to hit the reset button and start over.
You have 7 days to complete the first challenge. Break it up into several days or take one full day to conquer it. Go with whatever works for you. You can complete the challenge whether you are a stay at home mom or a full time worker. Make the challenge work for you. Before you begin, print out the complete 14 week schedule and checklists below.
Free Challenge Kit

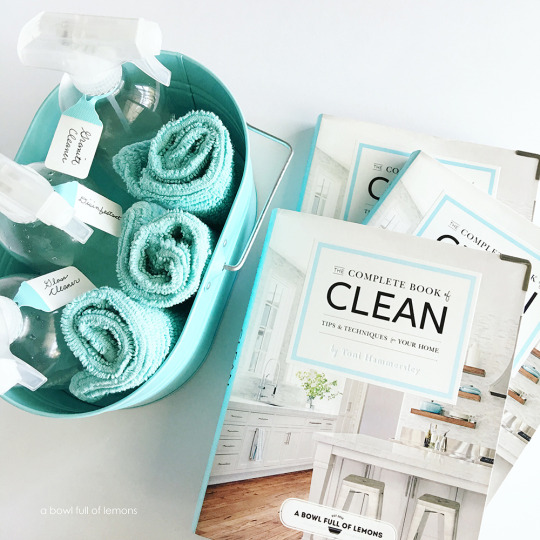
For the perfect companion guide to our challenge, purchase The Complete Book to Home Organization. It includes all 14 weekly challenges and will be your guide over the next 14 weeks, as you tackle your spaces. No need to log onto the computer for ideas, this manual has it all!

For help with cleaning your house during the challenge, be sure to get the complimenting book The Complete Book of Clean. It has tons of cleaning recipes, tips, and checklists that will teach you how to get your homes sparkling clean.


Welcome to day 1 of the 2019 challenge. We will be spending the next 7 days in the kitchen. If you are new, look over the challenge details then begin working at your own pace. For encouragement, join our Home Organization Facebook community to share your progress, or struggles, or questions. Or simply look through the photos and read how others are doing.
Week #1 Checklist
Clean out and organize all cabinets.
Clean out and organize all drawers.
Purge everything that is not used, expired, doesnt belong, collecting dust.
Clean out & organize the refrigerator & freezer.
Mop, wipe down cabinet doors, clean counter tops & tables.
Take everything off the refrigerator door. It makes the kitchen look messy.
Clean all appliances.
The Process
Clear off the kitchen table. This is your dumping grounds.
Empty out all cabinets & drawers! Place ALL items into “categories” on the table.
Wipe down the cabinet doors, shelves and drawers. Add new liners if necessary.
Discard (trash) old, expired, and no longer used items & food. Check the dates.
Place all items that are able to fit, into baskets.
Place everything back into the cabinets & drawers (in categories).
Take everything off the kitchen counters and place onto the table.
Wipe down the counters & backsplash with a good natural cleaner.
Wipe down ALL small appliances & large ones too!
Put back items you use on a daily basis, onto the counter top.
Mop the floors and wipe down the table & chairs.
Empty fridge/freezer. Wipe out. Put back in an organized manner.
Clean and organize under the kitchen sink.
Tip: Keep all clutter off the counters at all times. If you take it out, put it away!

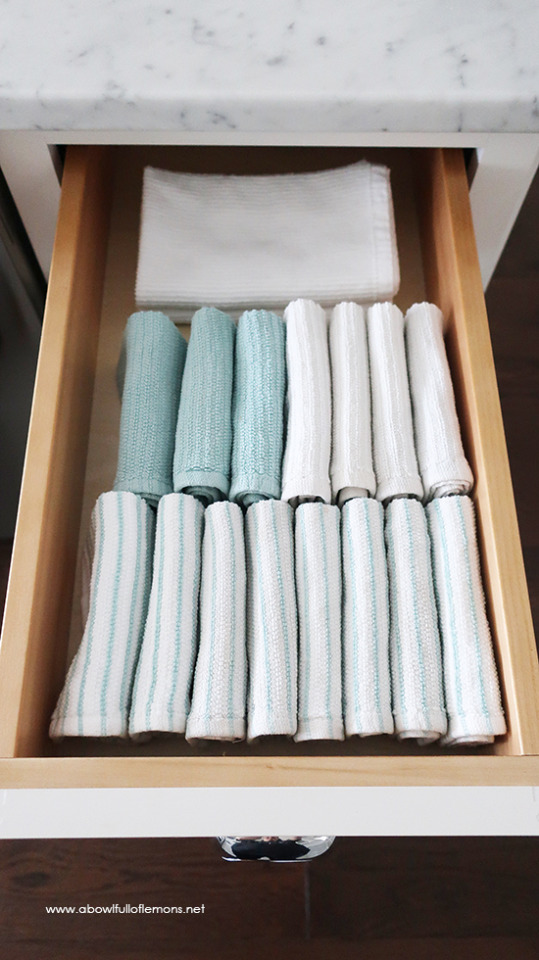
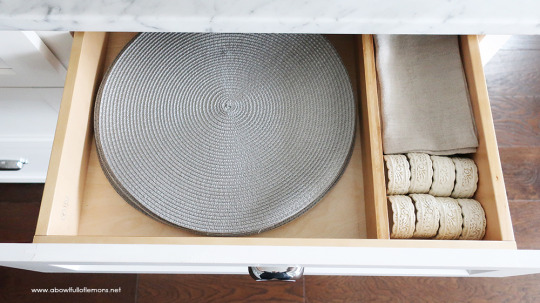
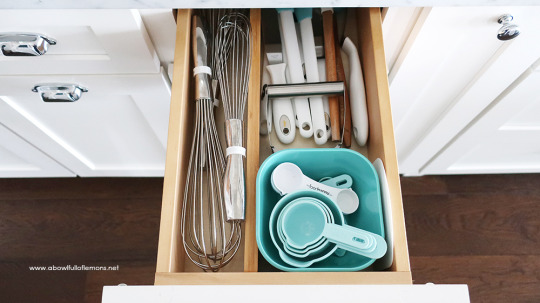
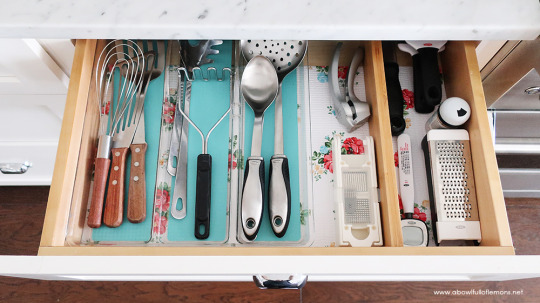
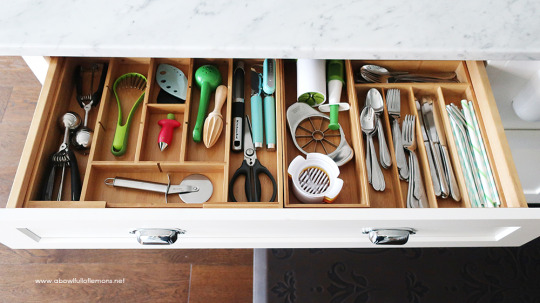
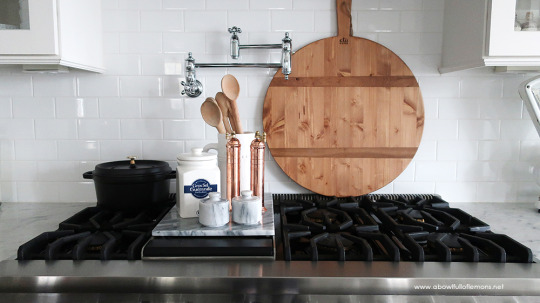
We have been in our new home for 5 months now and I am still in love with our kitchen. I designed it with many drawers. Drawers are easy to organize and I wanted easy. Like my old kitchen, I've set up the new space into zones so it will function well for our needs. Keep reading to see how I organized the zones throughout my kitchen. Hopefully this will give you the motivation you need to begin the challenge.
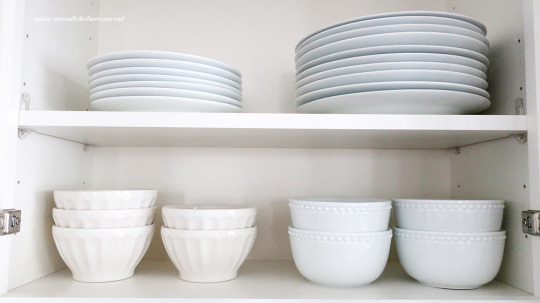
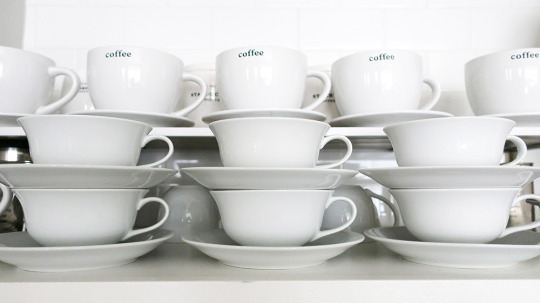
DISHES. I love dishes and I want to be able to show them off, so we had glass doors installed in our new kitchen. When organizing your dishes, keep similar items together.
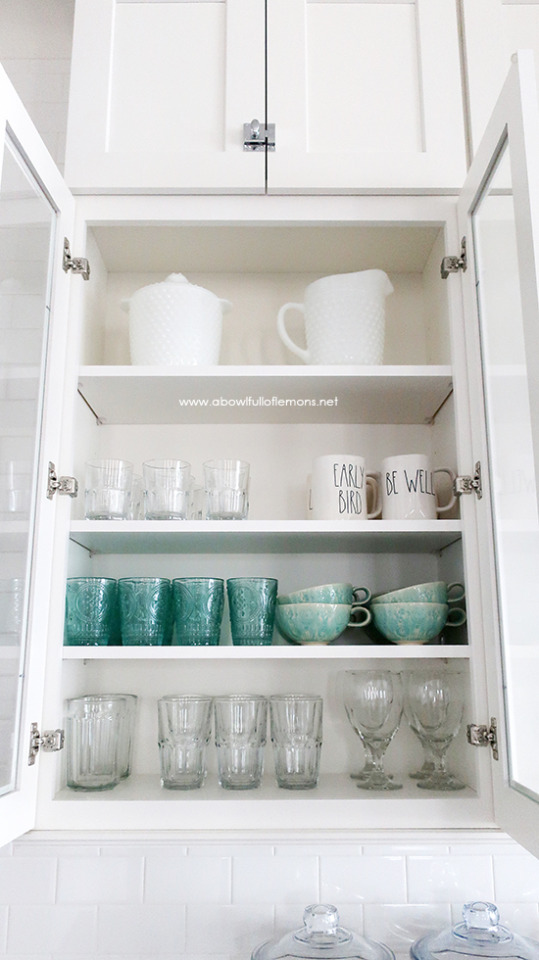
Organize cups, glasses, and mugs together. Place plates and bowls together, etc. Similar items grouped together (and in line) are more visually appealing. And white dishes look less cluttered and streamlined when displayed.
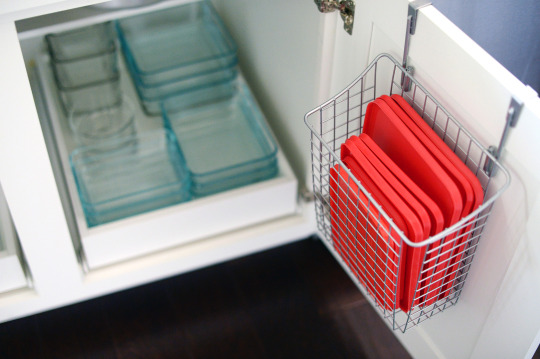
FOOD STORAGE CONTAINERS. Toss your old mismatched plastic bowls and lids and invest in quality (and healthier) glass food containers. Once you do, organize the lids separately into 'over the door' baskets. They will make your life so much easier, I promise. You can find the organizers here.
SPICES. I have a lot of spices. I cook at home 5-6 nights out of the week and I use them often. Keeping this spot organized is the key to my sanity. I keep my spices in a drawer near the range for easy reach. It's simple and functional. I could go even further and alphabetize but I'm good with this for now.

If you don't have drawer space, lazy susans are the way to go. You can find these here.

SKILLETS AND PANS. Store these feisty things in a wire kitchen organizer. You will thank me for this tip. Trust me, it has changed my life. Purchase one similar to mine here.

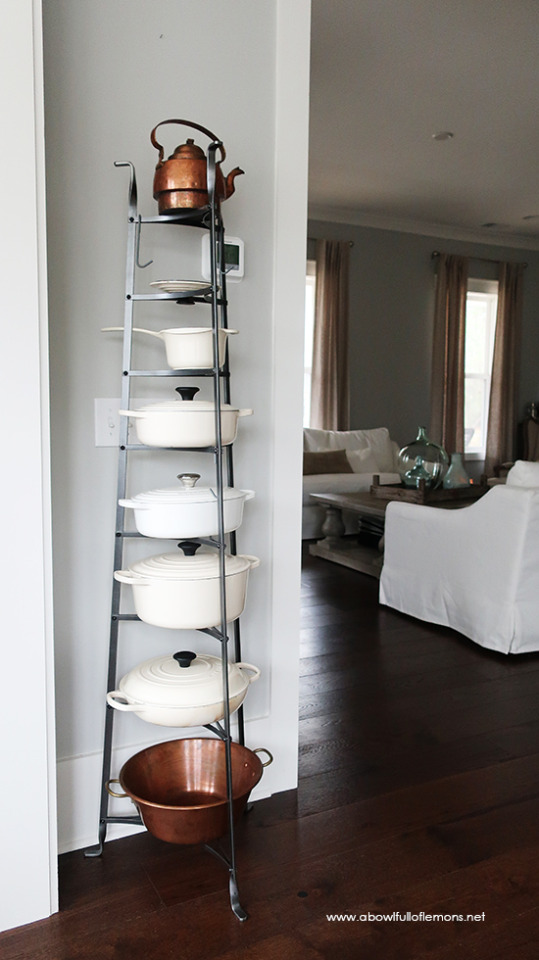
If you have heavier pots like Le Creuset or Staub cast iron, this tower may be a better option for you. It's easy to grab what I need, when it's time to cook. You can find this one here.
UTENSILS: I keep all of our eating and cooking utensils in drawers. If needed, I separate the drawers with bamboo dividers. You can find them here. I also love these bamboo utensil trays.


KITCHEN LINENS & CLOTHS: I use the Konmari method of folding my wash cloths. It's visually appealing and they just fit better this way!
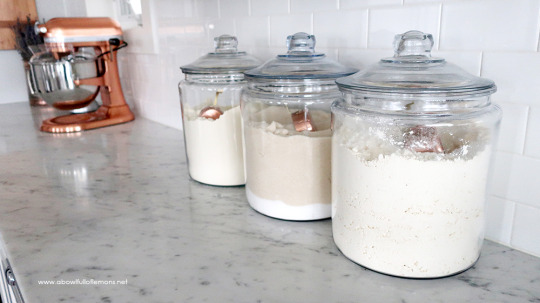
COUNTER TOP STORAGE: If you cook or bake a lot like me, you may want to keep your mixer and flour/sugar displayed in glass containers on the kitchen counter. There's no need to go digging for these, if you use them often. You can find these 2 gallon jars here.
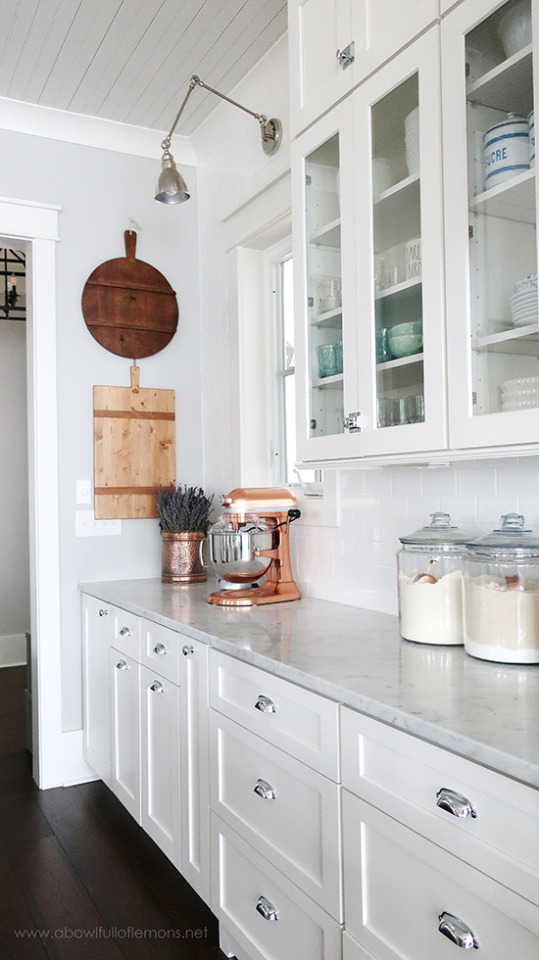
I also keep my French salt collection, pepper mill, and wooden spoons on the stove top. I use these items daily. You can find more of my most loved kitchen items here.

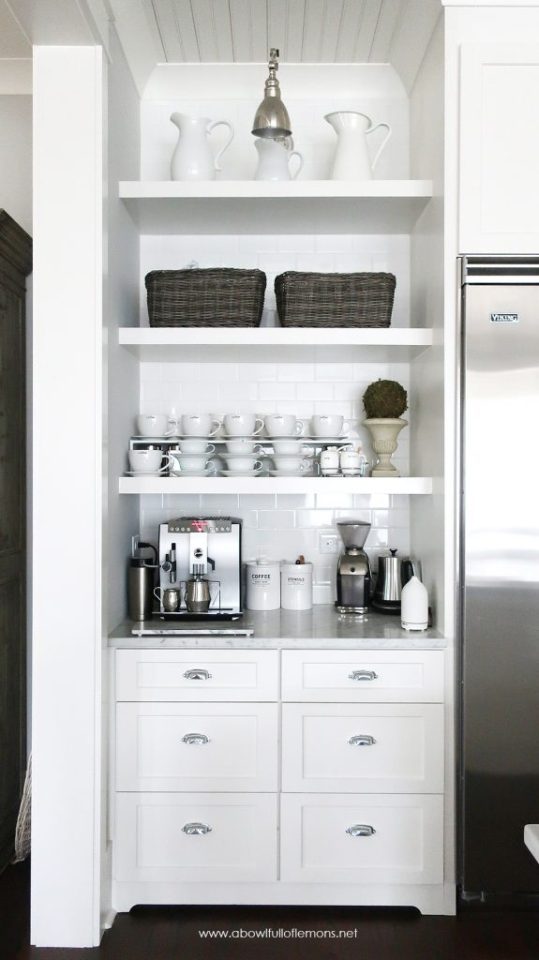
BEVERAGE/COFFEE STATION: To the left of the refrigerator is my favorite area of the kitchen. I keep all coffee and tea related items in this spot. If you don't have cabinetry to fit these items, you can use a hutch or buffet table. Use your imagination.


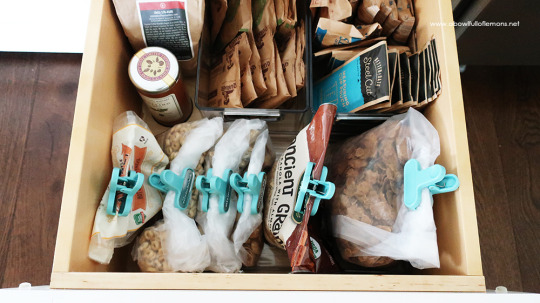
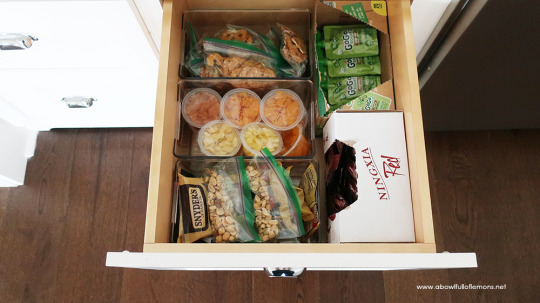
FOOD STORAGE: I will share our “pantry” with you next week, but here's how we store breakfast and snack items in our kitchen drawers. I always take cereal out of the boxes and use chip clips to close them. It saves so much space. I got the clips at TJ Maxx, but you can also find them here.
I use organizer bins to store just about everything in my house. This size works great in drawers. Find this exact bin here.


I hope you've enjoyed a tour of our new (organized) kitchen. Be sure to tag me on social media, if you're participating in the challenge. I would love to see your progress. Use the hashtag #abfolchallenge and @abowlfulloflemons. If you love my kitchen and want too shop my favorite products, visit my shop here.

If you need more inspiration, here are some in depth organizing posts from my kitchen.
Kitchen Organization
2018 Kitchen Organization
Organized Menu Planning
Under the Kitchen Sink
Green Makeover Under the Kitchen Sink
Spice Organization
Updated Spice Organization
Fridge Organization
Freezer Organizatio
Pantry Organization
Kitchen Utensils
Baking Cabinet Organization
Tupperware
Coffee Station Organization
Take the next seven days to tackle your kitchen. Follow the step by step process I've laid out for you. Make sure to set up organized zones for better functionality. (You can find the zones I use in my book). Try not to get side-tracked and don't move ahead until you are completely finished with the space.
Share your progress on Instagram using the hash tag #abfolchallenge, blog about the weekly challenges, and share your before and after pictures over at my Home Organization FB group here. Hold yourself accountable and finish all 14 challenges! I can't wait to see what you accomplish. Good luck. I'll see you back next week for the week 2 challenge. Happy Organizing!
~Toni

Disclaimer: You may find Amazon affiliate links within this post. Thank you for your support to A Bowl Full of Lemons.
0 notes
Text
How a Small Kitchen Can Work Best
When it comes to kitchen designs, smaller rooms are often ignored.
We don't always see how a small kitchen can work best the compared to large rooms that have enough space to include many different elements such as a kitchen island, large separate seating area and many other things too.
Bigger isn't always better!
While many people would prefer to have a bigger kitchen because it provides more options not just from a design point of view but from a practical aspect as well, a smaller room means you can be more selective with the features you have.
Just because your kitchen isn't that big doesn't mean you can't enjoy a practical, aesthetically pleasing and functional kitchen. In fact, having a small kitchen can have benefits such as ensuring that you don't have unnecessary clutter and you can be smarter with your design choices.
We've looked at ways in which you can design a small kitchen in the past and for our first post in 2019 here at the Kitchen Warehouse we are going to look at how a small kitchen can work best with some space saving tips and style ideas.
Space savings tips for a small kitchen
If you don't have loads of room then making the best use of space is vital. You can't afford to have too much clutter in your small kitchen because it will look even smaller.
In fact, many of the space saving ideas you can implement don't even come with a big price tag either.
#1 Remove upper cupboards and put in shelving
This is a technique that is more of a mind trick than anything else but it can be used to great effect in your small kitchen.
By removing your upper cupboards and instead using open shelving can give the illusion that the room is actually bigger. This kind of goes against the 'reducing clutter' advice because cupboards are a great way to get things out of sight in the kitchen. Simply put it into the cupboard and shut the door however in especially small rooms shelving can open the space up.
This is a great way to make galley kitchens appear bigger than they actually are and in any room design that feels a bit claustrophobic, removing the upper cupboards can really open it up and give the illusion of more space and remove to move.
#2 Add seating to spare counter space
Do you have a bit of spare space at the end of the counter with nothing on it? Why not add a couple of seats and provide an extra seating area?
Small kitchens generally suffer from a lack of places to sit. Even if you have a separate dining room or seating area, sometimes you just want somewhere to sit and have a casual coffee. A couple of kitchen stools at the end or the side of your kitchen worktop in a space that isn't really being used for anything else can add another dimension to your small kitchen.
If you have a small island in your kitchen then it can be worth adding seating there as well and doubling it up as a casual dining area with a place to prepare food and clean up too.
#3 Brighten it up
We'll have a quick look at some colour scheme that suit small kitchens below however to make the room seem bigger then using natural light and bright colours can have a big impact.
Even when it comes to things like your kitchen blinds you should aim to lighter colours instead of dark. Replacing your existing kitchen doors with lighter or even glossy colours have also brighten the room up and make it seem larger. We have an extensive range of light cupboards doors here at the Kitchen Warehouse that you can use to great effect.
The brighter your small kitchen is particular with natural light then the bigger it is going to seem.
#4 Install drawers instead of cupboards
Ok, so you will need a few cupboards in your kitchens but try and focus on drawers instead.
Why? Well, drawers provides easier access to a range of different items that would otherwise be stuck at the back of your kitchen cupboard. We all know the task of rummage through our cupboards to get that one item we haven't used in months but with drawers you get easier access. This means you can potentially store more things in the kitchen but it will reduce a lot of the clutter you have in your cupboards as well.
Drawers themselves can offer a cleaner and more organised look in the kitchen than cupboards even if the contents themselves are a bit of a mess.
#5 Get smaller appliances
Do you really need a massive kettle and toaster that toasts 8 pieces of bread at once when there are only 2 of you living there? What about a large oven that is better suited to a family of 6?
Investing in compact appliances can help save a lot of room and is one of the best ways as to how a small kitchen can work best. This really depends on how many people live there and are using the kitchen however if you can get away with it then small worktop appliances and white goods can go a long way to increasing the space you have available.
You don't need to have smaller everything but even just a few different compact appliances will open up more room for you.
Colour schemes for small kitchens
If you really want to know how small kitchens can work best then getting the colour scheme right is important.
Using neutral and bright colours can work wonders for a small kitchen. In fact, there are various methods you can use with paint which will improve how big your kitchen looks and feels. Eve things such as creating an accent wall can go a long way to achieving this as well.
Remember to avoid dull and darker colours in small spaces as even if you have a lot of natural light it will still feel cramped a very claustrophobic.
How a small kitchen can work best
Just because your kitchen isn't blessed with a massive amount of space doesn't mean that you can't make the most of it and have a beautiful designed room.
Smaller is often better particularly if there aren't that many people using the kitchen. I'm sure most of us would love a huge kitchen with endless possibilities but the reality is a bit different. If you have a small kitchen then these space saving tips and colour design schemes will really help you to not only physically open up the space you have but also give the impression that the room is larger too.
A small kitchen can work best in many instances and it is often the best choice for many people because it means less mess, less clean up and there are less things to think about from a design point of view too.
If you need any help in designing a small kitchen or want some advice how to make the most of the room you have available to you then don't hesitate to get in touch with our expert team.
The post How a Small Kitchen Can Work Best appeared first on Kitchen Blog | Kitchen Design, Style Tips & Ideas | Kitchen Warehouse UK.
0 notes
Text
How to Choose the Best Metal Hardware for Your Kitchen
Image:

Metal doesn't have to be heavy. In fact, when incorporated into the little details-- like kitchen cabinet hardware-- it can create the perfect finishing touch.
When selecting the best metal hardware for your kitchen, there are two main elements to focus on: contrast and shape.

Photo Credit: houzz.com
First, explore how various hardware finishes contrast with your cabinet colors.
If you're thinking of changing both your cabinets and the hardware, play with a wide variety of metal and color options. If you want to keep your cabinets as they are, be sure to note not just the metal looks that you like, but also how various metals look against your existing cabinet color.
To create contrast and make your hardware stand out, turn to the color wheel-- the closer your hardware color is to your cabinet color, the more your hardware will blend in; the further away the tones are on the color wheel, the more contrast, and the more your hardware will stand out.
For example, there is little contrast when you pair warm wood cabinets with brass hardware or light gray cabinets with chrome hardware.
Photo Credit: Fotsos.com
Pair warm brass hardware with a deep navy or dark gray cabinet, or black hardware with white or wood cabinetry, and you get a high-contrast, high-impact look.

Photo Credit: Autotraders.club
Photo Credit: ElleDecor.com
Next, play with hardware shape and how that impacts the style of your kitchen.
Do you want a modern or traditional feel in your kitchen-- or somewhere in between? The shape of your hardware can make a big impact.
Modern kitchen cabinet hardware is typically smooth, with a brushed finish (instead of chrome or matte). For a modern look, go with pulls over knobs.
Photo Credit: JillianHarris.com

Photo Credit: SincerelySaraD.com
Traditional hardware is often shinier than other styles, and more detailed or curved.

Photo Credit: Bigvine.com
The majority of hardware is a blend of modern and traditional that is known as transitional. A transitional look often includes cup pulls and circular knobs.

Photo Credit: Decoholic.com
Photo Credit: Traditional Victorian Kitchen in New Haven
By changing the shape or finish of your hardware, you can make it lean more toward the overall style you are trying to create.

Photo Credit: Schoolhouse,.com
While a detail like kitchen cabinet hardware might seem minor, these examples show that it's a small element with big impact-- one that can give your entire space a cohesive feel.
Not sure what look is best for your kitchen? Schedule a design consultation with one of our designers.
Category:
Design Trends
0 notes
Text
2 Behavioral Biases That Are Making You Lose Money

One of the most interesting areas of finance is called behavioral finance, which is the study of how our behaviors can influence the outcomes of our portfolios.
According to H. Kent Baker and Victor Ricciardi in The European Financial Review, there are several behavioral biases that can impact your investment portfolio and result in lower returns.
Here are two of those biases:

1. Representativeness
According to Baker and Ricciardi, this bias results when you label an investment “good” or “bad” based on recent performance - rather than looking at the fundamentals.
An investment might be considered “good” if its recent performance has been positive. As a result of this bias, an investor might buy something even if it's overvalued. Representativeness encourages you to buy high. On the other hand, this bias can also cause you to overlook good deals because of a recent poor performance.
As you can see, this bias can lead to you missing out on investments that have solid growth potential, while paying too much for investments that might be at their peak.
Instead of basing investment decisions on recent performance, it's a better idea to look at investment fundamentals to get a better idea of the true value of an investment. Look at “big picture” items such as management, balance sheet, and potential growth. You can also look at figures like P/E ratio to get an idea of whether or not the investment is overvalued or undervalued. If an asset with solid fundamentals is doing poorly in the short-term, it might actually be a good deal.

2. Familiarity
Another bias that Baker and Ricciardi tackle is familiarity, which is the idea that you prefer investments you recognize. You might choose to invest in a company you've heard of over one you don't really know. Familiarity also manifests as a preference for domestic assets over foreign assets.
As a result, familiarity can lead to a lack of diversification in your portfolio. While it's true that you should understand the assets you invest in, it's also true that you need to go beyond a few assets. Familiarity might lead you to invest too heavily in one industry, sector, or geographical location - and you need more diversity than that for a well-balanced portfolio.
The good news is this doesn't need to be all that risky. If you want to diversify, but are wary of foreign investments, consider using index mutual funds and ETFs. It's possible to invest in an all-world ETF that provides you with exposure to foreign assets without as much risk or individual stock picking.
While there's no way to completely eliminate risk from your portfolio, you can invest smarter when you're aware of your behavioral biases. Examine your investing style for these biases, and then make changes to improve your portfolio.
Do you have either of these behavioral biases? How have you controlled them?
This article originally appeared on MoneyNing.com. Let us know what you think (or read what others thought) here.


0 notes
Text
2019 Home Organization Challenge Week 1: The Kitchen


A new year always gives us a fresh new outlook on life. New routines, implementing a healthy lifestyle, and a refresh of our homes are usually at the top of the list. I'm here to show you how to give your home a refresh & a new slate. The best way to accomplish this is by participating in our yearly home organization challenge. This is our 8th year of the challenge and there are thousands of you joining in. Each year, the challenge just gets better and better and so many more of you are now a part of this tradition. If you would like to purchase any of the items featured in this post, check out my favorites shop here.
FIRST TIME PARTICIPANTS: Welcome to our challenge. You are in for a delightful surprise. For those returning, welcome back. Your homes will improve with each year that you participate. I'm so glad you are all taking the steps to a better new year. You won't regret it.
WEEK 1 TASK: We are kicking off the challenge in the kitchen. This is the most used space in the home. Not a day goes by that it doesn't get used, so clearly it will become the most disorganized space at one point or another. If your kitchen organization isn't working anymore or if you don't have zones set up to help you work efficiently, it's time to hit the reset button and start over.
You have 7 days to complete the first challenge. Break it up into several days or take one full day to conquer it. Go with whatever works for you. You can complete the challenge whether you are a stay at home mom or a full time worker. Make the challenge work for you. Before you begin, print out the complete 14 week schedule and checklists below.
Free Challenge Kit

For the perfect companion guide to our challenge, purchase The Complete Book to Home Organization. It includes all 14 weekly challenges and will be your guide over the next 14 weeks, as you tackle your spaces. No need to log onto the computer for ideas, this manual has it all!
For help with cleaning your house during the challenge, be sure to get the complimenting book The Complete Book of Clean. It has tons of cleaning recipes, tips, and checklists that will teach you how to get your homes sparkling clean.

Welcome to day 1 of the 2019 challenge. We will be spending the next 7 days in the kitchen. If you are new, look over the challenge details then begin working at your own pace. For encouragement, join our Home Organization Facebook community to share your progress, or struggles, or questions. Or simply look through the photos and read how others are doing.
Week #1 Checklist
Clean out and organize all cabinets.
Clean out and organize all drawers.
Purge everything that is not used, expired, doesnt belong, collecting dust.
Clean out & organize the refrigerator & freezer.
Mop, wipe down cabinet doors, clean counter tops & tables.
Take everything off the refrigerator door. It makes the kitchen look messy.
Clean all appliances.
The Process
Clear off the kitchen table. This is your dumping grounds.
Empty out all cabinets & drawers! Place ALL items into “categories” on the table.
Wipe down the cabinet doors, shelves and drawers. Add new liners if necessary.
Discard (trash) old, expired, and no longer used items & food. Check the dates.
Place all items that are able to fit, into baskets.
Place everything back into the cabinets & drawers (in categories).
Take everything off the kitchen counters and place onto the table.
Wipe down the counters & backsplash with a good natural cleaner.
Wipe down ALL small appliances & large ones too!
Put back items you use on a daily basis, onto the counter top.
Mop the floors and wipe down the table & chairs.
Empty fridge/freezer. Wipe out. Put back in an organized manner.
Clean and organize under the kitchen sink.
Tip: Keep all clutter off the counters at all times. If you take it out, put it away!

We have been in our new home for 5 months now and I am still in love with our kitchen. I designed it with many drawers. Drawers are easy to organize and I wanted easy. Like my old kitchen, I've set up the new space into zones so it will function well for our needs. Keep reading to see how I organized the zones throughout my kitchen. Hopefully this will give you the motivation you need to begin the challenge.

DISHES. I love dishes and I want to be able to show them off, so we had glass doors installed in our new kitchen. When organizing your dishes, keep similar items together.

Organize cups, glasses, and mugs together. Place plates and bowls together, etc. Similar items grouped together (and in line) are more visually appealing. And white dishes look less cluttered and streamlined when displayed.

FOOD STORAGE CONTAINERS. Toss your old mismatched plastic bowls and lids and invest in quality (and healthier) glass food containers. Once you do, organize the lids separately into 'over the door' baskets. They will make your life so much easier, I promise. You can find the organizers here.

SPICES. I have a lot of spices. I cook at home 5-6 nights out of the week and I use them often. Keeping this spot organized is the key to my sanity. I keep my spices in a drawer near the range for easy reach. It's simple and functional. I could go even further and alphabetize but I'm good with this for now.

If you don't have drawer space, lazy susans are the way to go. You can find these here.

SKILLETS AND PANS. Store these feisty things in a wire kitchen organizer. You will thank me for this tip. Trust me, it has changed my life. Purchase one similar to mine here.

If you have heavier pots like Le Creuset or Staub cast iron, this tower may be a better option for you. It's easy to grab what I need, when it's time to cook. You can find this one here.

UTENSILS: I keep all of our eating and cooking utensils in drawers. If needed, I separate the drawers with bamboo dividers. You can find them here. I also love these bamboo utensil trays.
KITCHEN LINENS & CLOTHS: I use the Konmari method of folding my wash cloths. It's visually appealing and they just fit better this way!


COUNTER TOP STORAGE: If you cook or bake a lot like me, you may want to keep your mixer and flour/sugar displayed in glass containers on the kitchen counter. There's no need to go digging for these, if you use them often. You can find these 2 gallon jars here.


I also keep my French salt collection, pepper mill, and wooden spoons on the stove top. I use these items daily. You can find more of my most loved kitchen items here.
BEVERAGE/COFFEE STATION: To the left of the refrigerator is my favorite area of the kitchen. I keep all coffee and tea related items in this spot. If you don't have cabinetry to fit these items, you can use a hutch or buffet table. Use your imagination.


FOOD STORAGE: I will share our “pantry” with you next week, but here's how we store breakfast and snack items in our kitchen drawers. I always take cereal out of the boxes and use chip clips to close them. It saves so much space. I got the clips at TJ Maxx, but you can also find them here.

I use organizer bins to store just about everything in my house. This size works great in drawers. Find this exact bin here.

I hope you've enjoyed a tour of our new (organized) kitchen. Be sure to tag me on social media, if you're participating in the challenge. I would love to see your progress. Use the hashtag #abfolchallenge and @abowlfulloflemons. If you love my kitchen and want too shop my favorite products, visit my shop here.

If you need more inspiration, here are some in depth organizing posts from my kitchen.
Kitchen Organization
2018 Kitchen Organization
Organized Menu Planning
Under the Kitchen Sink
Green Makeover Under the Kitchen Sink
Spice Organization
Updated Spice Organization
Fridge Organization
Freezer Organizatio
Pantry Organization
Kitchen Utensils
Baking Cabinet Organization
Tupperware
Coffee Station Organization
Take the next seven days to tackle your kitchen. Follow the step by step process I've laid out for you. Make sure to set up organized zones for better functionality. (You can find the zones I use in my book). Try not to get side-tracked and don't move ahead until you are completely finished with the space.
Share your progress on Instagram using the hash tag #abfolchallenge, blog about the weekly challenges, and share your before and after pictures over at my Home Organization FB group here. Hold yourself accountable and finish all 14 challenges! I can't wait to see what you accomplish. Good luck. I'll see you back next week for the week 2 challenge. Happy Organizing!
~Toni
Disclaimer: You may find Amazon affiliate links within this post. Thank you for your support to A Bowl Full of Lemons.
0 notes
Text
4 Things the United Airlines MileagePlus Program Gets Right
Everyone loves a bargain – but maybe not at the expense of comfort. When you're crammed into a middle seat between a sneezer and a snorer, you start to reconsider if the ultra-savings was worth it. United Airlines, while not considered a low-cost carrier, could be a solid option for flyers looking for comfort and...
Joan Kornblith is a writer at NerdWallet. Email: [email protected].
The article 4 Things the United Airlines MileagePlus Program Gets Right originally appeared on NerdWallet.

0 notes
Text
Looking Back on 2018 and What's to Come This Year

It's hard to believe that another year has passed and we're full force heading into another one. I hope you all had the most wonderful Christmas and New Years and are feeling refreshed and ready... Read The Post
The post Looking Back on 2018 and What's to Come This Year appeared first on brepurposed.
0 notes
Text
Beauty Out of Necessity: Landscape Drainage in Landscape Design

The landscape drainage plan shown in this rendering brings excess rainwater to an infiltration trench at the front right side yard where it can seep back into the ground
The first questions I ask when I stand on a new site are: where is the water coming from, where is it going to go, and what's going to happen when it gets there? Howard Cohen, Landscape Architect
Landscape drainage is a critical factor in the success of any landscape design project. And most Northern Virginia properties have pre-existing drainage problems that must be addressed within the scope of a landscape design project.
The first step for your landscape architect is to conduct a thorough site analysis and evaluation taking note of the existing slopes and elevation changes on the property, surface and groundwater (wet and dry areas), and soil composition. We want to be sure that rainwater is not puddling on hard surfaces but is directed to run off and sink into the ground. We want soil around plants and trees to drain efficiently so plants will stay healthy.
The Necessity of a Landscape Drainage Plan
The effectiveness of the drainage system on a property overall and techniques that support well-drained planting beds have a direct bearing on the health and longevity of your garden plants. A sound landscape drainage plan is comprised of two principal parts: one relates to hardscaping and the other to planting beds.

An aggressive re-grading of the slope, terracing, raised planting beds and permeable hard surfaces resolved drainage issues in this front entry area. PHOTO Morgan Howarth
Drainage and Hardscaping
The drainage system is built into the hardscape. The landscape architect may specify permeable surface areas with buried drainage pipes and retention wells that allow water to percolate naturally back into the soil.
We often use slot drains along the perimeters of patios and walkways to take rainwater straight into the ground. We also adjust grading on the property to control the direction and flow speed of surface water. We may direct rainwater toward a natural slope or to an area where we've installed a small culvert or drain box.
Drainage and Plants
In Virginia, we have dense clay soil that stays wet. We try to select plants that can take sustained periods of moisture. We also plant in raised or mounded beds with sand mixed into the soil–which ensures that water drains well away from plants and keeps the roots dry.
A raised bed will usually have low retaining wall bordering it. Mounding doesn't require hardscaping. In both, we use a balanced blend of sand, soil, and compost to build up the mound so it is stable, provides nutrients, and drains properly.
Drainage Solution 1: A Damp Yard Reclaimed

An infiltration trench, concealed by landscaping, allow excess rainwater to seep slowly back into the ground. PHOTO: Morgan Howarth
The owners of this McLean residence rarely used their backyard patio because it always felt damp and uncomfortable. During heavy rainstorms, water would sometimes flood the lower level of the house. A landscaping project not only beautified the backyard but permanently fixed their serious drainage issues.
We dug an infiltration trench in the front right corner of the side yard. All the downspouts from the house tie into it. An infiltration trench sinks about six feet into the ground. It is lined with fabric, filled with layers of sand, clean washed gravel and topped off with about a foot of well-draining topsoil. Excess water filters into the ground.
Although you can't see it, this part of the drainage plan was vitally important the success of this landscape design project. If the property didn't drain properly, plants and people would suffer from too much moisture. Making an outdoor environment beautiful is important, making it comfortable and fully functional is essential.
Drainage Solution 2: A Low Spot Becomes a Highlight


This Herndon residence had drainage problems that made it impossible to plant anything to make the front entry attractive. The ground sloped left along the front of the house toward a lot spot where water collected and pooled against the foundation.
A front entry landscaping project beautified the curb appeal of the home while solving the drainage problem.
We ran drainage pipes under the driveway to draw excess water away from the house, then built up the garden beds above the previous ground level and held them in place with a low retaining wall.
Drainage Solution 3: Beautiful & Practical

This Oakton residence sits on an expansive lot that had a combination of steep slopes and low areas. Extensive regrading and terracing made the backyard highly functional. A highlight of the drainage plan is the biofiltration sinks disguised by lush planting beds. The biofiltration sinks receive water from upper levels on the landscape and let it percolate naturally back into the ground-and at the same time feeding the moisture-loving bedding plants on the surface.
The Design You Don't See

Drainage design is the part of every landscape design you will never see. But everything you see and enjoy above ground is supported by it. If you skip investing in landscape drainage to save a little money, you will end up with issues after the fact. And that could end up costing you more because you may have to remove expensive hardscaping and landscaping to install a solution.
All of the example projects began with a desire on the part of a homeowner to correct a drainage problem that was preventing them from using their yard or was interfering with the ability of landscaping plants to establish and thrive. If you feel that landscape drainage issues are preventing you from fully enjoying your outdoor living areas, contact one of our landscape architects to schedule a consultation.
0 notes
Text
Happy Holidays: See you in 2019!


Image above by @OliviaRichards from @PartyCrushStudio
Oh, what a year it's been! 2018 has flown by and our team is looking forward to our annual break and a chance to regroup, celebrate with family and get ready for the next year. This year we started a new print magazine, launched a new podcast, traveled around the country to celebrate both, and put a new project onto the stove that will hopefully (fingers crossed) be starting early in the new year. We have some very BIG news coming up after the break, too, so I hope you'll join us on Monday, January 7th when we're back from the holidays with our regular weekly content.
Until then, all of us here at Design*Sponge are wishing you a safe and happy holiday, safe travels if you're heading anywhere and best wishes for a happy new year. I know this year has been filled with ups and downs for so many in our community and we just to send all of our love and our gratitude for your continued support, feedback and friendship. Next year Design*Sponge will turn 15 (!!) and this year we really got a chance to sit back and look at how we've all grown up together. We are all feeling awash in gratitude and thanks. So from all of us to you and yours, thank you and have a wonderful holiday! We'll see you in 2019! (January 7th, to be precise). xoxo, Grace

0 notes