
visualproductions
Visual Productions BV
Lighting Control
10 posts
Don't wanna be here? Send us removal request.
Last Seen Blogs

jhonchance
Untitled

bluebaggas
Up the Baggas!

chillllwinstone
Untitled

arewetoday
WAT

lyric-loves
Lyric loves ... ...
Text
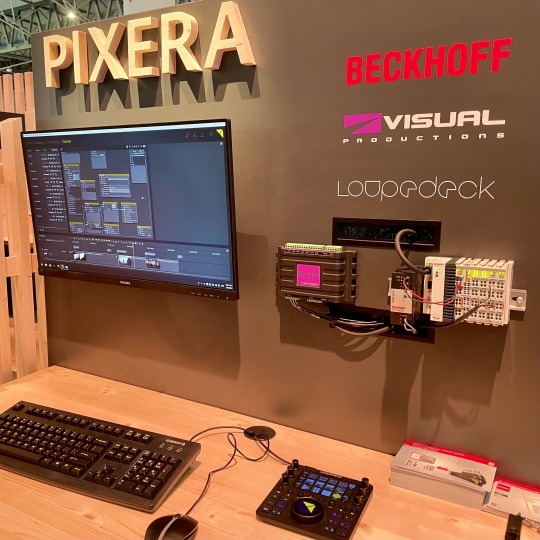
Pixera Media Server solutions & Visual Productions
The Pixera Media Server system is a compact yet extremely powerful media server range with many flexible options, including Visual Productions integration!
With Pixera, usability is key. The real-time media processing, compositing and management solution exists of high performance server hardware and innovative software applications. Pixera playout solutions are being used in museums, interactive installations, immersive experiences, theme parks, houses of worship and in many other markets across the globe.

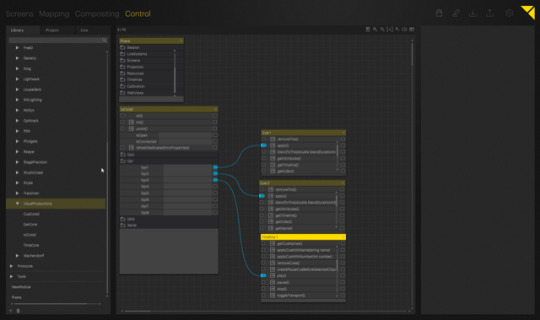
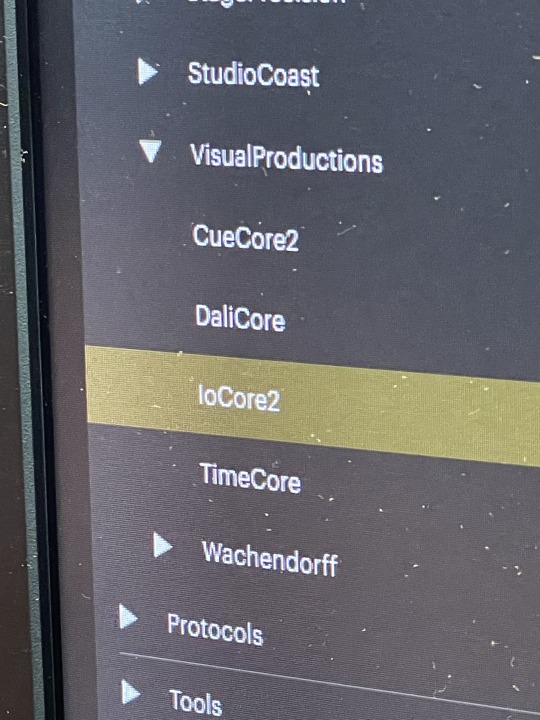
A dedicated module within the PIXERA control interface allows for easy access to the compact IoCore2 unit‘s inputs and outputs. The IoCore2 is a network-based solid-state interface for GPIO signals. It features eight GPI ports that can be configured as digital contact-closures or analog 0-10V level inputs. The IoCore2 also has eight GPO ports that are fitted with potential free relay switches. Furthermore, it has a RS-232 port, a bi-directional DMX-512 port and supports many Ethernet based protocols.
When including an IoCore2 in your system, you instantly add interactivity to your immersive environment. Think of changing video content when crossing a photo electric beam, pushing a button changes screen or information, and much more.
When using CueCore2 with Pixera, you can even add automated lighting control, whether it be simple white lights or advanced RGBW lights which will enhance the atmosphere with subtle colour changes.
A DALI controlled lighting system? Include control of groups or intensity with DaliCore, integrated in Pixera Control IO.
Synchronising video content with audio? Converting timecode? Pixera can control and sync up audio- and video content across multiple screens when integrated with Visual Productions' TimeCore: compatible with all major timecode formats and all major frame rates.
0 notes
Text
Visual Productions adds MA3 compatibility to CueCore and B-Station2
And to QuadCore, TimeCore, IoCore2 and DaliCore of course! So Visual Productions recently decided to add MA3 Templates to its lighting controllers targeted at architectural and system integration markets. Where more and more integrated solutions are being requested, with the MA Lighting-Visual Productions combo it is now possible to integrate control of stage lighting, venue- or building lighting, emergency lighting and even include a BMS (building management system).
More specific, we have programmed templates and macros to interface and automate in both directions: from grandMA3 consoles to various Visual Productions controllers (using MA3 Macros and Executors) and from Visual Productions controllers to grandMA3 consoles (using Templates). The OSC network protocol is used for this, as it is supported by both manufacturers.
We will make the MA3 Macros available through the Downloads section of the Visual Productions website. Templates for controlling a grandMA3 with Visual Productions' controllers will be included in upcoming firmware versions and can be selected from the Templates list which can be found on the Show Control page of each controller. Just like any other Template, selecting an MA3 Template in a Visual Productions controller will automatically create the Actions List with associated Actions, Triggers and Tasks.
For grandMA3, in general any button or cue can be assigned a macro which can be part of a preprogrammed show. The OSC command set will then trigger the associated task in a Visual Productions controller.
Below is an overview of all MA3 macros we prepared:
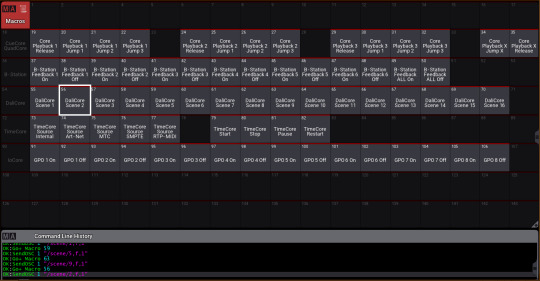
We have developed templates and macros for grandMA3 working with CueCore3, CueCore2, QuadCore, IoCore2, B-Station2, DaliCore and TimeCore. The first Visual Productions product to include an MA3 Template is CueCore3, available with a new vManager release. Templates for other products will follow soon. See below for more detailed descriptions and applications with other Visual Productions controllers.
Remember to make sure you set the correct OSC Remote network configuration on the MA3 to match the Visual Productions settings. See the MA3 manual here.

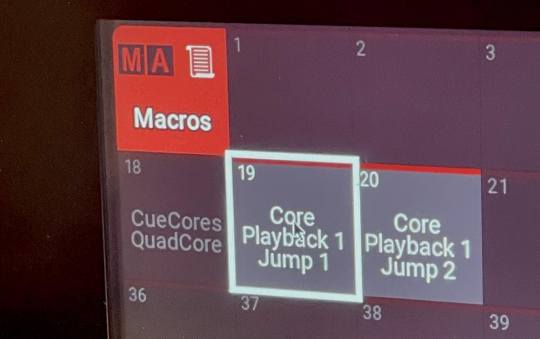
grandMA3 controlling CueCore3, CueCore2 and QuadCore
Template name: MA3->Playbacks
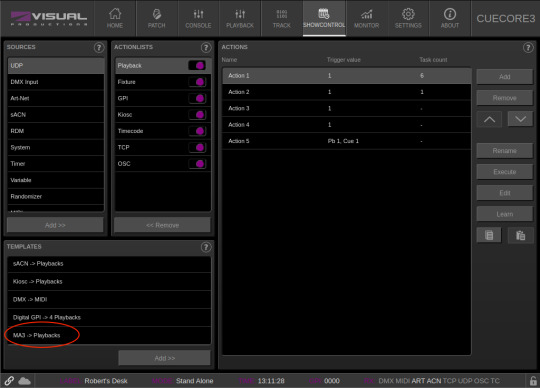
Description: MA3 can jump to Cues in Playbacks and can release Playbacks
In MA3 import the Visual Productions macros. They appear in your Macro Pool. Simply push a button named "Core Playback 1 Jump 1” or "Core Playback 1 Release”.
A typical application would be: trigger house lights presets as part of the show lighting without patching and integrating any of the fixtures in the MA3 show.
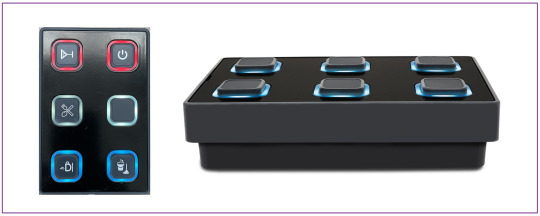
B-Station2 controlling grandMA3
Template name: Buttons->MA3
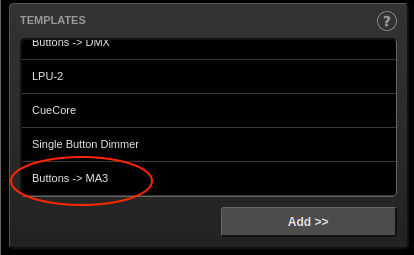
Description: use any of the 6 B-Station2 buttons to control an MA3 Executor’s Go command. Short press starts the Executor, long press releases the Executor. In B-Station2’s Show Control, you can adapt the Executor to be controlled, or replace the Executor by any valid MA3 command. This is done in the Task menu.
Application: the B-Station2 can be used as a simplified and accessible remote control for a complex MA3 system.
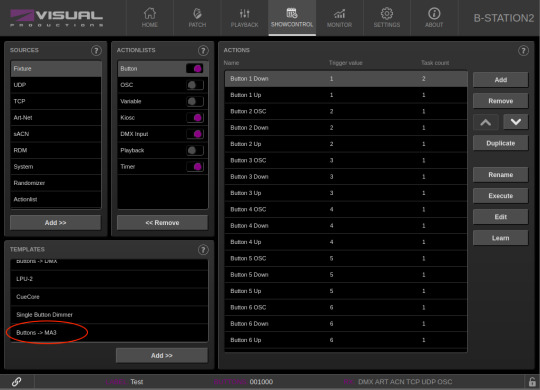
Feedback is provided by MA3: it switches the LED ring in B-Station2 on and off provided you have added our MA3 feedback macros to the Cues and Off-Cues in the Executors controlled.
grandMA3 controlling TimeCore
Template name: MA3->Timecode
Description: MA3 can select which timecode source is to be used: internal, SMPTE, MTC, RTP-MIDI or Art-net. It can also control TimeCore's transport functions Start, Stop, Pause, Restart and Reset.

grandMA3 controlling DaliCore
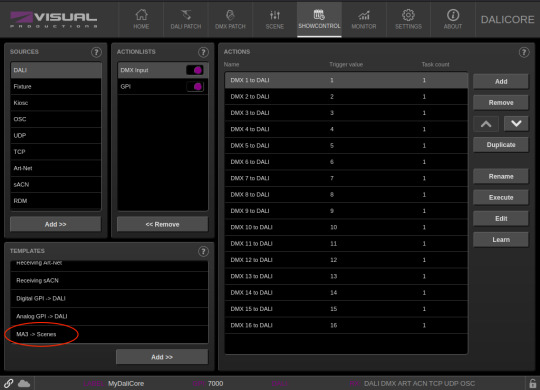
Template name: MA3->Scenes

Description: MA3 can control DaliCore Scenes, containing both DMX fixtures and DALI devices.
Application: control DALI lights in bar, lounge etc. and select Scenes to adjust brightness and colour, matching mood or event.
grandMA3 controlling IoCore2
Template name: MA3->GPO
Description: control the GPOs (General Purpose Outputs) of an IoCore2 by MA3 macros.
Application: trigger any device with GPIs (General Purpose Inputs), for example broadcast from MA3.

IoCore2 controlling grandMA3
Template name: GPI->MA3
Description: use the General Purpose Inputs of an IoCore2 to control MA3 Executors.
Application: add interactivity to rides, museums and other interactive installations.
This concludes the overview of Visual Productions-MA Lighting integration options.
Eternal thanks to Jeroen@Light Image BV!
1 note
·
View note
Text
Locking B-Station2 buttons
When using Visual Productions’ B-Station2 in public spaces, a good option is to be able to lock and unlock buttons in order to prevent from unauthorised operation. With below description and an example show file we have created ‘panel lock’ or '(de)activate buttons’ functionality in B-Station 2.
The Binary Trigger Type
Essential is understanding the Binary Trigger Type. This trigger is generated when more than one button is pressed simultaneously. In Binary mode, each button represents a value: button 1 has value 1, button 2 has value 2, button 3 has value 4, button 4 has value 8, etc. When pressing buttons 1+2+3 at the same time, a Trigger Value of 1+2+4=7 is generated.
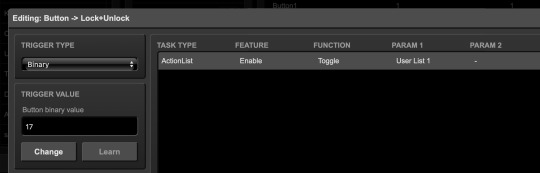
If the Binary Trigger Value is set to 7 and these buttons are pressed, the corresponding task will be performed. Another example: pressing buttons 5+6 as the secret combination generates a binary trigger of 16+32=48. Set the Trigger to Binary, add Trigger Value 48 and program your preferred task. Any combination and any number of buttons may be pressed and used as a 'secret combination'.
Enabling/disabling Action Lists
Now in Show Control we can enable or disable Actions Lists, such as the Button Action List. Disabling the Button Action List with a secret combination is not a good idea however. You will disable (lock) the buttons, yet unlocking is impossible because the Button Action List is disabled and the buttons will not respond…
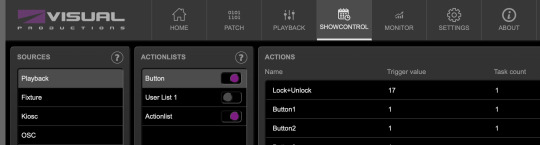
So here the ‘regular’ button actions and tasks are programmed in User List 1, not in the Button Action List. In the Button Action List, the Lock+Unlock Action ('secret combination') switches User List 1 on/off, and relays button presses to their equivalents in User List 1. The Action List acts as a trigger, switching the LED rings on/off, as an indicator showing buttons are active or inactive. In the Button Action List the ’secret’ binary trigger is processed and the regular button 1-6 presses are linked to the actual tasks in UserList 1.
Various Tasks
In this example we use the secret combination to lock and unlock the buttons. Of course the Binary Trigger Type may be used for any other Task, such as switching off mood lighting and switching on utility lights for cleaning, etc. Binary Trigger may also be used with CueCore2, IoCore2 and the new DaliCore: closing a number of GPI contacts at the same time will generate the binary trigger.
We have an example show file available for you. Just send us your contact details through our web form here and request the B-Station button lock demo show file. Hope you enjoyed this post!
0 notes
Text
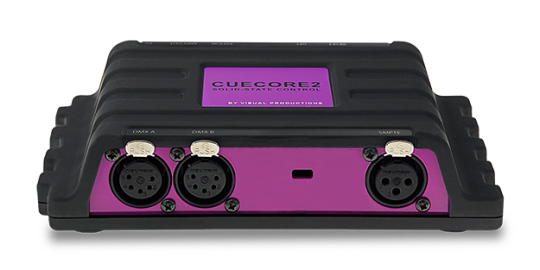
Integrating Visual Productions' CueCore2 in Q-SYS
This article describes how to add automated lighting to a Q-SYS AV system triggering the Visual Productions CueCore2 solid state lighting controller.
Manufacturer QSC launched Q-SYS some years ago. The Q-SYS Audio, Video & Control Platform integrates audio, video and control into small to larger, easy to operate systems.
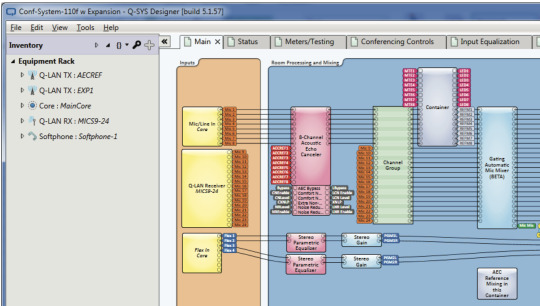
As the requirements for even more versatility have been growing, Q-SYS can also integrate and control 3rd party devices: integrated lighting control is now possible with Visual Productions' lighting control solutions like CueCore2. CueCore2 is a 2 universe solid state lighting controller that can be controlled over the network by UDP, TCP, HTTP and OSC messages.
Once a CueCore2 has been programmed to perform specific lighting tasks, the Q-SYS platform takes care of triggering CueCore2 when controlling a fully integrated system, such as a meeting room, theatre or cinema.
Let's discuss a typical example. Imagine we have a fully equipped meeting room with a nicely designed touch screen as the user interface to a host of audiovisual equipment. Now let's start a presentation! Pushing only one button will close the blinds, lower the projection screen, switch on a projector and amplifier, select the right inputs and fade most lights to 50% and the lights in front of the screen to 10%.
When focusing on our part of the job, the lighting, assume we have programmed the CueCore2 earlier using its web interface: we created cues, added these to a playback, set fade times and programmed triggers.
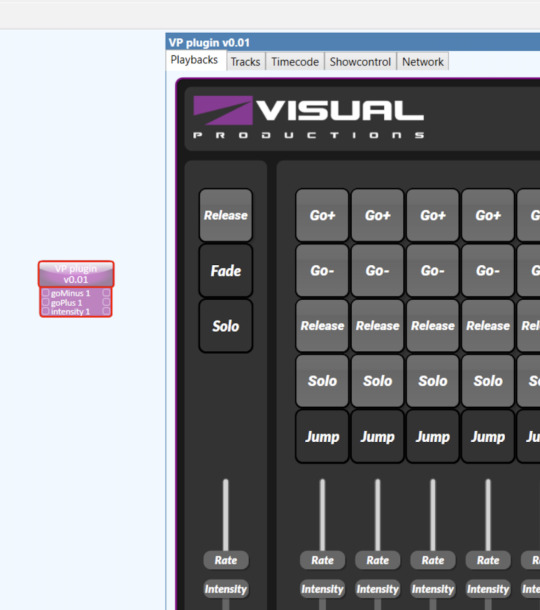
Now Visual Productions have created a plugin to be certified with the Q-SYS Platform. The plugin will be included in Q-SYS Designer, and can be found in the Schematic Elements > Plugins section of the Q-SYS Designer interface.
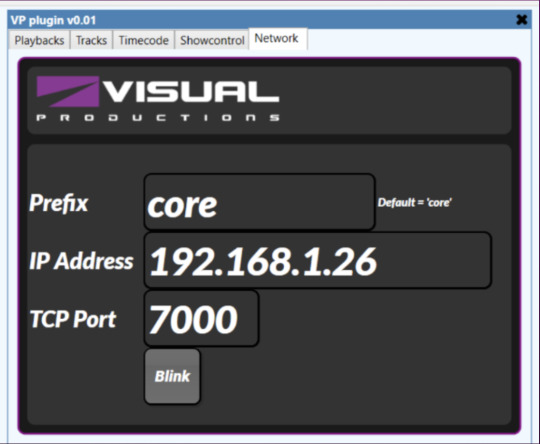
This plug-in allows you to tailor the CueCore2's behaviour to your system. Once configured, it 'translates' the messages sent by the touch screen user interface, through the Q-SYS Platform or Q-SYS Core processor, to the CueCore2 lighting controller. If a message is received, CueCore2 will act accordingly by starting a playback, jumping to a cue, changing a playback's intensity, etc.
More integration options
Visual Productions’ lighting controllers may be integrated with other control systems as well: CueCores2 and LPU-2s are working closely with Atlona Velocity, Xilica, Crestron, AMX and other brands, either using a special driver or plugin, or by using CueCore2′s or LPU-2s extensive API, specified in the user manuals. For more information please contact Visual Productions here.
1 note
·
View note
Text
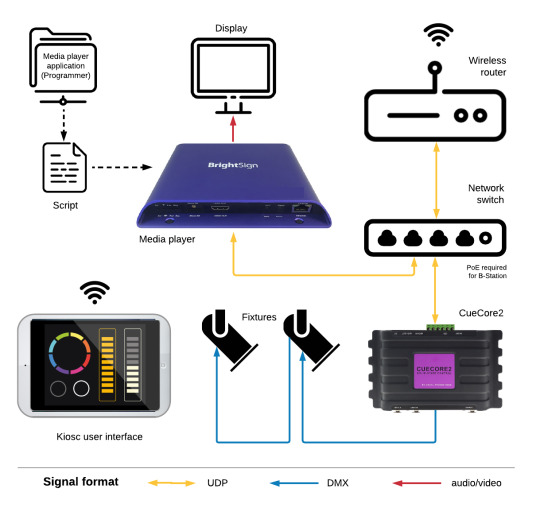
Visual Productions applications: Interactive Museum Exhibit
This article explains how to configure, build and program an interactive museum exhibit combining a Visual Productions DMX lighting controller and touch screen, and a BrightSign media player. This application has been shown on various trade shows.
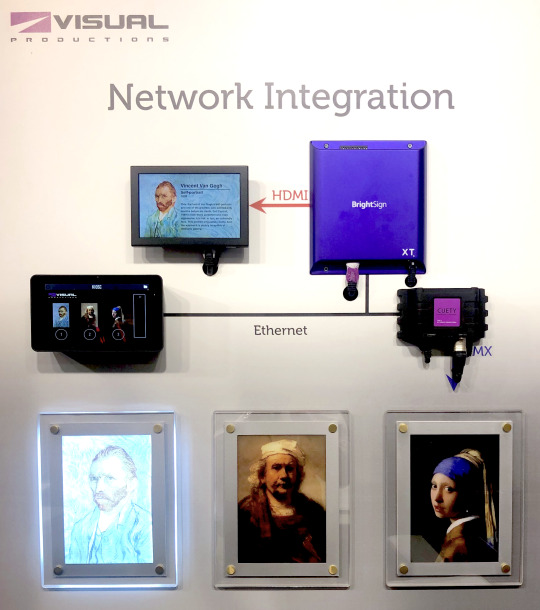
The application
This application is a typical museum application where three paintings of famous Dutch masters are on display. Additional information is shown on a video display. If no visitor is present, each painting is being lit sequentially. If a museum visitor selects a painting by pressing its image on a touch screen, the focus shifts to this painting and the video display shows additional information about that painting.
The components
This small interactive system includes (apart from three beautiful paintings) the following components:
Three DMX controlled LED lights, highlighting the paintings;
A Visual Productions LPU-2 entry level architectural lighting controller;
A Visual Productions Kiosc Touch wall mount touch screen;
A BrightSign media player;
A generic video display, HDMI connected to the BrightSign player
Component description
The LPU-2 is an entry level architectural lighting controller. With its companion app Cuety, lighting scenes ('cues') or a list of scenes (called 'playback') can be programmed. Cuety can control both static and dynamic lighting, a library of over 4,500 different lighting fixtures is included. Once all lights have been programmed with Cuety, the LPU-2 can be controlled with 3rd party equipment using the Application Programming Interface. This API includes commands that may be sent over the network and can for example start a playback, jump to a cue and change intensity. LPU-2 is compatible with OSC, UDP, TCP and HTTP protocol.
Kiosc Touch is a wall mount touch screen interface. With the free Kiosc Editor app any user interface containing elements like buttons, faders, labels, simple or complex, can be designed. Imported images may be used as background, logo or even as a button (as we do here). Kiosc Touch is UDP and OSC compatible and was designed to have no editing capability, thus being a fool-proof interface that can be presented to non-technical persons.
BrightSign is the market leader in solid state multi media players, and used often in museums. Being UDP compatible and accepting a multitude of image and video formats, it is a versatile and robust media player. Visual Productions is a BrightSign Technology Partner.
How the system works
First, all hardware had to be programmed and configured. These steps show you how:
First, the paintings were attached to the panel and the LED lights and drivers were positioned;
Content that should be running on the BrightSign was designed: regular jpg images show an image of the painting and information about that painting. Three jpgs were created, one for each painting;
Three simple lighting cues were made, each one lighting a painting. For this the Cuety app was used. Cues were stored automatically in the LPU-2;
A Kiosc Touch layout was designed, including images of each painting. These image elements are used as a button. A master fader was added for adjusting the overall lighting level;
In the BrightSign programming software BrightAuthor a show file is created that, after power on, starts playing the jpg images in a carousel. Each image is associated with a unique UDP message which recalls the corresponding cue in the LPU-2.

What happens if a someone presses a button on Kiosc:
If an 'image' button on Kiosc is pressed, it sends a UDP message to the BrightSign player;
This UDP message forces the BrightSign to display the requested information image and to send and UDP message to the LPU-2 to switch to the related cue. This cue switches on the LED lighting behind the painting;
When no button is pressed on Kiosc Touch for 10 seconds, the BrightSign player is programmed to revert to carousel mode, highlighting the paintings in subsequent order again, until another button is pressed on Kiosc Touch.
More information
Visual Productions is the manufacturer of LPU-2, an entry level architectural lighting controller, and Kiosc Touch, a wall mount touch screen interface. A full range of other lighting controllers is available which support DMX, Art-net, sACN, Ki-Net and DALI. For larger systems and system integration projects RDMSplitters are available in two versions. an i/o expansion interface, a 6-button panel and a timecode reader/generator/converter complement the product line. All products can be found at the Visual Productions website.
1 note
·
View note
Text
Visual Productions applications: Venue Override
This article describes the 'Venue Override' application with Visual Productions' CueCore2 (or QuadCore) and B-Station. Maybe you have seen the Venue Override panel that has been shown on various trade shows.
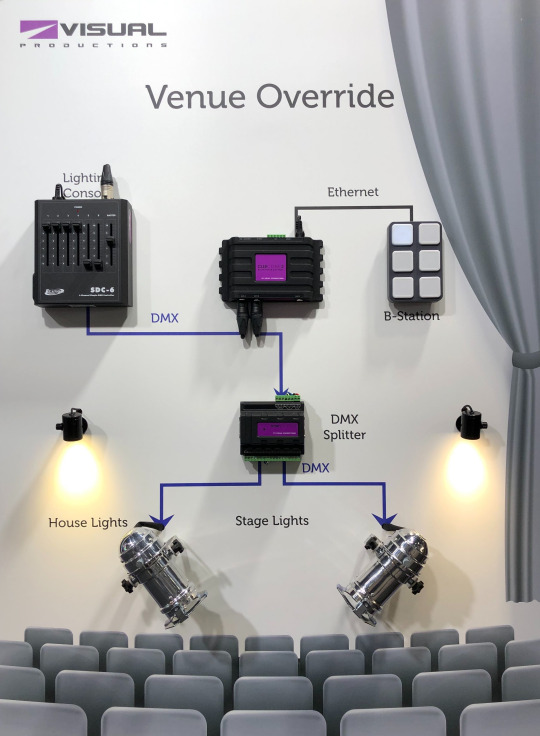
Visual Productions has a neat solution for this. By combining a CueCore2 solid state lighting controller with a B-Station 6-button networked remote control, basic presets can be programmed to control the house- and stage lights of any space in a venue. These presets could include settings for a meeting, a presentation, a classroom layout, a video screening etc. Presets are stored in CueCore2's solid state memory and may be recalled with a push on a B-Station button.
Non-lighting staff
With this system, 'non-lighting staff' like receptionists or AV assistants can operate the lights without any in-depth knowledge of lighting. There is no need for a technician or lighting engineer (or complex traditional lighting console!) during daytime or when meetings or presentations take place. B-Station buttons labeled 'MEETING', VIDEO' or "PRESENTATION' simply do the job.

Now if there is a big event, a live performance or TV show in the venue, a lighting operator will bring in his lighting console to control all rental and stage lights. Yet these kind of events also require control over house lights, for instance in a black-out or to change audience mood lighting. And nowadays, house lights are not only white lights but also RGB or even RGBW/RGBA.
The nice thing about connecting a lighting console to the DMX* input of a CueCore2 is that it is immediately connected to the house lights, and these can be controlled with the console now, together with the rental/stage lights.
Now how does this work?
Upon connecting the console, the CueCore2 will notice DMX is coming in (the 'Receiving' trigger), will switch off the B-Station's LEDs and buttons (disable OSC Action List) and forward the DMX signal through the CueCore2 to its output. This way the lighting operator has control over both house lights and rental/stage lights. Once the live event is over, disconnecting the console's output from the CueCore2 will bring the B-Station back to life again. When properly programmed, it will even recall the last preset that was active before connecting the console!
Typical examples of this application
- An event venue that is being used for a product introduction during the day turns into a TV studio where a TV show is being broadcast or recorded during the evening;
- A small university theatre where during the day videos are being screened, meetings are held and where during the evening artists perform classical music in front of a live audience.
Clever additional features
The application also allows a building management system or fire alarm to access all connected house and stage lights in case of an emergency;
When using multiple B-Stations in this venue override system, feedback may be programmed: if one button is pushed all B-Stations will indicate that button by switching on the LED inside that specific button;
The system can be programmed to switch on utility lights by pressing a 'secret' combination of buttons on B-Station. Secret combination is only known by cleaning staff;
Upon receiving an external DMX signal, the CueCore2 can send a network message to connected nodes in order to rearrange control and zones;
In this application, all functions and features mentioned apply to QuadCore as well.
More information
CueCore2, QuadCore, B-Station and other products can be found on the Visual Productions website. Data sheets of our products can be downloaded from the Downloads section.
* Where DMX input is mentioned, Art-net or sACN protocol signals may be connected instead.
1 note
·
View note
Text
UDP compatibility within Visual Productions lighting and show controller products
Introduction, about UDP
Many protocols are supported by Visual Productions lighting and show controllers and control interfaces. These include SMPTE, MTC and Art-Net for timecode, contact closures and 1-10V signals for GPI, NTP for clock synchronisation, and even RS232 as a legacy computer protocol. And let's not forget DMX, Art-net, sACN and KiNET as the lighting control protocols supported.
Let's have a closer look at the integration and applications of the UDP network protocol. The User Datagram Protocol is a being used in many multi media installations because it is suitable for fast data transfer and because it offers a short response time.
BrightSign, a UDP compatible device
In this topic we focus on compatibility with BrightSign, the bright blue digital signage media player which is UDP compatible: it is capable of sending UDP messages based on the timeline of a video being played, and capable of receiving input signals such as a press on a touch screen, activating a contact closure, etc. It is also capable of receiving UDP messages upon which it can perform certain tasks, such as jumping to a specific video (track) or a specific moment in a video (video time).
When UDP communication is required, BrightSign media players need to be programmed using BrightSign Author authoring software. The software allows you to import content, create layouts, synchronise multiple media players in one installation, publish content to the network, and to set all player and network parameters.
This topic describes a system setup for both using a BrightSign media player as a source, controlling a UDP compatible Visual Productions lighting controller, and as a slave, responding to incoming UDP messages sent by a Visual Productions control interface.
Controlling a CueCore2/QuadCore
This example explains how to synchronise lights with video with in a simple way. It uses any model BrightSign media player and a CueCore2 or QuadCore ('Core') lighting controller.
Play your video on a computer and use a media player which shows you the timecode (actually, it isn't the 'official' timecode but just video time). Determine at which positions (video time) you want to change the lights into different colours: create a table with video time and the corresponding lighting colour;
Now, using Bright Author, create a script for your BrightSign media player that includes a list with video times and a unique UDP message that defines each colour to be recalled by the Core;
In the Core, create Tracks with all static colours, then create a Playback Cue list containing all Tracks. If required, set a fade time to prevent from instant colour changes when playing your video;
In Core Show Control, create a UDP Action list, create an Action and edit this action: set the Trigger Value to (or learn) the UDP message that you defined in your table and add a Task that either Jumps to a cue (Playback/Track) or uses the Go+ command to advance to the next cue in the Playback Cue list.
Controlling a Brightsign media player
This example shows how to start videos stored on a BrightSign media player using Visual Productions Kiosc personalised touch screen interface.
In BrightSign Bright Author, create a script where each video stored on the media player is linked to an incoming UDP message (the start trigger). Define what needs to happen if a UDP message is received, for example 'Stop all videos and start video A'. After that, publish the script to the media player;
To create a custom user interface, use Kiosc Editor. Now when you have created buttons on your custom user interface, you need to define the UDP messages that wil trigger the file within the BrightSign media player. This is done in the Tags UDP field.
Considering you have stored your new Kiosc layout on your tablet, you need to either input or learn the UDP tags to trigger a task in the Core's Show Control. A task could be ‘start a playback’ for example.
When pressing a Kiosc button on your tablet, the corresponding video will start playing.
More applications
Any device that is UDP compatible can control or can be controlled by Visual Productions' lighting and show controllers. Other examples are control systems like Crestron, Extron and AMX which can integrate DMX lighting control in an affordable way, and large screen video projectors where UDP can be used to switch on/off or select inputs. Because of the Core's flexible Show Control functionality, sending UDP messages can be combined with sending other signals and messages simultaneously. Think of switching on a projector, selecting the correct input and at the same time dim the lights closest to the projection screen. Or imagine a Building Management System sending a UDP message that turns on all lights at 100% and at the same time activating a relay that opens all sliding doors in an emergency situation.
Apart from our Cores, the affordable LPU-2 is UDP compatible as well, although in a more limited way: it only accepts incoming UDP messages which are predefined as described in the Application Programming Interface. This API can be found in the Cuety/LPU user manual. Remember programming of your lighting fixtures (the cues and playbacks) still needs to be done using the Cuety app, available for iOS, Android, macOS, Windows and Linux.
2 notes
·
View notes
Text
Test case CueCore2
Dutch distributor FullAVL saw an opportunity to test case their new stock of CueCore2 last week.
A small village near the company head quarters in Tilburg asked them for sponsorship of an event celebrating the 44th anniversary of the Carnival Club. The event was a village quiz with the main focus being a themed environment; the “Haunted House” attraction based in the village church for which they required interactive (Timecode run) sound and lighting.
Patrick Leijten, General Manager of Full AVL, took it upon himself to supply and program the show using CueCore2, B-Station, the new Duo Net player from ECLER and a number of DTS LED fixtures from the Full AVL demo room.
Leijten programmed the CueCore2 using CueluxPro and dumping the content into the CueCore2. The network was set up with a B-Station for triggering:
Button 1 Start up of system as people entered the Haunted House
The audio track was endless to allow people time to enter
Button 2 Show: the lighting triggered on Timecode to sync with smoke and audio track
The Show could be repeated whenever required, with the end track again set to endless
Button 3 Emergency lighting
Button 4 Smoke if additional was required
Button 5 Shut down of system
Leijten (familiar with the CueCore) was quite surprised by the ease to work with real playback with cues in the new CueCore2, which he stated “works really well”.
Two additional points in his programming of the unit stood out for him as very good new features.
When preparing a Timecode show, the main preparation is with the synchronisation of the frames with the audio which can take time. When Leijten arrived at the venue he needed to add additional lights to the show. The strength of the CueCore2 came into play here well: you can dump new content which is automatically synced. The organisation of the cues and timecode is separate to the content of the tracks. A big cost saving in programming time.
For this Timecode based application, Leijten made dynamic recordings which can be handled as a cuelist. When shifting a track forward or back in the position of the timeline to sync with audio, it is only necessary to shift one track for the entire effect to shift.
The transition from CueCore to CueCore2 proved not to be so big and bought with it some very nice tools.
www.fullavl.nl
1 note
·
View note
Text
Visual Productions’ Cuety: Controlling the ImageCue Media Server with Cuety
FACE BvbA Belgium is distributing the ImageCue media server in Belgium. Geert Custers, FACE, asked Visual Productions BV to research if Cuety could be used as a controller for ImageCue. Below is the result of that survey and yes, Cuety is an excellent solution for controlling ImageCue!
About Visual Productions Cuety
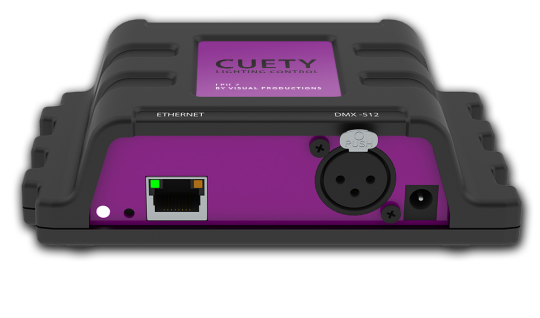
Visual Productions BV is the manufacturer of Cuety, an affordable lighting control solution for iOS. The system consists of:
- the Cuety App, the actual programmer software that runs on an iPad (and macOS/Win/Linux);
- the Cuety Remote App, a remote control app for controlling Cuety using an iPhone or iPad;
- the LPU-1 hardware platform that contains the engine, renders the shows and outputs DMX, Art-net and sACN. The LPU-1 is controlled by Cuety and/or Cuety Remote
- the LPU-2 hardware platform, which is similar to LPU-1. It can be controlled by Cuety and/or Cuety Remote or by 3rd party control systems using the network protocols TCP, UDP or OSC.
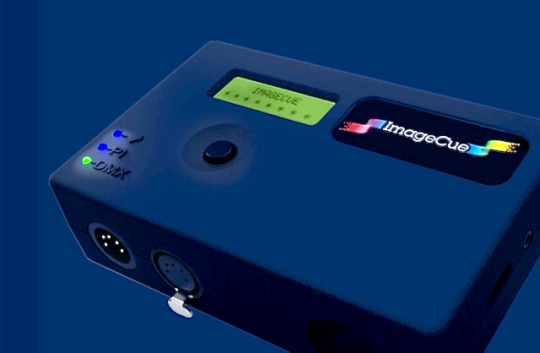
An introduction to ImageCue
ImageCue is a cost effective media server that provides control of full-HD stills and videos with only 12 DMX channels. It comes with a library of 255 images and users can add up to 65.000 image and video files. ImageCue features overlay of PNG images, full RGB mixing control of foreground and background, output dimming and adjustable fade timing. Content is output on HDMI or DVI with the supplied adapter.
ImageCue and Cuety
Visual Productions have created a special ImageCue personality file and a show file for controlling the ImageCue Media Server. When transferring these files to Cuety, you are able to control your ImageCue Media Server or combine control of your lighting rig and the ImageCue. When using Cuety on your iPad, you have all ImageCue controls at your fingertips.
Controlling ImageCue
Visual Productions have created the cue lists which contain the DMX values that control the various functions and selections within the ImageCue Media Server. These are activated using the playbacks. When operating ImageCue with Cuety, intensity playbacks can be controlled using the intensity fader. Playback name and actual cue (status) are indicated on the playback button. The available playbacks and their functions are listed at the end of this post.
Using ImageCue with Cuety
Once personality and show files have been imported in Cuety using iTunes, you are able to control ImageCue with the Cuety and Cuety Remote for iPhone or iPad. When using Cuety, remember the intensity faders may be used when the blue bar is placed on the lower playbacks bank. Also, for releasing playbacks, remember to press and hold the playback you want to release.
Since Cuety Remote does not feature intensity faders, we have mapped a series of intensities as cues in the playbacks.
When using an LPU-2, you are able to control Cuety with 3rd party equipment or to create your own user interface. Various programs are available that can send OSC or UDP commands across the network, thus activating functions of Cuety. Examples are TouchOSC by hexler.net and Lemur by Liine.
Cuety and Cuety Remote are free downloads, available from the Apple App Store. Cuety is also available in macOS, Windows and Linux versions for programming on desktop or notebook computers. Since Cuety was developed as an iPad app, due to iOS standards, minimum vertical resolution for using Cuety on a computer is 1080 pix.
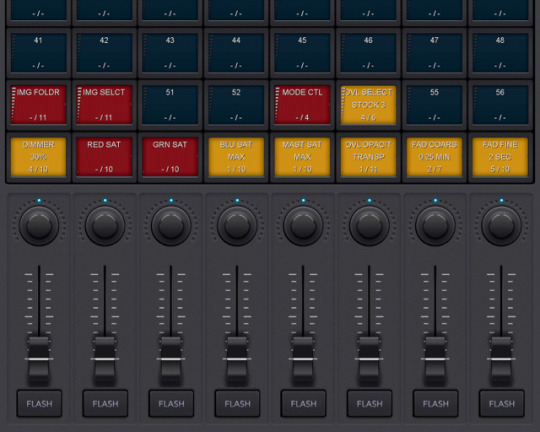
Below is a part of the Cuety UI that shows the lay-out of the ImageCue controls in Cuety. Use the playback swap function in Cuety if you would like to rearrange playbacks in your favorite order.
Available files
If you would like to start using Cuety with ImageCue, we have following files available at no cost:
- ImageCue personality file for Cuety
- ImageCue personality file for Cuelux
- Cuety show file for controlling ImageCue
- A TouchOSC file will be added later
Please contact us if you would like to use these files.
List of playbacks/ImageCue controls
Playback name: DIMMER
- Function: Dimmer
- Default setting: FULL ON
- Steps: levels 10-90%
This DMX channel controls the output intensity from blackout (0) to full intensity. Default is full on (100% or 'open').
Playback name: RED SAT
- Function: Red saturation
- Default setting: MAX
- Steps: levels 10-90%
This DMX channel controls the red saturation from none (0) to full saturation. Default is open (100%).
Playback name: GRN SAT
- Function: Green saturation
- Default setting: MAX
- Steps: levels 10-90%
This DMX channel controls the green saturation from none (0) to full saturation. Default is open (100%).
Playback name: BLU SAT
- Function: Blue saturation
- Default setting: MAX
- Steps: levels 10-90%
This DMX channel controls the blue saturation from none (0) to full saturation. Default is open (100%).
Playback name: MAST SAT
- Function: Master saturation
- Default setting: MAX
- Steps: levels 10-90%
This DMX channel controls the master color saturation from none (0) to full saturation. Default is open (100%).
Playback name: OVL SELCT
- Function: Overlay select Default
- setting: OPEN
- Steps: STOCK 1-5
This DMX channel selects the stock overlay files 1 to 5. There are 255 stock overlay files available, these 5 steps (cues) have been programmed as an example. Default is OPEN (no overlay selected).
Playback name: OVL OPACIT
- Function: Overlay opacity
- Default setting: TRANSP
- Steps: levels 10-100% (opaque)
This DMX channel controls the opacity of the overlay image from transparent (0) to opaque
Playback name: IMG FOLDR
- Function: Image folder
- Default setting: STOCK
- Steps: USER 1-10
This DMX channel selects the source folder. First folder contains stock material, access to user folders 1 to 10 is programmed. These are empty and can be loaded with user images or video files. A total of 255 folders is available and can be programmed.
Playback name: IMG SELCT
- Function: Image select
- Default setting: OPEN
- Steps: USER 1-10
This DMX channel selects the image or video. First step (cue) does not contain any image ('open'), access to user images 1 to 10 is programmed. These are empty and can be loaded with user images or video files. A total of 255 images or videos is available and can be programmed.
Playback name: MODE CTL
- Function: Mode control
- Default setting: NONE
- Steps: COL IMG, PLAY ONCE, COL+IMG
This DMX channel selects the control mode. First step (cue) is 'none' or no mode selected. Second mode is Color in front of image, second is Video play once and exit, and third is Color in front & Video play once. Future control modes may be added later.
Playback name: FAD COARS
- Function: Fade time - coarse
- Default setting: OFF
- Steps: 0:25/0:50/1:15/1:40/2:05/2:30 MIN
This DMX channel selects a coarse fade time. Each step is appr. 25 seconds, 6 fade times (steps, cues) have been programmed, 255 steps may be programmed.
Playback name: FAD FINE
- Function: Fade time - fine
- Default setting: OFF
- Steps: 0,5/1,0/1,5/2,0/3,0/4,0/5,0/7,0/10,0 SEC
This DMX channel selects a fine fade time, programmable in 0,1 second steps. 9 fade times (steps, cues) have been programmed, 255 steps may be programmed.
Mapping of ImageCue DMX profile to Cuety programmer
DMX Parameter Cuety programmer fader
1 Dimmer -> Intensity
2 Image source folder -> Gobo
3 Image select -> Rotation
4 Fade time coarse -> Custom 1
5 Fade time fine -> Custom 2
6 Color red saturation -> Red
7 Color green saturation -> Green
8 Color blue saturation -> Blue
9 Master color saturation -> Shutter
10 Mode control -> Iris
11 Overlay select -> ColFix
12 Overlay opacity -> Frost
0 notes
Text
Visual Productions’ CueluxPro: about monitoring DMX and Art-net
System basics
CueluxPro, Visual Productions’ advanced and scalable lighting control application, uses the CueCore and/or QuadCore (‘Cores’) as the hardware platform to output DMX via the network connection: both the CueluxPro server and Cores are connected to the network and receive their information from CueluxPro. However, although the Cores process the incoming data sent by CueluxPro and present a DMX signal at the DMX outputs, the Art-net signal generated by CueluxPro is actually output directly to the network by the CueluxPro server.
Signal presence on CueCore and QuadCore Monitor pages
Obviously, the DMX signal deducted from the data coming from the CueluxPro server and being generated in the Cores is visible on a Core's Monitor page. With Art-net, this is different: since all system components are connected to the network using a network connection, also, because the CueluxPro server outputs an Art-net signal directly to the network, this Art-net signal will not be visible on the Monitor page of a Core acting as CueluxPro’s hardware platform.
Mastered and stand-alone use of CueCore and QuadCore
If a Core is running in stand-alone mode and Art-net output is enabled, this Art-net signal will be visible on the Core’s Monitor page. Once CueluxPro is switched on and is being used to generate DMX and Art-net signals, it will take control of (or 'master’) the connected Core(s). At the same time most web interface pages of that Core will gray out and display the message ‘this device is mastered by other software’. As explained before, as a consequence, the Art-net signal generated by CueluxPro will not be visible on the Core’s Monitor page.
Checking presence of Art-net signals
You can easily test if the Art-net signal generated by CueluxPro is present by connecting another Core to the network, use it in stand-alone mode and look at the Monitor page, provided you have set all Art-net parameters such as universe and subnet for the Art-net input correctly.
Remember you can set Art-net outputs to unicast or broadcast. In the CueCore, this is done when connected to the vManager, in the QuadCore this is done on the Quadcore’s Settings page or using the vManager. To set a Core to broadcast, set the subnet to IP 255.255.255.255.
3 notes
·
View notes