
theveganroadierecipes
The Vegan Roadie Recipes
Welcome to The Vegan Roadie Recipe Blog! On here you will find easy every day recipes, new mouth watering creations and exclusive recipes from The 5 Ingredient Challenge (5IC) segment of Dustin's Web Series The Vegan Roadie!
BE A KITCHEN WARRIOR IN YOUR OWN HOME!! Post your delicious dishes on Instagram, Facebook & Twitter and tag @TheVeganRoadie
Hashtag:
#kaledit #5IC
124 posts
Don't wanna be here? Send us removal request.
Last Seen Blogs

daveyyyyoung
Untitled

the-noisemaker
Moved To @Spiral-Mouth

i-love-soc-a-very-normal-amount
SoC Brainrot

lovingaubs-blog
aubree

tvstayinfo
TVstayinfo Oficial
Text
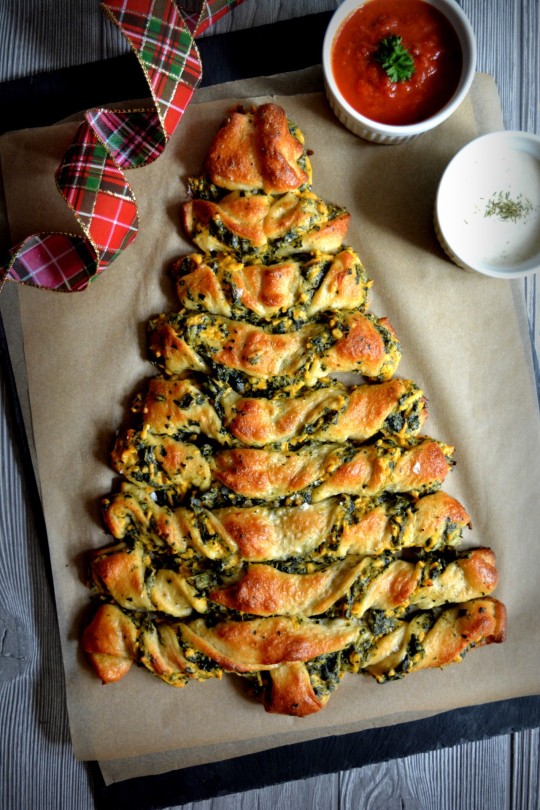
Festive Cheesy Spinach Bread
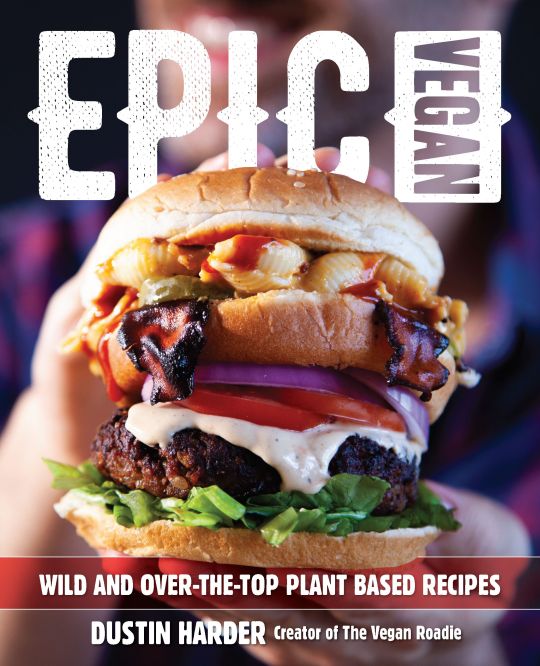
This recipe is a must every Christmas in our home. The recipe is featured in all it’s glory in my book Epic Vegan. You can also get a pizza dough from scratch in that book, but never fret, store bought vegan pizza dough works just fine! Impress your friends and family with this over the holidays. It’s creamy and cheesy on the inside with a crispy buttery crust, you can’t go wrong!
Festive Cheesy Spinach Bread from Epic Vegan
1/2 cup (68 g) raw cashews, soaked in water overnight or boiled for 10 minutes and drained
1/4 cup plus 2 tablespoons (88 ml) water
2 tablespoons (10 g) nutritional yeast
2 teaspoons (10 ml) lemon juice
1 clove garlic
1/2 teaspoon onion powder
1/2 teaspoon sea salt
1/2 cup (58 g) vegan cheddar shreds
1/4 cup (20 g) packed frozen chopped spinach, thawed and squeezed dry
1 batch Pizza Dough, divided, enough for 1 pizza (store bought or homemade from Epic Vegan)
2 tablespoons (42 g) vegan butter, melted
1/2 teaspoon garlic powder
1/2 teaspoon Italian seasoning
Maldon or coarse sea salt (optional)
Marinara, for dipping
Preheat the oven to 400°F (200°C, or gas mark 6). Line a large baking sheet (13 x 18 inches [33 x 46 cm] or larger) with parchment paper.
In a high-speed blender, combine the cashews, water, nutritional yeast, lemon juice, garlic, onion powder, and salt. Blend until creamy and smooth, 1 to 2 minutes. Transfer to a bowl, and stir in the cheese and spinach. Set aside.
Take the parchment from the baking sheet and lay it on a flat surface. Roll out the pizza dough to a 10 x 12-inch (26 x 30-cm) rectangle on the parchment paper. With a pizza cutter or sharp knife, cut the dough into the shape of a tree with the tip at the top; keep the excess dough where it lays—don’t gather it or remove it from the parchment. Carefully transfer the parchment paper with the dough on it back to the baking sheet. Spread the spinach mixture over the tree part of the dough, leaving a 1/2-inch (1-cm) border all around the tree dough. Flip the 2 pieces of dough that were cut off from the sides, so that the bottom points are now up top, and lay the pieces over the filling to match the shape of the tree and cover the filling. Pinch the 2 pieces of the top layer of dough together in the middle and pinch all sides of the dough together to close in the filling. Cut 7 lines, through to the bottom, from either side of the dough toward the middle of the tree, being careful to leave the dough connected in the middle; there will be 8 “tree branches” on each side. Twist each branch toward the bottom one time. Bake for 20 to 22 minutes, or until crispy and golden brown. While it’s baking, mix together the butter, garlic powder, and Italian seasoning.
When the bread is done, remove from the oven and immediately brush with the butter mixture. Sprinkle with coarse salt, if desired. Serve warm with the marinara.
4 notes
·
View notes
Text
Cranberry Pistachio Biscotti
This is the last in the #12treatsofchristmas series. This is one of the original treats from the list that actually got cut from the list halfway through to make room for a peppermint bark cheesecake. Well, the cheesecake was a bit of a flop on my end. While I’m perfecting the cheesecake, I turned back to the biscotti, I’m so glad I did! I am a little obsessed with these! In a way they are a less sweet variation of the cranberry bliss bar. Crunchy and delicate, these festive biscotti will go great with the perfect cup of coffee on Christmas morning.

Cranberry Pistachio Biscotti
Makes: 16 Biscotti
Serving Size: 1 Biscotti
3 tablespoons flax meal
6 tablespoons water
¾ cup organic cane sugar
½ cup canola oil
1 teaspoon almond extract
½ teaspoon orange extract, optional
1 ¾ all purpose flour
2 teaspoons baking powder
½ teaspoon sea salt
½ teaspoon ground nutmeg
1/2 cup raw unsalted unroasted unshelled pistachios, chopped
½ cup dried cranberries, chopped
2 tablespoons unsweetened soy or almond milk
1 tablespoon maple syrup
Optional White Chocolate Coating:
1 cup vegan white chocolate chips
1 teaspoon refined coconut oil
Preheat the oven to 325 F and line a baking sheet with parchment paper.
Add the flax meal and water to a bowl, whisk to combine and set aside for 5 minutes to thicken.
Add the sugar, oil, almond extract, and orange extract (if using), to the bowl of a stand mixer and cream everything together with a paddle attachment until combined. Add the flax mixture and mix to combine.
Add the flour, baking powder, salt, and nutmeg to a bowl and whisk to combine. Add half of the flour mixture to the wet mixture and mix to combine, add the other half and mix until everything is incorporated, do not overmix. Fold in the cranberries and pistachios.
Turn the dough onto a lightly floured surface, split the dough in half. With lightly floured hands roll each half of dough into a log about 6 inches long, gently flatten the logs so they are 3 inches wide. Place the logs at least 3 inches apart on the prepared baking sheet.
Add the milk and maple syrup to a small bowl and whisk until well combined, this is a plant based vegan egg wash. Brush each log with the vegan egg wash. Bake the logs for 35 minutes. Remove from the oven and let cool for 15-20 minutes, until you are able to easily handle them.
Transfer logs to a cutting board and use a serrated knife, cut the rounded ends off of each log. Cut the logs into biscotti size pieces, about ¾ inch thick, you'll get 8 pieces from each log. Arrange the biscotti pieces, cut sides down on the baking sheet and bake for 10 minutes, flip all the pieces and bake an additional 10 minutes, until they are golden brown. Transfer to a cooling rack and let cool completely. They will firm up more as they cool.
Option with white chocolate coating: Melt the chips in the microwave or double boiler. Add the coconut oil, stir to combine. Place melted mixture in a shallow bowl and dip the bottom quarter inch of each biscotti into the chocolate, shake off excess chocolate and transfer to a parchment lined baking sheet, set biscotti on its side until chocolate seizes. Alternatively, instead of dipping the bottoms you can drizzle the chocolate over the biscotti’s or dip partially in the chocolate and sprinkle with chopped cranberries and pistachios.
Biscotti last up to two weeks when stored in an airtight container.

2 notes
·
View notes
Text
Gingerbread Cake Truffles
These are a variation of the Gingerbead Cake Pops David and I used to make many years ago. We would make them and sell them at vegan markets in NYC. I wanted to do a version that avoided the muss and fuss of the lollipop sticks, and here it is! Moist gingerbread cake rich in flavor and spiced with gingerbread coated in white chocolate and topped with vegan sprinkles, if you like. These are sure to become a holiday favorite!

Gingerbread Cake Truffles
Makes: 40 truffles
Serving size: 1 truffle
Cake Truffles:
1 tablespoon apple cider vinegar
¼ cup unsweetened soy milk
1 ½ cup all-purpose flour or gluten free 1 to 1 baking flour
2/3 cup organic cane sugar
1 teaspoon baking powder
1 teaspoon baking soda
2 teaspoons ground ginger
1 teaspoon ground cinnamon
¼ teaspoon ground cloves
¼ teaspoon salt
½ cup molasses
¼ cup canola oil
½ cup unsweetened applesauce
Vegan sprinkles or edible dust (optional)
Frosting:
½ cup non hydrogenated shortening
2 cup powdered sugar, sifted
1 teaspoon vanilla extract
2 tablespoons non dairy milk or non dairy creamer
White Chocolate Coating:
1 (8 ounce bag) vegan white chocolate chips (I use King David Kosher)
1 tablespoon refined coconut oil, as needed
Procedure:
Preheat the oven to 375. Lightly grease a 8x8 baking dish, set aside.
Combine milk and apple cider vinegar in a medium bowl, set aside.
Add the flour, sugar, baking powder, baking soda, ginger, cinnamon, cloves, and salt to the bowl of a stand mixer. Whisk to combine the ingredients.
Add canola, applesauce, and molasses to the milk and cider mixture, whisk until combined.
Add wet mixture to dry mixture and mix with a paddle attachment until combined with no lumps, do not overmix.
Transfer to the prepared 8x8 baking dish, bake for 28-30 minutes or until a toothpick inserted in the center comes out clean.
While the cake is baking, get your frosting prepared. Whip the shortening with a stand or hand mixer, add the powdered sugar ¼ cup at a time, add the non dairy milk or creamer and mix until well combined and fluffy.
Remove cake from the oven and let cool completely.
Cut the cake into 4 large squares. Over a large bowl rub two squares together at the edges crumbling it to bits in the bowl. Repeat with the remaining two squares. Add ½ cup frosting to the mixture, mix it in well, you don’t want clumps of frosting, it should be worked into the mixture but you should still have a crumbly texture. The frosting serves as a binder to create your cake balls so the cake sticks together when creating the truffles.
Line a baking sheet with parchment paper, the baking sheet should fit in your freezer.
Scoop 1 level tablespoon of the cake and frosting mixture out and form it into a ball. Transfer to the prepared baking sheet. Repeat with the mixture until it is all turned into cake balls.
Place the cake balls in the freezer for 30 minutes.
Melt the chocolate chips in the microwave or a double boiler. If using a microwave, heat in 30 seconds increments and stir between. Add the coconut oil and stir to combine. Transfer melted chocolate to a small bowl so that the truffles are easily submerged into the chocolate.
Dip the cake ball into the chocolate mixture and gently rotate to fully coat. Scoop out with a fork, tap on the edge of the bowl to remove excess chocolate. Transfer back to the baking sheet and top with sprinkles or edible dust, if using. Repeat with all balls until they are coated.
Allow truffles to sit for an hour for the chocolate to fully seize.
These will keep in a tightly sealed container in the refrigerator for up to 2 weeks. Let set out at room temperature to serve.
0 notes
Text
David’s Raspberry Thumbprint Cookies
This is the holiday cookie that is a must for my husband, David. He loves them so much that when I finally got to posting the recipe he had some notes for me. I’m a purest, so my drizzle for these is on the simpler side, but he loves doing the white chocolate drizzle or the lemon zest drizzle. Both variations are detailed in the notes of this recipe if you want to give one or both of them a whirl. Delicate and buttery with that lip smacking raspberry jam in the middle, it’s very easy to eat too many of these!

David’s Raspberry Thumbprint Cookies
Makes: 36 cookies
Serving size: 1 cookie
1 cup vegan butter, softened
⅔ cup organic cane sugar
1 teaspoon almond extract
2 cups all purpose flour
3/4 cup raspberry jam
½ cup organic confectioners sugar, sifted
1 teaspoon non dairy milk
Preheat the oven to 350 F. and line a baking sheet with parchment paper.
Add the butter and sugar to a stand mixer and cream together. Add the almond extract until combined. Add the flour and mix until a cookie dough forms, do not overmix.
Use a leveled tablespoons worth of dough to create a small ball. Add the balls to the baking sheet, about 2 inches apart, press down on each ball with your thumb to create a dent in each cookie. Patch any cracks on the edges of the cookies that might occur. Fill each dent with scant ½ teaspoon of jam.
Bake for 14-18 minutes until the bottoms just start to brown. Remove from the oven and let cool completely.
Add the confectioners sugar and milk to a small bowl, whisk to combine. Drizzle over the cookies and allow 15 minutes for drizzle to set completely.
Variations:
White Chocolate Drizzle: Omit the glaze and use melted King David Kosher white chocolate chips. Melt the chips in the microwave or double boiler and drizzle over the top of the cookies.
Apricot: Use apricot jam instead of raspberry, or use both to create options for your guests. Add lemon zest to the drizzle for a citrusy kick to the cookie.

3 notes
·
View notes
Text
Sugar Cookies with Frosting
Sugar cookies with frosting are my all-time Christmas cookie favorite. I’m a purest at heart and this cookie does it for me with its buttery sugar goodness. When we were kids my mom would by a big box of frozen sugar cookies from Gordons Food Service every Christmas. She would bake them off and then my sister and I slathered them in Betty Crocker frosting and tossed sprinkles all over them. My love for the sugar cookie with frosting has never disappeared, so I’m thrilled to make them from scratch every year without animal products now. I use Watkins food coloring and Supernatural sprinkles, if you’re curious.

Sugar Cookies with Frosting
Makes: 28 cookies
Serving size: 1 cookie
¾ cup vegan butter, softened
¾ cup organic cane sugar
2 tablespoons unsweetened nondairy milk
½ teaspoon vanilla extract
½ teaspoon almond extract
2 ¼ cups all-purpose flour
2 tablespoons cornstarch
½ teaspoon baking powder
½ teaspoon sea salt
Frosting:
⅓ cup vegan butter, melted
3 cups organic confectioners sugar, sifted
2-3 tablespoons plain or vanilla nondairy milk
Preheat the oven to 350 F and line a baking sheet with parchment paper.
In a stand mixer cream together the butter, sugar, milk, vanilla extract, and almond extract.
In a separate bowl whisk together the flour, cornstarch, baking powder, and sea salt. Add ½ of the flour mixture to the stand mixture, use a paddle attachment to mix it with the creamed ingredients. Add the remaining flour mixture and mix again until well combined.
Split the dough in half and roll the first half out onto a floured surface until it’s ¼ inch thick. Use desired cookie cutter shapes and transfer cut out dough to the prepared baking sheet. Bake for 8-10 minutes until the bottoms of the cookies are just starting to brown. Repeat with remaining dough until all of the dough is cut out and baked off.
Let the cookies cool completely before frosting.
To make the frosting, add the butter, sugar, and milk to the bowl of a stand mixer and mix with a paddle attachment until creamed together. Add more liquid or sugar depending on desired thickness.
Frost the cookies as desired and top with sprinkles, if using. I like to let them set for a few hours before I put them in containers for storage, this gives the frosting time to firm up.
Note: I love freezing these even after they are frosted and pulling them out as I need them through the month of December, they are the perfect addition to any holiday cookie platter.

0 notes
Text
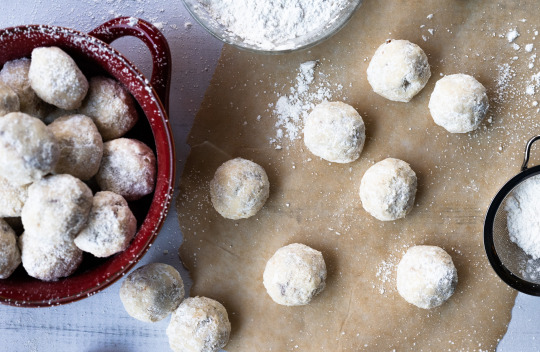
Gluten Free Snowball Cookies
It’s the Snowball Cookie! Also known as the Russian Tea Cake or Mexican Wedding Cooking. This cookie has some history, it’s a fun one to google. This cookie is crunchy, crumbly, sweet, and nutty and a really nice one to make gluten free because the texture is so forgiving. It’s also a very nice thing for you to do this holiday season to make sure that one gluten free friend has a little sugary treat. Look at you, so sweet.

Gluten Free Snowball Cookies
Makes: 42 cookies
Serving size: 1 cookie
1 cup vegan butter, softened
1 ½ cup organic confectioners sugar, divided
2 teaspoons vanilla extract
2 cups gluten free 1 to 1 baking flour
¾ cups finely chopped pecans
Preheat the oven to 350 F. Line a baking sheet with parchment paper.
In a stand mixer cream together the butter, ½ cup sugar, and vanilla. Add the flour until combined. Fold in the pecans until evenly dispersed.
Use a leveled tablespoon worth of dough to create a ball. Repeat with all of the dough and place balls on the prepared baking sheet. Bake the cookies for 14-16 minutes until they are set and the bottoms are lightly browned.
Remove the cookies from the oven and let them cool for 10 minutes.
Add the remaining 1 cup of confectioners sugar to a large bowl. Add the cookies and lightly toss them to coat in the sugar. Remove cookies and place on a cooling rack. When completely cooled, toss in remaining sugar until well coated.
Will keep in a well sealed container for up to one week.
3 notes
·
View notes
Text
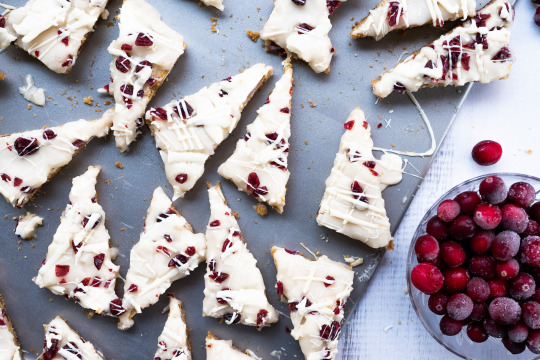
Vegan Starbucks Cranberry Bliss Bites
This is my second version of these, I like both versions but the cookie from the previous one was a little crumblier and I wanted chewy, so I went back to the drawing board! I remember the first winter season after going vegan when I walked into a Starbucks and realized I couldn’t order a Cranberry Bliss Bar, I was absolutely crushed. Where else could I get white chocolate blondies with notes of orange and chewy bits of cranberry but without the animal derived butter and eggs? My own kitchen, that’s where. And now yours too!
Vegan Starbucks Cranberry Bliss Bars
Makes: 32 Bars
Serving Size: 1 Bar
For the bars:
1 cup vegan butter, melted
1 ½ cup packed light brown sugar
2 vegan eggs (bob's red mill, just egg, zero egg) or flax egg *see note
1 teaspoon orange extract
1 teaspoon vanilla extract
2 cups all-purpose flour or 1 to 1 gluten free baking flour for gluten free
½ teaspoon ground ginger
1 teaspoon baking powder
½ teaspoon sea salt
1 cup vegan white chocolate chips
¾ cup dried cranberries
For the frosting and drizzle:
8 ounces plain vegan cream cheese
3 cups organic confectioners sugar
½ teaspoon orange extract
½ teaspoon vanilla extract
⅓ cup dried cranberries, roughly chopped
1 cup vegan white chocolate chips, melted
Coconut oil, as needed
Preheat the oven to 350 F. Line a 13x9 rimmed baking sheet with parchment paper.
Add the butter and brown sugar to the bowl of a stand mixer. Mix on low with the paddle attachment until creamed together. Add the vegan egg, orange extract, and vanilla extract and mix until well combined.
Add the flour, ginger, baking powder, and salt to a separate bowl and whisk to combine. Slowly addthe flour mixture to the butter mixture in the stand mixer and continue to combine on low speed with the paddle attachment. Fold in the chips and cranberries until well combined. Do not over mix.
Transfer mixture to the prepared baking sheet and spread into an even layer. Bake for 18-22 minutes until golden brown on the edges. Remove from the oven and let cool. Cool completely before frosting. I like to remove it from the pan and cut off the crispy edges, the edges make great little snacks on their own! Then you have the perfect rectangle for your cranberry bliss canvas, set the cookie rectangle on a large cutting board.
Add the cream cheese, sugar, orange extract, and vanilla extract to the bowl of a stand mixer. Use a paddle attachment and mix on low until well combined.
Frost the cooled uncut rectangle with frosting and sprinkle with chopped cranberries.
Melt the chips in the microwave, heating for 30 seconds at a time until melted. Mix with a fork between 30 second increments. Add a dash of coconut oil, if desired, to thin the chocolate and make it easier to drizzle. It will also add a slight sheen.
Drizzle melted chocolate over the bars. Place the sheet pan into the refrigerator to let everything set for about an hour, until the drizzle on top seizes completely. Remove from the refrigerator and cut into 24 triangles.
Place in a tightly sealed container and store in the refrigerator. Will keep for up to one week.
Notes: For vegan white chocolate chips my go to has been King David Kosher chips for years. To make 2 vegan flax eggs mix 2 tablespoons of flax meal with ¼ water and let sit for 5 minutes to thicken, use in recipe as directed. If you want the frosting thicker use less cream cheese, start with half and add more as desired.

2 notes
·
View notes
Text
Easy Vegan Peppermint Bark
My husband, David, loves peppermint bark. There is one by “No Whey!” on the market now, and I’m sure some other vegan variations. This is a thicker variation; I was nervous of not being able to cover the entire surface of the baking dish, so I went with a smaller one. As years pass, I will work on a thinner version, but this still has all of the peppermint chocolatey goodness you are looking for! Be sure to let it set at room temp, a cold temperature will cause the two chocolates to separate from each other as they seize.

Easy Vegan Peppermint Bark
Makes: 16 pieces
Serving size: 1 2-inch piece
1 (10 ounce) bag vegan semi-sweet chocolate chips or vegan dark chocolate chips
1 (8 ounce) bag vegan white chocolate chips (I use King David Kosher)
½ teaspoon peppermint extract, divided
⅓ cup crushed vegan candy canes (I use Thrive or Yum brand)
Line an 8x8 baking dish with 2 pieces of parchment paper so that the paper hangs over all four sides by a couple inches.
Melt the semi-sweet chocolate chips in a small pot or double boiler. Remove from the heat and add ¼ teaspoon peppermint extract, stir to combine. Transfer it to the prepared baking dish into an even layer. Immediately melt the white chocolate in a small sauce pot or double boiler. You don’t want the semi-sweet chocolate to set before you add the white chocolate to the top of it. If it sets, the two layers won't stick together. Remove from the heat and add the remaining 1⁄4 teaspoon of peppermint extract. Fold in ¼ cup of the crushed candy canes.
Carefully transfer the white chocolate mixture to the top of the semi-sweet layer so that it covers the semi-sweet layer completely. Spread gently with an offset spatula. Sprinkle with remaining crushed candy canes. Add more if you would like, I make sure the entire top is covered with candy cane crumbles.
Set aside at room temperature. Allow to set at room temperature, do not put in the refrigerator before it sets. After it sets completely, lift out of the baking dishes and cut or break into bite sized pieces.
Will keep in a tightly sealed container for up to one week at room temperature.
2 notes
·
View notes
Text
Walnut Fudge
My Aunt Char ALWAYS had fudge at her house on Christmas eve. It’s taken me years to get this recipe to a place that gave me those nostalgic Christmas eve feels, but I think I’m finally there! If nuts aren’t your thing, make it without, see notes at the bottom for other add ins.

Walnut Fudge
Makes: 16 (2 inch) squares
Serving Size: 1 square
1 cup vegan butter
1 cup canned coconut milk, mixed well
10 ounces (1 bag) vegan chocolate chips
1 tablespoon vanilla extract
4 cups organic confectioners sugar, sifted
½ cup high quality cocoa powder
1 ½ cups roughly chopped walnuts, lightly toasted
Line an 8x8 baking dish with parchment paper in two directions with a couple inches of parchment hanging off of all four sides. There will be 2 layers of parchment to achieve this.
Add the butter to a sauce pot or double boiler, heat over low heat until melted. Add the coconut milk and whisk to combine. Add the chocolate chips and stir frequently, cook until all of the chocolate is melted and everything is well combined. Remove from the heat and add the vanilla, whisk to combine.
Add the sifted sugar and cocoa powder to the bowl of a stand mixer and whisk to combine. Slowly drizzle in the chocolate mixer while combining everything on low speed with a paddle attachment. Fold in the walnuts until evenly dispersed. Transfer mixture to prepared baking dish.
Refrigerate for 8 hours or overnight. Remove from the refrigerator and use the overhanging parchment paper to lift the fudge up out of the baking dish and onto a cutting board. Cut into bite sized 2 inch fudge pieces.
Store in an airtight container for up to 5 days. Refrigerate for optimal texture and freshness.
If serving at a party, serve in small batches. The fudge will get softer in texture sitting out at room temperature over time.
Notes: Add your favorite dried fruits like apricots, cranberries, or cherries for a tart pop of flavor to this very sweet treat.
2 notes
·
View notes
Text
Deep Dish Thanksliving Pizza
This is inspired by a Green Bean Casserole Pizza from Natalie Slaters cookbook Bake and Destroy (find her @bakeanddestroy). The pizza is amazing, and I got to thinking how everyone loves Thanksgiving leftovers. In my house growing up I remember family members all chatting about who gets what when the meal was barely even over on Thanksgiving. Everyone boasting about how they were going to build the best sandwich ever the next day when morsels had even yet to begin digestion from the present meal. So why wait for the leftovers? Enter the Deep Dish Thanksliving Pizza. Layers of Thanksgiving piled onto a pizza made of a sausage stuffing crust, honey, I know… youre welcome. ALSO… if you are vegan headed to a carnivorous Thanksgiving gathering (bless you) you can take this with you and your meal is done, and it will make everyone ooh and ahh in jealousy.

For the stuffing crust:
¼ cup flax meal
½ cup water
2 tablespoon olive oil, divided
1 onion, chopped, divided
2 celery stalks, thinly sliced
2 carrots, peeled and sliced
4 cloves garlic, minced
2 vegan sausages, sliced
1 apple, cored and diced
1/2 teaspoon sea salt
½ teaspoon dried sage
1 teaspoon thyme
1 teaspoon rosemary
¼ teaspoon pepper
4 cups sturdy bread cut into 1 inch cubes
½ cup vegetable broth
For the mashed potatoes:
1 lb russet potatoes, peeled and cut into 2 inch chunks
1 tablespoons vegan butter
Non dairy milk, as needed
Salt and pepper to taste
For the green bean casserole in gravy:
2 tablespoons olive oil, divided
1/2 onion, chopped
4 ounces (half of an 8 ounce package) sliced cremini or white mushrooms
1/4 teaspoon garlic powder
¼ teaspoon thyme
1/4 teaspoon sea salt
1/4 teaspoon black pepper
2 tablespoons flour
1 cups non dairy unsweetened milk
1 tablespoon soy sauce or tamari
7 ounces frozen cut green beans
Topping:
½ cup whole cranberry sauce
1/2 cup fried onions
1 tablespoon parsley, chopped
Procedure:
Preheat the oven to 375°. Grease a 9 inch springform pan.
To make the crust combine the flax and water in a bowl and set aside for 5 minutes to thicken. In a skillet heat 1 tablespoon of olive oil, add the onion, celery and carrots and saute 4 minutes until onions are soft and translucent. Add the garlic and saute 1 additional minute. Add the sausage, apple salt, thyme, rosemary and pepper to the skillet, drizzle with remaining olive oil and mix to combine. Saute 4-6 additional minutes until sausage and apple have started to brown. Add the bread, flax meal mixture and vegetable broth, stir to combine and every pieces of bread has been moistened slightly.
Transfer the stuffing crust to the prepare springform pan and press the crust to the bottom of the pan and up the sides of the pan with the bottom of a measuring cup or tumbler. Bake for 30 minutes, prepare mashed potatoes and gravy while baking crust.
To make the potatoes add potatoes to a pot and cover with water, bring to a boil and cook for 10 minute or until fork tender. Drain potatoes and return them to the pot, add the vegan butter and mash briefly until chunky. Add milk if necessary and salt and pepper to taste, use a spoon to mix in milk and seasoning. Add more milk 1 teaspoon at a time to reach desired consistency, do not overmix. Set aside.
In a skillet heat 1 tablespoon of oil over medium heat. Add the onion and mushrooms and saute 4-6 minutes until mushrooms have reduced in size slight,y. Add the garlic, thyme, salt, pepper and flour. Mix until everything is coated in flour. Slowly add in the milk and stir until mixture begins to thicken, 2-3 minutes. Add the tamari and mix until combined, the gravy will turn a darker color. If the gravy gets too thick add more milk as needed. Mix the beans into the gravy until well incorporated.
To Make the Deep Dish Pizza remove the stuffing crust from the oven after 30 minutes, raise the heat to 425°. Add the potatoes to the crust to create one layer and add the green beans in gravy to the top of that. By the teaspoon dollop the cranberry sauce in random spots, bake an additional 15 minutes until the top edges of the crust have started to brown. Top with fried onions and bake an additional 5 minutes until the top has slightly browned.
Remove from the oven and serve hot or let cool completely and store in the refrigerator to serve the next day as Thanksliving leftovers. If you decide to serve it fresh let it cool for 10 minutes, use a serrated knife to gently cut slices. As you can imagine when its fresh the stuffing crust is fragile.
Tag me in your photos on instagram @theveganroadie

11 notes
·
View notes
Text
White Cheddar and Rosemary Garlic Seitan Pretzel Rolls
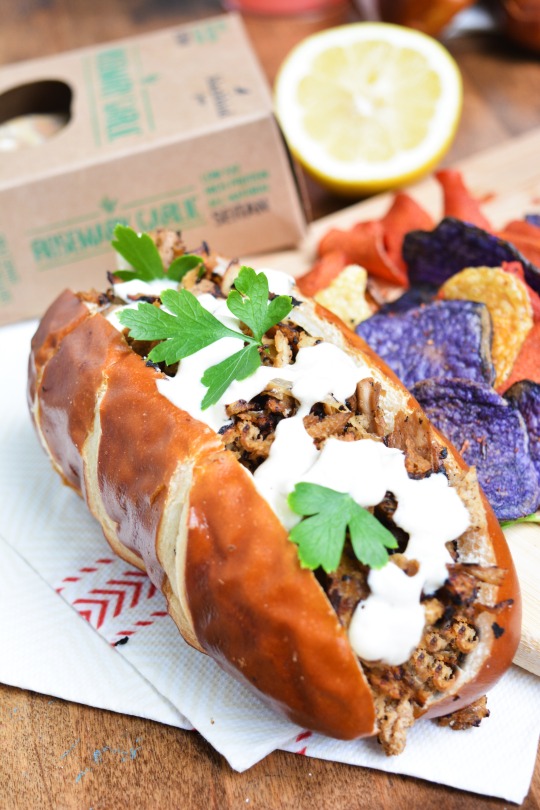
I love me some cheesesteak sandwiches! I also love the variety of seitan available from Blackbird Foods. I took their Rosemary Garlic Seitan and created this pretzel roll sandwich as a sort of elevated version of the classic Cheesesteak. Quick, easy, saucy and delicious!
White Cheddar Sauce Ingredients:
1/4 cup raw cashews, soaked overnight or boiled for 10 minutes and drained
1/2 cup water
2 teaspoons miso
1/2 teaspoon garlic powder
1/2 teaspoon onion powder
2 pinch salt
1 teaspoon tahini
Sandwich Roll Ingredients:
1 package Blackbird Food Rosemary Garlic Seitan
1/2 onion, sliced
2 vegan pretzel rolls
To make the white cheddar sauce add all of the sauce ingredients to a blender and blend until smooth and creamy.
To make the sandwich heat a skillet over medium heat until hot, add the seitan and onion and sauce for 4-6 minutes until the seitan is slightly charred and the onions are stringy and translucent. Divide the mixture between the two pretzel rolls and drizzle each with desired amount of white cheddar.
3 notes
·
View notes
Text
CHOCOLATE UBER CHUNK
Recipe by Kate Jacoby and Rich Landau as seen on a LIVE DEMO ....
CLICK HERE TO VIEW THE LIVE DEMO

Pretzel Crust
12 pretzel rods (or about 3 cups hard pretzels)
1/4 C vegan butter, melted
1. Preheat oven to 350.
2. Pulse pretzels in food processor until completely crushed.
3. Mix pretzels and butter in small bowl, then transfer to baking sheet and bake for 3 minutes until crisp. Allow to cool fully.
Peanut Butter
1 C smooth, unsweetened peanut butter
1/2 C powdered sugar
1/2 C vegan creamer
1. In food processor, pulse all ingredients until smooth and creamy.
Chocolate
1 C vegan creamer
1 C chocolate chips
1. In small sauce pan, bring vegan creamer to a near boil.2. Remove from heat and stir in chocolate chips until smooth.
Malt Custard2 13oz cans coconut milk1/4 C barley malt syrup1/4 tsp agar1/2 tsp vanilla extract1/8 tsp salt2 1/2 TBSP cornstarch
1. In medium sauce pan, combine all ingredients except corn start and bring to a rolling boil, stirring frequently for about 3 minutes. 2. Carefully transfer to blender and add cornstarch. Transfer back to pan and bring to boil, the remove from heat.
Final Assembly1. Arrange pretzel crust layer in bottom of serving dish(es) and pat firm into place. 2. Spread peanut butter layer on top, (sprinkling with a few chocolate chips if you want!)3. Spread chocolate layer on top.4. Spoon malt custard layer on top.5. Chill in fridge for at least 1 hour before serving (sprinkling with pretzel crust if you want!)
0 notes
Text
SEARED TURNIPS With a green garlic caper butter
Recipe by Kate Jacoby and Rich Landau of VEDGE Restaurant Group
SEE THIS RECIPE DEMO’d LIVE BY CHEFS KATE JACOBY AND RICH LANDAU MONDAY 4/20/20 ON ZOOM
CLICK HERE TO WATCH DEMO
Turnips
2 large purple top turnips- cut into 1 inch rounds (probably 2- 3 cuts per turnip)
1) lighty score the turnips in a criss cross pattern cutting about ¼ of the way through on one side only.
2) Blanch in salted water for 2 minutes, remove and drain on a sheet tray
3) Sprinkle each side of each turnip with aprox ¼ tsp each of salt and pepper
4) In a large saute pan- sear each side of each turnip in a shallow layer of neutral oil until golden brown (aprox 2 min each side)
Green Garlic Caper Butter
2 TBlsp minced shallot or onion
1 TBlsp minced garlic
2 TBLsp sunflower oil
¼ cup chopped green garlic, spring onion, leek or scallion
1 tsp salt
1 tsp black pepper
1/3 cup vegetable stock
1 TBlsp white wine or vermouth
1 tsp Dijon mustard
2 TBlsp capers
1-2 TBlsp vegan butter (depending on how rich you like the sauce)
1 TBlsp chopped parsley
1) Heat the sunflower oil, add the shallots and garlic and brown (about 3-4 minutes)
2) Off the heat, add the wine. Return to heat and reduce to almost nothing
3) Add the stock, mustard, salt and pepper, bring to a boil
4) Add the green garlic and capers- cook 2 more minutes
5) Remove from the heat, add parsley and stir in the butter with the back of a spoon.
6) Serve on top of the turnip wheels
0 notes
Text
Salted Caramel Apple Pie Blondies
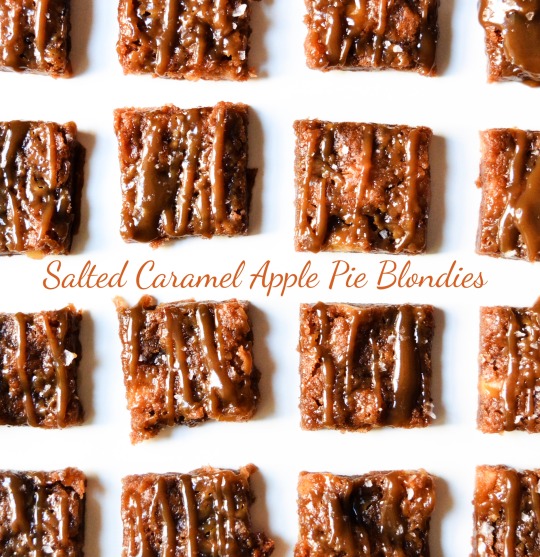
Apple Pie. Blondies. Caramel. Yes, yas and yaaasssssss! And nothing was stopping me from putting all three of these together for a weekend trip pre 4th of July with my fiancé to share with our friends once we reach our destination... if they make it that far! And how great for a 4th of July snack, right? They are as American as...apple pie. But be prepared, they are gooey af.
Ingredients:
1/2 cup plus 2 tablespoons vegan butter (room temperature), divided
1 cup plus 3 tablespoons light brown sugar
1 tsp vanilla extract
1 1/2 cups peeled and diced gala apples (about 2 medium sized apples)
1 tablespoon apple pie spice (store bought or see DIY version below)
1 tbsp flour
2 tablespoons cornstarch
1 cup all purpose flour
1 tsp baking powder
1/2 cup vegan vegan caramel sauce or Silky Sunflower Caramel from Epic Vegan Cookbook (see below), divided
Maldon Sea Salt
Procedure:
Preheat the oven to 350° and line an 8X8 baking dish with parchment paper.
In a sauce pot combine the apples, 2 tablespoons butter, 3 tablespoons brown sugar and pie spice over medium heat. Mix until well combined and the butter has melted, reduce to a simmer and cook 6-8 minutes until apples soften just slightly. Add the flour and mix until all pieces are coated, remove from the heat.
Using a hand mixer or stand mixer with paddle attachment combine the remaining butter with the remaining sugar and vanilla until creamy. Add the flour mixture and apple mixture and mix on low speed until everything is well combined, do not overmix.
Transfer the batter to the prepared baking dish, spread out into an even layer. Drizzle ¼ cup of the caramel sauce over the batter and use the tip of a butter knife to cut the caramel into the batter, making zig zags to get the caramel spread in all directions.
Bake 22-26 minutes or until the middle appears to have firmed up, let cool for 30 minutes. Drizzle with remaining ¼ cup caramel sauce and sprinkle with desired amount of maldon sea salt. For firmer bars let set in the refrigerator covered for 4 hours or more, but if you are impatient like me dig in! They will be gooier if they don’t sit for a bit, but that never bothered me.
DIY Apple Pie Spice:
4 tablespoons ground cinnamon
1 1/2 teaspoons ground nutmeg
1/2 teaspoon ground allspice
1 teaspoon ground ginger
1 1/2 teaspoons ground cardamom
Combine everything until well combined, seal tightly and use as needed.
Silky Sunflower Caramel Sauce:
(from my new book EPIC VEGAN <-- PRE-ORDER LINK)
1/2 cup organic cane sugar
1/2 cup sunflower butter
1/2 cup unsweetened soy or almond milk
1/4 teaspoon sea salt
Combine everything in a sauce pot and simmer over low heat for 8-10 minutes, mixing with a spatula until smooth and creamy and the liquid thickens slightly and sticks to the back of a spoon.
12 notes
·
View notes
Text
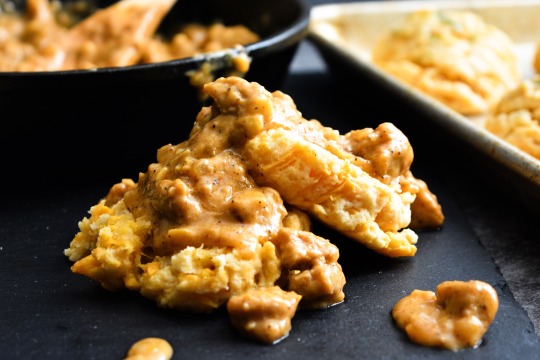
Garlicky Cheddar Biscuits with Sausage Gravy
I’m so excited to share one of my favorite recipes from my new book EPIC VEGAN - click here to pre-order your copy today!
Biscuits and Gravy are one of my favorite vegan diner dishes, and aren’t we so blessed to have so many vegan diners popping up all over America? But I always felt the gravy was the star of this dish, no matter how good the biscuits were, so I wanted to offer up a biscuit that complimented the gravy just as much as the gravy complimented the biscuit, and this recipe delivers. What’s even better is that you can serve these biscuits up by themselves and they are jam packed full of flavor! They are also reminiscent of a certain Lobster joint’s biscuits. For this particular picture I used Beyond Meat’s Hot Italian sausage!
For the Biscuits:
3/4 cup non dairy milk
Juice of 1/2 lemon
2 cups all-purpose flour
1 tablespoon organic cane sugar
1 tablespoon baking powder
2 teaspoons garlic powder
1/4 teaspoon cayenne pepper
1/2 cup vegan butter
1 1/2 cups shredded vegan cheddar cheese
For the Garlicky Topping:
3 tablespoons vegan butter, melted
2 teaspoons dried parsley
1 teaspoon garlic powder
For the Gravy:
2 tablespoons olive oil
2 vegan sausages, ground or diced small (Beyond Meat Hot Italian Diced, Pictured)
1/2 large onion, chopped
2 garlic cloves, minced
2 tablespoons all purpose flour
1 1/2 cups non-dairy milk
3/4 teaspoon sea salt
1/2 teaspoon black pepper
1/4 teaspoon chili powder
For the Garnish:
Chopped chives or fresh parsley
To Make the Biscuits: Preheat the oven to 400°. Line a baking sheet with parchment paper.
In a small bowl combine the milk with the lemon juice and let sit for 5 minutes until it thickens.
In a medium bowl mix together the flour, cane sugar, baking powder, garlic powder and cayenne pepper until well combined. Cut the butter into the flour mixture with a fork, your fingers or a pastry cutter until it has developed into a crumbly sand like consistency. Mix the cheese in with the flour mixture, add the milk and mix with a spatula until all of the ingredients combine, the dough will seem slightly wet, don’t over mix.
Using a 1/4 cup measuring cup, scoop out 12 portions onto the prepared baking sheet at least 1/2 inch apart. Bake for 14-16 minutes until the tops look dry and the bottoms are just slightly browned.
For the topping combine the butter, parsley and garlic in a small bowl, using a pastry brush, immediately brush the tops of each biscuit with the mixture when they come out of the oven.
To Make the Gravy: Heat the oil in a large skillet over medium heat, add the onions and sausage and sauté for 3-4 minutes until onions are soft and sausage is seared. Add the garlic, mix in and sauté an additional 1 minute until fragrant.
Add the flour to the skillet and mix until well combined, slowly add in the milk and stir until well combined, bring just to a bubble and lower to a simmer. Add the salt, pepper and chili powder and let simmer 2-4 minutes until gravy thickens more. Taste and add more seasoning if desired.
Plate 2 biscuits and smother with 1/3 cup gravy, repeat. Garnish with chopped chives or fresh parsley, if desired.
Tip
Don’t have sausage? No problem! Omit the sausage and just call it “country gravy”, adjust seasoning if desired.
Yields: 12 Biscuits, 2 cups gravy, 6 servings
Featured in the following recipes in EPIC VEGAN:
Lobster Roll ‘n A Biscuit Sliders (page xx)
Deep Dish Brunch Pizza (page xx)
PRE-ORDER THE BOOK - EPIC VEGAN

PRE-ORDER THE BOOK - EPIC VEGAN
6 notes
·
View notes
Text
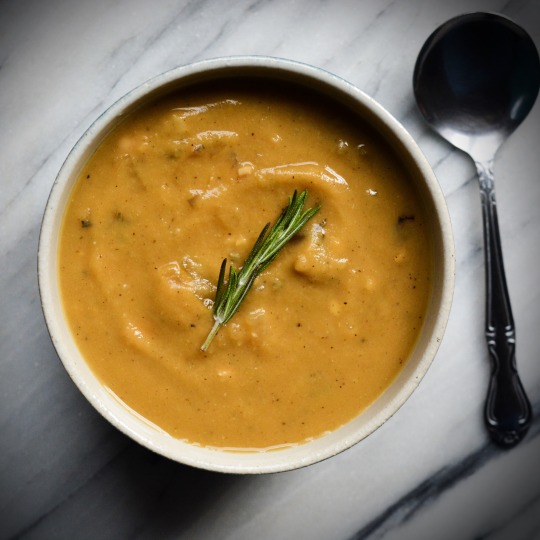
Rosemary and Garlic Chickpea Bisque
I’m forever fascinated with the world of labels and titles for food. For example, Bisque... I was just thinking, isn’t that just a creamy soup? But it sounds so fancy, surely there must be more to it! Turns out, nope. Creamy Soup.
bisque
/bisk/
noun
a rich, creamy soup typically made with shellfish, especially lobster.
Now there is the fishy part, but it says “typically”... well, who likes anything that is typical, am I right? Make this fish free bisque with the use of our buddy, chickpea. You can also go oil free if you are on the crusade to lower them calories.
Ingredients:
1 onion, chopped
1 celery stalk, thinly sliced
3 cups vegetable broth, divided
6 garlic cloves, minced
1 tablespoon fresh rosemary, minced
2 (15 ounce) cans chickpeas, drained and rinsed
2 bay leaves
Procedure:
*see tip for option with oil
To dry sauce the onions and celery, heat a stockpot over high heat, add the onions and celery and sauté for 2-4 minutes tossing around until the onions start to brown. Drizzle in a couple tablespoons of vegetable broth to deglaze the pan, add the garlic and rosemary sauté an additional minute until fragrant, adding a tablespoon of broth as needed to keep the garlic from burning.
Add the chickpeas, remaining broth and bay leaves, stir well to combine. Cover and bring to a simmer for 25 minutes. Remove the bay leaves, transfer half of the soup to a blender and blend until smooth, return to the stockpot and stir until well combined.
Serve hot garnished with rosemary, a drizzle of oil or a dollop of sour cream, if desired.
Tip:
If using oil, heat 1 tablespoon olive oil in a stockpot and then start with the directions from the top adding the onions and continue with recipe as written.
7 notes
·
View notes
Text
Chocolate Peanut Butter Mousse Tart
January 24th was National Peanut Butter Day, that was yesterday. And I definitely posted a PB treat on instagram, the only problem is that it’s in my upcoming book that isn’t available for many more months. SO, I had to offer up something ya’ll can make NOW! So here it is, the velvety smooth decadent Chocolate Peanut Butter Mousse Tart - get a fork and dig in!

Ingredients:
For the Crust:
1 tablespoon flax meal
2 tablespoons water
1 cup all purpose flour
1 cup organic cane sugar
1/3 cup fair trade cocoa powder
1/2 teaspoon baking soda
1/2 teaspoon sea salt
1/3 cup canola oil
1/4 cup soy milk
1 teaspoon vanilla
For the Filling:
1 block (14 ounces) extra firm tofu
1 1/2 cups smooth peanut butter
1/2 cup plus 2 tablespoons Agave
2 teaspoons vanilla
1/2 teaspoon sea salt
Chocolate Ganache Topping:
1 cup soy milk
1 1/2 cups semi sweet chocolate chips
Procedure:
To Make the crust Preheat the oven to 350° and line a 8x8 baking dish with parchment paper with 2 inches hanging over two opposite sides, spray lightly with cooking spray.
Mix the flax meal and water together in a small bowl and set aside for 5 minutes, until thick.
Mix the flour, sugar, cocoa, baking soda and salt together in a bowl. Add the canola, milk and vanilla and mix with a spoon until well combined. Press into the prepared baking pan and smooth the top over with a spatula for a flat and even crust.
Bake for 20 minutes until the top is firm, place in the freezer or refrigerator to accelerate cooling.
To make the filling add the tofu, peanut butter, agave, vanilla and salt to a food processor and mix until smooth and creamy. After the crust has chilled completely, add the peanut butter filling on top of the crust and smooth out with a spatula until even and smooth.
To make the ganache topping add the milk to a small saucepan and bring to a gentle boil. Place the chocolate chips in a bowl, add the milk and cover with a plate and let sit for 5 minutes. Remove the plate and gently whisk the chocolate into the milk from the center of the bowl. Let sit 5-10 minutes to thicken until the ganache coats the back of a spoon. Pour the ganache over the peanut butter filling and smooth out with a spatula to create an even layer. Place the refrigerator to set for at least 3 hours.
Cut into squares and serve topped with whipped cream or a side of ice cream.
16 notes
·
View notes