#warringtonseocompany
Text
Explore Characteristics of a Professional Web Design Company - South Florida Reporter
Explore Characteristics of a Professional Web Design Company South Florida Reporter
This post comes from Digital Marketing Warrington
3 notes
·
View notes
Text
Hillside NJ Web Design Business Lead Generation SEO Expert Services Launched - USA TODAY
Hillside NJ Web Design Business Lead Generation SEO Expert Services Launched USA TODAY
This post comes from Digital Marketing Warrington
3 notes
·
View notes
Text
Web Design Software Market Executive Summary, Introduction, Sizing, Analysis and Forecast To 2025 - Cole of Duty
Web Design Software Market Executive Summary, Introduction, Sizing, Analysis and Forecast To 2025 Cole of Duty
This post comes from Digital Marketing Warrington
3 notes
·
View notes
Text
Implementing Dark Mode In React Apps Using styled-components
Implementing Dark Mode In React Apps Using styled-components
Blessing Krofegha
2020-04-28T10:30:00+00:002020-04-29T14:07:00+00:00
One of the most commonly requested software features is dark mode (or night mode, as others call it). We see dark mode in the apps that we use every day. From mobile to web apps, dark mode has become vital for companies that want to take care of their users’ eyes.
Dark mode is a supplemental feature that displays mostly dark surfaces in the UI. Most major companies (such as YouTube, Twitter, and Netflix) have adopted dark mode in their mobile and web apps.
While we won’t go in depth into React and styled-components, a basic knowledge of React, CSS, and styled-components would come in handy. This tutorial will benefit those who are looking to enhance their web applications by catering to those who love dark mode.
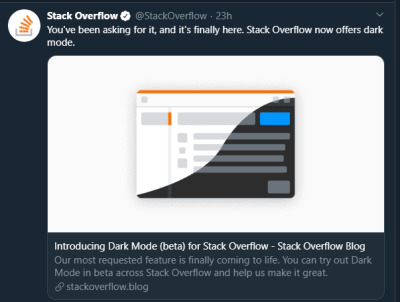
StackOverflow announces dark mode on Twitter (Large preview)
A few days before the writing of this article, StackOverflow announced its release of dark mode, giving users the chance to toggle between the two modes.
Dark mode reduces eye strain and helps when you’re working for a long time on a computer or mobile phone.
What Is Dark Mode?
Dark mode is the color scheme of any interface that displays light text and interface elements on a dark background, which makes the screen a little easier to look at mobile phones, tablets, and computers. Dark mode reduces the light emitted by the screen, while maintaining the minimum color-contrast ratios required for readability.
Why Should You Care About Dark Mode?
Dark mode enhances visual ergonomics by reducing eye strain, adjusting the screen to current light conditions, and providing ease of use at night or in dark environments.
Before implementing dark mode in our app, let’s look at its benefits.
Battery Saving
Dark mode in web and mobile apps can prolong the battery life of a device. Google has confirmed that dark mode on OLED screens has been a huge help to battery life.
For example, at 50% brightness, dark mode in the YouTube app saves about 15% more screen energy than a flat white background. At 100% screen brightness, the dark interface saves a whopping 60% of screen energy.
Dark Mode Is Beautiful
Dark mode is beautiful, and it can significantly enhance the appeal of the screen.
While most products are going for that similar bland white look, dark mode offers something different that feels mysterious and new.
It also provides great opportunities to present graphic content such as dashboards, pictures, and photos in a fresh way.
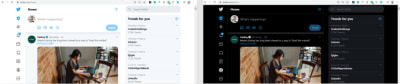
The beauty of Twitter’s dark mode over light mode (Large preview)
Now that you know why you should implement dark mode in your next web app, let’s dive deep into styled-components, which is the defining resource of this tutorial.
Dark mode is the color scheme of any interface that displays light text and interface elements on a dark background, which makes it a little easier to look at on mobile phones, tablets, and computers.
“
What Are styled-components?
Throughout this article, we will be using the styled-components library very often. There have always been many ways to style a modern web app. There’s the traditional method of styling at the document level, which includes creating an index.css file and linking it to the HTML or styling inside the HTML file.
A lot has changed in the ways that web apps are styled recently, since the introduction of CSS-in-JS.
CSS-in-JS refers to a pattern in which CSS is composed using JavaScript. It utilizes tagged template literals to style components in a JavaScript file.
To learn more about CSS-in-JS, check out Anna Monus’s article on the subject.
styled-components is a CSS-in-JS library lets you use all of the features of CSS that you love, including media queries, pseudo-selectors, and nesting.
Why styled-components?
styled-components was created for the following reasons:
No class name hell
Instead of you scratching your head to find a class name for an element, styled-components generates unique class names for your styles. You’ll never have to worry about misspellings or using class names that have no meaning.
Using props
styled-components allow us to extend styling properties using the props parameter, commonly used in React — thus, dynamically affecting the feel of a component via the application’s state.
Supports Sass syntax
Writing Sass syntax out of the box without having to set up any preprocessors or extra build tools is possible with styled-components. In your style definitions, you can use the & character to target the current component, use pseudo-selectors, and experiment with nesting.
Theming
styled-components have full theming support by exporting a ThemeProvider wrapper component. This component provides a theme to all React components within itself via the Context API. In the rendering tree, all styled-components will have access to the provided theme, even when they are multiple levels deep. As we continue in this tutorial, we will look deeper into the theming features of styled-components.
To learn more advantages of styled-components, check out Kris Guzman’s article.
Implementing Dark Mode
In this article, we are going to implement dark mode on a simple YouTube-like web page.
To follow along, ensure that you clone the original repository from the starter branch.
Setting Up
Let’s install all of the dependencies in our package.json file. From the terminal, run the following command:
npm install
Upon its successful installation, run npm start. Here is what the web page looks like without dark mode implemented on it.
The web page to be used, without dark mode. (Large preview)
To install styled-components, in your terminal run npm install styled-components.
Implementation
To implement dark mode, we need to create four different components.
Theme
This contains the color properties of our light and dark themes.
GlobalStyles
This contains the global styles for the entire document.
Toggler
This holds the button element that toggles the functionality.
useDarkMode
This custom hook handles the logic behind the change of theme and the persistence of our theme in localStorage.
Theme Component
In the src folder, you’ll see components in the components folder. Create a Themes.js file, and add the following code to it.
export const lightTheme = { body: '#FFF', text: '#363537', toggleBorder: '#FFF', background: '#363537', } export const darkTheme = { body: '#363537', text: '#FAFAFA', toggleBorder: '#6B8096', background: '#999', }
Here, we’ve defined and exported lightTheme and darkTheme objects with distinct color variables. Feel free to experiment and customize the variables to suit you.
globalStyles Component
Remaining in your components folder, create a globalStyles.js file, and add the following code:
import { createGlobalStyle} from "styled-components" export const GlobalStyles = createGlobalStyle` body { background: ${({ theme }) => theme.body}; color: ${({ theme }) => theme.text}; font-family: Tahoma, Helvetica, Arial, Roboto, sans-serif; transition: all 0.50s linear; } `
We’ve imported createGlobalStyle from styled-components. The createGlobalStyle method replaces the now deprecated injectGlobal method from styled-components version 3. This method generates a React component, which, when added to your component tree, will inject global styles into the document, in our case, App.js.
We defined a GlobalStyle component and assigned background and color properties to values from the theme object. Thus, every time we switch the toggle, the values will change depending on the dark theme or light theme objects that we are passing to ThemeProvider (which will be created later, as we proceed).
The transition property of 0.50s enables this change to occur a little more smoothly, so that as we toggle back and forth, we can see the changes happen.
Creating Theme-Toggling Functionality
To implement the theme-toggling functionality, we need to add only a few lines of code. In the App.js file, add the following code (note that the highlighted code is what you should add):
import React, { useState, useEffect } from "react"; import {ThemeProvider} from "styled-components"; import { GlobalStyles } from "./components/Globalstyle"; import { lightTheme, darkTheme } from "./components/Themes" import "./App.css"; import dummyData from "./data"; import CardList from "./components/CardList"; const App = () => { const [videos, setVideos] = useState([]); const [theme, setTheme] = useState('light'); const themeToggler = () => { theme === 'light' ? setTheme('dark') : setTheme('light') } useEffect(() => { const timer = setTimeout(() => { setVideos(dummyData); }, 1000); return () => clearTimeout(timer); }, []); return ( <ThemeProvider theme={theme === 'light' ? lightTheme : darkTheme}> <> <GlobalStyles/> <div className="App"> <button onClick={themeToggler}>Switch Theme</button> { videos.map((list, index) => { return ( <section key={index}> <h2 className="section-title">{list.section}</h2> <CardList list={list} /> <hr /> </section> ); })} </div> </> </ThemeProvider> ); }; export default App;
The highlighted code is the one newly added to App.js. We’ve imported ThemeProvider from styled-components. ThemeProvider is a helper component in the styled-components library that provides theming support. This helper component injects a theme into all React component below itself via the Context API.
In the rendering tree, all styled-components will have access to the provided theme, even when they are multiple levels deep. Check out the section on “Theming”.
Next, we import the GlobalStyle wrapper from ./components/Globalstyle. Lastly, from the top, we import both the lightTheme and darkTheme objects from ./components/Themes.
In order for us to create a toggling method, we need a state that holds our theme’s initial color value. So, we create a theme state, and set the initial state to light, using the useState hook.
Now, for the toggling functionality.
The themeToggler method uses a ternary operator to check the state of the theme, and it toggles either dark or light based on the value of the condition.
ThemeProvider, a styled-components helper component, wraps everything in the return statement and injects any components below it. Remember that our GlobalStyles inject global styles into our components; hence, it’s called inside the ThemeProvider wrapper component.
Lastly, we created a button with an onClick event that assigns our themeToggler method to it.
Let’s see the outcome thus far.
Dark mode implemented without persistence (Large preview)
Our App.js file needs to be refactored; a lot of its code is not DRY. (DRY stands for “don’t repeat yourself”, a basic principle of software development aimed at reducing repetition.) All of the logic seems to be in App.js; it’s good practice to separate our logic for the sake of clarity. So, we’ll create a component that handles the toggling functionality.
Toggle Component
Still within the components folder, create a Toggler.js file, and add the following code to it:
import React from 'react' import { func, string } from 'prop-types'; import styled from "styled-components" const Button = styled.button` background: ${({ theme }) => theme.background}; border: 2px solid ${({ theme }) => theme.toggleBorder}; color: ${({ theme }) => theme.text}; border-radius: 30px; cursor: pointer; font-size:0.8rem; padding: 0.6rem; } \`; const Toggle = ({theme, toggleTheme }) => { return ( <Button onClick={toggleTheme} > Switch Theme </Button> ); }; Toggle.propTypes = { theme: string.isRequired, toggleTheme: func.isRequired, } export default Toggle;
To keep things neat, we’ve styled our toggle button in the Toggle component, using the styled function from styled-components.
This is purely for presentation; you can style the button as you see fit.
Inside the Toggle component, we pass two props:
the theme provides the current theme (light or dark);
the toggleTheme function will be used to switch between themes.
Next, we return the Button component and assign a toggleTheme function to the onClick event.
Lastly, we use propTypes to define our types, ensuring that our theme is a string and isRequired, while our toggleTheme is func and isRequired.
Using Custom Hooks (useDarkMode)
When building an application, scalability is paramount, meaning that our business logic must be reusable, so that we can use it in many places and even in different projects.
That is why it would be great to move our toggling functionality to a separate component. For that, we would create our own custom hook.
Let’s create a new file named useDarkMode.js in the components folder, and move our logic to this file, with some tweaks. Add the following code to the file:
import { useEffect, useState } from 'react'; export const useDarkMode = () => { const [theme, setTheme] = useState('light'); const setMode = mode => { window.localStorage.setItem('theme', mode) setTheme(mode) }; const themeToggler = () => { theme === 'light' ? setMode('dark') : setMode('light') }; useEffect(() => { const localTheme = window.localStorage.getItem('theme'); localTheme && setTheme(localTheme) }, []); return [theme, themeToggler] };
We’ve added a few things here.
setMode We use localStorage to persist between sessions in the browser. So, if a user has chosen the dark or light theme, that’s what they’ll get upon their next visit to the app or if they reload the page. Hence, this function sets our state and passes theme to localStorage.
themeToggler This function uses a ternary operator to check the state of the theme and toggles either dark or light based on the truth of the condition.
useEffect We’ve implemented the useEffect hook to check on component mounting. If the user has previously selected a theme, we will pass it to our setTheme function. In the end, we will return our theme, which contains the chosen theme and the themeToggler function to switch between modes.
I think you’ll agree that our dark-mode component looks sleek.
Let’s head over to App.js for the final touches.
import React, { useState, useEffect } from "react"; import {ThemeProvider} from "styled-components"; import {useDarkMode} from "./components/useDarkMode" import { GlobalStyles } from "./components/Globalstyle"; import { lightTheme, darkTheme } from "./components/Themes" import Toggle from "./components/Toggler" import "./App.css"; import dummyData from "./data"; import CardList from "./components/CardList"; const App = () => { const [videos, setVideos] = useState([]); const [theme, themeToggler] = useDarkMode(); const themeMode = theme === 'light' ? lightTheme : darkTheme; useEffect(() => { const timer = setTimeout(() => { setVideos(dummyData); }, 1000); return () => clearTimeout(timer); }, []); return ( <ThemeProvider theme={themeMode}> <> <GlobalStyles/> <div className="App"> <Toggle theme={theme} toggleTheme={themeToggler} /> { videos.map((list, index) => { return ( <section key={index}> <h2 className="section-title">{list.section}</h2> <CardList list={list} /> <hr /> </section> ); })} </div> </> </ThemeProvider> ); }; export default App;
The highlighted code is newly added to App.js.
First, we import our custom hook, destructure the theme and themeToggler props, and set it with the useDarkMode function.
Note that the useDarkMode method replaces our theme state, which was initially in App.js.
We declare a themeMode variable, which renders either a light or dark theme based on the condition of the theme mode at the time.
Now, our ThemeProvider wrapper component is assigned our just recently created themeMode variable to the theme prop.
And lastly, in place of the regular button, we pass in the Toggle component.
Remember that in our Toggle component, we defined and styled a button and passed both theme and toggleTheme to them as props. So, all we have to do is pass these props appropriately to the Toggle component, which will act as our button in App.js.
Yes! Our dark mode is set, and it persists, not changing color when the page is refreshed or visited in a new tab.
Let’s see the outcome in action:
Dark mode implemented, but with a glitch in the button color when the browser reloads. (Large preview)
Almost everything works well, but there is one small thing we can do to make our experience splendid. Switch to the dark theme and then reload the page. Do you see that the blue color in the button loads before the gray for a brief moment? That happens because our useState hook initiates the light theme initially. After that, useEffect runs, checks localStorage, and only then sets the theme to dark. Let’s jump over to our custom hook useDarkMode.js and add a little code:
import { useEffect, useState } from 'react'; export const useDarkMode = () => { const [theme, setTheme] = useState('light'); const [mountedComponent, setMountedComponent] = useState(false) const setMode = mode => { window.localStorage.setItem('theme', mode) setTheme(mode) }; const themeToggler = () => { theme === 'light' ? setMode('dark') : setMode('light') }; useEffect(() => { const localTheme = window.localStorage.getItem('theme'); localTheme ? setTheme(localTheme) : setMode('light') setMountedComponent(true) }, []); return [theme, themeToggler, mountedComponent] };
The highlighted code is the only one added to useDarkMode.js. We’ve created another state named mountedComponent and set the default value to false using the useState hook. Next, inside the useEffect hook, we set the mountedComponent state to true using setMountedComponent. Lastly, in the return array, we include the mountedComponent state.
Finally, let’s add a bit of code in App.js to make it all work.
import React, { useState, useEffect } from "react"; import {ThemeProvider} from "styled-components"; import {useDarkMode} from "./components/useDarkMode" import { GlobalStyles } from "./components/Globalstyle"; import { lightTheme, darkTheme } from "./components/Themes" import Toggle from "./components/Toggler" import "./App.css"; import dummyData from "./data"; import CardList from "./components/CardList"; const App = () => { const [videos, setVideos] = useState([]); const [theme, themeToggler, mountedComponent] = useDarkMode(); const themeMode = theme === 'light' ? lightTheme : darkTheme; useEffect(() => { const timer = setTimeout(() => { setVideos(dummyData); }, 1000); return () => clearTimeout(timer); }, []); if(!mountedComponent) return <div/> return ( <ThemeProvider theme={themeMode}> <> <GlobalStyles/> <div className="App"> <Toggle theme={theme} toggleTheme={themeToggler} /> { videos.map((list, index) => { return ( <section key={index}> <h2 className="section-title">{list.section}</h2> <CardList list={list} /> <hr /> </section> ); })} </div> </> </ThemeProvider> ); }; export default App;
We’ve added our mountedComponent state as a prop in our useDarkMode hook, and we’ve checked whether our component has mounted, because this is what happens in the useEffect hook. If it hasn’t happened yet, then we will render an empty div.
Let’s see the outcome of our dark-mode web page.
Final result of dark mode (Large preview)
Now, you’ll notice that while in dark mode, when the page reloads, the button’s color doesn’t change.
Conclusion
Dark mode is increasingly becoming a user preference, and implementing it in a React web app is a lot easier when using the ThemeProvider theming wrapper in styled-components. Go ahead and experiment with styled-components as you implement dark mode; you could add icons instead of a button.
Please do share your feedback and experience with the theming feature in styled-components in the comments section below. I’d love to see what you come up with!
The supporting repository for this article is available on GitHub. Also, check it out on CodeSandbox.
References
“Documentation”, styled-components
“Create a Dark Mode of your app using Styled Components”, Tom Nolan, Medium

(ks, ra, il, al)
0 notes
Text
What Should You Do When A Web Design Trend Becomes Too Popular?
What Should You Do When A Web Design Trend Becomes Too Popular?
Suzanne Scacca
2020-03-31T11:30:00+00:002020-04-01T03:35:52+00:00
I read an interesting article on Forbes recently about language saturation. Here’s the problem:
Consumers don’t always understand the technicalities of what businesses do or the solutions they’ve created for them. So, copywriters use jargon that translates something like “Internet-connected devices with computing capabilities” into “smartphones”, “smart watches” and “smart speakers”.
Some of these buzzwords spread like wildfire and it soon becomes impossible to find a brand or website that doesn’t use them. When that happens, the words — and the associated product or service — become meaningless in the minds of consumers because everyone is saying the same thing.
The same thing happens when design trends become too popular. This is something Vitaly Friedman talked about last year with regards to cookie consent notices and banner blindness.
But what choice do you have? Are you supposed to hop on the design bandwagon anyway so your website doesn’t get left behind? Today, we’re going to look at what your options are.
What Should You Do with Too-Popular Design Trends?
To be clear, I’m not suggesting that you ignore any and all rising design trends.
There are certain trends that we absolutely need to adopt across the board. Like minimalism and mobile-first design. When there’s substantial, quantifiable proof that a design technique is needed, please don’t ignore it.
What I’m talking about are design trends that aren’t aimed at strengthening the web. Instead, they’re solely about driving up engagement on websites.
Brutalism. Facebook Messenger pop-ups. Home page hero sliders. The second that popular websites begin to adopt these trends and once writers and designers start including them in design trend roundups, it’s only a matter of months before consumers are inundated with them. And this is when banner blindness kicks in.
So, what are your options when you learn about a new design trend that promises big results?
Option 1: Ignore It and Stick with What Works
There are a few reasons you should consider going with this option:
You work on short-term website projects.
For those of you who build websites, hand them over to clients and then wish them luck as you move onto the next, it’s probably not a good idea to play around with fad-like design trends.
You know how quickly design trends change, so why put your client in a position where they have a website with an outdated design? One of three things is going to happen:
They’ll leave the outdated feature as is and have no idea that it’s costing them conversions.
They’ll ask you for help in removing the feature not too long after launch and won’t be happy about needing a rework so soon.
They’ll ask another designer for help because they’re upset you put them in this less than ideal position.
Unless your client has a very good reason why they need to exploit a passing design trend, try to dissuade them from it. If they understand the fleeting nature of some of these trends, as well as how banner blindness develops from oversaturation, they should be onboard with you sticking to what works.
You’re designing (or redesigning) a site for a very well-established company.
When building a website for a company that has a long-standing reputation with its audience as well as a tried-and-true formula for success, adopting a passing trend could be risky.
Take Zillow, for example.

The homepage for Zillow on mobile (Image source: Zillow) (Large preview)
This is the mobile homepage as it stands today. It’s simple, sleek and intuitive by nature.
Can you imagine what would happen if the designer decided to add a video background to the hero banner? Or to interrupt the property browsing experience with a pop-up advertising a free ebook download?
You have to really think about what disruptions to the expected design would do to the flow of things. So, when building something for a brand that’s known for its consistency and convenience, it’s best to ignore passing trends.
This doesn’t mean that a website like this shouldn’t be redesigned. Like I said before, lasting design “trends” can’t be ignored as they enable us to move websites in the right direction (like responsive design). For example, this was Zillow in 2017:

The mobile homepage for the Zillow website in 2017 (Image source: Zillow) (Large preview)
See how far we’ve come in terms of making websites mobile responsive and mobile-first in just a few years? These are the kinds of popular changes that don’t require debating.
The company’s goal is to build relationships; not to increase sales.
I realize that every website needs conversions in order to survive. However, many business models can’t sustain with just one-off sales. It costs too much money to constantly market to new customers, which is why some businesses focus on building long-term relationships with their customer base.
And that’s why you need to steer clear of conversion-boosting design trends on these kinds of websites.
Take, for instance, Gary Vaynerchuk’s website:

The mobile website for Gary Vaynerchuk is free of passing design trends and elements. (Source: Gary Vaynerchuk) (Large preview)
Remember when every website seemed to have a pop-up containing two buttons — one of which would be super-positive like “Yes, I want to change my life!” and the other which was meant to shame the visitor with something like “No, I like living in squalor.”
How do you think Vaynerchuk’s always-growing loyal following would feel if the site displayed one of those pop-ups? Not only would they be annoyed by the disruption keeping them from the content, but they’d probably be upset that he’d use such a shameless ploy to bully them into signing up.
If the brand you’re building a website for is on a similar mission — to build long-lasting and meaningful relationships — you don’t want to sully that with bad design decisions.
Option 2: Adopt the Trend But Keep an Eye on Market Saturation
Patrick Ward, the author of the Forbes article mentioned above, explained that many writers in the fintech space have had to pivot towards a simpler style of writing:
“At first, new startups used jargon and buzzwords to highlight their brand new tech and give themselves a competitive edge.”
I think this is a good lesson for designers as well. It’s not always a bad thing to hop on a design trend’s bandwagon — especially if it’s proven to work and it’s still in the very early stages of public awareness.
So, while there are clear cases where it makes sense to avoid design fads, I think there are times when it makes sense to take advantage of them. The only thing is, you can’t just implement the design and then leave it be.
For instance, this is the 15 Finches website on desktop:

A walk-through of the animation on the 15 Finches website on desktop. (Source: 15 Finches) (Large preview)
Now let’s compare this same animated experience to what users get on their mobile devices:

A walk-through of the 15 Finches website on mobile with layering errors and no animation. (Source: 15 Finches)(Large preview)
There are a number of design choices made on this mobile site that should’ve been long phased out.
The vertical typography in the background should go. It might add texture to the desktop site, but it’s just a confusing distraction on mobile.
The animation on the desktop site doesn’t translate to mobile. To present visitors with a consistent experience, the designer should commit to mobile-first design.
There are also layering errors all over the mobile site, with text often covering other bits of text as well as missing call-to-action buttons.
As I said, there are some sites where it’s okay to adopt short-term design trends. Just keep an eye on them.
For example, the Hubspot site design is always changing, but any design trends it adopts never seem to overstay their welcome. Hubspot tends to cut out just before they become too much. And that’s a key thing to remember.

Hubspot’s mobile site continues to use a chatbot widget to guide prospective customers in the right direction. (Image ource: Hubspot) (Large preview)
As you can see, the mobile site still uses a chatbot widget. For a business that sells sales and marketing software, it’s an important element to retain even if other sites have since ditched theirs.
That said, I’m positive that Hubspot keeps close tabs on its user data so it probably has confirmation that the element continues to work well. This is just one of the things you should be mindful of when monitoring a trend.
If you want to utilize popular design trends, you need to be in it for the long haul with your clients. That way, the second you start to notice:
Oversaturation in the market,
The trend has gone completely stale,
Or your users aren’t responding positively to it.
You can immediately move the website to safer ground.
Option 3: Go in a Similar But Different Direction
When a design technique or element immediately and universally becomes popular, there’s more value to it than just its ability to increase conversions or create a prettier design.
Take a look at why it’s caught on the way it has. If you understand what’s driving the popularity of the fad, you can leverage the strongest parts of it, make it your own and have something with real staying power.
Do you remember the New York Times’ Snow Fall article in 2012? This was shortly after parallax scrolling started to pick up speed in web design. And despite some websites utilizing the trend, it was the way the NYT creatively integrated it along with interactive and animated images that really blew people away — so much so that it won a number of journalism awards for it.
Notice that the NYT didn’t try to redesign its website with parallax scrolling or interactivity. It took the basic principles gaining in popularity and applied it to one groundbreaking story. By considering how the trend could be best used for maximum impact, the NYT turned a short-term fad into something that would make its story memorable.
If you understand what’s driving the popularity of the fad, you can leverage the strongest parts of it, make it your own and have something with real staying power.
“
Let’s take a look at a more recent example of a site using this approach.
You’re all familiar with the trend of split-screen design, right? It worked really well on desktop, both in its static form as well as when one half of the screen would remain put while the other moved. But on mobile? It wasn’t so great.
While we’ve seen a lot of split screen designs get phased out, EngineThemes has made the trend its own:

EngineThemes has put a playful twist on the once-trendy split screen design. (Source: EngineThemes) (Large preview)
Upon entering the site, it’s a look we’re familiar with as consumers. But it doesn’t take long to realize that this is going to be a different experience.
For starters, the bobbing bird and red double-headed arrow are something you don’t see much of, if at all, on other sites. I can’t imagine many visitors scroll past this banner without engaging with it.
Secondly, there are no words in this banner on mobile. (There are on the desktop website.)
One of the reasons why this design trend doesn’t work anymore is because it can’t be used on mobile sites — there just isn’t enough space to split the screen and fit enough words in there. Or is there?

EngineThemes has hidden a message in its animated, split screen graphic. (Image source: EngineThemes) (Large preview)
Eagle-eyed visitors will notice that there’s a message carefully hidden in the bird graphic when the arrow is moved to the right. Granted, the text should be bigger, but mobile visitors can zoom in if they’re struggling to read it.
It’s a string of code that reads:
"EngineThemes provides effective business solutions with simple and powerful WordPress app themes."
But do you see what I mean? When a design trend suddenly becomes popular — for a short or long while, too — it doesn’t necessarily mean you need to use the same exact version of it like everyone else. This is why oversaturation quickly turns once great-looking websites stale.
By taking what’s so innovative about a design trend and making it your own, though, you can give the trend real staying power while making your site a standout in the process.
Wrapping Up
When we overdo it by leveraging the same design trends as everyone else, we put our websites at risk of becoming redundant or, worse, invisible. So, how do we establish a cutting edge if we can’t make use of design “jargon”?
The truth is, there’s no one clear-cut answer. You need to be able to read the room, so to speak, and figure out which approach is best for you. You could leave the passing trend alone, you could adopt it temporarily or you could make it your own.
Further Reading on SmashingMag:
What Does A Foldable Web Actually Mean?
Table Design Patterns On The Web
Designing The Perfect Slider
Bottom Navigation Pattern On Mobile Web Pages: A Better Alternative?

(ra, il)
0 notes
Text
Upcoming Web Design Conferences (April 2020 – August 2020)
Upcoming Web Design Conferences (April 2020 – August 2020)
Jan Constantin
2020-03-24T10:00:40+01:002020-03-25T06:05:34+00:00
Please note that dates are subject to change due to COVID-19, so it would be best to check the websites for further information regarding their conference dates and schedules.
We’re putting our heart and soul into crafting personal, inclusive and valuable events for all of us to become better professionals. With online workshops, we aim to give you the same experience and access to experts as in an in-person workshop, without needing to leave your desk. So you can learn at your own pace, in your own time, and follow interactive exercises along the way.

Excited and ready for the adventure, but think your manager could need just a little bit more persuasion? Don’t worry — we’ve prepared a neat lil’ template: Letter For The Boss Template. Good luck!
Boost your skills online and learn practical, actionable insights from experts in the industry, live. With insightful takeaways, interactive exercises, access to experts, slides, recordings and a friendly Q&A.
Explore all workshops →
Now, enough for the plug! Let’s dive into our list for April to August:
April 2020
May 2020
June 2020
July 2020
August 2020
April 2020
ScanAgile 2020
“The presentations and workshops are suitable for developers, scrum masters, product owners, team leaders, agile coaches, project and program managers, management consultants as well as executives.”
When: April 1-2, 2020
Where: Helsinki, Finland

Frontcon 2020
“FrontCon is a two-day conference that focuses on front-end concepts and technologies. This year, there will be 23 speakers, 270+ attendees, and 4 workshops.”
When: April 1-3, 2020
Where: Riga, Latvia

DevConf Johannesburg 2020
“DevConf is a community driven, developer focused, one-day conference hosted annually. The aim of the conference is to provide software developers a buffet of tools, practices and principles applicable to tackling current and future challenges in the South African software development environment. It's an event where attendees can learn, network and be inspired regardless of their specific technology stack and programming language of choice.”
When: April 2, 2020
Where: Johannesburg, South Africa

GenerateJS 2020
“Generate is brought to you by leading design magazine brands net and Creative Bloq. At our latest conference, once again hosted at Rich Mix in Shoreditch, you’ll be able to attend awesome talks on all things JavaScript, including the latest libraries, most fashionable frameworks and more than a hint of vanilla JS. Not only that but you’ll also get to network with fellow devs, grill JS experts, check out great web tech and unwind with some of our Creative Bloq break activities. And even once the conference is at an end, we have more on offer: we’d love for you to join us for a beverage or two in the bar.”
When: April 2, 2020
Where: London, United Kingdom

MIDWEST PHP 2020
“Midwest PHP is the only conference to offer a full digital library, giving you access to even more sessions day or night! ”
When: April 2-4, 2020
Where: Mineapolis, MN, USA

vueday 2020
“VueDay the first international conference in Italy entirely about Vue.js. Vue is a progressive framework for building user interfaces. Vue is designed from the ground up to be incrementally adoptable. The core library is focused on the view layer only, and is easy to pick up and integrate with other libraries or existing projects.”
When: April 3, 2020
Where: Verona, Italy

UXinsight 2020
“UXinsight is an international event for UX research professionals and anyone interested in UX research. This years’ theme focusses on the creative part of UX research. UX research is a field born in academia, but most UX researchers work in the creative field functioning as a bridge between technology and people. In our increasingly fast and agile working environments we need to be even more creative to deliver solid research. Let’s celebrate creativity together!”
When: April 6-7, 2020
Where: Breda, Netherlands

The Lead Developer New York 2020
“The Lead Developer New York is a two-day conference packed full of inspirational and practical sessions from the world’s top technical leaders, focussed around three core themes: teams, tech and tools. Engineering leaders learn to nurture high performing teams, apply the best tech and tools for the job, and thrive as they meet the challenges of software engineering leadership.”
When: April 7-8, 2020
Where: New York, NY, USA

HolyJS 2020 Piter
“HolyJS 2020 Piter will be the ninth in a row JavaScript conference held by JUG Ru Group. More than 1000 JS developers will be brought together to discuss the present and future of JavaScript community with the world's leading experts and watch dozens of frontend talks and much more. We'll dwell on both backend and desktop.”
When: April 10-11, 2020
Where: St Petersburg, Russia

ODSC East 2020 - Open Data Science Conference
“Open Data Science will bring together the open source and data science communities to help foster the growth of open source software used in data science. The primary focus will be on the languages and tools that enable effective data analysis.”
When: April 13-17, 2020
Where: Boston, MA, USA

Ai x Summit
“This is the most important Industry AI Event of the year, hear from fellow CxOs, executives, chief data scientists, and thought leaders. Learn how AI and Data Science techniques are transforming business and prepare your company for the next wave of innovation by learning about: Deep Learning, Real-time Prediction, New product development, Data Visualization, Machine Learning, AI Tools and frameworks, Case studies, Automation, Sentiment Analysis, Open source AI/Data Science, Best practices, Law, Ethics and Governance.”
When: April 14-17, 2020
Where: Boston, MA, USA

JS Kongress 2020
“The focus of JS Kongress on April 15-16 2020 is Scaling JS – Pushing the Limits: Massive Platforms, Data-Driven Architectures, and Modern APIs. The #DeepTrack is about all things JavaScript. YOU create the program!”
When: April 15-16, 2020
Where: Munich, Germany

5G Africa Forum - Next Digital Revolution in Africa
“"Next Digital Revolution in Africa" 5G network is the next generation of mobile internet connectivity, offering faster speeds and more reliable connections on smartphones and other devices than ever before. It is the fifth generation of cellular mobile communications, which will ultimately replace 4G LTE to provide faster and more reliable service with lower latency. The conference will look at the progress that has been made to date and the challenges ahead for policy-makers and stakeholders. Key areas being covered include connectivity, future deployment and business model impact. It will look at what a 5G world might look like and where Africa sits at a global level as it seeks to deliver on making 5G a reality by 2020. The forum will offer the ideal space for networking with industry players; senior managers, decision-makers, and practitioners operating in the industries and making the most of banking technologies.”
When: April 15-16, 2020
Where: Johannesburg, South Africa

DragonPy
“Python Best Practices for the modern Web and Data Scientists A Python conference in Ljubljana, Slovenia, taking place on April 18 & 19, 2020. Followed by three days of sprints.”
When: April 18-19, 2020
Where: Ljubljana, Slovenia

SmashingConf San Francisco 2020
“Let’s rock’n’roll! For SmashingConf SF 2020, April 21–22, we’re bringing back two full days packed with front-end, UX and all that jazz! Live sessions on performance, accessibility, security, interface design, debugging and fancy CSS/JS techniques — and a few surprises along the way.”
When: April 20-23, 2020
Where: San Francisco, CA, USA

Devopsdays Baltimore 2020
“DevOpsDays is a worldwide series of technical conferences covering topics of software development, IT infrastructure operations, and the intersection between them. DevOpsDays Baltimore 2020 is run by volunteers from the Baltimore area and will be hosted at the Columbus Center (iMET) in downtown Baltimore on April 21-22, 2020. The event features single-track agenda with a combination of talks (30 minute open format and ignite format) and self-organized open space content. More information can be found on our website. ”
When: April 21-22, 2020
Where: Baltimore, MD, USA

NDC Porto 2020
“NDC Porto 2020 is a 4 day event with workshops 21-22 April followed by a 2 day conference 23-24 April. From 21-24 April 2020, NDC Porto will offer a combination of talks, lightning talks and panels.”
When: April 21-24, 2020
Where: Porto, Portugal

UX Healthcare London 2020
“We live in a world of constant change. Technology is evolving more rapidly than anyone would have ever thought. In healthcare, this change is not embraced as much as in other industries. Most healthcare systems weren’t designed for this world. With UX Healthcare we aim to make a difference, because better design is needed in the healthcare industry. From clinicians, healthcare insurances to hospital equipment manufacturers - our goal is to help healthcare across the world to implement the best user experiences possible.”
When: April 22-24, 2020
Where: London, United Kingdom

Uphill Conf 2020
“Uphill Conf is a two days conference on top of Mount Gurten with awesome speakers and unique workshops. Learn about the latest trends in frontend web technologies in an inspiring, open environment. Meet and connect with our speakers and other like-minded, passionate developers.”
When: April 23-24, 2020
Where: Bern, Switzerland

HalfStack Charlotte 2020
“An authentic, high value experience for attendees and sponsors focused on UI-centric JavaScript and web development. The priority for HalfStack is the attendee experience, with great food, drinks, talks, swag, and community. Hosted by London's longest-lived JavaScript meetup group, HalfStack is coming to Charlotte for the first time. HalfStack is a UI-centric, one-day single track conference hosted in a relaxed environment. HalfStack carefully curates talks that inspire and inform the audience in a highly interactive and entertaining manner. An initimate feeling where each attendee has time to meet one another; maximum capacity for HalfStack Charlotte is 200 attendees.”
When: April 24, 2020
Where: Charlotte, NC, USA

beyond tellerrand // DÜSSELDORF 2020
“beyond tellerrand celebrates the 10th edition in Düsseldorf. Join for two days of conference with the renowned familiar atmosphere to attend inspiring and exciting talks plus full-day workshops and side events around those dates. Not to forget the many networking opportunities.”
When: April 27-29, 2020
Where: Düsseldorf, Germany

May 2020
UX Burlington 2020
“UX Burlington is an event tailored for UX professionals seeking to stay ahead of the curve and push their work to the next level. UX Burlington is not a 101 event—we’d say more like a 301. Attendees include designers, developers, content producers, researchers, digital strategists, and product and brand managers. Every year 200+ UX practitioners attend to hear and learn from experts like yourself. In addition to keynotes, the conference runs two parallel tracks for part of the day, one catering to developers and the other a more general track tailored to UX/UI designers, researchers, and marketers.”
When: May 1, 2020
Where: Burlington, VT, USA

Texas Linux Fest 2020
“Texas Linux Fest is a weekend event geared towards individual users, rather than an expensive multi-workday expo that might cater primarily to sponsored attendees. Whether you use free software and Linux at home, in your place of business, in your school or non-profit, or you are simply curious, Texas Linux Fest offers something for you.”
When: May 1-2, 2020
Where: Austin, TX, USA
Into The Box 2020
“Into The Box is a 2-day, 2-track event with speakers from around the world presenting on topics surrounding modern web and mobile technologies, development processes, software craftsmanship and infrastructure. We will be located in the Hyatt Place The Woodlands locate at 1909 Research Forest Drive, The Woodlands, Texas 77380. Into The Box also offers 1 full day of training workshops, 2 conference days with over 30+ sessions, breakfast, hot lunches, and our now famous Mariachi Party!”
When: May 7-8, 2020
Where: The Woodlands, TX, USA

HalfStack Tel Aviv 2020
“An authentic, high value experience for attendees and sponsors focused on UI-centric JavaScript and web development. The priority for HalfStack is the attendee experience, with great food, drinks, talks, swag, and community. Hosted by London's longest-lived JavaScript meetup group, HalfStack is coming to Tel Aviv for the first time. HalfStack is a UI-centric, one-day single track conference hosted in a relaxed environment at the Bascula Circus Theatre. HalfStack carefully curates talks that inspire and inform the audience in a highly interactive and entertaining manner. An initimate feeling where each attendee has time to meet one another; maximum capacity for HalfStack Tel Aviv is 300 attendees.”
When: May 11, 2020
Where: Tel Aviv, Israel

Web Rebels 2020
“Web Rebels is a non-profit community conference for anyone who loves developing applications and services using web technology. Two days, one track, 16 speakers.”
When: May 14-15, 2020
Where: Oslo, Norway

Dutch Clojure Days 2020
“The Annual International Gathering of Clojure Enthusiasts and Practitioners in the Netherlands! We welcome you to the 5th edition of our free and non-profit Clojure conference organised by the community, for the community with a full day of amazing talks in a friendly welcoming atmosphere.”
When: May 16, 2020
Where: Amsterdam, Netherlands

Voxxed Days Frontend Bucharest 2020
“This developer conference aims to bring together popular speakers, core developers of popular open source technologies and professionals willing to share their knowledge and experience on frontend development. With several tracks on different topics (JS, Angular, React, React Native, Web, Mobile, GraphQL, PWA, VueJS, HTML, CSS, Typescript, Frontend testing, UI/UX design, and so on) attendees can satisfy their curiosity and learn new skills while enjoying and having fun!”
When: May 19-20, 2020
Where: Bucharest, Romania

DevDay Faro 2020
“DEVDAY'20 is a deep tech festival for developers and tech enthusiasts. Save the dates on 2020/05/22-23 to join us in Faro/Portugal for talks, workshops and discussions. This year on May 22nd, we'll kick off the event with 5 all-day workshops on the latest concepts of software development. On May 23rd, we invite you to enjoy 10 selected talks on two stages all about coding and tech-related subjects.”
When: May 22-23, 2020
Where: Faro, Portugal

DigiMarCon Cruise 2020 - Digital Marketing Conference At Sea
“Immerse yourself in topics like digital strategy, programmatic advertising, web experience management, usability / design, mobile marketing & retargeting, customer engagement, user acquisition, social media marketing, targeting & optimization, video marketing, data science & big data, web analytics & A/B testing, email marketing, content marketing, conversion rate optimization, search engine optimization, paid search marketing, geo-targeting, predictive analysis & attribution, growth hacking, conversion rate optimization, growth marketing tools, marketing & sales automation, sustainable growth strategies, product marketing & UX / UI and much, much more!”
When: May 23-28, 2020
Where: Baltimore, MD, USA

PGCon 2020
“PGCon is an annual conference for users and developers of PostgreSQL, a leading relational database, which just happens to be open source. PGCon is the place to meet, discuss, build relationships, learn valuable insights, and generally chat about the work you are doing with PostgreSQL. If you want to learn why so many people are moving to PostgreSQL, PGCon will be the place to find out why. Whether you are a casual user or you've been working with PostgreSQL for years, PGCon will have something for you.”
When: May 27-28, 2020
Where: Ottawa, Canada

June 2020
2020 AI & Innovation
“Artificial Intelligence is based on the research of fundamental and applied sciences. Through the evolution of information and engineering, it has gradually penetrated and changed not only our lives but our work style, which has resulted in bringing new experiences and convenience. And yet we’re facing with an unprecedented challenge and a crisis of privacy. An agenda, such diversified and interdisciplinary, ACEAI and the 8th ISFAS sincerely invite all relevant professionals in both academic and the industry to present and to exchange. All relevant abstracts/full papers in regards to “Fundamental and Applied Sciences” and “Engineering and Information” are welcomed, especially in the fields of AI, 5G, IoT and Blockchain.”
When: June 1-4, 2020
Where: Taipei, Taiwan

Amsterdam JSNation Conference 2020
“Amsterdam JSNation is going to be the main happening of the JS scene in 2020. The conference unites library authors and core teams with fresh ideas, great people, and a summer Amsterdam in the background. We recognize JavaScript development as an art of engineering, and that's why the conference offers both a JS-driven art exhibition and audiovisual performances during the afterparty. After the event, we'll explore the well-known Amsterdam museums together, and later on, we'll gather for a JS hangout in the Vondelpark.”
When: June 3-5, 2020
Where: Amsterdam, Netherlands

NDC Oslo 2020
“From 8-12 June 2020, Oslo Spektrum will once again host NDC Oslo. NDC Oslo is a 5-day event with 2 days of pre-conference workshops and 3 days of conference. The conference will cover topics such as: NET Framework - Agile - C++ - Cloud - Database - Design - Devops - Embedded - Front-End Framework - Fun - Functional Programming - Gadgets - Internet of Things - Javascript - Microsoft - Misc Languages - Mobile - People - Programming Languages - Security - Techniques - Testing - Tools - UX – Web and more.”
When: June 8-12, 2020
Where: Oslo, Norway

SmashingConf Austin 2020
“The Smashing Cat is coming to Austin, Texas, y’all! Meet an inclusive, practical and friendly conference for front-end developers and designers who love their work. One track, two days, 14 speakers and 500 truly smashing attendees. But most importantly: a community that cares, shares and learns from each other.”
When: June 8-11, 2020
Where: Austin, TX, USA
RightsCon Costa Rica 2020
“Originally called the Silicon Valley Human Rights Conference, RightsCon rotated between San Francisco and another global city. Now, RightsCon is an annual event that rotates its location each year to new host cities around the world that are power centers for technology and human rights. In 2019, we hosted RightsCon in Tunis, Tunisia, and we look forward to gathering in San José, Costa Rica, in 2020.”
When: June 9-12, 2020
Where: San José, Costa Rica

Craft Conference 2020
“CRAFT is about software craftsmanship, which tools, methods, practices should be part of the toolbox of a modern developer and company, and it is a compass on new technologies, trends. You can learn from the best speakers and practitioners in our community.”
When: June 9-12, 2020
Where: Budapest, Hungary

Pixel Pioneers Bristol 2020
“A one-day conference of practical and inspiring design and front-end talks, featuring eight world-class speakers, preceded by a workshop day. Here's what you get for your conference ticket: - Eight practical sessions with actionable takeaways, - First dibs on limited tickets for workshops and side events, - Drinks and refreshments, - After-party with complimentary drinks.”
When: June 11-12, 2020
Where: Bristol, UK

Accessibility Club Summit 2020
“After last year's very first and hugely successful summit in Berlin we are giddy with excitement to announce our next summit for 2020! Again, the summit will be jointly run by multiple web accessibility and inclusive design related meetups from all over Europe, and again there will be a premiere: For the first time, the Accessibility Club will meet outside of Germany, this time welcoming you to Amsterdam! The summit will take place right after CSS Day 2020 and again feature a full-day barcamp a second day with community run workshops. There are still a lot of details to be figured out, but you should definitely save the date already!”
When: June 13-14, 2020
Where: Amsterdam, Netherlands

KubeCologne Conference 2020
“KubeCologne is about Cloud-Native Thinking, Learning Kubernetes and its ecosystem, networking and community love! Be part of the second KubeCologne Conference on June 17th in Mediapark Cologne, learn and love Kubernetes® and Cloud-Native Thinking! Be part of the second KubeCologne Conference on June 17th in Mediapark Cologne, learn and love Kubernetes® and Cloud-Native Thinking! Meet with experts and users alike to learn and share knowledge on your journey to enterprise-grade container platforms and CI/CD chains.”
When: June 17, 2020
Where: Cologne, Germany

Swiss PGDay 2020
“This day is all about PostgreSQL - the world's most advanced open source database. Take the opportunity to meet with other people interested in PostgreSQL in Switzerland. Beside the talks we offer the chance to network during the day and are pleased to invite you for a round of drinks after the meeting. The event is suitable for everybody, from first-time users to experts and from clerks to decision-makers. It is a two track conference, a complete track in English and one in German.”
When: June 18-19, 2020
Where: Rapperswil, Switzerland

JSCONF.BE 2020
“We’re looking forward to JSCONF.BE 2020 which will take place June 22-23, 2020 in Brussels. We plan to make June 23 a day packed with valuable and exciting content for the JavaScript community! This year there will be two themes: -Security -Reactive Frameworks/Serverless Architectures. Additionally, we’ll have a handful of break-out tracks for exciting niche topics such as AI/Machine Learning, Blockchain, Augmented Reality.”
When: June 22-23, 2020
Where: Brussels, Belgium

LeadDev Manager of Managers London 2020
“Lead Dev Managers of Managers is a new, intimate, one-day conference for those leading teams of teams and managing other managers (Senior Managers, Directors, Heads and VPs of Engineering, and CTOs). Hosted by Monzo CTO Meri Williams, the event is taking place on 23 June, the day before Lead Dev London (24 & 25 June). It will feature a blend of talk sessions and practical structured discussions; help you to become a better leader & manager, build a peer network, and enable your teams to be higher performing.”
When: June 23, 2020
Where: London, UK

OpenJS World 2020
“OpenJS Foundation’s annual event brings together the JavaScript and web ecosystem including Node.js, Electron, AMP and more. Learn and engage with leaders deploying innovative applications at massive scale.”
When: June 23-24, 2020
Where: Austin, TX, USA

enterJS 2020
“EnterJS opens its gates for the seventh time in 2020 and offers developers a comprehensive view of the JavaScript-based enterprise world. The focus is not only on the latest trends around the JavaScript programming language itself, but also on the frameworks and tools that are part of skillset of every JavaScript developer. Of course, the conference also takes a look at the latest technologies and frameworks. Always with the aim of being able to assess whether it is worth using them in your own team.”
When: June 23-26, 2020
Where: Darmstadt, Germany

The Perl Conference 2020
“The Perl Conference is a high-quality, inexpensive, technical Conference that celebrates the family of Perl programming languages. The beauty of The Perl Conference is that it remains accessible to everyone regardless of experience, yet it is still valuable to the most skilled programmers.”
When: June 23-27, 2020
Where: Houston, TX, USA

Lead Dev London 2020
“Join our community at the Lead Dev London, where technical leaders learn to nurture high performing teams, apply the best tech and tools for the job, and thrive as they meet the challenges of software engineering leadership.”
When: June 24-25, 2020
Where: London, United Kingdom

UX Healthcare Amsterdam 2020
“We live in a world of constant change. Technology is evolving more rapidly than anyone would have ever thought. In healthcare, this change is not embraced as much as in other industries. Most healthcare systems weren’t designed for this world. With UX Healthcare we aim to make a difference, because better design is needed in the healthcare industry. From clinicians, healthcare insurances to hospital equipment manufacturers - our goal is to help healthcare across the world to implement the best user experiences possible.”
When: June 24-26, 2020
Where: Amsterdam, Netherlands

ADDC - App Design & Development Conference
“Single-track international conference for iOS & Android developers and UX/UI designers in Barcelona, Spain. ADDC aims to create an opportunity for designers and developers to meet, find new ways to work together and get inspired in an open, inclusive and collaborative space. Our talks are crafted to be valuable for both designers & developers.”
When: June 24-26, 2020
Where: Barcelona, Spain

July 2020
OdessaJS'2020
“Enjoy Odessa together with 500+ international participants and share your knowledge with the community. Welcome to submit your talk and get ready for 2 days of endless fun and be one of the 20+ speakers of the greatest summer Ukrainian JS gathering.”
When: July 4-5, 2020
Where: Odessa, Ukraine

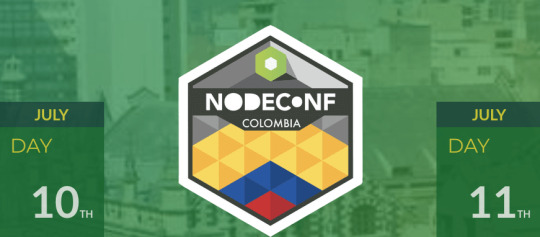
NodeConf Colombia 2020
“NodeConf Colombia 2020 is the first international event focused on the entire Node.js ecosystem. It’s a non-profit event, where our attendees will be sharing in an environment of inclusion and respect, having access to relevant information through talks, workshops, and great experiences with the Colombian Node community.”
When: July 10-11, 2020
Where: Medellín, Colombia
O'Reilly Open Source Software Conference (OSCON)
“OSCON: Ground Zero for the evolution of Open Source. For over 20 years, OSCON has been the focal point of the open source movement. The inception of OSCON came from an event focused on Perl and grew to cover the other scripting languages. It has since evolved into the destination for all things free and open. The event has also provided a platform for the launch of major initiatives such as Kubernetes 1.0 and OpenStack—both announced at OSCON. Today, OSCON continues to be the catalyst for innovation, bringing together large corporations and grass-roots communities to share insights and foster change. Open source helps technology to thrive, and OSCON continues on with the tradition of bringing you the latest technological advances and a path to successfully implement open source in your workflow.”
When: July 13-16, 2020
Where: Portland, OR, USA

CSSCAMP 2020
“One-day, one-track conference for developers and designers who work on the web. International conference dedicated to the developers, designers and engineers who work on the web and build the world’s most engaging user interfaces. Learn how to push the boundaries with the latest technologies, cutting edge techniques, and tools.”
When: July 15, 2020
Where: Barcelona, Spain

Algorithm Conference 2020
“Algorithms have found their way into practically every aspect of our lives. Wherever you look, howe’er you range, algorithms are hard to miss. Increasingly being deployed to guide you along. Algorithm Conference 2020 will bring you 3 days of high-level workshops and presentations that show how algorithms have been shaping and will continue to shape every aspect of our lives. Special consideration will be given to sessions that highlight innovative technical and commercial developments in big data, artificial intelligence and blockchain technologies, their ethical and privacy implications, and how they impact and are impacted by public policies. Researchers from the academia, developers and technical managers from startups and established companies will be on hand to share insights on the current state of development in big data, artificial intelligence and blockchain technologies, and their future trajectories. Those overseeing the rollout of these technologies on the management side and people involved in influencing and advising policy makers will also be on hand to share their insights.”
When: July 16-18, 2020
Where: Austin, TX, USA

DevopsDays Medellin 2020
“DevOpsDays is an international event of technical conferences on software development, IT infrastructure and operations and the intersection between them. This year this world reference conference on DevOps arrives in Medellin July 30 and 31 of 2020. DevOpsDays events present a combination of talks and self-organized open space content. Topics often include Pipelines Integration and Continuous Deployment (CI / CD), Test Automation, Security, Lean and Organizational Culture, among others.”
When: July 30-31, 2020
Where: Medellín, Colombia

August 2020
THAT Conference 2020
“Over four days, folks of diverse technology backgrounds and expertise levels gather to take advantage of multiple learning mediums to maximize one’s community and career advancements. An inclusive, multi-day event for anyone passionate about learning and sharing all things mobile, web, cloud, IoT, and technology. Engage in a wide range of software development topics with 150+ sessions, massive open spaces, and culture of creating and giving back. And there’s bacon, water slides, and, you know what? Bring the whole family.”
When: August 3-6, 2020
Where: Wisconsin Dells, WI, USA

UX And Digital Design Week 2020
“Create experiences that people will fall in love with. Get inspiration for your current projects and advice on how to build a design team of your dreams. Find out the secrets of what makes products successful and what mistakes companies made when they were building new services.”
When: August 10-14, 2020
Where: London, UK

International Travel Roadshow-Kuala Lumpur
“International Travel Roadshowis a unique & well known travel roadshow which is a connects the world wide sellers (exhibitors) and Buyers (Travel agents / Tour Operators) from the local city. The Roadshow usually happens 1 day in each city to meet the hand picked outbound tour operators. ITR is not like any other travel exhibition just for the below reasons. 1Day - 1 City - 100 Buyers Pre-fix Appointment with Buyers Networking Lunch with Buyers Luxury - MICE - Business Travel Invitation to Potential Buyers Full Day Roadshow.”
When: August 13, 2020
Where: Kuala Lumpur, Malaysia

International Travel Roadshow-Singapore
“International Travel Roadshowis a unique & well known travel roadshow which is a connects the world wide sellers (exhibitors) and Buyers (Travel agents / Tour Operators) from the local city. The Roadshow usually happens 1 day in each city to meet the hand picked outbound tour operators. ITR is not like any other travel exhibition just for the below reasons. 1Day - 1 City - 100 Buyers Pre-fix Appointment with Buyers Networking Lunch with Buyers Luxury - MICE - Business Travel Invitation to Potential Buyers Full Day Roadshow.”
When: August 14, 2020
Where: Singapore, Singapore
HalfStack NYC 2020
“An authentic, high value experience for attendees and sponsors focused on UI-centric JavaScript and web development. The priority for HalfStack is the attendee experience, with great food, drinks, talks, swag, and community. Hosted by London's longest-lived JavaScript meetup group, HalfStack is returning to New York for the second time. HalfStack is a UI-centric, one-day single track conference hosted in a relaxed environment. HalfStack carefully curates talks that inspire and inform the audience in a highly interactive and entertaining manner. An initimate feeling where each attendee has time to meet one another; maximum capacity for New York HalfStack is 270 attendees.”
When: August 14, 2020
Where: New York, NY, USA

International Travel Roadshow-Melbourne
“ITR Australia ( Sydney & Melbourne ) Travel Roadshow is carefully designed to create a great platform for the suppliers around the world to meet the top notch travel buyers in Australia region. Buyers and Sellers love this roadshow for the following reasons. 2 Days - 2 Cities - 60 Buyers Pre-fix Appointment with Buyers Presentation Cocktail Networking Party Invitation to Potential Buyers Full Day Roadshow.”
When: August 18, 2020
Where: Melbourne, Australia
International Travel Roadshow-Sydney
“ITR Australia ( Sydney & Melbourne ) Travel Roadshow is carefully designed to create a great platform for the suppliers around the world to meet the top notch travel buyers in Australia region. Buyers and Sellers love this roadshow for the following reasons. 2 Days - 2 Cities - 60 Buyers Pre-fix Appointment with Buyers Presentation Cocktail Networking Party Invitation to Potential Buyers Full Day Roadshow.”
When: August 21, 2020
Where: Sydney, Australia
Beyond Tellerrand Berlin 2020
“Established in 2014, beyond tellerrand is back for the 7th time in Berlin. Two days of conference with talks about design, technology and many opportunities to meet old and make new friends. Don’t miss out.”
When: August 24-27, 2020
Where: Berlin, Germany

“Codebreeze 2020
“Codebreeze is an unconference with very little structure. Actually, it’s not a conference at all. Codebreeze is a time and place for software craftspeople to meet. We would like to have like-minded people to gather in one place and have long conversations about our craft over a drink. And to practice our coding skills.”
When: August 31- September 7, 2020
Where: Turku, Finland

Where Are You Going?
If you’re planning to attend any of these events, we’d love to hear your thoughts in the comments section below. What are you most excited about? What are you looking forward to learning and experiencing?
By the way, the Smashing team is constantly organizing a series of conferences and workshops! We’d love to welcome you there!

(vf, il)
0 notes
Text
How To Make Cross-Browser Testing More Efficient With LambdaTest
How To Make Cross-Browser Testing More Efficient With LambdaTest
Suzanne Scacca
2020-02-18T11:00:00+00:002020-02-19T07:07:45+00:00
Before consumers sat in front of mobile devices for hours every day, there were numerous browsers and operating systems web designers had to contend with. So, it’s not like the concept of cross-browser testing is new.
Because web browsers don’t always render websites the same way or process data in the manner originally intended, cross-browser testing has long been an important part of web design and development. It’s the only way to ensure that what’s built behind the scenes is properly implemented on the frontend of a website.
But it can quickly become a tedious undertaking if you attempt to review every browser, OS and device on your own.
Fortunately, we’re living in an era where automation is king and we now have a better way of conducting cross-browser tests (and more frequently, too). So, let’s talk about why you need to automate this process and how to do so with the help of LambdaTest.
An Improved Way To Handle Cross-Browser Testing
When you set out to build a website for your users, you account for who they are, what they need and what they will respond to along their journey. But how and when do you address the different outcomes your users might experience thanks to their browser choice?
Responsive design may help mitigate some of these differences, but it’s not a cure-all for the inherent display issues between browsers and devices.
To fully ensure that the code and design choices you’ve made for a website won’t negatively impact users, cross-browser testing throughout the web design process is essential.
“
And if you want to make sure extensive cross-browser testing doesn’t have a negative impact on your bottom line, then automating it is the way to go.
Here are some tips to help you build automated testing into your process:
Familiarize Yourself With Browser Support Differences
This is a roundup from Statista of the top web browsers by market share:

Statista data on the top web and mobile browsers in 2020. (Source: Statista) (Large preview)
Now, the issue here isn’t necessarily that every browser processes your website data differently. What’s really mucking things up is the engine powering the browser behind the scenes.
For example, these are the engines the leading web browsers use:
Chrome uses Blink + V8;
Edge uses Blink;
Firefox uses Quantum/Gecko + SpiderMonkey;
Safari uses WebKit + Nitro;
Internet Explorer uses Trident + Chakra.
Many of these engines render the same piece of code differently. For example, look at this experiment created by LambdaTest:

A LambdaTest Experiment shows how the Chrome browser displays this code snippet. (Source: LambdaTest) (Large preview)
The date HTML tag is one of the most used tags and, yet, Chrome, Firefox and Opera are the only ones that fully support it — as indicated in the top blue bar above the test area. Even then, these browsers provide very different user experiences.
For example, the image above shows you what the date tag looks like in Chrome. Here’s how the same code displays in Edge:

A LambdaTest Experiment shows how the Edge browser displays this code snippet. (Source: LambdaTest) (Large preview)
Not only does the font styling and sizing slightly different, but the way in which the date selection dropdown appears is vastly different.
So, before you start thinking about cross-browser testing and hammering out the kinks between these browsers and engines, familiarize yourself with the key differences.
A tool you can use as reference is Can I use….
You can look for discrepancies in the most commonly used components and technologies. Take, for instance, CSS grid layout:

Can I use… keeps track of cross-browser compatibility for CSS Grid Layout. (Source: Can I use…) (Large preview)
Most of the leading (and some not so leading) browsers support CSS grid layout (the ones in green). Internet Explorer (in blue) provides partial support and Opera Mini (in purple) provides none at all.
Or let’s say you’re trying to use more WebP images in your designs as they’re much better for performance and resolution. Here’s what Can I use… tells us about browser support for the image format:

Can I use… data on cross-browser support for the WebP image format. (Source: Can I use…) (Large preview)
The most recent versions of Internet Explorer and Safari (web and mobile) do not provide support for it. So, if you intend on designing with WebP images, you’ll have to create a workaround for these browsers.
Bottom line: Take the time now to understand what kind of content or code is supported, so you can more effectively build a website from the get-go.
Pro Tip: Create a Browser Matrix for Reference
You can see why it’s so important to understand the differences between browser renderings and support. The more you familiarize yourself with them, the less scrambling you’ll have to do when a new discrepancy is discovered.
To make it easier on yourself, it would be a good idea to create a browser matrix for all these differences now.
Here’s a simple one that LambdaTest has designed:

An example of how web designers can create their own browser support matrices. (Source: LambdaTest) (Large preview)
I’d recommend creating one of your own. You can leverage data from Can I use… as well as documenting support issues you’ve encountered in your own projects.
This will also help you set priorities when you’re designing. For example, you can decide which non-supported features are worth using based on what kind of impact they have on your website’s goals.
It would also be useful to have this spreadsheet on hand once a site has gone live. Using data from Google Analytics, you can start prioritizing design choices based on which web browsers your users primarily use.
Get Yourself A Cross-Browser Testing Tool That Does It All
It doesn’t matter the size of the websites you build. All public-facing sites would benefit from an automated cross-browser testing tool.
What’s especially nice about automating with LambdaTest is that it gives its users options. From fully automated tests that check how your code impacts the frontend to semi-automated tasks that ease the work in managing updates and bugs, there are so many ways to automate and optimize your process.
Here are some of the feature highlights you should know about:
Real Time Testing: Best for Bug Tracking
Real-time testing is useful when there’s something targeted you need to examine with your own two eyes. Like if you’ve shipped a design to the client for review and they insist something doesn’t look right on their end, you can review the website using their exact configuration. It would also be helpful for confirming bugs and sussing out which browsers are impacted.
From the Real-Time Testing panel, you’ll enter your site URL and then choose your viewing specifications.
It lets you get super specific, choosing from:
Mac vs. Android,
Device type,
Device version,
Operating system,
Web browser.

This is the LambdaTest dashboard area for Real Time Testing. (Source: LambdaTest) (Large preview)
Once the test begins, this is what you’ll see (depending on the type of device you choose, of course):

A Real Time Test conducted by LambdaTest. (Source: LambdaTest) (Large preview)
Above, you can see the first option in the sidebar enables you to quickly switch the device view. That way, if you have a couple of browser views you’re trying to compare or check errors on, you don’t have to backtrack.
As far as the other real-time testing options go, most of them are useful for identifying and reporting issues within the context that they actually happened.

LambdaTest’s Real Time Testing can be used for bug tracking and reporting. (Source: LambdaTest) (Large preview)
In the bug tracking tool above, you can pinpoint a spot on the page where an error has occurred. You can then mark it up using a number of tools on the sidebar.
Users can also use the screenshotting and video options to capture bigger errors — especially ones that occur when you move through or engage with the site.
Screenshot Testing: Best for Speeding Up Manual Testing
There’s no reason you or your QA can’t still review your website on your own. That said, why make the process take longer than it needs to? You can let LambdaTest’s Visual UI Testing tools speed up the process.
The Screenshot tool, for instance, enables you to select all of the devices and browsers you want to compare at once:

LambdaTest Visual UI Testing comes with simultaneous cross-browser screenshotting. (Source: LambdaTest) (Large preview)
When the test completes, you’ll have all requested screenshots in one place:

LambdaTest screenshots enable designers to quickly check for inconsistencies across browsers. (Source: LambdaTest) (Large preview)
You can view them here, download them to your computer or share them with others.
You can also organize your screenshots by project and version/round. That way, if you’re working through multiple rounds of revisions and want to refer back to a previous version, all copies of the previous iteration exist here. (You can also use screenshots in regression testing which I’ll explain shortly.)
Responsive Testing: Best for Confirming a Mobile-first Experience
If you need to see more than just a static screengrab, Responsive tests have you covered. All you need to do is select which OS and devices you want to compare and the tool will populate full working versions of the site in the mobile browser:

LambdaTest includes real-time responsive tests for all OS and devices. (Source: LambdaTest) (Large preview)
You can review your website’s design and interactivity not just in all possible browsers, but you can change the orientation of the site as well (in case issues appear when it goes landscape).
What’s nice about this testing tool is that, if anything appears wonky, you can mark the bug the second you detect it. There’s a button for you to do that directly above the interactive mobile browser. That'll get those costly mobile errors reported and resolved more quickly.
Smart Testing: Best for Regression Testing
The eye can only detect so much, especially when you’ve been looking at the same section of a web page for weeks.
So, when you start implementing changes on your site — during development, just prior to launch and even afterwards — regression testing is going to be crucial for catching those potentially hard-to-spot issues.
This should take place any time something changes:
You manually update part of the design.
Code is tweaked on the backend.
Someone reports a bug and the fix is implemented.
Software is updated.
An API is reconnected.
If you know which page and which part of that page are directly impacted, smart testing can make light work of confirming that everything is okay.
Just upload the original screenshot of the impacted page and then add a comparison image when the change has been made. (This is where that Screenshot tool really comes in handy.)

LambdaTest enables users to do side-by-side comparison tests of web pages. (Source: LambdaTest) (Large preview)
Note: There’s obviously nothing wrong with the Smashing Magazine website. But what I did in the example above is use renderings for different versions of the iPhone. Obviously, that’s not how regression tests work, but I wanted to show you how this comparison feature looks when something’s amiss.
Now, as for why this feature is so awesome, here’s how it works:

LambdaTest users can compare two versions of the same web layered on top of one another. (Source: LambdaTest) (Large preview)
This single screenshot allows you to see where the two versions of your page no longer align. So, if the screenshots had been from the same browser view originally, this could be a problem if you hadn’t planned on realigning all of the elements.
You could also use the side-by-side comparison tests to check the same thing:

LambdaTest users can compare two versions of the same web page side-by-side. (Source: LambdaTest) (Large preview)
Again, smart testing is meant to help you quickly locate and report issues during regression testing. Find the method that works best for you, so you can get these issues resolved as quickly as possible from now on.
Automated Testing: Best for Detecting Issues on a Larger Scale
Technically, everything we’ve looked at so far has some form of automation built in, whether it’s processing 20 different browser screenshots simultaneously or letting you instantly see mobile test interfaces for all iOS and Android devices at once.
That said, the LambdaTest platform also comes with a tool called “Automation”. And what this does is enable you to do Selenium testing in the cloud on over 2,000 browsers. A newer feature, “Lambda Tunnel”, can be used to do Selenium testing on your localhost as well. That way, you can see how your code changes appear even before they go live.
There are tons of benefits to combining LambdaTest with Selenium testing:
It’s a highly efficient way to conduct large quantities of cross-browser tests, thereby increasing your browser coverage (something that’s impossible to do manually).
With parallel cross-browser tests, you’ll reduce the time spent executing automation tests as a whole.
Because Selenium testing starts by identifying your preferred coding language, it can more intelligently detect errors that will appear in browsers.
Of course, the biggest benefit of using the LambdaTest Selenium Automation Grid is that LambdaTest will help you evaluate whether or not your tests pass or fail.

LambdaTest can help users qualify cross-browser tests as failures when errors are detected. (Source: LambdaTest) (Large preview)
You still have to review the results to confirm that all errors are true failures and vice versa, but it’s going to save you a lot of time and headaches having LambdaTest do the initial work for you.
Wrapping Up
Cross-browser testing isn’t just about making sure websites are mobile responsive. What we’re ultimately looking to do here is take the guesswork out of web design. There may be over a dozen possible browsers and hundreds of browser/device configurations, but automated cross-browser tests can make checking all of these possibilities and locating errors much easier.

(ms, ra, yk, il)
0 notes
Text
Smashing Podcast Episode 9 With Stéphanie Walter: How Can I Work With UI Frameworks?
Smashing Podcast Episode 9 With Stéphanie Walter: How Can I Work With UI Frameworks?
Drew McLellan
2020-02-11T05:00:00+00:002020-02-11T08:07:04+00:00
As a developer myself, one of the things that I like about UI frameworks is that they often come with default styling, but is that something that we should be relying on in projects? Simply using the default styling and trusting that whoever produced the framework has done a really good job in designing those components? Join me for today ’s podcast episode in which I soeak to UX Designer Stéphanie Walter about things we should be considering when building on a UI framework.
Show Notes
Stéphanie’s website
Stéphanie on Twitter
Weekly Update
“How To Create A Card Matching Game Using Angular And RxJS” by Anna Prenzel
“How To Create A Headless WordPress Site On The JAMstack”
by Sarah Drasner
“Magic Flip Cards: Solving A Common Sizing Problem”
by Dan Halliday
“Django Highlights: User Models And Authentication (Part 1)”
by Philip Kiely
“How To Create Maps With React And Leaflet”
by Shajia Abidi
Transcript
Drew McLellan: She’s a user centered designer and expert in mobile experience, who crossed delightful products and interfaces with a special focus on performance. She’s worked on projects for clients such as the University of Luxembourg, European Investment Bank, BMW and Microsoft to name but a few, and she helps those clients deliver successful projects to their audience all the way from strategy to the final product. She’s a Google Developer expert in product design and a passionate teacher sharing her knowledge in numerous blog posts, articles, workshops and conference presentations. So we know she’s an expert user experience designer, but did you know she once had a job fitting carpets with Sir Elton John? My Smashing friends, please welcome Stéphanie Walter. Hello Stéphanie, how are you?
Stéphanie Walter: Hi, I’m smashing and loved the introduction.
Drew: So I wanted to talk to you today about a particular issue and that’s the subject of using off-the-shelf user interface frameworks. Now you’re a user experience designer and you work with lots of different clients and your job is to help those clients create the best possible user experiences through crafting highly usable user interfaces. So the idea of being able to do that with an off-the-shelf set of tools seems like a bit of a stretch to me. Is the use of UI framework something you see a lot throughout your work?
Stéphanie: Yeah, it’s something I’ve seen a lot, especially in the last few years because I started working with an agency and now I work within the company. So in those super big IT tech teams and yeah, at the moment there’s a lot of framework UIs like the one that I’ve seen the most is Material-UI, basically Material design is a Google design kind of guidelines and thing, and Material-UI is the team from Angular, but also the team from React. They created their own framework using kind of the look and feel of the Material design from Google. But it has nothing to do with Google anymore. It’s just like they, I don’t know, I think they liked the look and feel. So at the moment, those are the two main UI framework I work with. And also there’s something called Ant Design, that’s grew quite popular.
Stéphanie: It’s a React framework. I don’t know if they have Angular too. I think it was made by a team in China. And it’s interesting because not only does it provide the components, everything in React, but if you go to their website you’ll also get the scratch files, which is actually quite interesting because then it kind of motivates or helps the designer build or shape the interface into the UI components used by that framework. So yeah, it’s something I’ve seen a lot, especially in big IT teams because most of the times those don’t have a designer. At the moment I’m basically UX team of one in a small team at a European investment bank. So it’s me as a UX designer. I work with a team of developers, business analysts, all the good people, but still is one designer for the whole project.
Stéphanie: Until I arrived there was no designer. So it’s kind of a solution implemented in a lot of companies, especially on internal products for instance. Where they usually say, okay, we don’t really need a designer for that. We just need something that works for our internal users and let’s just use a framework because it’s convenient for the developers. Most of the components are already there and since they don’t have designers in the team, then it’s kind of replacing, as to say, the role of a UI designer. Yeah, problem with that is that, okay, then you have the components, but the role of the UI designer is not just to decide about should the button be red, green, orange, blue, whatever. Usually the role of the UI designer is information architecture, understanding user needs. So everything that goes beyond the interface. So even if you have this kind of framework that kind of takes care of the whole UI, So visually what you see on the screen.
Stéphanie: You still need someone at some point to do the job of understanding what do we put on the screen, how is it going to behave? What happens when we click here? How does the user accomplish their goal? How do we go from point A to point B? Because we can use a model, we can use tabs, we can use all of the components. So that’s why it’s always kind of a little bit complex and tricky.
Drew: Is it possible, do you think be able to create a usable user interface using an off the shelf UI framework, or is it always going to be a bit of a compromise?
Stéphanie: I kind of hope so. I kind of hope so because otherwise I’m building not usable interfaces. So this answer is totally biased, but yeah, I think it is, but it also depends on the level of compromise you’re willing to do and there’s compromises on both sides. At the moment I’m compromising a lot of buttons for instance, because you have some really specific buttons in Material-UI, and I don’t really like the ripple effect on the button. I think it works great on mobile because on mobile you need a kind of a big feedback when user clicks on or touches the button. But then the steps is kind of ripple effect that goes all the way on the button. It’s a little bit overkill, especially when there’s a lot of button. But still we are going to keep this ripple effect because it would be super complex to remove it because this was built in to the React framework. And to have another hover effect on this button, something more subtle that will not be this kind of whooshy thing here. It would be super complex.
Stéphanie: So this is the kind of compromises you do. But on the meantime, I don’t compromise on specific things which is custom components. Where I was working before, the current client for a travel and airline company. And airline has some really, really super specific needs. The calendar for the airline for instance, you want to put prices, you want to put… if you don’t travel to this destination on a specific date, you don’t know when to put that, you have this departure and arrival and the basic calendar of most of those UI frameworks don’t provide these kind of things. So at some point you can say, okay, we will just use the calendar they have. And that’s it. You need to go beyond that. So most of the compromises are basically built on, do we use the basic component? Do we create a custom one that will fit the user needs? Or do we make a mix of the two? In the case of the calendar, for instance, we use the calendar grid, so we use the basic component and then we enhanced it with customization on top of that. So it was a lot of React development for that one.
Stéphanie: And yeah, so usually you do a lot of compromises.
Drew: So it sounds like using a user interface framework can get you a certain amount of the way there, but to really have a good user interface as a result of it, you need to do quite a bit of customization on top?
Stéphanie: Usually. Yeah.
Drew: Does that customization go beyond theming?
Stéphanie: Yeah, my developer wished it wouldn’t go beyond theming. Eugene If you listen to me. I think he would be super happy if we would just change a few colors on everything. But yes, at some point you need to go beyond the customization because first, like UI frameworks are like Lego tools is kind of a toolbox. So you have a lot of different components in the box, but this doesn’t build a page. You still need a header, you still need a footer. You still need extra content that was not in the framework. So sometimes you can tweak a component into what you needed. From what I understood, we are using the card component to build a modal windows, but the thing with the modal windows is that it doesn’t really behave like a card.
Stéphanie: You are kind of going a little bit beyond that. You need a background with obscurification. You need to trigger it on click while usually your card is already there in the interface. So we are using this card component because it has a lot of the things we need like the background, a header and a title at the top, some buttons at the bottom. So we have the structure and then we tweak it a little bit. But we end up with some conflict sometimes about semantics, HTML as well. Because for instance, I wanted to have buttons that didn’t have button shapes, so just like link button and the developer said, “Okay, so we use a link like your href link.” I said, “No, this is not a link. It’s a button. When they click it, it doesn’t open a new page. It clears everything that is into the form.”
Stéphanie: So it should be technically from a semantical point of view, it should be a button. “Yeah. But it doesn’t exist in the framework.” I say “So okay, I know so what do we do?” So usually you start discussing these little things and since I’m really annoying my developers with accessibility also, this is another extra layer of trying to make sure that we have the basic components that they work well with. But also that they are semantically like I don’t want to have buttons with gifs within gifs within gifs. Otherwise we’ll have issues in the end.
Drew: I guess starting a new project that’s going to use a UI framework, you probably need to start with some sort of user research.
Stéphanie: Yes.
Drew: Is that fair?
Stéphanie: You should. You need to. So yes, usually you can have all the components you want. You still need to know what do your users need on the pages, how are they going to navigate? You need to build a flow. So usually even before deciding on a framework, what we do is we go to our users, we talk to them, we try to understand their needs. So at the moment I’m quite lucky because the users are internally within the bank. So we do a lot of workshops with them and you have to imagine it’s a super complex interface. We are migrating from something that was built, I don’t know, I think 10 or even 15 years ago to something all new shiny using Material-UI React. So it’s quite a big change and you have to understand that during those 15 years, everyone who wanted something could go to the support and then they ask the IT team to implement it. So at the moment my interface is like 400 pages with tables, within tables, within tables, with other tables, and stuff that shouldn’t even be in tables.
Stéphanie: Like we have a lot of things that are just key value, key value, key value. So they build the table with two columns. I’m like, “Nope, maybe we can do something better with that.” So at the moment what we are doing is we did some user research to understand the different goals of the users. So what we identified is that what they do with the interface, they have some planification goals. They need to plan their work. So I want to know that this operation is going to go to this meeting, so I need that on that schedule, stuff like that. They want to monitor a thing, they want to report the data. So monitoring is just like looking at the data and making sure everything is fine. Reporting is being able to exploit the data, to do something with it they want to share and to kind of collaborate with colleagues and all of that we discovered by discussing directly with the users.
Stéphanie: And what we discovered is that actually some of the things we were planning on migrating at the end are some of the most important things on a daily basis for the user. So the planification user goal is one of the kind of biggest one at the moment. So we are really, really working on that. So yeah we do use the interview and now we are in the phase where at the moment we are super high level saying okay we need to build the shell, we need to understand navigation. But at the moment we didn’t really go through all of the data and this is now what we are going to do. And it’s interesting because we have a lot of tables and we said we can either go the kind of not smart way and just put the tables in the new interface and we’re done, or we can say, okay, let’s try to understand what those tables are, What do our users use this table for?
Stéphanie: And then maybe some of the tables could be displayed as data visualization and then to do that you need to understand the whole business So that the data makes sense. So if you have a nice framework and you say, okay, let’s use this chart… I think is called chart JS framework. You have a lot of things, you can have histogram, pie charts and graphs and everything, but at some point you still need a designer to help you decide. Okay, this data, does it make sense if we show it into a graph or it makes more sense to show it as a pie because we want to show part of the whole, or we want to compare evolution for one country in the last 10 years, then a histogram is more interesting. So based on what the user wants to do with the data, you are going to display them a whole other way.
Stéphanie: And usually it’s not a developer job to do that. Our developer, they’re super smart guy. I’m sorry, but I honestly work with guy developers, I wish I had some ladies, but no. None of them are women. So super smart guys but they are not super qualified to say, okay, this data should be displayed like that, that, that and that. So in the end you still need some designers go to talk to the users, understand what you can do with the data and this goes far beyond just saying, okay, this should be a tab bar or this should be a navigation on the left.
Drew: And after making those sorts of decisions based on talking to the users. Would you typically take the resulting prototypes or designs back to users to test them again to see if they understand your type of chart choice for example?
Stéphanie: Yeah, we did that a lot actually, which is really nice because then you don’t develop something until you know it’s going to be useful and usable. So it depends. If it’s quicker to actually develop the thing because they have already most of the components, what I usually do is I do really quick paper prototyping and then we develop the thing because it’s quick, even without the data. If it’s something complex, something really, really new that will take a lot of time to develop, then we say, okay, we design a few screens and we do some testing directly on the screen. So we have a tool it’s called InVision, where basically you put all of your design, you can create links between the different parts. The thing is it also depends what you want to test. If you want to test phones for instance, it’s a nightmare to test those in InVision because the people can’t really feel them and especially on mobile phone for example.
Stéphanie: So it’s always kind of being smart. What’s the fastest and cheapest way? Is it faster and cheaper to test only designs. Is this enough? For forms usually, not really because you have auto completes all of the heavy lifting you put in the front end who have actually the user fill a form so for forms, maybe it’s more efficient to actually build a form and test it. But for new things, yeah, we do a lot of designs. We go to the users. So at the moment we either do one-on-ones, but my users are really busy people. It’s a European investment bank so they don’t have that much time. So what we usually do is that if we come to one-on-one with the users, we do some small meetings, like more like focus groups. And it’s also interesting because then you have kind of a confrontation sometimes. Some people say, “Yeah, I think it works for me because I work like that and that,” and then there’ll be other people who are like, “Oh you work like that? Actually no, I do it like that and that.”
Stéphanie: So it’s also interesting to kind of have a few people in the room and to listen just to the conversation, taking notes and say, “Oh maybe then we could do that” and “This component would be better based on what I just heard.” And things like that.
Drew: If you’re working with a more general audience for your product. So perhaps not internal users like you have, but more the general public, are there inexpensive ways that designers can get that use of research in? Are there easier ways if you don’t know directly who your users are going to be?
Stéphanie: You should know who they are going to be otherwise it does the job of the marketing people before building the product. But yeah, we did some guerrilla user testing for instance, You can still use InVision for instance. So you can build some prototypes in InVision and then you can recruit the users through social media, for instance. I was working for a product that helped, what is the name, car dealerships mechanics who repair things and then to also inform the client about extra repairs, things like that. So we had already kind of a growing community on LinkedIn and Facebook. So what you can do is you can recruit those people. You can do remote testing, like we are having conversation in a tool like an online tool. You can do some screen sharing. So we did that for some project also.
Stéphanie: I would just give you one advice is test the tool before, because I was using, it was called appear.in. But I think they changed the name to Whereby or something, but it’s really in the browser who I said, okay, it’s nice because then the users don’t need to install anything but do users were not on a real computer. They were into VM, into a Citrix and they didn’t have microphones so what we ended up doing is like they used my tool to share the screen. They were clicking on the prototype and at the same time I had them over the phone, like a landline phone, to talk to them directly. So there’s always, this was a quite cheap because it was a wonderful day of recruiting, I think we had 10 users or something like that. Yeah, you can do a lot of things even if you can’t go face to face, I’ve done a lot of usability testing directly on Skype or things like that. So there’s always some cheap ways to do that.
Drew: When it comes to choosing a UI framework to work with, if that’s the route that you’re going, is that something that you would leave just to the developers or is that something that designers should get involved in too?
Stéphanie: For me, you should involve the whole team. Like the designers, the developers, maybe also architects if you have some, because how the framework is built might also influence these kind of things. Unfortunately, most of the time when they arrive on the project, the framework was already decided. No, actually it’s funny, either it’s already decided or they ask me to validate their choice of the framework, but I didn’t do any reviews or research. I have strictly no idea what’s in the project because they didn’t even show me their screens. They’re like, “Yeah, do your thing. We can use this framework.” I don’t know. Well, do we have a screen? So they ended up showing you a few screens, which was a Windows native app they wanted to migrate in the cloud. They said, “Yeah, we only need the buttons and mostly like forms and things like that.”
Stéphanie: But it’s really hard to say, “Yeah, go for this framework, we have all of the components we need.” Or like, “Don’t go if you don’t have a rough idea of what’s your content going to be, what is the navigation.” So I think you should still have kind of a global overview before choosing your frameworks unless you’re 100% sure you have all of the components. But I have a feeling that most of the time the framework choice is basically based on what technologies do developer like at the moment, do they have experience with a framework before that? We used Ant on some projects just because a few developers had experience with that and they really liked it and they were kind of efficient using Ant. And for the Material React UI it’s the same. It’s like because the developer already used it on previous projects, so they are efficient with it.
Drew: So really it’s got to be a balance between what the developers are comfortable with, what they know, what’s going to work with their technology stack and then what the requirements of the product are in terms of creating a good user interface. And you somehow need to balance the two of those to find the ideal framework for it.
Stéphanie: Yes. I have a kind of a specific requirement for some project, which is… I’m in Luxembourg, we have a lot of European institutions and things like that, so we have an extra accessibility requirement for some of those. And usually when the framework was decided, they didn’t really check about the accessibility of their framework and then they come back a few months after the beginning of the project saying, “Oh, just told us that there’s this new law and we should be accessible but we don’t know how to do that.” Like yeah, it’s a little bit too late. So for me, to choose a framework you need really to know all of the constraints at the beginning of the project and if accessibility is one of them you need to test your components and make sure that they are going to be accessible. But I am not a React or Angular developer, but I’m pretty sure that it’s super complex to turn a not accessible UI framework into something accessible. I guess it might be a little bit complex to rebuild all of the components, so things like that.
Drew: If you find yourself working on a project where that process hasn’t taken place and a UI framework has already been chosen, is there a danger that the user interface could start being influenced by the components that already exist within that framework rather than being driven by the needs of the user?
Stéphanie: It really, honestly, most of the projects I worked on, eventually you end up having a lot of trade offs, even if you really try to push. So it’s mostly about balance and discussing with the developers. So usually what I do is we do some wire frames, even quick paper wire frames, say okay, on this page we will need that and that and that component, the first thing I do is I ask the developer do we have that in our framework at the moment? What does it look like? And then we decide together, okay, this is a component that would do the job or okay this will not do the job. Do we tweak it? Like do we still keep the component but change it a little bit so that it does the job, or do we build something from scratch?
Stéphanie: And at the end of the day it will depend on the budget of course. So you ended up doing trade offs. Like I would be okay for small components that are almost never used if they’re not perfect and there’s kind of few issues. But for main navigation, main structure, things that you see all the time on the screen, for instance, this really needs to work. The user’s needs to understand how they work efficiently and yeah, it’s, as you said, finding a balance between the ideal experience you wish you would have if you didn’t have any framework and what you have at hand and the budget and also the timing. If we say, okay, for these sprints, the feature needs to be finished at the end of this sprint, and then they say, okay, but if you want your components we will never finish the feature at the end of this sprint then you start discussing, okay, do we finish this feature in the next screen, do we take more time to do it properly? And usually it really depends.
Stéphanie: The things that frustrate me the most is when I know that we use a crop fix component and they say to me like, Oh no, don’t worry. We will fix that later. And I knew that the later unfortunately might never happen. So depends on the team. But after a while you have the experience and you know, will this later arrive and or will it not? Yeah, it’s about compromises. When you are working with these kind of tools.
Drew: As a developer myself, one of the things that I like about UI frameworks is that they often come with default styling. So that means that I don’t necessarily need to have a designer maybe to help me with the look and feel of all the components. Is that something that we should be relying on in projects? Just the default styling and trusting that whoever produced the framework has done a really good job in designing those components? Or would you be styling those components yourself?
Stéphanie: I think it truly depends. The problem for instance with Material-UI is the look and feel of your a web app will be basically the configured Google products. So if you don’t actually change the font, change a few colors and kind of bring your own brand identity and do that, you’ll have a product that will just looked like any Google product, which could be a good thing because if your users are used to Google products it might help them understand it. So usually if you don’t have a designer in the team, do you have any choice? Like a lot of the different work I’ve seen, they come with custom themes so at least you can change the colors. I think you can change the fonts also pretty easily. But again, like if you change the colors and you’re not super good at design or even accessibility, maybe the colors you will use will clash, they might have contrast problems.
Stéphanie: For instance, I love orange, but it’s one of the most annoying color to work with because to have a real accessible orange, for instance, as a button with white text, it almost looks brownish. And if you want to have this really shiny orange, you need dark text on top of it to make it readable but it kind of makes your interface look like Halloween at the end of the day. Yeah, I see you laughing. But it’s true. So it’s always about these kind of compromises and say if you’re a developer and you want to use the framework as it is and you don’t have a designer, I think it’s still better than not having anything and building it from scratch and then it’s super complex to use. But the thing is, just because you have the components doesn’t mean you will build a great interface. It’s like Lego bricks. If you have the Lego bricks, okay it’s fine, but you can do a real nice spaceship or you can do something that isn’t holding together and will fall apart because you didn’t have really a plan.
Stéphanie: So design is kind of more than that. Design is about really understanding what’s going to be on the screen, how it will work. And I know some developers who actually have the capability to do that. So they are really good with usability guidelines and they understand a lot of design rules, for instance. So when it comes to choosing the components, they’re really good at that. And I know developers who have no idea what components to choose and choose the first one that does the job. But after a while it doesn’t work anymore. Like tabs for instance, we had an interface where some developers chose tabs. I think it makes sense at the beginning when you only have three items. But then there was 12 items on the screen and then you have the tabs that are three lines of tabs, and all of those are the same level one tabs, and there’s tabs within tabs. So they had the component, it looked nice because they use the framework, but it wasn’t really usable.
Stéphanie: And I had the same with like a modal windows for instance. Where they build the projects without a designer and after a while I think the client asked for more and more stuff into this modal. So they ended up with a screen with a table and when you click on add a row, you open a modal, and in this modal you have two tabs, and then in one of those tabs you even have another table and then they wanted to add an extra stuff into that, I was like, okay, maybe we can put a modal on top of a modal. And at some point the designer would reply, okay, if you have that much content in the modal, it should not be a modal window. It should be a page. So even if you have the component, you still need kind of an architect to do the plan and make sure that all of those components work well together.
Drew: So if as a designer, you’re being asked to change the styling of some components, would you just try and change all of the styling? Would you customize all of it or are there certain areas that you’d focus on?
Stéphanie: Colors I think because it’s the first thing you see, colors can actually bring you identity. If you have like a strong brand identity, at least having the colors of your product on the buttons or the icons and things like that, already helps you customize the framework. Fonts because I think it’s easy, if the framework is well-built, usually you change the whole font family in someplace and then it should kind of cascade on the rest of the site. So colors and fonts is I think two easy ways to quickly customize the framework. Icons is another nice way to bring personality, but it might be difficult because from what I’ve seen, most of the framework come with custom icons or Font Awesome or like a library already built in. So to replace those, first you need a lot of icons if you want to replace them all. So it might be a little bit complex. I have also seen frameworks that lets you choose which icon pack you want to use. like Font Awesome, Glyphicons and some of the other ones. So this is the kind of things you can quite easily customize.
Stéphanie: And then it’s about look and feel, for instance the header, usually you have different kinds of headers, footers. How do you navigate things like that. So there’s already a lot of small customization you can bring so that it doesn’t look Material-UI-ish, it more looks like your brand and then you can play around with border radius’s for instance. Whether you want completely rounded buttons, or you want square buttons or you want something in the middle like shadows also. So some small stuff that are kind of usually easy to customize because most of those frameworks have them in CSS variables. This is the kind of small things that you can customize without I think a lot of effort, except for these ripple effects. I hate that. I’m going to fight it. I kind of hope they change it eventually.
Drew: I guess things like that, that might seem obvious might seem just like a surface level effect, Do you think that would be easy to change and in this case it turns out it wasn’t easy to change? Is that just a case of speaking to your developers to find out what’s going to be easy to customize and what’s not going to be easy?
Stéphanie: Yeah, usually, especially if they’re used to work with the framework, they know what’s easy to change on it. It depends on the developer, I had discussion with one developer and I asked him if we can not have like uppercase buttons, because they are kind of a little bit hard to read, especially in the font we were using, he went into the documentation and say, I don’t know if we can customize it because I can’t see it in the API. I was like, what API? It’s like CSS class, CSS definition. You remove the uppercase from the CSS and it’s done. So he was like looking for an API to change just the font, how does the font look like. And I was like, yeah, but if there’s no API for that, I think you can change it in CSS.
Stéphanie: But then it’s complex because if you have to change this in like all of the CSS line. So it’s usually kind of a big discussion. It was the same… was like drop downs. So Material-UI, the React version we use, has some customized drop downs. So when you have a select box like form element, the select it opens these custom components and I don’t know why but we have a big problem with that on Internet Explorer. We are going to migrate to windows 10 and Edge. I’m looking forward to it, but we are still Internet Explorer 11 at the moment. And what’s happened is whenever you use or you open one of those components, it freezes the screen behind it and you have a scroll bar, so it kind of jumps around whenever you want to use one of those.
Stéphanie: And at some point we discuss with the developer, is the customizing of that worth the screen jumping around whenever users click on that. And it’s like, honestly for me, no, I prefer it not to jump and we use the select in the browser, then it will not look the same if our users have Edge and, no not Edge, IE. Or if some users are using Firefox, okay? So it will not look the same but it will be the native one and it will not make the page jump around every time someone clicks. So it’s this kind of discussion also, do we want to customize it but then it’s kind of clumsy or do we say, okay we are not going to customize it. We had the same debate with a scroll bar because we had another project we had drop-downs and they were 100 elements at some point in the drop downs. So there’s an auto complete but you can still scroll inside the drop down. And the developer said, yeah but this is looking really ugly on IE, the default scroll bar.
Stéphanie: And they investigated, they found JavaScript library that would let us have this really small little a scroll down you have on Mac and have it everywhere. Then we said, okay, is it worth investigating? We need to investigate, test it, put it everywhere, test all of the browsers. So we said we are going to do it, but only if it doesn’t damage the performance and if he doesn’t damage the rest of your experience, otherwise it’s perfectly normal that the browser element don’t look the same on any browsers. So at the end, don’t customize everything.
Drew: I guess it’s a collaborative team effort, then? Everyone needs to discuss and balance up again all the different performance factors, ease of customization and where that customization happens. So once you’ve got your UI framework in place, you’ve got all your components specified and built out and customized and styled to how you want them. I guess you need to document that in some way to maintain consistency?
Stéphanie: So at some point as a designer what we usually do, we already document them in our sketch files. So we have the working files with every single screen and everything. And in the sketch files we have really specific art boards where we put all of the different components. So that if another designer works on the project, they know that the components already exist and they can just drag and drop it in a new page and reuse it afterwards. So we have this system where we document the components also we document the use, like when do you use this component? When do you use that one? Where is this one working better? So all of the different states for instance, like inputs, we have I think 10 of those, like a focus with a placeholder, without a place holder, with content like arrows and things like that. So again, we bring consistency and then the development parts, it really depends on the kind of maturity of the communication of the team. So what we are currently building is basically a library of components and we are also building the tool around it.
Stéphanie: So my developer is currently building that and the idea is to build the component first in our kind of a sandbox, document it. Also he builds things where you can change the colors and if have a button for instance, you can change the icon, you can change the text to see if it will still work with longer text, smaller text, things like that. So we are building this sandbox and in the sandbox, you have a ‘Read me’ tab where you have documentation for how should this look, how should this component be used, when, how is it supposed to behave? Like auto complete for instance, seems to be something really, really easy, But if you start actually designing the flow of the auto complete, what happens when you put the focus in the field? Do you start auto completing or offering suggestion after one character after two, after three? If it’s after three, what happens in the meantime?
Stéphanie: So there’s a lot of different questions about that that we also document, which is really going super deep into that so that if this auto complete gets implemented on another project or gets used by another team, they know exactly how it’s supposed to work as well. So we kind of do the same. The two of us, so designers are documenting into the design tools and usually in the design tool we document the colors and shadows and gradients so that the developer don’t have to look around and try to remember exactly what the hexadecimal code for this button was and things like that. So in the end it’s kind of you have this UI framework that was super generic and you customized it, you made sure that the components you use are actually the ones that are going to help your user accomplish their goals.
Stéphanie: Everything you’ve customized is kind of starting to become your own little design system. So at the end you’re building a design system, but instead of building it from scratch, you’re basically building it using React, Material or, what was the other one? Ant or something like that. So it’s the same constraints.
Drew: Would you go back to user testing at this point after things have actually been built? Would you go back and test things with users again?
Stéphanie: We have tests, like real people testing, like regression testing and making sure that everything works. Like when you click it works, when you hover it works, stuff like that. But yes in the end, especially if we didn’t do a prototype, if we did the user testing in mockups, we want sometimes to test it again with the real users who have a feeling that everything is still working. So yeah, sometimes we go again into user testing at the end. We do that usually at the end of a few sprints where the features were implemented. So usually what happens is like we do the research, we design the feature into design tools, we do quick testing at the beginning, then it’s implemented, we do tests to make sure it works. And then again we go back to the users.
Stéphanie: And it’s also interesting because we are building a community with the users. So they’re actually quite eager to see that. The first testing was a little bit kind of a sneak peek, like, Oh, this is what it might look like. And then they are super curious about how it works and how it looks like at the end. So we go back usually in one-on-one testing for that or if we don’t have the time, we do just like panels and also we deploy it. So sometimes we do AB testing also sometimes if we don’t have time for the user testing one-on-ones, we deployed it and then we say, okay, it was deployed. If you have any feedback, please come back to us. Also if you see bugs, because sometimes we compete, the team missed a bug or something, so if we don’t have time for re testing it, we still try to find and manage to find some ways to gather feedback even after it’s deployed.
Drew: And over time, one of the things that might be a concern probably from a technical point of view is that you’ve built on top of a UI framework and then a new version of that framework comes out and things have changed. Is that a situation that you’ve experienced where a new version has come, your developers want to update but it might have implications on the design?
Stéphanie: Yeah. The thing is we have test environments, so they’re really quick and easy thing to do is like, okay, let’s put in your version in one of those secure environment and see what is broken. So from when designers most of the time when they do a new version they tell developers, is it going to break? Like is this new version something completely new and it’s not compatible with the old version? Or is this new version something that is just an announcement and you might not break that many things. So yeah, obviously sometimes when you put a new version it completely breaks, but this is again, then you have like testing stories and like technical investigation stories to decide if we are going to migrate or not. Also like from what I understand in some of the environment I worked on, they kind of encapsulated those in web components.
Stéphanie: So they’re already has kind of two different version of Angulars on some components, it was using one version on the other ones it was using the other one and from what I understood it works because then you only encapsulate what you need. So this apparently is also a solution is then you can use whatever version you want, but I’m not a developer but I feel at some point you’ll be like, okay, this component is using that version of Angular and this one, this and this maybe kind of becomes super hard to maintain. Do you know?
Drew: Yup.
Stéphanie: It does. Okay. So yeah, you make sure it still works, but I don’t have the feeling that Material-UI are like those frameworks, even bootstrap for instance, they don’t have any new version every year or something. It’s a long lifecycle and in the case of my tool, I think this tool will be here for the next year, so we have eventually to update. But if you’re building kind of a online tool, more like a B to B product. Most of the time you revise every three years or something. And usually there is a new technology. I was talking to a friend and they’re currently working on a project where they’re rebuilding and riffing on React. The first version was built three years ago with another technology. I really don’t remember the technology, but they say, okay, we are three years later, they’re already rebuilding it. And I think in like three years, they will re-rebuild it. So at some points if you’re in like in B to C products, I even wonder if you update your framework or if you are going to change the design and rebuild it anyway in a few years from scratch.
Drew: Is there anything else that we should be considering when building on a UI framework?
Stéphanie: I feel we covered a lot of things. Well, the thing is like, there’s always a way to do it quick, user research, talk to users or at least do usability testing. Make sure you don’t design or build in a silo and try to have other people at least look at what you’ve created to make sure that the components as a developer, that you used as a developer I really do wonder are going to do the job. And don’t ask the designer to put paint on top of the framework at the end of the project because it’s kind of already too late to do big infrastructure on changes. It might not work.
Drew: So at Smashing, we have books, we have conferences, and of course, we have Smashing Magazine, a website with loads of articles. We’re all about learning. So what is it that you’ve been learning lately?
Stéphanie: I’ve been taking online introduction to psychology class.
Drew: Tell us a bit about that.
Stéphanie: Last lesson was actually super interesting. We were talking about visual illusions and how they work with your brain. So it’s really super complex and there’s… Apparently not everyone agrees on the explanation of most of those illusions, but it’s interesting because I had a small psychology lesson, like I read books on cognitive sciences and things like that. So I already knew kind of the basics, but it’s interesting to see like all the different aspects of psychology. So the interesting part of this course is it’s an introduction but it explains to you kind have all the branches from say child development psychology to trauma psychology to intercultural psychology. So and then illusions and I think this week it’s actually about cognitive psychology and how to apply psychology to interfaces. So all of those really, really interesting topics. And it’s nice because it’s an online class, so I’m basically learning stuff on my couch with some tea, and yeah, that’s really, really cool.
Drew: Oh, that’s super interesting. If you, dear listener, would like to hear more from Stéphanie. You can follow her on Twitter where she’s @WalterStephanie, or find her on the web at stephaniewalter.design. Thanks for joining us today, Stéphanie. Do you have any parting words for us?
Stéphanie: Thanks for having me. It was a smashing experience.

(dm, ra, il)
0 notes
Text
Smashing Podcast Episode 5 With Jason Pamental: What Are Variable Fonts?
Smashing Podcast Episode 5 With Jason Pamental: What Are Variable Fonts?
Drew McLellan
2019-12-17T05:00:00+00:002019-12-17T07:36:22+00:00
In this episode of the Smashing Podcast, we’re talking about variable fonts. What are they, how do they differ from regular fonts, and how can they help in the design and performance of our websites? Drew McLellan talks to a font of knowledge on the matter, Jason Pamental.
Show Notes
Weekly update:
Brand Illustration Systems: Drawing A Strong Visual Identity
Struggling To Get A Handle On Traffic Surges
Building A CSS Layout: Live Stream With Rachel Andrew
Web Design And Development Advent Roundup For 2019
Should Your Portfolio Site Be A PWA?
Variable Fonts
Find Jason on the web at rwt.io
Web Typography News newsletter
Variable Fonts: What web authors need to know
Ellen Lupton’s book Thinking with Type
Erik Spiekermann’s book Stop Stealing Sheep & Find Out how Type Works
Transcript
Drew McLellan: He’s a design strategist, UX leader, technologist, expert in web typography, and invited expert on the W3C Web Fonts Working Group. He writes, speaks, and works with teams and brand owners on how to set type better on digital platforms. He’s spoken with organizations like Adobe, Audible, Condé Nast, GoDaddy, IBM, and given presentations and workshops and conferences all over the world. His newsletter, Web Typography News, is popular with those wanting latest updates and tips on typography on the web. He’s clearly an expert in web typography. But did you know he represented Sweden at Lawn Croquet in the 1984 Olympic Games? My smashing friends, please welcome Jason Pamental. Hello, Jason. How are you?
Jason Pamental:I’m smashing. Especially after that intro.
Drew: I wanted to talk with you today obviously about web typography because that’s really your thing. You are a real expert with web typography. About that in general, but in particular, talk a little bit about variable fonts. I’ll be the first to admit I’m no typography expert. I mean, please consider me as uninformed as anyone listening. You cannot patronize me with any information about typography. I guess we’ve had usable web fonts on the web for probably about a decade now. Is that right?
Jason:Yeah. Actually, wasn’t it you that started something on Twitter a couple days ago? It was like November 9th in 2009. It’s like 10 year in two days since Typekit launched. I know Font Deck was right in the same time frame. Then Google Fonts and Monotype Service not long after. I had a beta invite that was given to me by my friend, John Cianci, who is actually now still a colleague of my wife’s at the agency where she works to Typekit sometime in 2009. That was a complete reinvention of my interest in the web. I mean, it was nothing short of a revolution for me. I mean, I’d always loved typography when I’d studied it in school, but we couldn’t do anything with it on the web for 15 years. That was pretty amazing.
Drew: There must be designers working on the web now having had web fonts for 10 years plus potentially. There are designers working on the web now who have never designed a site without the ability to select from a huge range of typefaces.
Jason:Yeah, it’s true. Nobody without that experience had to push the pixels uphill in both directions like we did growing up. We’re not some cranky old men shaking their fists at the sky. But yeah, it is kind of amazing just with all of the things that have changed on the web, the idea that some people never experienced in any other way is remarkable.
Drew: By the time we got web fonts, that was a massive shift in how we started to use typography on the web because we could really start to use typography on the web. There were obviously things that we could do with web safe fonts, but we were pretty limited to a very restricted palette. But there’s potentially now another big shift almost as significant perhaps with variable fonts. I mean, what are variable fonts? What do they do for us? Where do we begin?
Jason:I always try and start with giving people a frame of reference. So when we think about using fonts on the web, the thing we have to remember is that currently with “traditional” fonts, every font is an individual width, weight, slant, variant of that typeface. For every one we want to use on the web, we have to load a file. For a typical website where you’re using it for body copy, you’re loading, usually, four fonts: the regular, bold, italic, and bold italic. All of those things have to get loaded. Each one of those is a little bit of data that has to be downloaded and processed and rendered.
Jason:So typically, what we’ve done over the years is constrain ourselves to using that very small number of fonts, which is actually not particularly great typography practice. It’s much more common in graphic design to use a much broader range. You might use eight or 10 different weights and variants of a typeface in a given design. On the web, we’ve been very constrained because of performance. The big difference in a variable font is all of those permutations, those variations are contained in a single file. That format is really efficient because what it’s doing is storing the regular shape of that character and then what are called the deltas of where the points along those curves would move to render it as bold or thin or wide or narrow.
Jason:So by only storing the differences, you don’t have to store the whole outline. It’s a much more efficient format. While it’s not as small as a single font file, it’s still much smaller than all of the individual ones taken separately. If you look at something like Plex Sans from IBM, all of those separate files might be nearly a megabyte where two variable font files that contain all the widths and weights in the upright in one file, the italics in the other is like 230K. That’s for really, really complete character sets. Most people could use a subset of that and get it even smaller. I’ve generally been seeing those file sizes around 50 to 100K for a typical Western language website need. That’s not that different from loading… Once you load three or four individual font files, you’re probably loading more data than that. It’s an interesting win for performance, but it also then opens up the whole range of the typeface for us to use on the web through CSS.
Drew: So it’s almost like delivering the recipe rather than the meal. Rather than here’s the italic version, here’s the bold version. It’s like, “Here’s the regular version and to make it italic, you would do this, to make it bold, you would do that.” That reduces the file size that goes down over the wire.
Jason:Yeah. Well, in a way, it’s giving you all the ingredients and then you can make any recipe you want. Because you could really go everywhere from… To go back to the Plex example, from 100 to 700 weight where 700 is sort of the typical bold, 400 would be kind of a normal weight. But then you have much lighter. So you could do really big and really fine line headings or block quotes or different items or like emphasis, and then be able to kind of modulate what you want bold to be at different sizes. There’s all kinds of different things that you can do for better typography, better user experience, all the while getting better performance. That’s the gatekeeper.
Drew: So there’s almost an infinite number of tweaks of steps between what we would think of today as regular and bold? You actually got the ability to go anywhere along that axis to tweak between the two?
Jason:Right. What I think is really exciting to me as somebody that studied graphic design and has looked fairly closely at print design for many years, the idea of what bold is really should change based on the size of the text that you’re rendering. So by default, that 400 and 700 for normal and bold is kind of what the web defaults to. But in truth, the only reason you’re calling out bold is you want some emphasis, you want something to stand out. But the heavier the font gets out of small size, the harder it is to read. It kind of fills in the little open spaces. Instead of using 700 for body copy when it’s set at that roughly 16 pixel size or whatever we’re using there, you use maybe 550, 575 where you get enough emphasis but the letter forms are still more open. Then as it gets bigger, you might use a heavier weight.
Jason:But again, it’s sort of your choice at that point. By modulating that for getting the right level of emphasis, but still maintaining really good legibility, we have so much more flexibility. I’m really hoping that as these become more popular and more widely used, that we can start to teach people to be a little bit more nuanced with the way they use that range and actually get more expressive and also more readable at the same time.
Drew: One thing I’ve noticed implementing designs as a front end and implementing designs that I’ve been given is that different color contrast combinations and light text on a dark background versus dark text on light background, the weights can look completely different. So presumably, this would help to even out and sort of finesse the visual and the reading experience based on changes like that?
Jason:Absolutely. That’s one of the things that I usually will showcase in workshops and talks is adding in support for that light mode media query. You can flip that contrast but then you do want to do it in kind of a nuanced way. Depending on the typeface, it can end up looking really heavy or kind of spindly with a serif typeface. Sometimes you want to go a little heavier or a little lighter, but you then also tend to need to space the lettering out when you have it on a dark background or else the letter forms kind of bleed together. There’s little things that you can adjust in the typography. The media query is dropped dead simple. I mean, it’s like two lines of code to add that to your site. Then it’s what you do with that. It’s not necessarily just inverting the colors. Sometimes you need to adjust for contrast, but also tweak the type itself for better legibility.
Drew: So presumably, it’s not just weight that can be varied in a variable font. There are other ways we can change our font as displayed?
Jason:Yeah. It’s completely up to the type designer. I think it’s really good to reinforce that this is not a free for all in the browser. The browser can only render what has been enabled in the font. Ultimately, it’s the type designer who says the weight ranges this to this. You might have a width axis. It would get a little bit narrower or a little bit wider, but there’s also the ability to have what are called registered axes. There’s width, weight, slant, italic, and optical size. Those are all sort of core things that are mapped to CSS properties. Slant allows an angle in between one and another, so upright and I’ve actually seen ones with a reverse slant as well as a forward slant. That’s totally open. Italic is generally on or off but not necessarily. You can actually have… Well, there are type designers that have experimented with changing the letter forms over gradually as you shift from normal to italic, and sort of substituting letters along the way. That’s kind of an interesting thing.
Jason:But then there’s the ability to have custom axes. The type designer can define whatever custom axes they want to vary. You’ve seen ones that add sort of a gravity spread drippiness and all kinds of fun twisting shapes, or extending serifs, changing the height of the ascenders and descenders. On the lowercase letter forms, changing whether or not they are serifs or not. There’s all kinds of things that you can do. It’s really up to the imagination of a type designer. I think we’re only scratching the surface as to what could realistically happen with all those things. It’s all accessible through CSS.
Drew: Yeah. All of these properties can be tweaked just through the normal CSS that you’re delivering with the rest of your design. What sort of things can we do in CSS to sort of trigger those changes? Is it just like we would do with a responsive layout where we have media queries to trigger that?
Jason:There’s all kinds of ways you can do it. There’s a small change that you have to make. I’m assuming that we’ll provide a bunch of links to some stuff that will help people kind of play around with this stuff. I mean, I’ve written a bunch. Hopefully, that will help people out. Then on the use side, the font weight axis is just mapped to font weight. Instead of saying regular bold, you just supply a number. You can change that with media queries. You can change it with JavaScript. You can kind of do it whatever you want with that. I’ve been using a technique called CSS Locks that I learned from Tim Brown to basically use math. CSS custom properties and calculations to scale it from, once you hit a small break point up to a large break point, it kind of smoothly scales the font size and line height.
Jason:Then you can also use a little bit of JavaScript to do the same thing with their weight if you want to. The weight axis maps to font weight, the CSS property. The width axis in the font will map to font stretch, and that’s just expressed as a percentage. I should note that many type designers are not necessarily thinking through how this is expressed so you might see weight ranges that do weird things like go from 400 to 650. You still have to express it as a percent, but it works. It’s fine. You just need to know what normal is and all the fonts are documented. Then with anything other than those two, currently, there’s a little bit uneven support in the implementation for slant and italic. A lot of those things you sort of need to fall back to using font variation settings and then you can supply several things at once. It’s kind of like font feature settings. It’s sort of a lower level syntax where you can supply a comma separated list of this four letter axis and the value, the next one, the next one.
Jason:The one thing that people need to keep in mind is that when you use font variation settings, you lose all the semantic understanding of that and you lose the fallback. Font weight and font stretch are universally supported in all the browsers. You should definitely use those attributes. For anything else, you might use font variation settings. But the advantage to using font weight the way you normally would is if the variable font doesn’t load, the browser can still do something with that. Whereas if it doesn’t understand variable fonts, or it doesn’t load, if everything is in font variation settings, then you lose all of the styling information. That’s just a little side note there just in terms of what is supported where. But I should also say that it is supported in all the shipping browsers that you’re likely to encounter in most circumstances. I-11 doesn’t work, but you can deliver static web fonts, and then use ad supports in your CSS to change over to the variable fonts. Then you’ll avoid any duplicate downloads of assets and it works really well. I have that in production on several sites already.
Drew: I think like many of the sort of more modern web technologies you’re seeing, if there’s a variable font that has been bubbling away quietly for a while, and is only when it sort of finally boils over and we get support in browsers and people like yourself making noise about it and letting everyone know that it’s there. It can almost feel to the standard designer or developer who’s just day-to-day getting on with their job and not tracking all the latest downloads. It can seem like it’s come out of nowhere. But I guess this has been bubbling away for quite… I mean, you mentioned the two slightly different implementations that we’re now dealing with. There’s a sort of older and a newer standard for implementing?
Jason:Well, it’s actually not older and newer. They’re both very intentional. I’ll come back to that in a second because it is really worth kind of understanding what the difference is with those. But you’re right. The format was introduced just over three years ago, was in September of 2016. We actually had the first working implementation in the nightly build of Safari three weeks later. It was pretty remarkably quick that we had working browser. Safari was the first one to ship full support for it. I think it was when High Sierra came out. I don’t know, it was like Safari 12 or something like that.
Jason:But not that long after, we ended up getting support shipped in Firefox, Edge, and Chrome. We’ve actually had browser support for almost two years. But there weren’t a ton of fonts. There’s been this sort of steady evolution. The support for using them on the web has actually been there longer than anywhere else. I mean, technically, this format works on desktop OS as well. So if you have a TTF format, you can install it in your desktop OS on Windows or Mac, and you can use it in any application. You can’t always get to vary the axes the way you might want to play with them kind of infinitely, but there are this notion of named instances embedded in that font file that map it back to what we’re used to.
Jason:In Keynote, for example, there’s not explicit support for variable fonts, but the format does work if there are things like in Tech Sense, again, condensed, light. You’ll have those normal, regular, regular bold, narrow, etc, all would be available in a drop down menu just like installing the whole family. Then if you’re in Illustrator or Photoshop or now InDesign that just shipped last week or Sketch that shipped a couple weeks ago, they all support variable fonts now, so that you can then access all of the different axes and play with it to your heart’s content. But in the browser, that’s where we’ve had a lot more to work with. Taking a cue from your wife, I have been kind of beating this drum for a while trying to get people to be more aware of it. Then thanks to the work that the Firefox team has done in creating developer tools. With Jen Simmons kind of pushing that along, we have incredible tools to work with on the browser that help us understand what the fonts are capable of.
Drew: You mentioned type designers and the font capabilities. There are lots of fonts that are available?
Jason:Well, a lot of people are doing it now. Probably the best and most comprehensive place to go look for them is Nick Sherman’s site, v-fonts.com, v-fonts.com. That’s just a catalog site. It’s rapidly becoming really, really big. There’s more variable fonts coming out all the time now. There’s not a huge number of open source ones, but if you search on GitHub for variable fonts, you actually will find a whole bunch of projects there. But Google has launched a beta of their new API with about a dozen variable fonts available there. There’s more coming from them. They just released Recursive at recursive.design, which is a fantastic new typeface from Stephen Nixon. The Plex variable, one is available, that’s open source. Then there’s tons of commercial ones.
Jason:The cool thing about that is Monotype has released some pretty big ones. But it’s lots of smaller foundries and individual designers that are just kind of leading the way in experimenting with this format. I think that’s really great for design and great for the web that we’re seeing all of these new designs from new designers or smaller designers that are kind of breaking this new ground. Because I like to see them succeed with this because they’ve really taken the initiative to kind of put some great stuff out there.
Drew: Are we seeing any updating of existing fonts to be variable fonts to have families replaced by a single variable font? Is that happening at all?
Jason:It is. The ones that Monotype released are updates to some really classic typefaces. FF Meta was one that I helped them launch by designing the demo for that last year. They’ve got that. Univers, Frutiger, Avenir, I think those are the ones that they’ve released so far, those four. Those are really kind of core classic brand typefaces. They’re working on more. I know they have at least another half dozen or so that are kind of in various stages of production. I know that Dalton Maag which does a ton of custom typeface work for large corporations has several really nice variable fonts. I’ve been doing some work with TypeTogether. They also have several really great typefaces. I know that one…
Jason:I’ve shown at some of the conferences where I’ve spoken about these things that Adidas has their own too that they’ve been using for all of their brand work in print for almost two years now. Which is really, really remarkable stuff. But also Mark Simonson is working on a variable version of Proxima Nova. That’s kind of a big deal. That’s been one of the best selling web fonts of all time. It’s happening. It’s happening in bits and pieces kind of all up and down the scale. But even something as simple as subscribing to David Jonathan Ross, Font of the Month Club, will get you a variable font almost every month. I mean, he’s been really incredible on the stuff that he’s been putting out. It’s like $72 for the year or something like that. He’s been putting out all kinds of really beautiful stuff.
Drew: It is quite interesting then, because obviously, with the capabilities of variable fonts, you could create new designs that make use of these. But potentially, there could be sites that are in production where there are variable font versions now available where somebody could go back, revisit that, and replace out multiple font files with a new implementation based on a new variable font version.
Jason:Yeah, absolutely. That’s some of the questions that I get fairly regularly. Recently, I was looking at a pretty large sports broadcasting website that the development team asked me about that same question. I looked, and sure enough, for two of the typefaces they’re using, there are variable fonts available. A quick bit of research showed us that we could replace four instances of one typeface and three of the other with two variable font files and take over 70% of the file size away in five requests. I mean, it would be a question win from a performance standpoint. For really large scale site, when you look at removing almost 300K of data download across millions of users, that actually adds up to real dollar savings and bandwidth cost. Even from that purely practical standpoint without rewriting any of their CSS, just replacing those fonts, it’s already going to be a significant win for them in performance, in page render time and then in actual bandwidth costs for them.
Drew: In practical terms, is it as simple as it sounds, just swapping one out for the other?
Jason:It can be. I think the perfect example of that is something that Google sort of casually let slip at ATypI in September that they have started doing that with Oswald to the tune of 150 million times a day. They made a variable font version of it, and they just started surfing it on websites that were using enough instances where it would yield a significant benefit. They didn’t tell anybody. They didn’t tell the site owners. Nobody had to do a thing. Because it had the right mapping of the weight axis so the defaults would just work. 150 million times a day is a lot of font serving. That’s starting to give them some better insights into what would this landscape look like for them if they could start to switch over the top five web fonts that they serve? I’m assuming Open Sans is probably one of those. I know Lato is probably in there, Roboto.
Jason:So if you look at those and look at what optimized versions of those might look like, then you can see that there are some very clear reasons why Google would be interested in that. Then if you look on the other side, just the design space and how much truer to a brand voice a company could be if they’re working with the whole range of their own brand typeface rather than having to swap in different ones or be more limited in their palette. So there’s really interesting things to learn and explore on kind of both ends of that spectrum.
Drew: It sounds like an exciting brave new world of typography and opportunities for doing type in a more sort of sensitive and potentially more creative way on the web than we’ve had been able to do before.
Jason:Well, that’s certainly what I hope. I think that one of the biggest barriers to adoption with fonts on the web at all stages has been performance. So what happens? How long does it take to load? What does that mean to the render time on the page? We’ve got those issues of that sort of flash of invisible text or unstyled text. Grappling with all those things, really, it comes back to how long does it take everything to get there? How does the browser react to that? There’s lots of things we can do to mitigate some of those issues. But it really comes down to if we have a better font and a better way to serve it, then all of those issues become much less significant. So having that in place, then we get to be way more expressive. We can really try and push the design end of this and try and be a little more creative.
Drew: Because you’ve written lately sort of expressing the feeling that perhaps the web has drifted into a bit of a trap of designing an article template per site maybe with some variations for a few different types of content. But everyone’s sort of drifting towards this medium.com style of single column of text very readable to my eyes. Nicely typeset. Is that such a bad thing?
Jason:I don’t think it’s bad. I just think it’s going to get boring. I mean, when Medium came out, that was pretty novel. I mean, I think that one column of… Like you say, it was pretty nicely typeset copy. It has nice an area. It wasn’t crowded. It wasn’t cramped and sidebars and all this other stuff. There’s always going to be questions of business model and what will support that. That’s why a really beautiful redesign of, I think, it was the Seattle Times that Mike Monteiro for Mule Design did a few years ago. Absolutely gorgeous until it launched. Then they had these massive banners down either side of the column and it just kind of took away all that whitespace. It was a real shame.
Jason:I understand that companies have to make money. There are ramifications to that. So it would be wonderful to have that be one option. To have that nice clean layout. But it shouldn’t be the only one. We have all these capabilities in CSS that allow us to do really interesting things with margins and layout. I mean, it’s not even just the fact that we have grid now. But the fact that we can do calculations in the browser in CSS allows us to do a lot more interesting stuff. You layer in with that, the ability to be much more expressive with type, then we could start to look at what they do in magazines. Vanity Fair doesn’t have one article template. They have six or seven or eight. If you really look at how they lay those things out, there’s a tremendous amount of variability but it is playing within a system.
Jason:So when we create a design system for our website, instead of stopping at just one layout, we have a relatively easy way to build some switches into our content management systems. Most of them support a fair amount of flexibility. There’s no reason why we couldn’t give people a choice. I want to use layout one, two, three, four, five, six. That’s going to introduce different margins, different offsets. Maybe introducing the ability to create some columns. There’s lots of different things that we could do that would make for a much more interesting web. I think that type can play a really big part in that.
Drew: Is type our savior when it comes to adding a bit more personality back to the web?
Jason:Well, I think it can be. I think we’ve had this long evolution on the web towards better usability. But I think that one of the casualties there is when all we’re ever concerned about is that utilitarian, is it usable approach? That tends to beat out personality. Then when every single website is… Again, we had web fonts come along and that created a new level of expressiveness that we didn’t have before. Then all of a sudden, we could… Displays got better. So serifs came back into the mix. We could use those again on the web. These things added some life. Then we’ve kind of optimized back to everybody using one or two San-serifs. It’s Open Sans or it’s Roboto or Oswald or whatever. We’re kind of back to the same thing where there are tons of really good, really readable typefaces. We haven’t really taught this current generation of UX designers who are often the ones driving a lot of this anything about typography. Anything about how expressive it can be, how much it can alter the mood and the tone.
Jason:So we have a huge number of people that are dictating the design direction of things on the web who have ideas about type that are perhaps not as well-informed as somebody who studied graphic design and those notions of readability. We need to bring those things together. It’s not one or the other. It’s an and. It needs to be.
Drew: Especially when we talk about personality and about tone and mood. From a business point of view or from what we’re talking about is aspects of a brand. So in making everything look the same, are we losing the ability to communicate a brand to customers?
Jason:Absolutely. Not to dive into politics, but I think the whole… One of the major issues that we certainly experienced in the US, and I’m sure it’s not that different from what happened in the UK over the last few years. When all the news is consumed through a single platform, and everything looks the same, there’s no distinction of voice. So it’s something like 75% of adults in the US say that they get a significant portion of their news from Facebook. I mean, let’s set aside just how generally horrifying that is. But given that everything is presented uniformly, there’s no difference between an article from The Guardian, to New York Times, The Wall Street Journal, The Washington Post, and Joe’s right wing news. It’s all presented exactly the same.
Jason:When we see that logo, that type style, the Guardian is so characteristic. The Wall Street Journal is so characteristic. We recognize instantly when we see it, even just a headline. We know where that came from. Then there’s this automatic association with that brand and that authenticity. When you strip all of that away, you’re left with, “Okay, I’m going to evaluate this on a headline. Then it’s on, who wrote a better headline? That’s not a lot to go on. So I think that we have lost a tremendous amount. If you look at what Apple News Plus is trying to do, there are some efforts on a part of a few companies to try and reintroduce that. Blundell did a really interesting job of that in Europe. They launched in the US, but I’m not really sure they’re ever really that successful. That was a platform that would allow you to subscribe and see content from all these different top level newspapers and publications. It would always be in their own design. So that was really kind of an interesting approach there. It was always preserving the brand voice, that authenticity and that authority that would go along with that news. It really helped provide some cues for you as a reader to kind of evaluate what you’re reading.
Jason:I think that’s important. I think it’s not something to be taken lightly.
Drew: Thinking back to RSS readers in days gone past, the same sort of problems we were seeing then where everyone’s content was being just distributed via RSS and appearing in a reader in identical format, identical layout. I think you do lose something of the personality and the voice.
Jason:Yeah. It’s true. I don’t think that’s an entirely solvable problem. I think if you can imagine an RSS reader with a different typeface for every headline, it would be crazy. There’s a reason why that that doesn’t work that well, but there has to be some middle ground. Type does play a role in that. Then certainly, once you get back to the website, there is that sort of instant recognizability that will help that experience stand apart from seeing it anywhere else.
Drew: So say I’m a designer. I’m working in a small agency. I’m turning out designs for all sorts of different clients. I look at my work. I think, “This is all good. This is readable, but it’s got no personality in it.” Where do I start to actually put back some interest, some excitement, and not just lean on this sort of uniform UX driven layout that I’ve sort of conditioned myself to use?
Jason:Well, I think the thing to do is if you’ve never studied typography, you haven’t necessarily kind of trained your eyes to see what the differences are in one typeface to another. Even when you have studied graphic design, you have to remind yourself of these things all the time. So I think oftentimes that I’ll recommend, and actually, I wrote about this a few weeks ago because I kept getting asked like, “Where do you start?” I made a list of books that I think are really helpful. So something like Ellen Lupton’s book, Thinking with Type is a fantastic introduction to looking at type and seeing it. Erik Spiekermann’s book, Stop Stealing Sheep is a great one although I think at the moment, it’s out of print. I think that he might be working on another edition but that’s so… If you find that one, that’s a good one as well.
Jason:Those will help introduce you to the terminology and understanding what the differences are between the different styles of text. Then once you have that basic introduction, it gives you a better frame of reference when you look at other websites. Getting a sense of like, why does this one feel warmer than that one? What are the combinations of type? What are the characteristics? As a web developer often does or web designer often does, you inspect an element, see what the typeface is that’s being used there, and that can start to help build a palette of ones that you become familiar with. Very often, designers do hone in on a few that they get to know well and they tend to use them on a lot of different projects. That’s not necessarily a bad thing. It’s certainly better now if you’re working with a variable font and you can be that much more varied.
Jason:So you can decide that on this website, this is what I want to call normal. This is the width that I want to use and the other aspects of it. So even using the same typeface across websites because you have access to the full range of characteristics, it could still look quite different.
Drew: So I think there’s a lot of reading to be done. I’m sure we’ll add some links to the show notes of all the excellent articles you’ve written up and some references to these books and what have you. Because I think there’s so much to learn. I think we’ve always got to be learning with these things. The learning never ends.
Jason:It’s true. It is true. That is something that I’ve enjoyed immensely when I started writing this newsletter. Every week when I’m writing it, I’m reading more of the specs. I’m reading more of what other people have discovered and written. There’s tremendously knowledgeable folks out there. Rich Rutter, for instance, from Clearleft, wrote a fantastic book called Web Typography. He was one of the founders of Font Deck, which was one of the very first services to launch. He’s always been kind of the most scholarly of authors about this stuff. I mean, he’s really tremendously thoughtful in the way he puts those things together. But there’s a bunch of people doing really interesting stuff. That has kind of forced me to kind of keep up with what other people are doing all the time, which is really fantastic.
Drew: Is there anything in particular that you’ve been learning lately?
Jason:The stuff that I’ve been learning the most is actually the corners of the specs. I think it’s something that… I mean, again, probably the biggest influence for me on that is probably Rachel [Andrew]. That she’s always talking about like, “Well, if you actually read what’s written here, there’s actually really good stuff to know.” So in reading exactly what the specs are, there’s a tremendous amount of great typographic control that is available to us. Then layering into that different things like mix blend modes and CSS and learning more about different size units and how they interact together and learning how to use and where you can use CSS custom properties. I keep reading little bits more and more and then kind of compare that to what the browsers are doing. It really has been a tremendous experience for me in what I’ve been learning every week. Even having been doing this stuff for 25 years, there’s still like a new gem every time I dig into one of these things.
Drew: That’s fantastic. Thank you. So if you dear listener would like to hear more from Jason or perhaps hire him to work with you on your web typographic challenges, you can follow him on Twitter where he’s @jpamental, or find his website at rwt.io where you can also find the web typography newsletter to sign up to. So thanks for talking to us today, Jason. Do you have any parting words?
Jason:Yeah, experiment. I mean, there’s lots of open source stuff to play with. I think once people get this in their hands and get familiar with it, that I think they’ll start to see more and more how much fun they can have with this stuff and how much more expressive they can be. I think I was talking to the design director at The Wall Street Journal actually on Friday. I was then talking to their design team. We were talking about it’s great that you have a design system that standardizes things, but it’s then like any good design where you break that rule. That’s where the exciting things really happen. So we’ve gotten this necessary evolution of like getting really good at the system. Now we’ve got to break it some. That’s when we can get excited again. Break the rules. That’s my best advice, I think.

(dm, ra, il)
0 notes
Text
Web Design And Development Advent Roundup For 2019
Web Design And Development Advent Roundup For 2019
Rachel Andrew
2019-12-11T10:30:30+02:002019-12-13T08:07:09+00:00
In the run-up to Christmas, there is a tradition across the web design and development community to produce advent calendars, typically with a new article or resource for each day of December. Last year, I did a roundup of these calendars, and now that the 2019 season is in full swing, here is this year’s line-up.
I’m sure you’ll notice that the majority of the calendars published here are true community efforts, often with the bulk of the work falling to an individual or tiny team, with no budget to pay authors and editors. So, please join us in supporting these efforts; share the articles that you enjoyed reading and join the discussions respectfully.

Whether you celebrate Christmas or not, you can certainly learn a lot of new things. (Large preview)
What follows is an amazing variety of calendars, taking different approaches to the idea of publishing something every day in advent. There are plenty of traditional articles, but also code challenges to get involved with. I’ve tried to locate RSS Feeds and Twitter accounts to make it easy for you to keep track of your favorites. Enjoy!
It’s A Shape Christmas
It’s A Shape Christmas is a digital calendar that counts down to Christmas and reveals a bespoke illustration each day themed around four different shapes (Square, Triangle, Circle and Hexagon) and Christmas. The project was started in 2011 by a UK design agency called Made by Shape. This year, it is showcasing some of the best of the previous seasons.
@shapechristmas on Twitter
24 Ways
For twenty-four days, 24 ways is publishing a daily dose of web design and development goodness to bring folks a little Christmas cheer. It’s celebrating 15 years of advent publishing and will be taking a well-earned break after this year’s “final countdown”.
RSS Feed
@24ways on Twitter
24 Days In Umbraco
24 Days In Umbraco is a calendar of articles relating to the Umbraco CMS. However, the themes of the articles so far this year will be of interest to more people than just those who use Umbraco. I enjoyed the article from December 2nd — Setting The Stage by Laura Weatherhead about public speaking.
@24daysinumbraco on Twitter
PerfPlanet Calendar
PerfPlanet is back for another season with all things speed and web performance. The Web Performance Calendar has been publishing since 2009 and is maintained by Sergey Chernyshev.
RSS Feed
@perfplanet on Twitter
Lean UXMas
Lean UXMas has been publishing each advent since 2014 and is a collection of the most popular articles from this year’s Agile & Lean UX News delivered daily this coming December.
RSS Feed
@leanuxmas on Twitter
24 Days In December
Back with 24 thoughts from the PHP family is 24 Days in December. They began publishing in 2015, when Andreas Heigl realized that he missed Web Advent who had stopped publishing in 2012.
RSS Feed
@24DaysInDec on Twitter
Perl Advent
Perl Advent is back. Mark Fowler has been publishing since 2000 and is the longest running web advent calendar that I know of. You’ll find insightful articles written by diverse author submissions from all types of Perl programming levels, so sit back and enjoy 2019’s for 24 merry days of Perl!
RSS Feed
@perladvent on Twitter
24 Accessibility
24 Accessibility are back for a third year of accessibility posts in the run-up to Christmas. The site also has an excellent set of a11y related books, events, and Twitter accounts to follow in the sidebar.
RSS Feed
@24accessibility on Twitter
“A Language A Day” Advent Calendar
In this calendar, Andrew Shitov is introducing a different programming language each day. I like the fact that for each language he is examining the same set of tasks, which makes for interesting comparisons. It’s an impressive amount of work to undertake.
RSS Feed
SysAdvent
Now in its 11th year, SysAdvent is a collection of articles written by sysadmins and published with the goals of sharing, openness, and mentoring.
RSS Feed
@SysAdvent on Twitter
Ladies of Code
New this year is the Ladies of Code Advent Calendar, from Ladies of Code, an organization that runs workshops, meetups, and hack nights across Europe.
@ladiesofcode on Twitter
The JVM Programming Advent Calendar
Originally the Java Advent Calendar, this annual offering renamed to JVM Advent as the ecosystem is more than just the Java language.
RSS Feed
@JavaAdvent on Twitter
RIPSTECH Java Security Calendar
In 2017 RIPSTECH published a PHP Security calendar and in 2018 a WordPress Security calendar. They are back for 2019 with a focus on Java security. Can you spot the vulnerability in each of the 24 challenges?
WordPress Snippets Til Christmas
Elliott Richmond has come together with other folks in the WordPress community to publish useful WordPress snippets every day of advent to help developers improve their workflow.
RSS Feed
#wpsnippetstilxmas on Twitter
The Third Annual C# Advent
A community effort with 50 slots, two per day, for people to claim and write an article about C# development. The articles are hosted on the authors' sites or on Medium, and so the calendar is a list of links to them all.
@mgroves on Twitter
Marco’s Extended Advent Calendar
Marco Zehe is posting daily until Christmas, and says these posts could be about “everything and anything”. However, expect a strong accessibility focus given his areas of expertise!
@MarcoInEnglish on Twitter
@MarcoZehe on Twitter
IT Security Advent Calendar
“Stay safe online all Advent time” is the credo of the IT Security Advent Calendar. Counting down to Christmas, it features a new tip for protecting your devices, networks, and data each day.
HaXmas
HaXmas is a security advent calendar by Rapid7 that is full of stories, advice, inspiration, and a bit of fun. Keep an eye on a new tidbit every day throughout December!
PHP Advent Calendar
Every year, for the first 24 days in December, the PHP Advent Calendar invites members of the PHPamily to share some gifts with you. And this year is no exception, of course.
Azure Advent Calendar
Run by Richard Hooper and Gregor Suttie, the initial idea of this advent calendar was to give people who aren’t that well-known an opportunity to share their content with the community. What started with 25 slots expanded to 75. A small community-driven idea brought to you by the community!
YouTube channel
#azureadventcalendar on Twitter
Webアクセシビリティ Advent Calendar 2019
This Japanese advent calendar has been running since 2013. Its focus lies on web accessibility, with a new author exploring a topic each day. The calendar is moderated by @hokaccha.
24 Jours De Web
24 Jours De Web is a lovely French calendar which first appeared back in 2012. The creators support the Pierre Deniker Foundation and kindly ask readers to donate to help this charity support mental health research and education.
RSS Feed
@24joursdeweb on Twitter
Kodekalender by Knowit
This Norwegian calendar is a series of programming challenges (each open for 24 hours only) with a prize draw at the end. Solving more puzzles gets you more entries. Good luck!
@knowitnorge on Twitter
Fronteers Advent Calendar
For the Dutch speakers among you, Fronteers are running an advent calendar on their blog. As last year, each writer chooses a charity, and the Fronteers organization will donate 75 euros on their behalf.
RSS Feed
@Fronteers on Twitter
SELFHTML Adventskalender
An advent calendar with web development tips in German comes from the SELFHTML community, who are committed to documenting web technologies for German-speaking developers in their SELFHTML wiki.
Advent Of Code
If you prefer a puzzle over an article, take a look at Advent of Code. Created by Eric Wastl, this is an advent calendar of small programming puzzles for a variety of skill sets and skill levels that can be solved in any programming language you like.
@ericwastl on Twitter
HACKvent 2019
The folks at Hacking Lab bring you a new (white-hack) hacking challenge every day during advent. You earn points based on the difficulty of your solution, but be quick, you need to solve the challenge on the same day to receive full points.
25 Days Of Serverless
25 Days Of Serverless has a new coding challenge waiting for you every day, for 25 days. Solve it in the programming language of your choice and submit your solution via GitHub. The best solutions will be showcased every week and possibly in a final series recap.
Advent Of Cyber
Advent of Cyber is TryHackMe's Christmas Security Challenge. And since security can be a daunting field, they break down common security topics into “byte-sized” challenges leading up to Christmas.
#DevToolsAdvent
Alex Lakatos started #DevToolsAdvent to count down the days to Christmas. Every day, he’ll be tweeting a useful Firefox DevTools tip or trick.
#DevToolsAdvent
@lakatos88 on Twitter
#devAdvent
Last year Sarah Drasner announced that she would be highlighting a person and project every day of Advent using the hashtag #devAdvent. She is continuing the tradition this year. Follow along to get to know some new folks and the work they do.
@sarah_edo on Twitter
#devAdvent
Last year I did a dev advent calendar, and I'm going to keep it going this year. Every day from the 1st to the 25th, I’ll highlight a new person/project that I’m into and think people would benefit from knowing about. ❤️
The hashtag is #devAdvent if you want to follow along
— Sarah Drasner (@sarah_edo) November 29, 2019
#CodeTidbits30
Another tweet calendar comes from Samantha Ming: follow her as she tweets 30 days of handy JS, HTML, and CSS snippets.
@samantha_ming on Twitter
#CodeTidbits30
#CodeTidbits30 Day 1 🎄
For the entire Dec, DAILY posts! 30 days straight of the very best JS, HTML, CSS snippets!
Let's start off with a classic. 3 ways to filter out duplicates from an array and return only the unique values.#Codenewbie #100DaysOfCode #301DaysOfCode pic.twitter.com/7j1dSh3CgW
— Samantha Ming (@samantha_ming) December 1, 2019
Bekk Christmas
Last year, Norwegian company Bekk produced four calendars. This year, they are back with twelve! In a blog post, they explain why they are producing such a huge number of articles this year. I learned that there are over 100 authors from within the company — many of who have not written articles before. Therefore, in the lead up they have been taking part in writing workshops. Perhaps we will find some future Smashing authors among them!
The homepage for the project is at bekk.christmas where you can check out the topics that interest you most.
CSS Christmas
Functional Christmas
Java Christmas
JavaScript Christmas
Kotlin Christmas
Machine Learning Christmas
Open Source Christmas
React Christmas
Security Christmas
The Cloud Christmas
UX Christmas
Share The Ones I Missed!
There seem to be even more calendars publishing this year than last, despite the fact that some are taking a break this year. It’s been nice to find some calendars in languages other than English, too! If you know of a calendar related to web design and development that I haven’t mentioned here, please post it in comments section below.
Enjoy your seasonal reading!

(il, cm)
0 notes
Text
Get Started With UI Design With These Tips To Speed Up Your Workflow
Get Started With UI Design With These Tips To Speed Up Your Workflow
Tomáš Čakloš
2019-12-04T10:00:00+00:002019-12-06T08:07:51+00:00
This article is about creating limits and rules to follow throughout the entire design process. There is an unlimited number of ways in which you can combine elements in a user interface — and so you’ll need to set some rules and boundaries, or else the design workflow might become an unpleasant chore. You might be struggling with all of the possibilities and trying to pick the best option among many “correct” options. By setting (and following) some basic rules, you will make your design look more consistent, too.
This article is intended for beginner UI designers. You don’t need a lot of experience in order to be able to follow the tips and tricks shared in it.

Having a system is important!
The Importance of Making Your User-Interface Design Consistent
Let’s start at the very beginning. You want your design to look good and trustworthy, and you need to avoid chaos at all costs. For this to happen, it’s very important to have a system for your design work.
Your developers will appreciate a system, too — they’ll love the fact that your design has order, and that you are making their work easier.
A System Of Resizing By A Predetermined Size
It doesn’t matter whether you want to resize a text block, resize an image, or adjust some white space. You need to decide how big each element will be. And I’ll bet you have been in this situation: Have you ever chosen a size for an element, and after five minutes, you change it, and then again, and maybe again and again?
Which size is perfect? It could be one of the ones you tried, right? You need to avoid this endless time-wasting trap!
Start By Choosing The Basic Unit: The 8-Pixel Grid
To make the whole design look cleaner, it’s helpful to first set the measurement value that will then determine all of the sizes. It is completely up to you what value you choose, but quite often, the best option is to stick to a few proven rules. And one of these rules is to resize and move elements by exactly eight pixels. This rule will streamline your decision-making.
Aside on px versus dp: In addition to pixels (px), you may have heard of the term dp being used in screen design and prototyping. The dp unit is short for “density-independent pixel.” The unit is relative to a 160-dpi screen, so 1 dp is equal to 1 pixel on a 160-dpi screen, and equal 2 pixels on a 320-dpi screen, and so on. The numeric value formula is px = dp * (dpi/160).
Note: If you work with smaller elements or objects, it’s also OK to use 4-pixel increments, instead of 8 — occasionally, you can make further adjustments, when required.)
But Why Exactly 8 Pixels?
There are a few reasons why eight often works like a “magic number” here:
Eight pixels is a sufficient minimum “jump”.
Eight is a great number because it is divisible by four and two.
If you use eight, you can easily resize any element without ending up with half pixels, as 8 / 2 = 4, 4 / 2 = 2, and 2 / 2 = 1. If, on the other hand, you start with 10, you’ll end up with 5 pixels, then 2.5 pixels, then 1.25 pixels. When designing for screen, you’d like to avoid half pixels as much as possible. By using whole pixels, elements in the design will align to precise pixel boundaries, and so will look crisper.
Multiples of eight (8, 16, 24, 32, 40, 48, 56, 64, 72, 80, etc.) are intertwined with binary values (1, 2, 4, 8, 16, 32, 64, 128, 256, 512, etc.).
Finally, the numbers are easy to remember.
What Are The Advantages Of Using An 8-Pixel Grid?
As a designer, your decision time is precious. This will make you faster and more efficient.
If you are working with a developer, you can create a system that will help you and your team. If the developer needs to make some quick changes, he can adjust the values by 8-pixel increments. This will ensure consistency and order.
People using your website will feel comfortable when they visit it. They will trust the website, and it’ll be easier for them to use the interface.

An effective way of using the 8px grid

The result of using an 8px grid
Work With A Grid To Lay Out All Elements
Horizontal Harmony
I’m sure you have already used a grid when designing websites. Using a grid helps you to accurately place all elements on the digital canvas.
The grid forms the skeleton of your interface and determines where you can place elements. The template holds the composition, and it defines clear boundaries so that your design will be more consistent. Now it will be easier for you to decide where to put the elements. As you gain more experience, you can update the boundaries as needed.
But how do you create this grid? We will cover the specifics next. Basically, the number and size of columns may be random and depends on your needs. The more detailed your design, the more columns the grid will require. If you’re hesitant, ask an experienced colleague for assistance.
Also, I recommend that you read “A Comprehensive Guide to UI Design”, which should help you understand user-interface design a bit more in depth.

Horizontal harmony
Vertical Harmony
Similar to maintaining horizontal harmony, it is important to keep vertical distances consistent in a design as well. Like the rows in a spreadsheet, they help you to keep text at evenly spaced intervals.
How big should these rows be? Again, it’s up to you. However, I recommend using 8 pixels or multiples of 8 (such as 16). Redefine boundaries where elements or text are to be aligned.

Vertical harmony
Picking Font Sizes The Right Way
If you look at some well-crafted designs, you will see consistency in font sizes. This is for a reason.
Note: Keep in mind also that you need only two, maybe three, fonts in your design. However, selecting the right typefaces and making them work together is beyond the scope of this tutorial.
Begin by defining a few key font sizes to use throughout the project. (For example, it would be foolish to use 30, 31, and 32 pixels. Rather, combine these three very similar sizes into one.)
Standard Font Sizes Bring Two Benefits:
Your design will be more consistent and more elegant.
It will speed up the design process and make you more efficient.
Font Sizes
When you are defining font sizes, make sure not to increase sizes by the same increment. When you are enlarging text, it should be non-linear. This means that the larger the text you are creating, the larger the increment should be.

Having a system in font sizes
Let’s say you have a text block with a 12-pixel font size, and you want to enlarge it. You try 14 pixels, and you are satisfied. But then imagine that you have a large headline (40 pixels) and you want to make it bigger. Would you increase the size by only 2 pixels, from 40 to 42? Of course not. Optically, the text requires a much bigger change. You might need to increase it by 24 pixels, giving you a bigger 64-pixel headline.
In short, this means that the bigger you want the text to be, the larger the increment you will need to use. This very simple principle applies not only to text, but also to the size of buttons, white space, and everything else.
It is typically based on a geometric progression. Here is a very useful chart demonstrating font scale:

Geometric progression
However, for typography, one proven scale is used with font sizes that you will want to stick with forever. The scale is 12, 14, 16, 18, 20, 24, 30, 36, 48, 60, and 72 pixels.

Proven typography scale for sizes
Text Line Height
Once you have defined all font sizes, you will want to take care of line spacing. For line height, use increments of 4 pixels again. For example, for 16-pixel text, let’s set the line height to 24 pixels. If you want the text to breathe more, then increase the row height by 4 pixels to 28.
Define Your Project’s Colors
Do you know how many color combinations exist? A lot! You will waste too much time if you don’t predefine shades of color. You can’t limit yourself to black, white, and, say, blue. For each color, you will need other shades, and it is important to set them in advance, so that the shades are consistent throughout your design project. We don’t want to create chaos in the design. Aim for 5 to 10 shades for each color. I prefer to define 9 shades for each color.
Let’s take a closer look at color shades.
Why 9 Shades Of Each Color?
The first advantage is color naming. Whether you are using a graphics editor or CSS code, you will definitely benefit from this tip. Each shade would be assigned a number, such as 100, 200, 300, 400, 500, 600, 700, 800, and 900. (Why hundreds? Typically, this is how cuts of typefaces are also organized.)
Secondly, 9 is a handy number for defining colors. The best way to prepare these shades is to prepare a row of 9 squares and fill the squares with colors. The one in the middle will be the base color. Then, you define the lightest shade (at the far left) and the darkest shade (at the far right). The next step is to select the hues in between.

Nine shades of each color
Prepare The Different Sizes, Types, And States Of Elements
When working on a design, you will usually work with a countless number of icons, buttons, and other components. Again, it’s a good idea to prepare in advance several sizes for them, and limit the options to as few as possible. During the design process, do not add other sizes, and don’t try to adjust the size of components to suit your needs. Instead, just use the ones you have already defined, and the whole design will be more consistent and clean.
Let’s look at buttons as an example. When you begin, you’ll need to define their hierarchical structure. To do so, make a button with a primary action, a button with a secondary action, and perhaps another button with a less important action. For each button, specify its status (active, inactive) and the color variant. Always try to reduce the number of elements to the most important ones.

An example of button styles
Define Other Elements’ Properties
User interface designers often use shadows in their design work. However, for less-experienced designers, shadows can sometimes be a struggle. When creating a shadow, you must set the shadow’s distance along the x-axis and y-axis, and also the blur radius, color, and transparency. Shadows can take a lot of time to fine-tune, which is why you’ll want to prepare them before diving into the design. It is helpful to prepare a set of shadows (using the same method as for colors), and then just apply them throughout the design process.
Also, be aware of all the other properties of elements that you will be working with, such as corner radius, transparency, and color gradients.

An example of shadow styles
White Space
Properly adjusting white space is important. Whether you offset elements from the outside (margin) or from the inside (padding), you should rely on the magic number of 8 again. Increase the offset by 8 pixels (4 for small elements). As with font size, the larger the gap you want, the larger the increment will have to be (again, you’ll need to define these increments in advance).

White space
Conclusion
To make your designs clean and consistent, define some boundaries and a clear path through the process.
When working on each element of your design, keep in mind the following:
See whether you have used it already somewhere in your design. If so, you can simply copy that element.
Follow a horizontal and vertical rhythm, and adjust the size of elements using the steps that you defined at the very beginning.
Avoid complicated decisions and never-ending battles with pixels. Have a system in place.
Do not create the same element twice. If there is order in your design, your work will be better and more efficient, you will be able to iterate faster, and you will be able to communicate with the developers more easily. The developers will set variables that follow your styles, so define them clearly. You’ll get a clean design, and the developers will be able to create better and more sustainable code. Everyone will be happy.
Related Reading
“Building Better UI Designs With Layout Grids,” Nick Babich, Smashing Magazine
“What Is The Difference Between “px”, “dip”, “dp” And “sp”?,” Stack Overflow
“Why UI Designers Are Using “dp” Instead Of “pixel” As The Unit To Design Mobile Apps?,” Kikahola, Medium
“font-weight CSS property,” Mozilla Developer Network web docs
“Step Up Your Design Game By Using Fewer Fonts,” Jacci Howard Bear, Lifewire
“Creating UI Shadows That Don’t Suck,” Anastasia Kas, Medium
“10 Golden Rules You Should Live By When Combining Fonts: Tips From A Designer,” Janie Kliever , Canva
“Material Design: 8 dp Grid, 4 dp Grid,” Google Help
“Why Some Designs Look Messy, And Others Don’t,” Reinoud Schuijers, UX Collective

(mb, il)
0 notes
Text
What Newspapers Can Teach Us About Web Design
What Newspapers Can Teach Us About Web Design
Frederick O'Brien
2019-11-08T11:30:00+00:002019-11-09T07:36:36+00:00
It’s easy to get caught up in the latest trends in web design. Web technology is constantly improving, and today developers have a formidable range of features at their disposal. This makes for a forward-thinking, innovative space — as it should — but also one at risk of being unrooted. Every art has its ancient masters. In the case of websites, it’s newspapers.
When you dig into the basic principles of news design, overlaps with the web are frequent and oftentimes indistinguishable. Many web design best practices can be traced directly back to news design. When it comes down to it, websites are made for users to engage with, and hopefully return to. Newspapers have been playing that game for centuries, and winning.
Anyone with even a passing interest in web design stands to benefit from knowing how news design works, and why it works. This piece will examine several tenets of newspaper design and show their connection to best practice online. At the core of that connection is a principle childlike in its simplicity, one newspaper and web designers alike would do well to remember.
Hold The Home Page
Newspapers have been around since the 17th century. They’ve worked hard for their rules, and because their content changes daily the rules have to be abstract. Ninety-five percent of what we see in any given newspaper will not be there the next day. It is what don’t see that is essential for wrangling the contents of newspapers into shape.
This framework is what we’ll be looking at; some of the invisible rules that hold newspapers together. They are concerned mainly with form, and how readers process information. The parallels with web design will soon become clear, and hopefully the lessons too. Let’s start with an obvious one — above the fold.
Above The Fold
If you’ve worked on the web you’ve likely heard the phrase ‘above the fold,’ meaning the content you’re met with when you land on a web page. It is a newspaper term, and it dates back centuries. Due to their size newspapers are often stacked folded in half, so above the fold literally means the content visible above where they’re folded in half. It is the first thing potential readers see. It is often the one and only chance to make an impression, to get people to buy a copy because they just have to know more. If the newspaper isn’t worth picking up for the front page, what reason is there to think it’s worth picking up at all?

I’d buy that for a dollar! Credit: The New York Times. (Large preview)
The space above the fold is the domain of the lead story, the most important piece of information in the entire paper. It has to hook the reader. This usually equates to big headlines, key pieces of information, and striking imagery. That said, there is not a rigid format. Whatever grabs people’s attention without distorting the truth is on to a winner.
Above the fold is a newspaper’s first and most important answer to ‘the pub test’ — what you’d blurt out if you were telling someone the crux of the story in the boozer. If you had the chance to tell your friends men walked on the moon yesterday, you probably wouldn’t open with the brand of shoes involved. You’d sprint in and yell, “Men have walked on the moon!” That’s above the fold. It’s where newspapers condense the most important story (or stories) of the day to the key points.
The same applies to websites, which no doubt is why the terminology has carried over. ‘Above the fold’ in web design (which online means what you see before scrolling) is the website’s answer to the pub test. What’s the single most important thing people should know? Though this is particularly relevant to home pages, it applies everywhere.

Three guesses what Apple wants you to know about right now. (Large preview)
According to a study of 25 million browsers last year, ‘above the fold’ is comfortably the most viewed part of a web page, with engagement peaking just below. From news to ecommerce to social media, the same principle applies: get to the point.
If you’d like to read more above the fold and front pages generally, Newseum’s Front Page poster is a good place to start.
The Gutenberg Principle
So you’ve grabbed someone’s attention. Congratulations. You’ll need to know about the Gutenberg Principle — or Z-pattern. Championed by ‘the father of newspaper design’ Edmund C. Arnold (more on him later), the Gutenberg Principle is a good rule of thumb to follow when thinking about how people engage with a page of content, be it paper or pixels.
The Gutenberg Principle states that when faced with homogenous content, we start at the top left hand corner and finish at the bottom right hand corner, flicking from right to left as we go. This stems from an idea called reading gravity. We in the western world spend our lives reading from left to right, flicking down and to the left to get to the start of the next line. Newspaper design tends to ape that flow.

The Gutenberg diagram, courtesy of Steven Bradley. (Read his Smashing Magazine article here) (Large preview)
Take the New York Times front page shown earlier for example. Your eyes zig-zag with each line. Where does your eye flick after ‘PLANT FLAG’? Almost certainly to ‘Voice from Moon.’ Breaking this flow tends to be jarring for readers because it’s at odds with a lifetime of reading habits. How often do you see the lead story hugging the right hand side of the page rather than the left? Not often.
The same flow applies to web design. Steven Bradley’s Smashing Magazine article on compositional flow and rhythm explores the principle in an online context, and certainly deserves a read, but I would add that there’s huge value in looking at its application in print. This is a principle that was being applied for decades before the world wide web came along, after all. Any given shortlist of Society for News Design finalists will be a masterclass in content flow. Here are some recent winners to whet your appetite.
Now to be clear, reading gravity isn’t quite as binding as, say, gravity. The eagle eyed among you may have noticed the qualifier that this applies mostly to ‘homogenous’ content. What’s more, it isn’t based on something innate in human nature — it’s guided by language. In languages that read right to left (Arabic for example) the same principle applies, but it is flipped.

Right-to-left languages provide a mirror image of western newspaper layouts. Credit: Tarek Atrissi Design. (Large preview)
This mattered less in the day of print. Papers were generally limited to a geographical region and could reflect the primary language of that region’s audience. In the online realm anyone, anywhere could be visiting your website, so it’s not only valuable to understand the Gutenberg Principle, but to design websites that change shape depending on the language they’re being read in.

(Large preview)

Al Jazeera flips its content based on the language it’s viewed in. (Large preview)
The Gutenberg Principle is not the only way people engage with content. Eye tracking studies have shown F-shaped patterns are also common online, for example, with more and more ‘hopping’ the further down the page readers go.
These patterns are all useful to know. They are not rules, just trends. Strong news design does not blindly adhere to the Z-pattern come what may; it uses it as a foundation. The same is true for web design. If in doubt, remember it, but don’t worship it. The human eye has an ingrained reading gravity, but great design leads rather than follows.
The adaptability of the web opens up amazing new possibilities for content presentation. The lessons of the Gutenberg Principle are starting points which can and should be played around with. The best rule breakers usually know exactly what the rules are.
For more information on the Gutenberg Principle follow the links below:
The Gutenberg Principle explained by the SUNY Political Institute
Understanding the Z-Layout in Web Design by Brandon Jones
Nameplates
Every newspaper has a nameplate. It’s just about the only thing you can guarantee won’t change from edition to edition. It’s the bit at the top (or very occasionally, along the side) of the front page, and comprises of the publication’s name and logo.
A lot of these are iconic in their own right. The nameplates of publications like The Washington Post and The Sun are seared into the public consciousness. Nameplates are the branding, the bit that says, ‘We’re not that other newspaper. We’re this newspaper.’ It communicates who you are and what you’re about.
It also serves as a kind of directory. Newspapers often have teasers in their nameplates, pointing readers to stories that don’t quite warrant a spot on the front page, but are still worth knowing about. It’s a key player in the above the fold game. Stick around. Keep reading. There’s something here for you. Keeping in mind the Gutenberg Principle, the nameplate is likely the very first thing readers will see.

Newspapers and websites alike understand the value of nameplates for both branding and navigation. (Large preview)
Practically every website has a nameplate, only on websites we call it the header. Smashing Magazine has one, Amazon has one, Facebook has one. It’s weird for a website not to have one, and for it not to appear on every page. On the web every page has to have a bit of the front page about it. A lot of users arrive at a site via the root domain, but a lot don’t.
This is one reason why nameplates online tend to be busier than their print elders. They are able to do more, which is just as well given more is asked of them. But in news and web design the underlying purpose of the nameplate is the same: get the brand front and centre and guide users to something they’ll care about.
Grid Systems And Content Blocks
Newspapers are pure content. From cover to cover, they are packed with information, information which needs to be well organised and well presented. The grid system is foundational to newspaper design. As water shapes itself to a bowl, news content shapes itself to grid systems.
Columns are the most important element of this. Depending on a newspaper’s format (tabloid, broadsheet, etc.) it might have anywhere from four to fourteen columns. It is rare for the content of newspapers not to shape themselves to these columns one way or another. Text flows down a column then resumes in the next one. Images can span multiple columns, especially if they’re eye-catching.

Early publications, like this 1905 edition of Norwegian newspaper Dagbladet, often stuck very closely to their grid systems. (Large preview)
Newspapers have evolved beyond the strangely rigid stream of consciousness affairs you’ll find in earlier efforts like those above. Now it is generally accepted that newspaper content should be organised in blocks, with each story forming its own box. This is called modular layout, and there are several reasons why it is the standard.
First, it is easier to organise. If every story fits in a clean, tidy space, they can be rearranged with relative ease. When you’re trying to fit dozens (or hundreds) of stories into a finite space with the clock ticking, this is a godsend.
Second, it is clearer. Good information is only worth so much when it’s presented badly. Blocks create pages within pages, where each piece of information is distinct and easy to follow.

Modular layout in action in The Guardian. (Large preview)
These standards have always played a role in web design, but they are particularly useful to understand now we have CSS Grid at our disposal. Not only do newspaper grid systems offer guidance for arranging content neatly and clearly, they show how content blocks interact with each other, and with advertising. The wrong alignment can look very silly indeed, while the right arrangement is a joy to read.
As ever, there are differences. For example, online there are rarely jumps (when you reach the bottom of a column and continue reading at the top of the next one) because web pages can go down indefinitely. This kind of layout generally makes less sense online because it leads to readers scrolling up as well as down to get through a single piece of content, which is pretty counterintuitive. As Rachel Andrew demonstrates, jumps can be just the thing for listings and small amounts of content, but the practice is generally a product of print’s physical limitations. The main value of jumps in web design may well be for stacking blocks of content, rather than organising copy.
What’s more, both in print and online abandoning the grid system can be striking in its own right. Just as Dada art recoiled from aesthetic norms of the early 20th century, so do brutalist websites invert the grid system to offer something more… unconventional.

A Dada print by Dutch artist Theo van Doesburg. (Large preview)

Yale School of Art sticking it to the man, man. (Large preview)
As noted already, to break the rules first you need to know them. For this and everything else, Tim Harrower’s The Newspaper Designer’s Handbook is a superb place to start. For a more sweeping introduction, Carrie Cousins’ Utilising Grids in Print Design over at Design Shack is excellent.
And how much does this all matter when you move over to the web? Well, more and more. CSS properties like Grid, Shapes, and Flexbox makes it easier than ever to both follow and break the rules of the grid system. Just as newspapers routinely venture outside the invisible lines of their wireframes, so too can websites push the boundaries of their own medium.
In his book Art Direction for the Web, Andy Clarke dives head first into the lessons of print media (and others), showing how advances in CSS can add whole new dimensions to the grid system. As Clarke himself puts it:
For years we’ve told each other the web isn’t print. We’ve told ourselves the things we admire in other design media cannot — and sometimes should not — be used online. We needn’t think that anymore.
Hear, hear.
For more inspiration, watch Jen Simmons live code a print layout in CSS Grid at Smashing Conference 2019. Beautiful. And for a more in-depth history of the grid system and its usage, check out this ‘Grids Are Good’ presentation by Khoi Vinh and Mark Boulton.
Look Forward… But Look Backward First
The conventions above were forged by decades — in some cases centuries — of experience, and there’s plenty more where they came from. What they all essentially boil down to is understanding content, and how people are likely to engage with that content.
Newspapers at their best follow a cartoonishly simple principle: present information in ways that are as clear, as attractive, and as accessible as possible. That’s a worthy goal for any website. And don’t take my word for it. These ideas were championed by Edmund C. Arnold, the aforementioned father of modern newspaper design.’ Arnold designed or redesigned hundreds of newspapers during his career, including The Chicago Tribune, The Boston Globe, The National Observer, and Newsday.

Edmund C. Arnold, ‘the father of modern newspaper design.’ Credit: Josh Meltzer/The Roanoke Times. (Large preview)
He pushed for designers to have more influence, for newspapers to have flair as well as substance. He was also a journalist, and an academic, and wrote numerous books about newspaper design and typography. He knew his stuff. It is no coincidence that the Society for News Design (SND), of which he was a founding member in 1992, now holds two awards each year — one for news design, the other for digital.
Anyone keen to learn more about Arnold and his work could do a lot worse than starting with the resources below:
Modern Newspaper Design by Edmund C. Arnold
Edmund C. Arnold interview by the Society for News Design
Remembering the Father of Modern Newspaper Design
Newspaper designers are students of the web — so too should web designers be students of newspapers. As improvements in web technology open up new frontiers, it pays to know whether someone else has been here before. We are all looking for the same thing, after all. It’s all, fundamentally, the same language.
You can see this playing out in real time as newspapers adapt to the web. The gold standard of news design online at the moment is probably The New York Times, which was a finalist in the print and digital SND awards this year. What’s interesting about the Times online is the blend between classicism and innovation. The homepage still essentially looks like the front page of a print edition, while individual stories, like ‘The Plot to Subvert Democracy’, immerse themselves in the new possibilities of the web.

The New York Times blends best practice of news and web design to make something entirely new. (Large preview)
Or take a newspaper designer like Mario García — part of the generation after Edmund — who’s most recent book, The Story, was designed to be read on mobile phones. The best news designers relish change. The proof is in the pudding. (For those interested, García blogs daily about the overlap of news and web design.)
This, in a lot of ways, is the main takeaway of news design. Its top practitioners are not dogmatists — they are students. When asked at the twilight of his career what his advice was to the next generation of designers, Edmunc C. Arnold’s answer was not a series of rules. It was far simpler than that: know where you came from.
My message to young designers is this: look, kids, you can do better, but the only way to achieve your potential is to go back to — and understand — the basics. That sounds boring, but it’s reality.
Newspapers don’t hold all the keys to great web design, but understanding the principles that guide them can only benefit web designers. There are plenty of kindred spirits in those two worlds. I’m no web designer, but I recognise good web design when I see it in part because of what I know about newspapers. Purpose and style has a way of looking, well, stylish.
Web design guru Jeffrey Zeldman hit the nail on the head when he tweeted this more than a decade ago:
Content precedes design. Design in the absence of content is not design, it's decoration.
— zeldman (@zeldman) May 5, 2008
Vitaly Friedman was bowing to the same altar when he said, “Good design is about effective communication, not decoration at the expense of legibility.” Both he and Zeldman would find plenty of allies in the news design space. Few, if any, mediums have a richer history wedding content and design than newspapers do. That struggle is all they have.
To The As Yet Unimagined
It’s worth reiterating here that there are clear and undeniable differences between news design and web design. In newspapers the dimensions of the space are always the same, while websites must adapt to radically different screen sizes and devices. In newspapers what you see is what you get, while websites can hide all sorts of useful features out of sight until they’re prompted to appear. The aim of this piece is not to convince you that news and web design are the same. They are, however, often very similar. To be master of one does not make you master of the other, but it helps.
Perhaps this is why Friedman collated a selection of award-winning newspaper designs all the way back in 2008. Back then he rued the fact that print techniques weren’t applicable online. Back then CSS wasn’t sophisticated enough. Well, its is now, and that’s really exciting.
The process never ends. It can’t end. No newspaper or website worth its salt is ever truly ‘done.’ It is always evolving. Look at the first ever newspaper and the first ever website and it’s fair to say a lot has changed in both worlds since then:

1609 edition of Relation aller Fürnemmen und gedenckwürdigen Historien, widely considered the first newspaper. (Large preview)

The first ever website. (Large preview)
Both formats have improved massively since those humble beginnings, and there’s an awful lot left to achieve. As C. Y. Gopinath traced out beautifully in 2016, the parameters are always changing; web technology, screen sizes, devices, internet speeds, you name it. In the mobile age maybe the nameplate belongs at the bottom. Who knows? It all lies ahead.
In many respects a torch has been passed from news design to web design. If developers can push forward with the knowledge of their elders on hand, they’ll achieve things previous generations couldn’t even have imagined. What an incredible opportunity. I can’t wait to see what they come up with.

(ra, yk, il)
0 notes
Text
How Frontend Developers Can Empower Designer’s Work
How Frontend Developers Can Empower Designer’s Work
Sandrina Pereira
2019-10-16T12:30:59+02:002019-10-17T08:06:08+00:00
This article is mostly directed at you, dear Frontend Developer, who enjoys implementing user interfaces but struggles in aligning expectations with designers you work with. Perhaps you are referred to as the “UI Developer” or “UX Engineer.” Regardless of the title that you carry around, your job (and as well as mine) consists of more than breathing life into design files. We are also responsible for filling the gap between the design and development workflows. However, when crossing that bridge, we are faced with multiple challenges.
Today, I’d like to share with you practical tips that have helped me to collaborate more efficiently with designers in the past years.
I believe it’s our job, as UI Developers, to not only help designers in their journey to learn how the web works, but also to get to know their reality and learn their language.
Understanding UX Designers’ Background
Most of the UX designers (also referred to as Web Designers or Product Designers) out there took their first steps in the design world through tools like Photoshop and Illustrator. Perhaps they were Graphic Designers: their main goal was to create logos and brand identities and to design layouts for magazines. They could also have been Marketing Designers: printing billboards, designing banners and creating infographics.
This means that most UX designers spent their early days designing for print, which is a totally different paradigm from their current medium, the screen. That was their first big challenge. When dealing with print, designers cared about pixel alignment, but on a fixed area (paper). They didn’t have to contend with a dynamic layout (screens). Thinking about text breaking or states of interactions was simply not part of their job either. Designers also had complete freedom over colors, images, and typography without performance constraints.
Fortunately, there have been many efforts from the self-taught UX designers community, to teach development fundamentals, discuss whether designers should learn to code and understand how to best perform hand-off to developers. The same held true for the development side as well (more about that in a minute.) However, there is still friction happening between the two fields.
On the one hand, designers complaining each time an implementation doesn’t match their designs or feeling misunderstood when those are rejected by the developers without a clear explanation. On the other hand, developers might take for granted that designers know something technical when that might not be true. I believe we can all do better than that.
Embracing A New Way Of Thinking
The websites and apps that we are building will be displayed on a wide range of screen sizes. Each person will use them on multiple devices. Our common goal is to create a familiar experience across their journeys.
When we, as developers, think that designers are being picky about pixel alignments, we need to understand why that is. We need to recognize that it’s beyond fidelity and consistency. It’s about the sum of all the parts working together. It’s cohesion. We have to embrace it and do our best to accomplish it. Learning the fundamentals of design principles is a good starting point. Understand the importance of selecting the right colors, how the hierarchy works, and why white space matters.
Note: There’s an online course known as “Design for Developers” and a book called “Refactoring UI” — both are great to get you started. With these, you’ll be able to implement user interfaces with a sharp eye for detail and gain significant leverage when communicating with designers.
Magnifying Your Designers’ Awareness
You might take for granted that designers know the web as much as you do. Well, they might not. Actually, they don’t have to! It’s our responsibility, as developers, to keep them updated with the current state of the web.
I’ve worked with the two sides of this spectrum: Designers who think that anything can be built (such as complex filters, new scroll behaviors or custom form inputs) without giving browser compatibility a thought. Then, there are designers with assumptions about the “low limitations of the web” and just assume by themselves that something is impossible to implement. We need to show them the true possibilities of web design and not let the limitations hold back their skills.
Teach Them Code, Not How To Code
This seems contradictory but bear with me: knowing how to code is at the core of a developer’s job. We work in a fast-paced industry with new stuff popping up every day. It would be a hypocritical request from us to demand designers to learn how to code. However, we can help them to understand code.
Sit next to the designer you work with for 15 minutes and teach them how they can see for themselves whether the specs of an element are correct and how to change them. I find Firefox Page Inspector remarkably user-friendly for this.
Nowadays, it’s a joy to visualize layouts, debug CSS animations and tweak typography. Show them a ready-to-use code playground like Codepen for them to explore. They don’t need to know all CSS specs to understand how the layout paradigm works. However, they need to know how elements are created and behave in order to empower their daily work.
Include Designers In The Development Process
Invite designers to join you in the stand-up meeting, to be part of the QA process and to sit down with you while you refine visual details in your implementations. This will make them understand the constraints of the web and, soon enough, they’ll recognize why a feature takes time to implement.
Ask Designers To Include You In Their Design Process
You’ll realize that they do much more than “make things pretty”. You’ll learn more about the research process and how user testing is done. You’ll discover that for each design proposal they show to you, several other studies were previously dropped. When designers request a change, ask the reason behind it, so you can learn more about the decisions being made. Ultimately, you’ll start to understand why they are picky about white space and alignments, and hopefully, soon you’ll be too!
I find it crucial to treat frontend development as a core part of the design process, and design as a core part of the development process. Advocating a mindset where everyone gets the chance to be involved in the design and development cycle will help us all to better understand each other’s challenges and to create great experiences as well.
We May Use Different Tools, But We Must Speak The Same Language
Now that we are starting to understand each other’s workflow a little better, it’s time for the next step: to speak the same language.
Looking Beyond The Code Editor
Once you start to pay attention to your surroundings, you’ll be better equipped to tackle problems. Get to know the business better and be willing to listen to what designers have to say. That will make you a team member with richer contributions to the project. Collaborating in areas beyond our expertise is the key to creating meaningful conversations and mutual trust.
Using UI Systems As A Contract
Ask designers to share their design system with you (and if they don’t use one, it’s never too late to start). That will save you the bother of handpicking the colors used, figuring out margins or guessing a text style. Make sure you are familiar with the UI System as much as they are.
You might already be familiar with the component-based concept. However, some designers might not perceive it in the same way as you do. Show them how components can help you to build user interfaces more efficiently. Spread that mindset and also say bye-bye to similar-but-not-equal-names: header vs hero, pricing info vs price selector. When a piece of the user interface (a.k.a ‘a component’) is built, stride to use the same names so they can be reflected in both design and code files. Then, when someone says, “We need to tweak the proposal invitation widget,” everyone knows exactly what is being talked about.
Acknowledging The Real Source Of Truth
Despite the fact that the user interface is first created in the design files, the real source of truth is on the development side. At the end of the day, it is what people actually see, right? When a design is updated, it’s a good idea to leave a side note about its development status, especially in projects where a large number of people are involved. This trick helps to keep the communication smooth, so nobody (including you) wonders: “This is different from the live version. Is it a bug or hasn’t so-and-so been implemented just yet?”
Keeping The Debt Under Control
So, you know all about technical debt — it happens when the cost to implement something new is high because of a shortcut we took in the past to meet a deadline. The same can happen on the design side too and we call it design debt.
You can think about it like this: The higher the UX & UI inconsistency, the higher the debt (technical and design). One of the most common inconsistencies is in having different elements to represent the same action. This is why bad design is usually reflected in bad code. It’s up to all of us, both as designers and developers, to treat our design debt seriously.
Being Accessible Doesn’t Mean It Has To Be Ugly
I’m really pleased to see that both we, as developers and designers, are finally starting to bring accessibility into our work. However, a lot of us still think that designing accessible products is hard or limits our skills and creativity.
Let me remind you that we are not creating a product just for ourselves. We are creating a product to be used by all the people, including those who use the product in different ways from you. Take into account how individual elements can be more accessible while keeping the current userflows clear and coherent.
For example, if a designer really believes that creating an enhanced select input is necessary, stand by their side and work together to design and implement it in an accessible way to be used by a wide range of people with diverse abilities.
Giving Valuable Feedback To Designers
It’s unavoidable that questions will pop up when going through the designs. However, that’s not a reason for you to start complaining about the designers’ mistakes or about their ambitious ideas. The designers are not there to drive you mental, they just don’t always intuitively know what you need to do your job. The truth is that, in the past, you didn’t know about this stuff either, so be patient and embrace collaboration as a way of learning.
The Earlier The Feedback, The Better
The timing for feedback is crucial. The feedback workflow depends a lot on the project structure, so there isn’t a one-size-fits-all solution for it. However, when possible, I believe we should aim for a workflow of periodic feedback — starting in the early stages. Having this mindset of open collaboration is the way to reduce the possibility of unexpected big re-iterations later in the road. Keep in mind that the later you give the designer your first feedback, the higher will be the cost for them to explore a new approach if needed.
Explain Abstract Ideas In Simple Terms
Remember when I said that performance was not a concern of the designers’ previous jobs? Don’t freak out when they are not aware of how to create optimized SVGs for the web. When faced with a design that requires a lot of different fonts to be loaded, explain to them why we should minimize the number of requests, perhaps even take advantage of Variable Fonts. Asides from loading faster, it also provides a more consistent user experience. Unless designers are keen to learn, avoid using too many technical terms when explaining something. You can see this as an opportunity of improving your communication skills and clarifying your thoughts.
Don’t Let Assumptions Turn Into Decisions
Some questions about a design spec only show up when we get our hands dirty in the code. To speed things up, we might feel tempted to make decisions based on our assumptions. Please, don’t. Each time you turn an assumption into a decision, you are risking the trust that the design team puts on you to implement the UI. Whenever in doubt, reach out and clarify your doubts. This will show them that you care about the final result as much as they do.
Don’t Do Workarounds By Yourself
When you are asked to implement a design that is too hard, don’t say “It’s impossible” or start to implement a cheap alternative version of it by yourself. This immediately causes friction with the design team when they see their designs were not implemented as expected. They might react angrily, or not say anything but feel defeated or frustrated. That can all be avoided if we explain to them why something it’s not possible, in simple terms and suggest alternative approaches. Avoid dogmatic behaviors and be open to collaborating on a new solution.
Let them know about the Graceful Degradation and Progressive Enhancement techniques and build together an ideal solution and a fallback solution. For example, we can enhance a layout from flexbox to CSS Grid. This allows us to respect the core purpose of a feature and at the same time make the best use of web technologies.
When it comes to animations, let’s be real: deep down you are as thrilled to implement the next wow animation as much as the designers are to create it. The difference between us and them is that we are more aware of the web’s constraints. However, don’t let that limit your own skills! The web evolves fast, so we must use that in our favor.
The next time you are asked to bring a prototype to life, try not to reject it upfront or do it all by yourself. See it as an opportunity to push yourself. Animations are one of the pickiest parts of web development, so make sure to refine each keyframe with your designer — in person or by sharing a private synced link.
Think Beyond The Ideal State — Together
Here’s the thing: it’s not all about you. One of the designers’ challenges is to really understand their users and present the designs in the most attractive way to sell to the Product Manager. Sometimes they forget about what’s beyond the ideal state and developers forget it too.
In order to help avoid these gaps from happening, align with designers the scenario requirements:
The worst-case scenario
A scenario where the worst possibilities are happening. This helps designers to say no to fixed content and let it be fluid. What happens if the title has more than 60 characters or if the list is too long? The same applies to the opposite, the empty scenario. What should the user do when the list is empty?
Interaction states
The browser is more than hovering and clicking around. There are a bunch of states: default, hover, focus, active, disable, error… and some of them can happen at the same time. Let’s give them the proper attention.
The loading state
When building stuff locally, we might use mocks and forget that things actually take time to load. Let designers know about that possibility too and show them that are ways to make people perceive that things don’t take that long to load.
Taking into consideration all these scenarios will save you a lot of time going back and forth during the development phase.
Note: There’s a great article by Scott Hurff about how to fix bad user interfaces that will take us a step closer to an accessible product.
Embrace Change Requests
Developers are known for not being too happy about someone finding a bug in their code — especially when it’s a design bug reported by a designer. There are a lot of memes around it, but have you ever reflected how those bugs can compoundingly rot both the quality of the experience as well as your relationship when these design bugs are casually dismissed? It happens slowly, almost like falling asleep. Bit by bit, then all at once. Designers might start out saying, “It’s just a tiny little detail,” until the indifference and resentment builds up and nothing is said. The damage has then already been done.
This situation is two-fold: both to your peers and to your work. Don’t let that happen. Work on what’s coloring your reaction. A designer being ‘picky’ can be inconvenient, but it can also be an engineer’s shallow interpretation of attentiveness and enthusiasm. When someone tells you that your implementation is not perfect (yet), put your ego aside and show them how you recognize their hard work in refining the final result.
Go Off The Record Once In A While
We all have tasks to deliver and roadmaps to finish. However, some of the best work happens off the record. It won’t be logged into the TO DO board and that’s okay. If you find a designer you have a rapport with, go sneak into their workspace and explore together new experiments. You never know what can come from there!
Conclusion
When you are willing to learn from the design team, you are also learning different ways of thinking. You’ll evolve your mindset of collaboration with other areas out of your experience while refining your eye for creating new experiences. Be there to help and be open to learning, because sharing is what makes us better.
This article wouldn’t be possible without the feedback of many great people. I want to gratefully thank to the designers Jasmine Meijer and Margarida Botelho for helping me to share a balanced perspective about the misunderstandings between designers and developers.
Related Reading on SmashingMag:
“Design For Developers” by Mason Gentry
“Working Together: How Designers And Developers Can Communicate To Create Better Projects” by Rachel Andrew
“How Frontend Developers Can Help To Bridge The Gap Between Designers And Developers” by Stefan Kaltenegger
“Which Podcasts Should Web Designers And Developers Be Listening To?” by Ricky Onsman

(ra, yk, il)
0 notes
Text
Animating Apps With Flutter
Animating Apps With Flutter
Shubham
2019-10-14T13:30:59+02:002019-10-15T08:36:43+00:00
Apps for any platform are praised when they are intuitive, good-looking, and provide pleasant feedback to user interactions. Animation is one of the ways to do just that.
Flutter, a cross-platform framework, has matured in the past two years to include web and desktop support. It has garnered a reputation that apps developed with it are smooth and good-looking. With its rich animation support, declarative way of writing UI, “Hot Reload,” and other features, it is now a complete cross-platform framework.
If you are starting out with Flutter and want to learn an unconventional way of adding animation, then you are at the right place: we will explore the realm of animation and motion widgets, an implicit way of adding animations.
Flutter is based on the concept of widgets. Each visual component of an app is a widget — think of them as views in Android. Flutter provides animation support using an Animation class, an “AnimationController” object for management, and “Tween” to interpolate the range of data. These three components work together to provide smooth animation. Since this requires manual creation and management of animation, it is known as an explicit way of animating.
Now let me introduce you to animation and motion widgets. Flutter provides numerous widgets which inherently support animation. There’s no need to create an animation object or any controller, as all the animation is handled by this category of widgets. Just choose the appropriate widget for the required animation and pass in the widget’s properties values to animate. This technique is an implicit way of animating.
Animation hierarchy in Flutter. (Large preview)
The chart above roughly sets out the animation hierarchy in Flutter, how both explicit and implicit animation are supported.
Some of the animated widgets covered in this article are:
AnimatedOpacity
AnimatedCrossFade
AnimatedAlign
AnimatedPadding
AnimatedSize
AnimatedPositioned.
Flutter not only provides predefined animated widgets but also a generic widget called AnimatedWidget, which can be used to create custom implicitly animated widgets. As evident from the name, these widgets belong to the animated and motion widgets category, and so they have some common properties which allow us to make animations much smoother and better looking.
Let me explain these common properties now, as they will be used later in all examples.
duration
The duration over which to animate the parameters.
reverseDuration
The duration of the reverse animation.
curve
The curve to apply when animating the parameters. The interpolated values can be taken from a linear distribution or, if and when specified, can be taken from a curve.
Let’s begin the journey by creating a simple app we’ll call “Quoted”. It will display a random quotation every time the app starts. Two things to note: first, all these quotations will be hardcoded in the application; and second, no user data will be saved.
Note: All of the files for these examples can be found on GitHub.
Getting Started
Flutter should be installed and you’ll need some familiarity with the basic flow before moving on. A good place to start is, “Using Google’s Flutter For Truly Cross-Platform Mobile Development”.
Create a new Flutter project in Android Studio.

New flutter project menu in Android Studio. (Large preview)
This will open a new project wizard, where you can configure the project basics.
Flutter project type selection screen. (Large preview)
In the project type selection screen, there are various types of Flutter projects, each catering to a specific scenario.. For this tutorial, choose Flutter Application and press Next.
You now need to enter some project-specific information: the project name and path, company domain, and so on. Have a look at the image below.
Flutter application configuration screen. (Large preview)
Add the project name, the Flutter SDK path, project location, and an optional project description. Press Next.
Flutter application package name screen. (Large preview)
Each application (be it Android or iOS) requires a unique package name. Typically, you use the reverse of your website domain; for example, com.google or com.yahoo. Press Finish to generate a working Flutter application.
The generated sample project. (Large preview)
Once the project is generated, you should see the screen shown above. Open the main.dart file (highlighted in the screenshot). This is the main application file. The sample project is complete in itself, and can be run directly on an emulator or a physical device without any modification.
Replace the content of the main.dart file with the following code snippet:
import 'package:animated_widgets/FirstPage.dart'; import 'package:flutter/material.dart'; void main() => runApp(MyApp()); class MyApp extends StatelessWidget { @override Widget build(BuildContext context) { return MaterialApp( title: 'Animated Widgets', debugShowCheckedModeBanner: false, theme: ThemeData( primarySwatch: Colors.blue, accentColor: Colors.redAccent, ), home: FirstPage(), ); } }
This code cleans up the main.dart file by just adding simple information relevant to creating a new app. The class MyApp returns an object: a MaterialApp widget, which provides the basic structure for creating apps conforming to Material Design. To make the code more structured, create two new dart files inside the lib folder: FirstPage.dart and Quotes.dart.

The FirstPage.dart file. (Large preview)
FirstPage.dart will contain all the code responsible for all the visual elements (widgets) required for our Quoted app. All the animation is handled in this file.
Note: Later in the article, all of the code snippets for each animated widget are added to this file as children of the Scaffold widget. For more information, This example on GitHub could be useful.
Start by adding the following code to FirstPage.dart. This is the partial code where other stuff will be added later.
import 'dart:math'; import 'package:animated_widgets/Quotes.dart'; import 'package:flutter/material.dart'; class FirstPage extends StatefulWidget { @override State createState() { return FirstPageState(); } } class FirstPageState extends State with TickerProviderStateMixin { bool showNextButton = false; bool showNameLabel = false; bool alignTop = false; bool increaseLeftPadding = false; bool showGreetings = false; bool showQuoteCard = false; String name = ''; double screenWidth; double screenHeight; String quote; @override void initState() { super.initState(); Random random = new Random(); int quoteIndex = random.nextInt(Quotes.quotesArray.length); quote = Quotes.quotesArray[quoteIndex]; } @override Widget build(BuildContext context) { screenWidth = MediaQuery.of(context).size.width; screenHeight = MediaQuery.of(context).size.height; return Scaffold( appBar: _getAppBar(), body: Stack( children: [ // All other children will be added here. // In this article, all the children widgets are contained // in their own separate methods. // Just method calls should be added here for the respective child. ], ), ); } }
The Quotes.dart file. (Large preview)
The Quotes.dart file contains a list of all the hardcoded quotations. One point to note here is that the list is a static object. This means it can be used at other places without creating a new object of the Quotes class. This is chosen by design, as the above list act simply as a utility.
Add the following code to this file:
class Quotes { static const quotesArray = [ "Good, better, best. Never let it rest. 'Til your good is better and your better is best", "It does not matter how slowly you go as long as you do not stop.", "Only I can change my life. No one can do it for me." ]; }
The project skeleton is now ready, so let’s flesh out Quoted a bit more.
AnimatedOpacity
To lend a personal touch to the app, it would be nice to know the user’s name, so let’s ask for it and show a next button. Until the user enters their name, this button is hidden, and it will gracefully show up when a name is given. We need some kind of visibility animation for the button, but is there a widget for that? Yes, there is.
Enter AnimatedOpacity. This widget builds on the Opacity widget by adding implicit animation support. How do we use it? Remember our scenario: we need to show a next button with animated visibility. We wrap the button widget inside the AnimatedOpacity widget, feed in some proper values and add a condition to trigger the animation — and Flutter can handle the rest.
_getAnimatedOpacityButton() { return AnimatedOpacity( duration: Duration(seconds: 1), reverseDuration: Duration(seconds: 1), curve: Curves.easeInOut, opacity: showNextButton ? 1 : 0, child: _getButton(), ); }
Opacity animation of next button. (Large preview)
The AnimatedOpacity widget has two mandatory properties:
opacity
A value of 1 means completely visible; 0 (zero) means hidden. While animating, Flutter interpolates values between these two extremes. You can see how a condition is placed to change the visibility, thus triggering animation.
child
The child widget that will have its visibility animated.
You should now understand how really simple it is to add visibility animation with the implicit widget. And all such widgets follow the same guidelines and are easy to use. Let’s move on to the next one.
AnimatedCrossFade
We have the user’s name, but the widget is still waiting for input. In the previous step, as the user enters their name, we display the next button. Now, when the user presses the button, I want to stop accepting input and show the entered name. There are many ways to do it, of course, but perhaps we can hide away the input widget and show an uneditable text widget. Let’s try it out using the AnimatedCrossFade widget.
This widget requires two children, as the widget crossfades between them based on some condition. One important thing to keep in mind while using this widget is that both of the children should be the same width. If the height is different, then the taller widget gets clipped from the bottom. In this scenario, two widgets will be used as children: input and label.
_getAnimatedCrossfade() { return AnimatedCrossFade( duration: Duration(seconds: 1), alignment: Alignment.center, reverseDuration: Duration(seconds: 1), firstChild: _getNameInputWidget(), firstCurve: Curves.easeInOut, secondChild: _getNameLabelWidget(), secondCurve: Curves.easeInOut, crossFadeState: showNameLabel ? CrossFadeState.showSecond : CrossFadeState.showFirst, ); }
Cross-fading between the input widget and name widget. (Large preview)
This widget requires a different set of mandatory parameters:
crossFadeState
This state works out which child to show.
firstChild
Specifies the first child for this widget.
secondChild
Specifies the second child.
AnimatedAlign
At this point, the name label is positioned at the center of the screen. It will look much better at the top, as we need the center of the screen to show quotes. Simply put, the alignment of the name label widget should be changed from center to top. And wouldn’t it be nice to animate this alignment change along with the previous cross-fade animation? Let’s do it.
As always, several techniques can be used to achieve this. Since the name label widget is already center-aligned, animating its alignment would be much simpler than manipulating the top and left values of the widget. The AnimatedAlign widget is perfect for this job.
To initiate this animation, a trigger is required. The sole purpose of this widget is to animate alignment change, so it has only a few properties: add a child, set its alignment, trigger the alignment change, and that’s it.
_getAnimatedAlignWidget() { return AnimatedAlign( duration: Duration(seconds: 1), curve: Curves.easeInOut, alignment: alignTop ? Alignment.topLeft : Alignment.center, child: _getAnimatedCrossfade(), ); }

Alignment animation of the name widget. (Large preview)
It has only two mandatory properties:
child:
The child whose alignment will be modified.
alignment:
Required alignment value.
This widget is really simple but the results are elegant. Moreover, we saw how easily we can use two different animated widgets to create a more complex animation. This is the beauty of animated widgets.
AnimatedPadding
Now we have the user’s name at the top, smoothly animated without much effort, using different kinds of animated widgets. Let’s add a greeting, “Hi,” before the name. Adding a text widget with value “Hi,” at the top will make it overlap the greeting text widget, looking like the image below.
The greeting and name widgets overlap. (Large preview)
What if the name text widget had some padding on the left? Increasing the left padding will definitely work, but wait: can we increase the padding with some animation? Yes, and that is what AnimatedPadding does. To make all this much better looking, let’s have the greetings text widget fade in and the name text widget’s padding increase at the same time.
_getAnimatedPaddingWidget() { return AnimatedPadding( duration: Duration(seconds: 1), curve: Curves.fastOutSlowIn, padding: increaseLeftPadding ? EdgeInsets.only(left: 28.0) : EdgeInsets.only(left: 0), child: _getAnimatedCrossfade(), ); }
Since the animation above should occur only after the previous animated alignment is complete, we need to delay triggering this animation. Digressing from the topic briefly, this is a good moment to talk about a popular mechanism to add delay. Flutter provides several such techniques, but the Future.delayed constructor is one of the simpler, cleaner and more readable approaches. For instance, to execute a piece of code after 1 second:
Future.delayed(Duration(seconds: 1), (){ sum = a + b; // This sum will be calculated after 1 second. print(sum); });
Since the delay duration is already known (calculated from previous animation durations), the animation can be triggered after this interval.
// Showing “Hi” after 1 second - greetings visibility trigger. _showGreetings() { Future.delayed(Duration(seconds: 1), () { setState(() { showGreetings = true; }); }); } // Increasing the padding for name label widget after 1 second - increase padding trigger. _increaseLeftPadding() { Future.delayed(Duration(seconds: 1), () { setState(() { increaseLeftPadding = true; }); }); }

Padding animation of the name widget. (Large preview)
This widget has only two mandatory properties:
child
The child inside this widget, which padding will be applied to.
padding
The amount of space to add.
AnimatedSize
Today, any app having some kind of animation will include zooming in to or out of visual components to grab user attention (commonly called scaling animation). Why not use the same technique here? We can show the user a motivational quote that zooms in from the center of the screen. Let me introduce you to the AnimatedSize widget, which enables the zoom-in and zoom-out effects, controlled by changing the size of its child.
This widget is a bit different from the others when it comes to the required parameters. We need what Flutter calls a “Ticker.” Flutter has a method to let objects know whenever a new frame event is triggered. It can be thought of as something that sends a signal saying, “Do it now! … Do it now! … Do it now! …”
The AnimatedSize widget requires a property — vsync — which accepts a ticker provider. The easiest way to get a ticker provider is to add a Mixin to the class. There are two basic ticker provider implementations: SingleTickerProviderStateMixin, which provides a single ticker; and TickerProviderStateMixin, which provides several.
The default implementation of a Ticker is used to mark the frames of an animation. In this case, the latter is employed. More about mixins.
// Helper method to create quotes card widget. _getQuoteCardWidget() { return Card( color: Colors.green, elevation: 8.0, child: _getAnimatedSizeWidget(), ); } // Helper method to create animated size widget and set its properties. _getAnimatedSizeWidget() { return AnimatedSize( duration: Duration(seconds: 1), curve: Curves.easeInOut, vsync: this, child: _getQuoteContainer(), ); } // Helper method to create the quotes container widget with different sizes. _getQuoteContainer() { return Container( height: showQuoteCard ? 100 : 0, width: showQuoteCard ? screenWidth - 32 : 0, child: Center( child: Padding( padding: EdgeInsets.symmetric(horizontal: 16), child: Text(quote, style: TextStyle(color: Colors.white, fontWeight: FontWeight.w400, fontSize: 14),), ), ), ); } // Trigger used to show the quote card widget. _showQuote() { Future.delayed(Duration(seconds: 2), () { setState(() { showQuoteCard = true; }); }); }

Scaling animation of the quotes widget. (Large preview)
Mandatory properties for this widget:
vsync
The required ticker provider to coordinate animation and frame changes.<
child
The child whose size changes will be animated.
The zoom in and zoom out animation is now easily tamed.
AnimatedPositioned
Great! The quotes zoom in from the center to grab the user’s attention. What if it slid up from the bottom while zooming in? Let’s try it. This motion involves playing with the position of the quote widget and animating the changes in position properties. AnimatedPositioned is the perfect candidate.
This widget automatically transitions the child’s position over a given duration whenever the specified position changes. One point to note: it works only if its parent widget is a “Stack.” This widget is pretty simple and straightforward to use. Let’s see.
// Helper method to create the animated positioned widget. // With position changes based on “showQuoteCard” flag. _getAnimatedPositionWidget() { return AnimatedPositioned( duration: Duration(seconds: 1), curve: Curves.easeInOut, child: _getQuoteCardWidget(), top: showQuoteCard ? screenHeight/2 - 100 : screenHeight, left: !showQuoteCard ? screenWidth/2 : 12, ); }
Position with scaling animation of quotes. (Large preview)
This widget has only one mandatory property:
child
The widget whose position will be changed.
If the size of the child is not expected to change along with its position, a more performative alternative to this widget would be SlideTransition.
Here is our complete animation:

All the animated widgets together. (Large preview)
Conclusion
Animations are an integral part of user experience. Static apps or apps with janky animation not only lower user retention but also a developer’s reputation to deliver results.
Today, most popular apps have some kind of subtle animation to delight users. Animated feedback to user requests can also engage them to explore more. Flutter offers a lot of features for cross-platform development, including rich support for smooth and responsive animations.
Flutter has great plug-in support which allows us to use animations from other developers. Now that it has matured to version 1.9, with so much love from the community, Flutter is bound to get better in the future. I’d say now is a great time to learn Flutter!
Further Resources
“Animation And Motion Widgets,” Flutter Docs
“Introduction To Animations,” Flutter Docs
Flutter Codelabs
Editor’s Note: A huge Thank You to Ahmad Awais for his help in reviewing this article.

(dm, og, yk, il)
0 notes
Text
A Guide To New And Experimental CSS DevTools In Firefox
A Guide To New And Experimental CSS DevTools In Firefox
Victoria Wang
2019-10-10T14:30:59+02:002019-10-10T14:36:30+00:00
Over the last few years, our team at Firefox has been working on new CSS tools that address both cutting-edge techniques and age-old frustrations. We’re the Layout Tools team, a subset of Firefox Developer Tools, and our quest is to improve the modern web design workflow.
The web has seen an incredible evolution in the last decade: new HTML/CSS features, browser improvements, and design techniques. Our team is devoted to building tools that match that innovation so that designers and developers can harness more of the efficiency and creativity that’s now possible.
In this guide, we’ll share an overview of our seven new tools, with stories from the design process and practical steps for trying out each tool.
Editorial Design Patterns
By naming lines when setting up our CSS Grid layouts, we can tap into some interesting and useful features of Grid — features that become even more powerful when we introduce subgrids. Read related article →
1. Grid Inspector
It all started three years ago when our CSS layout expert and dev advocate, Jen Simmons, worked with members of Firefox DevTools to build a tool that would aid users in examining CSS Grid layouts.
As one of the most powerful new features of the modern web, CSS Grid had quickly gained decent browser adoption, but it still had low website adoption. There’s a steep learning curve, and you still need fallbacks for certain browsers. Thus, part of our goal was to help popularize Grid by giving developers a more hands-on way to learn it.

Grid Inspector (Large preview)
The core of the tool is a grid outline, overlaid on the page, which helps devs visualize how the grid is positioning their elements, and how the layout changes when they tweak their styles. We added numbered labels to identify each grid line, the ability to view up to three grids at once, and color customization for the overlays. Recently, we also added support for subgrid, a brand new CSS specification implemented in Firefox and hopefully in more browsers soon.
Grid Inspector was an inspiration for all the tools that followed. It was even an inspiration for a new team: Layout Tools! Formed in late 2017, we’re spread across four time zones and collaborate with many others in Mozilla, like our rendering engine developers and the good folks at MDN.
Try Out The Grid Inspector
In Firefox, visit our Grid example site.
Open the Inspector with Cmd + Shift + C.
Turn on Grid overlay via one of three ways:
Layout Panel:
In the Grid section, check the checkbox next to .content.grid-content;
Markup View:
Toggle the “grid” badge next to <div class="content grid-content">;
Rules View:
Click the

button next to display:grid; inside #page-intro .grid-content;
Experiment with the Grid Inspector:
Change the purple overlay color to red;
Toggle “Line numbers” or “Extend lines infinitely”;
Turn on more grid overlays;
See what happens when you disable grid-gap: 15px in Rules.
Since Grid, we’ve been seeking to expand on the possibilities of what a browser CSS tool can be.
“
2. Shape Path Editor
The next project we worked on was the Shape Path Editor: our first visual editing tool.
CSS Shapes allows you to define shapes for text to flow around: a circle, a triangle, or a many-sided polygon. It can be used with the clip-path property which allows you to trim elements to any of those same shapes. These two techniques together open the possibility for some very unique graphic design-inspired layouts.
However, creating these sometimes complex shapes can be difficult. Typing all of the coordinates manually and using the right CSS units is error-prone and far removed from the creative mindset that Shapes allows. Therefore, we made a tool that allows you to edit your code by directly clicking and dragging shapes on the page.
This type of feature—visual editing—was new for us and browser tools in general. It’s an example of how we can go beyond inspecting and debugging and into the realm of design.
Try Out The Shape Path Editor
In Firefox, visit this page on the An Event Apart website.
Open the Inspector with Cmd + Shift + C and select the first circular image.
In Rules, click on the

icon next to the shape-outside property.
On the page, click on the points of the shape and see what happens when you drag to make the shape huge or tiny. Change it to a size that looks good to you.
Visual editing is an example of how we can go beyond inspecting and debugging and into the realm of design.
“
3. Fonts Editor
For years, we’ve had a Fonts panel in Firefox that shows an informative list of all the fonts used in a website. In continuing our theme of designing in the browser, we decided to turn this into a Font Editor for fine-tuning a font’s properties.

Fonts Editor (Large preview)
A driving force behind this project was our goal to support Variable Fonts at the same time that the Firefox rendering engine team was adding support for it. Variable Fonts gives font designers a way to offer fine-grained variations along axes, like weight, within one font file. It also supports custom axes, which give both font creators and web designers an amazing amount of flexibility. Our tool automatically detects these custom axes and gives you a way to adjust and visualize them. This would otherwise require specialized websites like Axis-Praxis.
Additionally, we added a feature that provides the ability to hover over a font name to highlight where that particular font is being used on the page. This is helpful because the way browsers select the font used to render a piece of text can be complex and depend on one’s computer. Some characters may be unexpectedly swapped out for a different font due to font subsetting.
Try Out The Fonts Editor
In Firefox, visit this variable fonts demo site.
Open the Inspector with Cmd + Shift + C and select the word “variable” in the title (the element’s selector is .title__variable-web__variable).
In the third pane of the Inspector, navigate to the Fonts panel:
Hover over the font name Output Sans Regular to see what gets highlighted;
Try out the weight and slant sliders;
Take a look at the preset font variations in the Instances dropdown menu.
4. Flexbox Inspector
Our Grid, Shapes, and Variable Fonts tools can together power some very advanced graphic design on the web, but they’re still somewhat cutting-edge based on browser support. (They’re almost there, but still require fallbacks.) We didn’t want to work only on new features—we were drawn to the problems that most web developers face on a daily basis.
So we started work on the Flexbox Inspector. Design-wise, this has been our most ambitious project, and it sprouted some new user research strategies for our team.
Like Grid, CSS Flexbox has a fairly steep learning curve when you first get started. It takes time to really understand it, and many of us resort to trial and error to achieve the layouts we want. At the beginning of the project, our team wasn’t even sure if we understood Flexbox ourselves, and we didn’t know what the main challenges were. So we leveled up our understanding, and we ran a survey to discover what people needed the most when it came to Flexbox.
The results had a big effect on our plans, making the case for complicated visualizations like grow/shrink and min/max. We continued working with the community throughout the project by incorporating feedback into evolving visual prototypes and Nightly builds.
The tool includes two major parts: a highlighter that works much like the Grid Inspector’s, and a detailed Flexbox tool inside the Inspector. The core of the tool is a flex item diagram with sizing info.

Flex item diagram and sizing (Large preview)
With help from Gecko layout engineers, we were able to show the step-by-step size decisions of the rendering engine to give users a full picture of why and how a flex item ended up with a certain size.
Note: Learn the full story of our design process in “Designing the Flexbox Inspector”.
Try Out The Flexbox Inspector
In Firefox, visit Mozilla’s Bugzilla.
Open the Inspector with Cmd + Shift + C and select the element div.inner (just inside the header bar).
Turn on the Flexbox overlay via one of three ways:
Layout Panel:
In the Flex Container section, turn on the switch;
Markup View:
Toggle the “flex” badge next to <div class="inner">;
Rules View:
Click the

button next to display:flex.
Use the Flex Container panel to navigate to a Flex Item called nav#header-nav.
Note the sizes shown in the diagram and size chart;
Increase and decrease your browser’s width and see how the diagram changes.
Interlude: Doubling Down on Research
As a small team with no formal user research support, we’ve often resorted to design-by-dogfooding: basing our opinions on our own experiences in using the tools. But after our success with the Flexbox survey, we knew we wanted to be better at collecting data to guide us. We ran a new survey to help inform our next steps.
We crowdsourced a list of the 20 biggest challenges faced by web devs and asked our community to rank them using a max-diff format.
When we found that the big winner of the challenges was CSS Layout Debugging, we ran a follow-up survey on specific CSS bugs to discover the biggest pain points. We supplemented these surveys with user interviews and user testing.
We also asked folks to rank their frustrations with browser developer tools. The clear top issue was moving CSS changes back to the editor. This became our next project.
5. Changes Panel
The difficulty in transferring one’s work from a browser developer tool to the editor is one of those age-old issues that we all just got used to. We were excited to make a simple and immediately usable solution.

Changes Panel (Large preview)
Edge and Chrome DevTools came out with variants of this tool first. Ours is focused on assisting a wide range of CSS workflows: Launch DevTools, change any styles you want, and then export your changes by either copying the full set of changes (for collaboration) or just one changed rule (for pasting into code).
This improves the robustness of the entire workflow, including our other layout tools. And this is just a start: We know accidental refreshing and navigation from the page is a big source of data loss, so a way to bring persistence to the tool will be an important next step.
Try Out The Changes Panel
In Firefox, navigate to any website.
Open the Inspector with Cmd + Shift + C and select an element.
Make some changes to the CSS:
Modify styles in the Rules pane;
Adjust fonts in the Fonts pane.
In the right pane of the Inspector, navigate to the Changes tab and do the following:
Click Copy All Changes, then paste it in a text editor to view the output;
Hover over the selector name and click Copy Rule, then paste it to view the output.
6. Inactive CSS
Our Inactive CSS feature solves one of the top issues from our layout debugging survey on specific CSS bugs:
“Why is this CSS property not doing anything?”
Design-wise, this feature is very simple—it grays out CSS that doesn’t affect the page, and shows a tooltip to explain why the property doesn’t have an effect. But we know this can boost efficiency and cut down on frustration. We were bolstered by research from Sarah Lim and her colleagues who built a similar tool. In their studies, they found that novice developers were 50% faster at building with CSS when they used a tool that allowed them to ignore irrelevant code.

Inactive CSS tooltip (Large preview)
In a way, this is our favorite kind of feature: A low-hanging UX fruit that barely registers as a feature, but improves the whole workflow without really needing to be discovered or learned.
Inactive CSS launches in Firefox 70 but can be used now in prerelease versions of Firefox, including Developer Edition, Beta, and Nightly.
Try Out Inactive CSS
Download Firefox Developer Edition;
Open Firefox and navigate to wikipedia.org;
Open the Inspector with Cmd + Shift + C and select the center content area, called central-featured;
Note the grayed out vertical-align declaration;
Hover over the info icon, and click “Learn more” if you’re interested.
7. Accessibility Panel
Along the way we’ve had accessibility features developed by a separate team that’s mostly one person — Yura Zenevich, this year with his intern Maliha Islam.
Together they’ve turned the new Accessibility panel in Firefox into a powerful inspection and auditing tool. Besides displaying the accessibility tree and properties, you can now run different types of checks on a page. So far the checks include color contrast, text labels, and keyboard focus styling.

Auditing in the Accessibility Panel (Large preview)
Now in Nightly, you can try the new color blindness simulator which harnesses our upcoming WebRender tech.
Try Out The Accessibility Panel
Download Firefox Developer Edition;
Navigate to meetup.com;
In the developer tools, navigate to the Accessibility tab, and click the “Turn on Accessibility Features” button;
Click the drop-down menu next to “Check for issues” and select “All Issues”;
Take a look at the various contrast, keyboard, and text label issues, and click the “Learn more” links if you’re interested.
Next Up
We’re currently hard at work on a browser compatibility tool that uses information from MDN to show browser-specific issues for a selected element. You can follow along on GitHub to learn more.
The Future
We’re committed to supporting the modern web, and that means continuously changing and growing.
New specifications get implemented by browser vendors all the time. Guidelines and best practices around progressive enhancement, responsiveness, and accessibility evolve constantly. Us tool makers need to keep evolving too.
And what of the long-lived, ever-present problems in creating the web? What everyday user interfaces need to be rethought? These are some of the questions that keep us going!
What about a better way to navigate the DOM tree of a page? That part of DevTools has gone essentially unchanged since the Firebug days.
We’ve been experimenting with features like back and forward buttons that would ease navigation between recently visited elements.
A more dramatic change we’re discussing is adding a compact DOM view that uses a syntax similar to HTML templating engines. The focus would be on the most common use case—navigating to CSS—rather than viewing/editing the source.

HTML Outline View (Large preview)
We’ve also been thinking about a better element selector. We know how it can be more productive to work inside the page, with less jumping back and forth into DevTools. We could make the element selector more powerful and more persistent. Perhaps it could select whitespace on a page and tell you what causes that space, or it could shed light on the relationships between different elements.

Visual Element Selector (Large preview)
These are just two of the many ideas we hope to explore further with the help of the community.
We Need Your Input!
We want to keep making awesome tools that make your life easier as a developer or designer.
Here’s an easy way to help: Download Firefox Developer Edition and try using it for some of your work next week.
Then, tell us what you think by taking our 1-page survey.
We’re always interested in hearing ideas for improvements, particularly any low-hanging fruit that could save us all from some regular frustration. We do our work in the open, so you can follow along and chime in. We’ll keep you updated at @FirefoxDevTools.
Thanks to Patrick Brosset for his contributions to this article.

(dm, il)
0 notes
Text
Webflow: The Web Development Platform Of The Future
Webflow: The Web Development Platform Of The Future
Nick Babich
2019-09-10T12:30:59+02:002019-09-10T11:05:54+00:00
(This is a sponsored article.) Time-to-market plays a crucial role in modern web design. Most product teams want to minimize the time required to go from the idea to a ready-to-use product without sacrificing the quality of the design along the way.
When it comes to creating a website, teams often use a few different tools: one tool for graphics and visual design, another for prototyping, and another for coding. Webflow attempts to simplify the process of web design by enabling you to design and develop at the same time.
Typical Problems That Web Designers Face
It’s important to start with understanding what challenges web design teams face when they create websites:
A disconnection between visual design and coding.
Visual designers create mocks/prototypes in a visual tool (like Sketch) and hand them off to developers who need to code them. It creates an extra round of back-and-forth since developers have to go through an extra iteration of coding.
It’s hard to code complex interactions (especially animated transitions).
Designers can introduce beautiful effects in hi-fi prototypes, but developers will have a hard time reproducing the same layout or effect in code.
Optimizing designs for various screens.
Your designs should be responsive right from the start.
What Is Webflow?
Webflow is an in-browser design tool that gives you the power to design, build, and launch responsive websites visually. It’s basically an all-in-one design platform that you can use to go from the initial idea to ready-to-use product.
Here are a few things that make Webflow different:
The visual design and code are not separated.
What you create in the visual editor is powered by HTML, CSS, and JavaScript.
It allows you to reuse CSS classes.
Once defined, you can use a class for any elements that should have the same styling or use it as a starting point for a variation (base class).
It is a platform and as such, it offers hosting plans.
For $12 per month, it allows you to connect a custom domain and host your HTML site. And for an additional $4 per month, you can use the Webflow CMS.
Building A One-Page Website Using Webflow
The best way to understand what the tool is capable of is to build a real product with it. For this review, I will use Webflow to create a simple landing page for a fictional smart speaker device.
Define The Structure Of The Future Page
While it’s possible to use Webflow to create a structure of your layout, it’s better to use another tool for that. Why? Because you need to experiment and try various approaches before finding the one that you think is the best. It’s better to use a sheet of paper or any prototyping tool to define the bones of your page.
It’s also crucial to have a clear understanding of what you’re trying to achieve. Find an example of what you want and sketch it on paper or in your favorite design tool.
Tip: You don’t need to create a high-fidelity design all of the time. In many cases, it’s possible to use lo-fi wireframes. The idea is to use a sketch/prototype as a reference when you work on your website.

(Large preview)
For our website, we will need the following structure:
A hero section with a large product image, copy, and a call-to-action button.
A section with the benefits of using our product. We will use a zig-zag layout (this layout pairs images with text sections).
A section with quick voice commands which will provide a better sense of how to interact with a device.
A section with contact information. To make contact inquiries easier for visitors, we’ll provide a contact form instead of a regular email address.
Create A New Project In Webflow
When you open the Webflow dashboard for the first time, you immediately notice a funny illustration with a short but helpful line of text. It is an excellent example of an empty state that is used to guide users and create the right mood from the start. It’s hard to resist the temptation to click “New Project.”

(Large preview)
When you click “New Project,” Webflow will offer you a few options to start with: a blank site, three common presets, and an impressive list of ready-to-use templates. Some of the templates that you find on this page are integrated with the CMS which means that you can create CMS-based content in Webflow.

(Large preview)
Templates are great when you want to get up and running very quickly, but since our goal is to learn how to create the design ourselves, we will choose “Blank Site.”
As soon as you create a new project, we will see Webflow’s front-end design interface. Webflow provides a series of quick how-to videos. They are handy for anyone who’s using Webflow for the first time.

(Large preview)
Once you’ve finished going through the introduction videos, you will see a blank canvas with menus on both sides of the canvas. The left panel contains elements that will help you define your layout’s structure and add functional elements. The right panel contains styling settings for the elements.

(Large preview)
Let’s define the structure of our page first. The top left button with a plus (+) sign is used to add elements or symbols to the canvas. All we have to do to introduce an element/visual block is to drag the proper item to the canvas.

(Large preview)
While elements should be familiar for anyone who builds websites, Symbols can still be a new concept for many people. Symbols are analogous to features of other popular design tools, like the components in Figma and XD. Symbols turn any element (including its children) into a reusable component. Anytime you change one instance of a Symbol, the other instances will update too. Symbols are great if you have something like a navigation menu that you want to reuse constantly through the site.
Webflow provides a few elements that allow us to define the structure of the layout:
Sections. Sections divide up distinct parts of your page. When we design a page, we usually tend to think in terms of sections. For instance, you can use Sections for a hero area, for a body area, and a footer area.
Grid, columns, div block, and containers are used to divide the areas within Sections.
Components. Some elements (e.g. navigation bar) are provided in ready-to-use components.
Let’s add a top menu using the premade component Navbar which contains three navigation options and placeholders for the site’s logo:

(Large preview)
Let’s create a Symbol for our navigation menu so we can reuse it. We can do that by going to “Symbols” and clicking “Create New Symbol.” We will give it the name “Navigation.”
Notice that the section color turned to green. We also see how many times it’s used in a project (1 instance). Now when we need a menu on a newly created page, we can go to the Symbols panel and select a ready-to-use “Navigation.” If we decide to introduce a change to the Symbol (i.e., rename a menu option), all instances will have this change automatically.

(Large preview)
Next, we need to define the structure of our hero section. Let’s use Grid for that. Webflow has a very powerful Grid editor that simplifies the process of creating the right grid — you can customize the number of columns and rows, as well as a gap between every cell. Webflow also supports nested grid structure, i.e. one grid inside the other. We will use a nested grid for a hero section: a parent grid will define the image, while the child grid will be used for the Heading, text paragraph, and call-to-action button.

(Large preview)
Now let’s place the elements in the cells. We need to use Heading, Paragraph, Button, and Image elements. By default, the elements will automatically fill out the available cells as you drag and drop them into the grid.

(Large preview)
While it’s possible to customize the styling for text and images and add real content instead of dummy placeholders, we will skip this step and move to the other parts of the layout: the zig-zag layout.
For this layout, we will use a 2×3 grid (2 columns × 3 rows) in which every cell that contains text will be divided into 3 rows. We can easily create the first cell with a 3-row grid, but when it comes to using the same structure for the third cell of the master grid, we have a problem. Since Webflow automatically fills the empty cells with a new element, it will try to apply the 3-row child grid to the third element. To change this behavior, we need to use Manual. After setting the grid selection to Manual, we will be able to create the correct layout.

(Large preview)
Similar to the hero section, we will add the dummy context to the grid sections. We will change the data after we finish with the visual layout.

(Large preview)
Now we need to define a section with voice commands. To save space, we will use a carousel. Webflow has a special element for that purpose: Slider.

(Large preview)
Once we have all the required elements in place, we can create a vertical rhythm by adjusting the position of every item that we use. First, we need to adjust the spacing of elements in grids. Change the margin and paddings and Align self for the image in order to place it in the center of the cell.

(Large preview)
Now it’s time to replace the dummy content with real content. To start adding images, we’ll need to click on the gear icon for the Image element and select the image of our choice.

(Large preview)
Notice that Webflow stores all images in a special area called Assets. Any media we add, whether it’s a video or image, goes straight to that area.

(Large preview)
After we introduce an image to the layout, we need to modify the Heading and Text sections.

(Large preview)
Webflow provides a visual style for every element we use in our design. Let’s take a Heading section as an example: It’s possible to play with font color, font, weight, spacing, shadows, and other visual properties of this object. Here is what we will have when adding real copy and playing with font color.

(Large preview)
Once we have a nice and clean hero section, we can add content to our zig-zag layout.
Notice that every time we style something, we give it a Selector (a class), so Webflow will know that the style should be applied specifically for this element. We can use the same class to style other elements. In our case, we need the same style for images, headings, descriptions, and links that we have in the zig-zag layout.

Applying the same “benefit” style for all images in the zig-zag section. (Large preview)
Webflow also allows creating combo classes — when one class is used as a base class, and another class is used to override the styling options of the base class. In the example below, we override the default font color of the Heading using the class “Zig-Heading-Second.” Combo classes can save you a lot of time because you won’t need to create a style from scratch.

Using a combo class for the Heading. The orange indicator is used to highlight the properties that were inherited from the base class. (Large preview)
Here is how our layout will look like after the changes:

(Large preview)
Webflow provides a very helpful feature for aligning content named “guide overlay” which can be located in the left menu panel. When you enable the guide, you will see the elements that are breaking the grid.

(Large preview)
After finishing with a zig-zag layout, we need to add information on voice commands in the Slider. Add a Heading section in a relevant slide and change the visual styling options of this object.

(Large preview)
It’s that simple!
Last but not least, we need to add a contact form to our website. Let’s add a section right underneath of Slider.
There are two ways we can add a form to the page. First, Webflow has a special element for web forms called Form Block. A form created using Form Block has three elements: Name, Email Address, and a Submit button. For our form, we will need a Message field. We can easily create one by duplicating the element Email Address and renaming it. By default, the Form Block has 100% width alignment, meaning it will take the entire width of the container. We will use the Grid settings to adjust the form width.

(Large preview)
Secondly, Webflow allows integrating custom code right in the page. It means that we can create a form in a tool like Typeform, copy the embed code it provides and place it to the component called Embed that we placed to the section. Note that embeds will only appear once the site has been published or exported — not while you’re designing the site.

(Large preview)
Once all elements are in place, we need to optimize our design for mobile. Almost half of the users (globally) access websites on mobile. What you can do within Webflow is to resize the browser window so that you can see how your design looks like with different breakpoints.
Let’s change our view to Mobile by clicking on the Mobile - Portrait icon.

(Large preview)
As you can see, the design looks bad on mobile. But it’s relatively easy to optimize the design using Webflow: It allows you to change the order of elements, the spacing between elements, as well as other visual settings to make the design look great on mobile.

(Large preview)
After we’re done making changes to our design, we have two options: we can export the design and use it on our own web hosting (i.e., integrate it into your existing CMS) or we can use Webflow’s own hosting provided. If we decide to use the second option, we need to click the Publish button and select the relevant publishing options, i.e. either publish it on the webflow.io domain or on a custom domain.

(Large preview)
If you decide to export the code, Webflow will prepare a full zip with HTML, CSS, and all the assets you’ve used to create your design. The exported code will help you build a solid foundation for your product.
Conclusion
Webflow is an excellent tool for building high-fidelity prototypes and inviting feedback from team members and stakeholders. People who will review your prototype won’t need to imagine how the finished product will behave and look — they can experience it instead!
The tool simplifies the transition from a prototype into a fully finished UI because you’re designing products with real code, as opposed to creating clickable mocks in Sketch or any other prototyping tool. You won’t waste time by using one piece of software to build prototypes and another to turning those prototypes into real products. Webflow solves this problem for you.

(ms, ra, il)
0 notes
Last Seen Blogs

indosup
Untitled

hawkxatxheart
Just Hawk...


amendhq
AMEND HQ ;

writingforstraykids
Stay a little while🤍