#tagging filbo because this pattern will create him easily with the right colors
Text
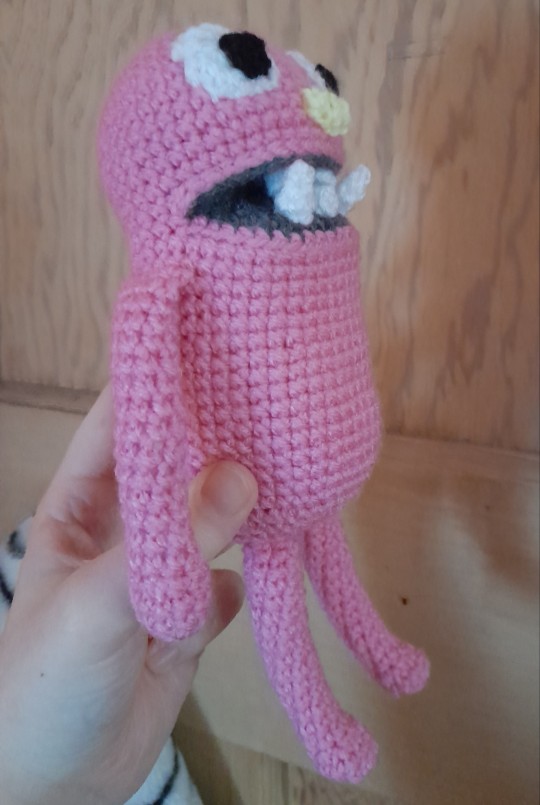
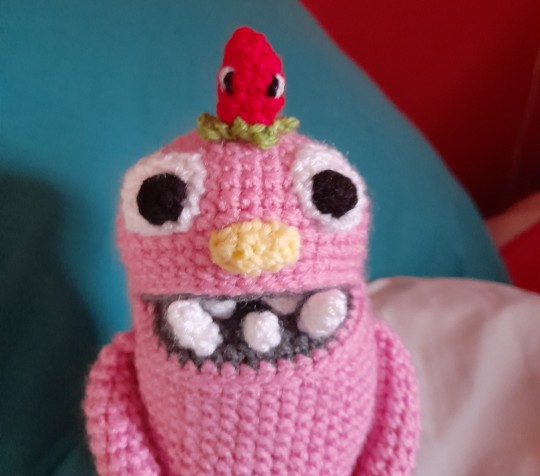
Free Grump crochet pattern!
Ravelry link
Pattern is also under the cut, but there are fewer photos due to Tumblr limits.
My grumpus base pattern is finally done! It's up on Ravelry as a free download in the link above. This pattern was actually fun to create, so I might make more in future.
Included:
- the base Grump (unchanged, it will create the basic Filbo Fiddlepie body type)
- a few different tooth patterns and advice for your own dental config
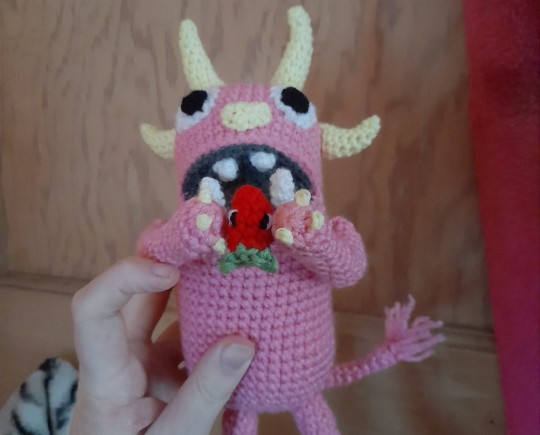
- extra details: 2 sizes of horns and a fluffy tail
- lil strabby (can change colour for white strabby, razzby, or black razzby)
With a few edits (such as torso and limb length), this pattern can create many different sizes and shapes of Grumpus.
If anyone makes one using this pattern, I'd love to see it!
PATTERN BELOW:
Note: Your DK yarn can be switched out for larger or smaller yarn, and this will change the size of the resulting Grumpus. Make sure to use a slightly smaller hook than the yarn label recommends for the best amigurumi gauge. I used DK and a 3.5mm hook.
Note: This contains instructions of how to make level-jawed Grumpuses, suitable for level or underbite Grumps. A little tucking can make a small overbite possible, but if your Grumpus has a significant overbite, their face would require a different shape.
Note: This pattern will create a Grump with a basic Filbo Fiddlepie body type. See the 'optional' section at the bottom for edits. If you want a drastically altered Grump, this is possible to make with a few edits, but I recommend practicing by making a basic one first following the instructions before you consider large changes in order to reduce errors.
You will need to know:
- how to make single crochets and slip stitches in the round
- how to increase and decrease
- how to attach parts
- how to add simple embroidery (optional)
Some parts are fiddly. This is not a pattern for absolute beginners, but should be possible for most crocheters.
You will need DK yarn in the following:
- in your chosen fur colour (less than one ball)
- in dark grey or another inner mouth colour (way less than one ball)
- in white (way less than one ball)
- in black (small amount)
- in your chosen nose colour (small amount)
Optional yarn:
- chosen claw colour, probably same as nose (small amount)
- chosen horn colour, probably same as nose (way less than one ball)
- red for the Strabby (small amount)
- green for the Strabby (small amount)
You will also need:
A 3.5mm hook
Stuffing/polyfill (I draw from a pillow that ripped)
Scissors
A darning needle
If you have them, pins help a lot
MOUTH DISC (dark grey, black, or another inner mouth colour)
1. Put 8sc into a magic ring (or chain 2 and put 8sc into the second chain from the hook) [8 stitches]
2. 1inc x8 [16]
3. (1sc, 1inc) x8 [24]
4. (2sc, 1inc) x8 [32]
5. (3sc, 1inc) x8 [40]. Finish off, you don't need a long tail because it will be tucked inside. Fold in half with the last stitch at one edge and put aside for later.
(Note: The wrong side of the piece should face inside the Grump, so it should be the outside of the angle, but it doesn't really matter.)
BODY (your chosen fur colour)
1. Put 6sc into a magic ring (or chain 2 and put 6sc into the second chain from the hook) [6 stitches]
2. 1inc x6 [12]
3. (1sc, 1inc) x6 [18]
4. (2sc, 1inc) x6 [24]
5. (3sc, 1inc) x6 [30]
6. (4sc, 1inc) x6 [36]
7. (5sc, 1inc) x6 [42]
8-14. Sc around (7 rounds) [42]
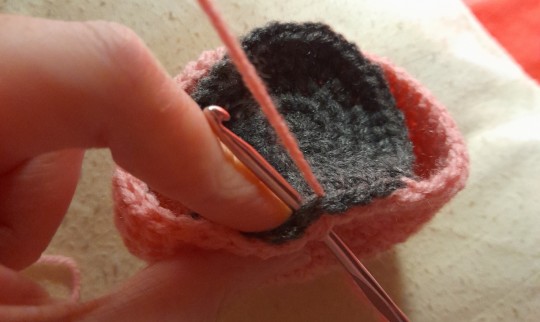
15. Put your hook through the next stitch of the body and up into the final stitch of the mouth piece. Slip stitch (not too tightly) across for a total of 20 stitches. Now half of the mouth disc should be attached to the body. Leaving half of the mouth disc unworked, sc around the remaining 22 body stitches. [42]
16. Sc across only the remaining 20 mouth stitches. Rejoin on the body and sc across the remaining 22 body stitches. The whole mouth should now be inside the Grumpus, though it will look odd at this point. [42]
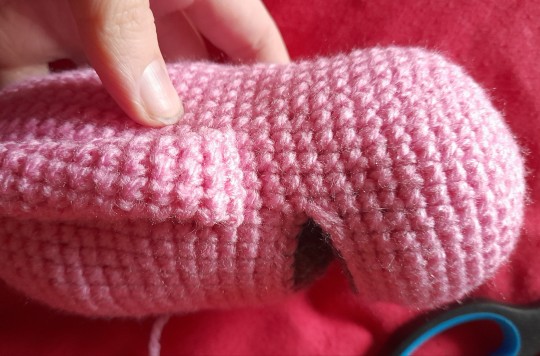
17. In the back loop only, sc across the next 20 stitches (across the lip). In both loops, sc across the remaining 22 stitches. [42]
18-32. Sc around (15 rounds). [42]
Stuff as you go. Ensure there is stuffing in the head.
33. (5sc, 1dec) x6 [36]
34. (4sc, 1dec) x6 [30]
35. (3sc, 1dec) x6 [24]
36. (2sc, 1dec) x6 [18]
37. (1sc, 1dec) x6 [12]
38. When stuffed, 6dec to finish.
Cut yarn, sew through the 6 outer loops and cinch the hole shut, and hide the yarn end.
ARMS (make 2 in your chosen fur colour)
1. Put 6sc into a magic ring (or chain 2 and put 6sc into the second chain from the hook) [6 stitches]
2. 1inc x6 [12]
3-4. Sc around (2 rounds) [12]
5. (1sc, 1dec) x4 [8]
6-18. Sc around (13 rounds) [8]
Stuff, then flatten the end and sc across both sides of it. Finish off and leave a tail for sewing. Attach the arms flat at the sides, 2 rounds below the mouth level.
LEGS (make 2 in your chosen fur colour)
1. Put 6sc into a magic ring (or chain 2 and put 6sc into the second chain from the hook) [6 stitches]
2. 1inc x6 [12]
3. Sc around [12]
4. 4dec, 4sc [8]
5-18. Sc around (14 rounds) [8]
Slip stitch into the next stitch and finish off. Stuff, then attach just below the hips.
EYES (make 2 in white)
1. 7sc into a magic ring [7]
2. 7inc [14]
Slip stitch and finish off. Attach to the face high and wide, about 4-5 stitches between them. See images.
PUPILS (make 2 in black OR embroider on pupils)
1. 3sc into a magic ring [3]
Slip stitch into the first sc and finish off. Attach to the eyes so that the Grump is looking slightly inwards.
(Optional: You can make eyelids by adding embroidered lines in fur colour over the very top of the eyes.)
ROUNDED NOSE (your chosen nose colour)
(Alternatively, there is an oval nose pattern below.)
1. 6sc into a magic ring [6]
Slip stitch into the first stitch and finish off. Attach.
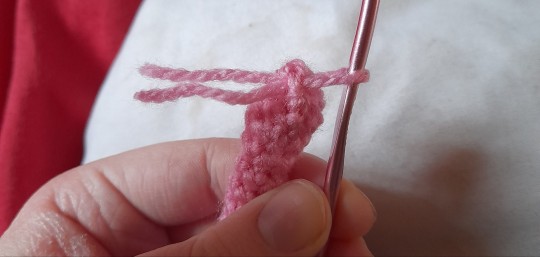
OVAL NOSE (your chosen nose colour)
Chain 4.
(2sc, 3sc in the end chain), repeat along the other edge of the chain. [8]
Slip stitch and finish off. Attach between and below the eyes.
TEETH (white)
Ok, here's where things really get personalised. Pretty much every Grumpus has their own unique tooth size configuration, and you likely an idea in mind or a reference to work from. Therefore, I'm going to give you several tooth patterns and you can make your own dental configuration.
Canon Grumpuses have 4 teeth on top and 3 below, unless they have missing teeth like Shelda. The outer pairs of teeth often show the greatest size differences but not always.
For my Grump, I've chosen to leave out the outer top teeth for a cleaner look. However many teeth your Grump has is up to you.
TIP: pin your teeth in place and move them around to find the best spacing and configurations before sewing them on.
SMALL TEETH
These will make good tiny teeth. These are typical top middle teeth and the typical bottom middle tooth.
1. 3sc into a magic ring [3]
2. 2sc, leave the last stitch unworked. [3 total]
Finish off. Use the end of the crochet hook to push the centre outwards into a triangle shape.
PLAIN TEETH
These are for those medium-sized unremarkable teeth. (See Filbo's bottom teeth or Wiggle's top middle teeth.)
1. 5sc into a magic ring [5]
2. 5sc [5]
3. (Optional to make them bigger -- 5sc [5])
Finish off.
LARGE WIDE TEETH
These are Fizzlebean style outer bottom teeth.
1. 8sc into a magic ring [8]
2. sc, 1dec, 2sc, 1dec, sc [6]
3. 6sc [6]
Finish off and squeeze to flatten a little.
FANGS/TUSKS
These are Wambus/Chandlo style sharper chompers. Top or bottom outer teeth.
1. 3sc into a magic ring [3]
2. 3sc [3]
3. 1inc, 2sc [4]
4. (Optional to make them bigger -- 1inc, 3sc [5])
Finish off.
Create as many of whatever kind you please and get creative. After the teeth are sewn into their desired places, you've completed the base Grumpus!
Thank Grump!
FURTHER PERSONALISATION
- Look below for extra piece patterns.
- You can add/remove rounds of the body to give your plush a longer or shorter body.
- You can alter the body to flare out at different points by adding increase or decrease rows at the shoulders, hips, belly, wherever.
- The arms typically reach to just below the hips and the legs are typically a similar length, this can be altered by adding/removing sc rounds.
- Using colour changes, try adding splotches or stripes. Or, try variegated yarn.
- If you use acrylic yarn, you can use a wire brush or a stiff plastic hairbrush to brush the fur of the Grump until fluffy. This takes a bit of elbow grease and can cause yarn breakages, so do with caution, and do this to seperate pieces before any sewing or detail work.
- You can use another colour to embroider evenly spaced claws onto the limbs of your Grump. Small lines will do, but 3-wrap French knots can produce good 3D claws.
SIMPLE TAIL (your chosen fur colour)
You don't need to stuff this. Add the tufts to the end before stuffing if you want to stuff it anyways.
1. 6sc into a magic ring [6]
2. (1sc, 1inc) x3 [9]
3. 9sc [9]
4. (1sc, 1dec) x3 [6]
5-17. Sc around (13 rounds) [6]
Finish off with a tail for sewing on. Attach on the lower back/the butt in the desired spot.
Note: add or remove sc rounds to make a longer/shorter tail.
(Optional) To add tufts of fluff to the end, cut a few small bits of yarn (fur colour or another colour) and use your hook to pull it under and out. Pull the ends through the loop and pull tight. You only need a dozen or fewer scraps to do this. Then trim the fluff until it looks as desired.
SHORT HORNS (make 2 in any colour)
1. 3sc into a magic ring [3]
2. 2sc, 1inc [4]
3. 3sc, 1inc [5]
4. 4sc, 1inc [6]
5. 5sc, 1inc [7]
6. 6sc, 1inc [8]
7. 7sc, 1inc [9]
8. 9sc [9]
Slip stitch and finish off. Stuff a little. Position as desired on head.
LONG HORNS (make 2 in any colour)
1. 3sc into a magic ring [3]
2. 2sc, 1inc [4]
3. 3sc, 1inc [5]
4. 4sc, 1inc [6]
5. 5sc, 1inc [7]
6. 7sc [7]
7. 6sc, 1inc [8]
8. 8sc [8]
9. 8sc [8]
10. 7sc, 1inc [9]
11. 9sc [9]
12. 9sc [9]
Slip stitch and finish off. Stuff and position as desired on head.
LIL STRABBY (begin in red, or pink for a Razzby)
1. 4sc into a magic ring [4]
2. (1sc, 1inc) x2 [6]
3. (2sc, 1inc) x2 [8]
4. 8sc [8]
Change colour to green
5. (1dec, picot) x4
Slip stitch and cut the yarn. Embroider two tiny eyes with black and white yarn. Tuck all ends inside.
This can be sewn to the Grump's paws, in its mouth, kept loose, or whatever you please.
Woohoo! Grump done!
#bugsnax#amigurumi#crochet#free pattern#strabby#filbo fiddlepie#tagging filbo because this pattern will create him easily with the right colors
22 notes
·
View notes
Last Seen Blogs

is-been-rael
is(been)rael

textbookx
counting my blessings

themusalini-blog
Untitled

kayeyeemm
Kay Eye Emm, is that witty?

allthiswvndering
The Incredible Benefits of Yoga