#so i dont bother. you can minimize shrinkage by wrapping very loosely and not pulling on the yarn or putting it
Text
[image description: an ask by @arbrehoux that says “Hi! I’m just getting into spinning, and I wanted to ask how to finish off the yarn once you’ve spun all you want. I’ve tried googling it, but every website I look at skips straight from the actual spinning to soaking. I’m using a drop spindle, if that’s relevant.” end image description]
soaking usually IS the way to finish yarn ! i'll give you the best step by step i can though (and for future reference, this applies to pretty much every single spinning method, so you can do this with yarns spun on a spinning wheel, a supported spindle, a drop spindle, a navajo spindle, a charkha wheel, or whatever else you might encounter. it's all yarn, so it can all be finished the same way.)
step 0: if you plan on plying your yarn, do it before finishing. you don't need to finish singles if you plan to ply them. finishing relaxes the yarn, so if you finish a singles and then ply it, it will end up being somewhat limp unless you overply it (which makes yarn less elastic and more rough) but if you spun a singles and want it to remain a singles, never to be plied, then you can certainly finish it as a singles.
step 1: remove the yarn from your spindle (or bobbin, or whatever it is on) and wrap it around something as it comes off. a niddy noddy is great for this, but not necessary. you can wrap your yarn around a big hardcover book or the back of a chair, or whatever. when taking yarn off a drop spindle, i usually just toss the spindle on the ground and let it roll around as I wind the yarn off. if you’re worried about it catching on something, put the drop spindle in a box or mixing bowl instead and let it roll around in there.

[image description: a somewhat blurry closeup of a tattooed man’s hands. in his right hand he’s holding a hardcover book. in his left he’s wrapping yarn around the book lengthwise. a red line has been drawn in to show the path of the yarn as he winds. end image description]
step 2: tie your yarn off. you can use the messy looking ends of the yarn if you wish, or another piece of yarn or string. just tie a simple knot around the hank. you want at least two knots, but if you're really worried about it tangling, you can do more. the purpose of tying your yarn off is to stop it from tangling in the next steps, to make it easier to work with when you wind it into a ball or cake later, and to keep it looking tidy.
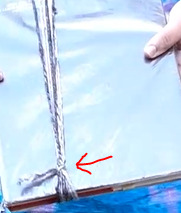
[image description: a closeup of the yarn on the book from the previous image. a knot has been tied around all the strands of yarn on that side. there is a red arrow pointing to the knot. end image description]
step 2.5: if you want to know your yardage or meterage, this is the time to do so. first, count how many strands you have. second, measure how many inches or centimeters it takes to span the entire length of the book (so, front, back, and the width of both the top and bottom). In this case I think it was 8 strands and 24 inches for the whole book. that means the whole yarn is 192 inches (8x24=192) and the yardage is 5.3 (192/36=5.3). same steps if it’s centimeters and meters, of course. also, if you’re thinking “wow, I have to measure whatever i’m winding my yarn on every time ? that sounds annoying”, then you’re seeing why niddy noddys are so helpful and you should get or make one. my niddy noddy takes 2 yards to span it, meaning whenever i wind yarn on, after counting it i can just multiply my result by 2 and know how many yards i have (if i have 100 strands and i know each strand spans 2 yards, that means my whole skein is 200 yards. so much simpler.)
step 3: soak your yarn. or just get it wet. i usually run my yarn under the tap for a few seconds to make sure it is fully wet, but you can also put it in a bowl with some water and make sure it's fully submerged. leave it there for a few minutes.
step 3.5: if your yarn isn't very soft and you want it to be softer, you can add conditioner (just like, the normal stuff you use for your hair) to the bowl before you put the yarn in to soak. if you're softening it this way, leave it in the bowl of water for at least an hour, or even overnight. when you take it out, rinse it briefly. this step is only necessary if you want your yarn softer.
step 4 (optional): go outside and snap your yarn like a whip a few times. this evens out twist and flicks a lot of the water off, so it will dry faster too. if your yarn has some spots that are really undertwisted or overtwisted or both, this is a good way to help reduce that and make more evenly plied.
step 5: let your yarn dry completely. in the summer i hang my yarn over the clothesline, and in the winter i usually put it over a heating vent. doesn't matter how you do it. remember that wool in particular can feel dry even when it has a fair amount of water in it, so don't grab it the second it feels dry--give it a while longer to actually dry.
you should notice that your yarn looks different now that it's dry. if it's wool, it's likely puffed up some (to varying degrees depending on the breed of animal it came from, as well as whether it was roving or a batt or a rolag or whatever else, and also depending on how you spun it. it's a cool thing to pay attention to.)
step 6: skein your yarn. pick up the hank and drape it over your thumb or hand or whatever. the vast majority of yarns will twist a little in one direction when you do this, from residual twist. some yarns will twist a lot, others only barely. note the direction that it twists in--to the left or to the right. put your other thumb at the other end of the hank, and start twisting one thumb in the opposite direction that your hank twisted in. i usually twist with one thumb until i can't easily twist it anymore, and then twist with the other thumb. your nice loop should now look kind of like a piece of rope, with your thumbs still hooked into each end.

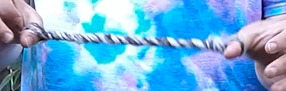
[image description: the first image shows the yarn hooked over each thumb, with two twists in the middle. the second image shows that same yarn, which now has so much twist it looks like rope. his thumbs are still hooked into each end. end image description]
you now want to find the center point of your ‘rope’ and fold it there. your ‘rope’ should kind of snap into place, looking like a much larger version of a 2 ply yarn. it’s nice and stable like this, and can be transported or stored easily (plus it’s pretty !). the last step is to take one of the loops you had your thumb in and push it through the other loop. this stops it from unraveling.
btw: the reason we twist it the opposite direction that it wants to turn is the same reason we ply in the opposite direction that we spin. if you spin Z and ply Z your yarn isn’t going to be structurally sound, and it’ll look pretty bad, too. when it comes to skeining you’re not adding any structural stability to the actual yarn, but the looks still matter--if your Z plied yarn is twisted Z while skeining, your skein will be limp and lifeless and not very pretty. if it’s twisted S, it’ll be nice and balanced and neat looking. it’s purely an aesthetics thing, but it also only takes half a second to figure out, so why not do it ?
and you’re done ! your yarn is now finished and skeined, and you know the yardage/meterage. you can label it with all relevant info if you want (for example: 4 ounces shetland roving, 2 ply, 350 yards, light worsted weight, finished august 2022, spun on a wheel)
#sorry this isnt an ask anymore#i somehow corrupted the original post by adding images and then saving it as a draft to work on later#idk... tumblr.#anyway those pictures are from a little video i made that im now somewhat too embarassed to post#although if this doesn't make sense and seeing it in video form would be helpful lmk and ill just link it anyway#it has to be a youtube video bc its too big to post on tumblr normally even after trying to condense it so#anyway sorry this took a while to answer ! it's hard to put most fiber instructions into words#spinning#handspun yarn#drop spindle#tutorial#also im not gonna go into shrinkage bc honestly i like to pretend it isn't a thing so that it doesnt mess up my yardage measuring#but if it immediately pops off the book/niddy noddy/whatever and looks way smaller that means your yarn is definitely shorter#than the actual yardage. calculating how long it really is while still using the same tools is rly hard#so i dont bother. you can minimize shrinkage by wrapping very loosely and not pulling on the yarn or putting it#under any tension as you wind. thats what i do with yarns when i really NEED to know the actual yardage#such as for a specific project or if i want to sell it#anyway yeah !
112 notes
·
View notes
Last Seen Blogs


themvideogamefeels
My Furry And Oc trash Page

laswendysface
Sin título

soraiatalassa
Soraia Tálassa

coy-lee
I'm not here...