#osupgrade
Photo

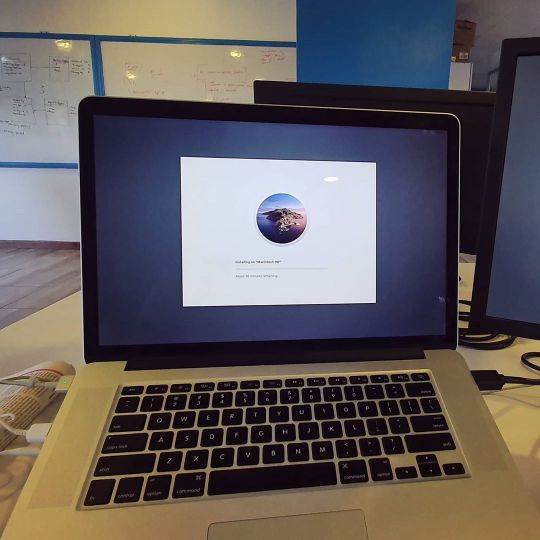
STOP falling for these online scams. No large company like Microsoft is going to reach out to you in this way. Too many people are getting scammed out of their data, money or bank account information! When in doubt, call us or any local computer technician instead of the number on your screen. #LCDReplacement #KeyboardReplacement #PowerJackReplacement #OSInstall #OSUpgrade #ComputerOptimization #Tuneups #VirusRemoval #FriedMotherboard #DataRecovery #ComputerRepair #TechSupport #ITSupport #PCRepair #PCSupport #Windows #Windows8 #Windows11 #MacOS #Apple #DataRecoveryCA #DataRecoveryCalifornia #DataBackup #LocalDataRecovery #FailedHeads #PlatterSurfaceDamage #HireAGeek #PowerSurge #LocalTechSupport #ElDoradoCounty (at Total Access Data Recovery/ Computer Repair) https://www.instagram.com/p/CpdjlTRSNdx/?igshid=NGJjMDIxMWI=
#lcdreplacement#keyboardreplacement#powerjackreplacement#osinstall#osupgrade#computeroptimization#tuneups#virusremoval#friedmotherboard#datarecovery#computerrepair#techsupport#itsupport#pcrepair#pcsupport#windows#windows8#windows11#macos#apple#datarecoveryca#datarecoverycalifornia#databackup#localdatarecovery#failedheads#plattersurfacedamage#hireageek#powersurge#localtechsupport#eldoradocounty
12 notes
·
View notes
Text
Galaxy A15 5G: Unleash Speed and Performance!

Galaxy A15 5G Case
With a brightness of up to 800 nits, a refresh rate of 90 Hz, and a low blue light display for eye comfort, the 6.5-inch Super AMOLED display on the Galaxy A15 5G, boosted by Vision Booster, offers seamless, bright, and vivid viewing experiences.
Basically easy
Both straightforward and clever. The svelte shape, fashionable backcover, and immaculate camera arrangement of the Galaxy A15 5G are made to be shown. Available in Yellow, Light Blue, Blue, Black, and Blue.
Multi-camera shot
Select the lens Identify your angle
Feel free to express your universe. The 50MP primary camera on the Galaxy A15 5G captures your masterpiece; the 5MP Ultra Wide and 2MP Macro cameras capture landscapes and up-close shots; and the 13MP front camera captures selfies worthy of a profile picture.
Enjoy 5G power and speed
Your gadget can easily manage work and play thanks to its powerful processor, plenty of RAM and storage capacity, and 5G connectivity.
By nation, area, or carrier, memory/storage choices and availability may differ. Pre-installed software may affect available memory and storage space. needs the best possible 5G connection. Depending on the nation, area, network provider, and user situation, 5G network availability and real speed may differ.
Stay in zone with 2-day battery
An extended amount of time to be productive thanks to a 5,000mAh (average) battery that lasts for two days and charges quickly with Super Fast Charging.
Have Faith in Samsung Knox Vault
Samsung Knox Vault, certified EAL5+, is intended to secure your private information, including passwords, PINs, and patterns, against tampering and high temperatures as well as software and hardware threats via separate, tamper-resistant storage. EAL stands for Evaluation Assurance Level (Common Criteria, CC). The hardware and software design of Samsung Knox Vault, as well as security features, may vary between Samsung Galaxy A series smartphones and flagship products such as S, Z, and SFE series smartphones and Tab S series tablets, which are expected to be released in 2021. The model of the device might affect Samsung Knox Vault’s availability.
Stay current for longer
With up to four generations of operating system updates and five years of security maintenance, your Galaxy A15 5G remains current for a longer period of time. A synthetic image used for explanation. The above-mentioned security update and OS upgrade rules are subject to modification.
Fingerprint unlock
Your security is built such that only your fingerprint can access it, as confirmed by the side fingerprint sensor.
Convenient Switch
When you move to a new Samsung Galaxy, the data from your old phone or tablet including contacts, calendar entries, notes, device settings, and more stays with you.
Why is the Samsung Smart Switch used?
Using the method that suits you best, Smart Switch easily moves all kinds of data from various devices to your new Samsung Galaxy.
Transfer data across various operating systems
You can now easily transfer the data you care about to your new Galaxy device, regardless of whether you’re switching from another Galaxy, iOS, or Android smartphone.
Flip through several options
With Smart Switch, you have a variety of choices for connecting your devices, including wireless connections, USB cables, connecting storage devices to PCs, and more.
Flip between different kinds of data
Photos, movies, notes, calendar events, and even device settings are among the several file types that Smart Switch transfers to your new Galaxy.
Hasty Sharing
File sharing is quick and simple with Quick Share, whether it is between Galaxy devices or not, nearby or far away, and even while exchanging sensitive data.
Fast Share makes it simple, safe, and fast to share files with pals. You can email documents, films, images, and more with just a few touches. Even files may be shared across PCs made by different manufacturers and Galaxy devices.
Reasons to Use Quick Share
Quick Share facilitates quick and simple file sharing across close and distant devices alike. Numerous gadgets are compatible with it. Tablets and phones from Samsung, as well as PCs from other manufacturers. Quick Share allows you to send files to contacts without worrying about distance limitations. Text messages and QR codes may be used to send files to mobile devices that aren’t Samsung. You may share confidential or sensitive information safely with the help of the private sharing option, which gives you piece of mind.
Sharing to nearby devices just a few taps
Share documents, movies, images, and other files of any size and quantity with ease.
You may still share via a QR code with your pals who use iOS or non-Galaxy Android smartphones.
Share instantly with peers, near or far
There’s no issue with distance. You may use your contacts to Quick Share with pals that aren’t in your immediate vicinity. Similarly, you may still share with your pals via contacts if they have non-Galaxy Android or iOS smartphones.
Transfer crucial data in a calm manner
Even after sharing them, keep critical data safe. You may choose the date and time that a file expires when you use private sharing. Recipients cannot take screenshots, save files, or email them again without your permission.
Smooth sharing with PCs from various firms
Have a Windows computer that’s not a Galaxy Book? You may start sharing with Galaxy devices or PCs from other manufacturers by downloading the Quick Share software from the Microsoft store. Quick Share is now compatible with a larger variety of PCs.
Samsung Galaxy A15 5G Price
The 6GB RAM and 128GB storage edition of the Samsung Galaxy A15 5G costs ₹ 17,999 in India. Priced at ₹19,499 for the 8GB RAM with 128GB storage model and ₹21,499 for the 8GB RAM with 256GB storage variant.
Read more on govindhtech.com
0 notes
Photo
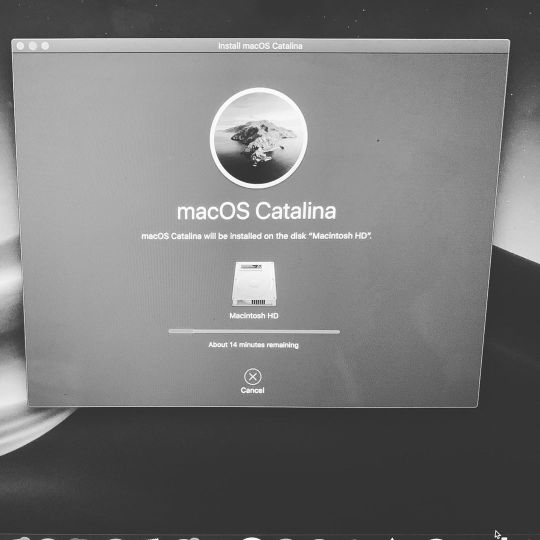
This is how am starting my day. Mac Os upgrade. #catalina #mac #makbook #os #upgrade #osupgrade #developerlife https://www.instagram.com/p/B8LDlcqAi8P/?igshid=jwfaq6zzqxu8
0 notes
Photo
🤞#apple #macbook #catalina #osupgrade (at Charlotte, North Carolina) https://www.instagram.com/p/B356MIvgvu1/?igshid=1amiznfgsfles
0 notes
Photo

Analog Keys v1.35 @weareelektron #analogkeys #osupgrade #analogsynth #elektron
0 notes
Text
[7 Solutions] Réparer Code d'erreur 80240020 Facilement
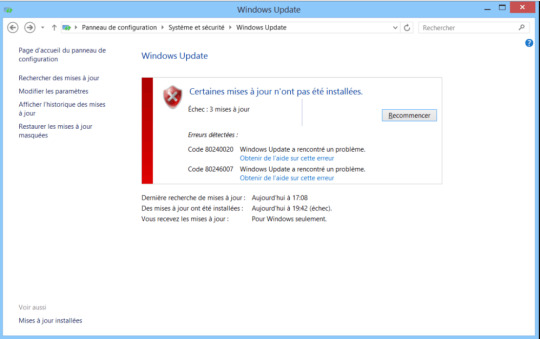
Certaines mises à jour n'ont pas été installées erreur 80240020 : si vous voyez ce message lors de la mise à jour vers la dernière version de Windows 10, alors il signifie que votre Windows n'a pas réussi à l'installer et qu'il y a quelque chose avec votre système.
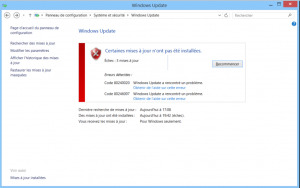
Eh bien, c'est un gros problème pour certains utilisateurs parce qu'ils ne peuvent pas mettre à jour vers la dernière version de Windows à cause de ce code d'erreur 80240020. Mais ici, nous avons trouvé des solutions :)
Méthode 1 : Modifier le registre pour autoriser la mise à niveau du système d'exploitation
Remarque : La modification du registre peut sérieusement endommager votre ordinateur (Si vous n'avez pas accès à la base de registre, vous risquez d'endommager votre ordinateur). il est donc conseillé de sauvegarder vos données. ou créer un point de restauration.
Appuyez sur la touche Windows + R pour ouvrir la boîte de dialogue "exécuter" et tapez "regedit" (sans guillemets) et appuyez sur Entrée pour ouvrir le registre.
Maintenant, dans le registre, naviguez jusqu'à ce qui suit :
HKEY_LOCAL_MACHINE\SOFTWARE\Microsoft\Windows\CurrentVersion\WindowsUpdate\OSUpgrade
Si le dossier OSUpgrade n'est pas là, vous devez le créer en faisant un clic droit sur WindowsUpdate et sélectionnez Nouveau puis cliquez sur la clé. Ensuite, nommez la clé OSUpgrade.
Une fois que vous êtes dans OSUpgrade, faites un clic droit et sélectionnez Nouveau puis cliquez sur valeur DWORD (32-bit). Ensuite, nommez la clé AllowOSUpgrade et fixez sa valeur à 0x00000001..
Enfin, fermez l'éditeur du registre et redémarrez votre PC. Une fois que votre PC redémarrez, essayez à nouveau de mettre à jour ou de mettre à niveau votre PC.

AllowOSUpgrade
Vérifier si l'erreur 80240020 a disparu
Méthode 2 : Supprimer tout ce qui se trouve dans le dossier SoftwareDistribution\download
Naviguez jusqu'à l'emplacement suivant (Assurez-vous de remplacer le lecteur) avec la lettre du lecteur où Windows est installé): C:\Windows\DistributionDesLogiciels\download
Supprimez tout ce qui se trouve dans ce dossier.
dossier download
Appuyez sur la touche Windows + X, puis sélectionnez Invite de commande (Admin).
Tapez la commande suivante dans le cmd et appuyez sur Entrée : wuauclt.exe /updatenow
Ensuite, à partir du Panneau de configuration, allez dans Windows Update et votre Windows 10 devrait recommencer à télécharger.
Assurez-vous d'avoir assez d'espace dans votre lecteur C, sinon Windows Update sera à nouveau bloqué.
Si vous ne pouvait pas, assurez-vous de déplacer le dossier de téléchargement de Windows Update vers un autre lecteur ou d'utiliser un lecteur externe de stockage.

wuauclt.exe / updatenow - erreur 80240020
Méthode 3: Utiliser l'outil DISM pour réparer l'erreur 80240020
Cet outil est utilisé pour corriger une image système corrompue. Vous devrez utiliser les commandes suivantes pour résoudre le problème avec les privilèges d'administrateur.
Dism /Online /Cleanup-Image /CheckHealth
Dism /Online /Cleanup-Image /ScanHealth
Dism /Online /Cleanup-Image /RestoreHealth
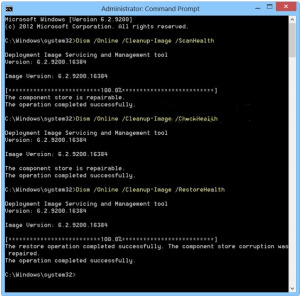
DISM RestoreHealth ScanHealth CheckHealth
Si Windows Update est endommagé, exécutez ce qui suit et corrigez-le. Vous avez besoin de redémarrer votre PC, et cliquez à nouveau sur Mises à jour.
DISM.exe /Online /Cleanup-Image /RestoreHealth /Source:C:\RepairSource\Windows /LimitAccess
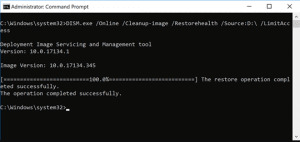
DISM limiteAccess
Voir aussi: 4 Solutions pour Résoudre l’Erreur 80073701 Windows update
Méthode 4 - Vérifier que le service BITS est activé
BITS (Background Intelligent Transfer Service) est le principal service de communication entre votre ordinateur et les serveurs de Microsoft, donc si quelque chose ne va pas avec ce service, vous ne pourrez probablement pas recevez de mises à jour. Pour vous assurer que ce service fonctionne correctement, procédez comme suite :
Allez dans Rechercher, tapez services.msc et ouvrez Services
Double-cliquez sur Service de transfert intelligent en arrière-plan
Dans la section État du service
Si le statut est arrêté, cliquez sur Démarrer, puis sur OK.
Essayez d'installer à nouveau les mises à jour
état service BITS
Méthode 5 - Vérifier la résolution du nom pour résoudre l'erreur 80240020
Une autre chose que vous pouvez essayer est de vérifier la résolution de votre nom.
Pour ce faire, procédez comme suit :
Fermer toutes les fenêtres du navigateur Windows Update
Cliquez avec le bouton droit de la souris sur le bouton Menu Démarrer et ouvrez l'invite de commandes (Admin).
Entrez la commandes suivante, puis appuyez sur Entrée après avoir entré la commande dans la ligne de commande :
nslookup
le nom de votre ordinateur (Vous pouvez vérifier le nom de votre ordinateur en cliquant avec le bouton droit de la souris sur l'icône Propriétés de cet ordinateur sur votre Bureau, (Nom d'ordinateur, domaine et paramètres de groupe de travail)
Une fois le processus sera terminé, essayez à nouveau d'exécuter les mises à jour.
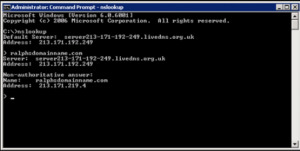
nslookup
voir aussi: Réparer l’Erreur 0xc000000f : Efficaces
Méthode 6 : Utilisation d'un logiciel tiers pour résoudre un problème de registre
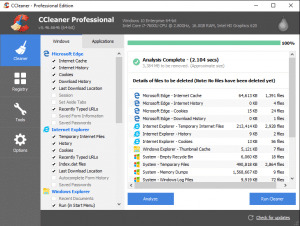
Si vous n'arrivez pas à réparer le registre, alors vous devriez prendre une aide du logiciel CCleaner.
Il est l'une des solutions parfaites qui vous permettent de scanner en toute sécurité, de nettoyer et de réparer les problèmes de registre et aidé a résoudre l'erreur 80240020
Ce logiciel scanne l'ensemble du registre de votre ordinateur, recherche le problème fondamental du registre et le résout entièrement. Après avoir téléchargé la version d'essai gratuite, vous ne pouvez résoudre que 29 problèmes de registre.
Vous pouvez acheter la clé de produit à utiliser en tant que professionnel. Et la profession prendra quelques instants pour résoudre tous les problèmes d'enregistrement de votre PC. Pour obtenir la version pro, vous devez payer une somme de 24,95 $ pour une seule fois.
ccleaner
Méthode finale pour réparer l'erreur 80240020
Si vous constatez qu'aucun des solutions ci-dessus ne fonctionne pas, vous pouvez télécharger Système d'exploitation Microsoft Windows 10 à partir du site Web, faire un DVD amorçable ou USB pour faire changer votre ancien système d'exploitation corrompu avec un nouveau de Windows 10.
J'espère que cet article vous aidera à corriger le code d'erreur 80240020 lors de l'exécution de la mise à jour de Windows 10. Si vous avez un autre problème lors de la mise à jour, merci de nous l'envoyez part de vos commentaires. Nous serons triomphants pour vous aider.
Read the full article
0 notes
Text
HOW TO FIX 80240020 ERROR CODE ON WINDOWS 10?
The error arises in Windows 10; usually, when you haven’t properly completed, it set up or maybe due to inappropriate installation. If you are also facing similar errors like this, then follow the below-written methods to resolve this issue. Make sure that you read each and every bit of this workaround attentively to get the best result. So, here are the steps to fix this error.

Check Windows 10 Updates
If you wish to check updates on Windows 10, then pursue the given instructions.
Go to the ‘Get Windows 10’ button and right-click on it on the right-hand side of the taskbar and click on the ‘check your upgrade status’ option.
You should click on the hamburger menu button and press on the option ‘Check your PC’ within the ‘Get Windows 10’ screen application.
Look at the list of possible compatibility problems. The list contains individual categories for apps and devices.
Remove Everything on Download Folder
If you would like to remove everything on the download folder, then abide by the given steps.
You should go into the ‘C:\Windows\SoftwreDistribution\Download’ and remove everything in this folder.
After that, perform the Command Prompt as an administrator.
You should enter ‘wuauclt.exe/updatenow’ into it.
Navigate to the ‘Control Panel’ and Windows Update’ and Windows 10 should begin the downloading again from scratch.
Fix System Image
If you wish to fix the system image, then pursue the given instructions.
Launch cmd and perform Dism/Online/Clean-Image/RestoreHealth.
You should launch the Win + X and click on the Command Prompt.
Go to the screen of elevated command prompt and enter wuauclt.exe/update now and press the Enter button.
Finally, look at the error is solved. Whether it’s not resolved, then reach the next step.
Change the Pursuing Registry Key to Install
If you would like to change the pursuing registry key to install, then abide by the given steps.
Find the key of registry: [HKEY_LOCAL_MACHINE\SOFTWARE\Microsoft\Windows\CurrentVersion\WindowsUpdate\OSUpgrade].
It should exist, but if it does not, then make it.
You have to make a new DWORD (32-bit) Value with Name= ‘AllowOSUpgrade’ and adjust the Value=0x00000001.
Finally, shut and launch the desktop again ‘Control Panel’ and navigate to the ‘Windows Update’ then check for upgrades.
Windows 10 Download from Microsoft Website
If you wish to download the Windows 10 from the site of Microsoft, then pursue the given instructions.
In case previous troubleshoots did not repair the error, then you should attempt to download Windows 10 within the site of Microsoft.
You should be able to go to this link ‘www.microsoft.com/en-us/spftwaredownload/windows10.’
Whether you have any problem to pursue the above direction, then you should get in touch with Windows support team to get immediate help.
Smith is an inventive person who has been doing intensive research in particular topics and writing blogs and articles on webroot.com/safe and many other related topics. He is a very knowledgeable person with lots of experience.
Source:-https://webrootcom.com/blog/how-to-fix-80240020-error-code-on-windows-10/
0 notes
Text
Facing Blue Screen Problem With Your Windows Laptop . Don't Worry Call Us 9088888835 or visit our website https://t.co/3d2HfoK2Uh #windows10 #techyuga #laptoposformat #osupgrade https://t.co/6UfDxPiNSB
Facing Blue Screen Problem With Your Windows Laptop . Don't Worry Call Us 9088888835 or visit our website https://t.co/3d2HfoK2Uh#windows10 #techyuga #laptoposformat #osupgrade pic.twitter.com/6UfDxPiNSB
— Techyuga (@techyugateam) July 9, 2020
from Twitter https://twitter.com/techyugateam
July 09, 2020 at 10:32PM
via IFTTT
0 notes
Text
How To Fix Windows Error Code 0x80070002 ?
The error code 0x80070002 is one of the common errors computer users may meet. Such numerical codes like 0x80070057, 0x80070005 and 0x80070002 can be deciphered by manufacturers of the product reporting the error. This error may come up in many different situations such as system, applications. Most often, it occurs together with some error messages, and yet it is still very complicated and difficult for many users who do not acquire relevant experience or professional technical knowledge. This article is going to explain several cases of the error and tell how to fix them step by step. For convenience, subtitles of each part are listed here and you can click to reach corresponding content.
WINDOWS UPDATE ENCOUNTERED AN UNKNOWN ERROR
Symptoms and causes
0x80070002 error and 0x80070003 error are common errors relevant to Windows update. When you are working with your Windows PC and trying to install system updates, you might run into error code 0x80070002 or 0x80070003. The numeric error often appears with error messages which differs from Windows versions. For example, you may get the message "Error(s) found: Code 80070002 Windows Update encountered an unknown problem" if your computer runs Windows 8/7/vista; as to Windows XP computers, the message will be "A problem is preventing Windows from accurately checking the license for this computer. Error code: 0x80070002."
Windows update error is usually caused by time/date issue, file corruption or registry problem and it's not difficult to fix it. The error happens when system update fails and the failure brings about data mismatch problem. Thus deletion of these corrupted files helps eliminate the error. There is a brief summary of possible causes:
The Windows XP default security provider has been changed.
System fails to update certain important files.
The drive letter of system partition has been modified.
Computer doesn't transmit all files during updating software.
Solutions to fix the error
Now that causes of the error are not exclusive, solutions vary largely. This article provides a couple of solutions which have been tested effective in solving this error.
Method 1: Check date and time settings
This solution sounds ridiculous but it does works for many users. If time or date is incorrect, it'll have bad effect on Windows update service and it's necessary to check settings of date and time first when you get the error, which is quite easy.
Step 1 Click "Date and Time" on the lower-right corner of screen and click "Change date and time settings".
Step 2 You'll see the "Date and Time" window and click the "Change date and time" button.
Step 3 The previous brings about the "Date and Time Settings" applet where you should set correct date and time. Then Click "OK" to save changes.
Now restart computer and try to install system updates. If this method doesn't work, please move to next solution.
Method 2: Remove Windows update files
If you get 0x80070002 error because of failed system update process, which means some files are corrupted. Hence, we should delete those files and try Windows update once again. You can follow these steps to settle the problem manually.
Step 1 Stop Windows Update service.
Click "Start" button and select "Control Panel". Type "Administrative Tools" in the search box and press Enter.
On the pop-up windows find and double-click "Service". If you are asked to provide administrator password or confirmation, type password and give confirmation.
Click the tab "Name" to sort items alphabetically, after which you can find out Windows Update service easily. Right-click it and select Stop. For Windows XP users, please find out Automatic Updates and right-click it to select Stop.
Step 2 Delete corrupted update files in Software Distribution folder.
Open My Computer and double-click drive C where operating system is installed.
Open Windows folder and double-click SoftwareDistribution folder to open it.
Open the DataStore folder and delete all files and folders in this folder. Then back to the SoftwareDistribution folder and double click Download folder to delete everything in it.
Alternative operation of step 2 is renaming the SoftwareDistribution folder as old if you don't want to delete files. Click Yes if you are prompted by UAC (User Account Control) warning.
Step 3 Restart Windows Update service
Follow operations in Step 1 to locate Windows Update service. Right-click it and click Start. Close Service windows and Administrator Tools window.
Method 3: Use Windows Update troubleshooter
Another common way to cope with the issue is using Microsoft Fix It Tool which can be downloaded online. This tool is able to automatically diagnose and fix common problems with Windows Update.
Method 4: Make Primary Partition as Active
One less common reason of 0x80070002 is that operating system is installed on a partition which is not activated. If you get into this situation, there are two ways you can choose: one is to repartition hard drive and reinstall Windows, which is not suggested, as repartitioning hard drive removes everything; the second option is setting system partition to active.
You can do this manually in Disk Management, but I'd like to recommend the use of DiskGenius which is a powerful partition managerpacked with diverse features and makes it easy to manage partitions and disks and recover lost data.
Step 1 Install and run DiskGenius and you can see disk and partitions information displayed clearly on the main interface.
Step 2 Right-click the partition that installs Windows and select "Mark Partition as Active".
Step 3 Click "OK" button on the pop-up message box.
How to disable the error message
The error described in this article can be disabled to prevent it from reporting even though it is not actually fixed. If you are fed up with the 0x80070002 or 0x80070003 and can't find out any provable error on your PC, then you can follow steps here to dismiss it. Note: these steps only stop the error from coming up, which doesn't mean the error can be fixed by these operations.
Step 1 Log on your computer with Administrator account. Open Registry Editor by clicking Start button ->All Programs ->Accessories ->Run. Type regedit and press Enter.
Step 2 When the Registry Editor is open, you can navigate the following path:
HKEY_LOCAL_MACHINE\SOFTWARE\Microsoft\Windows\CurrentVersion\Run\
Step 3 Then you can see the MSC key on the right part of Registry Editor. Right-click it and click Delete item to delete the key.
SOMETHING HAPPENED 0X80070002 – 0X20016
Summary
Microsoft media creation tool is provided by Microsoft and can be used to download and install Windows 10 upgrade for Win7 or 8.1 based PCs. If you do not want to wait for Windows 10 upgrade with Windows update, you can use Microsoft media creation tool to download and install Windows 10. This way of upgrading system to Win 10 has been confirmed by Microsoft, thus many users chose it to upgrade system.
Have you tried downloading and installing Windows 10 with Microsoft media creation tool? Did it works well on your computer? Some people encounter problem during the process and get an error message "Something Happened 0x80070002 – 0x20016". In some cases, the message comes without error code.
Solution
Step 1 Open Registry Editor. Press Windows key and R from your keyboard and you'll see Run window. Type regadit and press Enter to load Registry Editor. If you receive message prompted by UAC (User Account Control), please click Yes button.
Step 2 Now you get Registry Editor where you can navigate the OSUpgrade key following the path:
HKEY_LOCAL_MACHINE\SOFTWARE\Microsoft\Windows\CurrentVersion\WindowsUpdate\OSUpgrade.
Step 3 Select OSUpgrade key and right-click mouse button on the right pane of Registry Editor and click New. Then Click DWORD (32-bit) Value.
Step 4 Right-click the newly created NewValue#1 and select Modify. Please rename the entry as "AllowOSUpgrade", after which you can double-click it and enter 1 and select Hexadecimal and click OK.
You can close Registry Editor window and retry Windows update which can be launched from Control Panel. Check for updates and if there are available updates you can click "Get Started" button to download updates.
Note:
Make sure Language Setting is set as English (Unites states) instead of something else, otherwise it might not work. You can configure the setting in Control Panel and this helped some users to solve the problem.
You should run Windows Media Creation Tool as administrator. Right-click it and select Run as administrator option.
Disable firewalls or antivirus installed on your computer, as such software cause the issue in some cases. You can enable or reinstall firewalls or antivirus after Windows 10 upgrade is done.
MICROSOFT SECURITY CLIENT ERROR
You just installed Windows updates, which is quite normal to Windows users, but after the update, you receive an error when Windows starts up. The error pops up in a box message titled by Microsoft Security Client "An error has occurred in the program during initialization. If this problem continues, please contact your system administrator. Error code: 0x80070002". If you are having the error and have no idea what to do, this step-by-step manual can help a bit.
Step 1 Open Service window. Press Windows key + R on your keyboard and type "services.msc" in the search box of Run window and press Enter.
Step 2 Look for Windows Update item and view its properties by right clicking it and select Properties.
Step 3 When the Windows Update Properties (Local Computer) pops up, you can click General and select Automatic (Delayed start) for Startup type. Click Start button and then click Apply and OK to make changes take effect. Next close the window. Back to Service window and click File from menu to choose Exit.
Step 4 Open Windows Defender to download update. Click Start button and type Windows Defender in searching box and hit Enter. Click Update button under the Update tab.
Note:
If you are still having the problem after trying steps above, you can try Fixit to fix the issue.
BACKUP DATA WHEN ERROR 0X80070002 OCCURS
When system or computer reports errors, you should attach importance to the issue and try to fix them as much as possible, because those errors may the very reason you lose precious data someday. If you don't want to fix errors or can't find out effective solution to errors, you should back up files that are important to you. I'd like to recommend DiskGenius to you, as it offers diversified ways of backing up data and effective data recovery features. DiskGenius is able to backup any partition to an image file, clone partition, copy hard drive and copy sectors. Each backup feature can be done with different algorithms to meet various needs. Here is how to backup system partition:
Step 1 Install and launch DiskGenius and find the partition to be backed up in the program.
Step 2 Select system partition (usually drive C) and click "Backup Partition" button. Next the backup window pops up.
Step 3 Set a location to save backup file and name the file and click "Start" button.
If the partition hasn't been backed up before, the default backup type is full backup after which you can perform incremental backup.
Call On Our Technical Support Phone Number for fix fix windows error code 0x80070002 by Errorcode Expert USA +1 (800) 848-5295 Right Now to Get Instant Help
0 notes
Quote
このメッセージの元はファイルではなくレジストリに残っていました。
HKEY_LOCAL_MACHINE\SOFTWARE\Microsoft\Windows\CurrentVersion\WindowsUpdate\OsUpgrade
このレジストリ内の情報が表示されていたようです。
取り敢えずキーをエクスポートした後、キーを削除すると以降表示されなくなりました。
WindowsUpdateのC1900101-20017エラー表示を消したい - マイクロソフト コミュニティ
0 notes
Photo
When taking laptops apart, gotta keep it organized 😁 #LCDReplacement #KeyboardReplacement #PowerJackReplacement #OSInstall #OSUpgrade #ComputerOptimization #Tuneups #VirusRemoval #FriedMotherboard #DataRecovery #ComputerRepair #TechSupport #ITSupport #PCRepair #PCSupport #Windows #Windows8 #Windows11 #MacOS #Apple #DataRecoveryCA #DataRecoveryCalifornia #DataBackup #LocalDataRecovery #FailedHeads #PlatterSurfaceDamage #HireAGeek #PowerSurge #LocalTechSupport #ElDoradoCounty (at Total Access Data Recovery/ Computer Repair) https://www.instagram.com/p/CpA6mXZPnAb/?igshid=NGJjMDIxMWI=
#lcdreplacement#keyboardreplacement#powerjackreplacement#osinstall#osupgrade#computeroptimization#tuneups#virusremoval#friedmotherboard#datarecovery#computerrepair#techsupport#itsupport#pcrepair#pcsupport#windows#windows8#windows11#macos#apple#datarecoveryca#datarecoverycalifornia#databackup#localdatarecovery#failedheads#plattersurfacedamage#hireageek#powersurge#localtechsupport#eldoradocounty
7 notes
·
View notes
Photo
Analog Keys v1.35 @weareelektron #analogkeys #osupgrade #analogsynth #elektron
0 notes
Text
[Résolu] Réparer l'Erreur 0x80070002 : 5 Solutions Efficaces

Code erreur 0x80070002 de la mise à jour de Windows 10 est la plus facile à corriger. Il s'agit simplement d'une mise à jour qui n'est pas correctement installée. La solution proposée est de supprimer la mise à jour téléchargée, et la télécharger à nouveau et l'installer.
Il y a un bref résumé des causes possibles :
Le fournisseur de sécurité par défaut de Windows XP a été modifié.
Le système ne met pas à jour certains fichiers importants.
La lettre de lecteur de la partition système a été modifiée.
L'ordinateur ne transmet pas tous les fichiers pendant la mise à jour du logiciel.
Comment peut-on réparer l'erreur 0x80070002 de Microsoft
Méthode 1 : la date et l'heure :
Vérifiez la date et l'heure sur le système en bas à droite.
Puis modifiez les paramètres de date et d'heure en cliquant sur la fenêtre "Date et heure" et cliquez sur le bouton "Modifier la date et l'heure", puis sur "OK".
Lorsque l'heure est bien réglée, enregistrez votre travail et redémarrez le PC.

code erreur 0x80070002
Méthode 2 : Désactiver le pare-feu
Si vous rencontrez un problème avec la mise à jour, essayez toujours de désactiver temporairement le pare-feu de votre système jusqu'à ce que les mises à jour seront installées. Comment le faire ?
Faire un clic droit sur l'icône Antivirus/Pare-feu.
Choisissez Désactiver ou Arrêter
Méthode 3 : Redémarrer "wuauserv" et renommer "SoftwareDistribution"

softwaredistribution
Arrêter le service de la mise à jour , et renommer le dossier "SoftwareDistribution" pour créer un nouveau dossier et redémarrer le service pour supprimer tout fichier ou dossier endommagé dans le dossier SoftwareDistribution.
Appuyez sur la touche Windows de votre clavier et tapez cmd.
Cliquez avec le bouton droit de la souris sur le résultat et choisissez Exécuter en tant qu'administrateur.
Tapez les commandes suivantes :
net stop wuauserv
ren %systemroot%\SoftwareDistribution softwaredistribution.old
net start wuauserv
exit
Mais évitez de faire des fautes de frappe car elles doivent être tapées exactement comme elles sont écrites ici.
Appuyez sur la touche Entrée de votre clavier après chaque commande pour l'exécuter, et assurez-vous d'attendre que la commande soit terminée avant de taper la suivante.
Méthode 5 : Modifier l'éditeur du registre

Si vous rencontrez l'erreur 0x80070002 lors de l'installation de la mise à niveau : Vous pouvez essayer cette méthode pour résoudre le problème.
Avant de commencer, vous devez vous assurer que vous avez sélectionné Français (france) dans le paramètre Langue.
Exécutez Windows Media Creation Tool en tant que administrateur.
Clic-Droit sur l'icône et sélectionnez Exécuter en tant que administrateur.
Et suivez ensuite les étapes suivantes :
==> Sur votre clavier Appuyez sur la touche Windows + R en même temps .
==> Tapez regedit et appuyez sur Entrée. Il est possible que vous deviez fournir le droit administratif d'ouverture, cliquez sur Oui pour confirmer.
==> Allez dans : HKEY_LOCAL_MACHINE\SOFTWARE\Microsoft\Windows\CurrentVersion\WindowsUpdate\OSUpgrade
==> Sélectionnez la clé OSUpgrade, puis cliquez avec le bouton droit de la souris sur la zone vide dans le panneau droit de l'éditeur de registre, puis cliquez sur Nouveau, puis sur Valeur DWORD (32-bit).
==> Cliquez avec le bouton droit de la souris sur NewValue#1 et sélectionnez Modifier.
==> Changez le nom de la valeur en AllowOSUpgrade, après cela vous ferez un double-clic sur le numéro sous la valeur données et entrez 1. Sélectionnez Hexadécimal et cliquez sur OK.
MÉTHODE 3 - INSTALLER LES MISES À JOUR EN ATTENTE
Vous pouvez avoir installé les mises à jour de Windows plus tôt, mais certaines mises à jour nécessitent que vous redémarriez votre ordinateur pour une installation complète. De telles mises à jour en attente peuvent causer divers problèmes, y compris l'erreur 0x80070002.
Vérifiez s'il y a des mises à jour en attente pour les installer.
Cliquez sur "Démarrer".
Tapez "Mise à jour" dans le champ de recherche avant d'appuyer sur Entrée.
Recherchez toute mise à jour désinstallée dans la boîte de dialogue Windows Update qui apparaît. Cliquez avec le bouton droit de la souris sur chacun d'eux pour les mettre à jour.
Essayez d'accéder à Windows Update et recherchez maintenant de nouvelles mises à jour pour l'installation. Cette méthode peut ne pas fonctionner à chaque fois pour vous aider à vous débarrasser de l'erreur 0x80070002, mais dans votre cas elle peut fonctionner.
Exécuter l'analyse SFC (System File Checker)

L'analyse SFC vous aidera lorsque le problème est causé par un fichier.dll corrompu.
Voici comment le réparer :
Appuyer simultanément sur les touches Windows + X
Cliquez sur Invite de commandes (Admin) pour ouvrir une invite de commandes.
Si vous êtes invité à demander des permissions, cliquez sur Oui.
Dans l'invite de commande, tapez sfc/scannow et appuyez sur Entrée
Nous espérons que ces solutions vous ont permis de corriger l'erreur 0x80070002 sur votre ordinateur. Faites-le nous savoir dans la section commentaires.
Read the full article
0 notes
Last Seen Blogs

opera-house-twisted-wonderland
۵OperaHouse

dkskaoaalal
Untitled

charmiechu
Resources by CharmieChu.

crashpinball
Untitled

witchsautumn
The Autumn Witch