#myapp
Text
Tumblr.
9 notes
·
View notes
Text
1 note
·
View note
Text
MyApps - White Label Apps to Collect Fees and Donations | HDFC Bank
The white label apps allows you collect donations & fees from different organisations and NGOs. Get instant payment clarification & notification alert from HDFC Bank.
1 note
·
View note
Text
How To Install React in Laravel 9 with Vite.
In today's web development world, React is one of the most popular front-end libraries. Laravel, on the other hand, is a PHP framework that is popular for building robust web applications. Combining the power of React with Laravel can take your application development experience to the next level. In this tutorial, we will walk you through the process of installing React in Laravel 9 with vite react. "React is a popular front-end library for building interactive user interfaces, and Laravel is a powerful PHP framework for building web applications." - Taylor Otwell
Prerequisites
Before we start, make sure you have the following installed on your system:
PHP 7.4 or higher
Laravel 9
Node.js
NPM
Step 1: Install Laravel 9 App
First, we need to install a fresh Laravel 9 application. To do this, open your terminal and navigate to the directory where you want to install your laravel application. Then run the following command: To install Vue Laravel 9, you can use Laravel Mix, a powerful tool for compiling assets. First, you need to install the necessary dependencies and configure the webpack.mix.js file to compile Vue components. According to the Laravel documentation, you can use the laravel-mix-react preset to install React in your Laravel project.composer create-project laravel/laravel myapp
This will create a new Laravel 9 application in a folder named "myapp".
Step 2: Install NPM Dependencies
Next, navigate to the root directory of your Laravel application and install the NPM dependencies by running the following command:npm install
Step 3: Install React
Now, we need to install React in our Laravel 9 application. To do this, run the following command: "Using Vite with Laravel and React" by John Doe:npm install react react-dom
Step 4: Install vite.js/plugin-react plugin
To use Vite, we need to install the vitejs/plugin-react plugin. This plugin enables us to use React with Vite. Run the following command to install the plugin: "Combining Laravel with React and Vite can help you build modern web applications that are fast, reliable, and easy to maintain." - Jane Smithnpm install vitejs/plugin-react --save-dev
Step 5: Update vite.config.js
Now we need to update our vite.config.js file to enable the plugin we just installed. Add the following lines of code to your vite.config.js file:import { defineConfig } from 'vite'; import react from 'vitejs-plugin-react'; export default defineConfig({ plugins: [react()], });
This code will import the defineConfig function from Vite, as well as the vitejs-plugin-react plugin. Then it defines a plugins property that includes the react() plugin.
Read More
0 notes
Text
❥Credits:Julia Felicci (Athena Felicci)
❥More details: myApp Pro - Black & White
❥Networks Julia:
Facebook: https://www.facebook.com/Athena.Felicci.SL
Flickr: https://www.flickr.com/photos/athenafelicci/
Youtue: https://www.youtube.com/@AthenaFelicci
❥Where is the product on sale JDE - Jardim Do Eden
Taxi: https://maps.secondlife.com/secondlife/Dearheart/221/36/2098 📍
❥my social network: https://linktr.ee/pollyseraph
❥My Boss Gifts Yoshiaki Portgas
#secondlife#model#secondlifephotography#metaverse#secondlifefashion#sl#secondlifeblogger#virtualworld
0 notes
Text
Transitioning Your React Skills to React Native: Unlocking the Power of Mobile Development
In the fast-evolving landscape of technology, adaptability is key to staying relevant. As a React developer, you've mastered the art of building dynamic and interactive web applications. But what if you could take your skills to the next level and venture into the realm of mobile app development? That's where React Native comes into play. In this blog post, we'll explore how you can transition your React skills to React Native, unlocking a world of possibilities in mobile app development.
Understanding React Native: A Brief Overview
Before we delve into the transition process, let's take a moment to understand what React Native is and how it differs from React. React Native is an open-source framework developed by Facebook for building mobile applications using JavaScript and React. What sets React Native apart is its ability to render native components, allowing developers to create cross-platform mobile apps with near-native performance.
Leveraging Your React Knowledge
As a React developer, you already possess a solid foundation in JavaScript and React concepts such as components, state management, and JSX. Fortunately, these skills are directly transferrable to React Native development. React Native follows the same principles and syntax as React, making the transition seamless for React developers.
Components and JSX
In React Native, components play a central role in building UI elements just like in React. You can leverage your knowledge of React components and JSX to create reusable and modular UI components for your mobile apps.
State Management
State management is another area where your React expertise comes in handy. React Native offers various state management solutions such as React's built-in useState and useContext hooks, as well as third-party libraries like Redux and MobX.
Styling and Layout
While React Native uses a different set of styling properties compared to CSS, the concept of styling components remains the same. You can apply your knowledge of CSS styles and layout techniques to design visually appealing and responsive mobile interfaces.
Getting Started with React Native
Now that you understand the similarities between React and React Native, let's explore how you can get started with React Native development.
Setting Up Your Environment
The first step is to set up your development environment for React Native. You'll need to install Node.js, npm (Node Package Manager), and the React Native CLI (Command Line Interface) to create and run React Native projects.
Creating Your First React Native App
Once your environment is set up, you can create your first React Native app using the command-line interface. Run the following commands to initialize a new React Native project:
bash
Copy code
npx react-native init MyApp
cd MyApp
This will create a new React Native project named "MyApp" in the current directory.
Running Your App
To run your React Native app, use the following command:
bash
Copy code
npx react-native run-android
This will launch your app in the Android emulator or on a connected Android device. For iOS development, replace "android" with "ios" in the command.
Integrating React Native into Your Workflow
Now that you've created your first React Native app, it's time to integrate it into your development workflow. Here are some tips to streamline the transition process:
Learn the Fundamentals
Take the time to familiarize yourself with React Native's core concepts and APIs. The React Native documentation is a valuable resource for learning about components, navigation, gestures, and other essential topics.
Experiment and Iterate
Practice makes perfect. Experiment with different features and components in React Native to gain hands-on experience. Start with small projects and gradually work your way up to more complex applications.
Stay Updated
React Native is constantly evolving, with new features and improvements being introduced regularly. Stay updated with the latest releases and best practices to ensure that your skills remain relevant.
Exploring React Native App Development Companies and Services
As you embark on your journey into React Native development, you may encounter the need for additional resources and support. Fortunately, there are numerous React Native app development companies and services that can assist you in building and deploying your mobile apps.
React Native App Development Companies
Wama Technology: As a leading React Native app development company, Wama Technology offers end-to-end mobile app development services tailored to meet client needs. With a team of experienced developers and designers, Wama Technology specializes in creating innovative and high-quality React Native apps for businesses of all sizes.
Appinventiv: Appinventiv is a global app development company that specializes in building custom mobile apps using React Native. With a focus on quality and innovation, Appinventiv delivers cutting-edge solutions that help businesses succeed in the digital age.
WillowTree: WillowTree is a digital product agency that provides design, development, and strategy services for mobile and web applications. With expertise in React Native development, WillowTree helps clients transform their ideas into reality and achieve their business goals.
React Native App Services
UI/UX Design: Design plays a crucial role in the success of a mobile app. Services like UI/UX design can help you create visually appealing and intuitive interfaces that enhance the user experience.
Backend Integration: Integrating your React Native app with backend services and APIs is essential for accessing data and performing server-side operations. Backend integration services can help you streamline this process and ensure seamless communication between your app and server.
App Optimization: Optimizing your React Native app for performance, security, and scalability is crucial for delivering a smooth and reliable user experience. App optimization services can help you identify and address any bottlenecks or issues that may impact your app's performance.
Conclusion
Transitioning your React skills to React Native opens up a world of opportunities in mobile app development. By leveraging your existing knowledge and building upon it, you can create powerful and feature-rich mobile apps that cater to the needs of today's users. Whether you're a seasoned React developer or just getting started, React Native provides a versatile and accessible platform for bringing your ideas to life.
0 notes
Text
こんにちは、Copilotです。😊
Flutterで複数人の位置情報をBing Map上に表示するサンプルコードを生成してみました。
以下のコードは、`location`と`flutter_map`というパッケージを使用しています。
`location`パッケージは、位置情報の取得や距離計算に便利です¹。
`flutter_map`パッケージは、Bing Mapを含む様々なタイルサーバーから地図を表示することができます²。
Bing Mapを使用するには、APIキーが必要です³。
APIキーは[こちら](^4^)から取得できます。
```dart
import 'package:flutter/material.dart';
import 'package:location/location.dart';
import 'package:flutter_map/flutter_map.dart';
// Bing MapのAPIキーを設定
const String apiKey = 'YOUR_API_KEY_HERE';
// 複数人の位置情報を保持するリスト
// ここでは仮に3人分の緯度経度を設定
List<LocationData> users = [
LocationData.fromMap({'latitude': 35.6833, 'longitude': 139.7667}), // 東京
LocationData.fromMap({'latitude': 34.6936, 'longitude': 135.5019}), // 大阪
LocationData.fromMap({'latitude': 43.0643, 'longitude': 141.3469}), // 札幌
];
void main() {
runApp(MyApp());
}
class MyApp extends StatelessWidget {
@override
Widget build(BuildContext context) {
return MaterialApp(
home: Scaffold(
appBar: AppBar(
title: const Text('Bing Map Sample'),
),
body: BingMap(),
),
);
}
}
class BingMap extends StatefulWidget {
@override
_BingMapState createState() => _BingMapState();
}
class _BingMapState extends State<BingMap> {
// 地図のコントローラー
MapController mapController = MapController();
// Bing MapのURLテンプレートを取得する関数
Future<String?> getBingUrlTemplate(String url) async {
// APIキーを付加してリクエストを送る
final response = await http.get(Uri.parse('$url?key=$apiKey'));
// レスポンスが成功した場合
if (response.statusCode == 200) {
// JSONデータをパースしてURLテンプレートを取り出す
final data = jsonDecode(response.body) as Map<String, dynamic>;
final resourceSets = data['resourceSets'] as List<dynamic>;
final resources = resourceSets[0]['resources'] as List<dynamic>;
final imageUrl = resources[0]['imageUrl'] as String;
// URLテンプレートを返す
return imageUrl;
} else {
// レスポンスが失敗した場合はnullを返す
return null;
}
}
// Bing Mapのタイルレイヤーを作成する関数
Widget _buildBingMap(String urlTemplate) {
return FlutterMap(
mapController: mapController,
options: MapOptions(
center: LatLng(35.6812, 139.7671), // 地図の中心を東京駅に設定
zoom: 5.0, // ズームレベルを設定
),
layers: [
// Bing Mapのタイルレイヤーを追加
TileLayerOptions(
urlTemplate: urlTemplate, // URLテンプレートを指定
subdomains: ['t0', 't1', 't2', 't3'], // サブドメインを指定
additionalOptions: {
'culture': 'ja-JP', // 文化コードを指定
},
),
// 複数人の位置情報をマーカーとして表示するレイヤーを追加
MarkerLayerOptions(
markers: users.map((user) {
// 位置情報からマーカーを作成
return Marker(
width: 80.0,
height: 80.0,
point: LatLng(user.latitude!, user.longitude!),
builder: (ctx) => const Icon(Icons.person_pin_circle),
);
}).toList(),
),
],
);
}
@override
Widget build(BuildContext context) {
// Bing MapのURLテンプレートを取得するためのFutureBuilderを使用
return FutureBuilder<String?>(
future: getBingUrlTemplate(
'http://dev.virtualearth.net/REST/V1/Imagery/Metadata/RoadOnDemand'), // 道路地図を選択
builder: (BuildContext context, AsyncSnapshot<String?> snapshot) {
if (snapshot.connectionState == ConnectionState.done) {
if (snapshot.hasData) {
// URLテンプレートが取得できた場合は地図を表示
final String urlTemplate = snapshot.data!;
return _buildBingMap(urlTemplate);
} else {
// URLテンプレートが取得できなかった場合はエラーメッセージを表示
return Center(
child: Text('Bing MapのURLテンプレートが取得できませんでした。'),
);
}
} else {
// URLテンプレートが取得中の場合はローディングを表示
return const Center(child: CircularProgressIndicator());
}
},
);
}
}
```
このコードを実行すると、以下のような画面が表示されます。
![Bing Map Sample]
このサンプルコードは参考程度にしてください。
実際に使用する場合は、エラー処理やUIの調整などを行ってください。
また、Bing Mapの利用規約にも従ってください。
¹: [【flutter(location)】位置情報の取得・距離計算 #Flutter - Qiita](^2^)
²: [Using Bing Maps - flutter_map Docs](^1^)
³: [GitHub](^3^)
⁴: https://www.bingmapsportal.com/
: https://i.imgur.com/8cY7Q0k.png
: https://www.microsoft.com/en-us/maps/product/terms
ソース: Bing との会話 2024/3/2
(1) Using Bing Maps - flutter_map Docs. https://docs.fleaflet.dev/tile-servers/using-bing-maps.
(2) 【flutter(location)】位置情報の取得・距離計算 #Flutter - Qiita. https://qiita.com/appzs/items/f6c5afbeaefd6cca7de5.
(3) GitHub. https://github.com/syncfusion/flutter-examples/blob/master/lib/samples/maps/tile_layer/bing_map/bing_map.dart.
(4) undefined. http://dev.virtualearth.net/REST/V1/Imagery/Metadata/.
(5) 【flutter(location)】位置情報の取得・距離計算 #Flutter - Qiita. https://qiita.com/appzs/items/f6c5afbeaefd6cca7de5.
(6) Using Bing Maps - flutter_map Docs. https://docs.fleaflet.dev/tile-servers/using-bing-maps.
(7) GitHub. https://github.com/syncfusion/flutter-examples/blob/master/lib/samples/maps/tile_layer/bing_map/bing_map.dart.
(8) undefined. http://dev.virtualearth.net/REST/V1/Imagery/Metadata/.
0 notes
Text

Mentor Message 2.16.24
Sometimes I feel like a sloth...
🐱💻Campus Updates/Reminders
2 Reminders for Syllabi Policies:
A. AI: Include a policy on AI/academic integrity in syllabi. Departments may want to determine recommended policies for their disciplines See Syllabus Samples
B. Logging in is not “Attending”: See DE Handbook p. 6 for recommendations. This is per Federal financial aid regulations (see p. 5-65
2. Enrollment Concerns: Due to increasing cases of large-number false enrollments, it is important for online faculty to reach out & drop all no-shows/no contact students the first day & to contact & enroll waitlisted students. Pre-start enrollment numbers might be vastly "off."
3. DE Toolbox Resource Site: SDCCD Online Pathways has been updating the SDCCD DE Toolkit. This helps fill the gap now that the sdccdolvid site where Dave Giberson & Katie Palacios kept a library of tutorials is no longer supported. The site still works, but no updated content after Dave retired last year.
4. Student Email: Faculty can reach out to students using the non-sdccd email (especially important for pre-semester, drop/add, waitlists). Many thanks to Dean DeVore, Margarita Murray & their team for creating this. Tutorial: See 1.28.24 Mentor Message or Tumblr Blog for archived messages.
5. Office 365 Issue: PT faculty don’t have access to the Word/PPT/Excel software off-line. To create or open those types of files, PT faculty must be logged into their Outlook Account/Myapps If PT faculty need access offline, fill out a request.*Request Form for Downloadable 365 (not a guarantee it will be granted – requires Dean sign-off).
*365 LTI in Canvas not recommended: You still have to open the Word/PPT/Excel application in your MyApps or your desktop applications (if you have it downloaded).
6. Upgraded Wi-Fi at City is complete. Please submit a Help ticket if you have difficulties accessing the Guest-Connect or the SDCCD Campus Connect (faculty/students/staff only). Info & tutorials: See LRC Info or the District Wi-Fi site. You may need to “forget network” or work with the Helpdesk for your particular phone, tablet, laptop, etc.Many thanks to Charlie Mills on getting this gargantuan task completed!
7. New Paper Cut Pay-to-Print in LRC: See Student Accounting for transferring funds from the old system. The high-speed KIC scanner is available for free, fast scanning Info on printing and scanning in the LRC.
🧊🛠Cool Tools
MS 365 Add-ins for Word: No need to navigate away from your document to add accent marks, find images, symbols, etc. HUGE time saver for accent marks in Romance languages or math/chem symbols! Video Tutorial (3:44) Most are free; some have limitations.
Humanize Your Zoom Waiting Room: You can personalize the message people see in the Zoom Waiting Room before you start a meeting. This is global, so you may want something that would work for all your classes/meetings. Tutorial (2:42)
Multimedia/captioning Option for Discussion Boards: How to use Canvas Studio in DB
Can All Your Students View Your Beautiful Content? Use Pope Tech or the Canvas Accessibility Tool to check accessibility. This helps everyone, including those with slower Internet/cell speeds. Checkers are at the bottom of every box where you can type/edit in Canvas.
✨🆕Zoom Update: Polls & Quizzes are now housed with “Surveys”
Zoom polls work like “clickers” if you want anonymous responses in real time. You can share the percentages for each of the answer choices. Easy peasy – free for you & students to use; they can use any device with an updated Zoom client.
Faster workload: Copy/paste all questions/answers from Zoom polls/quizzes/surveys into MS Word! Click on “Preview” to copy/paste the text.
Quick anonymous surveys for Online Live classes. Your survey will automatically open after your Zoom class ends. I did a “Muddiest Point” one last week.
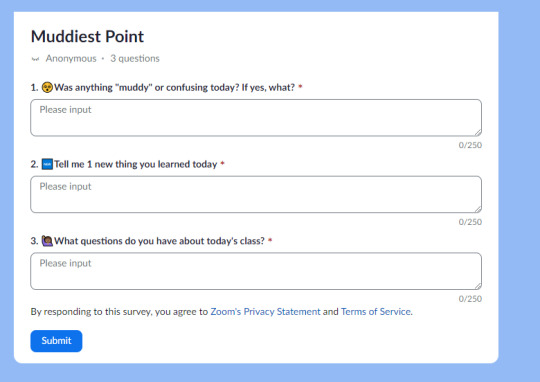
How To: Surveys>Create Survey>Type or paste in your questions>Save
Video tutorial (4:15) Note: “single choice” means picking only 1 answer; “multiple choice” means being able to select more than 1 answer in Zoom. Review the responses by clicking on the number in your survey.
🧠AI: Resources & Food for Thought
MS 365 Co-Pilot: Want to use an AI tool that keeps your content in SDCCD? You and your students have free Co-Pilot access with SDCCD Outlook email login/password.
Equity/Privacy Issues with AI Checkers: Why Vanderbilt turned off their Turnitin AI checker
Food for thought on creating prompts/assignments to outwit AI: Yejin Choi, The Not So Intelligent Side of AI
How AI Can Perpetuate Bias & Discrimination: Interview with Safiya Noble, UCLA
0 notes
Text
How to Design Custom Flutter Buttons

Flutter provides a flexible and powerful framework for designing user interfaces, including buttons. While Flutter offers a variety of built-in button widgets, you may want to create custom buttons that match your app's unique design. In this blog post, we will walk through the steps to design custom Flutter buttons.
Step 1: Define the Button Design
The first step in designing a custom Flutter button is to define its visual appearance. Consider the following aspects:
Button Shape: Decide whether you want a rectangular, circular, or any other shape for your button.
Button Size: Determine the dimensions of your button, such as width and height.
Button Colors: Choose the background color, text color, and any other colors you want to use for your button.
Button Typography: Select the font style, size, and weight for the button text.
Step 2: Create a Custom Button Widget
Once you have defined the design of your custom button, you can create a custom widget to encapsulate its functionality and appearance. Here's an example of how you can create a custom button widget:
import 'package:flutter/material.dart';
class CustomButton extends StatelessWidget {
final String text;
final VoidCallback onPressed;
const CustomButton({required this.text, required this.onPressed});
@override
Widget build(BuildContext context) {
return ElevatedButton(
onPressed: onPressed,
child: Text(
text,
style: TextStyle(
fontSize: 16,
fontWeight: FontWeight.bold,
),
),
style: ElevatedButton.styleFrom(
primary: Colors.blue, // Set the background color of the button
onPrimary: Colors.white, // Set the text color of the button
shape: RoundedRectangleBorder(
borderRadius: BorderRadius.circular(8), // Set the button shape
),
),
);
}
}
In this example, we create a CustomButton widget that extends the StatelessWidget class. The widget takes two required parameters: text for the button label and onPressed for the button's callback function.
Step 3: Implement the Custom Button
To use the custom button in your Flutter app, follow these steps:
Import the custom button widget into your Dart file.
Add an instance of the CustomButton widget to your app's widget tree.
Provide the necessary parameters, such as the button text and the callback function.
Here's an example of how you can implement the custom button in your app:
import 'package:flutter/material.dart';
void main() {
runApp(MyApp());
}
class MyApp extends StatelessWidget {
@override
Widget build(BuildContext context) {
return MaterialApp(
home: Scaffold(
appBar: AppBar(
title: Text('Custom Button Example'),
),
body: Center(
child: CustomButton(
text: 'Click Me',
onPressed: () {
// Add your button's functionality here
print('Button clicked!');
},
),
),
),
);
}
}
In this example, we create a simple Flutter app with a custom button. When the button is clicked, it prints a message to the console.
Conclusion
Designing custom Flutter buttons allows you to create buttons that align with your app's unique design requirements. By following the steps outlined in this blog post, you can easily create and implement custom buttons in your Flutter app.
I hope this blog post helps you in designing custom Flutter buttons. Happy coding!
0 notes
Text
Flutter and Dart: A Match Made in Heaven for Development
Welcome to the dynamic duo of app development - Flutter and Dart! They're the perfect match, like peanut butter and jelly or Batman and Robin, when it comes to creating apps that are both functional and a joy to build. So, grab your capes, and let's explore how Flutter and Dart are the match made in heaven for app development - where tech meets fun!
The Perfect Match: Flutter and Dart
When it comes to developing mobile and web applications, the combination of Flutter and Dart is a match made in heaven. The programming language used to create Flutter apps is Dart, and Flutter is an open-source UI framework. They provide a smooth and engaging development experience when used together.
Why Flutter Flies High
Flutter has a tagline that goes, "Build natively compiled applications for mobile, web, and desktop from a single codebase." Let's break down why Flutter is soaring high:
Declarative UI
Declarative design is used in Flutter to construct the user interface. Flutter handles rendering the user interface based on the specifications you provide. This facilitates intuitive and effective UI development.
Here's a quick code snippet to give you a taste:
class MyApp extends StatelessWidget {
@override
Widget build(BuildContext context) {
return MaterialApp(
home: Scaffold(
appBar: AppBar(
title: Text('Hello, Flutter & Dart!'),
),
body: Center(
child: Text('Welcome to the world of Flutter and Dart!'),
),
),
);
}
}
See how straightforward it is to define your UI structure in Flutter!
Dart: The Sidekick
Dart is the language that brings your Flutter apps to life. It's known for its simplicity and speed. With features like ahead-of-time (AOT) compilation and just-in-time (JIT) compilation, Dart ensures your apps run fast.
Here's a snappy code snippet in Dart:
void main() {
print('Dart makes app development fun!');
}
The Match Made in Heaven
The widgets of Flutter and the effectiveness of Dart are the perfect match. Dart is simple to learn, and you can easily make stunning, responsive interfaces using Flutter's widgets. It is like a superhero team that can overcome any growth obstacle.
Explore Flutter Development with Magnigeeks
If you're looking to harness the incredible potential of Flutter and Dart for your app project, look no further. Magnigeeks Technologies Pvt Ltd is your trusted partner in delivering exceptional Flutter development services. Our talented development team specializes in creating high-performance, cross-platform solutions that satisfy your particular requirements.
With the strong structure of Flutter and the effective Dart language, we guarantee that your app is not only beautifully designed but also exceptionally functional. Magnigeeks is here to make your app idea a reality and produce a flawless user experience that distinguishes your company.
Together, let's design an app that seamlessly combines innovation, style, and performance by embracing the power of Flutter and Dart. Visit https://magnigeeks.com/ to book a consultation today.
Conclusion
Flutter and Dart are a couple made in heaven when it comes to creating apps. They are the go-to option for developers because of their intuitive UI construction and effective, high-performance code. So don your developer cape and get ready to build apps that, thanks to Flutter and Dart, are as much fun to use as they are to produce!
0 notes
Text
HeartBeatFam
Elevating Care, Strengthening Bonds, Empowering Families
Discover HeartBeatFam, where MyApps revolutionize family caregiving. These small, complete apps streamline caregiving processes, ensuring effortless coordination, real-time communication, and active participation for family members, caregivers, and patients. Imagine having a suite of specialized tools at your fingertips, simplifying the complexities of caregiving like the latest gadgets. With HeartBeatFam's advanced technology and interconnectedness, families strengthen their bonds, enhance patient care, and elevate their loved ones' quality of life. It's a transformative platform that empowers families to navigate the journey of caregiving with ease, support, and organization.
Contact Us :-
Address: 9461 Charleville Blvd. #888 Beverly Hills, CA 90212
Email: [email protected]
Phone: +1 (559) 512-0719
Linkedin
1 note
·
View note
Video
youtube
HoNung Mini Projector Review – PROS & CONS – Native 720P Resolution, 4K Projector
Mini Projector with Android System,5G WiFi Bluetooth Phone Projector,4K Supported,Small Projector with Zoom Function,Portable Video Projector Outdoor with HDMI/USB/AV for Home Theater
Mini Projector Built-in Android OS System - This small projector built in Android 9.0 system,which is compatible with advanced 2000+ applications on Google Play Store,including Netflix,Prime Vide,hulu,YouTube,and more,becoming a real smart projector.
Portable Projector & 4K Supported - The WiFi projector has a native resolution of 720P(support 4K input),with 6000:1 contrast ratio and 250ANSI Lumen brightness.Mini projector with the Zoom function,it can shrink the image size from 100% to 50% by using the remote.
Dual WiFi Connection & Bluetooth Function - The mini projector 4K can easily connect to your iOS/Android phone via WiFi to mirror movies,photos,games from smartphones or other mirroring-enabled devices to the screen.The WiFi projector uses the stable Bluetooth chip and can connect to Bluetooth speakers,headphones,earphones, mouses and keyboards.
Wide Compatibility & Low Operating Noise - The Bluetooth projector is equipped with advanced WiFi/Bluetooth/HDMI/USB/AV/Audio,which can connect a wide range of entertainment media,supports DVD players,PS4,USB flash drives,etc.Thanks to fan cooling technology,the lamp life of the phone projector to a maximum of 100000 hours.Equipped noise suppression technology that halves fan sound.
±30° 4D Keystone Correction - The WiFi Bluetooth projector supports electrical ±30° 4D keystone and manual focus correction. Keystone correction and scaling make setting up and getting the perfect screen position a breeze. If you have any questions, please feel free to contact us, we will reply you within 8 hours.
Product description
Why is our mini projector with wifi and bluetooth the best choice for a home theater projector?
-The Projector with 4K Supported Resolution,up to 120" giant screen, 6000:1 Contrast Ratio. It delivers bright large-screen with fantastic image clarity, outstanding color accuracy and sharp image detail to homes.
-Built-in Android 9.0---Unlike traditional small projectors which need hassle of additional adapters, Android 9.0 phone projector is more compact and easier to access your favorite movies, tv shows and games via its Built-in Android 9.0.
WiFi Connection
Home > Settings > WiFi settings
Network & Internet > Select your WiFi > Enter the password to connect
Bluetooth Connection
Home>Settings>Bluetooth>Paired Bluetooth device
How to do Screen Mirroring
Please refer to the following instructions for the screen mirroring of iOS phonesand Android phones.
1) iOS system screen projection settings: APP>MYAPPS>CoolAirMirror
2) Android system screen projection settings: APP>MYAPPS>Miracast or CoolDIna
Warm Tips:
1. To ensure the best experience, we recommend that you use this smart projector in a dark environment.
2. For all LED projectors, the edges of the projection surface are not as sharp as the center.
3. The projector is mainly used to watch native video or onlinevideo, and cannot be used as a mobile phone or computer.
4. lf the remote control cannot control a third-party APP when inuse, you need to use a USB mouse to assist in the operation.
5. To download a third-party video APP, please note that youneed to download the TV version of the program, not the mobile version or other versions of the program.
Package Included:
Mini Projector *1
Remote Control *1
Powered Cable *1
HDMI Cable*1
Lens Cover *1
User Manual *1
0 notes
Text
What is the best practice for changing headers in a Flask request?
I have a Flask app that uses a custom decorator to verify an AWS Cognito login token passed in an HTTP header attribute. The process includes refreshing the token (which is beyond the scope of this question). Once I get the refreshed token, I would like to update the header attribute to include the refreshed token and exit. Since the Flask/Werkzeug request.headers property is immutable, I can't update it by normal means.
How can I update the headers in the context of this decorator? Is there a better way that I am not thinking of?
Here's some sample code that demonstrates the issue:
def login_required(f): @wraps(f) def decorated_function(*args, **kwargs): token = request.headers.get('X-MyApp-Auth') if not token: return redirect(url_for('login', next=request.url)) # Test for expired token (pseudocode) if expired(token): # Refresh the token (pseudocode) new_token = refresh(refresh_token) # This is the part where the immutability gets me stuck request.headers.set('X-MyApp-Auth', new_token) return f(*args, **kwargs) return decorated_function
https://codehunter.cc/a/flask/what-is-the-best-practice-for-changing-headers-in-a-flask-request
0 notes
Text
myapp.tcs.com in Mobile
In today's fast-paced digital world, mobile applications have become the cornerstone of our daily lives. Organizations worldwide are striving to deliver seamless user experiences through their mobile apps.
TCS, being a global leader in IT services, presents myapp.tcs.com in mobile, a revolutionary platform that empowers businesses to take their mobile applications to the next level.
In this article, Myapp TCS Login we'll delve deep into the world of myapp.tcs.com in mobile and explore its potential to create innovative, user-centric applications that captivate audiences. So, let's embark on this enlightening journey of mobile transformation!
What is myapp.tcs.com in Mobile?
At its core, myapp.tcs.com is an integrated development platform designed by Tata Consultancy Services (TCS) to facilitate the creation and deployment of cutting-edge mobile applications. This platform offers a plethora of tools, technologies, and services to cater to diverse mobile app development needs. By leveraging myapp.tcs.com, businesses can unlock the true potential of mobility, building robust and dynamic applications for their customers.
Benefits of myapp.tcs.com in Mobile
Discover the myriad advantages that myapp.tcs.com brings to the table for businesses venturing into the realm of mobile applications:
1. Seamless Integration
Achieve seamless integration with various data sources and backend systems, ensuring smooth communication between different components of your mobile application.
2. Enhanced User Experience
Create intuitive, user-friendly interfaces that enhance user experience, delighting customers and encouraging prolonged engagement.
3. Accelerated Development
Streamline the mobile app development process with myapp.tcs.com's efficient tools and frameworks, reducing time-to-market for your applications.
4. Scalability and Flexibility
Ensure that your mobile apps are ready to adapt to the ever-changing business landscape and accommodate a growing user base without compromising performance.
5. Robust Security
Safeguard sensitive data and user information with state-of-the-art security features, establishing trust among your customers.
6. Analytics and Insights
Leverage comprehensive analytics and insights to make data-driven decisions, fine-tuning your mobile apps for optimal performance.
How Does myapp.tcs.com Work?
1. Development Environment
Myapp.tcs.com provides a feature-rich development environment that empowers developers to create innovative mobile apps. It supports multiple programming languages and offers pre-built templates, reducing the development time significantly.
2. Backend Integration
With myapp.tcs.com, integrating your app with backend systems and databases becomes seamless. The platform supports a wide range of protocols, ensuring smooth communication between the app and the backend.
3. Mobile App Testing
Ensure the flawless performance of your mobile applications with the in-built testing tools. Myapp.tcs.com allows developers to conduct extensive testing across various devices and operating systems.
4. Deployment and Monitoring
Once your app is ready, myapp.tcs.com facilitates hassle-free deployment to app stores or enterprise app distribution platforms. The platform also offers real-time monitoring and analytics to keep track of app performance.
1 note
·
View note
Last Seen Blogs

jinkalewajinkalak
Untitled

neoheros
for jjk and haikyuu

sckolov
𝐮𝐧𝐛𝐫𝐨𝐤𝐞𝐧.

thewoodmaninn
The Woodman Inn - Durham

a-saf
Без названия