#maybe i should make 60fps gifs a thing.
Text


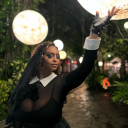
TALK TO ME NICE .ᐟ
tinashe, directed by bradley calder. (2023)
#tinashe#tinasheedit#black girl aesthetic#tinashe gif#dailymusicqueens#dailywomen#woc#dailywoc#black tumblr#anjelcore#pocsource#maybe i should make 60fps gifs a thing.#flash warning! flash warning!!
263 notes
·
View notes
Photo
GIFFING 101 - YOUR ULTIMATE GUIDE ON HOW TO GIF
I have gotten many, many asks before about how I gif and I finally decided to make a tutorial. This is going to be very long, very image heavy and with a lot of details and examples. I mean it, I’m going through every, single aspect of giffing that I can possibly think of. From start to finish. And please read the disclaimer at the very start.
* I use a macbook pro but this should probably work on windows too!
I hate doing this but if this helped and you want to, please consider donating to my ko-fi or if you want, commission a theme or page from me at @amaanat <3
tutorial under cut, I hope it helps!
★★★★★
- CONTENTS
disclaimer
what will you need to create gifs?
how to download videos?
extracting your scene from handbrake using VLC / built in video player
opening in photoshop
trimming, cropping and resizing videos
sharpening
colouring and psds
masks
adding subtitles
editing frames / timeline speed
multiple gifs in one grid.
actions
exporting the gif
last minute tips and extra links.
★★★★★
- DISCLAIMER
First off, this is not meant as a post where I am saying look here, this is the only and perfect way of giffing. Not at all. When I started out, there were many tutorials available that helped me figure out how to gif, and I slowly developed my own style and I would like to create an in depth tutorial that helps you grasp the basics. Heck, make your gifs whatever way you want, go absolutely crazy on colours or whatever, this tutorial is just here to guide you through the process of gifmaking, because I know it can be very intimidating to people who are just getting into it. That is why I made this and why I spent 8 hours writing this, because I want others to know too and this is the kind of in depth tutorial I needed when I was starting out 4 years ago. Thanks for reading, hope it helps and go crazy ahhh go stupid.
★★★★★
- what will you need to create gifs?
photoshop. I use photoshop CC 2020 on a mac and I pay monthly bc of student discount. There are many, many links you can find on @completeresources for downloads. You can use any photoshop you like, as long as you have the timeline option.
Handbrake. This nifty program is used mostly to convert MKV files to MP4, but I also use it to quickly extract the part of the video I want, because opening an entire movie in photoshop can quickly clog up space bc of cache and it’s a pain to find that one second scene you want with that tiny scrollbar. Download it from here.
your video (downloading explained down below)
extras: VLC, just to find how many seconds the scene is at, so we can input the time in Handbrake. You can use any other player though for that step, I use VLC or Quicktime. Download VLC from here.
★★★★★
- how to download videos
Ok so I will quickly go through a few methods here for getting your clips.
1. t*rrenting.
This is the most popular method for getting your film or tv episode. I personally get my t/rrents from rarbg dot to or if I am having trouble finding one, I go to 1337x dot to, because they compile them from different sites. I copy the magnet link and go to the qbittorrent application, import magnet link, choose the files I want and it downloads. Remember, the higher the seeder leecher ratio, the quicker it will download.
But which file should I choose?? there’s so many? Well yes there are many many files for different movies. On RAR, I found more than 40 t/rrent files for Endgame. I think that generally, the 4/5 GB 1080p copies are just fine. I have compared giffing with a 60GB Interstellar Remux (which is directly ripped from bluray) file to giffing from a 4GB 1080 file, it literally gave me the same quality and the 1080 looked crisper. So yeah don’t kill your computers space, just go for those 3/4/5GB files.
hot tip - don’t download from yify, the quality is way worse.
2. movies from twitter accounts such as logolessHD.
these accounts post MEGA links to movies and shows, but you will have to request to follow them to be able to get the links. Then you can download the movie from there. The accounts you can get these links from are here: 1 - 2 - 3 - 4. The quality can be a bit less though compared to t/rrents. Here is a link to a tumblr blog with these kinds of downloads too.
3. downloading from youtube.
ok, use 4kvideodownloader for this. It is incredibly easy to use, you just need the youtube link. Always Always go for 1080p, if you can’t then 720 at the most because otherwise quality gets really bad really fast.
4. netflix / screenrecording
If you don’t want to download / can’t find something, try using netflix and screen recording. In my experience, SC only works on google chrome and not safari so jsyk!! Here is a tutorial on how to screen record on mac (or for quick access, click command+shift+5) and windows.
NOTE: quicktime screen records at 60fps, which is nearly thrice the frame rate of movies and shows, so at the end you may end up with duplicate frames in the timeline of photoshop, so you will have to delete those frames one by one sorry.
★★★★★
- extracting your scene from handbrake using VLC / built in video player
muahaha here’s where the magic starts to happen. Open handbrake and import your video. For this part I am going to use a scene of Keanu Reeves from the 2019 movie Always be my Maybe. I will demonstrate with that scene up until colouring, because then I will show how I colour different scenes!
So when you have opened the image in HB, you get this layout. (link to imgur)
it is a bit intimidating, I know. So basically, first, click on where it says chapters near the top right and click seconds. then, input the time you want to extract from the entire video. For the Keanu scene, that scene starts at 00:57:18 and ends at 00:57:21. These are not exact timings, I usually add an extra second so the entire scene is captured and I heavily recommend you do the same.

Now down below, you can click browse and edit where your new video will be saved and you can also change the name of the new clip. Always ALWAYS remember to keep the .mp4 ending do not cut that part out!!! If the ending says .m4v change it to mp4!!

Ok then I undertake the following steps to ensure the video that will be exported is of the highest quality possible:
Firstly, I uncheck all these three boxes:

Then you see this bar here right? Well I will edit the dimensions, filters and video now. You don’t have to do anything for audio, subtitles or chapters so leaving that alone is best. Lets go to dimensions first.

Here are my settings for dimensions:
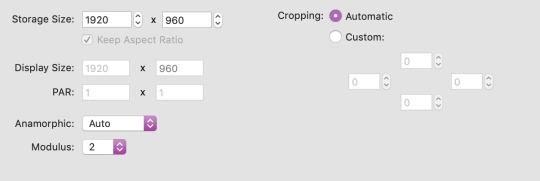
The storage size depends on if your file is 1080p or 720p. Most movies are shot in a ratio of 2.35:1, so if it does not say 1920x1080 like a 1080 file should be, don’t fret. The cut off parts are just the black bars you see when watching the movie. Handbrake doesn’t recognise nor convert them so that’s one less thing we have to worry about.
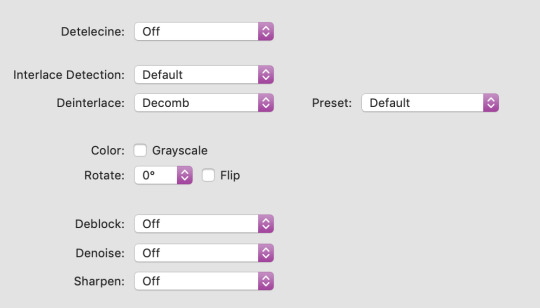
Now onto filters. Literally do NOT change anything there. Leave the settings as they are, which is like this:
Finally, go to video. You will see this kind of window and these are my settings (imgur)
Firstly, leave video encoder at H264 or 265 depending on how your video is encoded. For the FPS, choose same as source for the framerate and click constant instead of variable!!! This will ensure your video is smooth. For quality, bring the slider all the way to the right. RF0 means it will be at the best quality possible. I didn’t edit the settings at the bottom at all so just leave them be.
Now click this green icon (imgur) at the top and your video will start encoding! It does not take long at all and then your video is ready to made into a nice lil gif!
★★★★★
- opening in photoshop
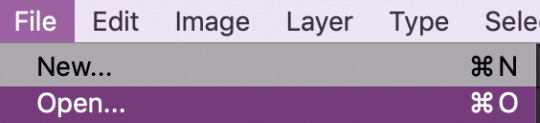
woohooo we got our video!! Ok now open photoshop. Click on file -> open:
now search for the file you extracted from VLC and import it! Now your screen will look like this (imgur). With a different video, of course lol.
★★★★★
- trimming, cropping and resizing videos
ok so firstly, we will trim the video. As you can see in the image I linked in the step before, the screencap you see is of someone else in ABMM, not Keanu, like I want. So use this slider:
and click and drag it to where your scene begins and shows up in the window. Then, click the following button to split at playhead.

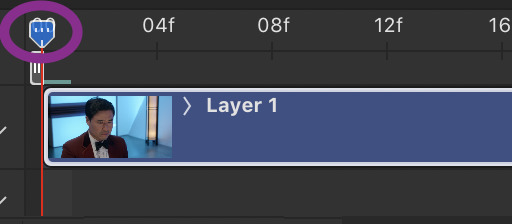
This will split the clip and so the timeline and layers section will look like this (imgur) (mine has three sections because there was space before and after the keanu scene so I cut two parts which made three clips)
so now all there is left in trimming is delete the layers of the video you do not need! For me in that image it was layer 1 and 3!
cropping and resizing
This depends on the kind of gifset you want to make. This picture is a handy guide for resizing:

This post is also very very useful for resizing info
Ok now I will crop my gif. Click on this tool:

and now my interface looks like this. I am using the ratio 6 by 4 but you can use whatever you want.

Ok now you may need to crop some black bars but since I don’t have to, I just moved the crop area around a bit and clicked enter to crop it. Just play around with sizes and whatnot, and get a feel of what you like!!
cropping tip: crop as close as you can to the edges. The more you zoom in, the more pixels that will be visible and it will make your gif extremely grainy!!
So now for resizing, go to image -> image size or click command-shift-i

and you will get this window.

A LITTLE NOTE - I personally do not use automatic but a friend who shared her sharpening psd would prefer if I kept it secret, but automatic is what most people use and it is what I used up until november 2019 and it worked just fine.
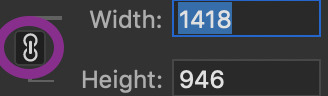
Ok anyway now I want to make my gif 268px wide so I will input that as width and make sure you click this!! It makes sure your height and width are proportional!
ok now we have this. After you’ve done that, click ok!

congrats, you just resized a gif!! Your gif probably looks smaller now in the main window once you click ok, just zoom in to it! don’t worry about it looking bad quality, sharpening is next!
This is how my gif looks with trimming, cropping and resizing (with 0.05 speed)
★★★★★
- sharpening
Now we sharpen! Make sure your layer is selected Go to filter -> sharpen -> smart sharpen and this window will pop up:

These are my settings which most people use. Just remove gaussian blur
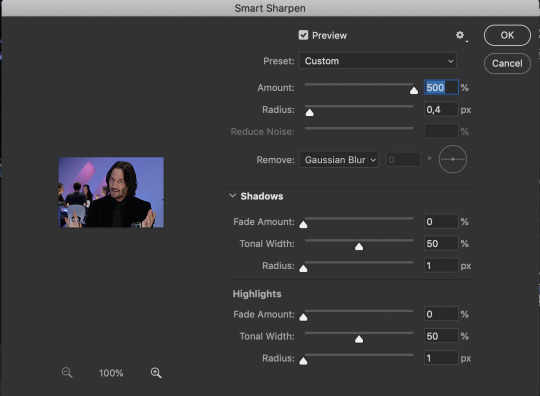
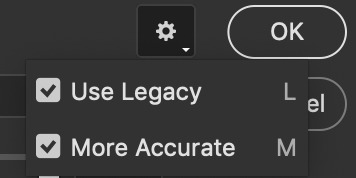
I have more accurate and use legacy checked too!
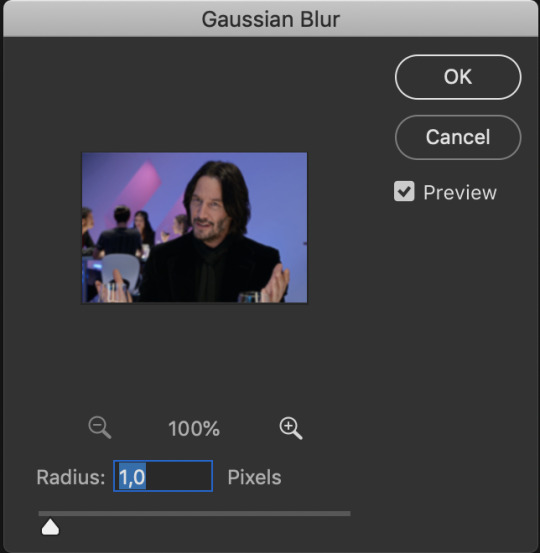
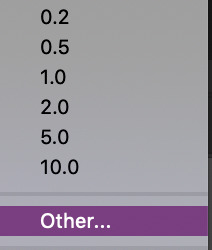
click ok! Now ... your gif might look a bit oversharpened. That’s why we use a bit of gaussian blur. Go to filter -> blur -> gaussian blur.

now I think most people also use a 1.0 radius so set that and click ok.
But now your gif looks too blurry. Lets fix that. Double click the icon below in the layers panel

and adjust the opacity! My go to is between 25 to 35, just so the gif looks smooth!

Now we’re done with sharpening! This is how our gif looks with sharpening with 0.05 speed:

sweet right? Now .... the best and hardest part ... colouring!!!!
★★★★★
- colouring and psds
First I will shortly talk about psds. They are photoshop files, that save the entire document which means you can share it with someone after uploading it and when they download and open it, they can edit the layers, tweak things just like they made the file in the first place. Many people upload psds of gifs with colouring so others can use that colouring. You can find so many psds on completeresources (I only linked gif psds but they have psds for icons and headers too) or allresources. I do not use psds but colour from scratch every time so I will not be explaining them further, sorry.
So for colouring, I will go very in depth into different styles. Here are the main types of colouring I have noticed people use on here:
simple - I normally use this for scenes with people in it
vibrant, bright - I use this for scenes with lots of colours in them
pale
black and white
gradients - I use this to spice scenes up a bit
colour palette
I only go for simple, vibrant and gradients and never do cp, pale or black and white, but I will link a few tutorials by talented creators who do and after that I will explain the three ways I colour by showing you three different examples :)
Some useful tutorials I have found for pale/bw/cp colouring are:
this pale tutorial by @samecoin. Especially useful read because Tippy explains how to avoid whitewashing in pale edits.
this pale tutorial by @kateausten. Very easy to read and to follow.
this colour palette tutorial by @freddyfreemen. They explain the basics and provide a psd too.
this colour palette tutorial by @stenbranlons. Very image heavy which guides you through every step of the way.
A blog dedicated to pale resources is @finesources and is definitely worth checking out!
this tutorials page by completeresources has many many tutorials on how to do different kinds of styles
Btw, this is a useful website that explains all the different adjustment layers in photoshop if you’re still getting the hang of them
ok now onto my examples for the colouring. I will first do simple colouring for which I will use the keanu gif. For vibrant and gradient I will use two different gifs. I usually put my colouring into a group so first, close the video group layer and click this to make a new group which will contain the adjustment layers for our colouring:

SIMPLE COLOURING
First I will brighten the gif up with some curves. That is this tool:

Then you get this window:
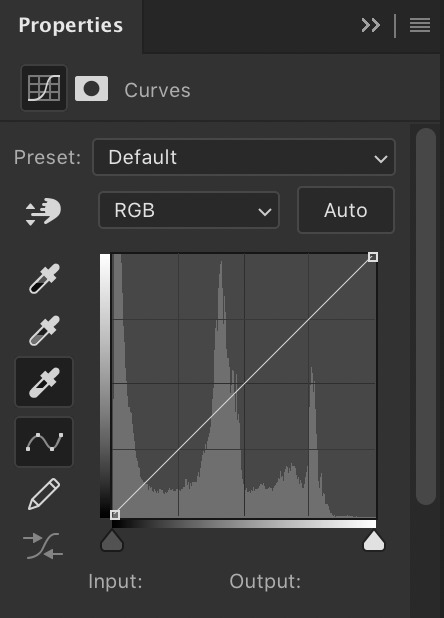
As you see, I have selected that white eyedropper tool. Using that I will brighten the image. Basically, you want to click on the whitest part of the gif using that tool. This is because wherever you click, the eyedropper will turn that part into white and adjust the entire gif that way so if you click somewhere dark, you’ll get this white bright fuzzy mess. So I clicked on the lightest place which imo is the white specks near the glass in front of his hand and now my gif looks like this:
Ok now if you look at the above image, there is a black eyedropper two steps above the white one. You want to use that to click on the darkest place of the gif bc it’ll turn that to pure black. Here is my gif when I did that:

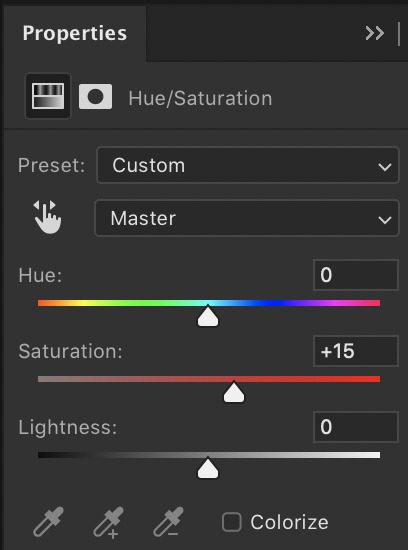
not a massive difference but it balances things out. Now I will add some saturation. Click this icon:
which brings up this window. I have already set saturation to around 15 to make it a bit warmer:
and the gif looks like this now:
I think it looks nice, but I would like to add something extra. That is why I am going to play around with selective colour to make the background pop a bit and make the black colour more dark. So click this icon:
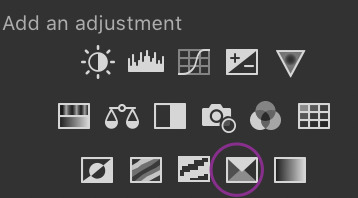
and you get this window and these colours (imgur). You can play around a lot with selective colour and manipulate colours! So if I turned the black dial on reds to +100, they would become wayyyy darker. However because I want the background to pop, I would use the colours magenta and blue (and black for the final touch). For those my settings are this: 1 - 2 - 3 (imgur). So now my gif looks like this:

And now i think we are done! For comparison, this is what the gif looked like with absolutely no colouring or sharpening:
And that was all for simple colouring!! Lets move on to vibrant colours!!
VIBRANT COLOURING
For this I will use an example from Thor: Ragnarok bc thor is my soft bb. I did not do much for this first example except play around a lot with selective colour and I used the exact way of adding saturation and curves as shown before. Honestly just playing around with selective is the best bet to get vibrant colouring. The gif without sharpening etc was this:
the gif after colouring and sharpening is this:
pretty sweet huh? Just play a lot with saturation, hue and selective colour and channel mixer and you can create a lot of styles that way!
GRADIENT
for this I will use another clip from Thor, but from The Dark World. It is a bare clip where it is raining and I will add a gradient on it. This is the gif without colouring nor sharpening:

now we will do the sharpening and colouring. I already applied a basic curves and saturation layer so now it looks like this:
It looks a bit better right? Ok lets get that gradient applied. Click here:

and click on gradient, NOT gradient maps bc those are different things and I honestly dont know how maps work.

now this is what will appear, I haven’t changed anything to this yet:
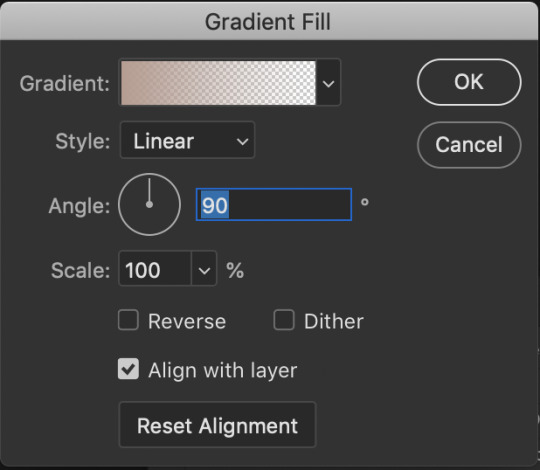
What style, colours, angle you choose is up to you. I personally am going for 0 angle because I want it going right. Now, to choose colours, double click on the colour shown next to the word gradient. This window will show up:
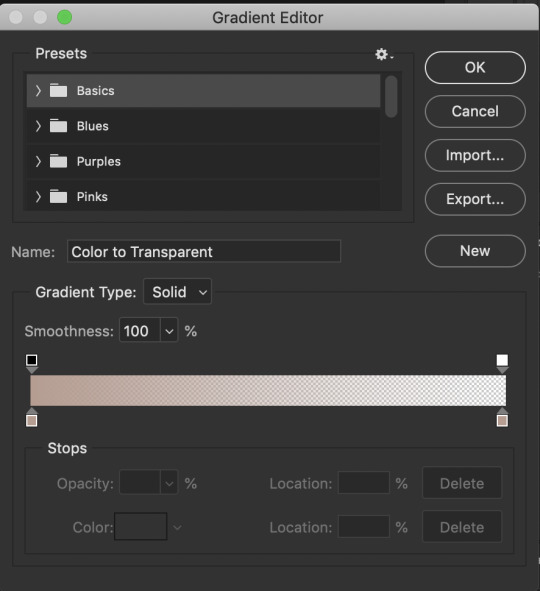
The fun part is you can do what you want here. Just experiment, click the buttons, adjust opacity etc. When you click at the bottom of the bar somewhere another stop marker appears meaning you can have even more colours! Just click on the bottom markers and edit to your hearts content! Use the top button to adjust opacities. Personally I went for this gradient:

Ok but now we have a problem because our gradient is fully covering the image and you can’t see anything. That is where blending modes come in. Right click on the gradient layer and click blending options. This window will pop up (ingur). When you click blending mode, these options appear (imgur).
Here is a good guide explaining the blending modes
I just recommend playing around seeing which one suits you. I went for overlay, which makes my final gif look like this:
and that was that on colouring!! Let me know if u have questions about it! Onto the next part, masks!
★★★★★
- masks
I will not go in depth here, but instead I will link some tutorials but the amazing @thepunisher who has explained it much better than I ever will be able to. The tutorials are all in this link. If you have any questions do lmk but idk how I could explain it.
★★★★★
- adding subtitles
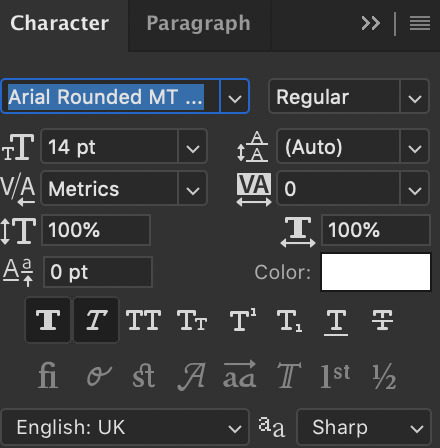
although we wish we could, we can’t all lip read so we need subtitles also I’m hard of hearing and need them anyway but yeah, I will quickly highlight how I add subs! I use the font Arial Rounded MT Bold Regular.
I will first link to this post because it helped me a lot and may explain stuff better than I do.
Lets take the keanu gif we had earlier. In it, he says ‘fish flakes’. Now what I do is this. Click on this icon:

and drag a box around the gif fully. Add your text. Mine looks like this now:
Well that ... does not look like a subtitle. BTW my settings are:
*when there are two people speaking I change the colour of the second person to #ffff00 - also for 540px gifs I usually use 12/13px text.
Ok now I will add the stroke and drop shadow. Right click on the layer of text, click blending options and change your stroke and drop shadow settings to this and this (imgur). Now just click the move tool or hit V on keyboard to select it and drag the gif down wherever you want. Now my final gif looks like this:

Ok, now if you have two gifs and you want them to be the same distance from the bottom, right click the text layer of the first gif document, click duplicate layer and you will get this window:
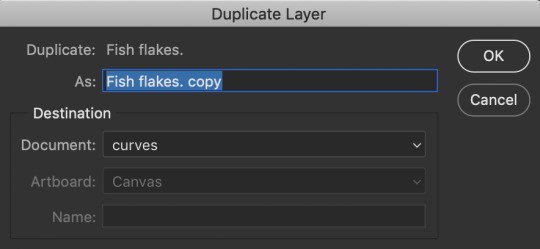
now click on destination and depending on what files you have open in PS, you will get this window:

now just choose where you want the text to go and if the gifs are the same sizes itll appear exactly where it did in the first one and you can edit the text for the second. You can do this with adjustment layers, groups etc too!!
Now text is done! Off to the next part!
★★★★★
- editing frames / timeline speed
We are done editing, now time to convert to frame animation and edit the speed!
Ok click on the four bars on the right side of the video timeline. It will bring up a menu. From there, select this:
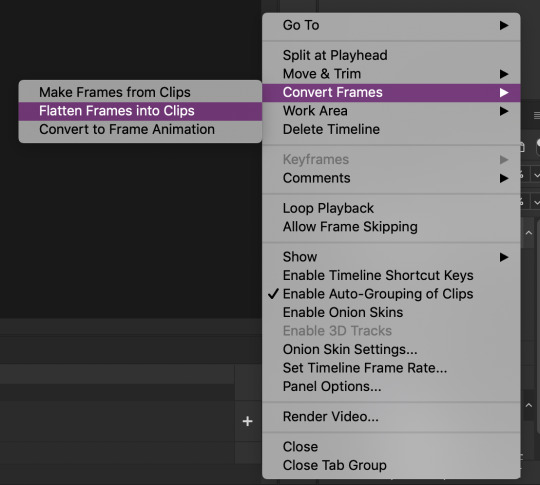
This will make individual layers of every frame into clips. Now, click this at the bottom left side of the video timeline:

This will convert your video timeline to a frame animation timeline. Now it looks like this (imgur). you’re probably wondering wait where the heck did my layers go well don’t fret, lets click the four bars on the right side again and click this:

now look! We have got all our frames into the timeline! Just delete the excessive frames at the front. Now click the four bars again, select all frames and then click the number at the bottom and change it to 0.05 or 0.06 or whatever speed you want:

Now we are done with this step!
★★★★★
- multiple gifs in one grid
I myself am not going to explain this, instead here are links to a few amazing tutorials that will help you further
this tut by @brolinjosh
this tut by @futurist��
★★★★★
- actions
Now actions ... man they make everything so much easier. Basically actions are a sequence of steps you undertake in photoshop that are recorded which you can then save and use on multiple files. This makes the giffing process much much faster!!! For instance, these are the actions I have saved (mind the doubles lol I am experimenting a bit!)
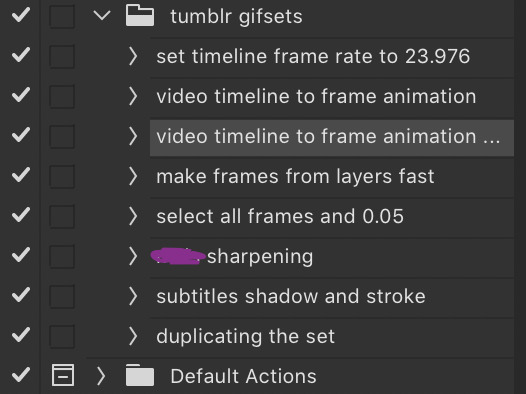
As you can see, I have one for undertaking the entire video timeline to frame animation process and one for sharpening and the subtitles. It has saved me around 75% of the original time I put into creating sets before which is a lifesaver.
I cannot explain how to make actions bc I am really bad at explaining stuff, but here are some tutorials:
- https://helpx.adobe.com/photoshop/using/creating-actions.html
- https://completeresources.tumblr.com/post/66560261468/how-make-action-%D0%B7
- https://completeresources.tumblr.com/post/50583786863/how-to-use-an-action
- https://completeresources.tumblr.com/post/50362731526/how-to-use-actions-on-gifs
https://www.creativebloq.com/adobe/create-own-photoshop-actions-61411918
★★★★★
- exporting the gif
now we’re at the final stage! When you have your gif ready, go to file -> export -> save for web legacy
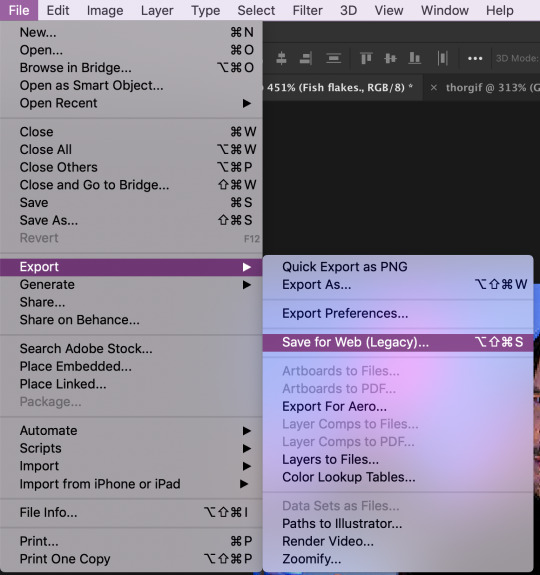
ok now the next window is this which looks intimidating I know
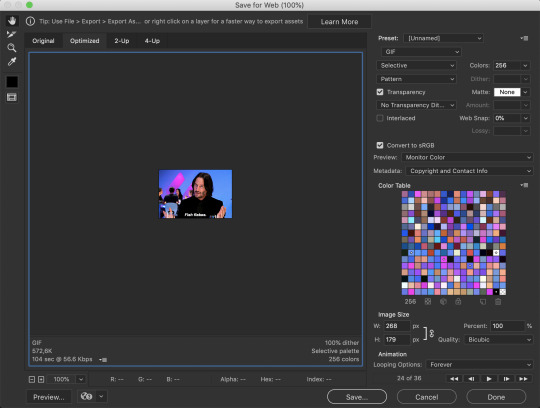
Well basically, those are my settings above. Make sure the looping option is set at forever. Also on the left size you see how big your gif is, make sure it is under 8mb but tumblr is unstable so keep it under 5MB and it should be fine.
I use different exporting types at times. Sometimes I use selective and pattern, sometimes diffusion or adaptive+dif. Just remember that the gif size depends on which you choose so keep that in mind. Here’s the difference (if u can even spot it).
selective + pattern

selective + diffusion

adaptive + diffusion
Personally I mostly only use selective + pattern!
btw make sure your matte is at NONE!!! This is because otherwise you have those whitish transparent borders on your gif, esp noticable on dark gifs, like shown in this tutorial by the talented @joewright !
And congrats, you have officially made a gif! Now go experiment, have the time of your life and do whatever the heck u want with your gifs. And if you want me to see them, tag me!! I track #usernums !!!
★★★★★
- last minute tips and extra links
man idk what to say here really but here goes:
@completeresources and @allresources are amazing places to learn more about gifmaking, pls take advantage of the opportunity
reminder: quicktime records at 60FPS, so unless you want a laggy gif delete the extra duplicate frames in the frame animation timeline!!
When opening import video frames to layers, do not click skip every second frame!! do not!!!!
Do not steal gifs. Try making them. I know it takes time and it can get frustrating but don’t post someone elses gifs as your own. Even the ugliest gifset in existence made originally by someone is better than a stunning set put together full of stolen gifs from various users. Don’t be that person
Don’t be afraid to ask for help pls just go on anon if u want!!
use the tumblr dimensions!!! I cannot stress enough how important this is because if you don’t, your gifs will look stretched af and lose quality so like .. don’t do that
1K notes
·
View notes
Last Seen Blogs

fy-oongi
min yunki
ballsack-bingus
bingus supremacy :3
anhedonia2
Du blutest nicht genug für mich
autogaiagraphy
autoGAIAgraphy

happylittletrees3
i am a god of chaos and i want appysauce