#i just kept refining my sketch and redoing lineart and messing with colors and here we are 6 hours later
Text

hello i spent 6 hours on this thank you goodbye
[click for better quality]
#reblogs appreciated!#i still kinda hate it even tho i wasted so much time on it lmao#i just kept refining my sketch and redoing lineart and messing with colors and here we are 6 hours later#anyway thanks if you like or reblog or even see this :]#illustration#artists on tumblr#ocs#oc#oc art#freya
3 notes
·
View notes
Text
Digital Painting: tips for beginners II
In my previous tutorial here http://holy-quinity.tumblr.com/post/155327072711/digital-painting-tips-for-beginners, I talked about how value and color essentially replace line to produce form and walked through the first steps of my painting process to make painting more approachable for someone who’s only worked with sketches and lineart coloring before.
After doing the stuff in the first tut, I usually reach a point where I want to add more detail, but the lines themselves are kind of getting in the way. Like, I want the nose to be outlined with a light yellow, not a faded black. But if I draw a yellow line under the sketch layer, the faded black will still be on top of it. I could delete the sketch layer and keep rendering, but then I wouldn’t have my lines to help guide me anymore. I could also toggle the sketch layer on and off constantly, but that’s annoying.
So what I do instead is make new layers above the sketch and paint over it, covering up all the lines I don’t want anymore. This way I can keep the lines I like and the sketch ultimately becomes integrated into my final painting. If I mess up, I can just erase to see the sketch again and redo it.
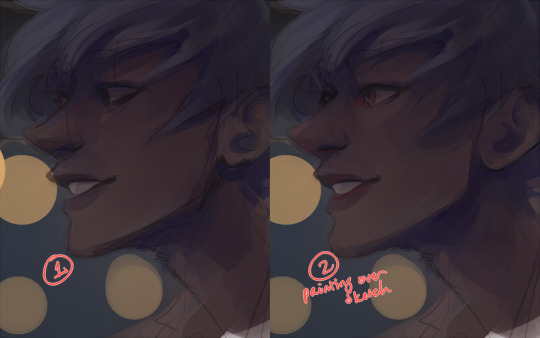
You can see above I started covering up the sketch lines in the eyes, nose, and throat. In the throat, I selected the blue color I shaded with there and then kept shading, except in a layer over the lines. This covered up the sketch lines and rendered the neck, and it took all of two seconds. On the nose I selected the colors there to render its shape more and cover up those sketch lines. The eyes I was able to add brighter colors, where previously the sketch layer, being black, wouldn’t let me. All I’m doing is selecting colors I’ve already put down in the layer under the sketch, and transferring them to be above the sketch, while adding detail and refinement.

The above shows the same level of rendering with the sketch layer turned on and off, respectively. You can see how my painting style transforms the sketch into the painting itself.
I think this can be a really useful approach for someone who’s just starting painting and doesn’t know how to deal with “lineless” work. The thing is: you don’t have to go fully lineless at all. Rather, rework your lines to be part of the painting itself. Use the sketch as much as possible.
Some other tips:
1. Work on the same layer as much as possible. Definitely a trap that we fall into is wanting to keep each object on its own layer: skin, hair, eyes, clothes, background stuff. But in a painting, we don’t want gaps in the edges between things, and we want all our colors to work together. Remember, value becomes our edges; we can always use hard-edged brushes to simulate a line. A rule of thumb I follow intuitively is to change layers only when I’m seeking a new level of refinery/detail, not when I change subjects.
2. Don’t abuse layer effects such as overlay or hard light. I only use these when I need to adjust something, or emphasize an effect. I consider these supplementary tools. It can look unskilled if you’re relying on a multiply layer for shading, and it’s a good habit to develop to work as much in the “normal” layer style as possible. It makes the effects look more cohesive and natural, and it’s a skill transferable to traditional paints.
By the end of a painting, my layers will often be something like this:

Here I have four or five layers of actual substance, and they make up the majority of the painting. Everything else is super small lighting or color effects. “backgroundcolor,” “basecolor,” and “paint” 1 and 2 are pretty much the whole painting.

Four slices showing the same process above, from color sketch to completed picture. Just another example where I haven’t added any overlay/hard light effects until the very last stage of the painting. Everything else is on the normal/default layer style. You can see how the hair comes over the sketch layer, and I covered up some of the lines in the hand with blue.
Part three of this tutorial will talk about brush types and brush strokes in rendering shapes and shading.
#art tutorial#digital art tutorial#digital painting tutorial#tutorial#painting tutorial#I don't feel like this is actually that helpful#like I'm just taking two posts to say#paint under the sketch and then paint on top#but idk a lot of people liked the last one i guess#:/
478 notes
·
View notes
Last Seen Blogs

andyeclov
Photography by Andy Eclov

alabamadeathcleanup
Licensed Blood Cleaning Alabama
gln231fr
无标题
auohno
Flordai's a fucking trip
mon-enj
Amour, tu as l'avenir