#how to reset windows 10 - Windows 10 - How to Reset Windows to Factory Settings
Text
How to Unlock an iPhone Without the Passcode? - ITMlab

For more visit: How to Unlock an iPhone Without the Passcode? - ITMlab
If you’ve forgotten your iPhone’s passcode, you’ll need to find another way to unlock it. There are two ways to do this: resetting or unfreezing the device. You can only use these methods if you know the last date and time that someone used the phone last, but it’s worth noting that it doesn’t matter whether or not they’re still using it today. In this article we’ll show you how to unlock an iPhone without a passcode using both methods so let’s get started!
How to Unfreeze an iPhone
If your iPhone has a passcode, you can use it to unfreeze the device.
In Settings, tap Passcode (or Touch ID & Passcode on an iPhone X or later).
Enter your passcode and tap Turn Off Screen Lock or Change Passcode if prompted to do so by entering an old one that’s no longer valid and then creating a new one for future use when prompted again by iOS 11+ devices or earlier versions of iOS 10 – 12+.
Once the screen is unlocked after entering your security code correctly, go back into Settings and navigate down until you find General > Reset > Erase All Content & Settings; then tap Reset All Settings near the bottom right corner of this page next time you need help with any kind of problem related specifically towards these two different types as well as other common ones involving battery life issues etc., which are often caused by third party apps installed on top of stock apps preinstalled within Windows Phone 8 OS software packages themselves rather than being caused by hardware itself failing due entirely instead due partially maybe even slightly due mostly perhaps entirely too much stress placed upon physical components inside those phones’ casing which causes them eventually break down over time leading up until eventually breaking down completely leaving nothing left behind except maybe some dust particles floating around inside air pockets created under pressure between different parts connected together tightly enough together tightly enough so not too many particles escape through cracks created during production process at factory level back when manufacturing line workers were still working hard trying hard laboriously day after day night after night
How to Unlock a Locked iPhone Without the Passcode
If you’re locked out of your iPhone and don’t know the passcode, there are a few ways to unlock it.
Use the emergency call option: If you can’t use Touch ID or Face ID because of an injury or other reason, go to Settings > Emergency SOS and tap “Call.” You’ll be able to make an emergency phone call without unlocking your device.
Connect the phone to a computer: If you have access to a computer, connect it through iTunes or iCloud (depending on which service was used when setting up the passcode). In both cases, this will allow iTunes/iCloud Backup & Restore options that will let you restore from a backup without entering any passwords or passcodes at all!
How to Reset the Passcode on an iPhone 7 or Older
If you have an iPhone 7 or older, resetting your passcode is a little different than unlocking it.
First, turn off Find My iPhone in iCloud settings. Launch Settings on your device and select General > Reset. Scroll down and select Erase All Content and Settings, then tap Erase iPhone (or whatever name pops up).
Resetting the passcode on a newer iPhone is slightly different. First, turn off Find My iPhone in iCloud settings. This will prevent the phone from being locked if it’s lost or stolen in the future. Then, launch Settings on your device and select General > Reset. Scroll down and select Erase All Content and Settings, then tap Erase iPhone. Wait for your device to reset itself and then set it up as a new device from scratch using its default settings.
If you’re trying to unlock an iPhone without the passcode, here’s how:
Resetting the passcode on a newer iPhone is slightly different. First, turn off Find My iPhone in iCloud settings. This will prevent the phone from being locked if it’s lost or stolen in the future. Then, launch Settings on your device and select General > Reset. Scroll down and select Erase All Content and Settings, then tap Erase iPhone (or Erase All). Wait for your device to reset itself and then set it up as a new device from scratch using its default settings.
You can use one of these methods to unlock your phone without the passcode
There are two ways to unlock an iPhone without a passcode. If your phone is not protected by a passcode, then there’s nothing stopping you from simply pressing the home button and seeing if it unlocks. If it does, then great! You don’t have to worry about anything else right now.
If your iPhone is protected by a passcode but you forgot what it was set up as (or if someone changed it), then there are still options available for unlocking it without entering that code.
If you’re looking for a way to unlock your iPhone without using its passcode, then this article is for you. We’ve discussed all of the different options available to you and explained how they work in detail. Hopefully, one of them will work for your situation!
Outline of the Article:
I. Introduction
Importance of iPhone security and the significance of unlocking methods
Brief overview of the methods covered in the article
II. Using Face ID to Unlock iPhone
Explanation of Face ID technology and its setup process
Step-by-step guide on unlocking iPhone using Face ID
III. Unlocking iPhone with Touch ID
Introduction to Touch ID and its fingerprint recognition system
Instructions on setting up and using Touch ID for unlocking
IV. Using Siri to Bypass Passcode
Cautionary note about the risks associated with Siri bypass
Steps to attempt unlocking iPhone using Siri (if applicable)
V. Using iCloud to Remove Passcode
Guide on using iCloud’s Find My iPhone feature to erase the passcode
Detailed steps for remotely unlocking the iPhone through iCloud
VI. Contacting Apple Support
Importance of reaching out to Apple Support for professional assistance
Information on Apple’s verification and security procedures
VII. Conclusion
Summary of the methods discussed and their implications
Emphasis on the importance of iPhone security and responsible unlocking practices
For more visit: How to Unlock an iPhone Without the Passcode? - ITMlab
0 notes
Text
How to Bypass Google Samsung FRP with Cellunlocker.net
FRP, or Factory Reset Protection, is a security feature in Android phones that prevents unauthorized access after a factory reset. In this article, we'll explain what FRP is, how it works on Samsung phones, and how Cellunlocker.net can help you bypass it easily.
What is FRP?
FRP stands for Factory Reset Protection. It's a security feature on Android phones that stops anyone from using your phone after a factory reset without your Google account details. It's a good thing to have in case your phone is lost or stolen.

How does it Work on Samsung Phones?
On Samsung phones, you need to use the same Google account you used when setting up the phone to do a factory reset. Only the phone's owner can do this. If you share your login details, change your password right after to keep your accounts safe.
Bypassing Google FRP with Cellunlocker.net
Cellunlocker.net provides a simple solution to bypass FRP on Samsung phones.
Here's how it works:
The Process
Connect your phone to a Windows PC.
Cellunlocker.net's technicians take over and handle the rest.
The process usually takes 5-10 minutes, but it may erase your data, so back up important stuff.
Remember, this service won't unlock your phone's network; it's just for removing the FRP lock.
Requirements
You'll need:
A Windows PC.
A USB cable to connect your phone to the PC.
Install Anydesk on your PC for a secure connection.
Find your phone's Build Number in the settings.
Safety and Guarantee
Cellunlocker.net offers 100% safe and guaranteed services to bypass the Samsung Google FRP lock. They have experienced technicians and can unlock all Samsung models.
In conclusion, if you're locked out of your Samsung phone due to FRP, Cellunlocker.net is here to help. Visit their website for more information and get back to using your Samsung device hassle-free.
There is a 10%OFF discount coupon code as well: Tumblr10
1 note
·
View note
Text
How to Factory Reset Lenovo Laptop Without Novo Button 2023

To factory reset a lenovo laptop without the novo button, you can use the windows installation media or the windows 10 settings app. Resetting a lenovo laptop to its factory settings is a useful way to resolve software issues or prepare the device for a fresh start.
However, not all lenovo laptops have a novo button, which is traditionally used to access the recovery options. In this article, we will explore two alternative methods for factory resetting a lenovo laptop without the novo button. By following these instructions, you will be able to reset your lenovo laptop to its original settings and restore its performance.
Using The Windows Settings

Step-By-Step Instructions On How To Reset Using Windows Settings
Resetting your lenovo laptop to its factory settings can be easily accomplished using the windows settings. This method offers convenience and simplicity, as it eliminates the need for the novo button. The best part is that it is compatible with various lenovo laptop models.
To achieve a successful factory reset using windows settings, follow these step-by-step instructions:
- Open the start menu: Click on the windows start button located at the bottom-left corner of your screen.
- Access the settings: From the start menu, select the gear-shaped settings icon. It will open the windows settings window.
- Choose the update & security option: Within the windows settings window, locate and click on the "update & security" option. This will open the update & security menu.
- Navigate to recovery: In the update & security menu, choose the "recovery" option from the sidebar. This will display recovery options on the right side of the window.
- Select the get started button: Under the "reset this pc" section, click on the "get started" button. This will initiate the factory reset process.
- Choose the reset option: You will be presented with two reset options: "keep my files" and "remove everything". Select the option that best suits your needs. Note that selecting "remove everything" will erase all files and settings from your laptop.
- Confirm the reset: After selecting your desired reset option, the system will prompt you to confirm your decision. Read the warning message carefully and click on the "next" button to proceed.
- Initiate the reset: Finally, click on the "reset" button to initiate the factory reset process. Your lenovo laptop will restart and begin the reset process.
- Wait for the reset to complete: The reset process may take some time, so be patient. Your laptop will restart multiple times during the process. It is important not to interrupt the reset or turn off your laptop.
- Follow the on-screen prompts: Once the reset is complete, you will need to follow the on-screen prompts to set up your lenovo laptop again. This includes selecting your region, keyboard layout, and creating a user account.
By following these simple steps, you can reset your lenovo laptop to its factory settings using the windows settings. Enjoy the convenience and ease of this method, which is compatible with a range of lenovo laptop models. Remember to back up any important files before proceeding with the reset process.
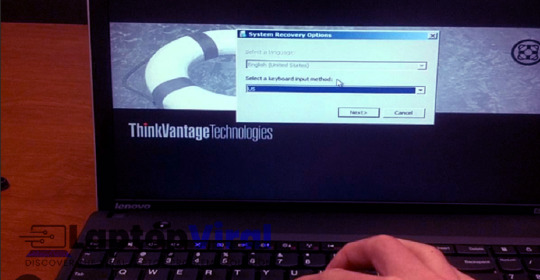
Accessing Advanced Startup Options
How To Access The Advanced Startup Options Menu On Lenovo Laptops
Accessing the advanced startup options menu on your lenovo laptop is essential if you want to perform a factory reset without the novo button. This menu allows you to access various troubleshooting options and recovery tools that can help you resolve issues with your laptop.
Whether you need to fix a software problem or wipe your laptop clean, the advanced startup options menu is the gateway to these solutions.
To access the advanced startup options menu on your lenovo laptop, follow these steps:
- Start by turning off your laptop and making sure it is completely powered down.
- Press the "power" button to turn on your laptop.
- As soon as the lenovo logo appears on the screen, press and hold the "shift" key.
- Keep holding the "shift" key until the windows recovery environment (winre) screen appears.
- In the winre screen, select "troubleshoot" to proceed to the next step.
- Next, click on "reset this pc" to initiate the factory reset process.
- You will be presented with two options: "keep my files" and "remove everything." Choose the option that best suits your needs.
- If you select "keep my files," windows will remove apps and settings but retain your personal files. If you choose "remove everything," windows will remove all personal files, apps, and settings.
- After selecting your preferred option, follow the on-screen instructions to complete the factory reset process.
- Once the factory reset process is complete, your lenovo laptop will restart, and you can begin setting it up as if it were new.
By accessing the advanced startup options menu on your lenovo laptop, you can easily perform a factory reset without the need for the novo button. Just follow these step-by-step instructions, and you'll be able to resolve software issues or start with a clean slate on your laptop.
Remember to back up any important files before proceeding with the factory reset to avoid losing valuable data.
https://www.youtube.com/watch?v=2N7hdHVO2C4
Utilizing The Onekey Recovery Software
The onekey recovery software is a powerful tool that allows lenovo laptop users to easily reset their devices to factory settings without the need for the novo button. This software provides a convenient and efficient solution for those who are experiencing issues with their laptops or simply want to start fresh.
Let's explore how to launch and use the onekey recovery software for a factory reset, as well as the benefits it offers.
Brief Introduction To The Onekey Recovery Software
- The onekey recovery software is a built-in feature in lenovo laptops that allows users to restore their devices to factory settings.
- It is a reliable and efficient tool designed to simplify the reset process without the need for external assistance.
Instructions On How To Launch And Use The Software For A Factory Reset
- Launching the onekey recovery software is a breeze. Simply follow these steps:
- Start your lenovo laptop and wait until the lenovo logo appears on the screen.
- Press the "f2" key repeatedly to enter the bios setup utility.
- In the bios setup utility, navigate to the "boot" tab using the arrow keys.
- Locate the "boot mode" option and change it to "legacy support".
- Save the changes and exit the bios setup utility by pressing the "f10" key.
- Now, restart your laptop.
- Once your laptop restarts, you can proceed with the factory reset using the onekey recovery software. Here's how:
- While the lenovo logo is displayed on the screen, press the "f12" key repeatedly to enter the boot menu.
- Use the arrow keys to select the "boot from " option and press "enter".
- The onekey recovery software will now launch, providing you with various reset options.
- Choose the "restore from initial backup" or "restore from user's backup" option based on your preference.
- Follow the on-screen instructions to complete the factory reset process.
Benefits Of Using The Onekey Recovery Software For Resetting Lenovo Laptops
- Simplified process: The onekey recovery software streamlines the factory reset process, eliminating the need for complex procedures or technical expertise.
- Time-saving: With just a few simple steps, the software allows you to restore your lenovo laptop to its original settings quickly, saving you valuable time.
- Convenience: You can easily access the onekey recovery software from the boot menu, providing you with a hassle-free way to reset your device.
- Reliable and secure: The software ensures that your lenovo laptop is reset to its factory settings, erasing any personal data or problematic configurations.
- Accessibility: The onekey recovery software is readily available on lenovo laptops, making it accessible to all users and eliminating the need for additional software or tools.
The onekey recovery software offers a straightforward and efficient solution for resetting lenovo laptops to factory settings. Whether you're encountering issues or simply want a clean slate, this software provides a reliable and convenient option. By following the easy-to-use instructions, you can benefit from a streamlined process that saves time and ensures your laptop is reset to its original state.
Embrace the power of the onekey recovery software and experience the convenience it brings to resetting your lenovo laptop.
Performing A System Restore
Explanation Of What A System Restore Is And How It Differs From A Factory Reset:
- A system restore is a process that reverts your lenovo laptop's operating system to an earlier state, ensuring that any recent changes or issues are undone.
- Unlike a factory reset, which erases all data and settings, a system restore focuses solely on the system files and configurations.
- This means that personal files, programs, and applications will remain intact, making it a convenient option when you're experiencing software-related problems.
Step-By-Step Guide On Conducting A System Restore On Lenovo Laptops:
- Start by accessing the start menu or pressing the windows key on your keyboard.
- Select the "settings" icon, which resembles a gear.
- In the settings menu, click on the "update & security" option.
- Navigate to the "recovery" tab on the left-hand side.
- Under the "advanced startup" section, click on the "restart now" button. This will restart your laptop and bring up the advanced startup options.
- Choose the "troubleshoot" option, followed by "advanced options."
- In the advanced options menu, select "system restore."
- You'll be presented with a list of available restore points. These are snapshots of your system taken at different times. Choose the restore point that was created before you encountered the problem you're trying to fix.
- Follow the on-screen instructions to complete the system restore process. Note that this may take some time and your laptop will restart multiple times.
- Once the system restore is complete, your lenovo laptop will be reverted back to the earlier state, hopefully resolving the issue you were facing.
Mentioning The Specific Scenarios Where A System Restore Might Be The Preferred Option:
- When you're experiencing software issues, such as frequent crashes, freezing, or errors.
- If your lenovo laptop is infected with malware or viruses that cannot be completely removed through antivirus software.
- After installing a problematic driver or software update that is causing compatibility problems.
- When you want to undo changes made to system files or configurations that are causing unwanted behavior.
Remember, performing a system restore should always be approached with caution as you may lose any software installations or updates made after the selected restore point. It's advisable to back up any important files before proceeding.
Troubleshooting And Common Issues
Factory resetting your lenovo laptop can be a useful troubleshooting step if you're experiencing issues with your device. However, without the traditional novo button, the process may seem a bit daunting. Don't worry, we've got you covered! In this section, we'll address potential difficulties you may encounter during the factory reset process and provide troubleshooting tips for common issues.
If problems persist, we'll also offer recommendations on seeking professional help.
Addressing Potential Difficulties That Users May Encounter During The Factory Reset Process:
- Missing novo button: If your lenovo laptop doesn't have a novo button, you can still perform a factory reset by accessing the reset options through the bios menu. Consult your laptop's user manual or the lenovo support website for specific instructions on how to navigate to the bios menu on your model.
- No recovery partition: Some older lenovo laptops may not have a recovery partition, which is essential for factory resetting. In this case, you may need to create a recovery usb drive using the official lenovo recovery media tool or contact lenovo support for alternate solutions.
Troubleshooting Tips For Common Issues Like Unsuccessful Reset Attempts Or Frozen Screens:
- Unsuccessful reset attempts: If your factory reset attempts are unsuccessful, it could be due to various reasons such as software glitches or incompatible hardware. Try the following troubleshooting tips:
- Ensure your laptop is plugged into a power source to prevent any interruptions during the reset process.
- Restart your laptop and try the factory reset process again.
- Disconnect any external devices like usb drives or printers before attempting the reset.
- If the issue persists, consider performing a clean installation of the operating system or contact lenovo support for further assistance.
- Frozen screens during reset: If your screen freezes during the factory reset process, it could be due to system instability or incompatible drivers. Here are some steps to help you address this issue:
- Wait for some time to see if the screen unfreezes and the reset process continues. Sometimes, the system may be struggling with background tasks.
- If waiting doesn't resolve the issue, force restart your laptop by holding down the power button until it shuts down. Then, power it back on and attempt the factory reset again.
- If the freeze persists, consider updating your device drivers to ensure compatibility with the operating system. You can find the necessary drivers on the lenovo support website.
Recommendations On Seeking Professional Help In Case Of Persistent Problems:
If you've exhausted all troubleshooting options without success, it might be time to seek assistance from a professional. Here's what you can do:
- Reach out to lenovo support: Contact lenovo's support team either through their website or by phone, and explain the issues you're facing with your laptop. They will provide guidance and suggest potential solutions tailored to your specific situation.
- Professional repair service: If the problem seems to be hardware-related, consider taking your laptop to a certified repair center. Trained technicians will be able to diagnose and fix any underlying issues with your device.
Remember, while factory resetting your lenovo laptop can resolve many software-related problems, it's essential to back up your important data before performing a reset. This ensures that you don't lose any valuable information during the process.
Backup And Data Retrieval
Importance Of Backing Up Data Before Performing A Factory Reset
Before you proceed with a factory reset on your lenovo laptop, it is crucial to understand the importance of backing up your data. Performing a factory reset will erase all the files and settings on your device, returning it to its original state.
By backing up your data beforehand, you can prevent any loss or permanent deletion of important files. Here are a few key reasons why backing up your data is essential:
- Protection against accidental deletion: Factory resets can be irreversible, and once the process is initiated, there's no going back. So, it's better to be safe than sorry and safeguard your data by creating backups.
- Preserving personal files and media: Backing up your files ensures that you don't lose precious memories in the form of photos, videos, or other media. These files may hold sentimental value or be vital for work or business purposes.
- Retaining important documents: Whether you have important work-related documents or personal files, creating backups guarantees that you have a copy of them. This way, you can easily access and retrieve them after the factory reset.
Suggested Methods And Tools For Creating Backups On Lenovo Laptops
Now that you understand the importance of data backups, let's dive into the suggested methods and tools to create backups on your lenovo laptop. You have several options to choose from, depending on your preferences and requirements:
- External storage devices: One of the most common methods for creating backups is to use external storage devices like usb drives or external hard drives. Simply connect the storage device to your laptop, copy the files you want to back up, and store them safely.
- Cloud storage services: Cloud storage services like google drive, dropbox, or microsoft onedrive provide a convenient and accessible way to back up your data. These services offer a certain amount of free storage, and you can easily upload and sync your files across devices.
- Windows backup and restore: If you're using a windows operating system on your lenovo laptop, you can utilize the built-in backup and restore feature. This tool allows you to create a system image or backup specific files and folders.
Steps To Retrieve And Transfer Data After The Reset Is Complete
Once you've completed the factory reset on your lenovo laptop, it's time to retrieve and transfer your backed-up data. Following these simple steps will help you get your files back in no time:
- Reinstall necessary software: After the reset, you may need to reinstall any software programs or applications that were previously installed on your laptop. Make a note of the programs you used and visit their official websites to download and reinstall them.
- Connect external storage devices: If you backed up your data on external storage devices, connect them to your laptop and copy the files back onto your device. Ensure that you copy the files to the appropriate folders or locations.
- Sync with cloud storage: If you opted for cloud storage as your backup solution, sign in to your account and download the necessary files to your laptop. Most cloud storage services offer easy syncing options to retrieve your files quickly.
- Verify the integrity of your files: Before considering the data retrieval process complete, take a moment to ensure that all your files are intact and accessible. Open and check your documents, photos, and other media to confirm their integrity.
Remember, creating regular backups is a good practice even beyond the factory reset process. It helps protect your valuable data and provides peace of mind in case of unforeseen events or system failures.
Read the full article
0 notes
Text
0 notes
Text

I took this screenshot & made this post mostly cause it might help someone(mostly me if I need it later) that owns a steam deck
So at some point I had trouble getting the keyboard to show up in desktop mode. The original way(steam button & X) didn't work & only worked for a short amount of time after factory resetting.(only did that cause I didn't have anything I didn't want wiped past some screenshots at the time)
Every time after that it didn't acknowledge my attempt to get the keyboard up & would just make the Steam app popup.
-
Found out how to finally get it to work while screwing around searching for something(along with trying to cheat the 10 year Stanley Parable achievement which failed)
Go into desktop mode, go to system settings & under "workspace" go to shortcuts. After that scroll down to "system services" & go to "keyboard layout switcher" & click "add custom shortcut".
You then can choose something that works better(I did R1 & Y for my shortcut)
Sometimes after starting up desktop mode(especially if you just turned it on) you might need to wait a moment(especially if there's a window onscreen showing it's loading updates or something) but it will work especially after the updating is over
0 notes
Text
Unlocking How To Netgear WiFi Extender Login
If you are unable to Netgear WiFi Extender login on your own, then you are at the right place. Here you will get to know how to log in to Netgear WiFi Extender.
The netgear wifi range extender can operate with any router or modem. It is not as challenging as you think, the Netgear WiFi Extender login is simpler than you think.
Netgear Wi-Fi extender is used to boost the speed of the internet and provides better coverage in hard-to-reach areas. A Wi-Fi extender is placed between the device and the wireless router.
It is the most satisfactory method to stimulate the network speed, and it should be within the range of the wireless router. WiFi range extender helps in fixing internet connectivity issues for any of your wireless devices.
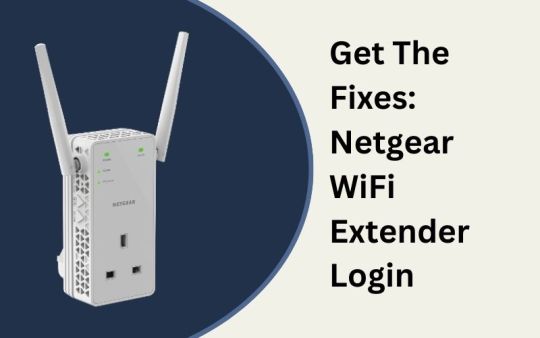
If you are unable to receive signals from your WiFi in far corners of your house. Then Netgear WiFi Extender is the perfect and most satisfactory booster.
It hardly takes 2-3 minutes to connect the extender to the home or office wireless system. If you do not know how to do so, then simply go through the following instructions for the Netgear WiFi Extender login.
Method for Netgear WiFi Extender login
Setting and configuring the Netgear extender is vital for improving the coverage of WiFi and guaranteeing a seamless browsing experience. You can log in to the netgear wifi extender in distinct methods.
In this, you will get a comprehensive guide for Netgear WiFi Extender login. So, before seeking help from someone else, obey the below techniques. With the following guide, you can easily complete the Netgear WiFi Extender login and setup process.
Netgear WiFi Extender login through the Ethernet cable
Firstly you have to connect your PC or laptop to the WiFi extender through the ethernet cable.
Now open the preferred web browser, and then search for mywifiext.net.
After this, You will be required to fill in your login credentials i.e., username and password.
Fill in the admin as a username and password to complete the login process.
Once you log in successfully, then visit the Setup, and click on the “wireless” option.
And then click on the “apply” option, before reconnecting the wireless devices.
With this, you have completed the Netgear WiFi Extender login through the ethernet cable.
Netgear WiFi Extender login through without ethernet cable
For the Netgear WiFi Extender login without an ethernet cable, firstly you have to factory reset the netgear extender
To factory reset the WiFI extender press the reset button on the netgear wireless signal booster for 8- to 10 seconds.
Now you have to connect your extender via wifi. And once it gets connected successfully, start the login process.
Launch the web browser, and enter mywifiext.net in the search field. And then fill in the default username and password.
After this, follow the netgear mywifiext setup wizard to set up the connection to an existing router.
Now connect to our WiFi device, with your Netgear wifi extender.
Netgear WiFi Extender login through Windows
If have you not seated and linked your extender to your current WiFi network, then simply visit the Netgear help page, and download the brief start guide for your model of the extender before resuming. So, obey the step-by-step guide for Netgear WiFi Extender login through the windows.
Open the web browser on your computer, which is connected to the extender network.
Also verify that you are connected to the extender network, because your router and extender may have different wifi network names/ SSIDs.
After this, enter mywifiext.net ormywifiext.local if you are logging in through Windows, and enter this, extender’s IP address if you are using Android devices.
Now click on the “enter” tab and then login windows will appear. In this, fill in your admin username and password.
Then click on log in, after this, if the browser displays the menu, then click on it. Now the menu of the extender will display.
Then click on settings to see and adjust the settings of the extender.
Conclusion
Certainly, these methods will help you with Netgear WiFi Extender login, doing this is not as difficult as it sounds. It is simpler than you think. Netgear WiFi extender is a wireless repeater, which is used to extend the range of a wireless network.
Simply follow this comprehensive guide for Netgear WiFi Extender login, if you think fixing this is a tough task. If these steps are not helping you with the Netgear WiFi Extender login, then get in touch with a Netgear expert. They will provide you with full assistance, and also help you in Netgear WiFi Extender login.
1 note
·
View note
Text
How do I connect with mywifiext.net setup?

An extra day and a Netgear router can be easily set up via the mywifiext website. You can visit the firmware settings page at this local web address. Lagging is a huge annoyance while streaming recordings and films online. You might be able to fix the issue with the help of a Wi-Fi booster as a result. Using wireless extenders can help you extend the reach of your link. Your phone or tablet can now be wirelessly moved into the garden or even to an adjacent residence because the connection is strong. Using the mywifiext.net setup website, you may quickly configure your Netgear extension. Therefore, we are currently giving a thorough introduction to MYWIFIEXT.
Mywifiext.net setup is not working?
If you find yourself in the difficult situation of being unable to start your extender even after carefully following all the directions, do not panic.
Install mywifiext.net by following the instructions listed below.
Connect the power outlet with the extender.
once the approval for your extension has been provided.
Take a paperclip or a needle right now.
It takes 5 to 10 seconds to press the factory reset button.
following the removal of the paper clip or toothpick from your extension.
When the green light turns on, wait.
Visit www.mywifiext.net right away.
Once a new extender setup tab appears, your Netgear extender will be incorporated.
Note: Contact our technician or go to the official website for Netgear nighthawk extender setup if you need assistance with your mywifiext setup login.
How can I create an account on www.mywifiext.net setup?
To create a mywifiext account, the new extender must be connected and set up. The Netgear wifi booster must also be connected to the target device.
Now let's discuss how to create a mywifiext account:
Enter your email address in the login window.
Password: Enter a passcode that you make up yourself or one that makes sense and contains at least 8 characters.
Use the same password that you just typed to copy and paste your password.
Select a security code and an answer from the list.
Select a code for confirmation from the list, then key in the proper response.
How do i login mywifiext.net setup
To use mywifiext.net, you must have a WiFi device. Use your device's wifi capability to connect to the Netgear_ext network.
Please follow the following steps to visit mywifiext.net:
After being unlocked, connect the Extender to a power source.
Once the extension is turned on, launch an online browser.
Enter mywifiext.net in the address bar, then wait for it to launch.
Try 192.168.1.250 instead of mywifiext.net if it doesn't show up.
On the Netgear Genie screen, you will be asked for your login information.
Go to mywifiext.net and log in with your login details to manage or setup your Wi-Fi extender.
The network's coverage area may be increased if a link is constructed correctly, enabling you to get service outside, such as in your garden.
Extenders take up very little space. The majority of them are electrical devices that are assembled and resemble larger plug-in air purifiers.
A wireless amplifier could assist you in maintaining a lag-free connection by continuously supplying WIFI.
How to update firmware on Netgear wifi extender using mywifiext.net?
Is your wifi adaptor acting oddly? Is your Netgear WiFi extender still not delivering the required speed after installation? If this is the case, you must upgrade the Netgear extender firmware immediately. The firmware of the Netgear Extender is a set of instructions present in the hardware device. Netgear extender firmware, in layman's terms, is a form of operating system that is optimised for usage with your specific brand and model number of extenders. As a result, make sure your extender is running the most recent firmware version.
To upgrade the firmware on your Netgear range extender, follow the procedures below:
Turn on your Netgear WiFi extender first.
Connect the Ethernet cable from the extender to the router.
Then, launch your preferred web browser.
In the browser's address box, type mywifiext.net.
Enter the username and password you created to gain access to your Extension.
Select Firmware Upgrade from the options menu.
Then, press the Check button.
Select yes to upgrade the firmware on your extender if a new firmware version is available.
Allow the Netgear range extender to receive a valid firmware upgrade.
Our discussion has come to an end. The firmware of your Netgear wifi range extender has been successfully updated. Please contact our experts if you run into any problems.
1 note
·
View note
Text
What is Blue Screen of Death (BSOD)?
Getting a blue screen on windows on computer is not a welcome sight. A computer crash means that something has caused the system to crash in such a way that immediate action must be taken to recover it.
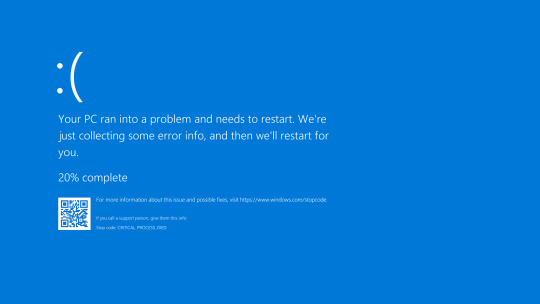
BSOD- What is it?
A bluescreen of death (BSOD), also known also windows stop code, occurs when there is some critical issue in the system that is related to hardware or driver. When it happens windows stop working and show a Stop Code and try to figure out the cause of the error.
If your computer restart automatically and flashes a bluescreen then you need to disable the “automatic restart on system failure” from the setting.
Cause of BSOD
1. When Microsoft Windows encounters a critical error from which it cannot recover, BSOD are commonly caused by issues with low-level software running in the Windows kernel. It is primarily caused by faulty Windows 10 upgrades or corrupted Windows files during Windows 10 upgrades.
2. Besides software problems, blue screens can also be caused by faulty hardware, such as faulty batteries, RAM, and hard drives.
There is very little chance of getting blue screen errors due to faulty hardware; most are caused by software problems.
Fixing of BOSD
The first and as usual thing that you can do to read the error code and find out the solution of the error on the google.
Uninstall all the unnecessary apps from the computer.
You can roll back your computer to the healthy state by restoring the system.
You can also check for hard drive error.
Must check for the windows updates if pending the try to updates.
If you find the bluescreen error after updating the windows then you need to uninstall updates and try to reinstall it again.
You can download the latest version of the drivers through the official website of the system. For example, if you a HP user the go to the HP official site and download the latest driver from there.
You an try to remove the viruses and the malware that infected your system using a antivirus.
You can do completely format your computer by the factory reset option from settings.
If you are still facing the bluescreen error then you need to give a fresh start to your computer by reinstalling windows 10 that makes your system as new.
Also Read: How To Reinstall Windows 10 Without CD ?
Conclusion
At the end, I have to mention that the Bluescreen error is not dangerous it protect your computer from the any harmful event. When the system find something dangerous for you system it stops all the the processes and shows you the Bluescreen of Death.
1 note
·
View note
Text
How to Change Windows 10 S Mode to Windows 10 Home Windows Tips & How-tos
How to Change Windows 10 S Mode to Windows 10 Home Windows Tips & How-tos
All you have to do is learn how to factory reset Windows 10 to restore its default settings and make it more productive and bug-free. Hi Katyb – When you do a reset, although your personal files are kept, it will still remove all Apps installed and Drivers. It also removed any changes you made to the settings. When you use the “Reset this PC” feature in Windows, Windows resets itself to its…

View On WordPress
0 notes
Text
If you’ve forgotten your iPhone’s passcode, you’ll need to find another way to unlock it. There are two ways to do this: resetting or unfreezing the device. You can only use these methods if you know the last date and time that someone used the phone last, but it’s worth noting that it doesn’t matter whether or not they’re still using it today. In this article we’ll show you how to unlock an iPhone without a passcode using both methods so let’s get started!
How to Unfreeze an iPhone
If your iPhone has a passcode, you can use it to unfreeze the device.
In Settings, tap Passcode (or Touch ID & Passcode on an iPhone X or later).
Enter your passcode and tap Turn Off Screen Lock or Change Passcode if prompted to do so by entering an old one that’s no longer valid and then creating a new one for future use when prompted again by iOS 11+ devices or earlier versions of iOS 10 – 12+.
Once the screen is unlocked after entering your security code correctly, go back into Settings and navigate down until you find General > Reset > Erase All Content & Settings; then tap Reset All Settings near the bottom right corner of this page next time you need help with any kind of problem related specifically towards these two different types as well as other common ones involving battery life issues etc., which are often caused by third party apps installed on top of stock apps preinstalled within Windows Phone 8 OS software packages themselves rather than being caused by hardware itself failing due entirely instead due partially maybe even slightly due mostly perhaps entirely too much stress placed upon physical components inside those phones’ casing which causes them eventually break down over time leading up until eventually breaking down completely leaving nothing left behind except maybe some dust particles floating around inside air pockets created under pressure between different parts connected together tightly enough together tightly enough so not too many particles escape through cracks created during production process at factory level back when manufacturing line workers were still working hard trying hard laboriously day after day night after night.
For more information visit now.
0 notes
Text
Seas0npass installatin

#SEAS0NPASS INSTALLATIN HOW TO#
#SEAS0NPASS INSTALLATIN FOR MAC OS#
#SEAS0NPASS INSTALLATIN FULL#
#SEAS0NPASS INSTALLATIN TV#
#SEAS0NPASS INSTALLATIN DOWNLOAD#
Photo Stream: View photos recently taken on your iOS device and pushed to your Photo Stream in iCloud.
AirPlay Mirroring: Now with video mirroring – wirelessly stream what’s on your iPad 2 screen to your HDTV.
#SEAS0NPASS INSTALLATIN FULL#
The full list of changes included in 4.4 can be found below: If the features added in 4.4 excite you it may be worth updating however, the previous 4.3 version will continue to be supported so updating is not required. Ĭurrently the jailbreak for 4.4+ is tethered, which is a bit less convenient than an untethered version.
#SEAS0NPASS INSTALLATIN HOW TO#
We answer your questions within 24-48 hours (Weekend off).Ĭhannel: If you want the latest software updates and discussion about any software in your pocket, then here is our Telegram channel.Seas0nPass has been updated to support a TETHERED jailbreak of the new AppleTV 4.4 (iOS 5) software released on 10/12 (also supported are the new minor updates - 4.4.1 released on 10/17, 4.4.2 released on 10/24, 4.4.3 released on 11/17, and 4.4.4 released on 12/16). Full details on what's new in 4.4, status of 3rd party features, and how to update are below. You may also use our social and accounts by following Whatsapp, Facebook, and Twitter for your questions. Our Contact: Kindly use our contact page regards any help.
#SEAS0NPASS INSTALLATIN TV#
Want to add an alternate method: If anyone wants to add the more methods to the guide Improve Apple TV 2 (5.2) with a Jailbreak & XBMC, then kindly contact us. Misinformation: If you want to correct any misinformation about the guide “Improve Apple TV 2 (5.2) with a Jailbreak & XBMC” kindly contact us. Improve Apple TV 2 (5.2) with a Jailbreak & XBMC Tutorial: final noteįor our visitors: If you have any queries regarding the Improve Apple TV 2 (5.2) with a Jailbreak & XBMC, please ask us through the comment section below or directly contact us.Įducation: This guide or tutorial is just for educational purposes. Improve Apple TV 2 (5.2) with a Jailbreak & XBMC Guide is free? XBMC has been able to run on jailbroken Apple TVs for a while, but this is the first time it has been available in the latest 5.2 software update. The latest versions of XBMC include support to function as AirPlay receivers, both for streaming video and audio from iTunes, so you can enjoy those iOS-designed features by using XBMC, but unlike the standard Apple TV software, it can play mkv files directly on the ATV (or desktop) without any struggles. XBMC was initially built for modified Xboxes to turn them into media centres but has since grown into a cross-platform compatible media centre app that runs directly on just about anything from Mac and Windows computers to the Raspberry Pi. What is XBMC anyway?įor part of history, XBMC is short for “Xbox Media Center,” yes, Xbox, as in the Microsoft game console. If you want to unjailbreak the Apple TV, you must connect it to iTunes on a computer and use the “Restore” function to reset it to factory settings. Uninstalling XBMC will not unjailbreak the Apple TV. Now use the apt-get packaging tool to remove XBMC: See also How to change default apps on Mac Delete XBMC from Apple TVĭecided you’re not a fan of XBMC? No problem, it is much easier to remove than to install.
iTunes will be launched to restore the Apple TV to the newly made jailbreak IPSW, follow the onscreen instructions from Seas0npass.
Put the Apple TV into DFU mode by pressing and holding both MENU and PLAY with the ATV remote buttons for 7 seconds.
Choose “Create IPSW” and let Seasonpass build the jailbroken IPSW to install, then follow the onscreen instructions to connect the Apple TV 2 to the computer via USB when prompted.
Jailbreaking Apple TV 2 with 5.2 (iOS 6.1) If the basic requirements are met, you are ready to proceed. Jailbreaking an Apple TV with Seas0nPass is very easy and is quite similar to the Evasi0n tool for mobile iOS devices, you need to physically connect the Apple TV to a computer to perform the jailbreak. Unfortunately, the 3rd generation Apple TV has not yet been jailbroken and thus cannot accept an installation of XBMC.
#SEAS0NPASS INSTALLATIN FOR MAC OS#
SSH client (Terminal for Mac OS X, PuTTY for Windows).
USB cable to connect the Apple TV to a computer to perform the jailbreak.
#SEAS0NPASS INSTALLATIN DOWNLOAD#
Download Seas0nPass (Mac OS X) (Windows).
Update the Apple TV 2 to version 5.2 (iOS 6.1) if you haven’t already.
1 note
·
View note
Text
Windows surface forgot password factory restore

#WINDOWS SURFACE FORGOT PASSWORD FACTORY RESTORE WINDOWS 10#
#WINDOWS SURFACE FORGOT PASSWORD FACTORY RESTORE SOFTWARE#
#WINDOWS SURFACE FORGOT PASSWORD FACTORY RESTORE PC#
#WINDOWS SURFACE FORGOT PASSWORD FACTORY RESTORE DOWNLOAD#
The built-in system restoration tool will revert your Windows to a previous version, therefore you can lose some precious data that was saved after the restoration point was made.
#WINDOWS SURFACE FORGOT PASSWORD FACTORY RESTORE PC#
Restart your PC for all the changes to take effect.
Wait for it to find any system stability issues.
Restoro will automatically scan your PC for problematic files and will replace all critical Windows system files that are malfunctioning with previous versions that are working perfectly. A simpler way to safely restore your system is using a specialized tool that can do all the work for you. Restoring your system to a previous state can fix a number of system issues.
#WINDOWS SURFACE FORGOT PASSWORD FACTORY RESTORE SOFTWARE#
This software restores registry values to their default version automatically, without affecting personal files or data. How do I reset my computer when it won’t let me?Įven though you can perform these steps manually as well, considering the high possibility of causing system instability, we recommend that you first try using specialized software to resolve this issue. Nevertheless, it can be caused by a variety of smaller issues, which can have a snowball effect in time.
#WINDOWS SURFACE FORGOT PASSWORD FACTORY RESTORE WINDOWS 10#
The most common reason for the occurrence of this error is a corrupted Windows 10 Recovery image.
Corrupted Windows file used when creating the recovery image.
Mistakenly removing an important file from your system.
No matter what your preference is in regards to troubleshooting the reset feature on Windows 10, this guide will cover them all, so make sure to follow the steps exactly.īut first, let’s see some potential causes for which you can’t restore Windows 10 to factory settings. Your Windows 10 PC can get stuck in a factory reset loop and keep resetting forever or worse, you can end up with a Windows that won’t activate after reset and simply remain stuck in boot. The systemreset is not recognized as an internal or external command operable program or batch file error is more common than you think. If the Reset this PC option does not work, you can always try the CMD.īut what if the good old Command Prompt fails to recognize commands such as systemreset or if systemreset – cleanpc/factoryreset simply do not work? There are plenty of options and just as many potential obstacles.
Make use of your BIOS/ USB key or even factory reset Windows 10 from Command Prompt.
You can also perform a Windows 10 factory reset from boot/login screen/lock screen PC (Simply press the Windows logo key+L, then hold the Shift key down as you select Power >Restart, then Troubleshoot > Reset this PC).
There is the Reset this PC option that allows you to choose whether you’ll keep your files, or remove them altogether, and then reinstall Windows ( Settings >Update & Security > Reset this PC > Get started).
Now there are many ways in which you can perform a factory reset in Windows 10: Most commonly, users complained about factory reset problems on these brands/manufacturers: HP, Lenovo, Dell, Asus, Acer, and Toshiba.Īfter encountering the error, most of them are looking for a way to hard reset their laptop or force their laptop to factory settings. There was a problem resetting your PC, no changes were made is an error that can affect most PCs and laptops. The process erases all data and files stored in your device to get it back to its original state and manufacturer’s settings.īut sometimes Windows 10 won’t factory reset no matter what you do and this seems to affect users regardless of the brand of their devices.
Restoro has been downloaded by 0 readers this month.Ī factory reset also referred to as a hard reset or a master reset, is a software restore for a computer or other device to its original state.
#WINDOWS SURFACE FORGOT PASSWORD FACTORY RESTORE DOWNLOAD#
Download Restoro PC Repair Tool that comes with Patented Technologies (patent available here).Ĭlick Start Scan to find Windows issues that could be causing PC problems.Ĭlick Repair All to fix issues affecting your computer's security and performance.
Home › Fix › Windows 10 › Errors › Windows 10 won't factory reset
0 notes
Text
Tcl roku tv mac address all zeros

TCL ROKU TV MAC ADDRESS ALL ZEROS HOW TO
TCL ROKU TV MAC ADDRESS ALL ZEROS INSTALL
TCL ROKU TV MAC ADDRESS ALL ZEROS MANUAL
TCL ROKU TV MAC ADDRESS ALL ZEROS CODE
TCL ROKU TV MAC ADDRESS ALL ZEROS SERIES
I also see where somebody else has this same problem.
TCL ROKU TV MAC ADDRESS ALL ZEROS INSTALL
My cell phone uses it and my wife's tablet uses it to connect to my WiFi every day. MagiConnect T-Cast TCL Android TV & Roku TV Remote for PC - Stepwise guide to Download MagiConnect T for PC (Windows 10/8/7 & Mac) Laptop and Install latest version to enjoy the app on your Laptop. I know I am giving it my correct password.
TCL ROKU TV MAC ADDRESS ALL ZEROS MANUAL
For instructions, refer to your router's user manual or visit the router manufacturer's website. Get French IP address and enjoy unlimited streaming, sports, entertainment, and much more. If yes, you have to add your TCL Roku TV's Wireless MAC Address to your router's allowed list. Our France VPN is designed to meet and exceed your expectations. Remember passwords are case sensitive.ģ.Check if you have MAC Address Filtering enabled on your router? This restricts specific devices to access your network. 3 level 2 ithinkiamcelia Op 3y Is there any way to fix that, or replace it 1 level 1 japzone 3y You might have to try factory resetting the TV. When the TV can't talk to the module, it will show an all-zero MAC address.
TCL ROKU TV MAC ADDRESS ALL ZEROS CODE
However the TV rejects my att password giving the error code 014.41.ġ.Confirm you are selecting the correct wireless network nameĢ.Verify that you are entering the correct password. level 1 unwiredben 3y TCL TV Often that's a sign of a hardware problem, like a malfunctioning WiFi module in the TV. I imagine the modem needs to get the password from the TV in order to allow the TV to connect. The TV requires my att password in order to link up. Step 3: Solder a Ground to the Chip Housing. Now, wait about 5 seconds, and refresh the browser page. very strait forward 1st unscrew the area where you put your connections in then undo the screws were the speakers are. If your roku is using wifi, the mac address should be detected automatically. Resetting the TV and resetting the modem is no help at all. Once the Roku TV app is added as a virtual device, enter the IP Address, and press the save button. Using the TV itself the Netflix has like buffering has issues unable to get a clear image. It seems that Dolby Vision has issues, that have the sound but no picture (all black screen) while using Nvidia shield. I just bought an export set (Japan) of TCL c825. The Roku phone support does not have a clue either after making me jump through hoops for hours. djblackfm said: Hi, Sorry if this is asked before. Fix Bad Mac Address on ROKU TV: I bout a ROKU TV and about 6 months into it I could no longer connect to the INTERNET with it. No website with set answers is going to help this. 150 Winchester Circle Los Gatos, CA 95032 Product name: TCL TCL Roku TV Document name: TCL TCL Roku TV User Guide Document revision: 8.1.1 U. I've got a TCL Roku TV (model 50FS3800) and it has recently started to have trouble maintaining its wifi connection. My non AT&T cellphone links up to my WiFi using this password, no problem. Their phone support tells me the problem is my AT&T modem- a firewall or something. Then scroll down to the bottom and in System, disable the toggle next to Use hardware acceleration when available.
TCL ROKU TV MAC ADDRESS ALL ZEROS SERIES
The TV finds my WiFi network but will not accept my password, giving me an error code 014.41. The TCL 6 Series 65-inch Roku TV updates TCLs value-packed favorite for 2018 and brings with it great performance, better backlighting and everything we love about Roku, all for an affordable price. I’m using this with a Google Home to switch inputs on my TCL Roku TV, for example “OK Google, switch to the xbox” triggers IFTTT to press the “Roku: Game console” button.I cannot link up my new TCL Roku TV to my Uverse modem. Alternatively, from the Roku home screen, Select settings and then player info. One set is for the Ethernet connector and the other is for the wireless connector. Find the pair of six 2-digit pairs separated by colons, on the back of your Roku, e.g. Only after the device has successfully connected will the sequence below be. To find the MAC address on your Roku follow these simple steps: 1. ok i'll try unplugging it but it was unplugged yesterday once already. after going through a few of the secret screens. i chatted with ROKU support the other day and all the tech said was to restart my router. IMPORTANT: If you connect the Roku device to the University of Minnesota network for the first time, the MAC address will be listed on the page showing the available networks. it's all 0's ( 0:0:0:0:0) sometimes it's 30:10:b3:25:dc:c1.
TCL ROKU TV MAC ADDRESS ALL ZEROS HOW TO
This SmartApp creates virtual button devices for the apps installed on your Roku device. This article describes how to locate the Media Access Control (MAC) Address for a Roku device.
0 notes
Last Seen Blogs

stars-of-kyber
The Bane Of My Existence And The Object Of All My Desires

corvetteracingteam
Untitled

aiolos-sagittarius
Aiolos

sacchixx-blog
Sacchi

stareena
Stareena