#gbfhbdfbghgthjdfbh
Text
GIF TUTORIAL
i’m finally getting around to giving the people what they want!! i hit 2.5k like 3 weeks ago and asked you guys what you would like me to do in honour of that...the resounding answer was ‘gif tutorial’ !!!!
so!! in true dnp fashion i’m merely here to give the people what they want and the people have demanded a gif tutorial, so here it is!
we’ll be learning to how to create this gif right here!

please keep in mind that this is how i make gifs!! everyone does things slightly differently and what i say and do may not match up with other people or your own personal style and that’s okay! editing is all about creative freedoms and you may use this as a basic starter so that you can branch into your own thing or you might really like how i do things and use the same methods. point is, it’s perfectly okay either way!!
right so!! let’s get the basic bullshit out of the way! i use ps cs6 but it’s basically all the same, so this should work perfectly fine no matter what ps you use.
1. we’re firstly going to choose our video to gif. for this tutorial, i’ve chosen pinof 10! pick a moment you like and get the timestamps from when the moment starts and finishes. i usually get a second before and a second after to make sure i’ve got it all!!


2. we’re now going to copy the url of the video and go to clip converter. clip converter basically is going to give us an mp4 version of our little timestamps so that we can put them into photoshop and make gifs from them! paste the url of the vid into clip converter and press enter once. once you’ve done that follow my settings and press start
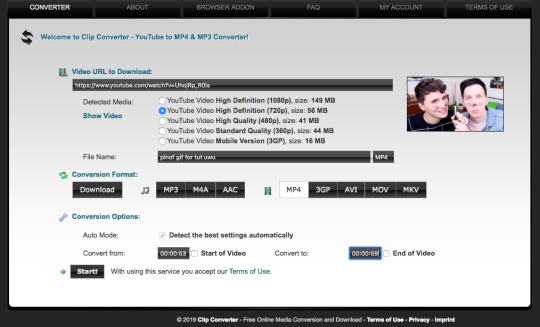
(of course you can name it whatever you want and put whatever timestamps you want in!!)
once it’s done converting, it’ll give you a download of your mp4 clip, which you’ll click!
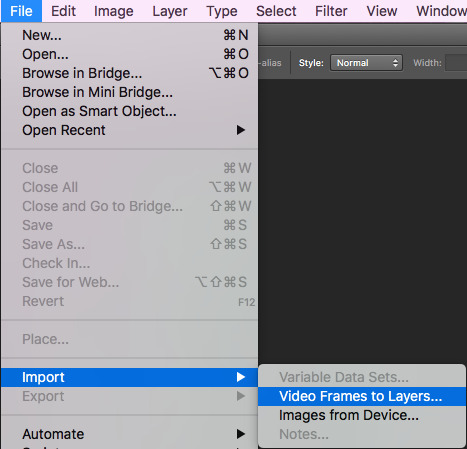
3. now open your photoshop. go to file, import, video frames to layers, like shown and select your video
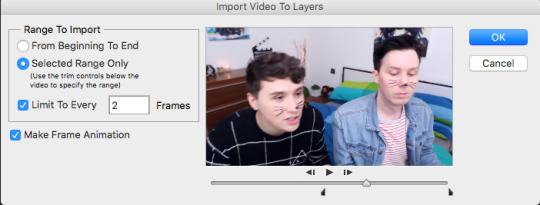
once you’ve done that, put these settings in and trim the clip to your liking (the little black place holder things trim the clip!)
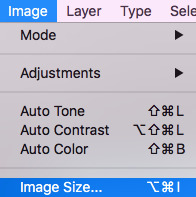
4. okay so!! we now have our gif imported and open on photoshop! we have to make it much smaller because right now it’s like...huge (that’s what she said hehehe)
simply click on image at the top of your computer and press ‘image size’, like shown
then make your settings like shown

5. so that’s done!! now, we have to change the pace of our gif to be a bit slower. i make my gifs real slow apparently but,,,,,personal preference man. click on the first frame of your gif and then scroll to the end of the frames of your gif. hold the shift button and click the last frame. this will select all your frames. press the little arrow thingy near the time of the frames. this will allow you to change the pace of your gif. press other and change the timing of the gif to whatever you want! i make my gifs like 0.07 normally but for this gif, i made it 0.09 because they’re moving so fast and it was giving me whiplash. anything under 0.1 is great!!
6. cropping time! you don’t have to crop your gif if you’d like, but mine is a little big for me, so i’m going to and show you how to do that! so basically press the cropping tool and put in the measurements you’d like, as i’ve done.


7. now we’re ready to convert our gif to the timeline method! select all your frames again, like before, as well as your layers. selecting your layers is the same as selecting your frames, so nothing new there, don’t worry! once everything is selected, press this lil guy.

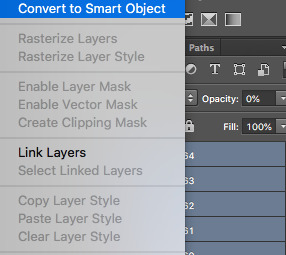
once our gif is in the timeline method, right click your layers that should all be selected and turn them into a smart object, as shown!
8. righty-o! we’ve done all the boring, dumb shit! time to use an action to make our gif look a little nicer and sharper! i really can’t be assed showing you how to use an action in here because i suck and this is long as fuck as it is but!! i am nice enough to link you to a basic tutorial on how to use actions and how to download them! you can find that here! right so, i use a certain action on all my gifs and then edit it slightly, which i’ll show you! you can find a download for the action i use here !!!
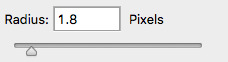
i play that action and now my gif looks much nicer! however, it’s not quite the way i like it, so i push the gaussian blur layer to the bottom and i adjust the strength of it to this!
9. i lied. now we’re up to the fun part!! colouring!! colouring is my best friend and i love her dearly!! technically you could stop now and save your gif and be done but....that’s boring as fuck!
right so, colouring really, truly is your own preference, loves. you can do whatever you like, you do NOT have to follow what i put here. this is simply the colouring i chose for this gif. i do literally whatever i feel like every time i make a gif, so it’s forever changing!
i gave a bit of thought to what kind of colouring i’d do in this tutorial. did i want to do something extra basic and like...no colour changing? did i want to do something wildly vibrant? and then i decided not to do either of those things! so today, i’m going to teach you how to create a soft, almost pastel blue/purple colouring for the ap room *cough* set *cough*!!
firstly, here is the adjustment panel where all the tools you need for colouring reside !!

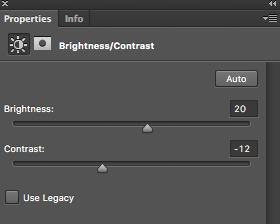
we’re firstly going to start with the boring crap,,,,,so i lied again....oops. firstly, we’re going to adjust the brightness, the levels and the curves. here are my setting for each, if you’d like to copy them!


here’s how the gif looks without all our colour layers!

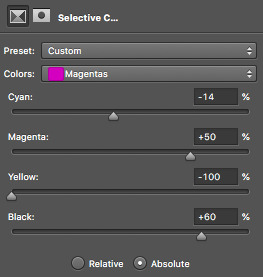
10. and now all that crap is done, i promise it’s actually the fun stuff!! selective colour is where all the magic happens! i sometimes do two, three or even four selective colour layers, depending on just how heavy the colour changing is going to be in my gifs, as well as using hue/saturation, colour balance and gradient maps!!
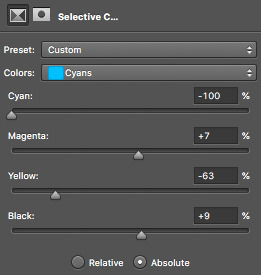
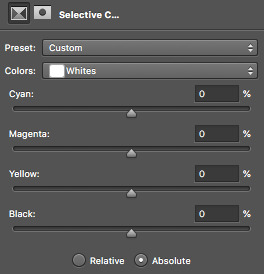
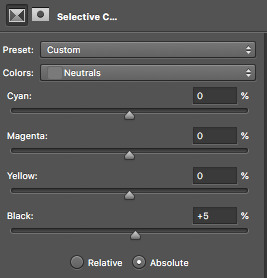
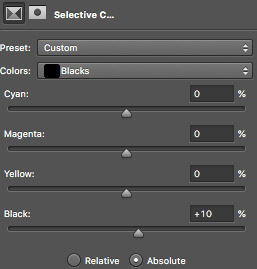
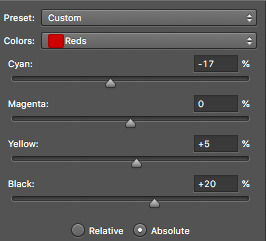
firstly, we’ll start off with our first selective colour layer! here are my settings for it (sorry for all the pics rip)


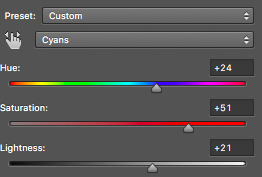
once you’ve got all those sorted, onto a hue/saturation layer! this basically drastically changes the colours, if you’d like it to but it’s not quite as accurate or smooth as a selective colour layer, so i only really use it for small things or if the colour i’d like can be acchieved nicely with it. i didn’t change anything in the master setting, but here are my settings for the things i did change!

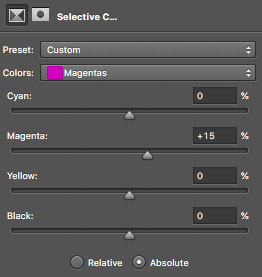
aaaaaaaand now we do another selective colour layer! i’ll just show you the layers i did change...everything else, leave as is!!
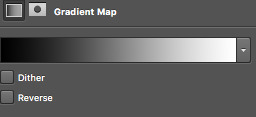
11. next is a few gradient maps and a layer of vibrance!! i promise, we’re almost done!! i add a bunch of probably unnecessary bullshit to my gifs but i like how it looks with all the extra stuff so!!! yeah!! make your first gradient map black and white, as shown and set the opacity to 10%
next step is to create a vibrance layer! when making a bright, colourful gif, i use about two or three vibrancy layers. i never EVER adjust the saturation, only the vibrancy. adjusting the saturation makes everything too heavy and it just looks kinda icky to me. the first layer, i normaly adjust the vibrancy to 100% and the rest being between like 20-50%, depending. i just thought i’d tell you guys because that’s vital if you’re making bright gifs!
we however are not, so i only adjusted the vibrancy to +14%, leaving the saturation alone....nasty saturation !!!
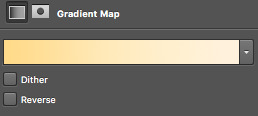
aaaaaaaaaaaaand finally, we are up to our last adjustment layer!! it is yet another gradient map oops. this gradient map is a light golden colour and i downloaded it in a pack somewhere ages ago. i do not remember where and i know that photoshop’s default gradient maps don’t have something like it so if you’d like, you can definitely just skip this last layer!! it’s not vital, i just think it gives the gif a nice touch!
for reference, the gradient map looks like this and i set it to 6% opacity!
12. that’s it!! the gif is complete! go to file, save for web and press on that! you might have to wait a little bit for it to load...photoshop is a really shit program sometimes, guys. once it loads you’ll see all these confusing settings. simply copy what i have here!

this is also the moment i realise my gif is over 3mb and go to fucking smack my head against a desk. tumblr basically has a thing against gif makers and will NOT allow gifs over 3mb to play once posted. this can be fixed though! i’ll show you how to shorten a gif right now because well...if you followed this tutorial, you’re stuck in the same boat as me and need to know how to fix it!!
so basically save your gif as is right now! now, we’re going to open the gif we just saved into photoshop. go to file, open and select your gif. it’ll open as a frame animation which is perfect! now, delete whatever frames from the start and end that you think you can live without. never delete frames from the middle because that’ll just disrupt the gif altogether. the less frames, the better!!
i got my gif down to 40 frames by deleting the first 15 frames of the gif and the last like 6 or so. now go back to ‘save for web’ and save this shorter gif as a whole new gif! this should be under 3mb. if it is not, go cancel the save and delete some more frames!
once that’s done....you’re done!!! congratulations!! you’ve made your very first gif, my dear!!!! here’s the finished labour of your hard work!!
i hope i wasn’t too confusing and i hope you now have a sound understanding of how to make a gif! if you’d like me to make another tutorial on something specific related to gifmaking or even to do with edits and edit-making, just send me an ask and i’ll see what i can do for you! happy giffing, loves!!
#i spent my entire day on this holy fuck#making tutorials takes fucking TIME !!!#but i've finally done it and i hope you guys get something out of it!!#i love you all !!#thank you for 2.5k <3#photoshop#yeahps#gifs#gifmaking#gif tutorial#completeresources#itsphotoshop#i have no idea how to tag this can u tell??#my gifs#my tutorials#hi im posting this now because there are people#gbfhbdfbghgthjdfbh
125 notes
·
View notes
Last Seen Blogs
tarianlloyd-blog
übermensch
mylifesbeentakenover
Lil.

trademaxauction
Untitled

supremetrashking
Bruh
folklorecostumes
Reputation Costumes