#edited to add dsn!
Text
The Thai Communal Wardrobe item #21
Don't Say No ep 4:

Love in the Air ep 12:

Ghost Host Ghost House ep 6:

Bed Friend ep 7:

for @blmpff 💙
#don't say no the series#don't say no#love in the air#love in the air the series#ghost host ghost house#ghgh#bed friend#bed friend the series#the thai communal wardrobe#a bl advent#there's a reason all these characters are looking so sad#AND IT'S BECAUSE OF WHAT THEY'RE WEARING#this one was always going to be yours mags#don't say no was a year and three months before lita#then lita and ghgh aired SIX DAYS apart#and then bed friend was five months later#edited to add dsn!
62 notes
·
View notes
Text
https://drive.google.com/drive/folders/1y7XRvCu5sN-MQet1hHZAHlig1baY8zvV?usp=sharing
7 days until the DSN Special Episode!
You know what that means?
It means I finish and post a PhunNoh cut for Reminders. 😅
An established relationship where the drama doesn't come from cheating or even fear of cheating. 😲 I can enjoy irrational fear of cheating sometimes, but this was such a nice break. TRUST. I love me some trust.
And Noh playing peanut gallery, and Phun being so nice and gentle, and both of them guiding the kids... There's lots I like.
Of course the plot beats are painfully forced amongst other problems, but this is about the good.
I did add a transition during that one music lesson; I presume they were supposed to in editing in the first place but forgot because it makes NO SENSE as an uncut scene.
It's softsub. I tried to clear up the subtitles a bit since they were... not great. But as previously stated: I do not know Thai.
PhunNoh youtube link
I also moved the PeteKao Kiss Supercut to that folder, so old links won't work. I did upload it to Youtube, but it was blocked worldwide so I deleted it again.
Question: do people think I shouldn't alter the subtitles: that it's disrespectful of the official translators?
Separately: Feel free to suggest other pairings I might want to make cuts for. I'm not promising anything, but ideas would be nice.
Warnings:
- I won't do pairings I dislike/don't care about at all (ask in case, just warning ahead of time),
- I won't do ones I can already find a cut for, and
- They won't be done on a schedule.
3 notes
·
View notes
Text
Dbeaver Mysql Client

DBeaver Overview
DBeaver is a free, open source multiplatform database management tool and SQL client for developers and database administrators. DBeaver can be used to access any database or cloud application that has an ODBC or JDBC driver, such as Oracle, SQL Server, MySQl, Salesforce, or MailChimp. Devart DBeaver provides you with the most important features you'd need when working with a database in a GUI tool, such as:
SQL queries execution
Metadata browsing and editing
SQL scripts management
Data export/import
Data backup
DDL generation
ER diagrams rendering
Test data generation
BLOB/CLOB support
Database objects browsing
Scrollable resultsets
The tool comes in two editions — Community and Enterprise. Enterprise Edition supports NoSQL databases, such as MongoDB or Cassandra, persistent query manager database, SSH tunneling, vector graphics (SVG) and a few other enterprise-level features. Note though that you can access a MongoDB database from DBeaver Community Edition using the respective Devart ODBC driver. For the purposes of this guide, we'll use the Community Edition of DBeaver to retrieve data from Oracle via the Open Database Connectivity driver.
Creating an ODBC Data Source to Use Oracle Data in DBeaver
Click the Start menu and select Control Panel.
Select Administrative Tools, then click ODBC Data Sources.
Click on the System DSN tab if you want to set up a DSN name for all users of the system or select User DSN to configure DSN only for your account.
Click the Add button and double-click Devart ODBC Driver for Oracle in the list.
Give a name to your data source and set up the connection parameters.
Click the Test Connection button to verify that you have properly configured the DSN.
When using ODBC driver for Oracle with DBeaver, SQL_WVARCHAR data types may be displayed incorrectly in DBeaver. To prevent this, you need to set the string data types to Ansi either in the Advanced Settings tab of the driver configuration dialog or directly in the connection string (String Types=Ansi) — all string types will be returned as SQL_CHAR, SQL_VARCHAR and SQL_LONGVARCHAR.
Connecting to Oracle Data from DBeaver via ODBC Driver for Oracle
Follow the steps below to establish a connection to Oracle in DBeaver.
DBeaver SQL Client for OpenEdge. Progress does not have a SQL Client like Microsoft has SQL Server Management Studio or MySQL has Workbench. DBeaver is an excellent SQL Client for OpenEdge using JDBC. This article discusses how to configure DBeaver to connect to OpenEdge using JDBC and execute SQL statements. Install DBeaver. DBeaver is a free, universal SQL client that can connect to numerous types of databases—one of which is MySQL. I want to show you how to install and use DBeaver to connect to your remote MySQL server. First copy mysql.exe and mysqldump.exe into the dbeaver folder. Or you change the Local Client the location in the c0onnection wizard. Improve this answer. Follow edited Sep 7 '20 at 16:54. Answered Sep 7 '20 at 16:36. 19.1k 4 4 gold badges 19 19 silver badges 34 34 bronze badges.
In the Database menu, select New Database Connection.
In the Connect to database wizard, select ODBC and click Next.
Enter the previously configured DSN in the Database/Schema field.
Click Test Connection. If everything goes well, you'll see the Success message.
This article shows how to connect to MySQL data with wizards in DBeaver and browse data in the DBeaver GUI. Create a JDBC Data Source for MySQL Data. Follow the steps below to load the driver JAR in DBeaver. Open the DBeaver application and, in the Databases menu, select the Driver Manager option. Click New to open the Create New Driver form.
Serge-rider commented on Feb 28, 2017 Some MySQL UI clients may have builtin mysqldump, mysqlrestore, mysql.exe + set of libraries of some particular MySQL client version. But DBeaver definitely not one of such clients. On Windows you can install MySQL Workbench (it includes all command line tools).
Viewing Oracle Database Objects and Querying Data
Dbeaver Mysql Client_plugin_auth Is Required
You can expand out the database structure in DBeaver's Database Navigator to visualize all the tables in Oracle database. To view and edit the data in a table, you need to right-click on the target table name and select View data.The content of the table will be displayed in the main workspace.

Dbeaver Mysql Native Client
If you want to write a custom SQL query that will include only the necessary columns from the table, you can select New SQL Editor in the SQL Editor main menu. Create your query and run it by clicking Execute SQL Statement to view the results in the same window.
Dbeaver Mysql Client Download
© 2015-2021 Devart. All Rights Reserved.Request SupportODBC ForumProvide Feedback
0 notes
Text
How to Connect MS-Access with Oracle Database
You can configure heterogeneous service to allow an oracle database to connect with Microsoft Access database from about any platform Linux or Windows.
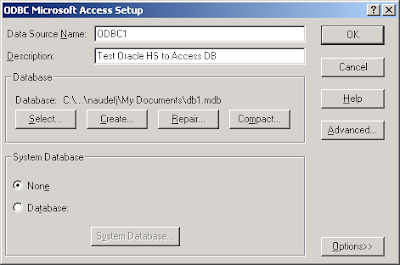
ODBC stands for Open database connectivity is an interface written in C program. Oracle ODBC driver provides a standard interface that allows one application to access many different data sources.Differentiate between ODBC and Net8?ODBC is a database independent where as NET8 is database dependent.ODBC is used to connect to any database that is supported by SQL where as Net8 is an oracle protocol, is used to connect only oracle database. ODBC uses drivers for connecting to different database where as NET8 uses network listener for connecting to oracle database.What are requirement to work on ODBC?– A client software such as SQL*Net or Net8 on the client machine. However a third party solution OCI driver already includes within the driver thus no need oracle Net installation.– A TCP/IP connection is required.How to attached oracle table in MS-Access?– Start the linking process by either selecting File–>Get External data–>Link Table or right click on within the table list and select link table.– Select ODBC from the drop down list.– Then from Machine data source tab select the appropriate data source name and click OK. This will open a login dialog box.– Once we login successfully onto oracle, a list of table displayed.– Now you are able to use this table in the MS-Access. Prepare MS-Access Environment:Create a database in MS-Access and create at least one table in this database. While creating the database ensure *.mdb file is used to save the Access database. For Example: you can see in the below picture a table named ‘shahid’ is created under the database db1.

Define ODBC Connectivity:Open the utility Microsoft ODBC Administrator and click on ‘Add’ button to add a new data source by providing description, service name and user ID & password. Generally if you expand the Start->Programs->ORACLE-HOME->Configuration and Migration tools path, you will find this utility. Finally test your connection before moving to next step.
Prepare the Oracle Environment:Configure the Oracle Listener on the Windows machine. Add the following entry in LISTENER.ORA and TNSNAME.ORA (SID_LIST = (SID_DESC = (SID_NAME = hsodbc) (ORACLE_HOME = D:Oracleora92) (PROGRAM = hsodbc) ))ACCESS_DB.WORLD = (DESCRIPTION = (ADDRESS = (PROTOCOL = TCP)(HOST = DBSERVER) (PORT = 1521) ) (CONNECT_DATA = (SID = hsodbc) ) (HS=OK) )Ensure to check the tnsping for new entry and if needed you can start/stop listener from the command line:C:>tnsping access_db
C:>lsnrctl stop
C:>lsnrctl startConfigure Oracle HS: Edit the ORACLE_HOMEhsadmininithsodbc.orafile and add your ODBC System DSN Name.HS_FDS_CONNECT_INFO = odbc1 HS_FDS_TRACE_LEVEL = offConnect Oracle with Sys user and execute this script.SQL>@D:oracleRDBMSADMINcaths.sqlSQL> select * from SYS.HS_FDS_CLASS;FDS_CLASS_NAME FDS_CLASS_COMMENTS FDS_CLASS_ID------------- ------------------ -------------BITE Built-In Test Environment 1Create a database link to access from Oracle databaseSQL> CREATE DATABASE LINK access_db USING ‘access_db.world’; Database link created.The tables in the MS-Access database can now be accessed from the Oracle environment.SQL> SELECT * FROM shahid_table@access_db; ENO ENAME SALARY ADDRESS ---------- ------------ -------- --------------------- 1 shahid 6000 Riyadh 2 xyz 5000 Delhi 3 pwz 4000 Banglore 4 bwz 3000 MumbaiSQL> CREATE TABLE my_oracle_tab AS SELECT * FROM Shahid_table@access_db;Table created.
0 notes
Text
PHP Multilanguage Class (PHPMLC)
New Post has been published on https://intramate.com/php-scripts/php-multilanguage-class-phpmlc/
PHP Multilanguage Class (PHPMLC)
LIVE PREVIEWGet it now for only $14
PHP Multilanguage Class (PHPMLC) is a PHP class to add multilanguage feature to the projects/websites.
It comes with advanced administation panel to manage translations.
When the class initialized, it tries to automatically select browser language.
It is possible to switch prefered language anytime with the class methods.
The class uses MYSQL database to store translation data.
The session is also used to remember the last selected language even if the $_GET parameter is not specified.
All translated strings can be returned as an array. It is also possible to get translated string for specific key with the getTranslatedString() class method.
The class has caching feature so the need to query database on every request is eliminated.
Admin Panel Features
All pages are password protected
Admin can edit access credentials
Admin can manage languages
Admin can manage translations
Admin can manage panel languages
Admin can manage panel translations
Public Methods of the Class
setConnectionDetails()
getLastErrorMessage()
createTables()
getTranslatedStringsForCurrentLanguage()
getTranslatedString()
getTranslationKeys()
getLanguages()
getLanguageIds()
getLanguageDetailsByLanguageId()
setUseCache()
setTablePrefix()
getTablePrefix()
getCurrentLanguageId()
getCurrentLanguageCode()
getDefaultLanguageId()
getDefaultLanguageCode()
getUseCache()
setCurrentLanguage()
setCurrentLanguageById()
autoSelectCurrentLanguage()
clearCache()
All public methods are commented.
Demo
You can access online demo with the following links:
Sample Usage – Translation of “Welcome” message
Admin Panel
Please use following credentials to login admin panel:
username: admin
password: password
Please note that no changes are allowed in the demo mode.
Documentation
PHP Multilanguage Class (PHPMLC) comes with full documentation.
From the installation to the usage you will feel like home.
Online documentation is also available.
Class Requirements
PHP 5.2 and above
MySQL 5.0 and above
In today’s technology, any modern web hosting company can provide you these requirements.
Change Log
v1.0.0
first release.
v1.1.0
add: dsn’s charset value.
add: connection’s MYSQL_ATTR_INIT_COMMAND attribute value.
updated documentation.
v1.5.0
add: when the new language is added, the translations of the default language are copied to the newly added language.
add: caching support with setUseCache() method. (Please check example.php for its usage.)
performance update: updating translations is now faster.
several bug fixes.
v1.5.1
bug fix: change in translation can’t be saved if the input field’s onchange event doesn’t occur.
v1.5.2
several bug fixes.
v1.5.3
bug fix: usage of undefined variable. (Thanks to József Nagy)
Support
If you have a bug report or an improvement idea, feel free to comment about it.
I will try my best to provide you a good support.
I would also appreciate if you have time to review or rate the class too!
Thanks!
LIVE PREVIEWGet it now for only $14
0 notes
Link
Cpwebhosting control panel
Cpwebhosting.net provides, Control Panel which has following Features
Monitor and change disk usage
Review site statistics
Manage e-mail accounts, autoresponders, forwards, mailing lists, etc.
Install, uninstall and manage FrontPage Server Extensions.
Manage SSL secure communications.
Add pre-installed scripts.
Change account passwords.
Set Custom Error Pages.
Monitor bandwidth
Access billing information
Set the home page for your sites.
Create/edit/delete ODBC DSNs for Microsoft Access, SQL Server 2000, MySQL and Excel.
Create Microsoft SQL Server databases and MySQL databases..
Enable/Disable PHP, Perl, ASP and .NET scripting.
Create/edit/delete new FTP users
Maintain access to FTP directories.
Create/Rename/Delete new folders and upload files to those folders using http.
Edit/Rename/Delete files on the server.
Create/Rename/Delete MIME Type
Enable/Disable permissions for users to change their own passwords under your domain.
Allow/Disallow directory browsing for your web sites.
Enable/Disable 'Read', 'Write', 'Execute' or 'Script' permissions for your websites.
Enable/Disable anonymous web access to your websites.
0 notes
Text
New Post has been published on João Clérigo - Photography
New Post has been published on http://fotografia.clerigo.pt/how-to-install-freetds-unixodbc-on-centos-7-with-php-5-6-to-access-sql-server-databases/
How to Install FreeTDS + UnixODBC on CentOS 7 with PHP 5.6 to access SQL Server Databases
Predetermined requisites: That you have at least Apache and PHP installed.
First, update your machine OS, like this:
yum -y update
Next, check if you have the right repo for PHP enabled in /etc/yum.repos.d/remi.repo
It should look like this:
[remi-php56] name=Remi's PHP 5.6 RPM repository for Enterprise Linux 7 - $basearch #baseurl=http://rpms.remirepo.net/enterprise/7/php56/$basearch/ mirrorlist=http://rpms.remirepo.net/enterprise/7/php56/mirror # NOTICE: common dependencies are in "remi-safe" enabled=1 gpgcheck=1 gpgkey=file:///etc/pki/rpm-gpg/RPM-GPG-KEY-remi
Next install these required packages:
yum -y install php-odbc php-pdo unixODBC unixODBC-devel
FreeTDS is an open source implementation of the TDS (Tabular Data Stream) protocol used by SQL Server, and allows unix / linux hosts to connect to these databases.
CentOS does not have a package ready for the installation of FreeTDS, but in the EPEL repository (Extra Packages for Enterprise Linux) there is a ready-to-use package. Configure CentOS to use the EPEL repository and install FreeTDS.
yum install epel-release yum check-update yum install freetds freetds-devel
The next steps are very important. We need to configure FreeTDS. The FreeTDS configuration file is located at /etc/freetds.conf. Edit this file, and add following, changing the parameter for your needs:
[nome_banco_sqlserver] host = server_IP port = server_port tds version = 7.4
One very important parameter is the “tds version” you have to match it to you SQL Server version, or you won’t be able to connect. You can check in this table the right one for you.
If everything went OK, you are now able to test your connection. But before anything else, lets try and communicate only with telnet:
telnet server_IP server_PORT
If you have an error like:
telnet: connect to address server_IP: Connection timed out
Something is wrong, the server IP is incorrect or the port. You must check this out until you have a connection like:
Trying server_IP… Connected to server_IP. Escape character is '^]'.
You can exit now by typing “quit”.
Now you can test if the connection to SQL Server, via FreeTDS, is working properly. For this you can use the FreeTDS tsql utility, like this:
tsql -H server_IP -L -p server_PORT -U sql_USERNAME -P sql_PASSWORD
You should get a result, with a list of the SQL Instances. If the connection was not successful, you will have to look for a solution before continuing to the next step. If you were not able to complete the last step, it’s no use to go ahead: try to see the documentation of FreeTDS, because you need it to connect to the database correctly because UnixODBC will have to use it.
Then, if you are here, happy days, you’re almost done. So far you have already have FreeTDS installed, configured and accessing the SQL Server.
Now it’s time to set up UnixODBC.
You have to edit the /etc/odbcinst.ini file and add the following content to the bottom of the file:
[ODBC] Trace = No TraceFile = /tmp/sql.log ForceTrace = No [FreeTDS] Driver = /usr/lib64/libtdsodbc.so.0 FileUsage = 1
In the above we are instructing that UnixODBC should use the FreeTDS driver (/usr/lib64/libtdsodbc.so.0) for it’s connections. If we want, to debug problematic connections, we can enable the trace file by changing from No to Yes (in production systems, leave as No).
Now we have to create or edit the /etc/odbc.ini file and leave it with the following content:
# Data Source Name (DSN) para o MS SQL-Server: [alias] Description = Conexão ao SQL Server 2008 R2 Driver = FreeTDS Trace = No Server = server_IP Database = SQLSERVER_database_name Port = server_PORT
Explaining the above:
alias = is an arbitrary alias, the name of the DSN. Can be anything and it will be used in connection calls to the SQL Server
Server = SQL Server IP
Database = name of the database to which you want to connect
Port = SQL Server port to receive connections
Now you can test the connections to the databases via UnixODBC, through the isix utility of UnixODBC.
Test connection to SQL Server using DSN alias, like this:
isql alias sql_USERNAME sql_PASSWORD -v
Response should look like this:
+---------------------------------------+ | Connected! | | | | sql-statement | | help [tablename] | | quit | | | +---------------------------------------+ SQL>
This is a SQL console, now you’re connected and you can run commands in the database, like this:
SQL> select count(*) from your_TABLENAME; +------------+ | | +------------+ | 2048 | +------------+ SQLRowCount returns 1 1 rows fetched SQL> quit
CentOS 7 features SELinux (Security Enhanced Linux) and it’s enabled by default and because of these security, Apache can not access network resources or databases.
To configure SELinux with the correct permissions, by releasing Apache to access network and database resources, we have to set two boolean properties in SELinux with the following commands:
setsebool -P httpd_can_network_connect on setsebool -P httpd_can_network_connect_db on
If you have SELinux disabled, this will not be needed.
Finally, using PHP, and it’s fairly simple. You can create a file “test.php” to test the connection to the SQL Server via PDO, something like this:
$server_IP = "server_IP"; $server_PORT = "server_PORT"; $server_DB = "server_DB"; $sql_USERNAME = "sql_USERNAME"; $sql_PASSWORD = "sql_PASSWORD"; $pdo = new PDO("odbc:Driver=FreeTDS; Server=$server_IP; Port=$server_PORT; Database=$server_DB; UID=$sql_USERNAME; PWD=$sql_PASSWORD;"); if (!$pdo) print '<h3>Could not connect to MS SQL Server.</h3>'; else print '<h3>Connection to MS SQL Server, via PDO, completed successfully!</h3>'; try $query = "SELECT * FROM your_TABLENAME"; $result = $pdo->prepare($a); $result->execute(); catch (PDOException $err) var_dump($err); $results = $result->fetchAll(PDO::FETCH_ASSOC); var_dump($results);
Run the file. If all went well your browser is now showing a successful connection message and a dump of the contents of one of your tables.
If you have run into any problem that you can’t solve, seek more help. Try these links:
FreeTDS User Guide
UnixODBC Documentation
Linux/Unix ODBC
0 notes
Photo
New Post has been published on https://programmingbiters.com/codeigniter-3-crudcreate-read-update-and-delete-using-jquery-ajax-bootstrap-models-and-mysql/
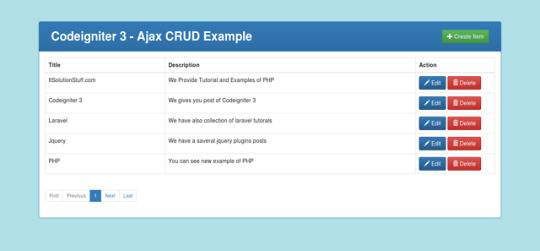
Codeigniter 3 - CRUD(Create, Read, Update and Delete) using JQuery Ajax, Bootstrap, Models and MySQL
CRUD is a basic step of any Core Language or framework. CRUD stand for Create Read Update and Delete. So in this post we will learn insert update delete in codeigniter using jquery Ajax. I gave you example from scratch so if you don’t know about Codeigniter 3 then no issue. You have to just follow simple step.There are listed bellow step you have to follow:
1)Download Fresh Codeigniter 3
2)Create Database and Configuration
3)Add Route
4)Create Controller
5)Update View
6)Create JS File
In this example i used several jquery Plugin for fire Ajax, Ajax pagination, Bootstrap, Bootstrap Validation, notification as listed bellow.
Jquery
Bootstrap
twbsPagination js
Validator JS(Bootstrap form validation example with demo using validator.js plugin)
toastr JS(Jquery notification popup box example using toastr JS plugin with demo)
After complete this c.r.u.d. application example you will be find preview as like bellow preview scheenshot:
Preview:
Step 1: Download Fresh Codeigniter 3
In First step we will download fresh version of Codeigniter 3, so if you haven’t download yet then download from here : Download Codeigniter 3.
After Download successfully, extract clean new Codeigniter 3 application.
Step 2: Create Database and Configuration
In this step we will create new database “test” and add new table “items” in test database. You can use following SQL Query for create “items” table. So let’s create using bellow sql query:
item table:
CREATE TABLE IF NOT EXISTS `items` ( `id` int(10) unsigned NOT NULL AUTO_INCREMENT, `title` varchar(255) COLLATE utf8_unicode_ci NOT NULL, `description` text COLLATE utf8_unicode_ci NOT NULL, PRIMARY KEY (`id`) ) ENGINE=InnoDB DEFAULT CHARSET=utf8 COLLATE=utf8_unicode_ci AUTO_INCREMENT=16 ;
After create database and table successfully, we have to configuration of database in our Codeigniter 3 application, so open database.php file and add your database name, username and password.
application/config/database.php
<?php defined('BASEPATH') OR exit('No direct script access allowed'); $active_group = 'default'; $query_builder = TRUE; $db['default'] = array( 'dsn' => '', 'hostname' => 'localhost', 'username' => 'root', 'password' => 'root', 'database' => 'test', 'dbdriver' => 'mysqli', 'dbprefix' => '', 'pconnect' => FALSE, 'db_debug' => (ENVIRONMENT !== 'production'), 'cache_on' => FALSE, 'cachedir' => '', 'char_set' => 'utf8', 'dbcollat' => 'utf8_general_ci', 'swap_pre' => '', 'encrypt' => FALSE, 'compress' => FALSE, 'stricton' => FALSE, 'failover' => array(), 'save_queries' => TRUE );
Step 3: Add Route
In this step you have to add some route in your route file. So first we will create route for items modules for lists, create, edit, update and delete.so put the bellow content in route file:
application/config/routes.php
<?php defined('BASEPATH') OR exit('No direct script access allowed'); $route['default_controller'] = 'welcome'; $route['404_override'] = ''; $route['translate_uri_dashes'] = FALSE; $route['items'] = "items/index"; $route['itemsCreate']['post'] = "items/store"; $route['itemsEdit/(:any)'] = "items/edit/$1"; $route['itemsUpdate/(:any)']['put'] = "items/update/$1"; $route['itemsDelete/(:any)']['delete'] = "items/delete/$1";
Step 4: Create Controller
Ok, now first we have to create one new controller api method listing, create, edit, update and delete. so create Items.php file in this path application/controllers/Items.php and put bellow code in this file:
application/controllers/Items.php
<?php defined('BASEPATH') OR exit('No direct script access allowed'); class Items extends CI_Controller /** * Get All Data from this method. * * @return Response */ public function index() $this->load->database(); if(!empty($this->input->get("search"))) $this->db->like('title', $this->input->get("search")); $this->db->or_like('description', $this->input->get("search")); $this->db->limit(5, ($this->input->get("page",1) - 1) * 5); $query = $this->db->get("items"); $data['data'] = $query->result(); $data['total'] = $this->db->count_all("items"); echo json_encode($data); /** * Store Data from this method. * * @return Response */ public function store() $this->load->database(); $insert = $this->input->post(); $this->db->insert('items', $insert); $id = $this->db->insert_id(); $q = $this->db->get_where('items', array('id' => $id)); echo json_encode($q->row()); /** * Edit Data from this method. * * @return Response */ public function edit($id) $this->load->database(); $q = $this->db->get_where('items', array('id' => $id)); echo json_encode($q->row()); /** * Update Data from this method. * * @return Response */ public function update($id) $this->load->database(); $insert = $this->input->post(); $this->db->where('id', $id); $this->db->update('items', $insert); $q = $this->db->get_where('items', array('id' => $id)); echo json_encode($insert); /** * Delete Data from this method. * * @return Response */ public function delete($id) $this->load->database(); $this->db->where('id', $id); $this->db->delete('items'); echo json_encode(['success'=>true]);
Step 5: Update View
In this step we will update view file of welcome_message.php. In this file we will write code of insert update delete and also include bootstrap, jquery, toastr and twbsPagination. So let’s update following file:
application/views/welcome_message.php
<!DOCTYPE html> <html> <head> <title>Codeigniter 3 - Ajax CRUD Example</title> <link rel="stylesheet" type="text/css" href="https://cdnjs.cloudflare.com/ajax/libs/twitter-bootstrap/4.0.0-alpha/css/bootstrap.css"> </head> <body> <div class="container"> <div class="row"> <div class="col-lg-12 margin-tb"> <div class="pull-left"> <h2>Codeigniter 3 - Ajax CRUD Example</h2> </div> <div class="pull-right"> <button type="button" class="btn btn-success" data-toggle="modal" data-target="#create-item"> Create Item</button> </div> </div> </div> <table class="table table-bordered"> <thead> <tr> <th>Title</th> <th>Description</th> <th width="200px">Action</th> </tr> </thead> <tbody> </tbody> </table> <ul id="pagination" class="pagination-sm"></ul> <!-- Create Item Modal --> <div class="modal fade" id="create-item" tabindex="-1" role="dialog" aria-labelledby="myModalLabel"> <div class="modal-dialog" role="document"> <div class="modal-content"> <div class="modal-header"> <button type="button" class="close" data-dismiss="modal" aria-label="Close"><span aria-hidden="true">×</span></button> <h4 class="modal-title" id="myModalLabel">Create Item</h4> </div> <div class="modal-body"> <form data-toggle="validator" action="items/store" method="POST"> <div class="form-group"> <label class="control-label" for="title">Title:</label> <input type="text" name="title" class="form-control" data-error="Please enter title." required /> <div class="help-block with-errors"></div> </div> <div class="form-group"> <label class="control-label" for="title">Description:</label> <textarea name="description" class="form-control" data-error="Please enter description." required></textarea> <div class="help-block with-errors"></div> </div> <div class="form-group"> <button type="submit" class="btn crud-submit btn-success">Submit</button> </div> </form> </div> </div> </div> </div> <!-- Edit Item Modal --> <div class="modal fade" id="edit-item" tabindex="-1" role="dialog" aria-labelledby="myModalLabel"> <div class="modal-dialog" role="document"> <div class="modal-content"> <div class="modal-header"> <button type="button" class="close" data-dismiss="modal" aria-label="Close"><span aria-hidden="true">×</span></button> <h4 class="modal-title" id="myModalLabel">Edit Item</h4> </div> <div class="modal-body"> <form data-toggle="validator" action="" method="put"> <div class="form-group"> <label class="control-label" for="title">Title:</label> <input type="text" name="title" class="form-control" data-error="Please enter title." required /> <div class="help-block with-errors"></div> </div> <div class="form-group"> <label class="control-label" for="title">Description:</label> <textarea name="description" class="form-control" data-error="Please enter description." required></textarea> <div class="help-block with-errors"></div> </div> <div class="form-group"> <button type="submit" class="btn btn-success crud-submit-edit">Submit</button> </div> </form> </div> </div> </div> </div> </div> <script type="text/javascript" src="https://cdnjs.cloudflare.com/ajax/libs/jquery/3.1.0/jquery.js"></script> <script type="text/javascript" src="https://cdnjs.cloudflare.com/ajax/libs/twitter-bootstrap/4.0.0-alpha/js/bootstrap.min.js"></script> <script type="text/javascript" src="https://cdnjs.cloudflare.com/ajax/libs/twbs-pagination/1.3.1/jquery.twbsPagination.min.js"></script> <script src="https://cdnjs.cloudflare.com/ajax/libs/1000hz-bootstrap-validator/0.11.5/validator.min.js"></script> <script type="text/javascript" src="http://cdnjs.cloudflare.com/ajax/libs/toastr.js/latest/js/toastr.min.js"></script> <link href="//cdnjs.cloudflare.com/ajax/libs/toastr.js/latest/css/toastr.min.css" rel="stylesheet"> <script type="text/javascript"> var url = "items"; </script> <script src="http://itsolutionstuff.com/js/item-ajax.js"></script> </body> </html>
Step 6: Create JS File
In this last step we will make new folder js on your root directory and create new file item-ajax.js on that folder. In item-ajax.js file we write all code of CRUD JS that will manage listing, insert, update, delete and pagination. So let’s create new file and put following code:
js/item-ajax.js
var page = 1; var current_page = 1; var total_page = 0; var is_ajax_fire = 0; manageData(); /* manage data list */ function manageData() $.ajax( dataType: 'json', url: url, data: page:page ).done(function(data) total_page = data.total % 5; current_page = page; $('#pagination').twbsPagination( totalPages: total_page, visiblePages: current_page, onPageClick: function (event, pageL) page = pageL; if(is_ajax_fire != 0) getPageData(); ); manageRow(data.data); is_ajax_fire = 1; ); /* Get Page Data*/ function getPageData() $.ajax( dataType: 'json', url: url, data: page:page ).done(function(data) manageRow(data.data); ); /* Add new Item table row */ function manageRow(data) var rows = ''; $.each( data, function( key, value ) rows = rows + '<tr>'; rows = rows + '<td>'+value.title+'</td>'; rows = rows + '<td>'+value.description+'</td>'; rows = rows + '<td data-id="'+value.id+'">'; rows = rows + '<button data-toggle="modal" data-target="#edit-item" class="btn btn-primary edit-item">Edit</button> '; rows = rows + '<button class="btn btn-danger remove-item">Delete</button>'; rows = rows + '</td>'; rows = rows + '</tr>'; ); $("tbody").html(rows); /* Create new Item */ $(".crud-submit").click(function(e) e.preventDefault(); var form_action = $("#create-item").find("form").attr("action"); var title = $("#create-item").find("input[name='title']").val(); var description = $("#create-item").find("textarea[name='description']").val(); $.ajax( dataType: 'json', type:'POST', url: form_action, data:title:title, description:description ).done(function(data) getPageData(); $(".modal").modal('hide'); toastr.success('Item Created Successfully.', 'Success Alert', timeOut: 5000); ); ); /* Remove Item */ $("body").on("click",".remove-item",function() var id = $(this).parent("td").data('id'); var c_obj = $(this).parents("tr"); $.ajax( dataType: 'json', type:'delete', url: url + '/' + id, ).done(function(data) c_obj.remove(); toastr.success('Item Deleted Successfully.', 'Success Alert', timeOut: 5000); getPageData(); ); ); /* Edit Item */ $("body").on("click",".edit-item",function() var id = $(this).parent("td").data('id'); var title = $(this).parent("td").prev("td").prev("td").text(); var description = $(this).parent("td").prev("td").text(); $("#edit-item").find("input[name='title']").val(title); $("#edit-item").find("textarea[name='description']").val(description); $("#edit-item").find("form").attr("action",url + '/update/' + id); ); /* Updated new Item */ $(".crud-submit-edit").click(function(e) e.preventDefault(); var form_action = $("#edit-item").find("form").attr("action"); var title = $("#edit-item").find("input[name='title']").val(); var description = $("#edit-item").find("textarea[name='description']").val(); $.ajax( dataType: 'json', type:'POST', url: form_action, data:title:title, description:description ).done(function(data) getPageData(); $(".modal").modal('hide'); toastr.success('Item Updated Successfully.', 'Success Alert', timeOut: 5000); ); );
Ok, now we are ready to run our CRUD Application example. So let’s run bellow command on your root directory for quick run:
php -S localhost:8000
Now you can open bellow URL on your browser:
http://localhost:8000/
قالب وردپرس
0 notes
Text
60 Performance and Optimization Tips for Your Website
60 Performance and Optimization Tips for Your Website
Learn and implement vital tips on increasing your website’s performance. Find out how to make general improvements, how to optimize images, tweak HTML source code, get better results from ASP and ASP.NET, tune your database, and enhance IIS.
Use one or more suggestions to give website visitors a better impression and keep them on your site longer.
Sections
A. General
B. Images
C. HTML
D. ASP
E. ASP.NET
F. Database
G. IIS
General – Hardware and Monitoring
1. Host your website with a company known for performance. Check newsgroups and web host listing sites such as TopHosts (http://www.tophosts.com) for companies known for high performance. In a shared server environment (not dedicated hosting), find out how many other websites are on the same server as yours. Some web hosts will put up to 1 thousand sites on one server.
2. When hosting your own website, install as much physical RAM as possible on the web server. As memory gets cheaper and cheaper by the minute it is one of the most cost effective purchases an IT department can make.
3. When hosting your own website, use quality hardware – don’t try and save money when purchasing the hardware that will run one of your most valuable assets.
4. When hosting your own website, consider purchasing quality NIC cards which can offload and reduce CPU usage for networking.
5. Monitor your web pages for performance to make more informed decisions. End-to-end testing of your website, e.g. testing of multiple web pages on your website, is essential to understanding weak points and places for improvement.
Images
6. Reduce the size of images by reducing the number of colors. Optimize your images with online tools like GifWorks (http://www.gifworks.com).
7. Reduce the size of images by reducing its dimensions. Cropping images, also known as relevance-enhancing, can reduce size and also help focus the attention of the quick eye of the web surfer.
8. Use the jpg format for photos. Jpeg compression is known for its exceptional compression abilities with regard to photos. Many tools, such as ACDSee (http://www.acdsee.com/) can easily convert images from one format to another and allow you to set the compression level for jpeg images.
9. Reduce the total number of images on one page. Most web browsers download up to 4 images concurrently; however, each connection adds to the overall response/load time.
10. Reuse images whenever possible to take advantage of server-side (web server) and client-side (browser) caching.
11. Specify image WIDTH and HEIGHT attributes for faster loading in the browser.
12. Combine images and use image maps instead of segmenting images, remembering that each image loaded is a connection between the web browser and the web server.
13. Use image ALT attributes sparingly. Each character adds to the size of the web page and to the load time.
HTML
14. Use comments sparingly. While invisible when a web page is loaded in a browser, the comments are still transferred from the web server, needlessly wasting bandwidth.
15. Avoid unnecessary HTML tags: not all tags need a closing tag. For example, it is not necessary to have a close or tag.
16. Optimize your HTML code with free online tools such as iWebTool (http://www.iwebtool.com/html_optimizer) to reduce the overall size of the html file.
17. Avoid using frames. Each frame loads its own web page which can increase the overall response time of a webpage.
18. Minimize the amount of text and sub-tags between the HEAD open and close tag.
19. Place external JavaScript tags, i.e. with src=”[someurl]”, at the end of the document to delay loading.
20. Simplify tables and avoid nested tables (tables within tables).
21. In tables use background colors instead of images.
22. Avoid using WYSIWYG editors, e.g. FrontPage, that include extra and irrelevant text and HTML tags. Learn to edit HTML code by hand.
ASP
23. Disable Session State if not using sessions. If you are using sessions, consider using cookies or an id in the query string along with temporarily storing data in a database. To disable session state, at the top of your ASP page, include the directive:
24. Use Option Explicit to reduce coding errors. At the top of your ASP page, include the directive:
25. Use Server.Transfer over Response.Redirect. Response.Redirect uses an additional round-trip to the web server whereas Server.Transfer does not, reducing the amount of bandwidth used, system resources, and overall response time.
26. When specifying a URL without a web page, e.g. http://www.exclamationsoft.com, include the trailing slash, e.g. http://www.exclamationsoft.com/, to save a trip back to the web server.
27. Reduce the use of global variables.
28. Reduce the number of include files used on a page. Also, segment and categorize functions in commonly used include files.
29. Be careful of string concatenation as the size of the string grows. As the string grows through concatenation, it is copied to a new location in memory each time.
30. Set objects, especially database objects to Nothing when no longer needed. For example, Set oRecordset = Nothing.
31. Keep blocks of ASP script together. Each switch between ASP script and HTML causes the compiler to stop and start processing.
32. Don’t use ASP commenting: which is compiled each time the page is loaded. Instead, use HTML commenting or no commenting at all.
33. Don’t leave empty Session_OnStart or Session_OnEnd methods. If Sessions are not used in your application, remove these two methods since they will be compiled and executed even when empty.
ASP.NET
34. ASP.NET Cache API. If you are not using the Cache API, stop your coding and read the help on this subject and implement it as soon as possible.
35. Reduce multiple database resultsets. Each database query with returned results is a round trip to the database server, adding to the overall response time.
36. Use “paged” data access, e.g. ASP.NET makes it easy to create DataGrids and DataLists of results from database queries. Use them to your advantage by only showing a small sub-set of those results to improve web page response times.
37. Use HttpContext.Items to add frequently used objects during a single page load to create a “per-request” cache.
38. Utilize background processing to help with long running tasks. Create multi-threaded operations when possible and feasible.
39. Use quick page caching for pages that are displayed repeatedly (think auto-refresh):
40. If not using form post-back, turn off viewstate:
41. Avoid catching unnecessary exceptions: exceptions incur a large amount of overhead and should not be used for program logic flow control.
42. Avoid throwing exceptions.
43. Enable buffering.
44. Use Page.IsPostBack to prevent code from being needlessly executed.
45. Ensure debug is set to false and the release build is used in production.
46. Use client-side validation controls to reduce server round-trips.
47. Use StringBuilder when concatenating strings.
Database
48. Use SQL Server or another professional level database over Access.
49. Use stored procedures over simple SQL queries.
50. Connection Pooling – ensure connection pooling is enabled by using a DSN (Data Source Name) in the ODBC Data Source Administrator.
IIS
51. Use server side compression software such as Port80’s httpZip
(http://www.port80software.com/products/httpzip/)
52. Use GZip compression to reduce bandwidth, but be aware that CPU utilization may go up. A-B testing can help you find the right balance of whether GZip compression is right for your website.
53. Use IIS 6.0, which includes significant performance enhancements such as Kernel Caching.
54. Don’t install or use Microsoft Index Server unless you need it. The cost far outweighs the benefits that Index Server will give.
55. Don’t enable logging unless needed. Logging is disk and resource intensive.
56. Run IIS “in-process” if the website is mostly static. Mostly dynamic or unstable websites should not use this setting.
57. Enable “Cache ISAPI applications” for sites that use ASP which benefits greatly from this setting.
58. Disable debugging on production servers.
59. Enable “HTTP Keep Alives” for IIS 5.0 – This setting is enabled by default in IIS 6.0.
60. Shorten connection timeouts to reduce the hold on resources.
Resources used:
1. MSDN
2. Chapter 6 — Improving ASP.NET Performance
3. Tips to Improve ASP Application Performance
4. IIS 101: The Basics of Performance Tuning
5. Top Ten Ways To Pump Up IIS Performance
Copyright 2006 ExclamationSoft
Ata Rehman
0 notes
Text
NEW STUFF FRIDAY 20th JANUARY 2017
Add to your standing order
START A STANDING ORDER
New Release Comics & Magazines
AFTERMATH BIG CLEAN #5 COVER A (MR)
ALL NEW X-MEN #17 – Inhumans Vs X-Men
AMAZING SPIDER-MAN #23 – Clone Conspiracy
AMAZING SPIDER-MAN #23 VARIANT 1:25 BIANCHI COVER
ANGEL SEASON 11 #1 MAIN FISCHER COVER
ANGEL SEASON 11 #1 ULTRA VAR EVELY COVER
ANGEL SEASON 11 #1 VAR DEKAL COVER
ANGRY BIRDS COMICS GAME PLAY #1
ANGRY BIRDS COMICS GAME PLAY #1 S/O SUBSCRIPTION COVER
AQUAMAN #15
AQUAMAN #15 ALTERNATE COVER
ARCHIE #16 COVER A REG JOE EISMA
ARCHIE #16 COVER B VAR SAUVAGE
ARCHIE #16 COVER C VAR DEAN TRIPPE
AVENGERS #3.1
BATMAN #15
BATMAN #15 ALTERNATE COVER
BATTLESTAR GALACTICA GODS & MONSTERS #3 (OF 5) COVER A MORGAN
BATTLESTAR GALACTICA GODS & MONSTERS #3 (OF 5) COVER B WOODS
BATTLESTAR GALACTICA GODS & MONSTERS #3 (OF 5) COVER C 1:10 VARIANT
BLACK HAMMER GIANT SIZED ANNUAL #1
BLACK PANTHER WORLD OF WAKANDA #3
BLACK ROAD #6 (MR)
BLACK WIDOW #10
CAGE #4 (OF 4)
CAPTAIN AMERICA SAM WILSON #18
CAVE CARSON HAS A CYBERNETIC EYE #4 (MR)
CAVE CARSON HAS A CYBERNETIC EYE #4 ALTERNATE COVER (MR)
CLONE CONSPIRACY #4 (OF 5) – Clone Conspiracy
CLONE CONSPIRACY #4 (OF 5) ALTERNATE BAGLEY COVER
CLONE CONSPIRACY #4 (OF 5) ALTERNATE ‘LOZANO CONNECTING D’ COVER
CURSE WORDS #1 COVER A BROWNE (MR)
CURSE WORDS #1 COVER B YOUNG (MR)
DARK HORSE PRESENTS #30
DEADPOOL AND MERCS FOR MONEY #7 – Inhumans Vs X-Men
DEADPOOL THE DUCK #2 (OF 5)
DEADPOOL THE DUCK #2 (OF 5) ALTERNATE JOHNSON ‘CONNECTING’ COVER
DEMONIC #6 (OF 6) (MR)
DESCENDER #18
DIRK GENTLY SALMON OF DOUBT #4
DIRK GENTLY SALMON OF DOUBT #4 VARIANT 1:10 COVER
DIRK GENTLY SALMON OF DOUBT #4 S/O SUBSCRIPTION COVER
DIVINITY III ARIC #1 COVER A CRAIN
DIVINITY III ARIC #1 COVER B BERNARD
DIVINITY III ARIC #1 COVER C CAFU
DIVINITY III ARIC #1 COVER D VARIANT 1:10 COVER CHAR DSN HAIRSINE
DOCTOR WHO 9TH #9 COVER A BOLSON
DOCTOR WHO 9TH #9 COVER B PHOTO
DOLLFACE #1 COVER A MENDOZA (MR)
DOLLFACE #1 COVER D HARRIS (MR)
DRIFTER #16 COVER A KLEIN (MR)
DRIFTER #16 COVER B KLEIN (MR)
FEW #1 (MR)
GAMORA #2
GENERATION ZERO #6 COVER A RYP (NEW ARC)
GENERATION ZERO #6 COVER B EISMA (NEW ARC)
GFT ROBYN HOOD I LOVE NY #8 (OF 12) COVER A RIVEIRO (MR)
GFT ROBYN HOOD I LOVE NY #8 (OF 12) COVER B QUALANO (MR)
GFT ROBYN HOOD I LOVE NY #8 (OF 12) COVER C REYES (MR)
GFT ROBYN HOOD I LOVE NY #8 (OF 12) COVER D CUFFARI (MR)
GRAND PASSION #3 (OF 5) COVER A CASSADAY (MR)
GREEN ARROW #15
GREEN ARROW #15 ALTERNATE COVER
GREEN LANTERNS #15
GREEN LANTERNS #15 ALTERNATE COVER
GWENPOOL #10
HARBINGER RENEGADE #3 COVER A ROBERTSON
HARBINGER RENEGADE #3 COVER B SAUVAGE
HARBINGER RENEGADE #3 COVER C PALOSZ
HARD CASE CRIME PEEPLAND #3 (OF 5) COVER A SCOTT (MR)
HARD CASE CRIME PEEPLAND #3 (OF 5) COVER B OLIVER (MR)
HARLEY QUINN #12
HARLEY QUINN #12 ALTERNATE COVER
HE MAN THUNDERCATS #4 (OF 6)
HOOKJAW #2 (OF 5) COVER A BOYLE
HOOKJAW #2 (OF 5) COVER B JOHNSON
HORIZON #7 (MR)
INJUSTICE GROUND ZERO #4
INVINCIBLE IRON MAN #3
INVINCIBLE IRON MAN #3 ANKA VAR
JAMES BOND HAMMERHEAD #4 (OF 6)
JEFF STEINBERG CHAMPION OF EARTH #5 (MR)
JUSTICE LEAGUE #13 Justice League Vs Suicide Squad
JUSTICE LEAGUE #13 ALTERNATE COVER (JL SS)
JUSTICE LEAGUE OF AMERICA THE RAY REBIRTH #1
JUSTICE LEAGUE OF AMERICA THE RAY REBIRTH #1 ALTERNATE COVER
JUSTICE LEAGUE SUICIDE SQUAD #5 (OF 6)
JUSTICE LEAGUE SUICIDE SQUAD #5 (OF 6) ALTERNATE CONNER COVER
JUSTICE LEAGUE SUICIDE SQUAD #5 (OF 6) ALTERNATE Andy KUBERT COVER
KAMANDI CHALLENGE SPECIAL #1
KILL OR BE KILLED #5 (MR)
KISS #4 COVER C PHOTO
KONG OF SKULL ISLAND #7
LUCIFER #14 (MR)
MANIFEST DESTINY #25 (MR)
MAYDAY #3 (OF 5) (MR)
MIGHTY CAPTAIN MARVEL #1 – Marvel NOW 2017
MIGHTY CAPTAIN MARVEL #1 VARIANT FRISON ‘HIP-HOP’ COVER
MIGHTY CAPTAIN MARVEL #1 VARIANT Skottie YOUNG COVER
MIGHTY CAPTAIN MARVEL #1 VARIANT 1:25 SIQUEIRA COVER
MIGHTY MORPHIN POWER RANGERS #11
MONSTERS UNLEASHED #1 (OF 5)
MONSTERS UNLEASHED #1 (OF 5) ALTERNATE FRANCAVILLA COVER
MOSAIC #4
MOTOR GIRL #3
NIGHTS DOMINION #5 (MR)
NIGHTWING #13
NIGHTWING #13 ALTERNATE COVER
OCTOBER FACTION DEADLY SEASON #4 S/O SUBSCRIPTION COVER
PATSY WALKER AKA HELLCAT #14
POSTAL #17 (MR)
RAVEN #5 (OF 6)
REVOLUTIONARIES #1
REVOLUTIONARIES #1 SUB VAR B OSSIO
REVOLUTIONARIES #1 SUB VAR D GRIFFITH
ROCKSTARS #2 (MR)
SIMPSONS COMICS #236
SLAM #3
SPIDER-GWEN #16 – Marvel NOW 2017
SPIRIT HUNTERS #3 (OF 12) COVER A TOLIBAO (MR)
SQUADRON SUPREME #15
STAR TREK WAYPOINT #3 (OF 6)
STAR TREK WAYPOINT #3 (OF 6) S/O SUBSCRIPTION COVER
STAR WARS DOCTOR APHRA #3
STAR WARS DOCTOR APHRA #3 VARIANT 1:25 David LOPEZ ‘DROIDS’ COVER
STAR-LORD #2
STEAM WARS PRINCESS LEGENDS #2
SUICIDE SQUAD MOST WANTED #6 (OF 6) EL DIABLO & AMANDA WALLE
SUPER POWERS #3 (OF 6)
SUPERMAN #15
SUPERMAN #15 ALTERNATE COVER
THEYRE NOT LIKE US #13 (MR)
TMNT UNIVERSE #6
TMNT UNIVERSE #6 VARIANT 1:10 COVER
TMNT UNIVERSE #6 S/O SUBSCRIPTION COVER
TRINITY #5
TRINITY #5 ALTERNATE COVER
ULTIMATES 2 #3
UNCANNY INHUMANS #18 – Inhumans Vs X-Men
US AVENGERS #2
VENOM #3
WALT DISNEY COMICS & STORIES #736
WALT DISNEY COMICS & STORIES #736 S/O SUBSCRIPTION COVER
WWE #1 MAIN COVER
WWE #1 UNIVERSAL CHAMPIONSHIP BELT FOIL COVER
X-FILES (2016) #10
X-FILES (2016) #10 PHOTO VAR
2000 AD PROG #2011 SPECIAL
DOCTOR WHO MAGAZINE SPECIAL #45 2017 YEARBOOK
JUDGE DREDD MEGAZINE #379
STAR WARS ROGUE ONE OFFICIAL SOUVENIR MAGAZINE PX ED
New Release Books TPBs GNs & Hardcovers (plus Merch)
ABE SAPIEN TP VOL 08 DESOLATE SHORE
A-FORCE TP VOL 02 RAGE AGAINST DYING OF LIGHT
BATGIRL TP VOL 03 POINT BLANK
BATMAN CLASSIC POISON IVYS SCARE FAIR YR SC
BLOOD QUEEN OMNIBUS TP (MR)
CHEW TP VOL 12 (MR)
COMPLETE SCARLET TRACES TP VOL 01
DEPT H HC VOL 01 PRESSURE
DONALD DUCK TIMELESS TALES HC VOL 02
FLASH TP VOL 01 LIGHTNING STRIKES TWICE (REBIRTH)
GARTH ENNIS TRAIN CALLED LOVE TP (MR)
GODDAMNED TP VOL 01 THE FLOOD (MR)
GREEN LANTERN HAL JORDAN TP VOL 01
HARLEY QUINN HC VOL 06 BLACK WHITE & RED ALL OVER
HARLEY QUINN TP VOL 05 THE JOKERS LAST LAUGH
HORIZON TP VOL 01
JUSTICE LEAGUE TP VOL 01 THE EXTINCTION MACHINE (REBIRTH)
KILL OR BE KILLED TP VOL 01 (MR)
LUKE CAGE IRON FIST AND HEROES FOR HIRE TP VOL 02
MECHANISM TP VOL 01
MIGHTY THOR TP VOL 01 THUNDER IN HER VEINS
MUNCHKIN TP VOL 04
MY LITTLE PONY PRINCESS TWILIGHT SPARKLE TP
OFFICER DOWNE TP (MR)
PREDATOR LIFE AND DEATH TP
RED ONE HC VOL 02 UNDERCOVER (MR)
SCARLET WITCH TP VOL 02 WORLD OF WITCHCRAFT
SMURFS HC VOL 22 SMURF MENACE
SNOW BLIND TP
SPIDER-MAN 2099 TP VOL 05 CIVIL WAR II
STAR WARS TP VOL 04 LAST FLIGHT OF THE HARBINGER
SUNSTONE OGN VOL 05 (MR)
TEEN TITANS GO TP VOL 03 MUMBO JUMBLE
TRANSFORMERS TITANS RETURN TP
WOLVERINE BY DANIEL WAY COMPLETE COLLECTION TP VOL 01
WOLVERINE OLD MAN LOGAN TP VOL 03 LAST RONIN
WOLVERINE ORIGIN COMPLETE COLLECTION HC
X-O MANOWAR TP VOL 13 SUCCESSION AND OTHER TALES
BVS WONDER WOMAN PX MAF EX
Back in Stock Products
Back in Stock Comics and Magazines
DIVINITY III KOMANDAR BLOODSHOT COVER C SMALLWOOD
ENCHANTED TIKI ROOM #3 (OF 5)
ENCHANTED TIKI ROOM #3 (OF 5) ALTERNATE GRANDT ‘CONNECTION’ COVER
INJECTION #1 COVER A SHALVEY & BELLAIRE (MR)
INJECTION #3 COVER A SHALVEY & BELLAIRE (MR)
JUSTICE LEAGUE SUICIDE SQUAD #1 (OF 6) 2ND PTG
STEAM WARS BOUNTY HUNTERS HELL FOR HIRE (ONE-SHOT)
TARZAN ON THE PLANET OF THE APES #4 (OF 5)
Back in Stock Books TPBs & Harcovers
A&A ADV OF ARCHER & ARMSTRONG TP VOL 01 IN THE BAG
ABE SAPIEN TP VOL 08 DESOLATE SHORE
ART OF THE UNCHARTED TRILOGY HC
AVATAR LAST AIRBENDER TP VOL 05 SEARCH PART 2
BART SIMPSON BLASTOFF TP
BART SIMPSON TO THE RESCUE GN
BATMAN ADVENTURES MAD LOVE DELUXE ED HC
BATMAN ARKHAM KILLER CROC TP
BATMAN DARK VICTORY TP NEW ED
BATMAN RIP TP
BATMAN TP VOL 07 ENDGAME
BATMAN VENOM TP NEW EDITION
BERLIN TP BOOK 01
BEST OF ARCHIE COMICS DLX ED HC VOL 01
BLACKEST NIGHT TP
BONE HANDBOOK SC (PP #906)
BOYS TP VOL 08 HIGHLAND LADDIE (MR)
BRIGHTEST DAY TP VOL 02
BTVS SEASON 8 LIBRARY HC VOL 02 WOLVES AT GATE
CITIZEN JACK TP (MR)
CIVIL WAR WARZONES TP
CLEAN ROOM TP VOL 01 IMMACULATE CONCEPTION (MR)
D4VE TP VOL 01
DARK NIGHT A TRUE BATMAN STORY HC (MR)
DEADPOOL HC VOL 01
DEADPOOL MINIBUS HC NEW PTG
DEADPOOL TP VOL 06 ORIGINAL SIN
DEADPOOL WORLDS GREATEST TP VOL 01 MILLIONAIRE WITH MOUTH
DISCIPLES TP VOL 01 (MR)
DISNEY ELENA OF AVALOR CINESTORY TP
DONALD DUCK DIABOLICAL DUCK AVENGER TP
DRAGON AGE HC VOL 01 SILENT GROVE
DRAGON AGE WORLD OF THEDAS HC VOL 01
DRAGON AGE WORLD OF THEDAS HC VOL 02
EAST OF WEST TP VOL 06 (MR)
FABLES DELUXE EDITION HC VOL 01 (MR)
FABLES DELUXE EDITION HC VOL 03 (MR)
FADE OUT TP VOL 03 (MR)
FAITH TP VOL 01 HOLLYWOOD & VINE
FAITH TP VOL 02 CALIFORNIA SCHEMING
FLASH THE SILVER AGE TP VOL 01
FLASH TP VOL 01 MOVE FORWARD (N52)
GEMINI COMPLETE SERIES TP
GOTHAM CITY SIRENS TP BOOK 01
GOTHAM CITY SIRENS TP BOOK 02
GRANT MORRISONS 18 DAYS TP VOL 03
GREEN ARROW BY KEVIN SMITH TP
GREEN ARROW YEAR ONE TP
GUARDIANS OF GALAXY TP VOL 01 COSMIC AVENGERS
HALO FALL OF REACH TP
HARLEY QUINN HC VOL 02 POWER OUTAGE (N52)
HARLEY QUINN HC VOL 03 KISS KISS BANG STAB
HE MAN & SHE-RA COMPLETE GUIDE CLASSIC ANIMATED ADV HC
HEAD LOPPER TP VOL 01 ISLAND OR A PLAGUE OF BEASTS (MR)
HELLBLAZER TP VOL 08 RAKE AT THE GATES OF HELL (MR)
HONEY SO SWEET GN VOL 01
INFINITY TP
INJECTION TP VOL 01 (MR)
INJECTION TP VOL 02 (MR)
JOKER DEATH OF THE FAMILY TP (N52)
JOKER ENDGAME TP
JONESY TP VOL 01
JUSTICE LEAGUE DARKSEID WAR POWER OF THE GODS TP
KAIJUMAX TP VOL 01
LOW TP VOL 01 THE DELIRIUM OF HOPE (MR)
LUMBERJANES TP VOL 02
LUMBERJANES TP VOL 03
MAGIKA SWORDSMAN & SUMMONER GN VOL 01 (MR)
MAGIKA SWORDSMAN & SUMMONER GN VOL 02 (MR)
MANHATTAN PROJECTS TP VOL 02
MARTIAN MANHUNTER TP VOL 01 THE EPIPHANY
MARTIAN MANHUNTER TP VOL 02 THE RED RISING
MARVEL UNIVERSE DOCTOR STRANGE DIGEST TP
MICKEY MOUSE HC VOL 01 TIMELESS TALES
MIDNIGHTER TP VOL 01 OUT
MIDNIGHTER TP VOL 02 HARD
MILES MORALES ULTIMATE SPIDER-MAN ULTIMATE COLL TP BOOK 01
MONSTER MUSUME GN VOL 10 (MR)
MOON KNIGHT TP VOL 01 FROM DEAD
MS MARVEL TP VOL 01 NO NORMAL
MY GIRLFRIEND IS T REX GN VOL 01
ODYC TP VOL 02 SONS OF THE WOLF (MR)
PHANTOM COMP AVON NOVELS VOL 01 STORY OF PHANTOM
PRETTY DEADLY TP VOL 01 (MR)
SAGA OF THE SWAMP THING TP BOOK 02 (MR)
SAGA TP VOL 02 (MR)
SAGA TP VOL 03 (MR)
SAGA TP VOL 04 (MR)
SAGA TP VOL 05 (MR)
SAGA TP VOL 06 (MR)
SECRET WARS TP
SEX CRIMINALS TP VOL 01 (MR)
SHAZAM TP VOL 01 (N52)
SMURFS GN VOL 16 AEROSMURF
SMURFS GN VOL 20 DOCTOR SMURF
STAR WARS DARTH VADER TP VOL 03 SHU TORUN WAR
STAR WARS TP CHEWBACCA
STAR WARS TP VOL 04 LAST FLIGHT OF THE HARBINGER
STAR WARS TP VOL 04 LAST FLIGHT OF THE HARBINGER
SUPERMAN FUNERAL FOR A FRIEND TP
SWAMP THING BY BRIAN K VAUGHAN TP VOL 02 (MR)
TEEN TITANS GO HEROES ON PATROL TP NEW ED
TEEN TITANS GO TRUTH JUSTICE AND PIZZA TP
TRUE LIVES OF FABULOUS KILLJOYS TP
UNBELIEVABLE GWENPOOL TP VOL 01 BELIEVE IT
VENOM SPACE KNIGHT TP VOL 01 AGENT OF COSMOS
WALKING DEAD COMPENDIUM TP VOL 02 (MR)
WALKING DEAD TP VOL 04 HEARTS DESIRE
WARHAMMER 40K DAMNATION CRUSADE GN
WARHAMMER CONDEMNED BY FIRE GN
WARLORD OF MARS DEJAH THORIS TP VOL 07 (MR)
Y THE LAST MAN TP BOOK 01 (MR)
YO-KAI WATCH GN VOL 04
0 notes
Photo
New Post has been published on https://programmingbiters.com/codeigniter-3-basic-crud-application-with-mysql-example-with-demo/
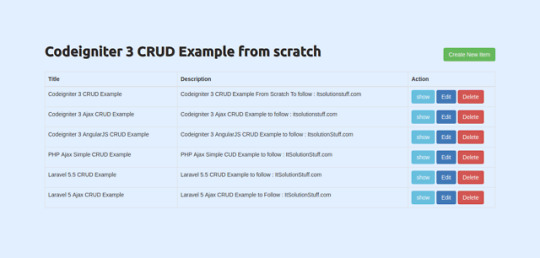
Codeigniter 3 - Basic CRUD application with MySQL Example with Demo
This tutorial will help to create simple CRUD (Create Read Update Delete) Operation application using MySQL Database with validation. As we know well we always require to create basic CRUD module for products, items etc using mysql database. It is primary requirement for any web application. So in this example i will explain example of add, edit and delete record using codeigniter 3 and mysql database. I am extending this tutorial and will add functionality to insert update delete record from mysql database with demo.Here i explain step by step process to create listing, add, edit and delete record using Codeigniter 3. You have to simple follow bellow few step to create basic CRUD application in codeigniter application.
There are listed bellow step you have to follow:
1) Download Codeigniter 3
2) Make Database and Configuration
3) Create Routes
4) Add ItemCRUD Controller
5) Create ItemCRUD Model
6) Create View Files
End of the example of this example you will get full CRUD app like as bellow screenshot.
Preview:
Step 1: Download Codeigniter 3
In this step we will download version of Codeigniter 3, so if you haven’t download yet then download from here : Download Codeigniter 3.
After Download successfully, extract clean new Codeigniter 3 application.
Step 2: Make Database and Configuration
In second step we will create new database “test” and add new table “items” in test database. You can use following SQL Query for create “items” table. So let’s create using bellow SQL query:
items table:
CREATE TABLE IF NOT EXISTS `items` ( `id` int(10) unsigned NOT NULL AUTO_INCREMENT, `title` varchar(255) COLLATE utf8_unicode_ci NOT NULL, `description` text COLLATE utf8_unicode_ci NOT NULL, PRIMARY KEY (`id`) ) ENGINE=InnoDB DEFAULT CHARSET=utf8 COLLATE=utf8_unicode_ci AUTO_INCREMENT=16 ;
After create database and table successfully, we have to configuration of database in our Codeigniter 3 application, so open database.php file and add your database name, username and password.
application/config/database.php
<?php defined('BASEPATH') OR exit('No direct script access allowed'); $active_group = 'default'; $query_builder = TRUE; $db['default'] = array( 'dsn' => '', 'hostname' => 'localhost', 'username' => 'root', 'password' => 'root', 'database' => 'test', 'dbdriver' => 'mysqli', 'dbprefix' => '', 'pconnect' => FALSE, 'db_debug' => (ENVIRONMENT !== 'production'), 'cache_on' => FALSE, 'cachedir' => '', 'char_set' => 'utf8', 'dbcollat' => 'utf8_general_ci', 'swap_pre' => '', 'encrypt' => FALSE, 'compress' => FALSE, 'stricton' => FALSE, 'failover' => array(), 'save_queries' => TRUE );
Step 3: Create Routes
Here, we have to add some routes in your route file. So first we will create routes for itemCRUD modules for lists, create, edit, update and delete. so put the bellow content in route file:
application/config/routes.php
<?php defined('BASEPATH') OR exit('No direct script access allowed'); $route['default_controller'] = 'welcome'; $route['404_override'] = ''; $route['translate_uri_dashes'] = FALSE; $route['itemCRUD'] = "itemCRUD/index"; $route['itemCRUD/(:num)'] = "itemCRUD/show/$1"; $route['itemCRUDCreate']['post'] = "itemCRUD/store"; $route['itemCRUDEdit/(:any)'] = "itemCRUD/edit/$1"; $route['itemCRUDUpdate/(:any)']['put'] = "itemCRUD/update/$1"; $route['itemCRUDDelete/(:any)']['delete'] = "itemCRUD/delete/$1";
Step 4: Add ItemCRUD Controller
Ok In this step, we will create one new controller ItemCRUD with method listing, create, edit, update and delete. so create ItemCRUD.php file in this path application/controllers/ItemCRUD.php and put bellow code in this file:
application/controllers/ItemCRUD.php
<?php defined('BASEPATH') OR exit('No direct script access allowed'); class ItemCRUD extends CI_Controller public $itemCRUD; /** * Get All Data from this method. * * @return Response */ public function __construct() parent::__construct(); $this->load->library('form_validation'); $this->load->library('session'); $this->load->model('ItemCRUDModel'); $this->itemCRUD = new ItemCRUDModel; /** * Display Data this method. * * @return Response */ public function index() $data['data'] = $this->itemCRUD->get_itemCRUD(); $this->load->view('theme/header'); $this->load->view('itemCRUD/list',$data); $this->load->view('theme/footer'); /** * Show Details this method. * * @return Response */ public function show($id) $item = $this->itemCRUD->find_item($id); $this->load->view('theme/header'); $this->load->view('itemCRUD/show',array('item'=>$item)); $this->load->view('theme/footer'); /** * Create from display on this method. * * @return Response */ public function create() $this->load->view('theme/header'); $this->load->view('itemCRUD/create'); $this->load->view('theme/footer'); /** * Store Data from this method. * * @return Response */ public function store() $this->form_validation->set_rules('title', 'Title', 'required'); $this->form_validation->set_rules('description', 'Description', 'required'); if ($this->form_validation->run() == FALSE) $this->session->set_flashdata('errors', validation_errors()); redirect(base_url('itemCRUD/create')); else $this->itemCRUD->insert_item(); redirect(base_url('itemCRUD')); /** * Edit Data from this method. * * @return Response */ public function edit($id) $item = $this->itemCRUD->find_item($id); $this->load->view('theme/header'); $this->load->view('itemCRUD/edit',array('item'=>$item)); $this->load->view('theme/footer'); /** * Update Data from this method. * * @return Response */ public function update($id) $this->form_validation->set_rules('title', 'Title', 'required'); $this->form_validation->set_rules('description', 'Description', 'required'); if ($this->form_validation->run() == FALSE) $this->session->set_flashdata('errors', validation_errors()); redirect(base_url('itemCRUD/edit/'.$id)); else $this->itemCRUD->update_item($id); redirect(base_url('itemCRUD')); /** * Delete Data from this method. * * @return Response */ public function delete($id) $item = $this->itemCRUD->delete_item($id); redirect(base_url('itemCRUD'));
Step 5: Create ItemCRUD Model
In this step, we have to create ItemCRUD model for write database logic, here we will write database logic to fetch all data, insert new record, update and delete. So you have to create new ItemCRUD.php in models folder.
application/models/ItemCRUD.php
<?php class ItemCRUDModel extends CI_Model public function get_itemCRUD() if(!empty($this->input->get("search"))) $this->db->like('title', $this->input->get("search")); $this->db->or_like('description', $this->input->get("search")); $query = $this->db->get("items"); return $query->result(); public function insert_item() $data = array( 'title' => $this->input->post('title'), 'description' => $this->input->post('description') ); return $this->db->insert('items', $data); public function update_item($id) $data=array( 'title' => $this->input->post('title'), 'description'=> $this->input->post('description') ); if($id==0) return $this->db->insert('items',$data); else $this->db->where('id',$id); return $this->db->update('items',$data); public function find_item($id) return $this->db->get_where('items', array('id' => $id))->row(); public function delete_item($id) return $this->db->delete('items', array('id' => $id)); ?>
Step 6: Create View Files
now we move in last step. In this step we have to create just php view files. So mainly we have to create layout file and then create new folder “itemCRUD” then create blade files of crud app. So finally you have to create following bellow view file:
1) header.php
2) footer.php
3) list.php
4) create.php
5) show.php
6) edit.php
So let’s just create following file and put bellow code.
application/views/theme/header.php
<!DOCTYPE html> <html> <head> <title>Basic Crud operation in Codeigniter 3</title> <link rel="stylesheet" href="https://maxcdn.bootstrapcdn.com/bootstrap/3.3.7/css/bootstrap.min.css" /> </head> <body> <div class="container">
application/views/theme/footer.php
</div> </body> </html>
application/views/itemCRUD/list.php
<div class="row"> <div class="col-lg-12 margin-tb"> <div class="pull-left"> <h2>Codeigniter 3 CRUD Example from scratch</h2> </div> <div class="pull-right"> <a class="btn btn-success" href="<?php echo base_url('itemCRUD/create') ?>"> Create New Item</a> </div> </div> </div> <table class="table table-bordered"> <thead> <tr> <th>Title</th> <th>Description</th> <th width="220px">Action</th> </tr> </thead> <tbody> <?php foreach ($data as $item) ?> <tr> <td><?php echo $item->title; ?></td> <td><?php echo $item->description; ?></td> <td> <form method="DELETE" action="<?php echo base_url('itemCRUD/delete/'.$item->id);?>"> <a class="btn btn-info" href="<?php echo base_url('itemCRUD/'.$item->id) ?>"> show</a> <a class="btn btn-primary" href="<?php echo base_url('itemCRUD/edit/'.$item->id) ?>"> Edit</a> <button type="submit" class="btn btn-danger"> Delete</button> </form> </td> </tr> <?php ?> </tbody> </table>
application/views/itemCRUD/create.php
<div class="row"> <div class="col-lg-12 margin-tb"> <div class="pull-left"> <h2>Add New Item</h2> </div> <div class="pull-right"> <a class="btn btn-primary" href="<?php echo base_url('itemCRUD');?>"> Back</a> </div> </div> </div> <form method="post" action="<?php echo base_url('itemCRUDCreate');?>"> <?php if ($this->session->flashdata('errors')) echo '<div class="alert alert-danger">'; echo $this->session->flashdata('errors'); echo "</div>"; ?> <div class="row"> <div class="col-xs-12 col-sm-12 col-md-12"> <div class="form-group"> <strong>Title:</strong> <input type="text" name="title" class="form-control"> </div> </div> <div class="col-xs-12 col-sm-12 col-md-12"> <div class="form-group"> <strong>Description:</strong> <textarea name="description" class="form-control"></textarea> </div> </div> <div class="col-xs-12 col-sm-12 col-md-12 text-center"> <button type="submit" class="btn btn-primary">Submit</button> </div> </div> </form>
application/views/itemCRUD/show.php
<div class="row"> <div class="col-lg-12 margin-tb"> <div class="pull-left"> <h2> Show Item</h2> </div> <div class="pull-right"> <a class="btn btn-primary" href="<?php echo base_url('itemCRUD');?>"> Back</a> </div> </div> </div> <div class="row"> <div class="col-xs-12 col-sm-12 col-md-12"> <div class="form-group"> <strong>Title:</strong> <?php echo $item->title; ?> </div> </div> <div class="col-xs-12 col-sm-12 col-md-12"> <div class="form-group"> <strong>Description:</strong> <?php echo $item->description; ?> </div> </div> </div>
application/views/itemCRUD/edit.php
<div class="row"> <div class="col-lg-12 margin-tb"> <div class="pull-left"> <h2>Edit Item</h2> </div> <div class="pull-right"> <a class="btn btn-primary" href="<?php echo base_url('itemCRUD');?>"> Back</a> </div> </div> </div> <form method="post" action="<?php echo base_url('itemCRUD/update/'.$item->id);?>"> <?php if ($this->session->flashdata('errors')) echo '<div class="alert alert-danger">'; echo $this->session->flashdata('errors'); echo "</div>"; ?> <div class="row"> <div class="col-xs-12 col-sm-12 col-md-12"> <div class="form-group"> <strong>Title:</strong> <input type="text" name="title" class="form-control" value="<?php echo $item->title; ?>"> </div> </div> <div class="col-xs-12 col-sm-12 col-md-12"> <div class="form-group"> <strong>Description:</strong> <textarea name="description" class="form-control"><?php echo $item->description; ?></textarea> </div> </div> <div class="col-xs-12 col-sm-12 col-md-12 text-center"> <button type="submit" class="btn btn-primary">Submit</button> </div> </div> </form>
Ok, now we are ready to run our CRUD Application example. So let’s run bellow command on your root directory for quick run:
php -S localhost:8000
Now you can open bellow URL on your browser:
http://localhost:8000/
If you are run using localhost:800 then you have to set base url in config:
application/config/config.php
$config[‘base_url’] = ‘http://localhost:8000’;
قالب وردپرس
0 notes
Last Seen Blogs

belgien-frankreich
Belgien - Frankreich (2014 - 2018)


https-hargreeves
☂️Anonymous☂️

morayyyxd
Moray

kruxband
⏳🌺🏆🛠️🛶🏍️🎤