#drying rack hamburger mold
Text
10+10cav plastic hanger stacking mold
China stack mold maker, offer coat hanger stacking mold, clothes stand hamburger mold, drying rack double deck mold, plastic maker of laundry rack multiple molding
#China mold#coat hanger stack mold#clothes stand stacking mold#drying rack hamburger mold#laundry rack double deck mold#clothes rack stack molding
0 notes
Text
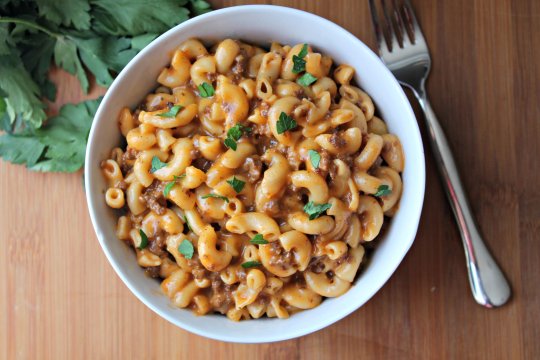
Gluten-Free Hamburger Buns (Yeast-Free)
Fluffy and soft gluten-free hamburger buns that are also yeast-free. No waiting, kneading, or special equipment is necessary to make these easy GF burger buns!
Let’s face it – finding a good gluten-free hamburger bun is not the easiest thing you’ve done all day. But it can be!
I have found whipping up a batch of my own homemade gluten-free hamburger buns is much more gratifying than putting the fate of my burger satisfaction in the hands of the store-bought version. After making my own Paleo Everything Bagels a few weeks ago, I resolved homemade is the best when it comes to all-things gluten-free (or grain-free) bread.
Plus, making burger buns at home is super easy! I use my favorite gluten-free flour blend to keep the ingredients list small (see Recipe Adaptations section for other flour options). I go yeast-free, which not only eliminates the troubleshooting of yeast activation, but also cuts down on prep time.
How to Make Gluten-Free Hamburger Buns:
Summary: All we do is combine wet and dry forces and bake!
Add all the wet ingredients (eggs, milk, oil, cider vinegar, honey) to a mixing bowl. Also add all dry ingredients to a separate mixing bowl.
Whisk up the wet ingredients until well-combined. Stir together the dry ingredients until well-combined.
Pour the wet mixture into the mixing bowl with the flour mixture and stir well.
Beat vigorously by hand (or with an electric hand mixer) for two minutes.
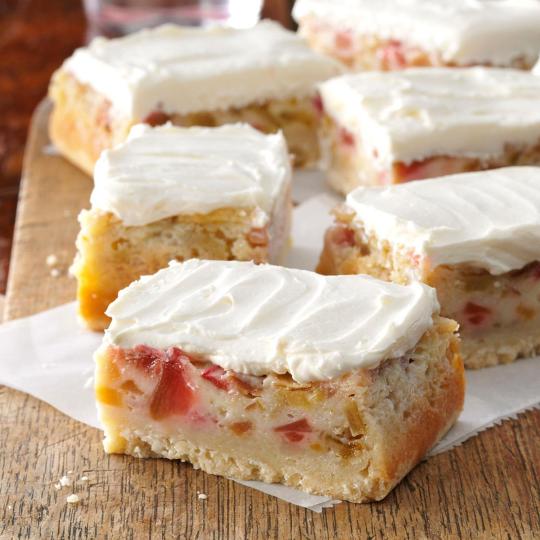
Spoon the hamburger bun dough into a burger bun pan (also known as a muffin top pan or a cinnamon roll pan) or English muffin rings.
I like to sprinkle my gluten-free hamburger buns with minced onion and sesame seeds before baking. This is optional!
After baking, allow the buns to rest at least 10 minutes before slicing and using.
Use your burger buns as the fluffy carby caravan for all your delicious burgers.
Recipe Adaptations:
If you’d like to make your own flour blend, replace the gluten-free flour blend with 1 cup rice flour, ⅔ cup potato starch, and ⅓ cup tapioca flour. You can also use arrowroot flour instead of tapioca. Use ½ cup millet and ½ cup rice flour instead of 1 cup rice flour. You have options!
Double the batch to make more buns in one go. This recipe makes 4 large buns, but doubling the recipe requires no additional effort and then you have buns for days.
How to Store Gluten-Free Hamburger Buns:
If you end up with leftover buns, simply place them in a zip lock bag and freeze them for up to 1 month. Thaw for 20 minutes at room temperature, then slice, toast and use!
Stay tuned for an epic burger recipe that features these buns! In the meantime, get your bun on!
Get your bun on!
My cookbook, Paleo Power Bowls, is now available! CLICK HERE to check it out. Thank you for your all your support!
If you make these gluten-free hamburger buns, please feel free to share a photo and tag @TheRoastedRoot on Instagram!
Gluten-Free Hamburger Buns (Yeast-Free)
An easy recipe for gluten-free hamburger buns that is also yeast free. These buns are quick and easy to make!
Print
Instructions
Preheat the oven to 375 degrees F and bring out your hamburger bun (or muffin top) pan or English muffin rings. As long as the pan is non-stick, you won't need to spray it with oil.
In a mixing bowl, stir together all of the dry ingredients (gluten-free flour through sea salt).
Whisk together the remaining (wet) ingredients in a separate mixing bowl (non-dairy milk through honey).
Pour the wet mixture into the mixing bowl with the dry mixture and stir well to combine. Beat vigorously for 2 minutes by hand or with a hand mixer.
Spoon the hamburger bun dough into the mold. Sprinkle with minced garlic and sesame seeds. Bake on the center rack of the oven 20 to 24 minutes, or until buns are baked through and golden-brown.
Allow buns to sit 10 minutes before removing from the pan. Slice buns in half and use for your favorite burgers!
Gluten-Free Hamburger Buns (Yeast-Free)
Amount Per Serving (1 of 4)
Calories 394 Calories from Fat 108
Total Carbohydrates 64g 21%
* Percent Daily Values are based on a 2000 calorie diet.
Source: https://www.theroastedroot.net/gluten-free-hamburger-buns-yeast-free/
0 notes
Text
Gluten-Free Hamburger Buns (Yeast-Free)
Fluffy and soft gluten-free hamburger buns that are also yeast-free. No waiting, kneading, or special equipment is necessary to make these easy GF burger buns!
Let’s face it – finding a good gluten-free hamburger bun is not the easiest thing you’ve done all day. But it can be!
I have found whipping up a batch of my own homemade gluten-free hamburger buns is much more gratifying than putting the fate of my burger satisfaction in the hands of the store-bought version. After making my own Paleo Everything Bagels a few weeks ago, I resolved homemade is the best when it comes to all-things gluten-free (or grain-free) bread.
Plus, making burger buns at home is super easy! I use my favorite gluten-free flour blend to keep the ingredients list small (see Recipe Adaptations section for other flour options). I go yeast-free, which not only eliminates the troubleshooting of yeast activation, but also cuts down on prep time.
How to Make Gluten-Free Hamburger Buns:
Summary: All we do is combine wet and dry forces and bake!
Add all the wet ingredients (eggs, milk, oil, cider vinegar, honey) to a mixing bowl. Also add all dry ingredients to a separate mixing bowl.
Whisk up the wet ingredients until well-combined. Stir together the dry ingredients until well-combined.
Pour the wet mixture into the mixing bowl with the flour mixture and stir well.
Beat vigorously by hand (or with an electric hand mixer) for two minutes.
Spoon the hamburger bun dough into a burger bun pan (also known as a muffin top pan or a cinnamon roll pan) or English muffin rings.
I like to sprinkle my gluten-free hamburger buns with minced onion and sesame seeds before baking. This is optional!
After baking, allow the buns to rest at least 10 minutes before slicing and using.
Use your burger buns as the fluffy carby caravan for all your delicious burgers.
Recipe Adaptations:
If you’d like to make your own flour blend, replace the gluten-free flour blend with 1 cup rice flour, ⅔ cup potato starch, and ⅓ cup tapioca flour. You can also use arrowroot flour instead of tapioca. Use ½ cup millet and ½ cup rice flour instead of 1 cup rice flour. You have options!
Double the batch to make more buns in one go. This recipe makes 4 large buns, but doubling the recipe requires no additional effort and then you have buns for days.
How to Store Gluten-Free Hamburger Buns:
If you end up with leftover buns, simply place them in a zip lock bag and freeze them for up to 1 month. Thaw for 20 minutes at room temperature, then slice, toast and use!
Stay tuned for an epic burger recipe that features these buns! In the meantime, get your bun on!
Get your bun on!
My cookbook, Paleo Power Bowls, is now available! CLICK HERE to check it out. Thank you for your all your support!
If you make these gluten-free hamburger buns, please feel free to share a photo and tag @TheRoastedRoot on Instagram!
Gluten-Free Hamburger Buns (Yeast-Free)
An easy recipe for gluten-free hamburger buns that is also yeast free. These buns are quick and easy to make!
Print
Instructions
Preheat the oven to 375 degrees F and bring out your hamburger bun (or muffin top) pan or English muffin rings. As long as the pan is non-stick, you won't need to spray it with oil.
In a mixing bowl, stir together all of the dry ingredients (gluten-free flour through sea salt).
Whisk together the remaining (wet) ingredients in a separate mixing bowl (non-dairy milk through honey).
Pour the wet mixture into the mixing bowl with the dry mixture and stir well to combine. Beat vigorously for 2 minutes by hand or with a hand mixer.
Spoon the hamburger bun dough into the mold. Sprinkle with minced garlic and sesame seeds. Bake on the center rack of the oven 20 to 24 minutes, or until buns are baked through and golden-brown.
Allow buns to sit 10 minutes before removing from the pan. Slice buns in half and use for your favorite burgers!
Gluten-Free Hamburger Buns (Yeast-Free)
Amount Per Serving (1 of 4)
Calories 394 Calories from Fat 108
Total Carbohydrates 64g 21%
* Percent Daily Values are based on a 2000 calorie diet.
Source: https://www.theroastedroot.net/gluten-free-hamburger-buns-yeast-free/
0 notes
Text
Advice To Assist You In Cooking Like A Pro
Regardless of your situation, you can benefit from learning how to cook. The many benefits of cooking include social family time, extra nutritional value and more money in your wallet as well! Here, you will find an incredible amount of delicious cooking information.
When this happens, it's still possible to salvage it. Put some corn starch into water and mix it in your sauce. Slowly add to the sauce while on simmer and your sauce will gradually thicken. Add the starch solution slowly, and stir constantly so that the sauce does not become too thick.
If you're making a recipe with seasoned meat, sample a small piece of the meat before cooking the rest of it. Many foods, like hamburgers, meatloaf and meatballs take careful seasoning to taste great. Don't cook it all at once after you have seasoned it. Instead, make a little piece into a patty and cook it first. After doing this, you can either adjust the seasoning to better suit your tastes, or just continue to cook the meat as is.
Have you felt bad before when you have had to throw away your moldy fruit? You may wonder if it's okay to salvage them by trimming away the moldy parts. Unfortunately, you cannot rescue a piece of fruit once it has started to grow moldy and decayed. The fruit needs to be thrown as away as some of the mold may not be visible and can cause you to become ill.
For crispier French fries, put raw potatoes into cold water and let them sit there for about half an hour before frying. When your potatoes soak up cold fluids, their fibers are reinforced. This means that they will hold up better to the heat necessary for the frying process.
Cooking veggies improves the quality of them. Slow cooking, and overcooking, vegetables will destroy their nutritional content and flavor. If you do this, it will provide you a vegetable that is higher in nutritious value. You should only cook them just as long as it takes for them to be done.
You should think big when preparing chicken stock. If you make a large amount of stock you can freeze it for future use. Homemade chicken stock adds great flavor to everything from soups to casseroles. Just cool your stock and freeze it in heavyweight Ziploc freezer bags.
By doing this, fruits can stay fresh all through the year. It will also allow you to eat seasonal fruits at any time you wish.
You should try and dry your tomatoes on your own. Slice tomatoes 1/2" thick to dry. Romas should be cut in two lengthwise. Next, lightly salt the open sides and place them salt-side up on a wire cooling rack. The next step is to put the rack on an old cookie sheet and then place in an oven set at 190 degrees for at least 10 hours. Place the tomatoes into a freezer bag, and freeze them for later use. Dried tomatoes could also be put in a jar with fresh herbs and topped up with olive oil. Use them within two weeks of refrigerating.
It's a huge asset to be able to prepare meals for you or for others. As we have shown, a few great cooking skills can make your life better in so many ways. You can learn to make healthy meals faster than it would take you to drive to a fast food restaurant.
0 notes
Text
New Post has been published on My Food and Cooking Blog
New Post has been published on http://princefood-cooking.princefamily33.com/2017/05/27/great-ideas-for-healthy-snacks-that-kids-love-7/
Great Ideas For Healthy Snacks That Kids Love
You need a few basic fundamentals to be a better cook. You can check out this article for cooking advice that will be useful to you no matter what your current cooking skill level is. By implementing these tips, you will learn exactly what you can do.
TIP! Oil should be added to the side of the pan. When it reaches the food, it will already be heated up.
As you are seasoning your meats, you should make a little piece first before you cook the entire piece. Certain foods like hamburgers, meatloaf and meatballs have certain kinds of seasonings. You do not want to try cooking the whole thing right from the get go. Rather, set aside a small bit of the meat and cook it the same way you will make the rest. Once you’ve tasted the meat, change the seasoning accordingly, then cook the entire piece of meat.
Do you find yourself throwing away molded fruits a lot? Do you think it’s a good policy to cut off any moldy, rotten parts and save the rest of the fruit? The truth is that a rotten spot often signifies that the whole fruit is bad. Mold and other potentially dangerous contaminants can be found even in portions of the fruit that look healthy, so you should pitch the whole thing.
Fresh Basil
Do you enjoy the flavor of fresh basil? If so, put lots of fresh basil into a glass. Next, fill the glass so that the stems are fully submerged. Keep it on the kitchen counter and it should stay fresh. You can even grow new basil plants if you feel like changing the water every day or so. The stems will sprout roots; that’s the wonder of plant life. To encourage growth, you can trim some of the leaves to use in your cooking.
TIP! When you are seasoning meats, try cooking a small piece first and testing it out, before making all of it. Foods like meatballs, hamburger and even meatloaf may require careful seasoning.
Dried and frozen ingredients should never be used over fresh ingredients if you want to get the most out of your cooking. Whenever possible, incorporate fresh ingredients; they enhance the flavor of other ingredients and may even be less expensive.
Add the seasonings a little at a time throughout the cooking process. Your food will taste as flavorful as ever if you season it this way.
TIP! Do you experience a guilty twinge when you pitch out rotten fruit? Have you ever thought to just remove the moldy section by cutting it out? You can’t save a piece of fruit that has begun to rot. The mold and spoilage that you can see is only part of the problem with marginal-looking fruit; even the parts that appear pristine can be unsafe to eat.
Make your own dried tomatoes. You can do this by cutting ripe tomatoes into 1/2 inch thick slices, or by cutting Roma tomatoes in half lengthwise. You should place them on cooling rack, and salt them lightly with the cut side up. Place the cooling rack on a cookie sheet and dry in a 190 degree oven for up to 10 hours. They can then be stored in plastic freezer bags in your freezer. You can also store them in jars packed with herbs and olive oil. When refrigerated, they will last a minimum of two weeks.
It does take some learning to become a great chef, but it’s well worth the effort. Some people have natural cooking ability, while others need to work at it. Thankfully, you now should have the tools discussed in this article at the ready to help you craft amazing food every time you cook!
0 notes
Last Seen Blogs

sanderssides-fic
Sanders Sides

bgirlpetit
Yenytt Sanchez

selenaemily
What Lies Between The Empty Space

fearlessleadeer-blog
D i a n a S w i f t ✨

huuxuanthieuls
Hứa Xuân Thiệu